


\VhMp<>ol
Home X Appliances
Instructions for Installation and
Freestanding Compactor
220-240-volt, 50-Hz Models
[~22
Us e
9871413
AMB 755

Con te nts
Page
Before Using the Compactor............................................ 1
Important Safety Instructions
Electrical Requirements
Precautions and general suggestions
Instaiiation Instructions.....................................................3
Before you start.............................................................3
Tools and materials needed for installation
Now start........................................................................4
Adjusting the toe plate..................................................6
Description of the Appiiance.............................................7
Using Your Compactor
Removing a filled bag
Installing a new bag..................................................... 11
How Your Compactor Works
Caring For Your Compactor
Changing Your Compactor’s Colour
Troubleshooting Guide/Service
Whirlpooi Compactor Warranty
Thank you for buying a WHIRLPOOL* appliance.
Please complete the form below. Have this information
ready if you need service or call with a question.
• Copy model and serial numbers from plate (see
diagram on page 7) and purchase date from sales slip.
• Keep this book and sales slip together in a handy
place.
...........................................
...............................................
........................
...............
.....................................................
.................................................
...........................................
.............................................
...............................
.......................................
.......................................
8
10
12
13
15
16
I6
Be for e U sing t he Com pa cto r
2
2
2
4
• After unpacking, make sure that the appliance is
undamaged and that the door opens and closes
properly. Any damage must be reported to your
retailer within 24 hours after delivery of the
appliance.
• The packaging box is recyclable and is marked with
the recycling symbol A ■
• The appliance is built with reusable material. When
scrapping, follow the local environment protection
disposal regulations. Do not dump the appliance.
Take it to the local disposal centre.
• Make sure that the installation and the electrical
connection are carried out by a qualified technician
according to the manufacturer’s instructions and
local safety regulations.
• Read “Important Safety Instructions" on page 2
before installing or using the compactor.
Model Number
Serial Number
Purchase Date
Retailer Phone Number

Imp ort an t Sa fe ty I nst ruc tio ns
Electrical Requirements
1
A 230 volt 50Hz ac only 15 ampere fused electrical
supply is required.
2. A time delay fuse or circuit breaker is recommended.
It is also recommended that a separate circuit serving
only this appliance be provided.
3. Use a power point which cannot be turned off with a
switch or pull chain. Do not use an extension cable.
4. For your personal safety, the compactor must be
earthed. Check with a qualified technician if you are
not sure that the compactor is properly earthed.
IMPORTANT;
ordinances.
Precautions and general suggestions
• Do not allow the compactor to be used as a toy, or to
run unattended at any time. Remove Key-knob when
not in use and store Key-knob out of reach of children.
• Do not compact:
- lighted cigarettes, cigars, or other hot or burning
items
- any container or aerosol can containing insecticide,
hair spray, paint, engine starting fluid or other poison
ous, toxic, or explosive products
- volatile flammable materials such as oily rags,
thinner, etc., which would create a fire hazard or
explosion
• Never lift bag by the sides. Broken glass or other sharp
objects in the bag can cause injury.
• Before carrying out any maintenance or cleaning,
always unplug the appliance or disconnect the power
supply.
• Do not store or use gasoline or other flammable
vapours and liquids in the vicinity of this or any
other appliance. The fumes can create a fire
hazard or explosion.
Observe all governing codes and

Ins ta llat io n I nst ruct io ns
Cutout dimensions
Earthed electrical outlet must be
8 cm minimum from either side of
|-<
------
38.4 cm min.
Clearance dimensions
--------
IMPORTANT:
Installer: Leave installation instructions with the
homeowner.
Homeowner: Keep installation instructions for future
reference.
Save installation instructions for local electrical
inspector’s use.
Before you start
You are responsible for making sure that your compac
tor is properly installed and leveled on a floor that can
support its weight. Make sure you have everything
necessary for correct installation. It is the personal
responsibility and obligation of the customer to contact
a qualified installer to assure that electrical installation
is in compliance with all governing codes and ordi
nances.
An earthed electrical outlet is required. See “Electri
cal Requirements” on page 2.
Check the location where your compactor will be
installed. Do not install or store compactor where it will
be exposed to the weather.
The cabinet opening should be square. You should be
able to fully open the compactor drawer. Sixteen cm of
clearance is needed on the right side of compactor
drawer (when fully extended) to be able to remove
compactor bag. Allow 60 cm in front of compactor to
remove drawer.
IMPORTANT: Do not let any items fall or collect behind
the compactor, as this may result in fire.
60 cm clearance
in front of
compactor is
needed to fully__T
open or remove
compactor drawer.
Product dimensions
O
16 cm clearance to the nearest vertical wall on the right side of compactor
is needed to
remove bag.
NOTE: Compactor height is adjustable. See Step 5 on
page 5 for other heights.
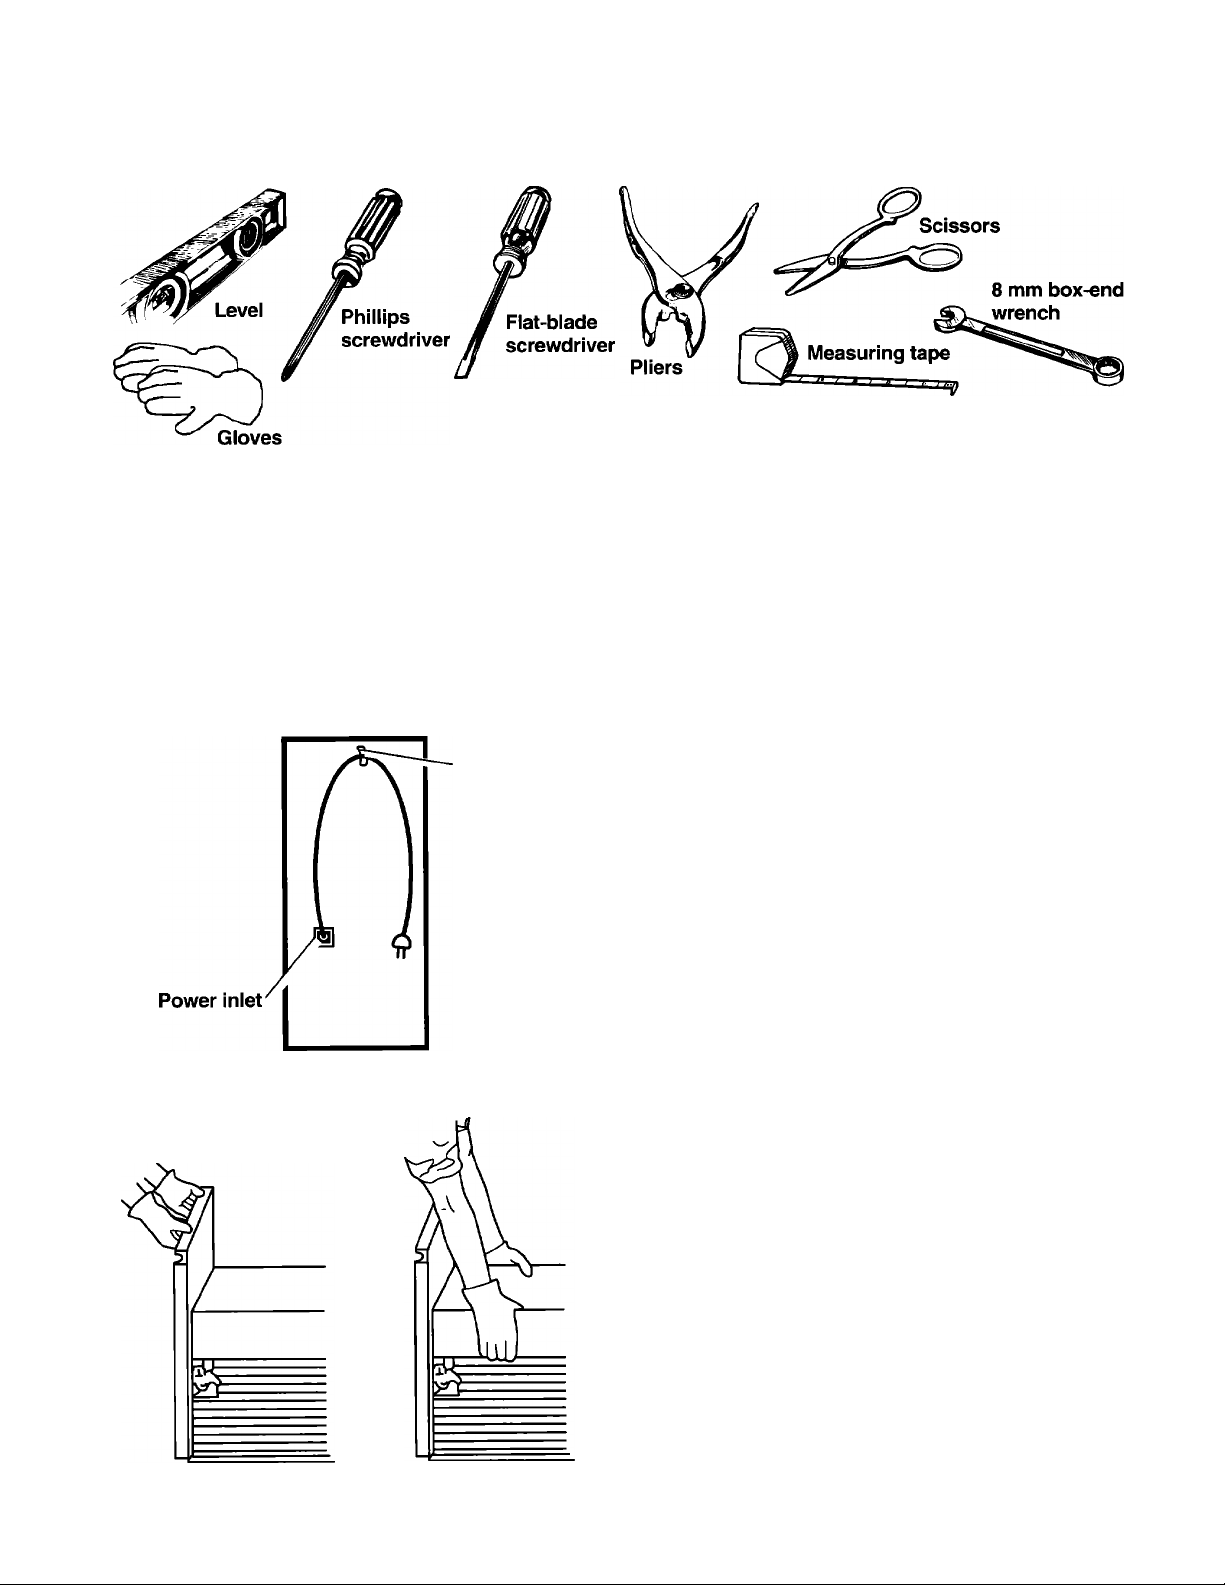
Tools and materials needed for
installation:
Cable clip
Now start
With compactor in room where it will be installed.
Do not grasp console to move compactor.
Slide compactor onto cardboard or hardboard
before moving compactor across fioor to prevent
damaging floor covering.
Do not allow the rear frame of compactor to
touch the floor covering when iifting or moving
compactor.
1 ■ Remove compactor from shipping carton. Remove
all protective packaging materials such as tape and
shipping pads. Remove waxy residue caused by
protective shipping material with a mild solution of
liquid household cleaner and water.
2. Plug in power cord to compactor power inlet on the
back panel. Power cord may be attached to cable clip.
3. Place two corner posts from carton on floor near
compactor. Open compactor drawer and remove
any shipping materials or other items shipped in
the drawer. Do not remove the compactor bag
(if installed). Grasp the handle and raise the front of
the drawer until it clears stops. Grasp sides of drawer
and lift drawer out of compactor. Place the drawer on
the two corner posts.
IMPORTANT: Use proper lifting methods in order to
avoid injury.
4. Place the other two corner posts on the floor to the
side of the compactor. Grasp the sides of the compac
tor cabinet and put compactor on its side on top of the
corner posts. Remove the shipping base from the
bottom of compactor.
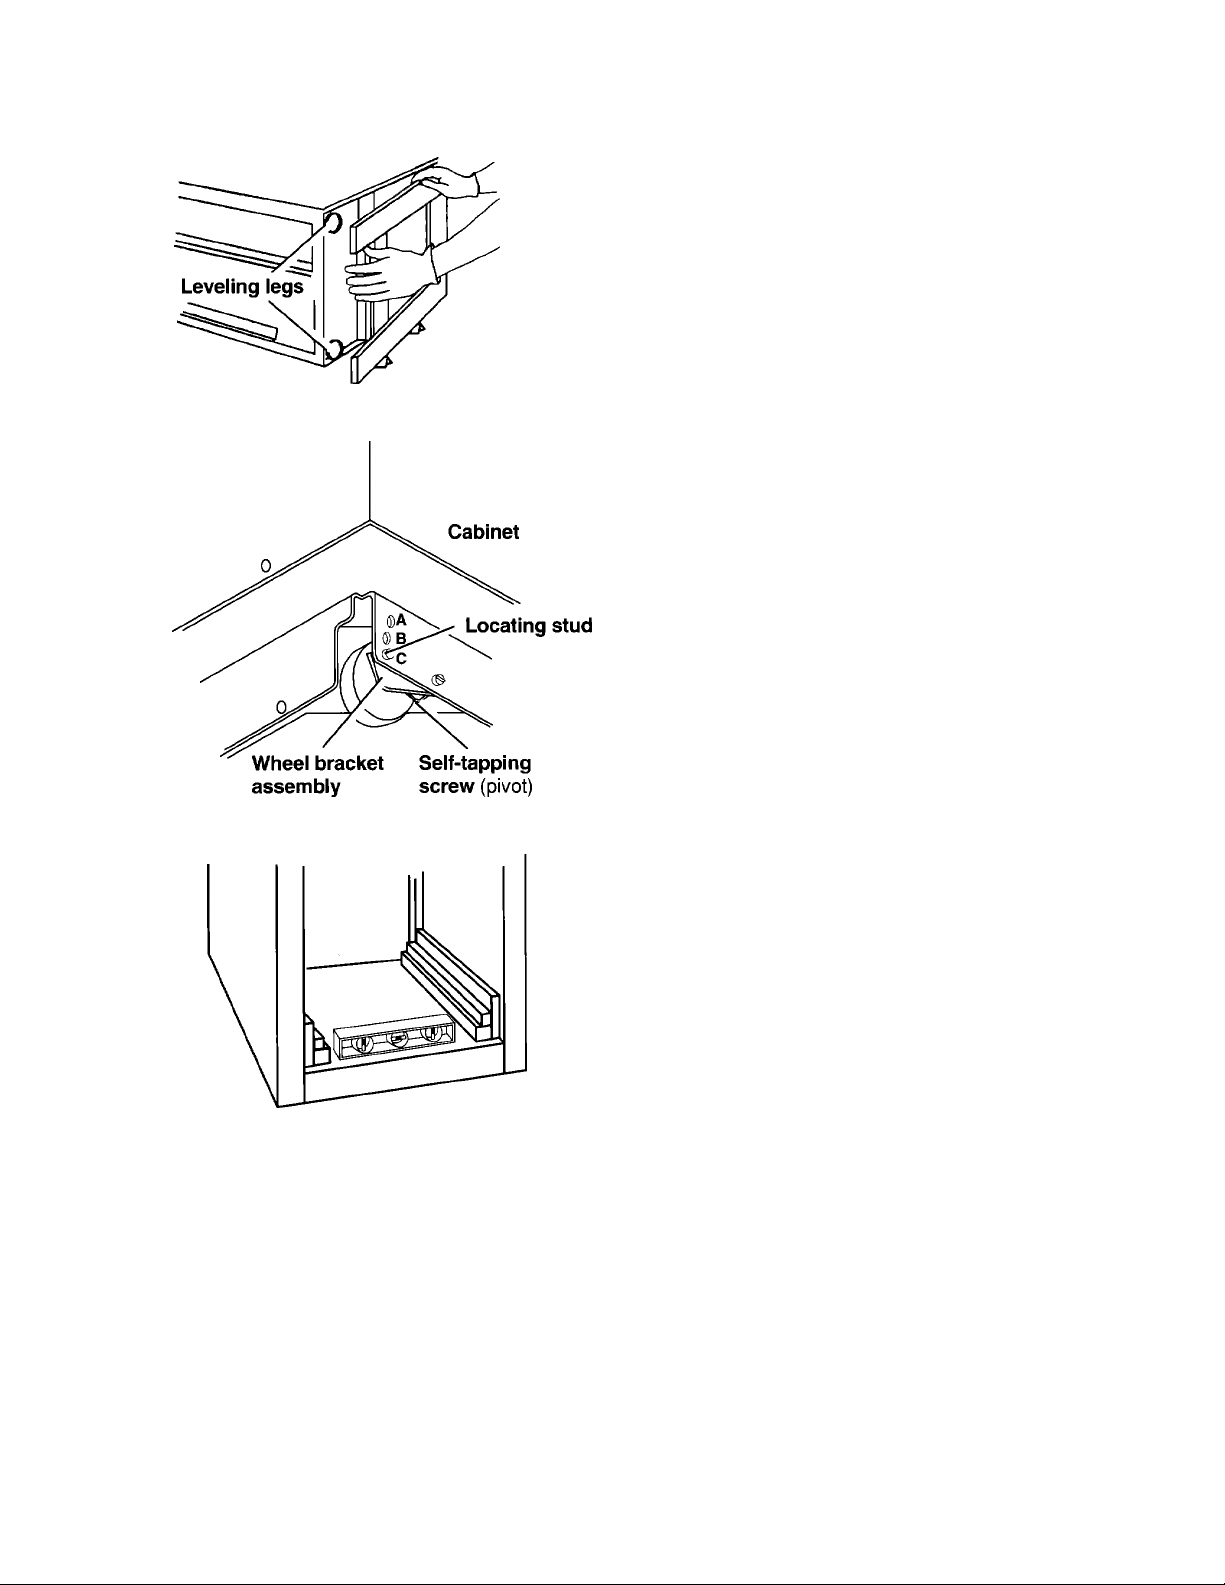
5. The rear wheels are preset for a cabinet opening
height of 86.4 cm (Position “A”). To adjust for other
heights, loosen screw just enough to clear stud from
hole in Position “A.” Move the rear wheel and stud to
Position “B” or “C as needed.
Position B: 87.4 cm
Position C; 88.1 cm
Tighten screw. Repeat for other rear wheel.
6. Place level inside on the floor of the cabinet. Check
that the compactor is level from front to back and
side to side. Adjust the leveling legs until the
compactor is level.
7. Move the compactor close to its final position.
Plug the power supply cable into a properly earthed
receptacle.
IMPORTANT; When moving or lifting the compactor,
use gloves to protect and cushion your hands.
8. Carefully move compactor into its final position. Check
that compactor is still level. (See Step 6.)
continued on next page

Installation Instructions Continued
9.Grasp sides of compactor drawer and place bottom
of drawer into tracks. Lift at the handle so the front
of drawer will go over drawer stops. Close drawer.
Check if drawer opens freely. If the toe plate rubs
against floor, see "Adjusting the toe plate” for further
instructions.
Adjusting the toe plate
If the toe plate rubs the floor covering, the toe plate
clearance may be changed as follows:
a. Mark on each side of the toe plate the amount of toe
plate that rubs the floor covering.
b. Remove the drawer from the unit. (See Step 3.)
c. Use a rule and pencil or chalk to draw a line between
the marks on each side of toe plate.
d. Use scissors to cut toe plate along line.
Replace drawer. (See Step 9.) If toe plate still rubs
floor covering, repeat steps a-e.

De scri pti on of th e A ppl ian ce
Below is an illustration of your appliance with the parts and features called out.
NOTE: The drawings in this book may vary from your compactor model. They are designed to show the
different features of all models covered by this book. Your model may not include all features.
Drawer handle
Bag retainer
buttons
Reversible
front panel
Bag carrier
handle
Side-lock latch
“Touch-toe bar”
drawer opener
Adjustable
toe plate
Key-knob
start-off
switch
Drawer
monitor
switch
Model-serial
number plate

Using Your Compactor
IMPORTANT: Do not compact any container, aerosol
cans or cloths which might contain insecticide, hair
spray, engine starting fluid, paints, liquids, thinners, or
any poisonous or explosive products. If you compact
these items, a fire or explosion could result.
Broken glass or sharp edges may be present in trash.
Do not shove items down into compactor with feet or
hands, risking cuts.
You are responsible for making sure that your
compactor is used only for jobs normally expected of
compactors.
• Do not use the compactor as a counter for electrical
cooking appliances nor as a cutting board.
• Do not set hot pans, etc., on the compactor top. Do not
spill any liquids on the compactor top.
Open the drawer:
Lift and pull the handle or press the Touch-toe bar to
open the drawer.
Put in the trash:
1 ■ Wrap or cover wet or messy trash.
2. Load bottles or cans on their sides in the centre of the
drawer. The waste paper below and beside the bottle
can help keep broken glass near centre of bag.
3. Do not compact items that may develop offensive
odors such as raw meat, fish, grapefruit rinds,
disposable diapers, or personal hygiene items.
Close the drawer:
Push drawer in until it stops.
Start the compactor:
1 ■ Turn the Key-knob to START.
2. Let the Key-knob go. The compactor will stop at the
end of the cycle.

• START
To stop the compactor during a cycle:
1. Turn the Key-knob to OFF.
2. Turn the Key-knob to ON. The compacting ram
will rise.
3. When the ram stops rising, you can open the drawer.
To remove the Key-knob:
1. Turn the Key-knob to the OFF position.
2. Remove and store Key-knob in a safe place out of
children's reach.

Using Your Compactor
Continued
Removing a filled bag
When the trash is compacted to the top of the drawer,
remove the bag. If the bag is too heavy, compact less
trash before emptying in the future.
IMPORTANT: Sharp objects may protrude through bag
after removal from compactor. Handle bag carefully.
1. Pull the drawer completely open.
2. Remove top of bag from bag retainer buttons. Pull up
all 4 bag cuffs.
3. Close bag with twist tie provided.
4. Push Side-lock latch down and tilt drawer side open.
5. Lift bag by bag carrier handles.
10

Installing a new bag
Before installing a new bag, be sure:
1. The drawer side is securely locked.
2. The container is clean and free of sharp debris that
may puncture the bag.
Do not use any kind of bag other than those designed
especially for use in your compactor.
Compactor bags may be purchased from your retailer.
1. Fit the bag caddy in the drawer.
2. Place folded bag into the drawer. Open bag and pull
top edges over the drawer top.
3. Lock bag in place by pulling the 4 prepunched holes
over the bag retainer buttons. Holes will expand over
the buttons without harming the bag.
4. Press inside of bag against the drawer bottom, sides
and corners for a smooth fit.
11

How Your Compactor Worte
The compacting ram does not go to the drawer bottom.
You will not see compacting of the first few loadings.
Compaction starts after the drawer is about Vs full. You
may hear a noise when glass breaks. Strong glass
bottles may not break at all.
The trash in a full compactor bag will be about V4 the
size of its original bulk.
Bottles or cans not placed in the centre may become
caught between the ram and the drawer. The Drawer
Monitor Switch senses a "misload” and causes the
ram to return to the “up" position without compacting.
Load bulky trash, bottles and cans in the centre of
the drawer.
12

Caring For Your Compactor
As is true of most appliances, proper care is needed to
give you continued satisfaction. Before cleaning the
compactor, turn the Key-knob to the OFF position and
remove. If you will be away for more than a couple of
days, remove the compactor bag. Lock the compactor
and remove the Key-knob. Store the Key-knob in a
safe place,
Clean exterior surfaces:
1 ■ Wipe with warm, soapy water and a damp cloth.
2. Wipe up spills right away. Some foods can damage
IMPORTANT: Wear protective gloves when cleaning
the inside of compactor in order to avoid cuts.
Clean inside the drawer:
1 ■ Remove the bag. (See "Removing a filled bag” on
2. Wear protective gloves. There may be bits of glass in
3. Press Side-lock latch down.
Rinse. Dry with a soft cloth.
the finish if left on the compactor surface.
page 10.)
the drawer.
4. Hold Side-lock latch and tilt side of drawer until the
latch clears the drawer front.
NOTE: Drawer side can be removed by tilting it out,
then lifting out.
5. If drawer contains bits of glass, use vacuum to
remove.
6. Wash with a damp cloth using warm, soapy water.
Rinse. Dry with a soft cloth.
7. If drawer side was removed, slide it back into the tilted
position.
8. Press the Side-lock latch down while pressing the side
to the upright position.
9. Lock the Side-lock latch.
13

Caring For Your Compactor
Continued
Clean inside the cabinet:
Wear protective gloves. There may be bits of glass in
the cabinet.
Pull the drawer out until it stops.
Note the tracks in which the drawer rollers move.
Lift the front to clear the drawer stops.
Grasp the drawer on the sides.
Pull it out the rest of the way.
Set it down gently.
Vacuum inside of cabinet and ram cover. Liquid spills
or wet trash should be cleaned up by hand, or use a
vacuum designed to pick up liquids.
Wash, rinse, and dry inside.
Replace drawer.
Wipe off the ram cover:
Wear protective gloves. There may be bits of glass on
the ram cover.
Wipe glass particles off ram cover with a cloth or
paper towels.
Use warm, soapy water to remove foods. Rinse. Dry
with a soft cloth.

Changing Your Compactor’s Colour
The colour panel on the front of your compactor’s
drawer reverses to another colour.
To change the colour of your compactor's front panel,
follow the directions below. All you need is a medium
sized screwdriver.
1 ■ Slide drawer out.
2. Remove two screws shown.
3. Remove handle.
IMPORTANT; When you are changing front panels,
handle carefully to avoid cuts.
4. Remove the colour panel and reverse. Be careful ■
edges may be sharp.
OR
Place extra panel at front with desired colour
showing.
5. Make sure panel(s) are all the way down.
6. Be sure to replace cardboard spacer in its former
position.
7. Replace handle and screws.
8. Slide drawer back in.
OPTION; Match your kitchen’s colour scheme by
applying paint, wallpaper, or other material to the
colour panel.
OR
Install a custom-made flat or raised panel in place of
the colour panel(s) and spacer. A panel 5.6 mm thick is
required. Decorative trim or raised panel sections must
be 8 mm from all edges of outer section.
15

Tro ubl es hoo tin g G uid e/Se rv ice
Before calling for assistance ...
Performance problems often result from little things you
can find and fix yourself without tools of any kind.
If your compactor won’t operate:
“Is the power cable plugged Into a live circuit with the
proper voltage?
'Have you checked your home's main fuses or circuit
breaker box?
-Is the drawer completely closed?
®ls the Key-knob turned all the way to START before it is
released?
Drawer won’t open:
»Drawer will open only when ram Is all the way up.
■»To raise the ram, turn the Key-knob to START and
release.
WHI RLP OOL
If trash is not compacting:
^Is the drawer loaded properly? If anything gets between
the ram and the drawer, the ram will return to the “up"
position, without compacting.
•Drawer must be at least Vs full before compactor will
compact.
Not enough compaction or force:
•Compacting works best when only a few items are
loaded. Use the compacting cycle frequently.
Bottles don’t break:
•Not all bottles will break every time, depending on the
bottle and the trash load below It.
Com pa cto r W arra nt y
LENGTH OF WARRANTY
FULL ONE-YEAR WARRANTY
FROM DATE OF PURCHASE
WHIRLPOOL WILL NOT PAY FOR
A. Service calls to:
1. Correct the installation of the compactor.
2. Instruct you how to use the compactor.
3. Replace house fuses or correct house wiring.
B. Repairs when compactor is used in other than normal, single-family household use.
C. Pick up and delivery. This product is designed to be repaired in the home.
D. Damage to compactor caused by accident, misuse, fire, flood, acts of God or use of products not
approved by Whirlpool.
E. Repairs to parts or systems caused by unauthorized modifications made to the appliance.
WHIRLPOOL CORPORATION SHALL NOT BE LIABLE FOR INCIDENTAL OR CONSEQUENTIAL DAMAGES.
WHIRLPOOL WILL PAY FOR
Replacement parts and repair labor to correct defects in materials or
workmanship. Service must be provided by an authorized Whirlpool
service company.
CP004
7/96

9871413
© 1996 Whirlpool Corporation
Whirlpool is a registered trademark of Whirlpool, U.S.A.
Whirlpool ist ein eingetragenes Warenzeichen der Whirlpool, USA.
Whirlpool est une marque déposée de Whirlpool, USA.
Whirlpool is een geregistreerd handelmerk van Whirlpool, USA,
Whirlpool è un marchio commerciale registrato della Whirlpool, USA.
Printed in U.S.A.
10/96
 Loading...