WHIRLPOOL SW8 AM2 D XR 2 User Manual

0 (0)

Instructions for use

Käyttöohje

Bedienungsanleitung

Brukerveiledning

Consignes d’utilisation

Bruksanvisning

Istruzioni per l’uso

Інструкції з використання

Brugsanvisninger

لامعتسلاا ليلد


ENGLISH

Instructions for use

Page 3

DEUTSCH

Bedienungsanleitung

Seite 12

FRANÇAIS

Consignes d’utilisation

Page 21

ITALIANO

Istruzioni per l’uso

Pagina 30

DANSK

Brugsanvisninger

Side 39

SUOMI

Käyttöohje

Sivu 48

NORSK

Brukerveiledning

Side 57

SVENSKA

Bruksanvisning

Sidan 66

УКРАЇНСЬКА

Інструкції з використання

стор.75

84 ةحفص

لامعتسلاا ليلد

يبرع


2

INDEX


Chapter 1: INSTALLATION..................................................................................................

4

1.1. INSTALLING SINGLE APPLIANCE.................................................................................................................

4

1.2. INSTALLING TWO APPLIANCES....................................................................................................................

4

1.3. ADJUST DOORS (IF AVAILABLE)..................................................................................................................

4

Chapter 2: FUNCTIONS.......................................................................................................

5

2.1. ON/STAND BY .................................................................................................................................................

5

2.2. SMART DISPLAY*............................................................................................................................................

5

2.3. 6TH SENSE FRESH CONTROL / PROFRESH ...............................................................................................

5

2.4. DOOR OPEN ALARM.......................................................................................................................................

5

2.5.VACATION .......................................................................................................................................................

5

2.6. FAST COOL .....................................................................................................................................................

5

2.7. ZERO DEGREES DRAWER* ...........................................................................................................................

6

2.8. FAN...................................................................................................................................................................

6

2.9.TEMPERATURE SETTING...............................................................................................................................

6

2.10. NO-FROST REFRIGERATOR COMPARTMENT............................................................................................

6

2.11. LED LIGHT SYSTEM*....................................................................................................................................

7

2.12.HUMIDITY CONTROLED CRISPER*.............................................................................................................

7

Chapter 3: USE....................................................................................................................

7

3.1. HOW TO INCREASE FRIDGE STORAGE CAPACITY.....................................................................................

7

3.2. NOTES..............................................................................................................................................................

7

Chapter 4: FOOD-STORAGE TIPS......................................................................................

7

4.1. AIR VENTILATION............................................................................................................................................

7

4.2. HOW TO STORE FRESH FOOD AND BEVERAGE.........................................................................................

7

4.3. WERE TO STORE FRESH FOOD AND BEVERAGE.......................................................................................

8

Chapter 5: FUNCTIONAL SOUNDS....................................................................................

8

Chapter 6: RECOMMENDATION IN CASE OF NO USE OF THE APPLIANCE.................

9

6.1. ABSENCE / VACATION....................................................................................................................................

9

6.2. MOVING............................................................................................................................................................

9

6.3. POWER FAILURE.............................................................................................................................................

9

Chapter 7: MAINTENANCE AND CLEANING....................................................................

9

Chapter 8: TROUBLESHOOTING GUIDE.........................................................................

10

8.1. BEFORE CONTACTING AFTER-SALES SERVICE…..................................................................................

10

8.2. FAILURES......................................................................................................................................................

10

Chapter 9: AFTER-SALES SERVICE................................................................................

11

Others:


REVERSE DOOR SWING (VERSION_1)............................................................................................................

93

REVERSE DOOR SWING (VERSION_2)............................................................................................................

95

NOTE:

The instructions apply to several models, so there may be differences. Sections which only apply to certain appliances are indicated with an asterisk (*).

Functions which are dedicated specially for your already bought model of product you will find in QUICK START GUIDE.

3

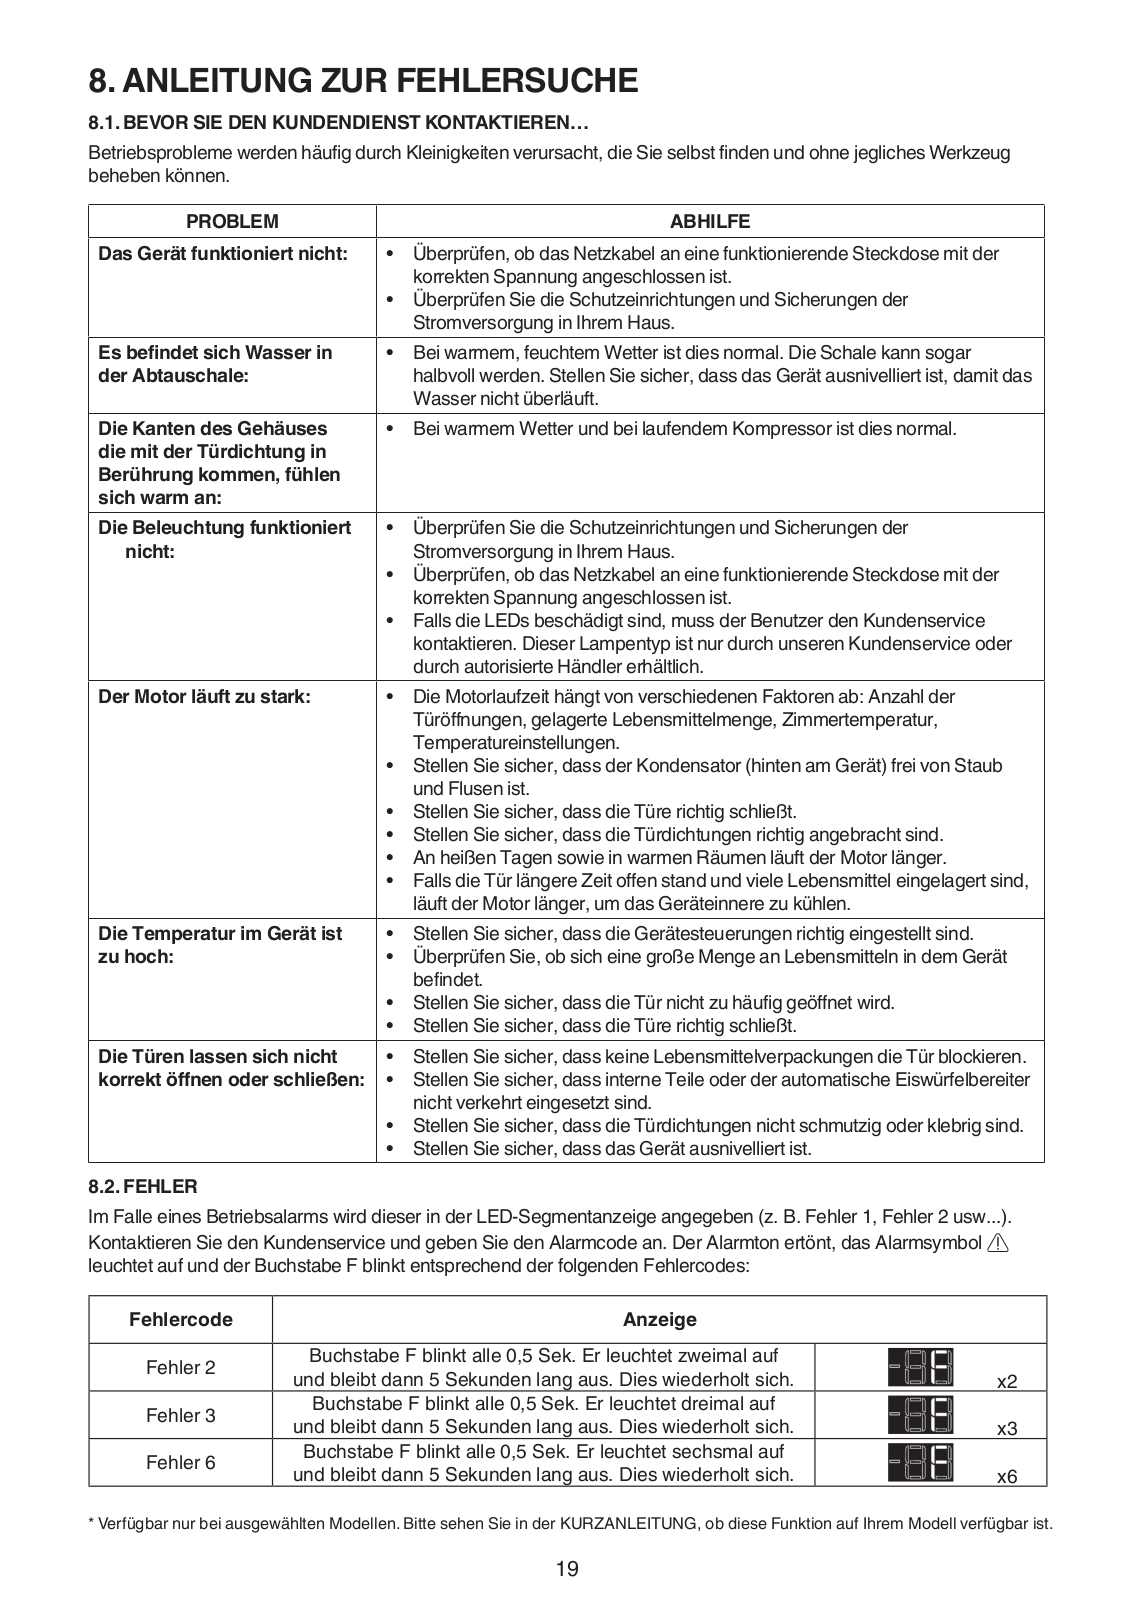
1. INSTALLATION

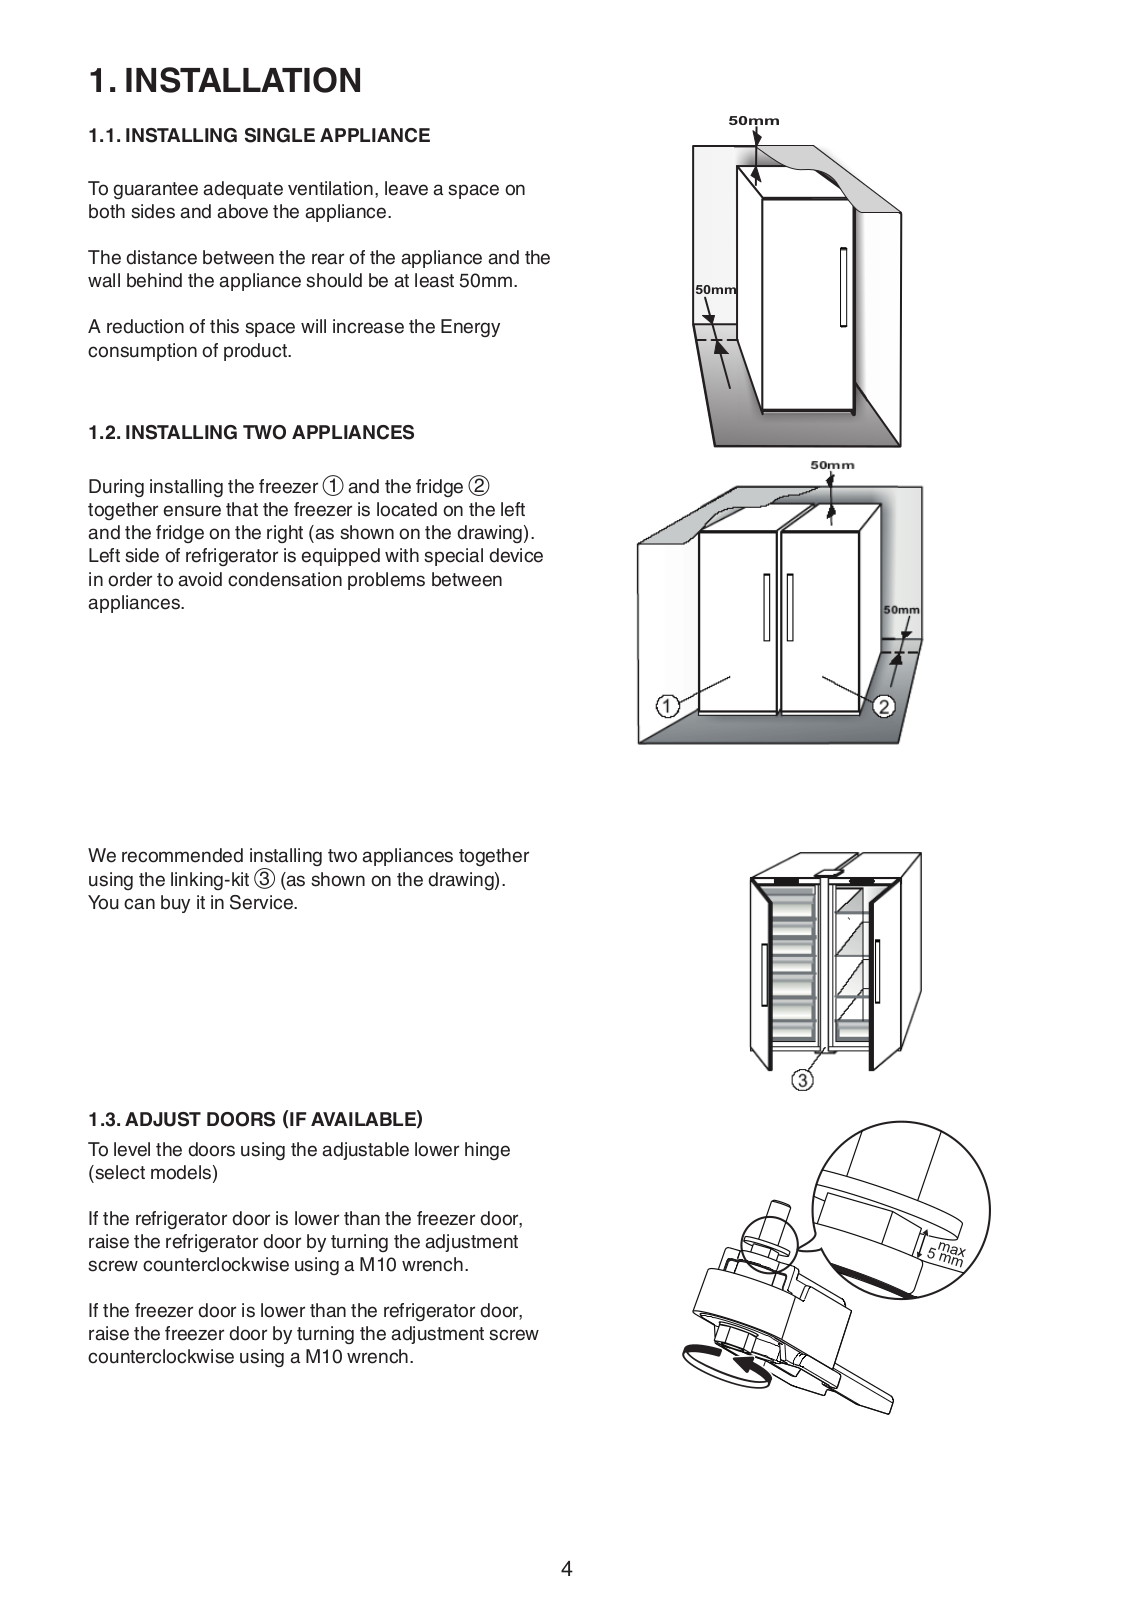
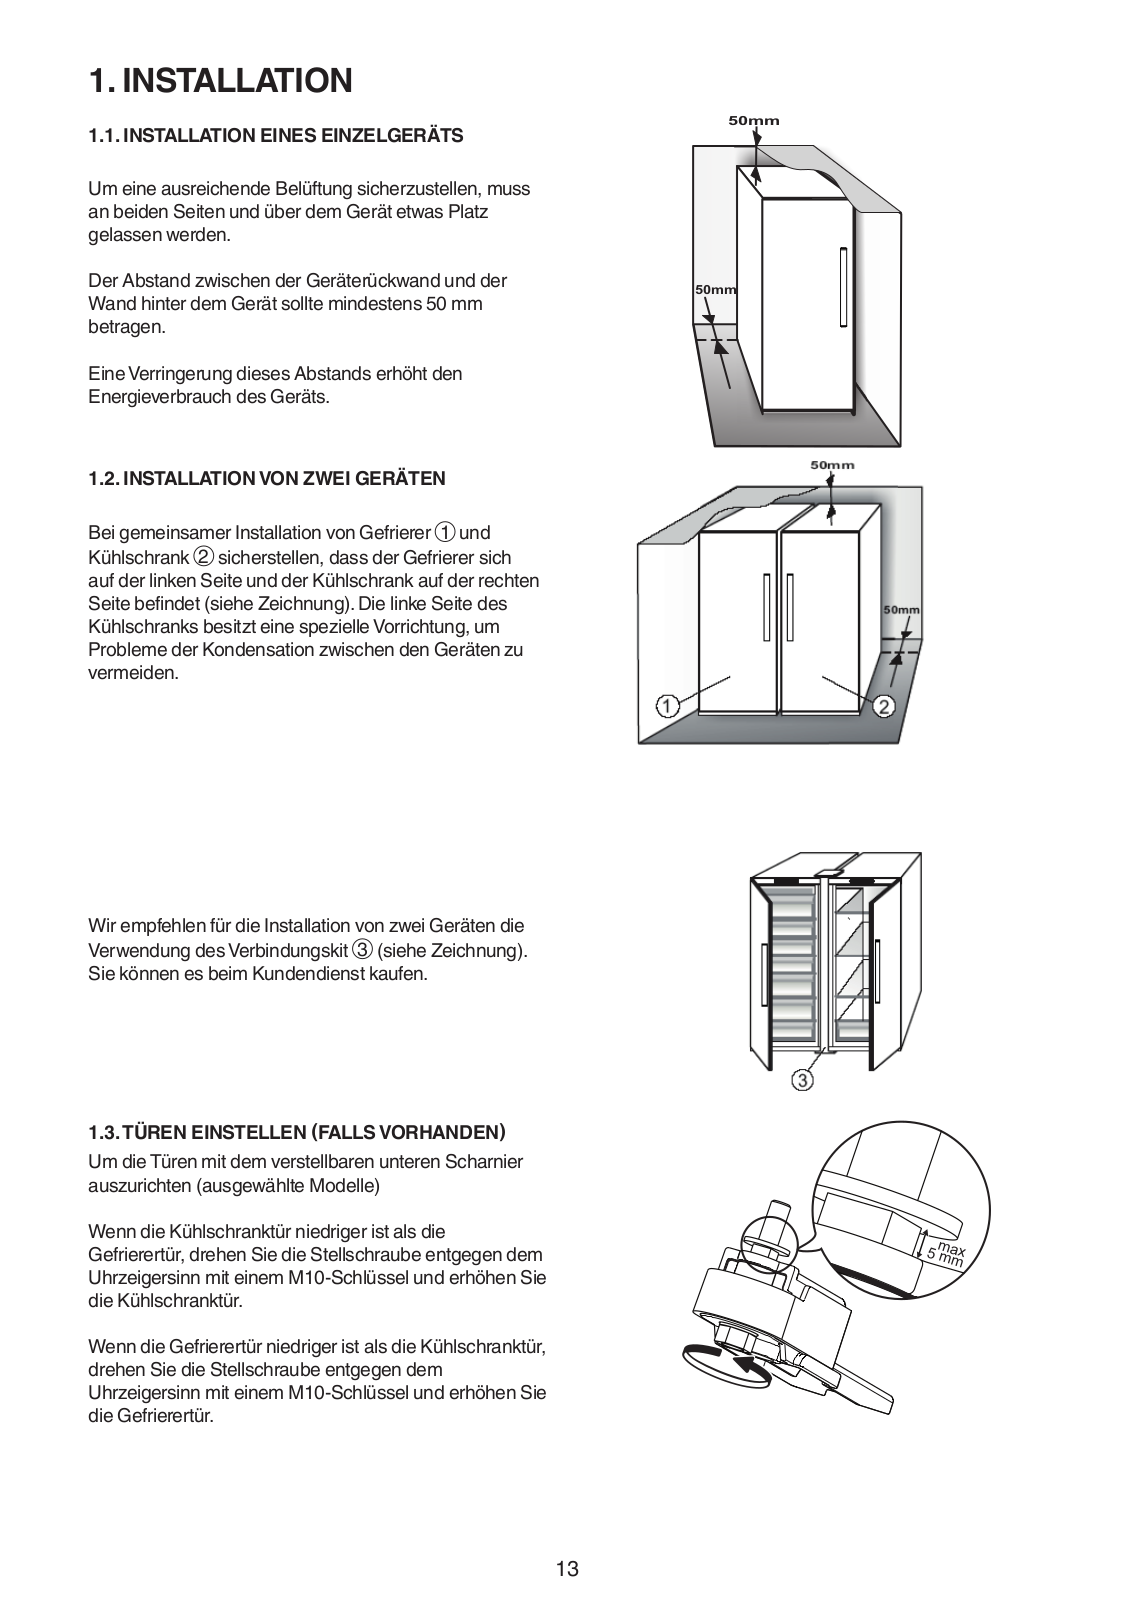
1.1. INSTALLING SINGLE APPLIANCE

To guarantee adequate ventilation, leave a space on both sides and above the appliance.

The distance between the rear of the appliance and the wall behind the appliance should be at least 50mm.

A reduction of this space will increase the Energy consumption of product.

1.2. INSTALLING TWO APPLIANCES

During installing the freezer 1 and the fridge 2 together ensure that the freezer is located on the left and the fridge on the right (as shown on the drawing).

Left side of refrigerator is equipped with special device in order to avoid condensation problems between appliances.

We recommended installing two appliances together

using the linking-kit 3 (as shown on the drawing). You can buy it in Service.

1.3. ADJUST DOORS (IF AVAILABLE)

To level the doors using the adjustable lower hinge (select models)

If the refrigerator door is lower than the freezer door, raise the refrigerator door by turning the adjustment screw counterclockwise using a M10 wrench.

If the freezer door is lower than the refrigerator door, raise the freezer door by turning the adjustment screw counterclockwise using a M10 wrench.

50mm

50mm

5 ma

x


mm

4

2. FUNCTIONS

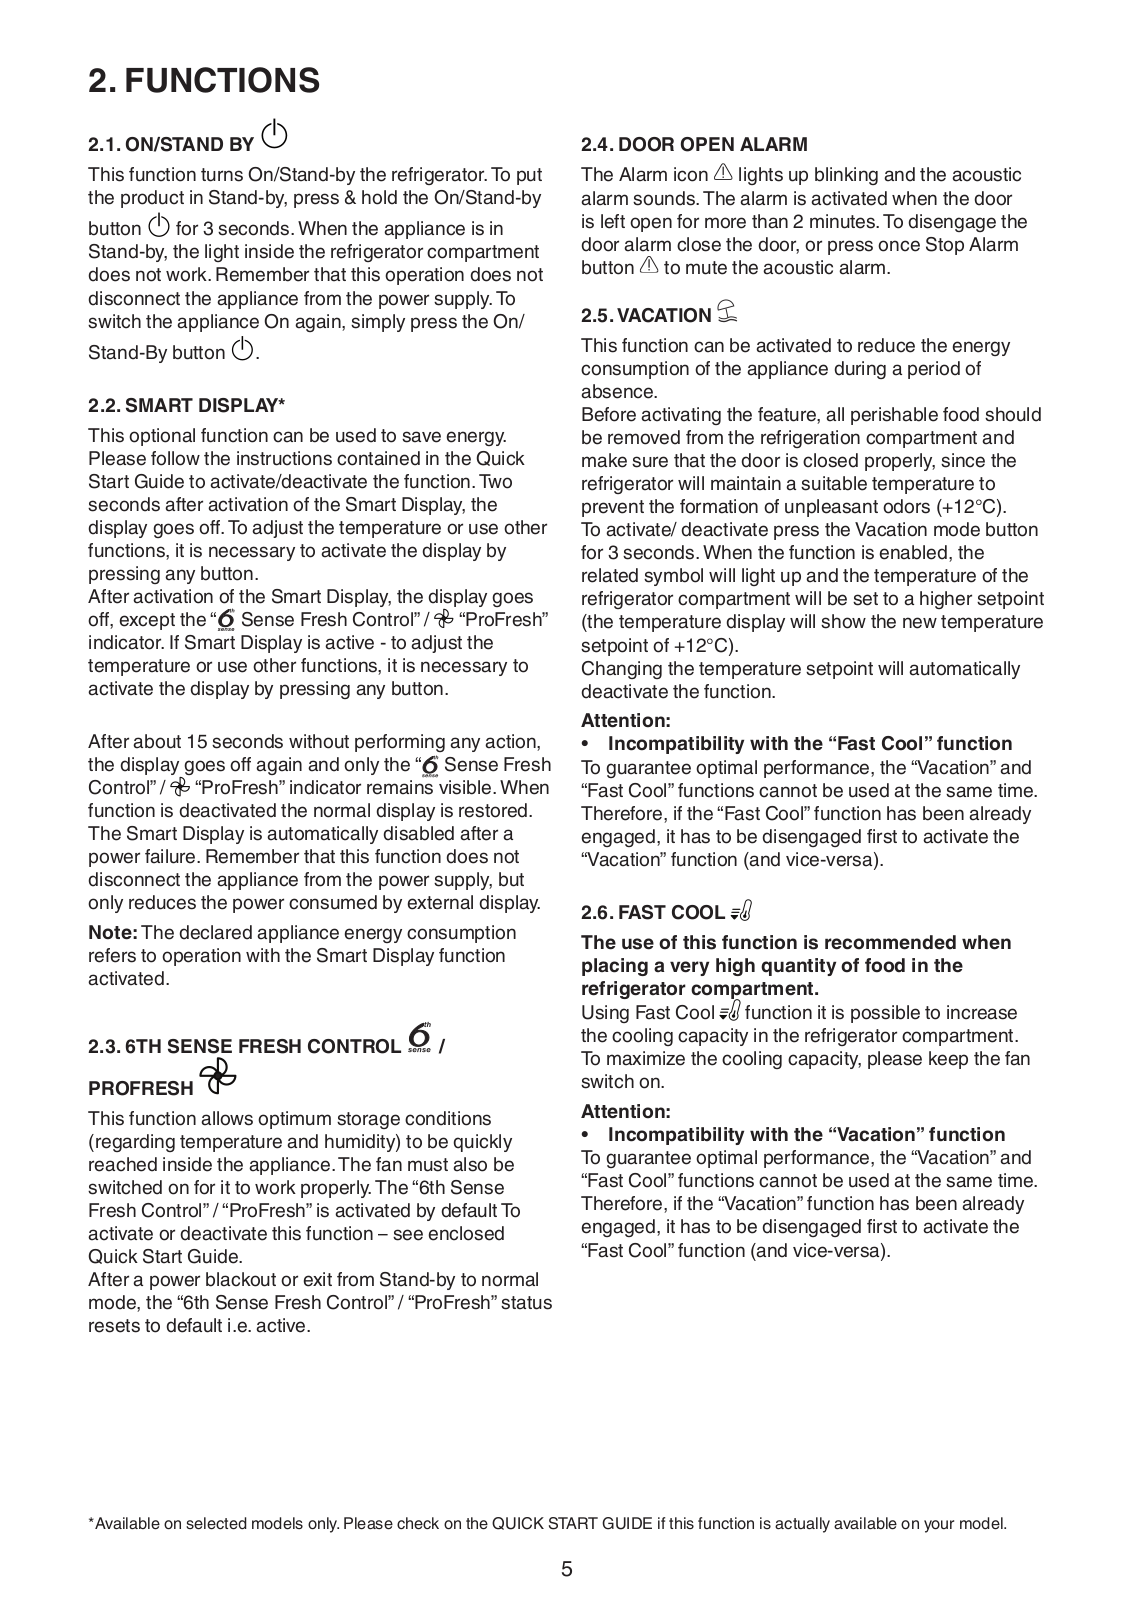
2.1. ON/STAND BY

This function turns On/Stand-by the refrigerator.To put the product in Stand-by, press & hold the On/Stand-by

button for 3 seconds.When the appliance is in

Stand-by, the light inside the refrigerator compartment does not work.Remember that this operation does not disconnect the appliance from the power supply.To switch the appliance On again, simply press the On/

Stand-By button .

2.2. SMART DISPLAY*

This optional function can be used to save energy.

Please follow the instructions contained in the Quick

Start Guide to activate/deactivate the function.Two seconds after activation of the Smart Display, the display goes off.To adjust the temperature or use other functions, it is necessary to activate the display by pressing any button.

After activation of the Smart Display, the display goes off, except the “ Sense Fresh Control” / “ProFresh” indicator.If SmartDisplay is active - to adjust the temperature or use other functions, it is necessary to activate the display by pressing any button.

After about 15 seconds without performing any action, the display goes off again and only the “ Sense Fresh Control” / “ProFresh”indicator remainsvisible.When function is deactivated the normal display is restored.

The Smart Display is automatically disabled after a power failure.Remember that this function does not disconnect the appliance from the power supply, but only reduces the power consumed by external display.

Note: The declared appliance energy consumption refers to operation with the Smart Display function activated.

2.3. 6TH SENSE FRESH CONTROL /

PROFRESH

This function allows optimum storage conditions (regarding temperature and humidity) to be quickly reached inside the appliance.The fan must also be switched on for it to work properly.The “6th Sense

Fresh Control” / “ProFresh” is activated by default To activate or deactivate this function – see enclosed

Quick Start Guide.

After a power blackout or exit from Stand-by to normal mode, the “6th Sense Fresh Control” / “ProFresh” status resets to default i.e.active.

2.4. DOOR OPEN ALARM

The Alarm icon lights up blinking and the acoustic alarm sounds.The alarm is activated when the door is left open for more than 2 minutes.To disengage the door alarm close the door, or press once Stop Alarm button to mute the acoustic alarm.

2.5.VACATION

This function can be activated to reduce the energy consumption of the appliance during a period of absence.

Before activating the feature, all perishable food should be removed from the refrigeration compartment and make sure that the door is closed properly, since the refrigerator will maintain a suitable temperature to prevent the formation of unpleasant odors (+12°C).

To activate/ deactivate press the Vacation mode button for 3 seconds.When the function is enabled, the related symbol will light up and the temperature of the refrigerator compartment will be set to a higher setpoint (the temperature display will show the new temperature setpoint of +12°C).

Changing the temperature setpoint will automatically deactivate the function.

Attention:

• Incompatibility with the “Fast Cool” function

To guarantee optimal performance, the “Vacation” and

“Fast Cool”functions cannot be used at the same time.

Therefore, if the “Fast Cool” function has been already engaged, it has to be disengaged first to activate the

“Vacation”function (and vice-versa).

2.6. FAST COOL

The use of this function is recommended when placing a very high quantity of food in the refrigerator compartment.

Using Fast Cool function it is possible to increase the cooling capacity in the refrigerator compartment.

To maximize the cooling capacity, please keep the fan switch on.

Attention:

• Incompatibility with the “Vacation” function

To guarantee optimal performance, the “Vacation” and

“Fast Cool”functions cannot be used at the same time.

Therefore, if the “Vacation” function has been already engaged, it has to be disengaged first to activate the

“Fast Cool”function (and vice-versa).

*Available on selected models only.Please check on the QUICK START GUIDE if this function is actually available on your model.

5

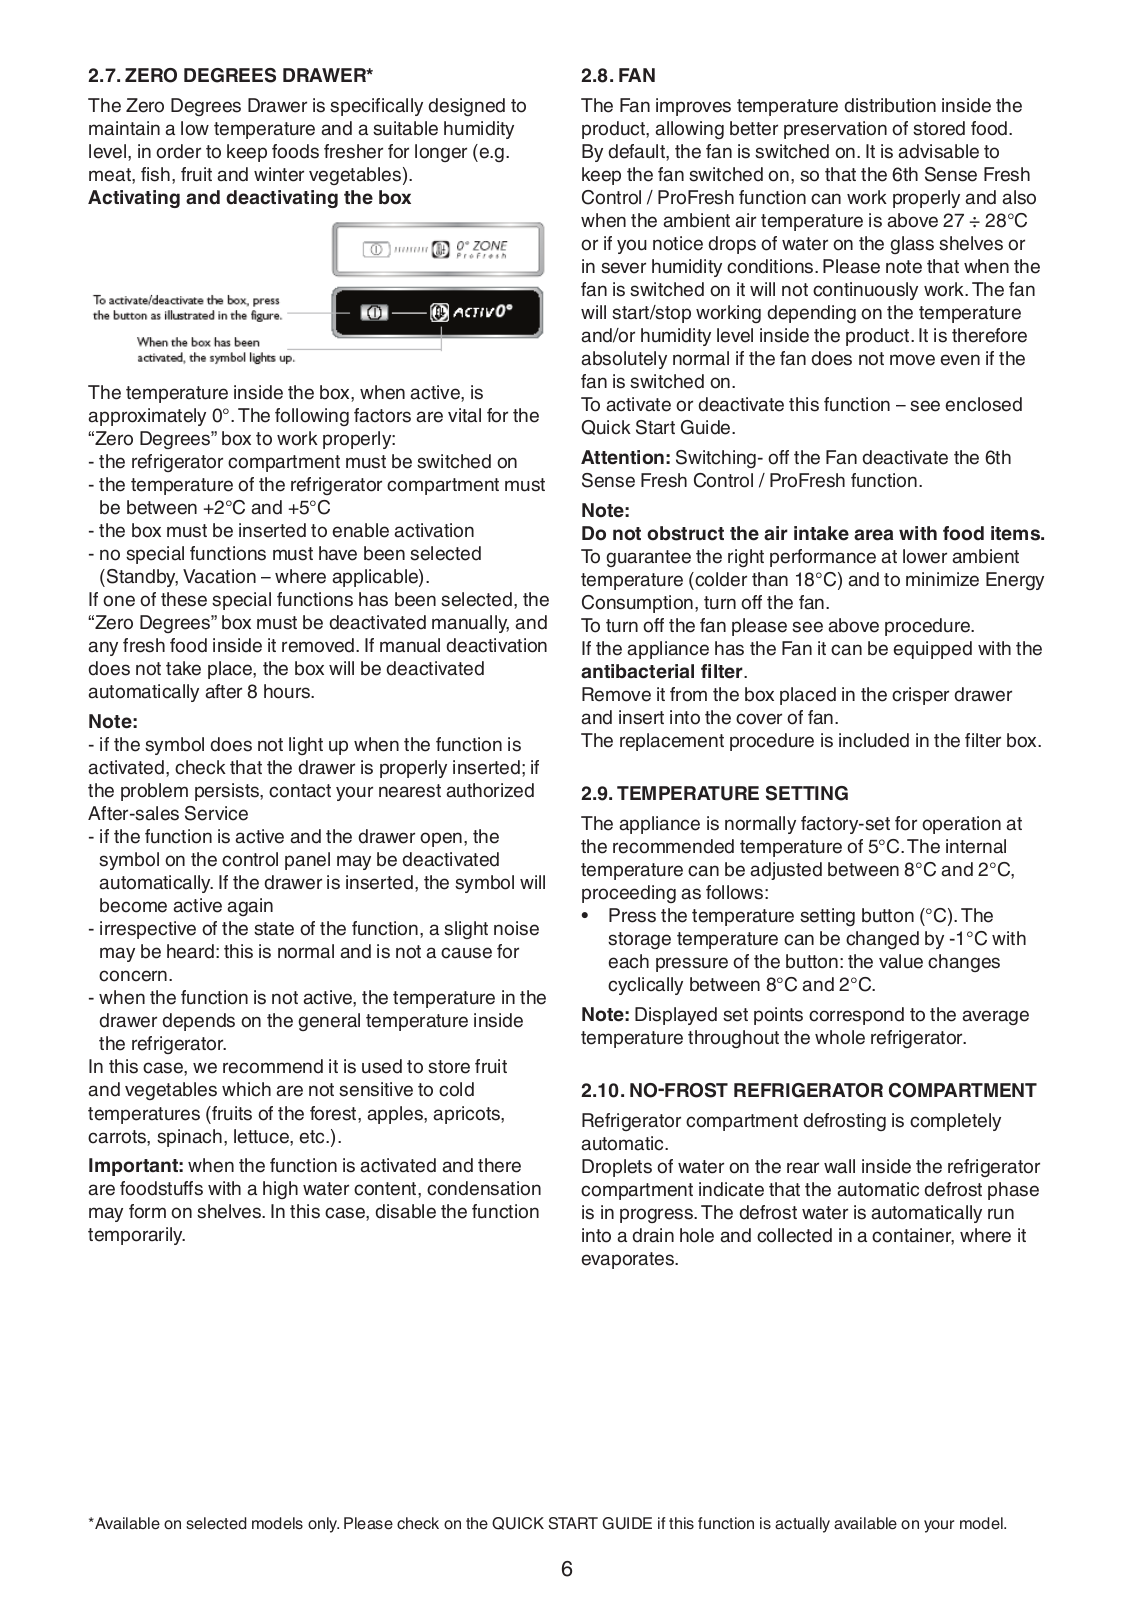
2.7. ZERO DEGREES DRAWER*

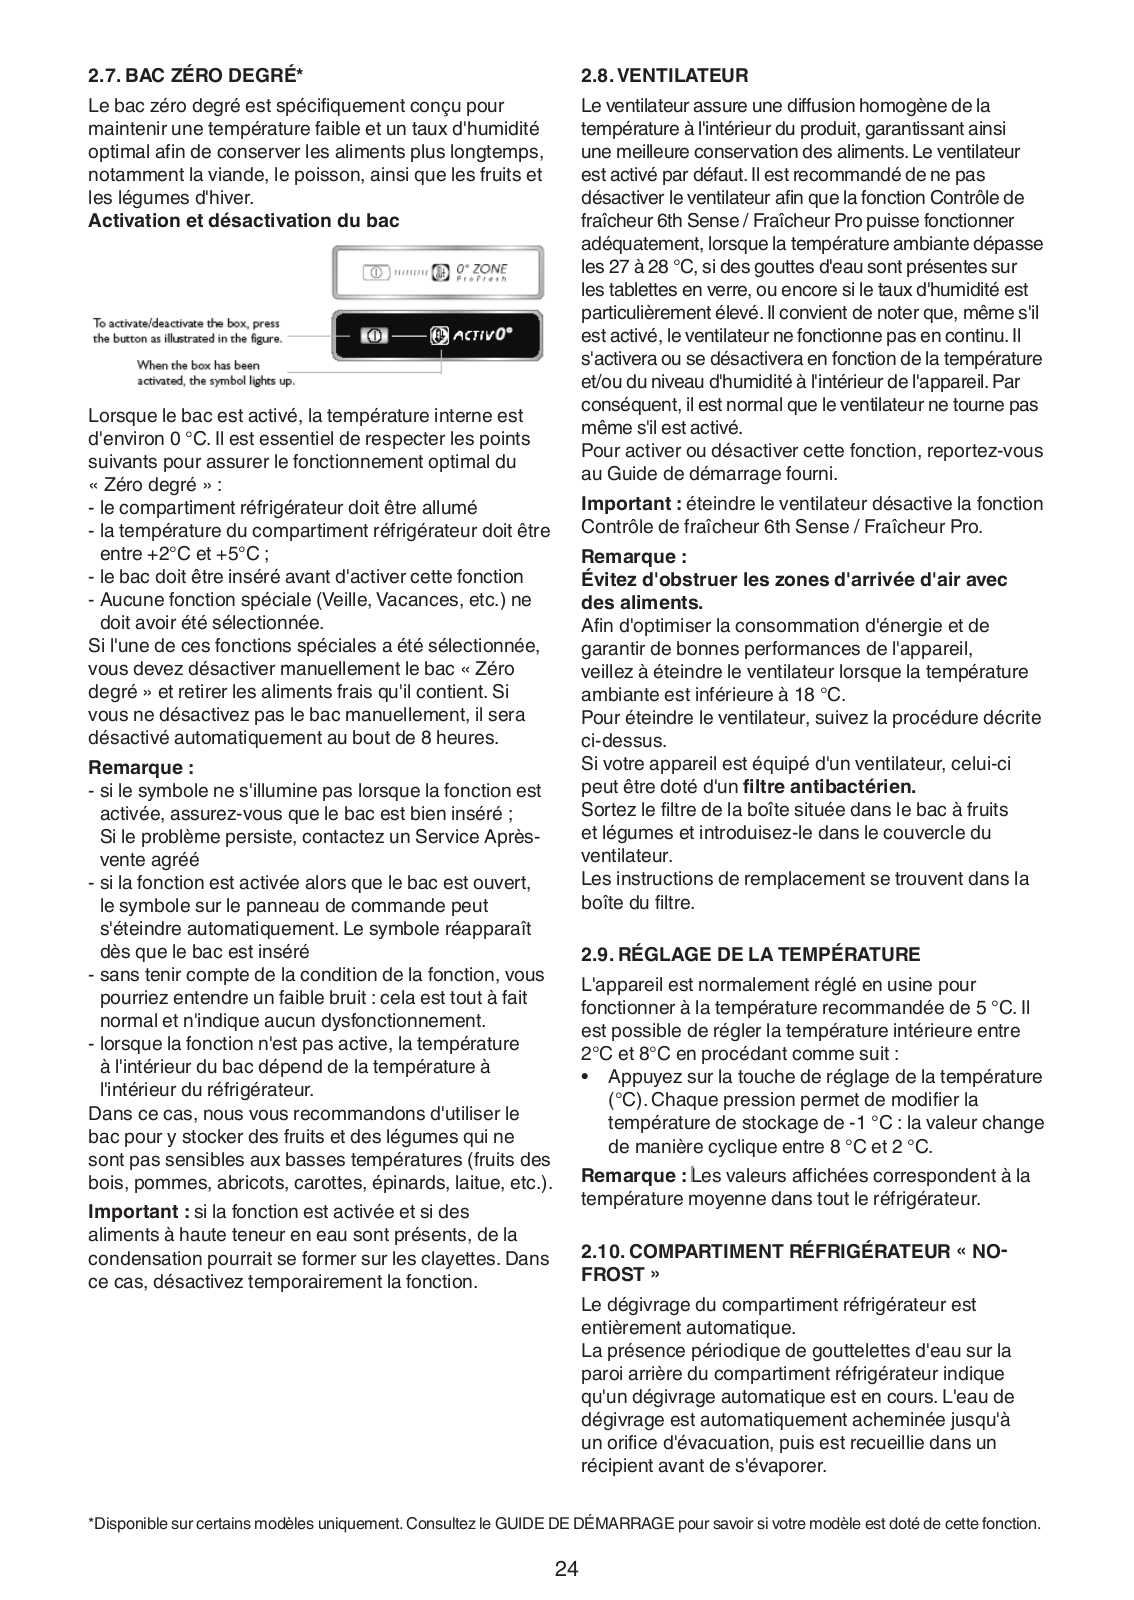
The Zero Degrees Drawer is specifically designed to maintain a low temperature and a suitable humidity level, in order to keep foods fresher for longer (e.g. meat, fish, fruit and winter vegetables).

Activating and deactivating the box

The temperature inside the box, when active, is approximately 0°.The following factors are vital for the

“Zero Degrees” box to work properly:

-the refrigerator compartment must be switched on

-the temperature of the refrigerator compartment must be between +2°C and +5°C

-the box must be inserted to enable activation

-no special functions must have been selected

(Standby,Vacation – where applicable).

If one of these special functions has been selected, the “Zero Degrees” box must be deactivated manually, and any fresh food inside it removed.If manual deactivation does not take place, the box will be deactivated automatically after 8 hours.

Note:

-if the symbol does not light up when the function is activated, check that the drawer is properly inserted; if the problem persists, contact your nearest authorized After-sales Service

-if the function is active and the drawer open, the symbol on the control panel may be deactivated automatically.If the drawer is inserted, the symbol will become active again

-irrespective of the state of the function, a slight noise may be heard: this is normal and is not a cause for concern.

-when the function is not active, the temperature in the drawer depends on the general temperature inside

the refrigerator.

In this case, we recommend it is used to store fruit and vegetables which are not sensitive to cold temperatures (fruits of the forest, apples, apricots, carrots, spinach, lettuce, etc.).

Important: when the function is activated and there are foodstuffs with a high water content, condensation may form on shelves.In this case, disable the function temporarily.

2.8. FAN

The Fan improves temperature distribution inside the product, allowing better preservation of stored food. By default, the fan is switched on.It is advisable to keep the fan switched on, so that the 6th Sense Fresh Control / ProFresh function can work properly and also when the ambient air temperature is above 27 ÷ 28°C or if you notice drops of water on the glass shelves or in sever humidity conditions.Please note that when the fan is switched on it will not continuously work.The fan will start/stop working depending on the temperature and/or humidity level inside the product.It is therefore absolutely normal if the fan does not move even if the fan is switched on.

To activate or deactivate this function – see enclosed

Quick Start Guide.

Attention: Switchingoff the Fan deactivate the 6th

Sense Fresh Control / ProFresh function.

Note:

Do not obstruct the air intake area with food items.

To guarantee the right performance at lower ambient temperature (colder than 18°C) and to minimize Energy

Consumption, turn off the fan.

To turn off the fan please see above procedure.

If the appliance has the Fan it can be equipped with the antibacterial filter.

Remove it from the box placed in the crisper drawer and insert into the cover of fan.

The replacement procedure is included in the filter box.

2.9.TEMPERATURE SETTING

The appliance is normally factory-set for operation at the recommended temperature of 5°C.The internal temperature can be adjusted between 8°C and 2°C, proceeding as follows:

Press the temperature setting button (°C).The storage temperature can be changed by -1°C with each pressure of the button: the value changes cyclically between 8°C and 2°C.

Note: Displayed set points correspond to the average temperature throughout the whole refrigerator.

2.10. NO-FROST REFRIGERATOR COMPARTMENT

Refrigerator compartment defrosting is completely automatic.

Droplets of water on the rear wall inside the refrigerator compartment indicate that the automatic defrost phase is in progress.The defrost water is automatically run into a drain hole and collected in a container, where it evaporates.

*Available on selected models only.Please check on the QUICK START GUIDE if this function is actually available on your model.

6

2.11. LED LIGHT SYSTEM*

The light system inside the fridge compartment uses LEDs light, allowing a better lightning as well as very low energy consumption.If the LED light system does not work, please contact the Service to replace it.

Important:

The refrigerator compartment light switches on when the refrigerator door is opened.If the door is kept open for more than 10 minutes the light will be automatically switched off.

2.12.HUMIDITY CONTROLED CRISPER*

The salad crispers fitted inside the fridge have been specially designed for the purpose of keeping fruit and vegetables fresh and crisp.Open the humidity regulator

(position B) if you want to store food in a less humid environment like fruit, or close it (position A) to store food in a more humid environment like vegetable.

3. USE

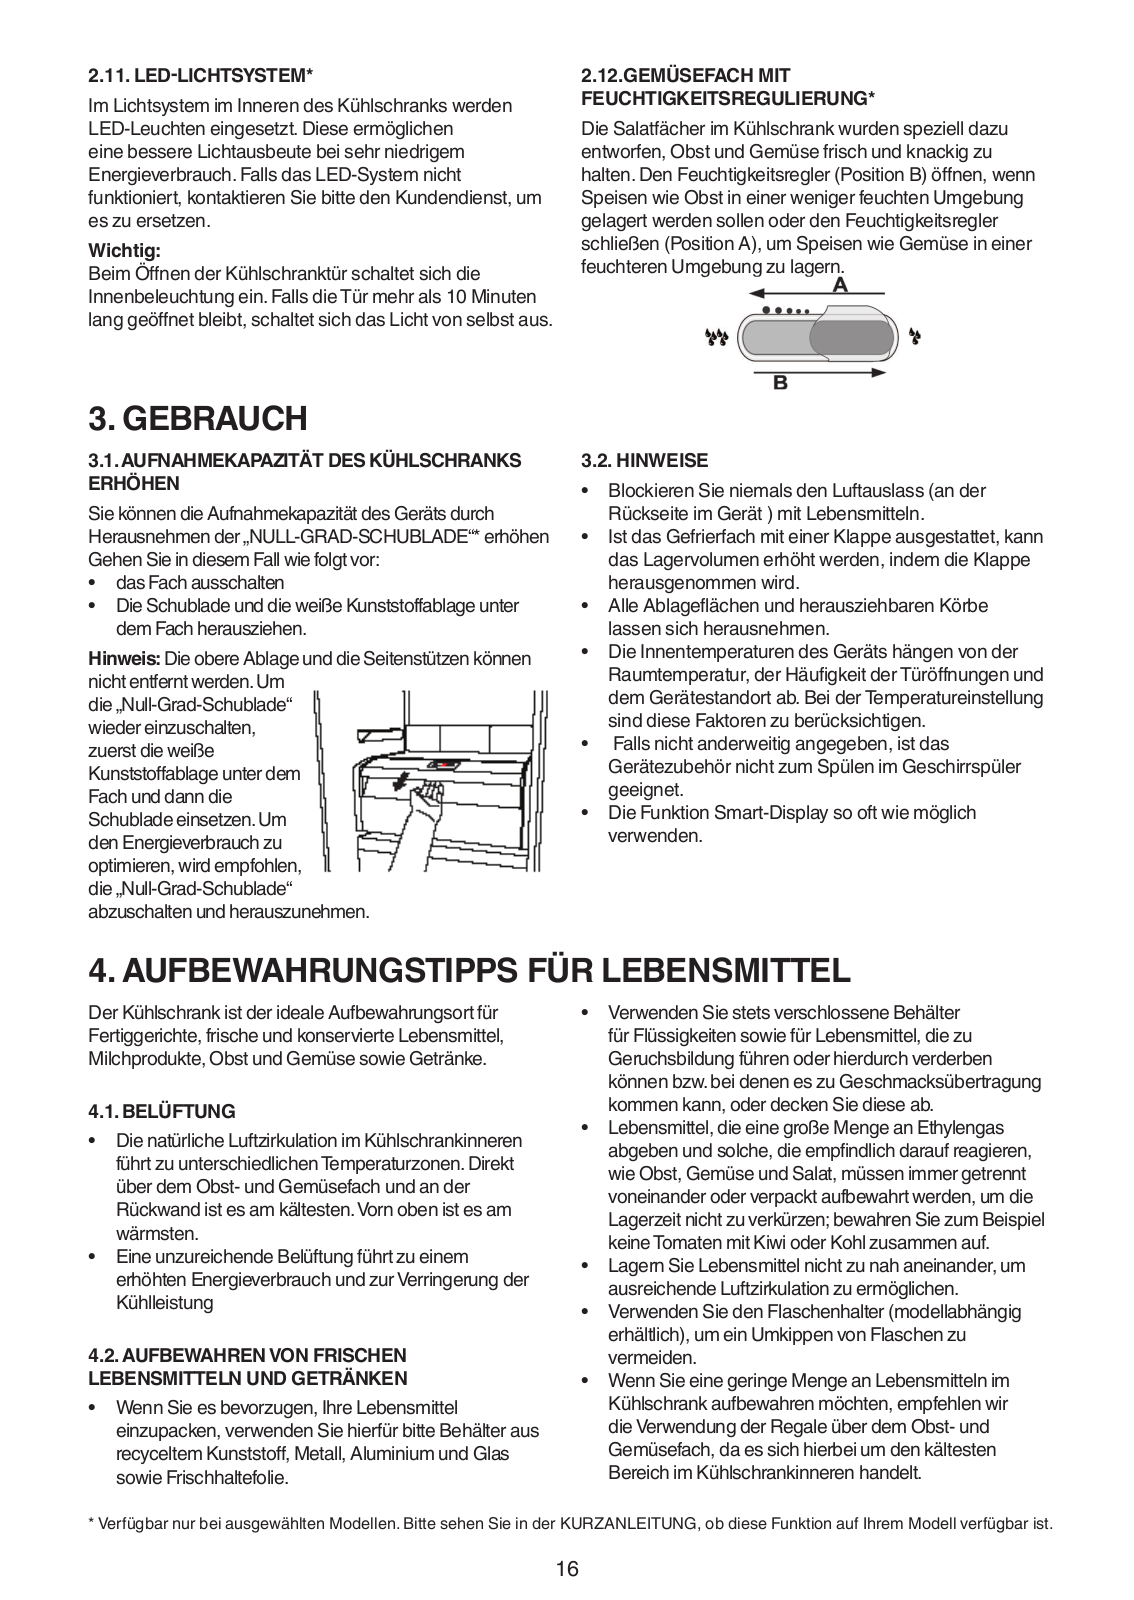
3.1. HOW TO INCREASE FRIDGE STORAGE CAPACITY

You can increase storage capacity by removing the

“ZERO DEGREES DRAWER”*

In this case proceed as follows:

switch off the box

pull out the drawer and the white plastic shelf underneath the box.

Note: the upper shelf and the side support cannot be removed.To restore“Zero

Degrees Drawer” operation, make sure you replace the white plastic shelf underneath the box before inserting the drawer and reactivating the function.To optimise energy consumption, we recommend you

deactivate the “Zero Degrees Drawer”and remove it.

3.2. NOTES

Do not block the air outlet area (on the back wall inside the product) with food products.

If the freezer is provided with a flap, it is possible to maximize the storage volume by removing the flap.

All shelves, flaps and pull-out baskets are removable.

The internal temperatures of the appliance may be affected by the ambient temperature, frequency of door opening, as well as location of the appliance.

Temperature setting should take into consideration these factors.

Unless otherwise specified the appliance accessories are not dishwasher safe.

Use Smart Display function as frequently as possible.

4. FOOD-STORAGE TIPS

The refrigerator is the ideal storage location for ready meals, fresh and preserved food, dairy products, fruit and vegetables and beverage.

4.1. AIR VENTILATION

The natural circulation of air in the refrigerator compartment results in zones with different temperatures.It is coldest directly above the fruits and vegetables crisper and at the rear wall.It is warmest at the top front of the compartment.

Insufficient ventilation results in an increase in energy consumption and reduction of the refrigerating performance.

4.2. HOW TO STORE FRESH FOOD AND

BEVERAGE

Use recyclable plastic, metal, aluminum and glass containers and cling film to wrap foods.

Always use closed containers for liquids and for food that may give off or be tainted by odor or flavor transfer or cover them.

Foods which give off a large amount ethylene gas and those that are sensitive to this gas, such as fruit, vegetables and salad, should always be separated or wrapped so as not to reduce the storage life; for example do not store tomatoes together with kiwi fruits or cabbage.

Do not store food too close together to enable sufficient air circulation.

To avoid bottles falling over, you can use the bottle holder (available on selected models).

If you have a little quantity of food to store in the refrigerator, we recommend to use the shelves above the crisper for fruits and vegetables since this is the coolest area of the compartment.

*Available on selected models only.Please check on the QUICK START GUIDE if this function is actually available on your model.

7

WHIRLPOOL SW8 AM2 D XR 2 User Manual

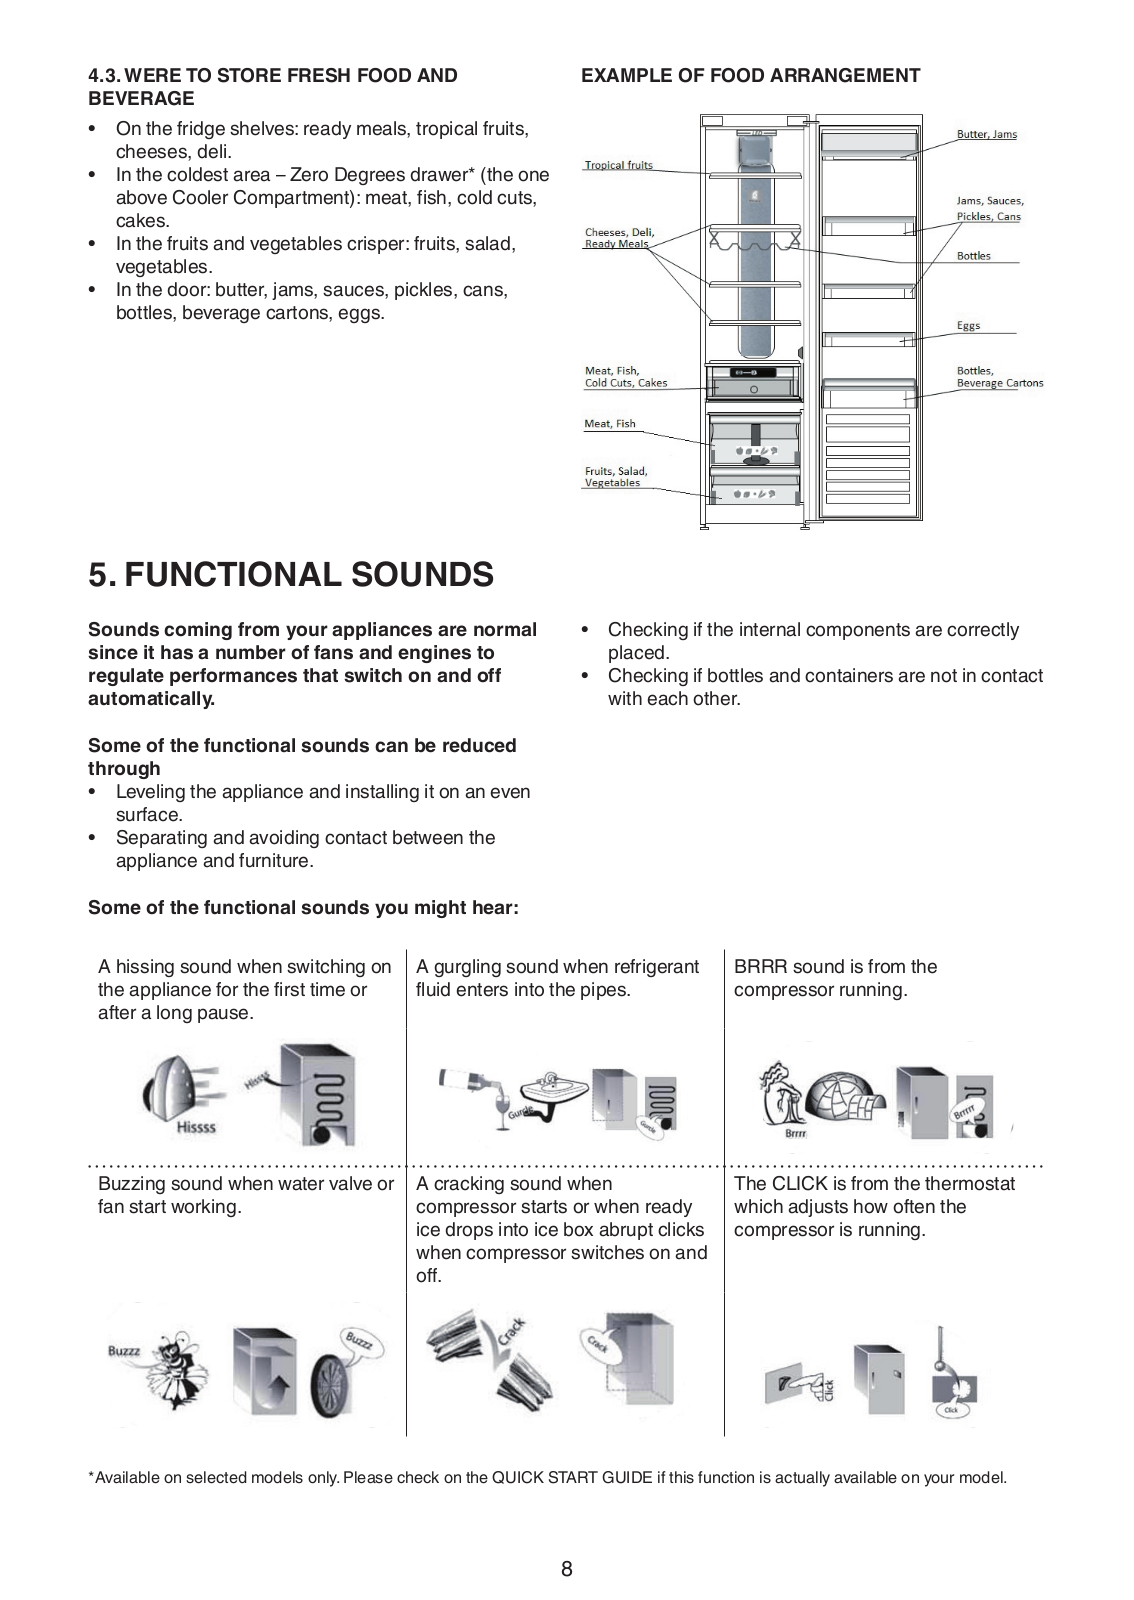
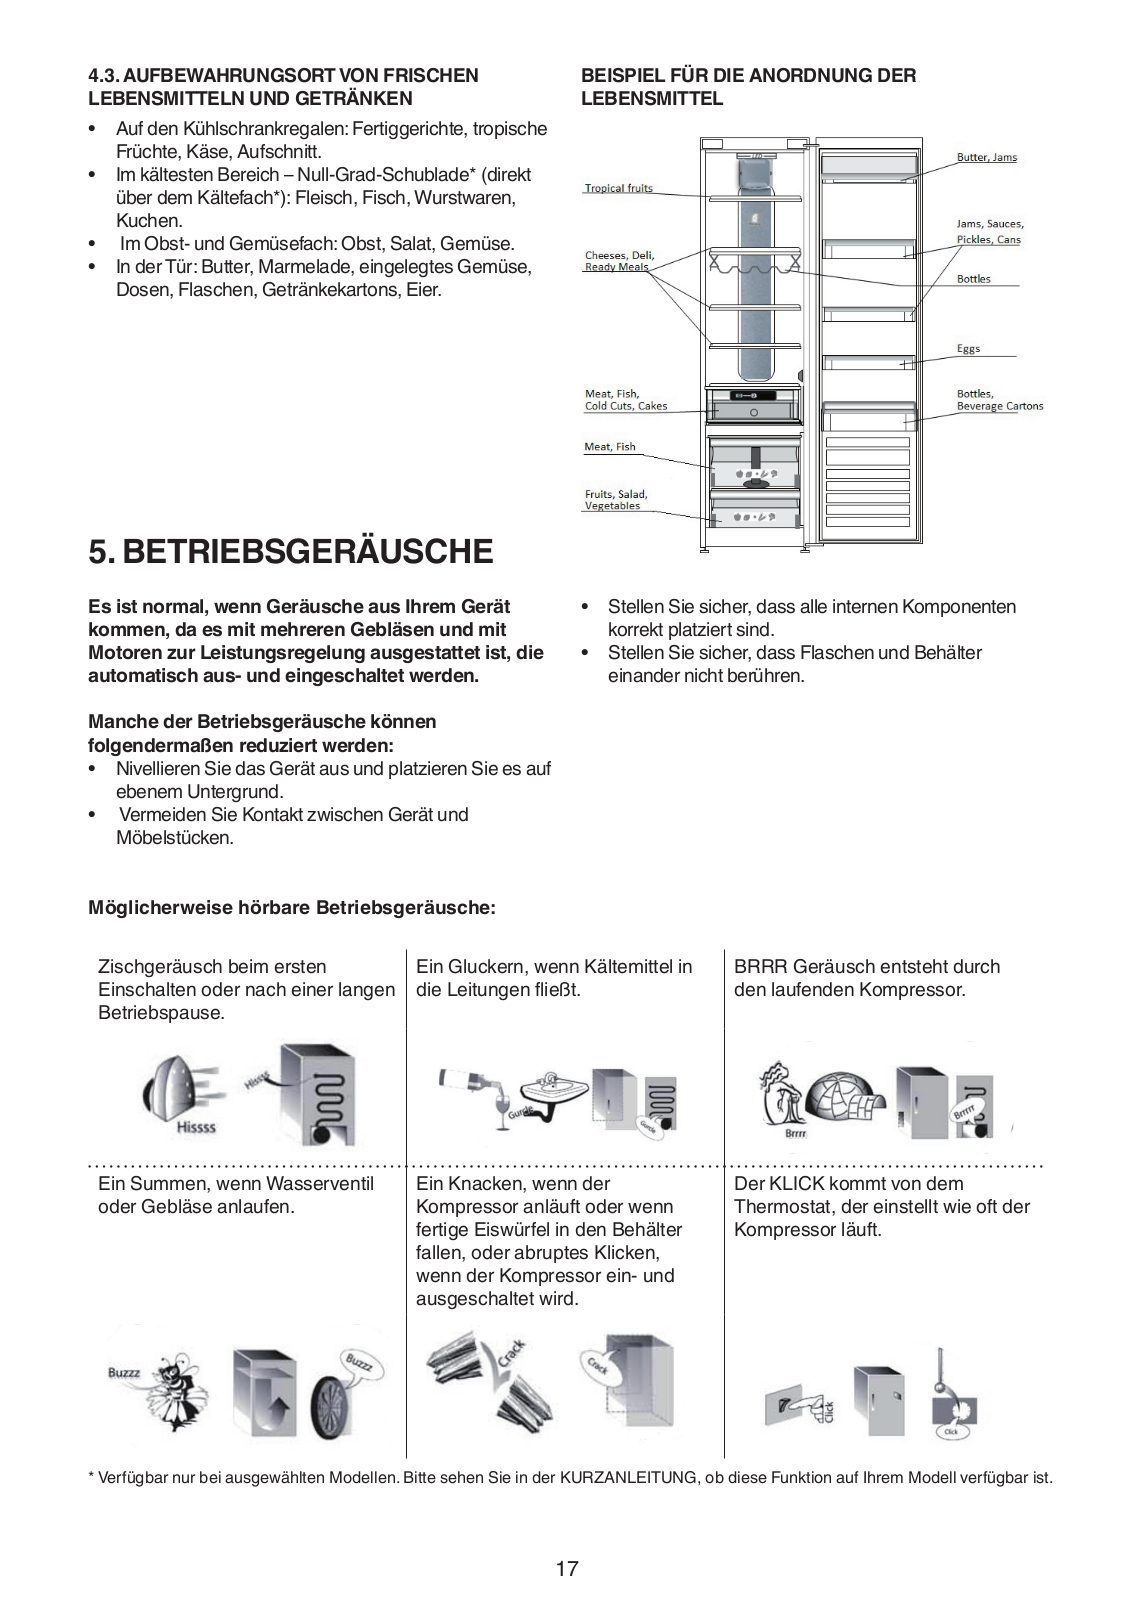
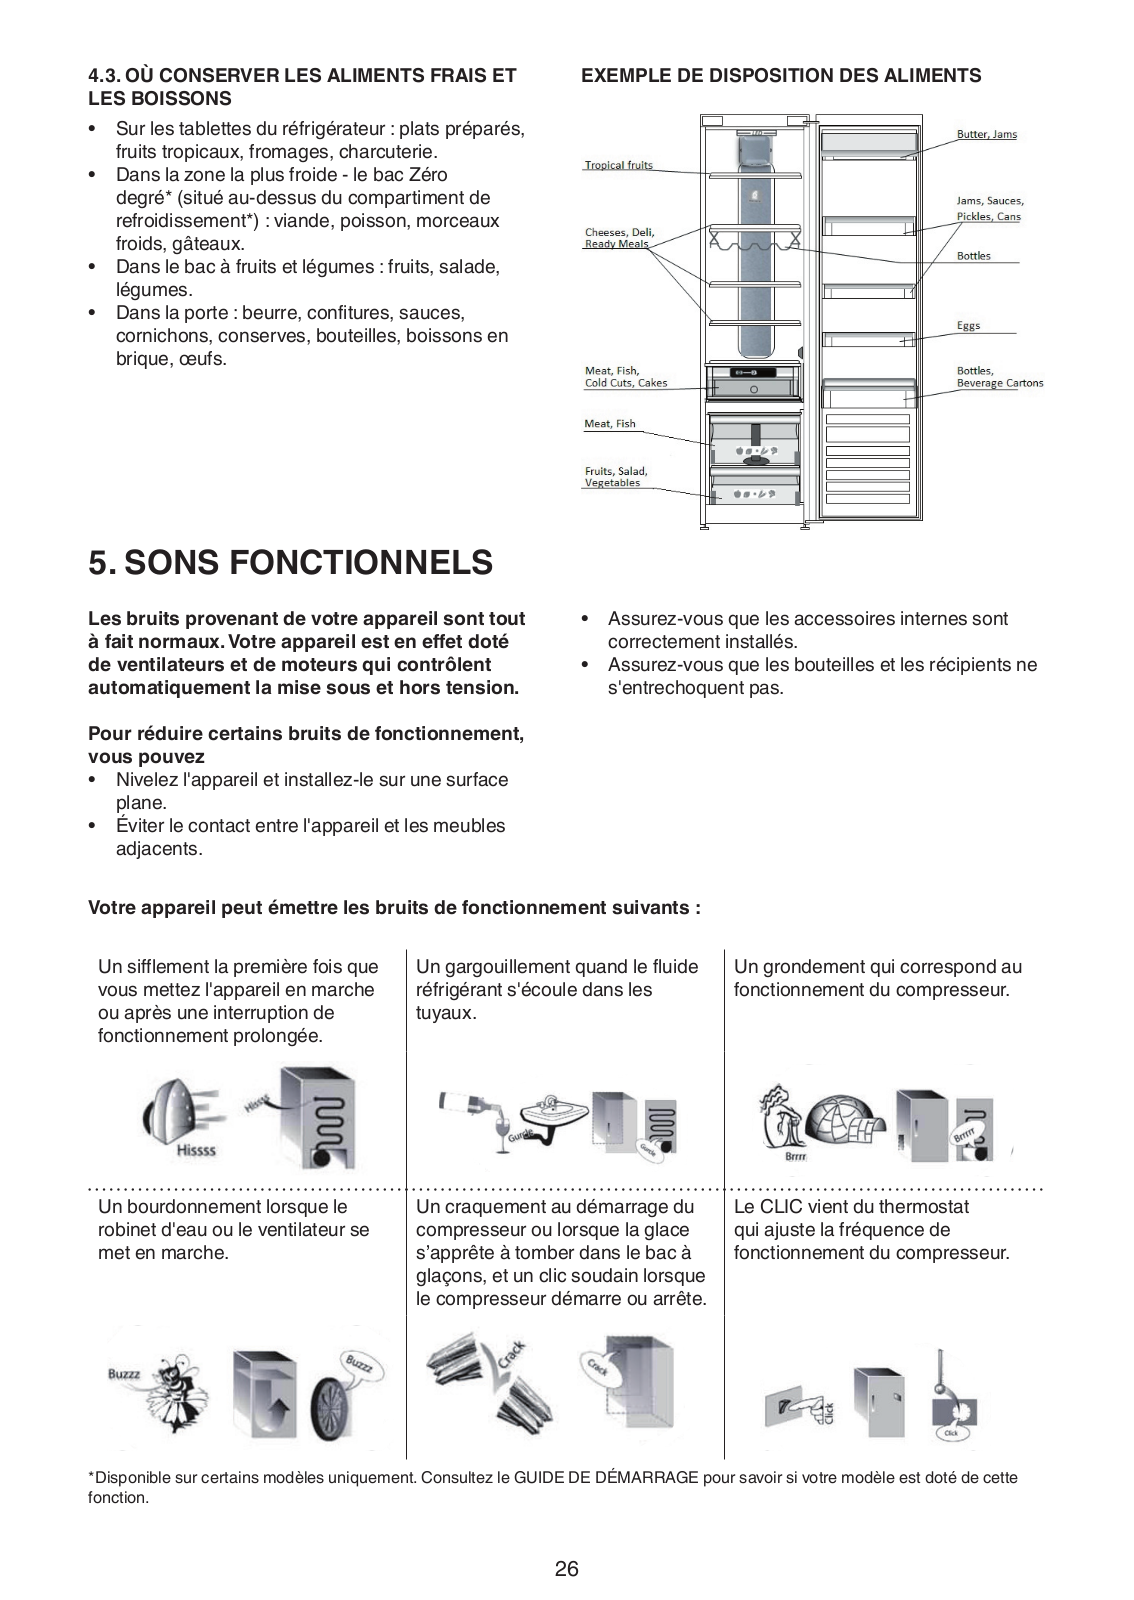
4.3. WERE TO STORE FRESH FOOD AND

EXAMPLE OF FOOD ARRANGEMENT

BEVERAGE


On the fridge shelves: ready meals, tropical fruits, cheeses, deli.

In the coldest area – Zero Degrees drawer* (the one above Cooler Compartment): meat, fish, cold cuts, cakes.

In the fruits and vegetables crisper: fruits, salad, vegetables.

In the door: butter, jams, sauces, pickles, cans, bottles, beverage cartons, eggs.

5. FUNCTIONAL SOUNDS

Sounds coming from your appliances are normal since it has a number of fans and engines to regulate performances that switch on and off automatically.

Some of the functional sounds can be reduced through

Leveling the appliance and installing it on an even surface.

Separating and avoiding contact between the appliance and furniture.

Some of the functional sounds you might hear:

Checking if the internal components are correctly placed.

Checking if bottles and containers are not in contact with each other.

A hissing sound when switching on the appliance for the first time or after a long pause.

Buzzing sound when water valve or fan start working.

A gurgling sound when refrigerant fluid enters into the pipes.

A cracking sound when compressor starts or when ready ice drops into ice box abrupt clicks when compressor switches on and off.

BRRR sound is from the compressor running.

The CLICK is from the thermostat which adjusts how often the compressor is running.

*Available on selected models only.Please check on the QUICK START GUIDE if this function is actually available on your model.

8

6. RECOMMENDATION IN CASE OF NO USE OF THE APPLIANCE

6.1. ABSENCE / VACATION

In case of vacation its recommended to use up food and to disconnect the appliance to save energy.

6.2. MOVING

1.Take out all internal parts.

2.Wrap them well, and fix them together with adhesive tape so that they do not bang together or get lost.

3.Screw the adjustable feet so that they do not touch the support surface.

4.Close and fix door with adhesive tape and, again using adhesive tape, fix the power cable to the appliance.

6.3. POWER FAILURE

In the event of a power failure, call the local office of your electricity supply company and ask how long it is going to last.

Note: Bear in mind that a full appliance will stay cold longer than a partially filled one.

If food is found to be in a poor condition, it is best to throw it away.

For power failures lasting up to 24 hours.

1.Keep the door of the appliance closed.This will allow the stored food to stay cold as long as possible.

For power failures lasting more than 24 hours.

1.Try to use up the food, which is more easily perishable.

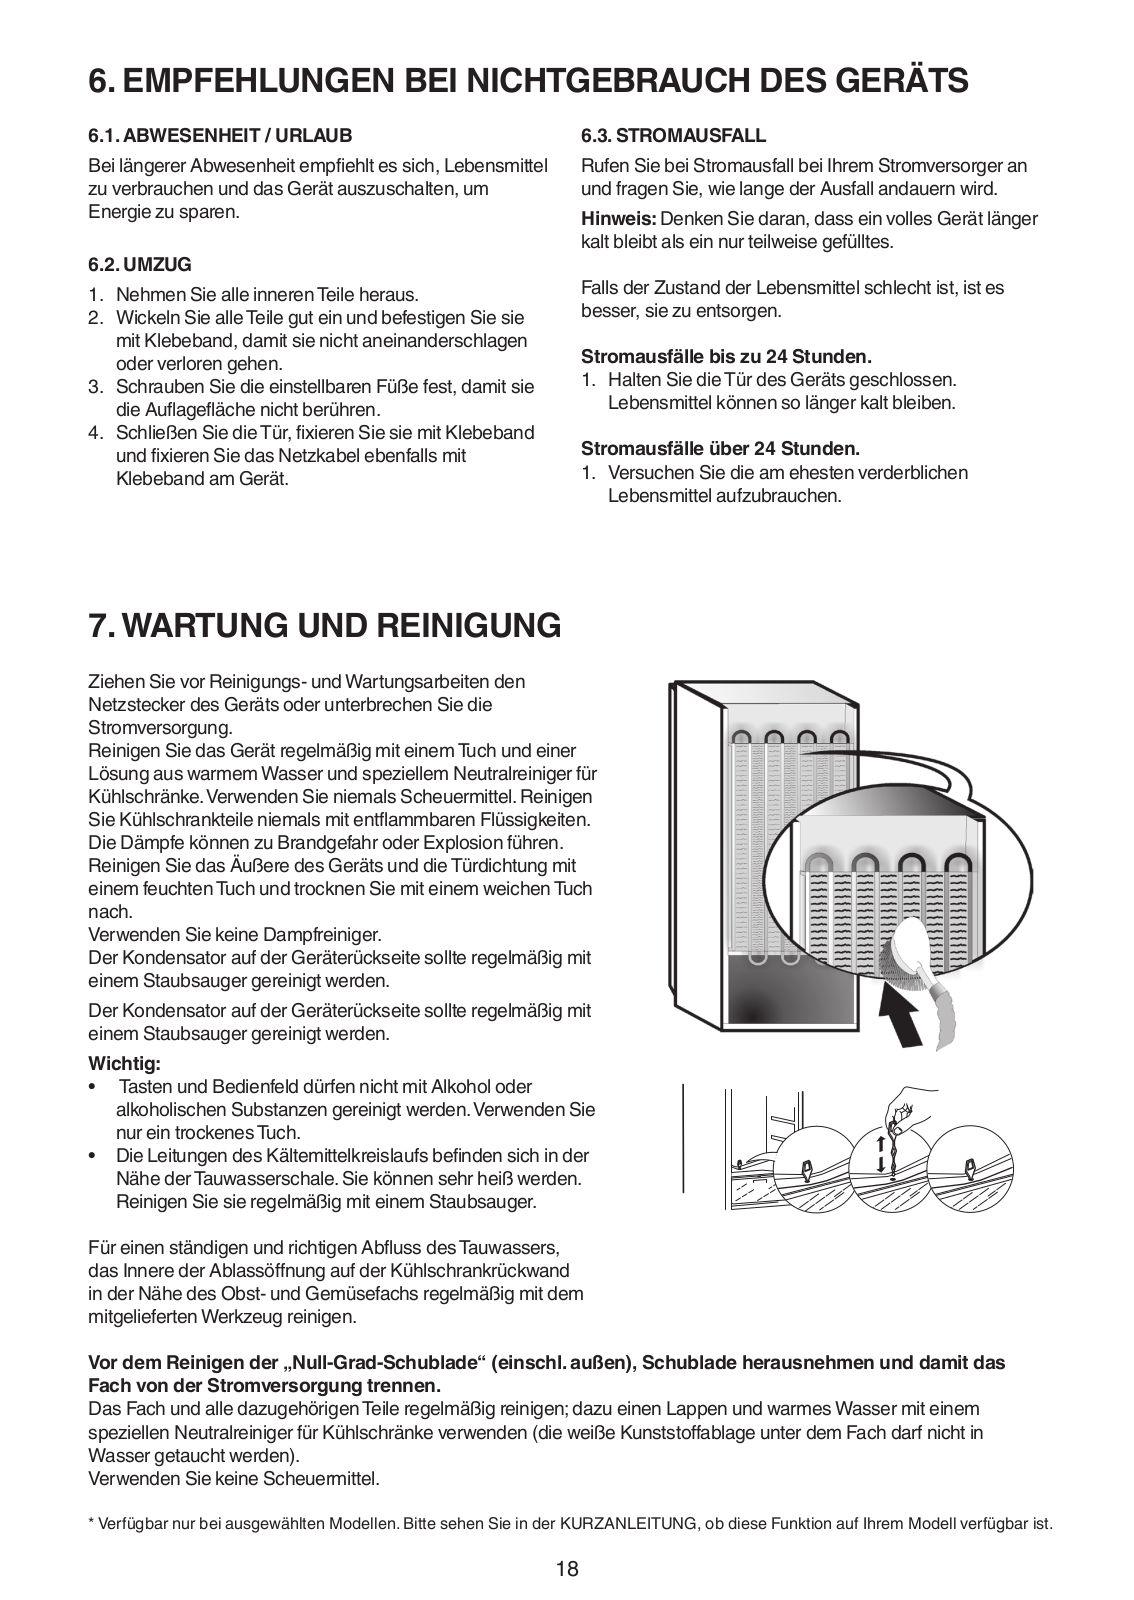
7. MAINTENANCE AND CLEANING

Before any cleaning or maintenance operation, unplug the appliance from the mains or disconnect the electrical power supply.

Periodically clean the appliance with a cloth and a solution of lukewarm water and neutral detergent specifically for refrigerator interiors.Never use abrasives.Never clean refrigerator parts with flammable fluids.The fumes can create a fire hazard or explosion.Clean the outside of the appliance and the door seal with a damp cloth and dry with a soft cloth. Do not use steam cleaners.

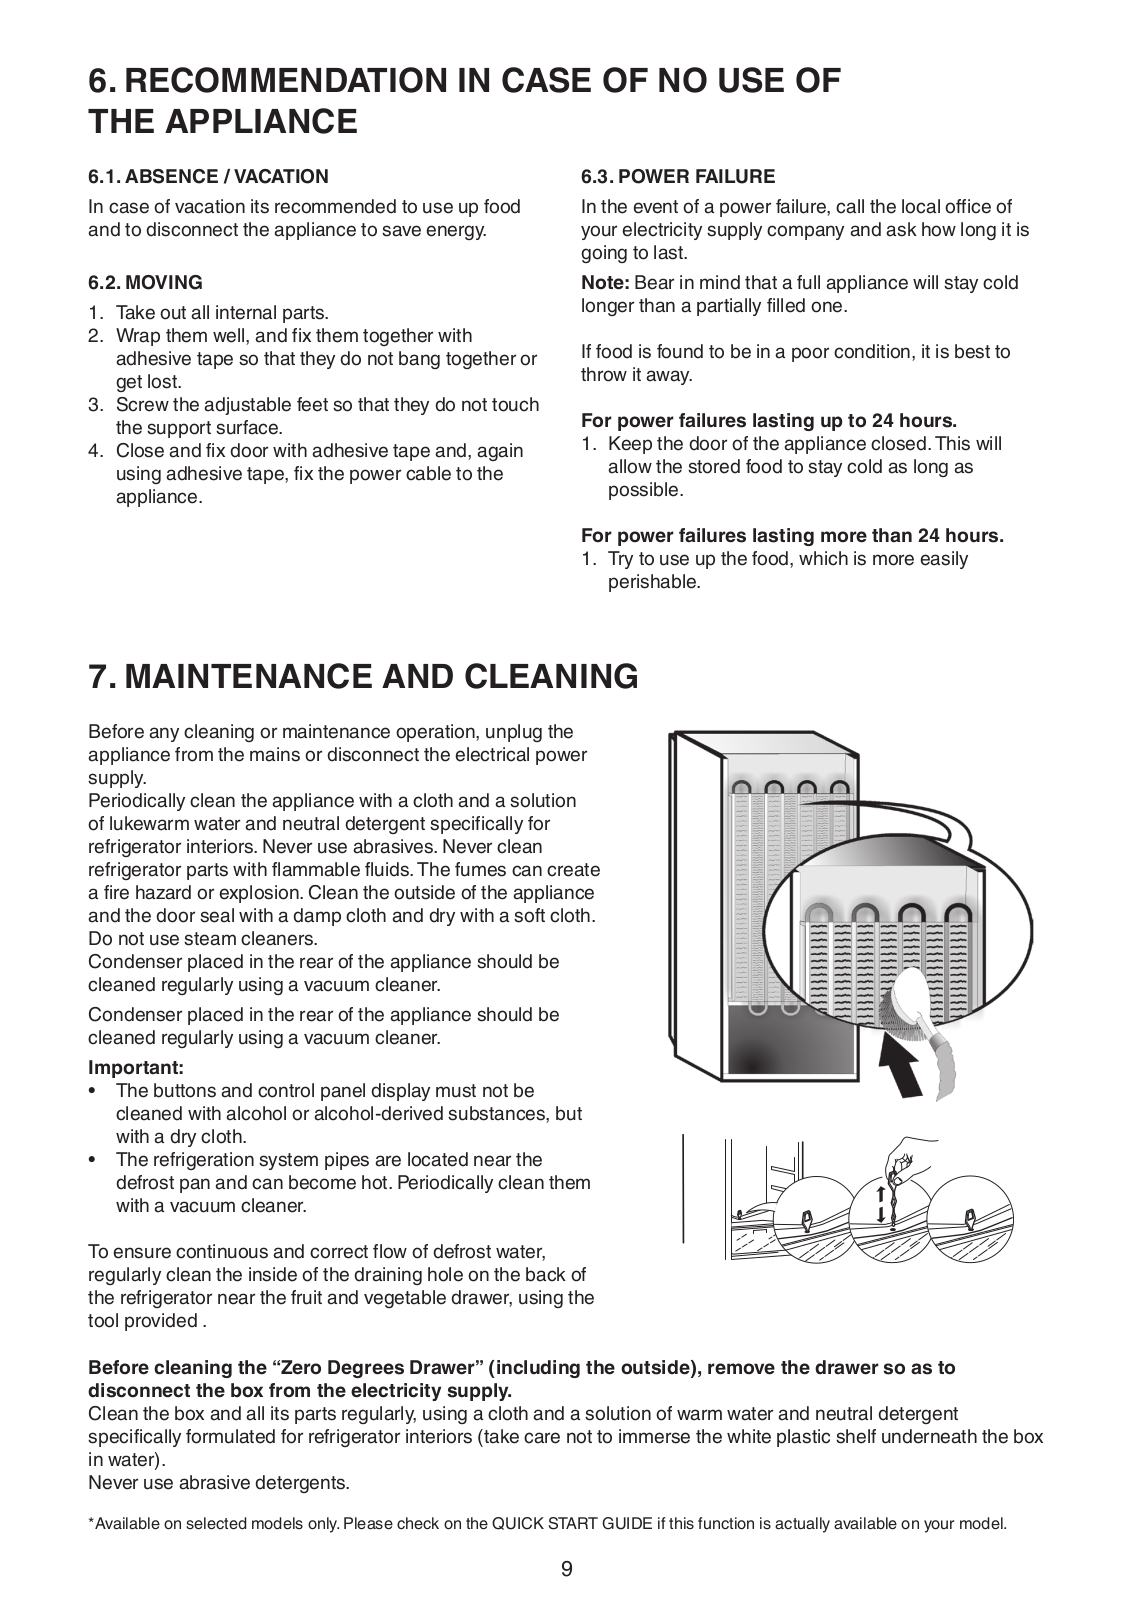
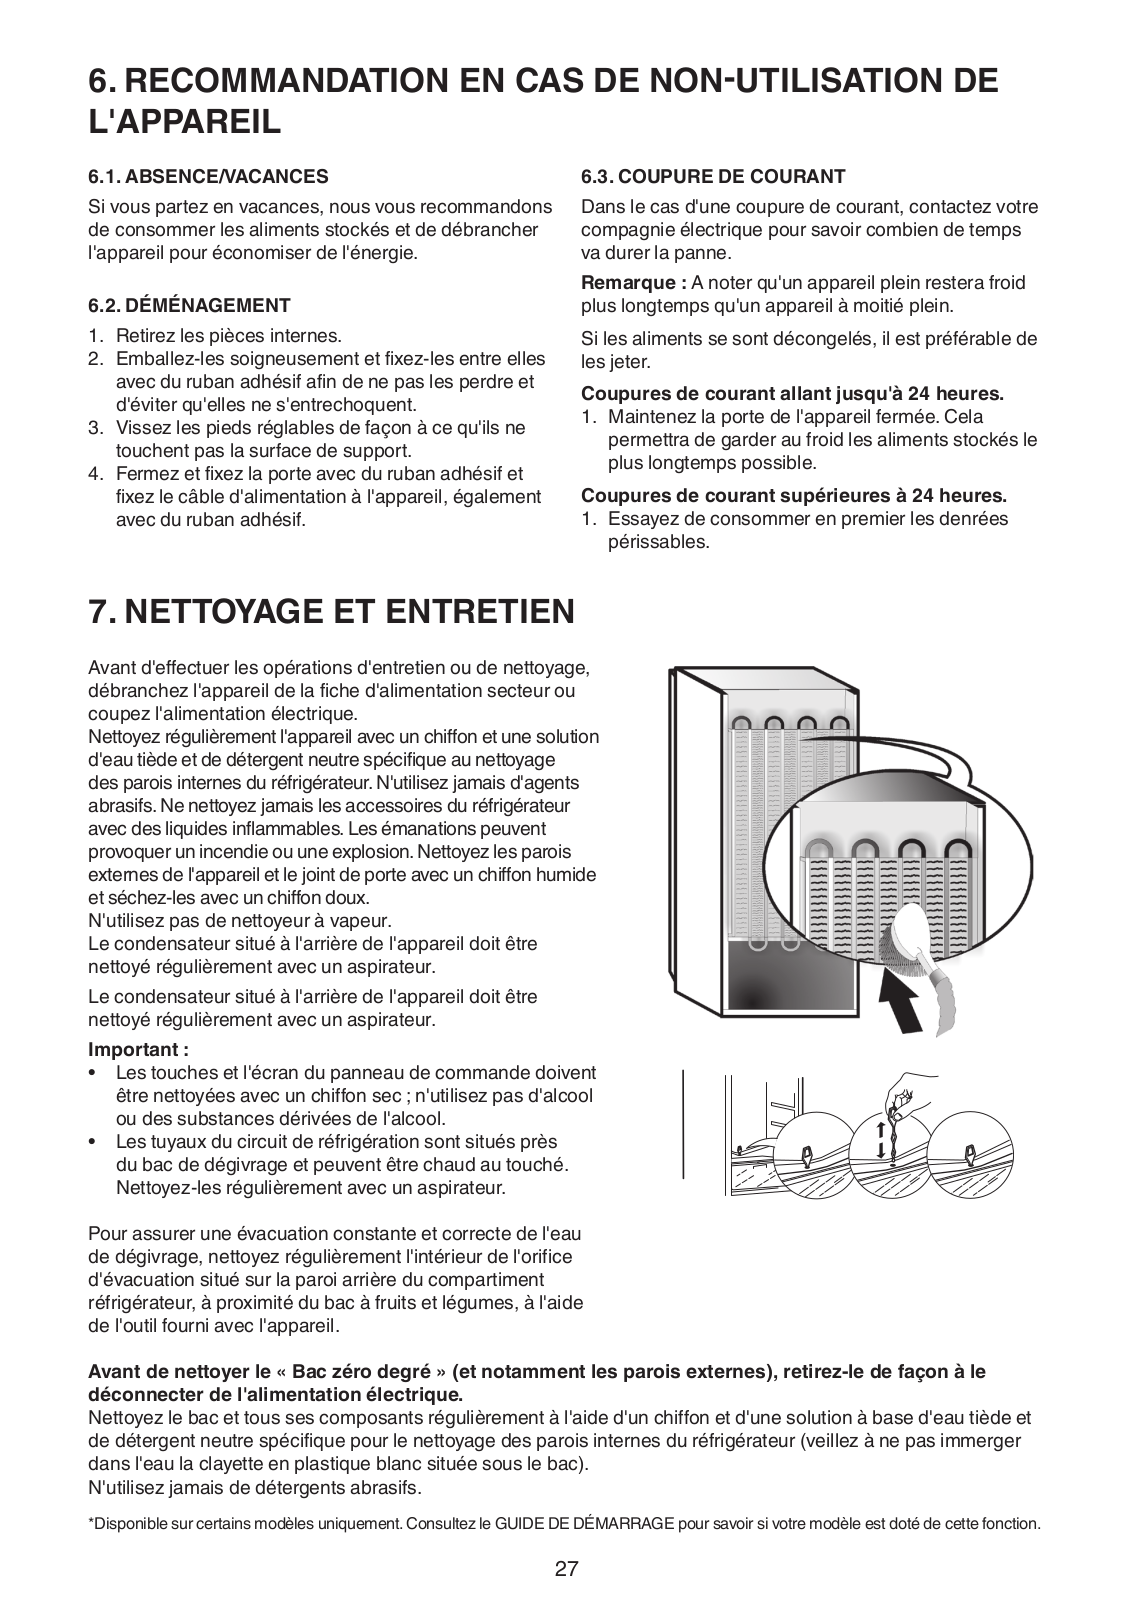
Condenser placed in the rear of the appliance should be cleaned regularly using a vacuum cleaner.

Condenser placed in the rear of the appliance should be cleaned regularly using a vacuum cleaner.

Important:

The buttons and control panel display must not be cleaned with alcohol or alcohol-derived substances, but with a dry cloth.

The refrigeration system pipes are located near the

defrost pan and can become hot.Periodically clean them with a vacuum cleaner.

To ensure continuous and correct flow of defrost water, regularly clean the inside of the draining hole on the back of the refrigerator near the fruit and vegetable drawer, using the tool provided .

Before cleaning the “Zero Degrees Drawer” (including the outside), remove the drawer so as to disconnect the box from the electricity supply.

Clean the box and all its parts regularly, using a cloth and a solution of warm water and neutral detergent specifically formulated for refrigerator interiors (take care not to immerse the white plastic shelf underneath the box in water).

Never use abrasive detergents.

*Available on selected models only.Please check on the QUICK START GUIDE if this function is actually available on your model.

9

8.TROUBLESHOOTING GUIDE

8.1. BEFORE CONTACTING AFTER-SALES SERVICE…

Performance problems often result from little things you can find and fix yourself without tools of any kind.

PROBLEM

SOLUTION

The appliance is not working:

• Is the power cable plugged into a live socket with the proper


voltage?


• Have you checked the protection devices and fuses of the


electrical system in your home?

If there is water in the defrost pan:

• This is normal in hot, damp weather. The pan can even be half


full. Make sure the appliance is level so that the water does not


overflow.

If the edges of the appliance

• This is normal in hot weather and when the compressor is

cabinet, which come in contact with

running.

the door seal, are warm to the touch:


If the light does not work:

• Have you checked the protection devices and fuses of the


electrical system in your home?


• Is the power cable plugged into a live socket with the proper


voltage?


• In case the LEDs are broken the user must call the Service for


exchange of the same type available only at our After-sales


Service Centers or authorized dealers.

If the motor seems to run too much:

• Motor running time depends on different things: number of door


openings, amount of food stored, temperature of the room, setting


of the temperature controls.


• Is the condenser (back the appliance) free of dust and fluff?


• Are the door properly closed?


• Are the door seals properly fitted?


• On hot days or if the room is warm, the motor naturally runs


longer.


• If the appliance door has been left open for a while or if large


amounts of food have been stored, the motor will run longer in


order to cool down the interior of the appliance.

If the appliance temperature is too

• Are the appliance controls correctly set?

high:

• Has a large amount of food been added to the appliance?


• Check that the door is not opened too often.


• Check that the door close properly.

If the doors do not open and close

• Check that food packages are not blocking the door.

properly:

• Check that the internal parts or automatic ice maker are not out of


position.


• Check that the door seals are not dirty or sticky.


• Ensure the appliance is level.

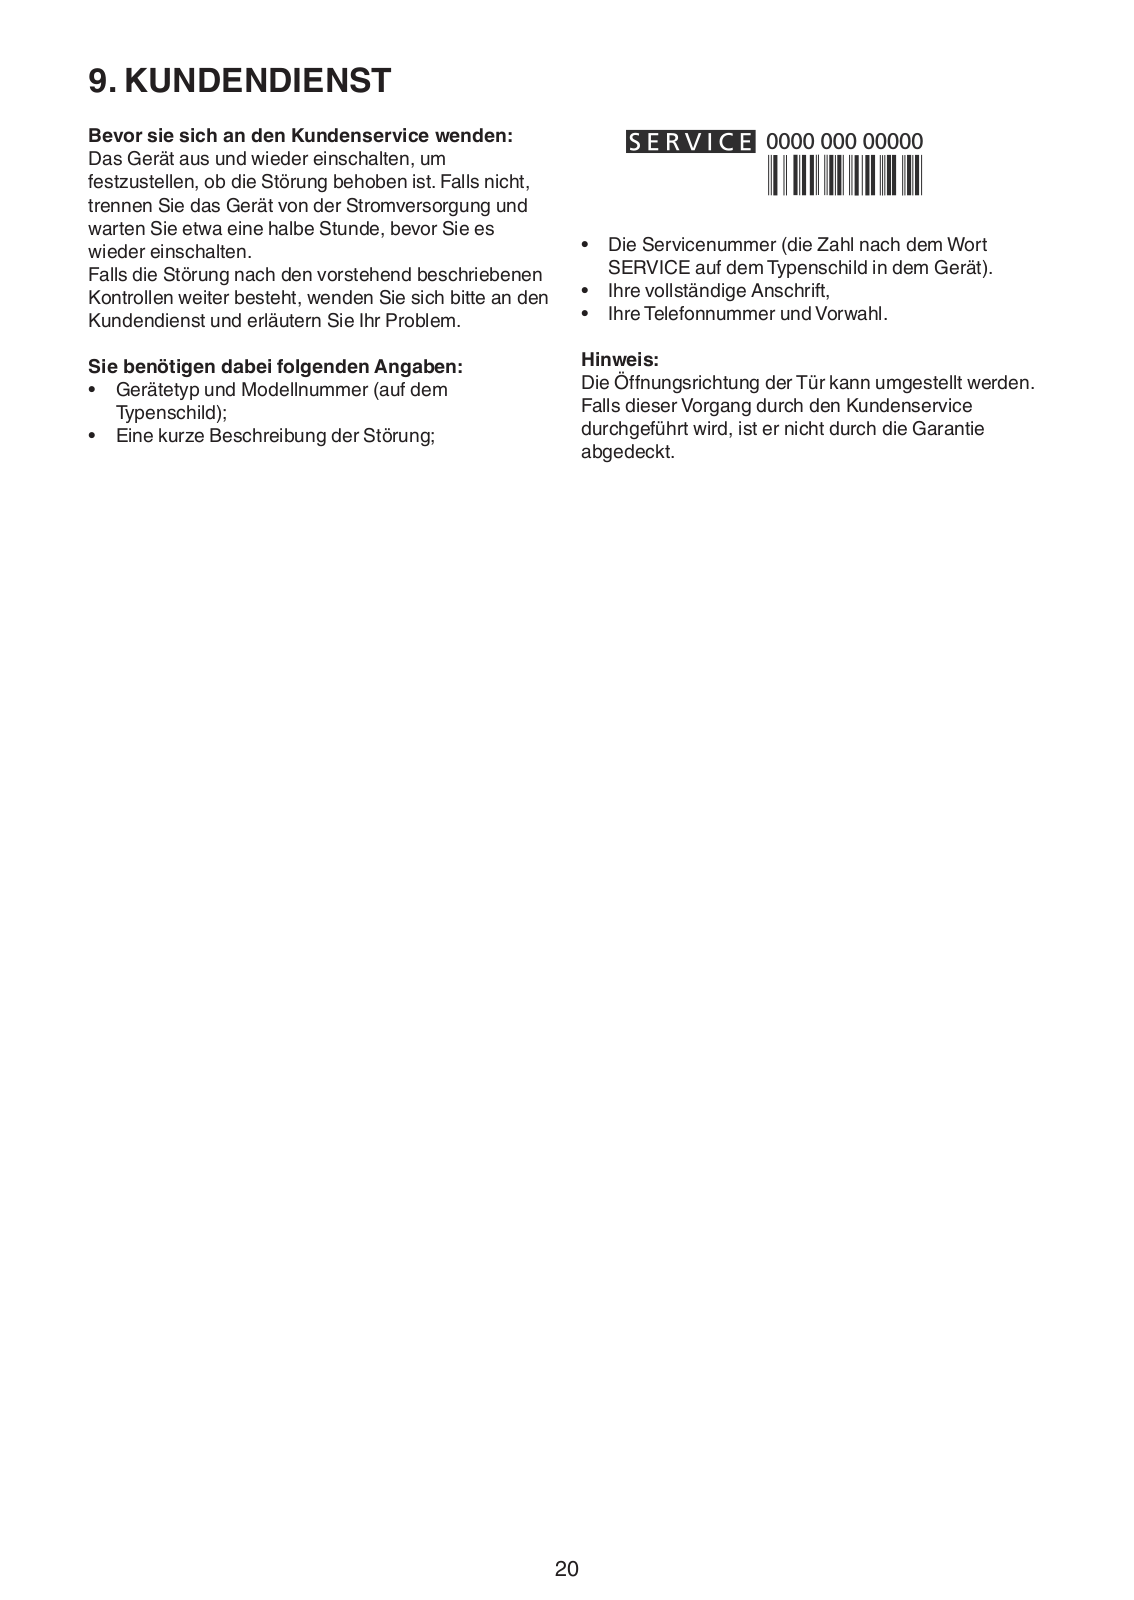
8.2. FAILURES

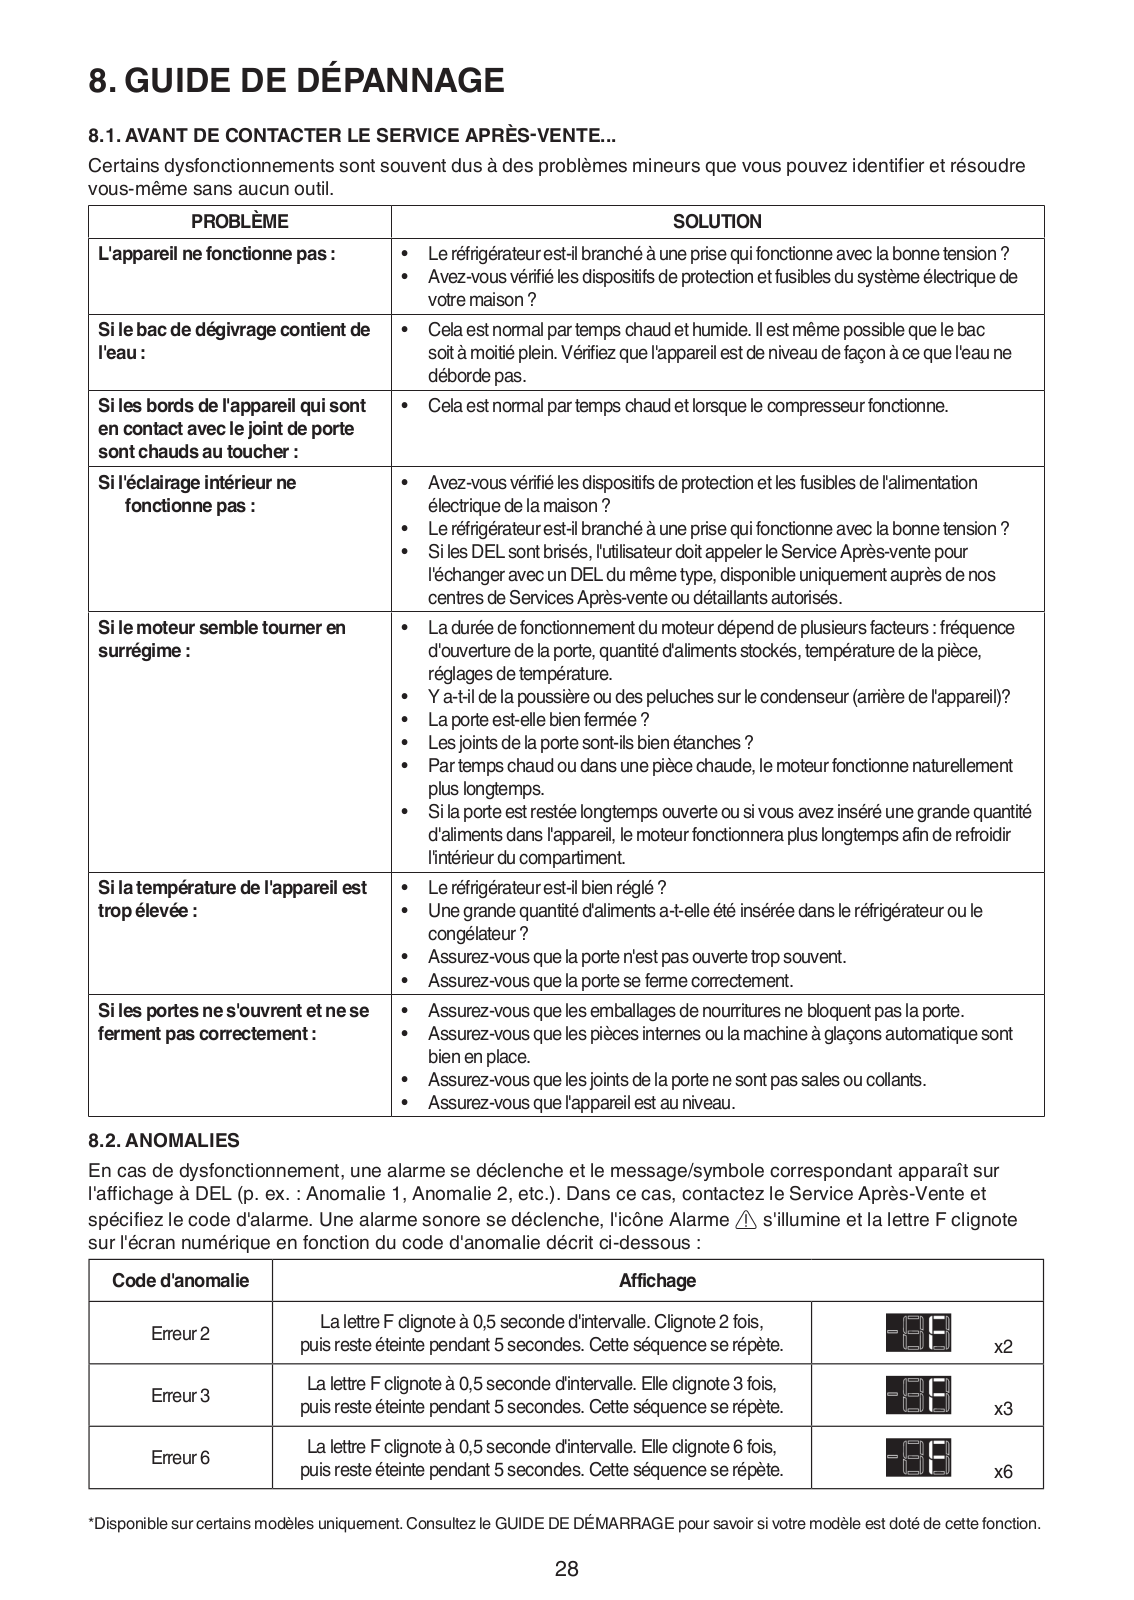
In the event of operation alarms, they will also be displayed in the digits LEDs, (e.g. Failure1, Failure 2, etc...) call

After-sales Service and specify the alarm code. The acoustic alarm sounds, the Alarm icon


lights up and the F


letter on the digit display blinks according to failure code described below:


Failure code

Visualization


Error 2

F letter blink on/off at 0,5 sec. Blinks ON 2 times


then remain off for 5 seconds. Pattern repeats.


x2


Error 3

F letter blink on/off at 0,5 sec. Blinks ON 3 times


then remain off for 5 seconds. Pattern repeats.


x3


Error 6

F letter blink on/off at 0,5 sec. Blinks ON 6 times


then remain off for 5 seconds. Pattern repeats.


x6


*Available on selected models only.Please check on the QUICK START GUIDE if this function is actually available on your model.

10

9. AFTER-SALES SERVICE

Before contacting After-Sales Service:

Switch the appliance on again to see if the problem has been solved.If it has not, disconnect the appliance from the power supply and wait for about an hour before switching on again.

If, after performing the checks described in the Troubleshooting Guide and switching the appliance on again, your appliance still does not work properly, contact the After-sales Service, explain the problem.

Specify:

the model and appliance serial number (stated on the rating plate),

the nature of the problem,

the Service number (the number after the word

SERVICE on the data plate on the inside of the appliance),

your full address,

your telephone number and area code.

Note:

The direction of door opening can be changed.If this operation is performed by After-sales Service it is not covered by the warranty.

11

INDEX


Kapitel 1:INSTALLATION...................................................................................................

13

1.1. INSTALLATION EINES EINZELGERÄTS.....................................................................................................

13

1.2. INSTALLATION VON ZWEI GERÄTEN.........................................................................................................

13

1.3.TÜREN EINSTELLEN (FALLS VORHANDEN).............................................................................................

13

Kapitel 2:FUNKTIONEN.....................................................................................................

14

2.1. EIN/STANDBY ..............................................................................................................................................

14

2.2. SMART-DISPLAY*.........................................................................................................................................

14

2.3. 6TH SENSE FRESH CONTROL / PROFRESH ............................................................................................

14

2.4. ALARM TÜR OFFEN.....................................................................................................................................

14

2.5. URLAUB ......................................................................................................................................................

14

2.6. SCHNELLKÜHLEN ......................................................................................................................................

14

2.7. NULL-GRAD-SCHUBLADE* ........................................................................................................................

15

2.8. GEBLÄSE......................................................................................................................................................

15

2.9.TEMPERATUREINSTELLUNG......................................................................................................................

15

2.10. NO-FROST KÜHLRAUM.............................................................................................................................

15

2.11. LED-LICHTSYSTEM*...................................................................................................................................

16

2.12.GEMÜSEFACH MIT FEUCHTIGKEITSREGULIERUNG*............................................................................

16

Kapitel 3:GEBRAUCH........................................................................................................

16

3.1. AUFNAHMEKAPAZITÄT DES KÜHLSCHRANKS ERHÖHEN....................................................................

16

3.2. HINWEISE.....................................................................................................................................................

16

Kapitel 4:AUFBEWAHRUNGSTIPPS FÜR LEBENSMITTEL............................................

16

4.1. BELÜFTUNG.................................................................................................................................................

16

4.2. AUFBEWAHREN VON FRISCHEN LEBENSMITTELN UND GETRÄNKEN................................................

16

4.3. AUFBEWAHRUNGSORT VON FRISCHEN LEBENSMITTELN UND GETRÄNKEN...................................

17

Kapitel 5:BETRIEBSGERÄUSCHE...................................................................................

17

Kapitel 6:EMPFEHLUNGEN BEI NICHTGEBRAUCH DES GERÄTS...............................

18

6.1. ABWESENHEIT / URLAUB...........................................................................................................................

18

6.2. UMZUG..........................................................................................................................................................

18

6.3. STROMAUSFALL..........................................................................................................................................

18

Kapitel 7:WARTUNG UND REINIGUNG............................................................................

18

Kapitel 8:ANLEITUNG ZUR FEHLERSUCHE...................................................................

19

8.1. BEVOR SIE DEN KUNDENDIENST KONTAKTIEREN….............................................................................

19

8.2. FEHLER.........................................................................................................................................................

19

Kapitel 9:KUNDENDIENST................................................................................................

20

Sonstiges:


TÜRANSCHLAG UMKEHREN (VERSION_1).....................................................................................................

93

TÜRANSCHLAG UMKEHREN (VERSION_2).....................................................................................................

95

HINWEIS:

Die Anweisungen beziehen sich auf verschiedene Modelle, daher kann es zu Unterschieden kommen. Abschnitte, die sich nur auf bestimmte Geräte beziehen, sind mit einem Sternchen (*) markiert.

Funktionen, die sich speziell auf das von Ihnen gekaufte Produktmodell beziehen, finden Sie in der KURZANLEITUNG.

12

1.INSTALLATION

1.1.INSTALLATION EINES EINZELGERÄTS

Um eine ausreichende Belüftung sicherzustellen, muss an beiden Seiten und über dem Gerät etwas Platz gelassenwerden.

Der Abstand zwischen der Geräterückwand und der Wand hinter dem Gerät sollte mindestens 50 mm betragen.

Eine Verringerung dieses Abstands erhöht den

EnergieverbrauchdesGeräts.

1.2.INSTALLATIONVON ZWEI GERÄTEN

Bei gemeinsamer Installation von Gefrierer 1 und

Kühlschrank 2 sicherstellen, dass der Gefrierer sich auf der linken Seite und der Kühlschrank auf der rechten

Seitebefindet(sieheZeichnung).DielinkeSeitedes

Kühlschranks besitzt eine spezielle Vorrichtung, um Probleme der Kondensation zwischen den Geräten zu vermeiden.

Wir empfehlen für die Installation von zwei Geräten die

Verwendung des Verbindungskit 3 (sieheZeichnung). SiekönnenesbeimKundendienstkaufen.

1.3.TÜREN EINSTELLEN (FALLSVORHANDEN)

Um die Türen mit dem verstellbaren unteren Scharnier auszurichten (ausgewählte Modelle)

Wenn die Kühlschranktür niedriger ist als die Gefrierertür, drehen Sie die Stellschraube entgegen dem Uhrzeigersinn mit einem M10-Schlüssel und erhöhen Sie dieKühlschranktür.

Wenn die Gefrierertür niedriger ist als die Kühlschranktür, drehen Sie die Stellschraube entgegen dem Uhrzeigersinn mit einem M10-Schlüssel und erhöhen Sie dieGefrierertür.

50mm

50mm

5 ma

x


mm

13

2.FUNKTIONEN

2.1.EIN/STANDBY

Diese Funktion schaltet das Kühlfach ein oder in den

Standby-Modus.HaltenSiedieTasteEin/Standby 3 Sekunden lang gedrückt, um das Gerät in den Standby-

Moduszuschalten.ImStandby-ModusistdieLeuchte imKühlfachnichtaktiviert.BittebeachtenSie,dassdas

Gerät im Standby-Modus weiterhin mit Strom versorgt

wird.DieTasteEin/Standbydrücken, um das Gerät wiedereinzuschalten.

2.2.SMART-DISPLAY*

Mit dieser optionalen Funktion können Sie Energie sparen.BefolgenSiedieAnweisungeninder

Kurzanleitung, um die Funktion zu aktivieren / zu deaktivieren.ZweiSekundennachAktivierungdes Smart-DisplaysschaltetdasDisplayab.ZumEinstellen der Temperatur oder für andere Funktionen müssen Sie das Display durch Drücken einer beliebigen Taste wieder einschalten.

NachderAktivierungdesSmartDisplay,schaltetsich das Display mit Ausnahme der Anzeige „ Sense Fresh Control“ / „ProFresh“aus.WenndasSmart-Display aktiviert ist - zum Einstellen der Temperatur oder für andere Funktionen, müssen Sie das Display durch

DrückeneinerbeliebigenTastewiedereinschalten.

Nachetwa15SekundenohneAktivitätschaltetsich das Smart-Display wieder aus, nur die Anzeige „ Sense Fresh Control“ / „ProFresh“bleibtsichtbar.

Bei deaktivierter Funktion wird das normale Display wiederhergestellt.DasSmart-Displaywirdnacheinem Stromausfallautomatischdeaktiviert.Bittebeachten

Sie, dass diese Funktion nicht die Stromversorgung des Geräts unterbricht, sondern nur den Stromverbrauch durchdasexterneDisplayverringert.

Hinweis: Der angegebene Energieverbrauch bezieht sich aufdenBetriebmitaktiviertemSmart-Display.

2.3.6TH SENSE FRESH CONTROL /

PROFRESH

Diese Funktion ermöglicht das rasche Erreichen der optimalen Temperaturund Feuchtigkeitsbedingungen im

Gerät.FürdenkorrektenBetriebderFunktionmussdas Gebläseeingeschaltetsein.DieFunktionen„6thSense FreshControl“/„ProFresh“sindstandardmäßigaktiviert.

Die Anweisungen in der Kurzanleitung befolgen, um dieseFunktionzuaktivierenoderdeaktivieren. NacheinemStromausfalloderWechselausdem Standby-ModusindenNormalmodus,schaltetdie

Funktion „6th Sense Fresh Control“ / „ProFresh“ in die

Werkseinstellungzurück,d.h.aufaktiviert.

2.4.ALARMTÜR OFFEN

Das Alarmsymbol blinktundderAlarmtonertönt.Der

Alarm wird aktiviert, wenn die Tür länger als 2 Minuten geöffnetbleibt.SchließenSiedieTüroderdrücken

Sie die Taste Alarm stoppen , um den Alarmton auszuschalten.

2.5.URLAUB

Diese Funktion kann aktiviert werden, um den Energieverbrauch des Gerätes für die Zeit der

Abwesenheitzuverringern.

Vor der Aktivierung der Funktion müssen alle verderblichen Lebensmittel aus dem Kühlfach entfernt werden und es ist sicherzustellen, dass die Tür korrekt geschlossen ist, da der Kühlschrank eine geeignete Temperatur beibehält, um das Auftreten unangenehmer

Gerüchezuvermeiden(+12°C).

Zur Aktivierung/Deaktivierung drücken Sie die Taste

Urlaub3Sekundenlang.BeiaktivierterFunktionleuchtet das entsprechende Symbol auf und die Temperatur

des Kühlfachs wird auf einen höheren Einstellwert eingestellt (die Temperaturanzeige zeigt den neuen

Temperatureinstellwertvon+12°C).

Durch eine Änderung des Temperatureinstellwertes wird dieFunktionautomatischdeaktiviert.

Achtung:

• Nicht kompatibel mit der Funktion „Schnellkühlen“

Um optimale Leistung sicherzustellen können die Funktionen „Urlaub“ und „Schnellkühlen“ nicht gleichzeitig eingesetztwerden.AusdiesemGrundmussdie

Funktion „Schnellkühlen“ zunächst deaktiviert werden, bevor die Funktion „Urlaub“ aktiviert werden kann (und andersherum).

2.6.SCHNELLKÜHLEN

Diese Funktion sollte beim Einlagern einer größeren Lebensmittelmenge im Kühlfach verwendet werden.

Mit Hilfe der Funktion „Schnellkühlen“ kann die

KühlkapazitätimKühlfacherhöhtwerden.Umdie

Kühlkapazität zu maximieren, muss das Gebläse eingeschaltetbleiben.

Achtung:

• Nicht kompatibel mit der Funktion „Urlaub“

Um optimale Leistung sicherzustellen können die Funktionen „Urlaub“ und „Schnellkühlen“ nicht gleichzeitig eingesetztwerden.AusdiesemGrundmussdie

Funktion „Urlaub“ zunächst deaktiviert werden, bevor die Funktion „Schnellkühlen“ aktiviert werden kann (und andersherum).

*Verfügbar nur bei ausgewählten Modellen.Bitte sehen Sie in der KURZANLEITUNG, ob diese Funktion auf Ihrem Modell verfügbar ist.

14

2.7.NULL-GRAD-SCHUBLADE*

Die„Null-Grad-Schublade“wurdespezielldarauf ausgelegt, eine niedrige Temperatur und die korrekte Feuchtigkeit einzuhalten, um frische Lebensmittel länger zu konservieren (zum Beispiel Fleisch, Fisch, Obst und

Wintergemüse).

Schublade aktivieren und deaktivieren

Die Temperatur in der Schublade beträgt bei Aktivierung ca.0°.DiefolgendenFaktorensindunerlässlich,damitdie „Null-Grad-Schublade“einwandfreifunktioniert:

-Das Kühlfach muss eingeschaltet sein

-die Temperatur im Kühlfach muss zwischen +2°C und +5°C betragen

-Die Schublade muss für die Aktivierung eingesetzt sein

-Es dürfen keine Spezialfunktionen gewählt werden

(Standby,Urlaub–fallszutreffend).

Wurde eine dieser Spezialfunktionen gewählt, muss die„Null-Grad-Schublade“manuelldeaktiviertwerden; frischeSpeisenmüssenherausgenommenwerden.

Funktioniert die manuelle Deaktivierung nicht, wird die

Schubladenach8Stundenautomatischdeaktiviert.

Hinweis:

-falls sich das Symbol bei der Aktivierung der Funktion nicht einschaltet, überprüfen, dass die Schublade korrekt eingeschoben wurde; sollte die Störung weiterhin bestehen, rufen Sie den Kundendienst

-Ist die Funktion aktiviert und die Schublade geöffnet, wird das Symbol auf dem Bedienfeld möglicherweise automatischdeaktiviert.NachdemEinsetzender

Schublade wird das Symbol erneut aktiviert

-unabhängig vom Status der Funktion kann ein leichtes Geräusch zu hören sein: dies ist normal und kein Grund zurBeanstandung.

-wenn die Funktion nicht aktiviert ist, hängt die

Temperatur in der Schublade von der allgemeinen

TemperaturimKühlschrankab.

In diesem Fall empfiehlt es sich, hier Obst und Gemüse zu lagern, welches nicht kälteempfindlich ist (Beeren,

Äpfel,Aprikosen,Möhren,Spinat,Kopfsalatusw.).

Wichtig: wenn die Funktion aktiviert ist und Lebensmittel mit hohem Flüssigkeitsgehalt vorhanden sind, schlägt sich möglicherweise Kondensation auf den Ablagen nieder.SchaltenSiedieFunktionindiesemFall vorübergehendab.

2.8.GEBLÄSE

Das Gebläse sorgt für eine gleichmäßige Temperaturverteilung im Gerät und somit für eine optimaleKonservierungdesKühlgutes.Normalerweise istdasGebläseeingeschaltet.Esempfiehltsich,das

Gebläse eingeschaltet zu lassen, damit die Funktion „6th Sense Fresh Control / ProFresh“ korrekt arbeiten kann, wenn die Umgebungstemperatur über 27-28 °C liegt, wenn Wassertropfen auf den Glasablagen entdeckt werdensowieinextremfeuchterUmgebung.Bitte beachten Sie, dass das Gebläse nicht kontinuierlich arbeitet,auchwenneseingeschaltetist.Jenach

Temperatur und/oder Feuchtigkeitsgrad im Gerät schaltet dasGebläseabundzuaboderstartetneu.Esistalso völlig normal, wenn sich das Gebläse nicht bewegt, auch wenneseingeschaltetist.

Um diese Funktion zu aktivieren oder zu deaktivieren – sieheKurzanleitungimAnhang.

Achtung: Durch die Deaktivierung des Gebläses wird die Funktion 6th Sense Fresh Control / ProFresh ausgeschaltet.

Hinweis:

Den Luftansaugbereich nicht mit Lebensmitteln verdecken.

Für die richtige Leistung bei niedriger Umgebungstemperatur (kühler als 18°C) und zur Verringerung des Energieverbrauchs, das Gebläse ausschalten.

Beachten Sie zum Abschalten des Gebläses die oben genanntenSchritte.

Wenn das Gerät mit einem Gebläse ausgestattet ist, kann es mit einem antibakteriellen Filter ausgerüstetwerden.

Den Filter der Box im Gemüsefach entnehmen und in die

Gebläseabdeckungeinsetzen.

DieEinbauanleitungliegtdemFilterbei.

2.9.TEMPERATUREINSTELLUNG

InderRegelwirddiesesGerätabWerkaufdie empfohleneBetriebstemperaturvon5°Ceingestellt.Die

Innentemperatur kann folgendermaßen zwischen 8 °C und 2°C eingestellt werden:

DieTemperatur-Einstelltaste(°C)drücken.Mitjedem

Tastendruck wird die Lagertemperatur um -1 °C geändert: Der Wert wechselt zyklisch zwischen 8°C und2°C.

Hinweis: Die angezeigten Einstellwerte entsprechen der

DurchschnittstemperaturimgesamtenKühlschrank.

2.10.NO-FROST KÜHLRAUM

DasAbtauendesKühlschrankserfolgtvollautomatisch. WassertropfenaufderRückwandimKühlschrankzeigen an,dassderautomatischeAbtauvorgangläuft.Das

Tauwasser läuft automatisch durch eine Abflussöffnung in einenBehälter,indemesverdampft.

*Verfügbar nur bei ausgewählten Modellen.Bitte sehen Sie in der KURZANLEITUNG, ob diese Funktion auf Ihrem Modell verfügbar ist.

15

2.11.LED-LICHTSYSTEM*

Im Lichtsystem im Inneren des Kühlschranks werden

LED-Leuchteneingesetzt.Dieseermöglichen eine bessere Lichtausbeute bei sehr niedrigem

Energieverbrauch.FallsdasLED-Systemnicht funktioniert, kontaktieren Sie bitte den Kundendienst, um eszuersetzen.

Wichtig:

Beim Öffnen der Kühlschranktür schaltet sich die

Innenbeleuchtungein.FallsdieTürmehrals10Minuten langgeöffnetbleibt,schaltetsichdasLichtvonselbstaus.

2.12.GEMÜSEFACH MIT

FEUCHTIGKEITSREGULIERUNG*

Die Salatfächer im Kühlschrank wurden speziell dazu entworfen, Obst und Gemüse frisch und knackig zu halten.DenFeuchtigkeitsregler(PositionB)öffnen,wenn

Speisen wie Obst in einer weniger feuchten Umgebung gelagert werden sollen oder den Feuchtigkeitsregler schließen (Position A), um Speisen wie Gemüse in einer feuchterenUmgebungzulagern.

3. GEBRAUCH

3.1.AUFNAHMEKAPAZITÄT DES KÜHLSCHRANKS ERHÖHEN

Sie können die Aufnahmekapazität des Geräts durch

Herausnehmender„NULL-GRAD-SCHUBLADE“*erhöhen

Gehen Sie in diesem Fall wie folgt vor:

das Fach ausschalten

Die Schublade und die weiße Kunststoffablage unter demFachherausziehen.

Hinweis: Die obere Ablage und die Seitenstützen können nichtentferntwerden.Um

die„Null-Grad-Schublade“ wieder einzuschalten, zuerst die weiße Kunststoffablage unter dem Fach und dann die

Schubladeeinsetzen.Um den Energieverbrauch zu optimieren, wird empfohlen, die„Null-Grad-Schublade“

abzuschaltenundherauszunehmen.

3.2.HINWEISE

Blockieren Sie niemals den Luftauslass (an der

RückseiteimGerät)mitLebensmitteln.

Ist das Gefrierfach mit einer Klappe ausgestattet, kann das Lagervolumen erhöht werden, indem die Klappe herausgenommenwird.

Alle Ablageflächen und herausziehbaren Körbe lassensichherausnehmen.

Die Innentemperaturen des Geräts hängen von der

Raumtemperatur,derHäufigkeitderTüröffnungenund demGerätestandortab.BeiderTemperatureinstellung sinddieseFaktorenzuberücksichtigen.

Falls nicht anderweitig angegeben, ist das Gerätezubehör nicht zum Spülen im Geschirrspüler geeignet.

Die Funktion Smart-Display so oft wie möglich verwenden.

4.AUFBEWAHRUNGSTIPPS FÜR LEBENSMITTEL

Der Kühlschrank ist der ideale Aufbewahrungsort für Fertiggerichte, frische und konservierte Lebensmittel,

Milchprodukte,ObstundGemüsesowieGetränke.

4.1.BELÜFTUNG

Die natürliche Luftzirkulation im Kühlschrankinneren führtzuunterschiedlichenTemperaturzonen.Direkt

über dem Obstund Gemüsefach und an der

Rückwandistesamkältesten.Vornobenistesam wärmsten.

Eine unzureichende Belüftung führt zu einem erhöhten Energieverbrauch und zur Verringerung der Kühlleistung

4.2.AUFBEWAHRENVON FRISCHEN LEBENSMITTELN UND GETRÄNKEN

Wenn Sie es bevorzugen, Ihre Lebensmittel einzupacken, verwenden Sie hierfür bitte Behälter aus recyceltem Kunststoff, Metall, Aluminium und Glas sowieFrischhaltefolie.

Verwenden Sie stets verschlossene Behälter für Flüssigkeiten sowie für Lebensmittel, die zu

Geruchsbildung führen oder hierdurch verderben könnenbzw.beideneneszuGeschmacksübertragung kommenkann,oderdeckenSiedieseab.

Lebensmittel, die eine große Menge an Ethylengas abgeben und solche, die empfindlich darauf reagieren, wie Obst, Gemüse und Salat, müssen immer getrennt voneinander oder verpackt aufbewahrt werden, um die Lagerzeit nicht zu verkürzen; bewahren Sie zum Beispiel keineTomatenmitKiwioderKohlzusammenauf.

Lagern Sie Lebensmittel nicht zu nah aneinander, um ausreichendeLuftzirkulationzuermöglichen.

Verwenden Sie den Flaschenhalter (modellabhängig erhältlich), um ein Umkippen von Flaschen zu vermeiden.

Wenn Sie eine geringe Menge an Lebensmitteln im Kühlschrank aufbewahren möchten, empfehlen wir dieVerwendungderRegaleüberdemObst-und

Gemüsefach, da es sich hierbei um den kältesten

BereichimKühlschrankinnerenhandelt.

*Verfügbar nur bei ausgewählten Modellen.Bitte sehen Sie in der KURZANLEITUNG, ob diese Funktion auf Ihrem Modell verfügbar ist.

16

4.3. AUFBEWAHRUNGSORT VON FRISCHEN

LEBENSMITTELN UND GETRÄNKEN

Auf den Kühlschrankregalen: Fertiggerichte, tropische

Früchte,Käse,Aufschnitt.

ImkältestenBereich–Null-Grad-Schublade*(direkt

über dem Kältefach*): Fleisch, Fisch, Wurstwaren,

Kuchen.

ImObst-undGemüsefach:Obst,Salat,Gemüse.

In der Tür: Butter, Marmelade, eingelegtes Gemüse,

Dosen,Flaschen,Getränkekartons,Eier.

5.BETRIEBSGERÄUSCHE

Es ist normal, wenn Geräusche aus Ihrem Gerät kommen, da es mit mehreren Gebläsen und mit Motoren zur Leistungsregelung ausgestattet ist, die automatisch ausund eingeschaltet werden.

Manche der Betriebsgeräusche können folgendermaßen reduziert werden:

NivellierenSiedasGerätausundplatzierenSieesauf ebenemUntergrund.

Vermeiden Sie Kontakt zwischen Gerät und

Möbelstücken.

Möglicherweise hörbare Betriebsgeräusche:

BEISPIEL FÜR DIE ANORDNUNG DER

LEBENSMITTEL

Stellen Sie sicher, dass alle internen Komponenten korrektplatziertsind.

Stellen Sie sicher, dass Flaschen und Behälter einandernichtberühren.

Zischgeräusch beim ersten

Ein Gluckern, wenn Kältemittel in

BRRR Geräusch entsteht durch

Einschalten oder nach einer langen

die Leitungen fließt.

den laufenden Kompressor.

Betriebspause.


Ein Summen, wenn Wasserventil

Ein Knacken, wenn der

Der KLICK kommt von dem

oder Gebläse anlaufen.

Kompressor anläuft oder wenn

Thermostat, der einstellt wie oft der


fertige Eiswürfel in den Behälter

Kompressor läuft.


fallen, oder abruptes Klicken,


wenn der Kompressor einund


ausgeschaltet wird.


*Verfügbar nur bei ausgewählten Modellen.Bitte sehen Sie in der KURZANLEITUNG, ob diese Funktion auf Ihrem Modell verfügbar ist.

17

6.EMPFEHLUNGEN BEI NICHTGEBRAUCH DES GERÄTS

6.1.ABWESENHEIT / URLAUB

Bei längerer Abwesenheit empfiehlt es sich, Lebensmittel zu verbrauchen und das Gerät auszuschalten, um

Energiezusparen.

6.2.UMZUG

1.NehmenSiealleinnerenTeileheraus.

2.WickelnSiealleTeileguteinundbefestigenSiesie mit Klebeband, damit sie nicht aneinanderschlagen oderverlorengehen.

3.SchraubenSiedieeinstellbarenFüßefest,damitsie dieAuflageflächenichtberühren.

4.SchließenSiedieTür,fixierenSiesiemitKlebeband undfixierenSiedasNetzkabelebenfallsmit KlebebandamGerät.

6.3.STROMAUSFALL

RufenSiebeiStromausfallbeiIhremStromversorgeran undfragenSie,wielangederAusfallandauernwird.

Hinweis: Denken Sie daran, dass ein volles Gerät länger kaltbleibtalseinnurteilweisegefülltes.

Falls der Zustand der Lebensmittel schlecht ist, ist es besser,siezuentsorgen.

Stromausfälle bis zu 24 Stunden.

1.HaltenSiedieTürdesGerätsgeschlossen. Lebensmittelkönnensolängerkaltbleiben.

Stromausfälle über 24Stunden.

1.VersuchenSiedieamehestenverderblichen Lebensmittelaufzubrauchen.

7.WARTUNG UND REINIGUNG

ZiehenSievorReinigungs-undWartungsarbeitenden NetzsteckerdesGerätsoderunterbrechenSiedie Stromversorgung.

ReinigenSiedasGerätregelmäßigmiteinemTuchundeiner LösungauswarmemWasserundspeziellemNeutralreinigerfür Kühlschränke.VerwendenSieniemalsScheuermittel.Reinigen SieKühlschrankteileniemalsmitentflammbarenFlüssigkeiten. DieDämpfekönnenzuBrandgefahroderExplosionführen. ReinigenSiedasÄußeredesGerätsunddieTürdichtungmit einem feuchten Tuch und trocknen Sie mit einem weichen Tuch nach.

VerwendenSiekeineDampfreiniger.

Der Kondensator auf der Geräterückseite sollte regelmäßig mit einemStaubsaugergereinigtwerden.

Der Kondensator auf der Geräterückseite sollte regelmäßig mit einemStaubsaugergereinigtwerden.

Wichtig:

• Tasten und Bedienfeld dürfen nicht mit Alkohol oder alkoholischenSubstanzengereinigtwerden.VerwendenSie nureintrockenesTuch.

• Die Leitungen des Kältemittelkreislaufs befinden sich in der

NähederTauwasserschale.Siekönnensehrheißwerden. ReinigenSiesieregelmäßigmiteinemStaubsauger.

Für einen ständigen und richtigen Abfluss des Tauwassers, das Innere der Ablassöffnung auf der Kühlschrankrückwand inderNähedesObst-undGemüsefachsregelmäßigmitdem mitgeliefertenWerkzeugreinigen.

Vor dem Reinigen der „Null-Grad-Schublade“ (einschl. außen), Schublade herausnehmen und damit das Fach von der Stromversorgung trennen.

Das Fach und alle dazugehörigen Teile regelmäßig reinigen; dazu einen Lappen und warmes Wasser mit einem speziellenNeutralreinigerfürKühlschränkeverwenden(dieweißeKunststoffablageunterdemFachdarfnichtin Wassergetauchtwerden).

VerwendenSiekeineScheuermittel.

*Verfügbar nur bei ausgewählten Modellen.Bitte sehen Sie in der KURZANLEITUNG, ob diese Funktion auf Ihrem Modell verfügbar ist.

18

8.ANLEITUNG ZUR FEHLERSUCHE

8.1.BEVOR SIE DEN KUNDENDIENST KONTAKTIEREN…

Betriebsprobleme werden häufig durch Kleinigkeiten verursacht, die Sie selbst finden und ohne jegliches Werkzeug behebenkönnen.

PROBLEM

ABHILFE

Das Gerät funktioniert nicht:

• Überprüfen,obdasNetzkabelaneinefunktionierendeSteckdosemitder


korrektenSpannungangeschlossenist.


• Überprüfen Sie die Schutzeinrichtungen und Sicherungen der


StromversorgunginIhremHaus.

Es befindet sich Wasser in

• Beiwarmem,feuchtemWetteristdiesnormal.DieSchalekannsogar

der Abtauschale:

halbvollwerden.StellenSiesicher,dassdasGerätausnivelliertist,damitdas


Wassernichtüberläuft.

Die Kanten des Gehäuses

• BeiwarmemWetterundbeilaufendemKompressoristdiesnormal.

die mit der Türdichtung in


Berührung kommen, fühlen


sich warm an:


Die Beleuchtung funktioniert

• Überprüfen Sie die Schutzeinrichtungen und Sicherungen der

nicht:

StromversorgunginIhremHaus.


• Überprüfen,obdasNetzkabelaneinefunktionierendeSteckdosemitder


korrektenSpannungangeschlossenist.


• Falls die LEDs beschädigt sind, muss der Benutzer den Kundenservice


kontaktieren.DieserLampentypistnurdurchunserenKundenserviceoder


durchautorisierteHändlererhältlich.

Der Motor läuft zu stark:

• Die Motorlaufzeit hängt von verschiedenen Faktoren ab: Anzahl der


Türöffnungen, gelagerte Lebensmittelmenge, Zimmertemperatur,


Temperatureinstellungen.


• Stellen Sie sicher, dass der Kondensator (hinten am Gerät) frei von Staub


undFlusenist.


• StellenSiesicher,dassdieTürerichtigschließt.


• StellenSiesicher,dassdieTürdichtungenrichtigangebrachtsind.


• AnheißenTagensowieinwarmenRäumenläuftderMotorlänger.


• Falls die Tür längere Zeit offen stand und viele Lebensmittel eingelagert sind,


läuftderMotorlänger,umdasGeräteinnerezukühlen.

Die Temperatur im Gerät ist

• StellenSiesicher,dassdieGerätesteuerungenrichtigeingestelltsind.

zu hoch:

• Überprüfen Sie, ob sich eine große Menge an Lebensmitteln in dem Gerät


befindet.


• StellenSiesicher,dassdieTürnichtzuhäufiggeöffnetwird.


• StellenSiesicher,dassdieTürerichtigschließt.

Die Türen lassen sich nicht

• StellenSiesicher,dasskeineLebensmittelverpackungendieTürblockieren.

korrekt öffnen oder schließen:

• Stellen Sie sicher, dass interne Teile oder der automatische Eiswürfelbereiter


nichtverkehrteingesetztsind.


• StellenSiesicher,dassdieTürdichtungennichtschmutzigoderklebrigsind.


• StellenSiesicher,dassdasGerätausnivelliertist.

8.2.FEHLER

Im Falle eines Betriebsalarms wird dieser in der LED-Segmentanzeige angegeben (z. B. Fehler 1, Fehler 2 usw...).

Kontaktieren Sie den Kundenservice und geben Sie den Alarmcode an. Der Alarmton ertönt, das Alarmsymbol

leuchtet auf und der Buchstabe F blinkt entsprechend der folgenden Fehlercodes:

Fehlercode

Anzeige


Fehler 2

Buchstabe F blinkt alle 0,5 Sek. Er leuchtet zweimal auf


und bleibt dann 5 Sekunden lang aus. Dies wiederholt sich.

x2


Fehler 3

Buchstabe F blinkt alle 0,5 Sek. Er leuchtet dreimal auf


und bleibt dann 5 Sekunden lang aus. Dies wiederholt sich.

x3


Fehler 6

Buchstabe F blinkt alle 0,5 Sek. Er leuchtet sechsmal auf


und bleibt dann 5 Sekunden lang aus. Dies wiederholt sich.

x6


*Verfügbar nur bei ausgewählten Modellen.Bitte sehen Sie in der KURZANLEITUNG, ob diese Funktion auf Ihrem Modell verfügbar ist.

19

9. KUNDENDIENST

Bevor sie sich an den Kundenservice wenden:

Das Gerät aus und wieder einschalten, um festzustellen, ob die Störung behoben ist.Falls nicht, trennen Sie das Gerät von der Stromversorgung und warten Sie etwa eine halbe Stunde, bevor Sie es wieder einschalten.

Falls die Störung nach den vorstehend beschriebenen Kontrollen weiter besteht, wenden Sie sich bitte an den

Kundendienst und erläutern Sie Ihr Problem.

Sie benötigen dabei folgenden Angaben:

Gerätetyp und Modellnummer (auf dem Typenschild);

Eine kurze Beschreibung der Störung;

Die Servicenummer (die Zahl nach dem Wort

SERVICE auf demTypenschild in dem Gerät).

Ihre vollständige Anschrift,

IhreTelefonnummer undVorwahl.

Hinweis:

Die Öffnungsrichtung derTür kann umgestellt werden.

Falls dieser Vorgang durch den Kundenservice durchgeführt wird, ist er nicht durch die Garantie abgedeckt.

20

INDEX


Chapitre 1 : INSTALLATION..............................................................................................

22

1.1. INSTALLATION D’UN SEUL APPAREIL.......................................................................................................

22

1.2. INSTALLATION DE DEUX APPAREILS........................................................................................................

22

1.3. CHARNIÈRES AJUSTABLES


(SELON LE MODÈLE).........................................................................................................................................

22

Chapitre 2 : FONCTIONS...................................................................................................

23

2.1. MARCHE/VEILLE .........................................................................................................................................

23

2.2. ÉCRAN INTELLIGENT*................................................................................................................................

23

2.3. CONTRÔLE DE FRAÎCHEUR 6TH SENSE / FRAÎCHEUR PRO.................................................................

23

2.4. ALARME PORTE OUVERTE.........................................................................................................................

23

2.5.VACANCES....................................................................................................................................................

23

2.6. REFROIDISSEMENT RAPIDE .....................................................................................................................

23

2.7. BAC ZÉRO DEGRÉ* .....................................................................................................................................

24

2.8.VENTILATEUR...............................................................................................................................................

24

2.9. RÉGLAGE DE LA TEMPÉRATURE..............................................................................................................

24

2.10. COMPARTIMENT RÉFRIGÉRATEUR « NO-FROST »...............................................................................

24

2.11. SYSTÈME D’ÉCLAIRAGE A DEL*..............................................................................................................

25

2.12 BAC À HUMIDITÉ CONTRÔLÉE*................................................................................................................

25

Chapitre 3 : UTILISATION..................................................................................................

25

3.1. COMMENT AUGMENTER LA CAPACITÉ DE STOCKAGE DU RÉFRIGÉRATEUR....................................

25

3.2. REMARQUES................................................................................................................................................

25

Chapitre 4 : CONSEILS POUR LA CONSERVATION DES ALIMENTS............................

25

4.1. AÉRATION.....................................................................................................................................................

25

4.2. COMMENT CONSERVER LES ALIMENTS FRAIS ET LES BOISSONS.....................................................

25

4.3. OÙ CONSERVER LES ALIMENTS FRAIS ET LES BOISSONS..................................................................

26

Chapitre 5 : SONS FONCTIONNELS................................................................................

26

Chapitre 6 : RECOMMANDATION EN CAS DE NON-UTILISATION DE L’APPAREIL.....

27

6.1. ABSENCE/VACANCES.................................................................................................................................

27

6.2. DÉMÉNAGEMENT........................................................................................................................................

27

6.3. COUPURE DE COURANT.............................................................................................................................

27

Chapitre 7 : NETTOYAGE ET ENTRETIEN........................................................................

27

Chapitre 8 : GUIDE DE DÉPANNAGE...............................................................................

28

8.1. AVANT DE CONTACTER LE SERVICE APRÈS-VENTE..............................................................................

28

8.2. ANOMALIES..................................................................................................................................................

28

Chapitre 9 : SERVICE APRÈS-VENTE..............................................................................

29

Autres :


INVERSER L'OUVERTURE DE LA PORTE (VERSION_1).................................................................................

93

INVERSER L'OUVERTURE DE LA PORTE (VERSION_2).................................................................................

95

REMARQUE :


Ces instructions s'appliquent à plusieurs modèles. Elles peuvent par conséquent différer.


Les sections ne concernant que certains modèles sont indiquées par un astérisque (*).


Consultez le GUIDE DE DÉMARRAGE pour connaître les fonctions propres au modèle de l'appareil que


vous venez d'acquérir.


21

1. INSTALLATION

1.1. INSTALLATION D'UN SEUL APPAREIL

Afin de garantir une aération adéquate, laissez un espace des deux côtés et au-dessus de l'appareil.

La distance entre l'arrière de l'appareil et le mur derrière l'appareil doit être d'au moins 50 mm.

Une réduction de l'espace recommandé entraîne une augmentation de la consommation d'énergie.

1.2. INSTALLATION DE DEUX APPAREILS

Durant l'installation du congélateur 1 et du

réfrigérateur 2 , assurez-vous que le congélateur est placé à gauche et le réfrigérateur à droite (comme illustré sur l'image).Sur le côté gauche du réfrigérateur se trouve un dispositif spécial permettant d'éviter les problèmes de condensation entre les appareils.

Nous vous recommandons d'installer les deux

appareils ensemble à l'aide de la trousse d'attaches 3

(comme illustré sur l'image).

Vous pouvez acquérir ce kit auprès du Service Après-

Vente.

1.3. CHARNIÈRES AJUSTABLES (SELON LE MODÈLE)

Pour niveler les portes à l'aide d'une charnière inférieure ajustable (selon le modèle)

Si la porte du réfrigérateur est plus basse que la porte du congélateur, soulevez la porte du réfrigérateur en tournant la vis ajustable dans le sens antihoraire en utilisant une clé M10.

Si la porte du congélateur est plus basse que la porte du réfrigérateur, soulevez la porte du congélateur en tournant la vis ajustable dans le sens antihoraire en utilisant une clé M10.

50mm

50mm

5 ma

x


mm

22

2. FONCTIONS

2.1. MARCHE/VEILLE

Cette fonction permet de mettre le réfrigérateur en mode Marche/Veille.Pour mettre l'appareil en mode

Veille, appuyez sur la touche Marche/Veille pendant

3 secondes.Lorsque l'appareil est en modeVeille, l'éclairage intérieur du compartiment réfrigérateur ne fonctionne pas.Il est bon de rappeler que cette opération ne coupe pas l'alimentation électrique au

niveau de l'appareil.Pour rallumer l'appareil, appuyez simplement sur la touche Marche/Veille .

2.2. ÉCRAN INTELLIGENT*

Cette fonction optionnelle peut être utilisée pour réaliser des économies d'énergie.Suivez les instructions du Guide de démarrage pour activer/ désactiver cette fonction.L'affichage s'éteint deux secondes après l'activation de la fonction Écran intelligent.Pour régler la température ou utiliser d'autres fonctions, il est nécessaire d'activer l'affichage en appuyant sur une touche quelconque.

Après avoir allumé l'Écran intelligent, l'écran s'éteint, à l'exception du voyant « Contrôle de fraîcheur Sense » / « Fraîcheur Pro ».Si l'Écran intelligent estactivé : pour régler la température ou utiliser d'autres fonctions, il est nécessaire d'activer l'affichage en appuyant sur une touche quelconque.

Après environ 15 secondes d'inaction, l'écran s'éteint de nouveau et seul les voyants « Contrôle de fraîcheur Sense » / « Fraîcheur Pro » demeurent visibles.

Dès que cette fonction est désactivée, l'affichage normal est rétabli.La fonction Écran intelligent est automatiquement désactivée après une panne de courant.N'oubliez pas que cette fonction ne coupe pas l'alimentation électrique au niveau de l'appareil, mais réduit uniquement l'énergie consommée par l'affichage externe.

Remarque : la consommation d'énergie déclarée fait référence au fonctionnement de l'appareil lorsque la fonction Écran intelligent est activée.

2.3. CONTRÔLE DE FRAÎCHEUR 6TH SENSE /

FRAÎCHEUR PRO

Cette fonction permet d'atteindre rapidement des conditions de conservation optimales (en termes de température et d'humidité) à l'intérieur de l'appareil.

Pour que cette fonction soit pleinement efficace, il est nécessaire d'activer également le ventilateur.Le

«Contrôle de fraîcheur 6th Sense » / « Fraîcheur Pro » s'active automatiquement.Voir le Guide de démarrage rapide pour activer ou désactiver cette fonction.

Après une panne de courant, ou lorsque vous passez du mode Veille au mode normal, la condition du

« Contrôle de fraîcheur 6th Sense » / « Fraîcheur Pro » est réinitialisée au réglage par défaut, p.ex.active.

2.4. ALARME PORTE OUVERTE

L'icône Alarme clignote et le signal sonore se déclenche.L'alarme se déclenche si la porte reste ouverte pendant plus de 2 minutes.Pour désactiver l'alarme de la porte, fermez la porte ou appuyez une fois sur la touche Arrêt d'alarme pour éteindre l'alarme sonore.

2.5.VACANCES

Vous pouvez activer cette fonction afin de réduire la consommation d'énergie de l'appareil lorsque vous vous absentez.

Avant l'activation de la fonction, retirez tous les aliments périssables du compartiment réfrigérateur et assurez-vous que la porte est fermée correctement, puisque le réfrigérateur maintiendra une température appropriée pour empêcher l'apparition d'odeurs désagréables (+12 °C).

Pour activer/désactiver cette fonction, appuyez sur la touche du modeVacances pendant 3 secondes.

Lorsque la fonction est activée, le symbole correspondant s'allume et la température du compartiment réfrigérateur sera réglée sur un point de réglage supérieur (l'affichage de température indique le nouveau point de réglage de température de +12 °C).

Le changement du point de consigne de la température désactive automatiquement la fonction.

Important :

• Incompatibilité avec la fonction « Refroidissement rapide »

Pour garantir des performances optimales, il est impossible d'utiliser simultanément les fonctions

«Vacances » et « Refroidissement rapide ».Par conséquent, si vous avez déjà activé la fonction

«Refroidissement rapide », vous devez la désactiver avant d'utiliser la fonction «Vacances » (et vice versa).

2.6. REFROIDISSEMENT RAPIDE

L'utilisation de cette fonction est recommandée lorsque vous placez une très grande quantité d'aliments dans le compartiment du réfrigérateur.

La fonction Refroidissement rapide permet d'augmenter la capacité de refroidissement

dans le compartiment réfrigérateur.Pour maximiser la capacité de refroidissement, laissez le ventilateur en marche.

Important :

• Incompatibilité avec la fonction « Vacances »

Pour garantir des performances optimales, il est impossible d'utiliser simultanément les fonctions

«Vacances » et « Refroidissement rapide ».Par conséquent, si vous avez déjà activé la fonction

«Vacances », vous devez la désactiver avant d'utiliser la fonction « Refroidissement rapide » (et vice versa).

*Disponiblesurcertainsmodèlesuniquement.ConsultezleGUIDEDEDÉMARRAGEpoursavoirsivotremodèleestdotédecettefonction.

23

2.7. BAC ZÉRO DEGRÉ*

Le bac zéro degré est spécifiquement conçu pour maintenir une température faible et un taux d'humidité optimal afin de conserver les aliments plus longtemps, notamment la viande, le poisson, ainsi que les fruits et les légumes d'hiver.

Activation et désactivation du bac

Lorsque le bac est activé, la température interne est d'environ 0 °C.Il est essentiel de respecter les points suivants pour assurer le fonctionnement optimal du « Zéro degré » :

-le compartiment réfrigérateur doit être allumé

-la température du compartiment réfrigérateur doit être entre +2°C et +5°C ;

-le bac doit être inséré avant d'activer cette fonction

-Aucune fonction spéciale (Veille,Vacances, etc.) ne doit avoir été sélectionnée.

Si l'une de ces fonctions spéciales a été sélectionnée, vous devez désactiver manuellement le bac « Zéro degré » et retirer les aliments frais qu'il contient.Si vous ne désactivez pas le bac manuellement, il sera désactivé automatiquement au bout de 8 heures.

Remarque :

-si le symbole ne s'illumine pas lorsque la fonction est activée, assurez-vous que le bac est bien inséré ;

Si le problème persiste, contactez un Service Aprèsvente agréé

-si la fonction est activée alors que le bac est ouvert, le symbole sur le panneau de commande peut s'éteindre automatiquement.Le symbole réapparaît dès que le bac est inséré

-sans tenir compte de la condition de la fonction, vous pourriez entendre un faible bruit : cela est tout à fait normal et n'indique aucun dysfonctionnement.

-lorsque la fonction n'est pas active, la température à l'intérieur du bac dépend de la température à l'intérieur du réfrigérateur.

Dans ce cas, nous vous recommandons d'utiliser le bac pour y stocker des fruits et des légumes qui ne sont pas sensibles aux basses températures (fruits des bois, pommes, abricots, carottes, épinards, laitue, etc.).

Important : si la fonction est activée et si des aliments à haute teneur en eau sont présents, de la condensation pourrait se former sur les clayettes.Dans ce cas, désactivez temporairement la fonction.

2.8.VENTILATEUR

Le ventilateur assure une diffusion homogène de la température à l'intérieur du produit, garantissant ainsi unemeilleureconservationdesaliments.Leventilateur estactivépardéfaut.Ilestrecommandédenepas désactiver le ventilateur afin que la fonction Contrôle de fraîcheur 6th Sense / Fraîcheur Pro puisse fonctionner adéquatement, lorsque la température ambiante dépasse les 27 à 28 °C, si des gouttes d'eau sont présentes sur les tablettes en verre, ou encore si le taux d'humidité est particulièrementélevé.Ilconvientdenoterque,mêmes'il estactivé,leventilateurnefonctionnepasencontinu.Il s'activera ou se désactivera en fonction de la température et/ouduniveaud'humiditéàl'intérieurdel'appareil.Par conséquent, il est normal que le ventilateur ne tourne pas mêmes'ilestactivé.

Pour activer ou désactiver cette fonction, reportez-vous au Guide de démarrage fourni.

Important : éteindre le ventilateur désactive la fonction

Contrôle de fraîcheur 6th Sense / Fraîcheur Pro.

Remarque :

Évitez d'obstruer les zones d'arrivée d'air avec des aliments.

Afin d'optimiser la consommation d'énergie et de garantir de bonnes performances de l'appareil, veillez à éteindre le ventilateur lorsque la température ambiante est inférieure à 18 °C.

Pour éteindre le ventilateur, suivez la procédure décrite ci-dessus.

Si votre appareil est équipé d'un ventilateur, celui-ci peut être doté d'un filtre antibactérien.

Sortez le filtre de la boîte située dans le bac à fruits et légumes et introduisez-le dans le couvercle du ventilateur.

Les instructions de remplacement se trouvent dans la boîte du filtre.

2.9. RÉGLAGE DE LA TEMPÉRATURE

L'appareil est normalement réglé en usine pour fonctionner à la température recommandée de 5 °C.Il est possible de régler la température intérieure entre 2°C et 8°C en procédant comme suit :

Appuyez sur la touche de réglage de la température

(°C).Chaque pression permet de modifier la température de stockage de -1 °C : la valeur change de manière cyclique entre 8 °C et 2 °C.

Remarque : ‎Les valeurs affichées correspondent à la température moyenne dans tout le réfrigérateur.

2.10. COMPARTIMENT RÉFRIGÉRATEUR « NOFROST »

Le dégivrage du compartiment réfrigérateur est entièrement automatique.

La présence périodique de gouttelettes d'eau sur la paroi arrière du compartiment réfrigérateur indique qu'un dégivrage automatique est en cours.L'eau de dégivrage est automatiquement acheminée jusqu'à un orifice d'évacuation, puis est recueillie dans un récipient avant de s'évaporer.

*Disponiblesurcertainsmodèlesuniquement.ConsultezleGUIDEDEDÉMARRAGEpoursavoirsivotremodèleestdotédecettefonction.

24

2.11.SYSTÈMED’ÉCLAIRAGEADEL*

Le système d'éclairage à l'intérieur du compartiment réfrigérateur comporte des ampoules à LED, ce qui permet un meilleur

éclairage,ainsiqu'uneconsommationd'énergieplusfaible.Sile système d'éclairage DEL ne fonctionne pas, contactez le Service

Après-ventepourleremplacer.

Important :

L'éclairage du compartiment réfrigérateur s'allume à l'ouverture de laporte.Silaporteestlaisséeouvertependantplusde10minutes, l'ampoules'éteintautomatiquement.

2.12BACÀHUMIDITÉCONTRÔLÉE*

Les bacs à salade installé dans le réfrigérateur sont spécialement conçuspourgarderlesfruitsetlégumesfraisetcroquants.Ouvrez le régulateur d'humidité (position B) si vous désirez conserver des alimentsdansunenvironnementmoinshumide(p.ex.desfruits), ou fermez-le (position A) pour conserver les aliments dans un environnementplushumide(p.ex.deslégumes).

3.UTILISATION

3.1.COMMENTAUGMENTERLACAPACITÉDESTOCKAGE

DU RÉFRIGÉRATEUR

Vous pouvez augmenter la capacité de stockage en retirant le

«BACZÉRODEGRÉ»*

Dans ce cas, procédez comme suit :

éteignez le bac

retirezlebacetlatabletteenplastiqueblancsituéesouslebac.

Remarque : vous pouvez retirer la clayette supérieure et le support latéral.Pourremettreenplace

le « Bac zéro degré », veillez à replacer la clayette en plastique blanc sous le compartiment avant d'insérer le bac et de réactiver la fonction.Pouroptimiserla consommation d'énergie, nous vous recommandons de désactiver le « Bac zéro degré»etdelaretirer.

3.2.REMARQUES

N'obstruezpaslessortiesd'air(surlaparoiarrière,àl'intérieur del'appareil)avecdesaliments.

Si le congélateur dispose d'un rabat, vous pouvez maximiser le volumedeconservationenleretirant.

Toutes les tablettes, les rabats, et les paniers coulissants sont amovibles.

La température intérieure de l'appareil est affectée par la température ambiante, la fréquence d'ouverture des portes, et l'endroitoùl'appareilestinstallé.Leréglagedelatempérature doittoujoursprendrecesfacteursencompte.

À moins d’indication contraire, les accessoires de l'appareil ne peuventpasêtrelavésaulave-vaisselle.

UtilisezlafonctionÉcranintelligentaussisouventquepossible.

4.CONSEILSPOURLACONSERVATIONDES ALIMENTS

Le réfrigérateur constitue le lieu de stockage idéal pour les plats préparés, les aliments frais et en conserve, les produits laitiers, les fruitsetlégumesetlesboissons.

4.1.AÉRATION

La circulation naturelle de l'air dans le compartiment réfrigérateur produit des zones avec des températures différentes.Lazonelaplusfroidesetrouvejusteaudessus du bac à fruits et légumes et au niveau de

laparoiarrière.Lazonelapluschaudesetrouveau niveausupérieuravantducompartiment.

Une mauvaise aération conduit à une augmentation de la consommation d'énergie et une réduction des performancesduréfrigération.

4.2.COMMENTCONSERVERLESALIMENTSFRAISETLES

BOISSONS

Utilisez des récipients recyclables en plastique, en métal, en aluminium, ou en verre, ou une pellicule autocollante pour envelopperlesaliments.

Utilisez toujours des récipients fermés pour les liquides et les aliments qui dégagent ou absorbent des odeurs ou des saveurs,ourecouvrez-les.

Les aliments qui laissent échapper une grande quantité de gaz éthylène, et ceux qui sont sensibles à ce gaz, comme les fruits, les légumes, et la salade, doivent toujours être séparés ou enveloppés de façon à ne pas réduire la durée de

conservation ;par exemple, n'entreposez pas les tomates avec leskiwisouleschoux.

Neplacezpaslesalimentstropprèslesunsdesautresafinde permettreunebonnecirculationd'air.

Pour éviter que les bouteilles ne tombent, vous pouvez utiliser leporte-bouteilles(disponiblesurcertainsmodèles).

Si vous avez une petite quantité de nourriture à conserver dans le réfrigérateur, nous vous conseillons d'utiliser les tablettes situées au-dessus du bac à fruits et légumes;cette zone est la plusfroideducompartiment.

*Disponiblesurcertainsmodèlesuniquement.ConsultezleGUIDEDEDÉMARRAGEpoursavoirsivotremodèleestdotédecettefonction.

25

4.3. OÙ CONSERVER LES ALIMENTS FRAIS ET

EXEMPLE DE DISPOSITION DES ALIMENTS

LES BOISSONS


Sur les tablettes du réfrigérateur : plats préparés, fruits tropicaux, fromages, charcuterie.

Dans la zone la plus froide - le bac Zéro degré* (situé au-dessus du compartiment de refroidissement*) : viande, poisson, morceaux froids, gâteaux.

Dans le bac à fruits et légumes : fruits, salade, légumes.

Dans la porte : beurre, confitures, sauces, cornichons, conserves, bouteilles, boissons en brique, œufs.

5. SONS FONCTIONNELS

Les bruits provenant de votre appareil sont tout à fait normaux. Votre appareil est en effet doté de ventilateurs et de moteurs qui contrôlent automatiquement la mise sous et hors tension.

Pour réduire certains bruits de fonctionnement, vous pouvez

Nivelez l'appareil et installez-le sur une surface plane.

Éviter le contact entre l'appareil et les meubles adjacents.

Assurez-vous que les accessoires internes sont correctement installés.

Assurez-vous que les bouteilles et les récipients ne s'entrechoquent pas.

Votre appareil peut émettre les bruits de fonctionnement suivants :

Un sifflement la première fois que

Un gargouillement quand le fluide

vous mettez l'appareil en marche

réfrigérant s'écoule dans les

ou après une interruption de

tuyaux.

fonctionnement prolongée.


Un grondement qui correspond au fonctionnement du compresseur.

Un bourdonnement lorsque le robinet d'eau ou le ventilateur se met en marche.

Un craquement au démarrage du

Le CLIC vient du thermostat

compresseur ou lorsque la glace

qui ajuste la fréquence de

s’apprête à tomber dans le bac à

fonctionnement du compresseur.

glaçons, et un clic soudain lorsque


le compresseur démarre ou arrête.


*Disponible sur certains modèles uniquement.Consultez le GUIDE DE DÉMARRAGE pour savoir si votre modèle est doté de cette fonction.

26

6. RECOMMANDATION EN CAS DE NON-UTILISATION DE L'APPAREIL

6.1. ABSENCE/VACANCES

Si vous partez en vacances, nous vous recommandons de consommer les aliments stockés et de débrancher l'appareil pour économiser de l'énergie.

6.2. DÉMÉNAGEMENT

1.Retirez les pièces internes.

2.Emballez-les soigneusement et fixez-les entre elles avec du ruban adhésif afin de ne pas les perdre et d'éviter qu'elles ne s'entrechoquent.

3.Vissez les pieds réglables de façon à ce qu'ils ne touchent pas la surface de support.

4.Fermez et fixez la porte avec du ruban adhésif et fixez le câble d'alimentation à l'appareil, également avec du ruban adhésif.

6.3. COUPURE DE COURANT

Dans le cas d'une coupure de courant, contactez votre compagnie électrique pour savoir combien de temps va durer la panne.

Remarque : A noter qu'un appareil plein restera froid plus longtemps qu'un appareil à moitié plein.

Si les aliments se sont décongelés, il est préférable de les jeter.

Coupures de courant allant jusqu'à 24 heures.

1.Maintenez la porte de l'appareil fermée.Cela permettra de garder au froid les aliments stockés le plus longtemps possible.

Coupures de courant supérieures à 24 heures.

1.Essayez de consommer en premier les denrées périssables.

7. NETTOYAGE ET ENTRETIEN

Avant d'effectuer les opérations d'entretien ou de nettoyage, débranchez l'appareil de la fiche d'alimentation secteur ou coupez l'alimentation électrique.

Nettoyezrégulièrementl'appareilavecunchiffonetunesolution d'eau tiède et de détergent neutre spécifique au nettoyage

desparoisinternesduréfrigérateur.N'utilisezjamaisd'agents abrasifs.Nenettoyezjamaislesaccessoiresduréfrigérateur avecdesliquidesinflammables.Lesémanationspeuvent provoquerunincendieouuneexplosion.Nettoyezlesparois externes de l'appareil et le joint de porte avec un chiffon humide etséchez-lesavecunchiffondoux.

N'utilisez pas de nettoyeur à vapeur.

Le condensateur situé à l'arrière de l'appareil doit être nettoyé régulièrement avec un aspirateur.

Le condensateur situé à l'arrière de l'appareil doit être nettoyé régulièrement avec un aspirateur.

Important :

Les touches et l'écran du panneau de commande doivent être nettoyées avec un chiffon sec ; n'utilisez pas d'alcool

ou des substances dérivées de l'alcool.

• Les tuyaux du circuit de réfrigération sont situés près du bac de dégivrage et peuvent être chaud au touché. Nettoyez-les régulièrement avec un aspirateur.

Pour assurer une évacuation constante et correcte de l'eau de dégivrage, nettoyez régulièrement l'intérieur de l'orifice d'évacuation situé sur la paroi arrière du compartiment réfrigérateur, à proximité du bac à fruits et légumes, à l'aide de l'outil fourni avec l'appareil.

Avant de nettoyer le « Bac zéro degré » (et notamment les parois externes), retirez-le de façon à le déconnecter de l'alimentation électrique.

Nettoyez le bac et tous ses composants régulièrement à l'aide d'un chiffon et d'une solution à base d'eau tiède et de détergent neutre spécifique pour le nettoyage des parois internes du réfrigérateur (veillez à ne pas immerger dans l'eau la clayette en plastique blanc située sous le bac).

N'utilisez jamais de détergents abrasifs.

*Disponiblesurcertainsmodèlesuniquement.ConsultezleGUIDEDEDÉMARRAGEpoursavoirsivotremodèleestdotédecettefonction.

27

8. GUIDE DE DÉPANNAGE

8.1. AVANT DE CONTACTER LE SERVICE APRÈS-VENTE...

Certains dysfonctionnements sont souvent dus à des problèmes mineurs que vous pouvez identifier et résoudre vous-même sans aucun outil.

PROBLÈME

SOLUTION

L'appareil ne fonctionne pas :

• Le réfrigérateur est-il branché à une prise qui fonctionne avec la bonne tension ?


• Avez-vous vérifié les dispositifs de protection et fusibles du système électrique de


votre maison ?

Si le bac de dégivrage contient de

• Celaestnormalpartempschaudethumide.Ilestmêmepossiblequelebac

l'eau :

soitàmoitiéplein.Vérifiezquel'appareilestdeniveaudefaçonàcequel'eaune


débordepas.

Si les bords de l'appareil qui sont

• Celaestnormalpartempschaudetlorsquelecompresseurfonctionne.

en contact avec le joint de porte


sont chauds au toucher :


Si l'éclairage intérieur ne

• Avez-vous vérifié les dispositifs de protection et les fusibles de l'alimentation

fonctionne pas :

électrique de la maison ?


• Le réfrigérateur est-il branché à une prise qui fonctionne avec la bonne tension ?


• Si les DEL sont brisés, l'utilisateur doit appeler le Service Après-vente pour


l'échanger avec un DEL du même type, disponible uniquement auprès de nos


centresdeServicesAprès-venteoudétaillantsautorisés.

Si le moteur semble tourner en

• La durée de fonctionnement du moteur dépend de plusieurs facteurs : fréquence

surrégime :

d'ouverture de la porte, quantité d'aliments stockés, température de la pièce,


réglagesdetempérature.


• Y a-t-il de la poussière ou des peluches sur le condenseur (arrière de l'appareil)?


• La porte est-elle bien fermée ?


• Les joints de la porte sont-ils bien étanches ?


• Par temps chaud ou dans une pièce chaude, le moteur fonctionne naturellement


pluslongtemps.


• Si la porte est restée longtemps ouverte ou si vous avez inséré une grande quantité


d'aliments dans l'appareil, le moteur fonctionnera plus longtemps afin de refroidir


l'intérieurducompartiment.

Si la température de l'appareil est

• Le réfrigérateur est-il bien réglé ?

trop élevée :

• Une grande quantité d'aliments a-t-elle été insérée dans le réfrigérateur ou le


congélateur ?


• Assurez-vousquelaporten'estpasouvertetropsouvent.


• Assurez-vousquelaportesefermecorrectement.

Si les portes ne s'ouvrent et ne se

• Assurez-vousquelesemballagesdenourrituresnebloquentpaslaporte.

ferment pas correctement :

• Assurez-vous que les pièces internes ou la machine à glaçons automatique sont


bienenplace.


• Assurez-vousquelesjointsdelaportenesontpassalesoucollants.


• Assurez-vousquel'appareilestauniveau.

8.2. ANOMALIES


En cas de dysfonctionnement, une alarme se déclenche et le message/symbole correspondant apparaît sur l'affichage à DEL (p. ex. : Anomalie 1, Anomalie 2, etc.). Dans ce cas, contactez le Service Après-Vente et

spécifiez le code d'alarme. Une alarme sonore se déclenche, l'icône Alarme


s'illumine et la lettre F clignote


sur l'écran numérique en fonction du code d'anomalie décrit ci-dessous :


Code d'anomalie

Affichage


Erreur 2

LalettreFclignoteà0,5seconded'intervalle.Clignote2fois,


puisresteéteintependant5secondes.Cetteséquenceserépète.

x2


Erreur 3

LalettreFclignoteà0,5seconded'intervalle.Elleclignote3fois,


puisresteéteintependant5secondes.Cetteséquenceserépète.

x3


Erreur 6

LalettreFclignoteà0,5seconded'intervalle.Elleclignote6fois,


puisresteéteintependant5secondes.Cetteséquenceserépète.

x6


*Disponiblesurcertainsmodèlesuniquement.ConsultezleGUIDEDEDÉMARRAGEpoursavoirsivotremodèleestdotédecettefonction.

28

9. SERVICE APRÈS-VENTE

Avant de contacter le Service après-vente :

Remettez l'appareil en marche pour vous assurer que l'inconvénient a été éliminé.Si ce n'est pas le cas, débranchez l'appareil de l'alimentation électrique et patientez environ une heure avant de le rallumer.

Si, après avoir procédé aux vérifications décrites dans le Guide de dépannage et après avoir remis l'appareil sous tension, ce dernier ne fonctionne toujours pas correctement, contactez le Service Après-Vente pour expliquer le problème.

Précisez :

le modèle et le numéro de série de l'appareil (figurant sur la plaque signalétique),

le type de panne ,

le numéro de série (numéro qui se trouve après le mot SERVICE sur la plaque signalétique placée à l'intérieur de l'appareil),

votre adresse complète,

votre numéro de téléphone avec l'indicatif régional.

Remarque :

Le sens d'ouverture des portes peut être modifié.

Si cette opération est effectuée par le Service Après-

Vente, elle n'est pas couverte par la garantie.

29

INDICE


Capitolo 1: INSTALLAZIONE.............................................................................................

31

1.1. INSTALLAZIONE DELL’APPARECCHIO SINGOLO.....................................................................................

31

1.2. INSTALLAZIONE DI DUE APPARECCHI.....................................................................................................

31

1.3. REGOLAZIONE DELLE PORTE (SE DISPONIBILE)...................................................................................

31

Capitolo 2: FUNZIONI........................................................................................................

32

2.1. ON/STANDBY ...............................................................................................................................................

32

2.2. SMART DISPLAY*.........................................................................................................................................

32

2.3. 6TH SENSE FRESH CONTROL / PROFRESH.............................................................................................

32

2.4. ALLARME PORTA APERTA..........................................................................................................................

32

2.5.VACANZA ......................................................................................................................................................

32

2.6. RAFFREDDAMENTO RAPIDO ....................................................................................................................

32

2.7. CASSETTO ZERO GRADI* ..........................................................................................................................

33

2.8.VENTOLA.......................................................................................................................................................

33

2.9. IMPOSTAZIONE DELLA TEMPERATURA....................................................................................................

33

2.10. COMPARTO FRIGORIFERO NO-FROST...................................................................................................

33

2.11. SISTEMA DI ILLUMINAZIONE A LED*......................................................................................................

34

2.12. CASSETTO A UMIDITÀ CONTROLLATA*..................................................................................................

34

Capitolo 3: IMPIEGO CONSIGLIATO................................................................................

34

3.1. AUMENTO DELLA CAPACITÀ DI CONSERVAZIONE DEL FRIGORIFERO...............................................

34

3.2. NOTE:.............................................................................................................................................................

34

Capitolo 4: CONSIGLI SULLA CONSERVAZIONE DEGLI ALIMENTI.............................

34

4.1.VENTILAZIONE.............................................................................................................................................

34

4.2. MODALITÀ DI CONSERVAZIONE DI ALIMENTI FRESCHI E BEVANDE...................................................

34

4.3. DOVE CONSERVARE ALIMENTI FRESCHI E BEVANDE...........................................................................

35

Capitolo 5: SEGNALI ACUSTICI FUNZIONALI.................................................................

35

Capitolo 6: RACCOMANDAZIONE IN CASO DI NON UTILIZZO DELL’APPARECCHIO.36

6.1. ASSENZA / VACANZA..................................................................................................................................

36

6.2. SPOSTAMENTO............................................................................................................................................

36

6.3. GUASTO DELL’ALIMENTAZIONE ELETTRICA............................................................................................

36

Capitolo 7: MANUTENZIONE E PULIZIA..........................................................................

36

Capitolo 8: GUIDA ALLA RICERCA GUASTI....................................................................

37

8.1. PRIMA DI CONTATTARE IL SERVIZIO ASSISTENZA.................................................................................

37

8.2. GUASTI..........................................................................................................................................................

37

Capitolo 9: SERVIZIO ASSISTENZA.................................................................................

38

Altro:


INVERSIONE DELLA PORTA (VERSIONE 1).....................................................................................................

93

INVERSIONE DELLA PORTA (VERSIONE 2).....................................................................................................

95

NOTA:


Le istruzioni sono valide per diversi modelli, si potrebbero quindi notare alcune differenze.


Le sezioni valide solo per determinati apparecchi sono contrassegnate con un asterisco (*).


Le funzioni dedicate appositamente al modello acquistato sono disponibili nella GUIDA RAPIDA


INTRODUTTIVA.


30

Loading...
+ 70 hidden pages