

Whirlpool RT18HK User Manual
UseAndCare
A Note To You
lFSE:BfefY
Parts And Features
E;ttcg Your
Using Your
Refrigerator
Caa;~rr
Food Storage Guide 16
If Yqu Need
i!irii!Gz
2
3
4
5
7
14
18
Warranty
WOO-&ROPER
Cdl us with questions of comments.
1
NO-FROST REFRIGERATOR-FREEZER
A
MODEL RT18HK
20
1
+-73
A Note To You
Thank you for buying a Roper appliance.
You have purchased a quality, worldclass home appliance. Years of engineering experience have gone
into its manufacturing. To ensure that you will enjoy many years of trouble-free operation, we have
developed this Use and Care Guide. lt is full of valuable information on how to operate and maintain
your appliance properly and safety. Please read it carefully. Also, please complete and mail the Ownership Registration Card provided with your appliance. This will help us notify you about any new information on your appliance.
Your safety is important to us.
This guide contains safety symbols and statements. Please pay special attention to these symbols and
follow any instructions given. Here is a brief explanation of the use of each symbol.
This symbol will help alert you to such dangers as
personal injury, burns, fire and electrical shock.
This symbol will help you avoid actions which
could cause product damage (scratches, dents,
etc.) and damage to your personal property.
Our toll-free number, l-80044-ROPER (l-800447-67371, is
available 24 hours a day.
If you ever have a question concerning your appliance’s operation, or if you need service, first see “If
You Need Assistance Or Service” on page 18. If you need further help, feel free to call us. When calling,
you will need to know your appliance’s complete model number and serial number. You can find this
information on the model and serial number label (see diagrams on page 4). For your convenience, we
have included a handy place below for you to record these numbers, the purchase date from the sales
slip and your dealer’s name and telephone number. Keep this book and the sales slip together in a safe
place for future reference.
Model Number
Serial Number
Purchase Date
baler Name
Dealer Phone
Important Safety Instructions
To reduce the risk of fire, electrical shock, or injury when using your
refrigerator, follow these basic precautions:
l
l
Read all instructions before using the
refrigerator.
l
Child entrapment and suffocation are not
problems of the past. Junked or abandoned
refrigerators are still dangerous . . . even if
they will “just sit in the garage a few days.”
If you are getting rid of your old refrigerator,
do it safely. Please read the enclosed safety
booMet from the Association of Home
Appliance Manufacturers. Help prevent
accidents.
Never allow children to operate, play with, or
crawl inside the refrigerator.
l
Never clean refrigerator parts with flammable
fluids. The fumes can create a fire hazard or
explosion.
. FOR YOUR SAFETY
l
DO NOT STORE OR USE GASOLINE OR
OTHER FLAMMABLE VAPORS AND LIQUIDS
IN THE VICINITY OF THIS OR ANY OTHER
APPLIANCE. THE FUMES CAN CREATE A
FIRE HAZARD OR EXPLOSION.
i
- SAVE THESE INSTRUCTIONS -
Help us help you
Please:
l
Install and level the refrigerator on a floor that
will hold the weight and in an area suitable for
its size and use.
l
Do not install the refrigerator near an oven,
radiator or other heat source.
l
Do not use the refrigerator in an area where the
room temperature will fall below 55’F (13°C).
l
Keep the refrigerator out of the weather.
l
Connect the refrigerator only to the proper kind
of outlet, with the correct electrical supply and
grounding. (Refer to the Electrical Requirements and Grounding Instructions Sheet.)
l
Do not load the refrigerator with food before it
has time to get properly cold.
l
Use the refrigerator only for the uses described
in this manual.
l
Properly maintain the refrigerator.
l
Be sure the refrigerator is not used by anyone
unable to operate it properly.
Also, remove tape and any inside labels (except
the model and serial number label) before using
the refrigerator.
To remove any remaining glue:
l
Rub briskly with thumb to make a ball, then
remove.
OR
l
Soak area with liquid hand dishwashing
detergent before removing glue as described
above. Do not use sharp instruments, rubbing
alcohol, flammable fluids or abrasive cleaners.
These can damage the material. See “Impor-
tant Safety Instructions” above.
NOTE: Do not remove any permanent instruction
labels inside your refrigerator. Do not remove the
Tech Sheet fastened under the refrigerator at the
front.
3
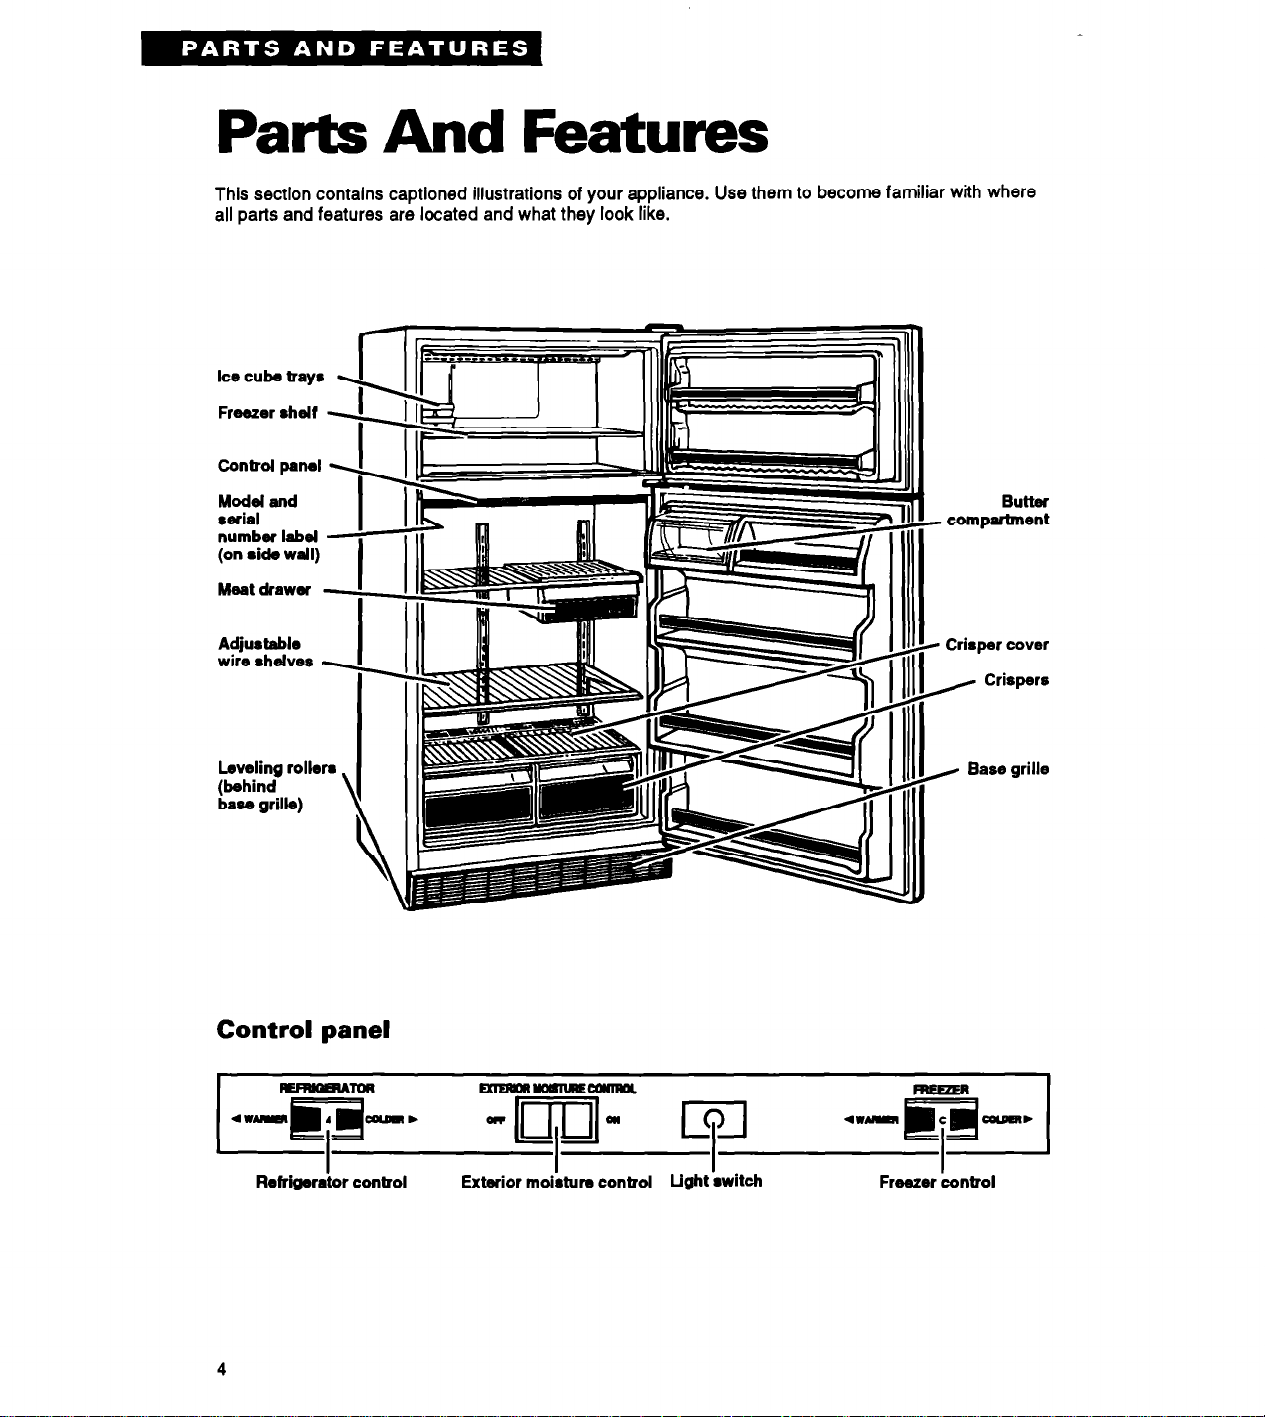
Parts And Features
This section contains captioned illustrations of your appliance. Use them to become familiar with where
all parts and features are located and what they look like.
Ice cubs tray
Freezer shell
Conlrol pana
Modd and
8eriel
number labd
(on side wdl
Meat drawer
Adjustable
wire shelves
Leveling rolls
(behind
base grille)
Control panel
- comparbnent
Butter
- Crisper cover
, Crispers
I Base grille
a
Relrigerator control
4
Exterior moisture control
Light switch
Freezer control
Before Using Your
Refrigerator
In This Section
Cleming it . . . . . . . . . . . . . . . . . . . . . . . . . . . . . . . . . . . . . . . . . . . . . . . . . . . . . . . . . . . 5
Plugging it in
It is important to prepare your refrigerator for use. This section will tell you how to clean it, connect it to
a power source, install it and level it.
. . . . . . . . . . . . . . . . . . . . . . . . . . . . . . . . . . . . . . . . . . . . . . . . . . . . . . .
Paw
5
Inotalling it properly
Leveling it
. . . . . . . . . . . . . . . . . . . . . . . . . . . . . . . . . . . . . .
. . . . . . . . . . . . . . . . . . . . . . . . . . . . . . . . . . . . . . . .
Paw
. . . . . . . . . . . . . . . . . . .
5
6
Cleaning it
Clean your refrigerator before using it, if necessary. See cleaning instructions on page
14.
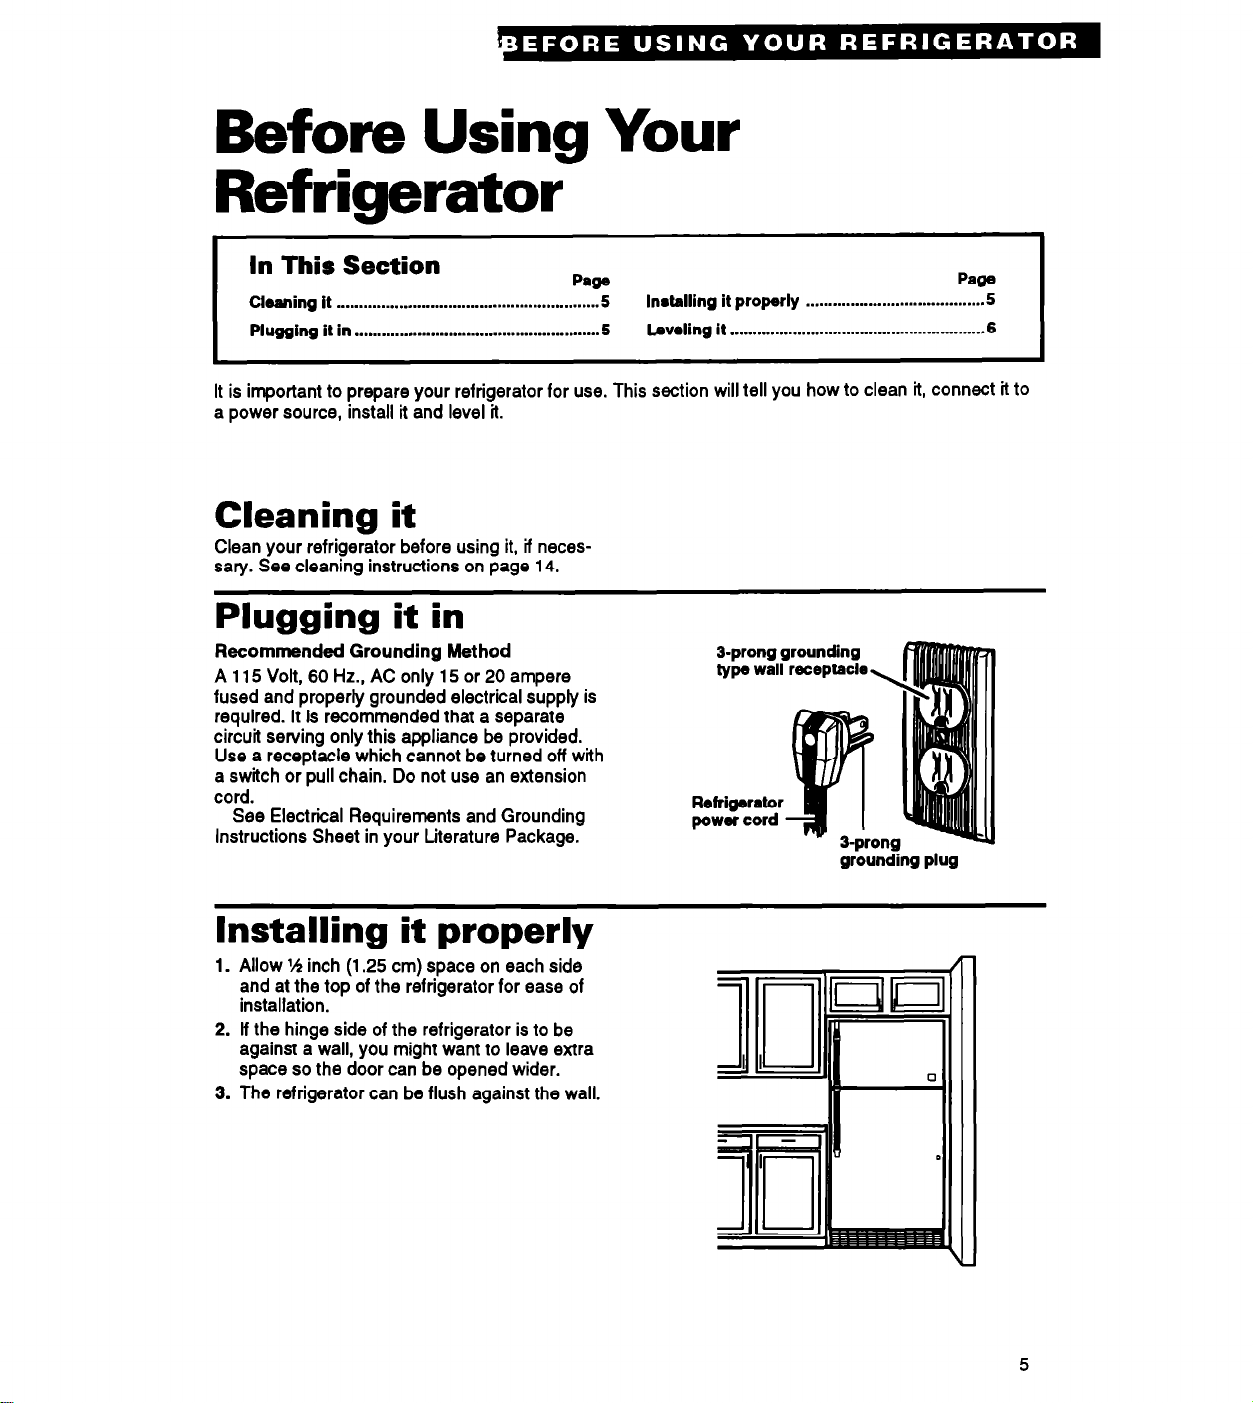
Plugging it in
Recommended Grounding Method
A 115 Volt,
fused and property grounded electrical supply is
required. It is recommended that a separate
circuit serving only this appliance be provided.
Use a receptacle which cannot be turned off with
a switch or pull chain. Do not use an extension
cord.
See Electrical Requirements and Grounding
Instructions Sheet in your Literature Package.
60
Hz., AC only 15 or 20 ampere
&prong grounding
type wall receptacle
Refrigerator
power cord
grounding plug
Installing it properly
1. Allow W inch (1.25 cm) space on each side
and at the top of the refrigerator for ease of
installation.
2. lf the hinge side of the refrigerator is to be
against a wall, you might want to leave extra
space so the door can be opened wider.
3. The refrigerator can be flush against the wall.
5
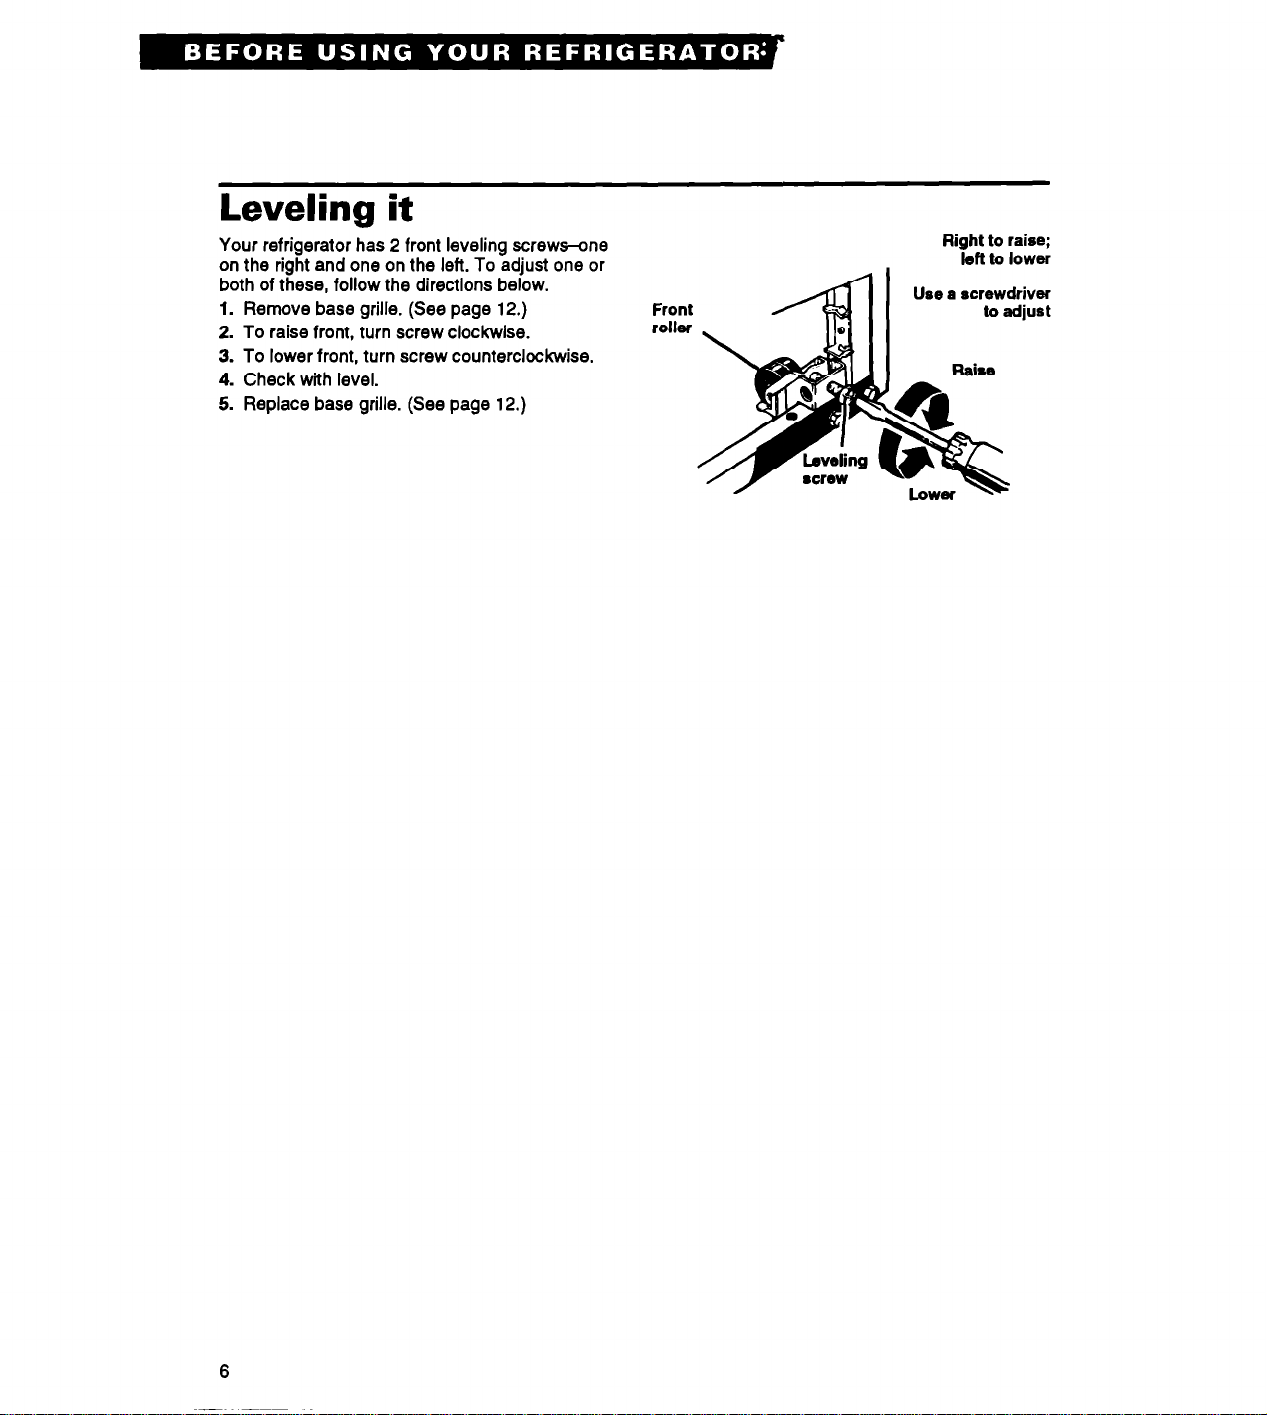
Leveling it
Your refrigerator has 2 front leveling screws-one
on the right and one on the left. To adjust one or
both of these, follow the directions below.
1.
Remove base grille. (See page 12.)
2. To raise front, turn screw clockwise.
3. To lower front, turn screw counterclockwise.
4.
Check with level.
5. Replace base grille. (See page 12.)
Right to raise;
left to lower
Use a screwdriver
Front
r0lh
6
 Loading...