

Whirlpool RT14DK, RTl8BM, RT2OCK, RTZOAK, RT14DM User Manual
...
No-Frost
Refrigerator-Freezer
Useand
CareGuide
ROPERw
EbmeAppliancer
RTl4CK RT18BK
RT14DK RTl8BM
RT14DM RT18DK
RT16DK RTZOAK
RT18AK RT2OCK
Thank you for choosing a
Roper Appliance.
This Use and Care
operate and maintain your new, qualitybuilt Roper refrigerator-freezer. Keep
this Use and Care Guide in a safe place
for future reference.
Guide
will help you
Complete and mail the
Product Registration Card.
This card enters your warranty into our
warranty system that ensures efficient
claim processing, can be used as a proof
of purchase for insurance claims and
helps Roper to contact you immediately
in the unlikely event of a product-safety
recall.
NOTE: Because this Use and Care Guide
covers several models, not all features
discussed will apply to your specific
model.
It is your responsibility
It is your responsibility to be sure your
refrigerator:
n
Has been properly installed and
leveled according to the installation
instructions given on page 2.
1 Is installed on a floor that can
support the weight of the
refrigerator.
. Is properly connected to a
grounded electrical circuit that
meets the electrical requirements
on page 2.
n
Is properly used only for the job it
was designed to do.
n
Is not used by children or anyone
unable to operate it properly.
n
Is cold in both the refrigerator and
freezer sections before food is
added.
n
Is properly maintained.
n
Is not loaded with food before it
has time to get properly cold.
Contents
Important Sefety Insauct.ions
Before Using Your
Party and
RT14DK end
RTl4CK
RTIGDK and RTlODK
RT18AK. RTlOBK and RT18BMp
RTZOCK
RTZOAK
Using Your Refriuerator
Set&g the controls
Changing control settings
Exterior moisture control
Adjusting refrigerator shelves Removing meat drawer and
Removing crispxs and crisper wver-$
Remoeg freezer shelf
Automatic ice maker
Changing the light bulb(s)
Food
Cleaning Your Refrigerator
Caring
If electricity goes off
Vacation and moving guide
Energy saving
Reversing the door swing
Before You Call For Service
WEUTa.llty
How to get seivicc or
Features
Storage Guide
For
Reklgerator-
RT14DM
cover -
Your Refrigerator
tips
atisistanCe
Page
~
ii
:i
::
:;
;
:
i
4
z
6
6
t
t
3
7
:
9

Important Safety Instructions
To reduce the risk of fire, electrical shock, or iujury when using your refrigerator-freezer,
follow basic precautions including the following:
1. Read all operating instructions
before using your refrigeratorfreezer.
2. Child entrapment and suffocations
are not problems of the past. Junked
or abandoned refrigerators are still
dangerous . . .
even if they will “just
sit in the garage for a few days.”
If you are getting rid of your old
refrigerator, do it safely. Please read
the enclosed safety booklet from the
Association of Home Appliance
Manufacturers. Help prevent
accidents.
3. Never allow children to operate,
play with, or crawl inside the
refrigerator.
. SAVE THESE INSTRUCTIONS .
Before Using Your Refrigerator
A. Remove labels
Remove the tape and any inside labels
before using the refrigerator. To remove
any remaining glue:
n
Rub briskly with thumb to make a
ball, then remove.
OR
. Soak area with liquid hand
dishwashing detergent before
removing glue as described above.
Do not use sharp instruments, rubbing
alcohol, flammable fluids or abrasive
cleaners. These can damage the
material. See “Important Safety
Instructions” above.
NOTE:
Do not remove the Tech Sheet
located on the bottom of the refrigerator.
B. Clean it
Clean your refrigerator before using it.
See cleaning instructions on page 9.
C. Plug it in
Recommended Grounding Method
A 115 Volt, 60 Hz., AC only 15 or 20
ampere fused and properly grounded
electrical supply is required. It is
recommended that a separate circuit
serving only this appliance be provided.
Use a receptacle which cannot be turned
off with a switch or pull chain. Do not
use an extension cord.
See Electrical Requirements and
Grounding Instruction Sheet in literature
package for complete details.
D. Install properly
Install the refrigerator according to the
dimensions shown below.
Leave extra space along the hinge-side
wall to allow the door to be opened
wider.
Do not install the refrigerator:
. next to an oven, radiator or other
heat source;
m out in the weather or direct
sunlight;
n
in an area where the room
temperature will fall below 55°F
(13OC).
3 in. (7.5
cabinets and top of refrigerator.
zII3m
‘rn[.
l/2 in. (1.25 cm) on each side of the
retigerator for
1 in. (2.5 cm) min. between rekigerator
condenser coils and the wall.
(Models RT2OCK and RT2OAK can be flush
against back wall.)
cm) min. between overhead
I I
\ Al
II
\
easier installation.
4. Never clean refrigerator parts with
flammable fluids. The fumes can
create a fire hazard or explosion.
. FOR YOUR SAFETY.
DO NOT STORK OR USE GASOLINE
OR OTHER
AND LIQUIDS IN THE VICINITY OF
THIS OR ANY OTHER APPLIANCE.
THE FUMES CAN CREATE A FIRE
HAZARD OR EXPLOSION.
FLAMMARLEVAPORS
E. Level refrigerator-freezer
Follow the leveling instructions for
your refrigerator model. Make sure
the refrigerator is level for efficient
operation.
Models RTl4DK, RT14DM, RTl4CK
and RTlGDK
(RT14DK and RT14DM do not have
rollers.)
1. Two threaded leveling legs are
secured into the base of the
refrigerator. Remove the legs and
insert them into the holes at the
bottom front comers of the
refrigerator. Carefully roll or slide
the refrigerator into place.
2.
Turn legs to the left until rollers are
completely off the floor.
3. Adjust each leg so that refrigerator
does not rock.
4. Place a level on top of the
refrigerator-first side to side, then
front to back. Turn leg clockwise to
/
raise the front of the refrigerator.
Turn leg counterclockwise to lower
the front of the refrigerator.
5. Check the levelness again and
repeat step 4 until the refrigerator
is level.
Page 2

Parts and Features
Models RT18AK, RTlIBM, RT18BK,
RTl8DK
Use screwdriver
toadjust ,I
FUght to rake;
left to lower
1. Place a level on top of the
refrigerator-first side to side, then
front to back. Turn each leveling
screw clockwise to raise the front
of the refrigerator. Turn each
leveling screw counterclockwise to
lower the front of the refrigerator.
2. Check the levelness again and
repeat step 1 until the refrigerator
is level.
Models RTZOCK, RTZOAK
Use
screwdriver
Front roller
Leveling screw
Models RT14DK and RT14DM (shown)
Automatic
ice maker fRTl4DM)
bR
Ice cube trays
(RTl4DK)
Model and
Serial
number
label -
Light -
EXtdOI
Reezer
control
Lev
WI
/
Juice can
-rack
y nest
,wmpart-
- shelves
ywver
,Crlspers
QJfJ
Butter
ment
Adjustable
Mmr
1. Remove base grille. (See page 7.)
2. Place a level on top of the
refrigerator-first side to side, then
front to back. Turn each leveling
screw clockwise to raise the front
of the refrigerator. Turn each
leveling screw counterclockwise to
lower the front of the refrigerator.
3. Check the levelness again and
repeat step 2 until the refrigerator
is level.
4. Replace base grille. (See page 7.)
Model RT14CK
Icecube
trays \
Refrigerator
EI’,‘d\
serial number
label-
Ltght-
FZXtari0r
moisture
control /
Freezer
COIltrOl
Leveling leg
and roller
/
\
--lil Ill I
Juice can
rack
Frwzer shelf
Page 3
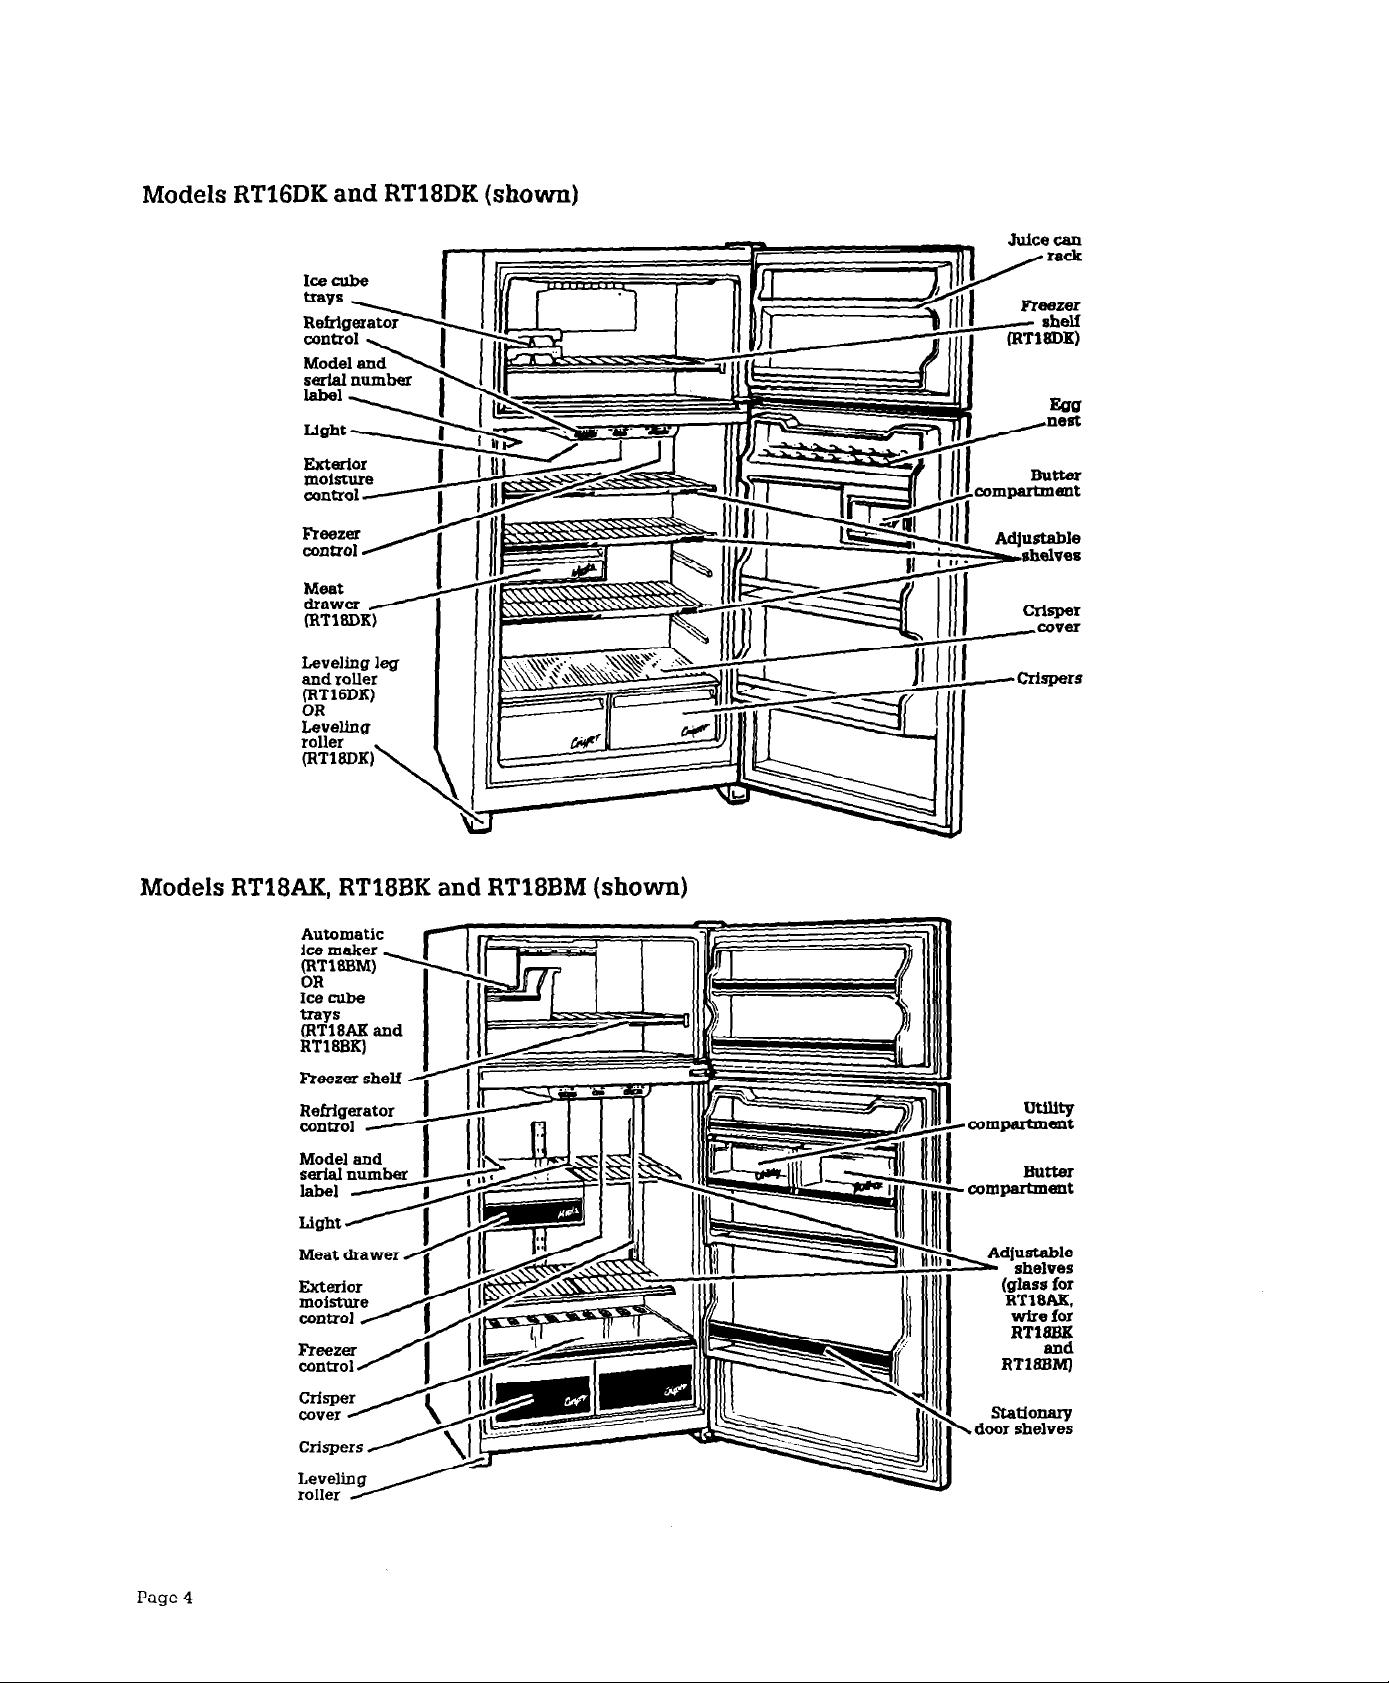
Models RT16DK and RT18DK (shown)
Fxterior
moisture
control Y
Meat
drawer /
(RT16DK)
gy;~ut3$7
(RTIGDK)
Ereling
roller
(RTISDK)
\
IllI/--
h
JI I III
. .
crm-
COVeT
Crispers
Models RT18AK, RT18BK and RT18BM (shown)
Aufomatic
ice maker N
g;l=W
ICecube
Qws
(RTlIAK and
RTlSBK)
Freezer shelf
Refrigerator
control Model and
seria.lllumhel
label -
Light A
Meat drawer
Exterior
z.lzwT0
Freezer
/
control
Crisper
cover y
Crispers /
. compartment
N door shelves
Butter
RTlG
St&iOll2U-y
Page 4
 Loading...