

Whirlpool RM988PXL User Manual
01 304NCH FREE-STANDING EYE-LEVEL
MICROWAVE RANGE
Model RM988PXL
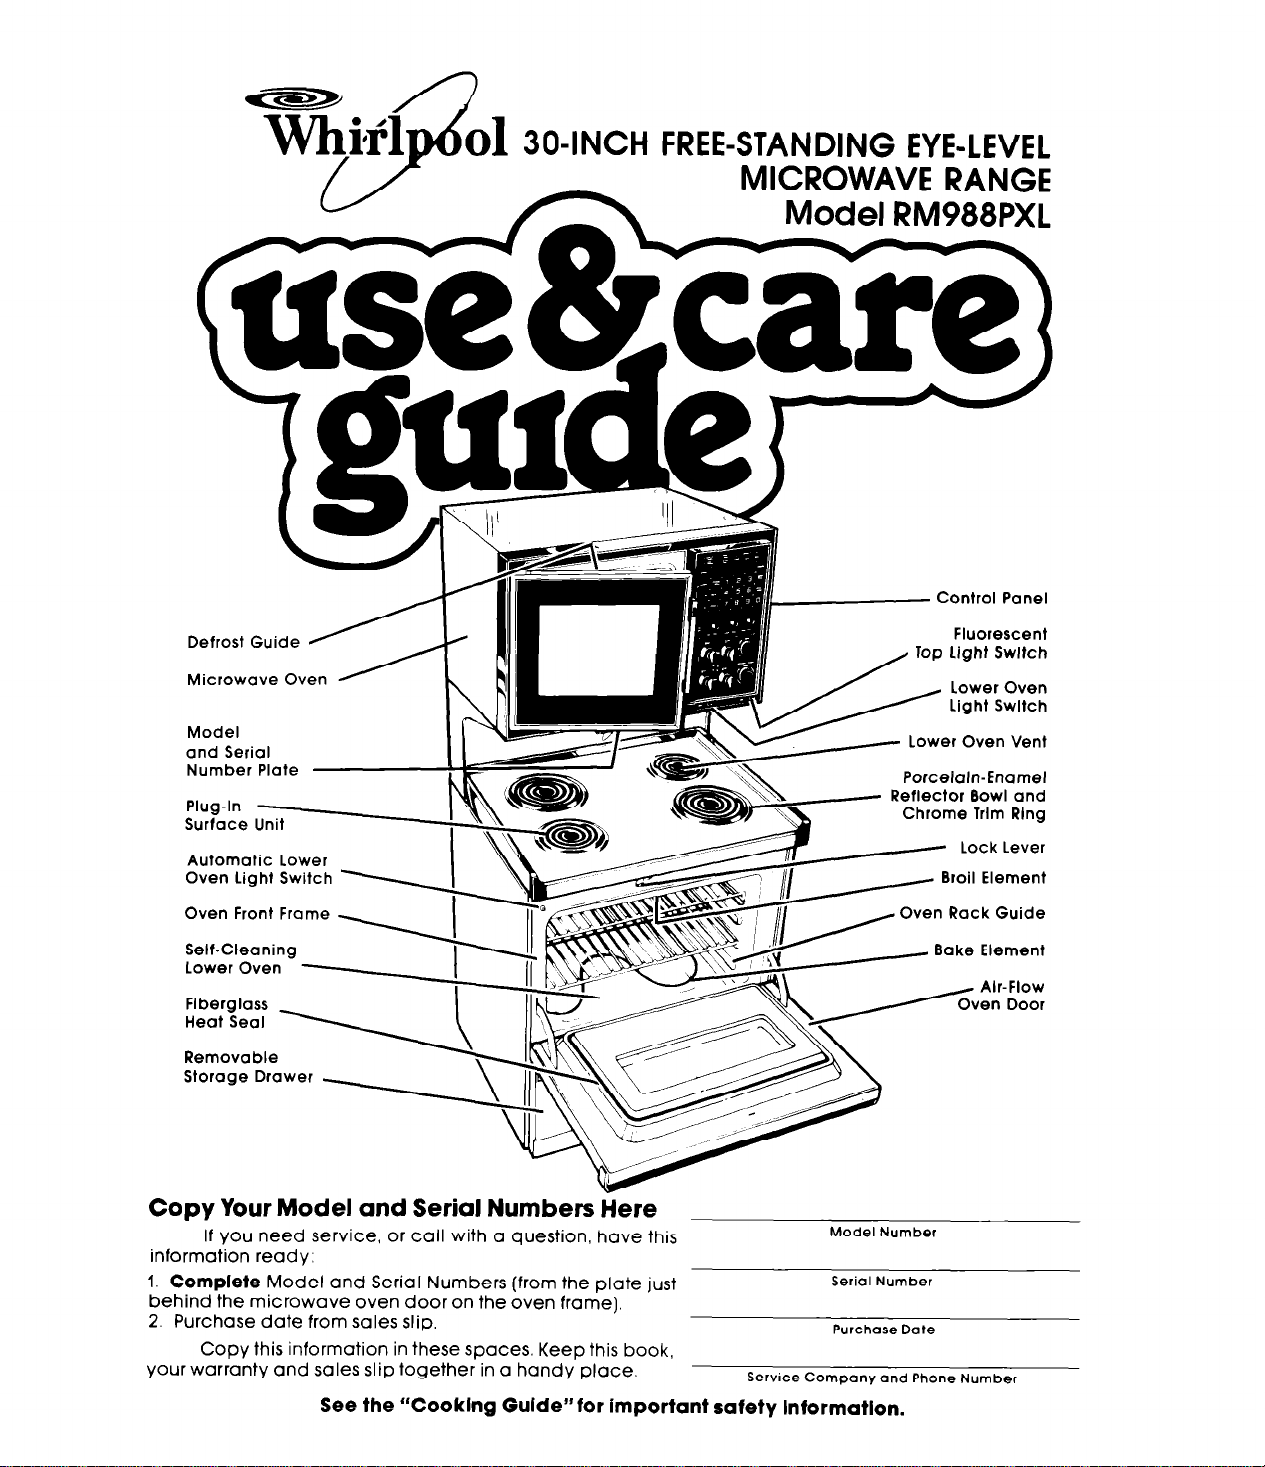
I//- Control Panel
Defrost Guide
Microwave Oven
Model
and Serial
Number Plate
Oven Front Frame
Removable
Storage Drawer
Copy Your Model and Serial Numbers Here
If you need service, or call with a question, have this
information ready:
1. Complete Model and Serial Numbers (from the plate just
behind the microwave oven door on the oven frame).
2. Purchase date from sales slip.
Copy this information in these spaces. Keep this book,
your warranty and sales slip together in a handy place.
See the “Cooklng Guide” for important safety Information.
Fluorescent
Top light Switch
/
Porcelain-Enamel
Reflector Bowl and
Chrome Trlm Rlng
Broil Element
Model Number
Serial Number
Purchase Date
Service Compony and Phone Number
Your respons2biNes.. .
Proper installation and safe use of your microwave range are your
personal responsibilities. Read this”Use and Care Guide”and the
“Cooking Guide”carefully for important use and safety information.
Installation
You must be sure your range is...
l
l
installed and leveled on a floor
that will hold the weight;
l
installed in a well-ventilated
area protected from the
weather;
Proper use
You must be sure your range is...
l
used only for jobs expected
of home ranges;
l
used only by people who can
operate it properly;
l
properly maintained.
properly connected to the cor-
rect electric supply and
grounding. (See “Installation
Instructions.“)
Contents
Responsibilities 2
Installation 2
Proper Use
Safety ..~.......~
Precautions to Avoid Possible Exposure
to Excessive Microwave Energy
Using the Microwave Upper Oven
Setting the Clock
Using the Minute Timer
Cooking in One Cycle
Defrosting
Cooking in Two Cycles
Cooking Automatically after
Defrosting
Cooking to a Serving Time
Cooking with the Temperature Probe 16
Bi-Level Oven Rack
Changing or Cancelling Instructions 19
Other Operating Hints
Cleaning the Microwave Oven
Important Information
How Microwave Ovens Work 22
The Microwave Oven Light 22
Uslng Your Cooktop and lower Oven
Surface Unit Controls
The Lower Oven Controls 24
Page
IO
12
14
18
19
19
20
23
23
The Oven Selector
The Oven Temperature Control 24
2
3
4
4
5
6
7
9
Baking or Roasting
Adjusting the Oven Temperature
Control .........................
Using the Automatic MEALTIMER
Clock ...........................
Broiling ...........................
Broiling Chart
The Cooktop Light
The Lower Oven Light
The Oven Vent ......................
Optlonal Accessories
Rotisserie ..........................
Canning Kit .........................
Cleaning and Caring for Your Range
Control Panel and Knobs
Surface Units and Reflector Bowls
Storage Drawer .....................
The Lower Oven Self-Cleaning Cycle 33
Cleaning Chart
If You Need Service or Assistance
I. Before Calling for Assistance
2. If You Need Assistance
3. If You Need Service
4. If You Have a Problem
................. 24
................ 24
................... 27
................... 28
................ 29
................. 29
............ 30
.....................
........... 37
.............. 38
............ 38
Poge
25
26
27
29
29
29
30
.... 30
32
36
37
...... 37
3
Using the fniaowave upper
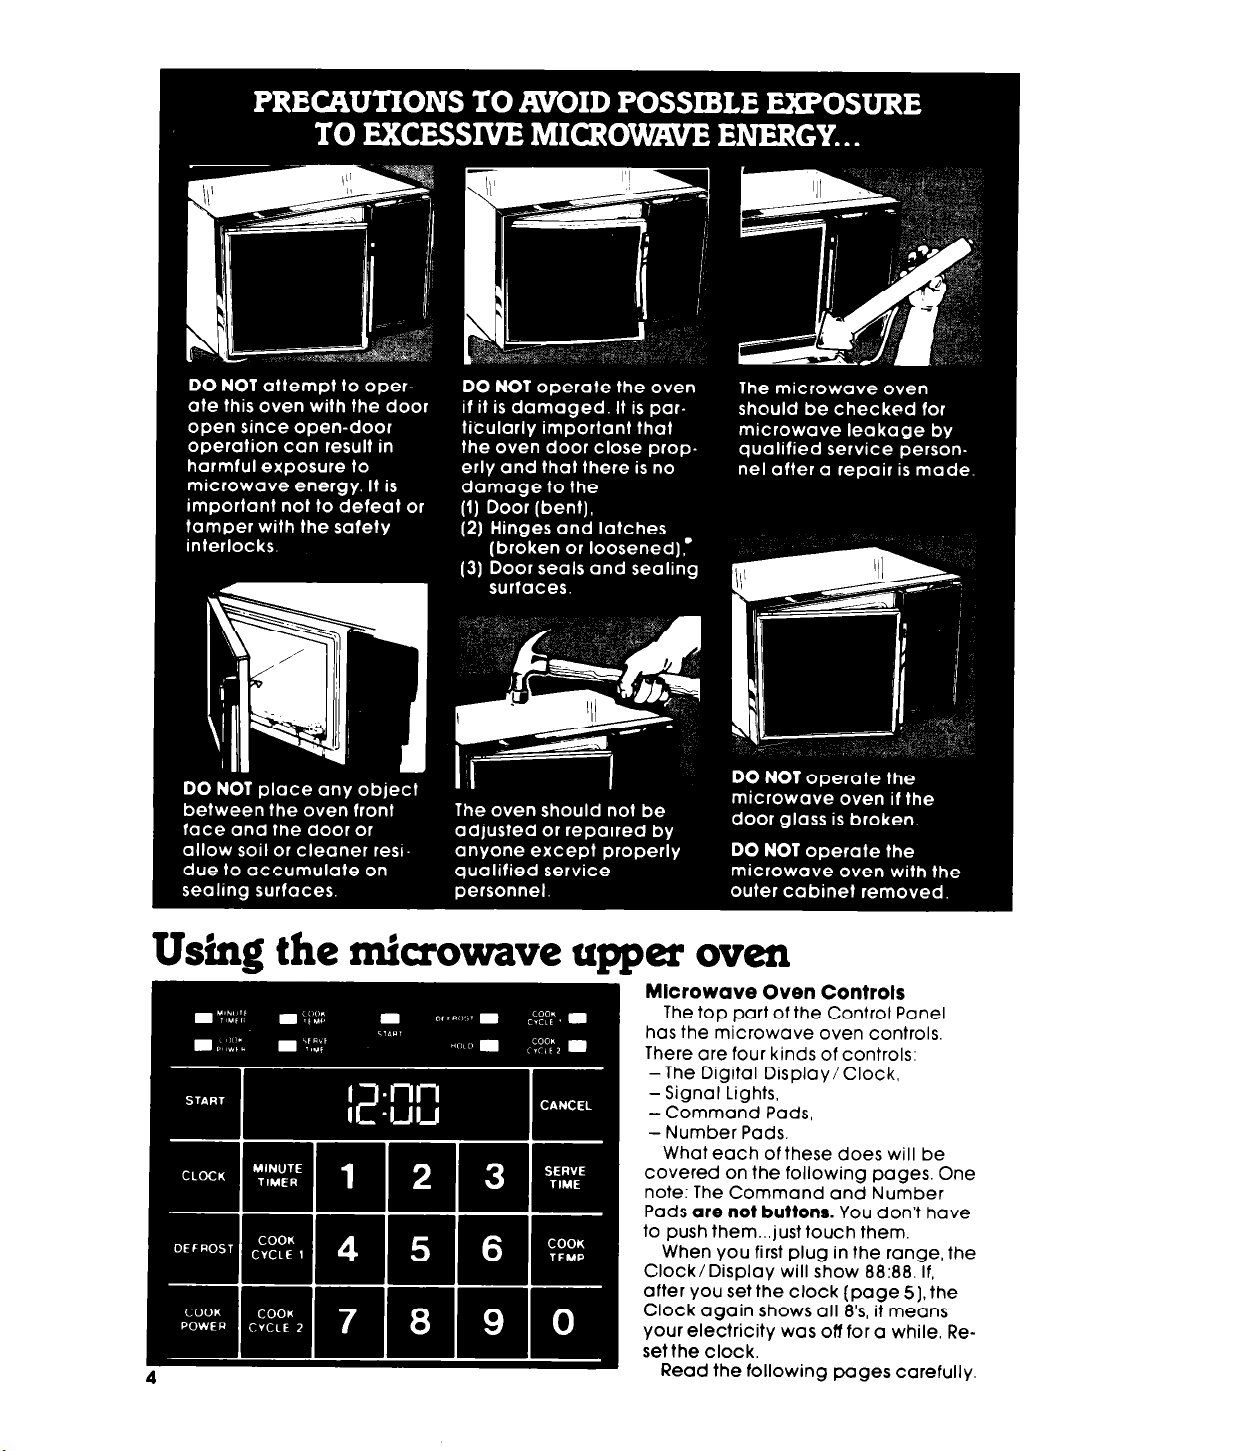
Mlcrowave Oven Controls
The top part of the Control Panel
has the microwave oven controls.
There are four kinds of controls:
-The Digital Display/ Clock,
-Signal Lights,
-Command Pads,
-Number Pads.
What each of these does will be
covered on the following pages. One
note: The Command and Number
Pads
to push them...just touch them.
When You first plug in the range, the
Clock/ Display will show 88:88. If,
after you set the clock (page 51, the
Clock again shows all B’s, it means
your electricity was off for a while. Reset the clock.
Read the following pages carefully.
oven
are not buttons.
You don’t have
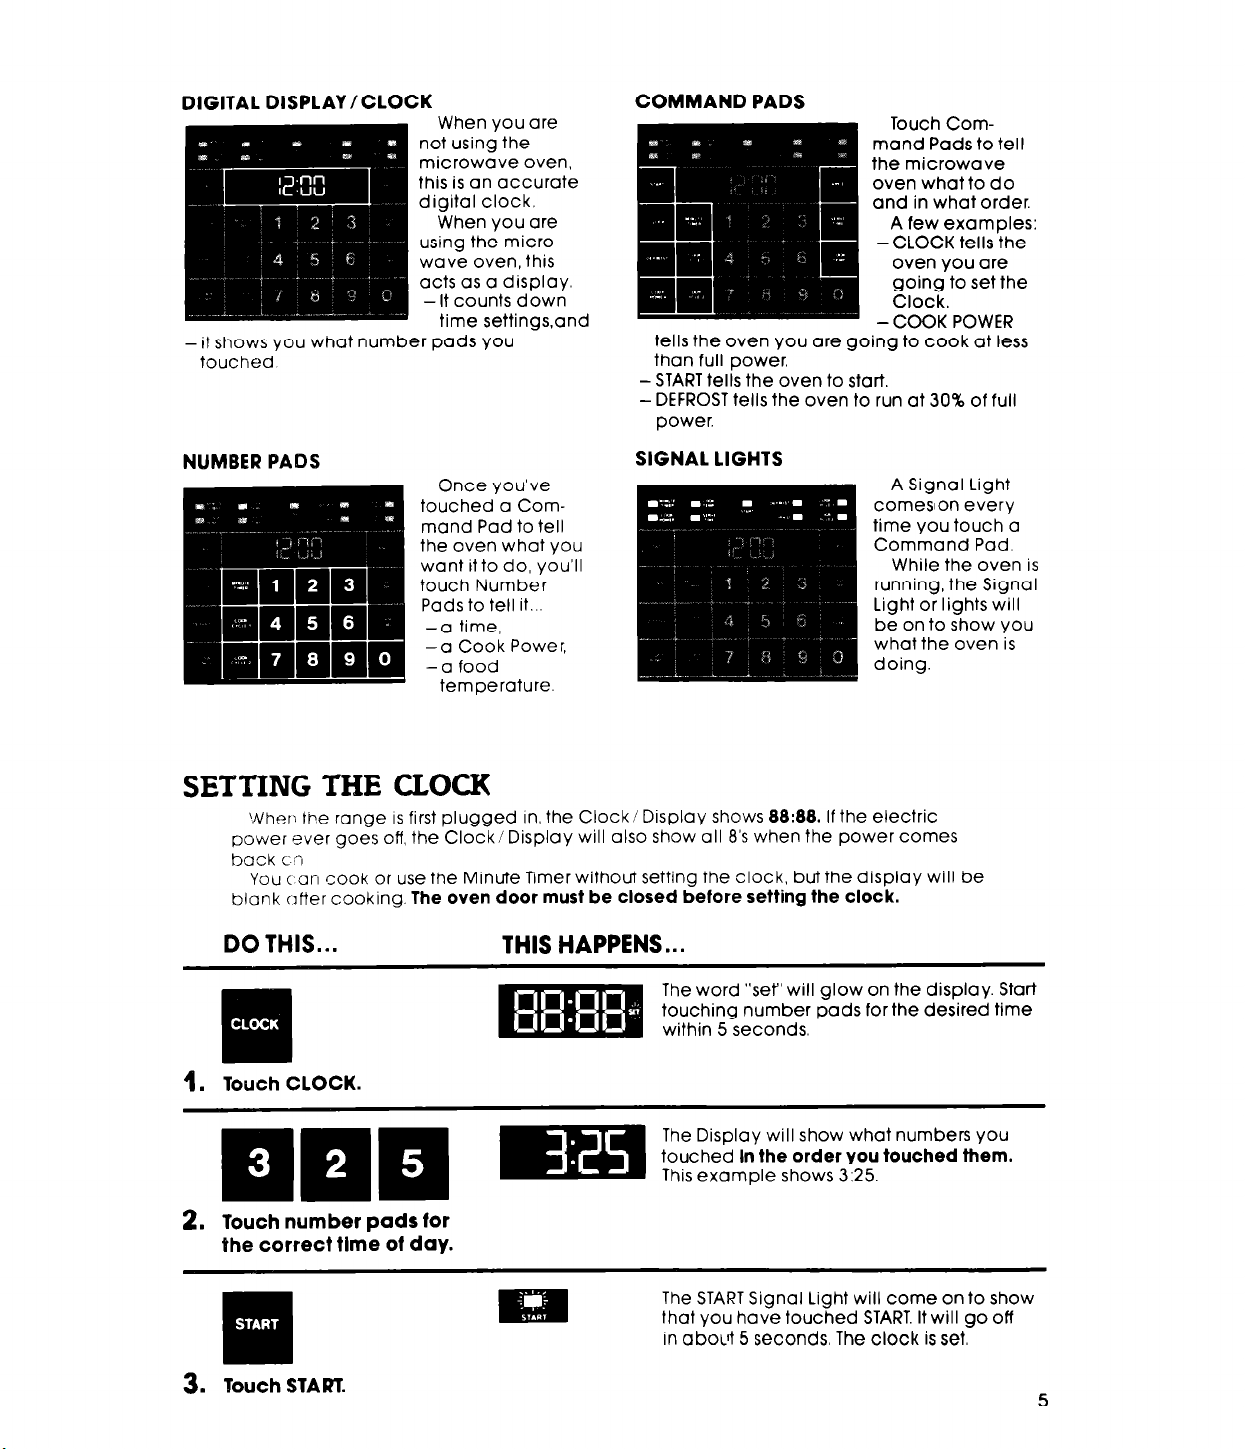
DIGITAL DISPLAY /CLOCK
-
it shows you what number pads you
touched
NUMBER PADS
tells the oven you are going to cook at less
than full power.
-START tells the oven to start.
-DEFROST tells the oven to run at 30% of full
SETTINGIHECLOCK
Wher; the range IS first plugged in, the Clock/ Display shows 88:88. If the electric
power ever goes off, the Clock/ Display will also show all 8’s when the power comes
hack c?
You ( an cook or use the Minute Timer without setting the clock, but the display will be
blank after cooking. The oven door must be closed before setting the clock.
A Signal Light
comesion every
time you touch a
Command Pad.
While the oven is
running, the Signal
Light or lights will
be on to show you
what the oven is
doing.
DO THIS...
.
q
I. Touch CLOCK.
2. Touch number pads for
the correct tlme of day.
.
q
3. Touch START.
THIS HAPPENS . . .
The word “seP’will glow on the display. Start
touching number pads for the desired time
within 5 seconds.
The Display will show what numbers you
touched In the order you touched them.
m This example shows 3:25.
The START Signal Light will come on to show
that you have touched START. It will go off
In aboLlt 5 seconds. The clock is set.
5
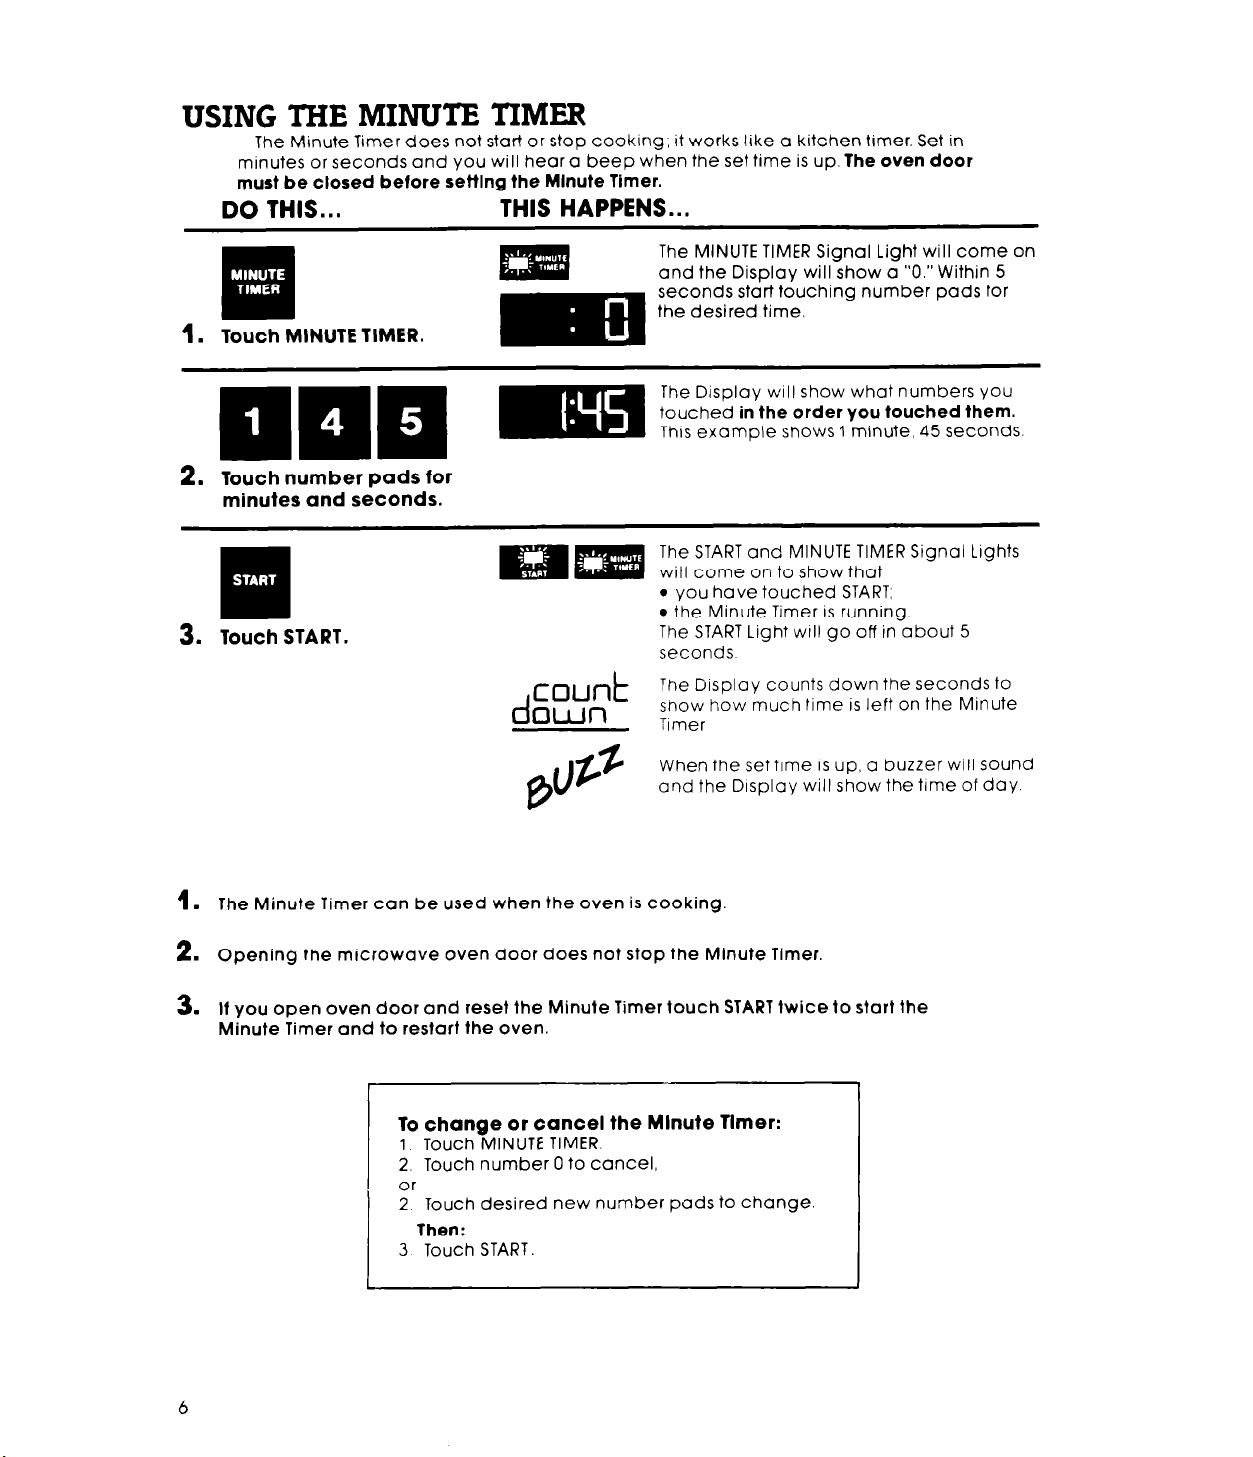
USING THE MINUTE
The Minute Timer does not start or stop cooking, it works like a kitchen timer. Set in
minutes or seconds and you will hear a beep when the set time is up. The oven door
must be closed before setting the Minute Timer.
DO THIS...
Ill!m
1. Touch MINUTE TIMER.
2. Touch number pads for
minutes and seconds.
q
3.
Touch START.
TIMER
THIS HAPPENS...
The MINUTE TIMER Signal Light will come on
and the Display will show a “0.” Within 5
seconds start touching number pads for
the desired time.
The Display WIII show what numbers you
touched in the order you touched them.
This example shows 1 minute, 45 seconds
The START and MINUTE TIMER Signal Lights
will come on to show that
l
l
The START Light WIII go off in about 5
seconds
count
d
oun
The Display counts down the seconds to
show how much time is left on the Minute
Timer
you have touched START;
the Minute Timer IS running
When the set time IS up, a buzzer will sound
and the Display will show the time of day.
1.
The Minute Timer can be used when the oven is cooking
Opening the microwave oven door does not stop the Minute Timer.
2.
If you open oven door and reset the Minute Timer touch START twice to start the
3.
Minute Timer and to restart the oven.
To change or cancel the Minute Tlmer:
1 Touch MINUTE TIMER.
2. Touch number 0 to cancel,
or
i 2 Touch desired new number pads to change
Then:
3 Touch START
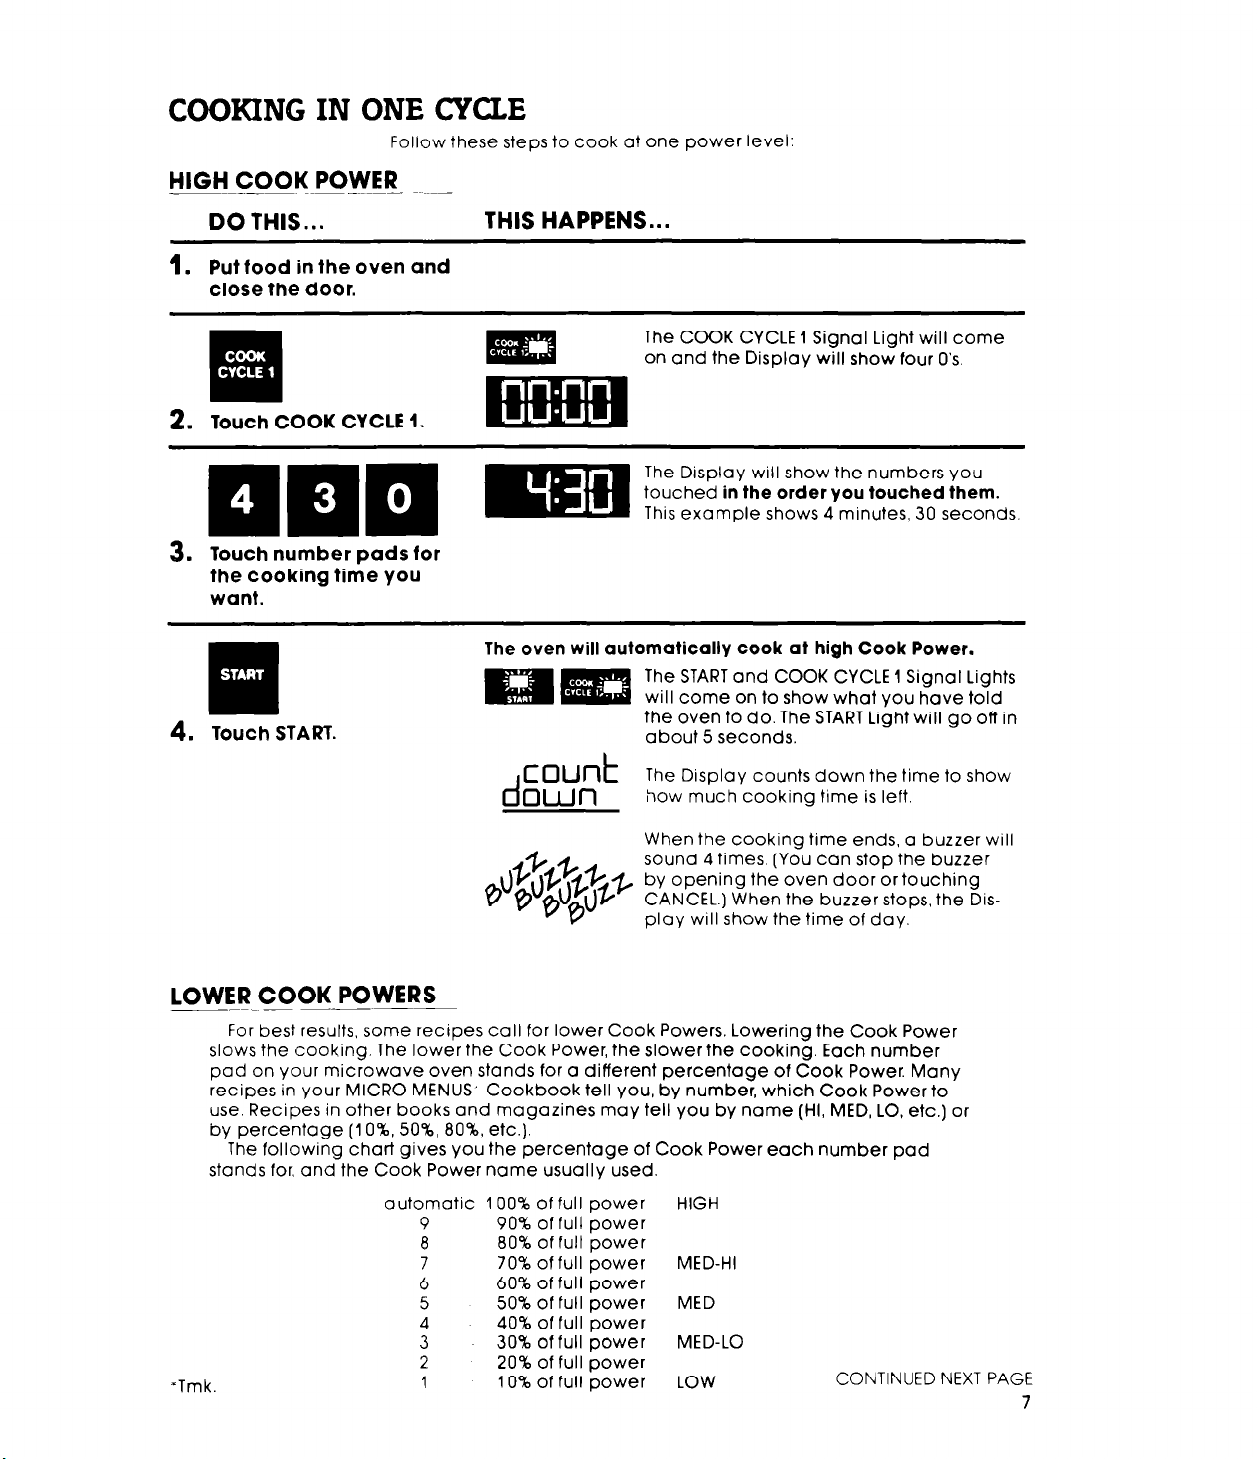
COOKING IN ONE CYCLE
Follow these steps to cook at one power level:
HIGH COOK POWER
DO THIS...
1.
Put tood in the oven and
close the door.
Touch number pads for
the cooking time you
want.
4.
Touch START.
THIS HAPPENS...
The COCK CYCLE 1 Signal Light will come
on and the Display will show four 0’s.
The Display will show the numbers you
touched in the order you touched them.
This example shows 4 minutes, 30 seconds.
The oven will automatically cook at high Cook
The START and COOK CYCLE 1 Signal Lights
will come on to show what You have told
the oven to do. The START Light will go off in
about 5 seconds.
count
d
own
The Display counts down the time to show
how much cooking time is left.
Power.
When the cooking time ends, a buzzer will
sound 4 times. (You can stop the buzzer
by opening the oven door ortouching
CANCEL.) When the buzzer stops, the Display will show the time of day.
LOWER COOK POWERS
For best results, some recipes call for lower Cook Powers. Lowering the Cook Power
slows the cooking. The lower the Cook Power, the slower the cooking. Each number
pad on your microwave oven stands for a different percentage of Cook Power. Many
recipes in Your MICRO MENUS, Cookbook tell You, by number, which Cook Power to
use. Recipes in other books and magazines may tell You by name (HI, MED, LO, etc.) or
by percentage (1 O%, 50%, 80%, etc.).
The following chart gives You the percentage of Cook Power each number pad
stands for, and the Cook Power name usually used.
-Tmk
~__~~
automatic 100% of full power
9 90% of full power
8
7 70% of full power
6
5 50% of full power
z
2
1 10% of full power LOW
80% of full power
60% of full power
40% of full power
30% of full power
20% of full power
HIGH
MED-HI
MED
MED-LO
CONTINUED NEXT PAGE
7
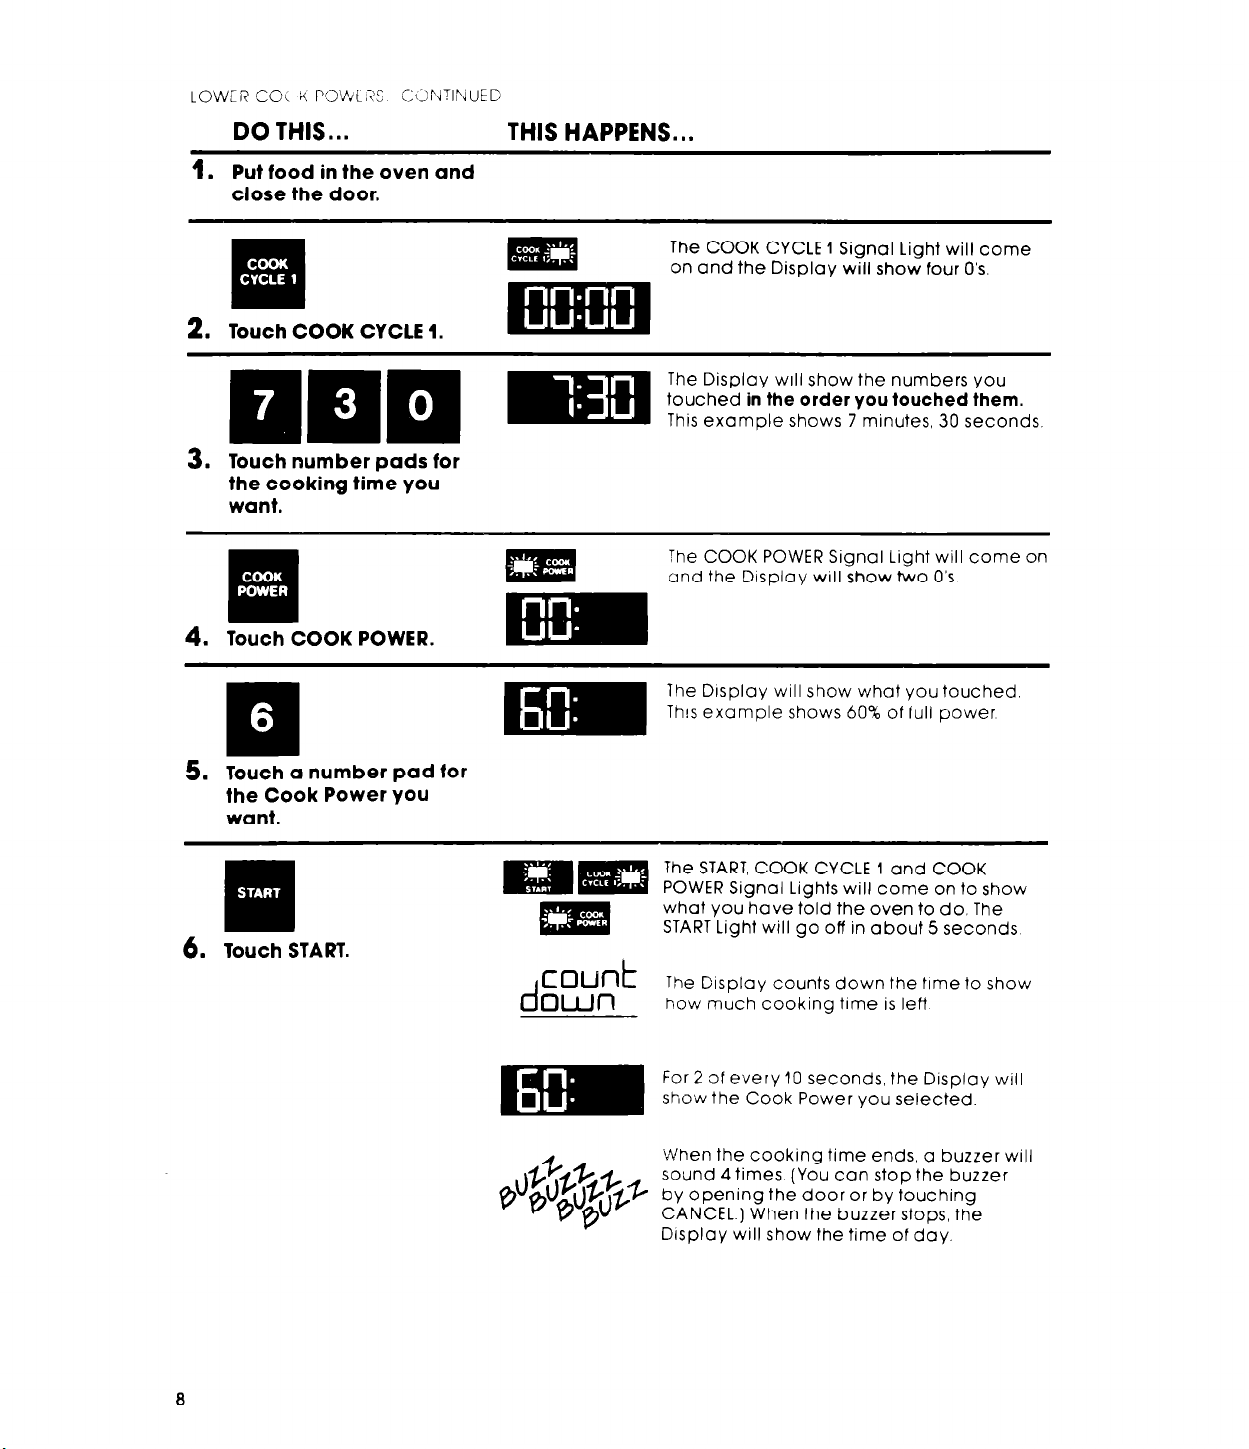
LOWER COi K POWt;X C~L)NTI~VUED
DO THIS... THIS HAPPENS. . .
1.
Put food in the oven and
close the door.
3. Touch number pads for
the cooking time you
want.
The COOK CYCLE 1 Signal Light will come
on and the Display will show four 0’s.
The Display WIII show the numbers you
touched in the order you touched them.
This example shows 7 minutes, 30 seconds.
I#
‘I
Eli!
4.
Touch COOK POWER.
5. Touch a number pad for
the Cook Power you
want.
R
6.
Touch START.
count
d
own
The COOK POWER Signal Light will come on
und the Display will show two O’s
The START, COOK CYCLE 1 and COOK
POWER Signal Lights will come on to show
what you have told the oven to do. The
START Light will go off in about 5 seconds
The Clsplay counts down the time lo show
how much cooking time is IeH
When the cooking time ends, a buzzer will
sound 4 times (You can stop the buzzer
by opening the door or by touching
CANCEL.) When the buzzer stops, the
Display will show the time of day.
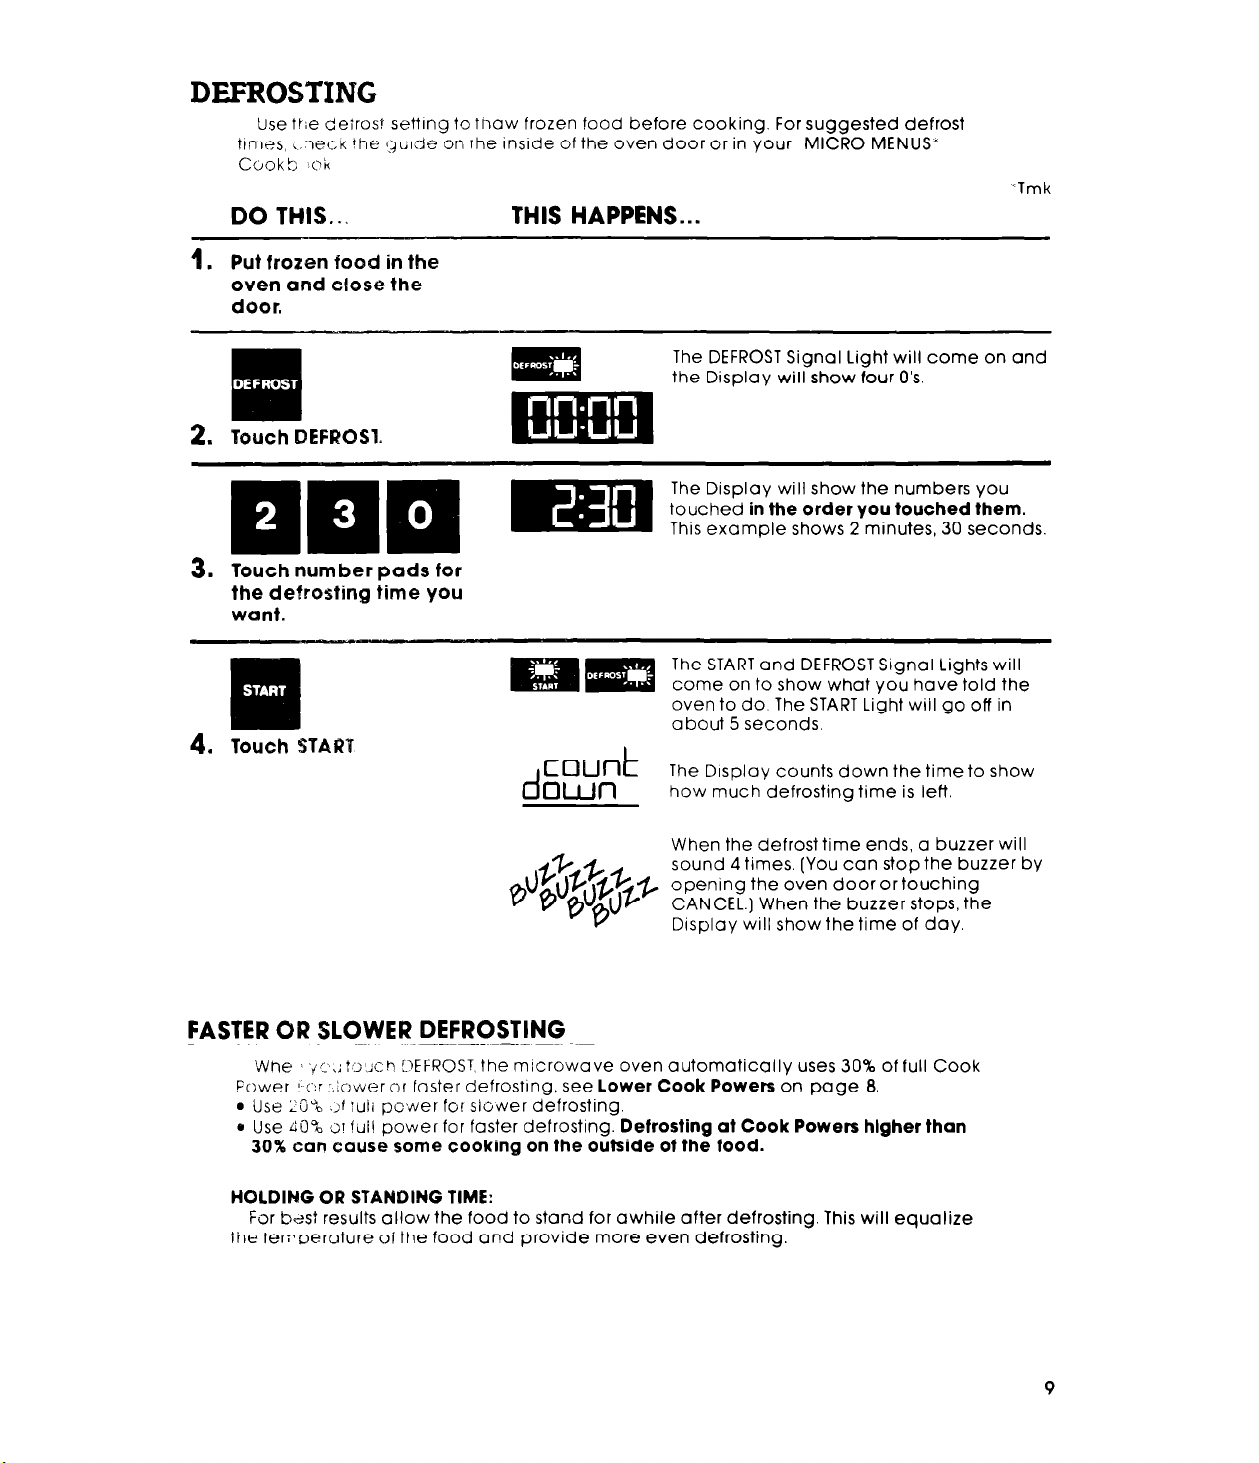
DEFROSTING
Use tr;e deiros? setting to tnaw frozen food before cooking. For suggested defrost
ttmes, ,:XXK the gti;lde on rhe inside of the oven door or in your MICRO MENUS”
Cookt; ok
DO THIS...
1.
Put frozen food in the
oven and close the
door.
,
*
THIS HAPPENS...
The DEFROST Signal Light will come on and
the Display will show four O’s
q
2. Touch BEFROSl.
The Display will show the numbers you
touched in the order you touched them.
This example shows 2 minutes, 30 seconds.
Touch number pads for
the defrosting time you
want.
‘Tmk
. .
ma
4.
Touch START
count
d
own
FASTER OR SLOWER DEFROSTING
Wne ‘ii
Fewer 1 c:
l
Use LG”b .~f :uii power for slower defrosting.
0 Use CO% ‘JI fui! power for faster defrosting. Defrosting at Cook Powers hlgher than
30% can cause some cooking on the outside of the food.
HOLDING OR STANDING TIME:
For bzst results allow the food to stand for awhile after defrosting. This will equalize
the temoerature of the food and provide more even defrosting.
.:?~;~;ch DEFROST, the microwave oven automatically uses 30% of full Cook
:.:ower or faster defrostrng, see lower Cook Powers on page 8.
~-.- ~~
The START and DEFROST Signal Lights will
come on to show what you have told the
oven to do. The START Light will go off in
a bout 5 seconds.
The Drsplay counts down the time to show
how much defrosting time is left
When the defrost time ends, a buzzer will
sound 4 times. [You can stop the buzzer by
opening the oven door or touching
CANCEL.] When the buzzer stops, the
Display will show the time of day.
9
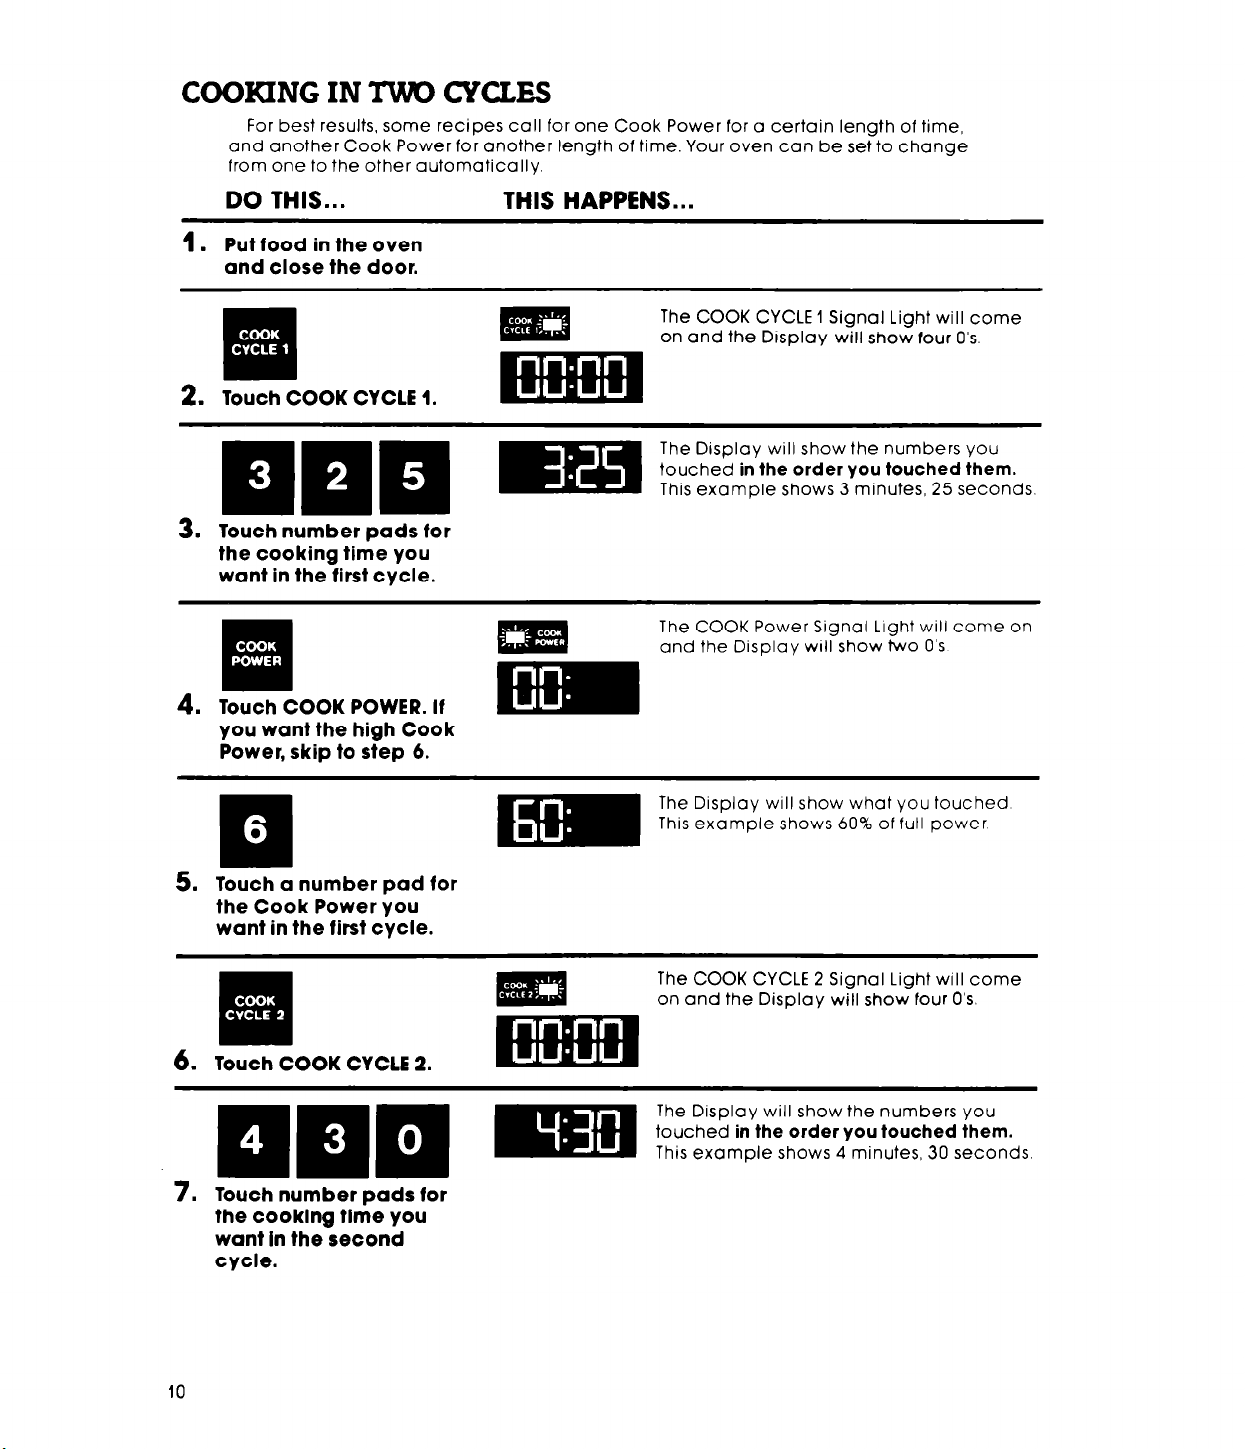
COOKING IN IWO CYCLES
For best results, some recipes call for one Cook Power for a certain length of time,
and another Cook Power for another length of time. Your oven can be set to change
from one to the other automatically.
DO THIS...
1.
Put food in the oven
and close the door.
3. Touch number pads for
the cooking time you
want in the first cycle.
. .
‘. .
•il
4. Touch COOK POWER. If
you want the high Cook
Power, skip to step 6.
THIS HAPPENS...
The COOK CYCLE 1 Signal Light will come
on and the Drsplay will show four O’s
The Display will show the numbers you
touched in the order you touched them.
This example shows 3 minutes, 25 seconds.
The COOK Power Signal Light will come on
and the Display WIII show two O’s
5. Touch a number pad for
the Cook Power you
want in the first cycle.
a.
II
6. Touch COOK CYCLE 2.
7. Touch number pads for
the cooklng tlme you
want In the second
cycle.
The Display will show what You touched
This example shows 60% of full power
The COOK CYCLE 2 Signal Light will come
on and the Display will show four O’s
The Display will show the numbers you
touched in the order you touched them.
This example shows 4 minutes, 30 seconds.
. .
‘. .
Em
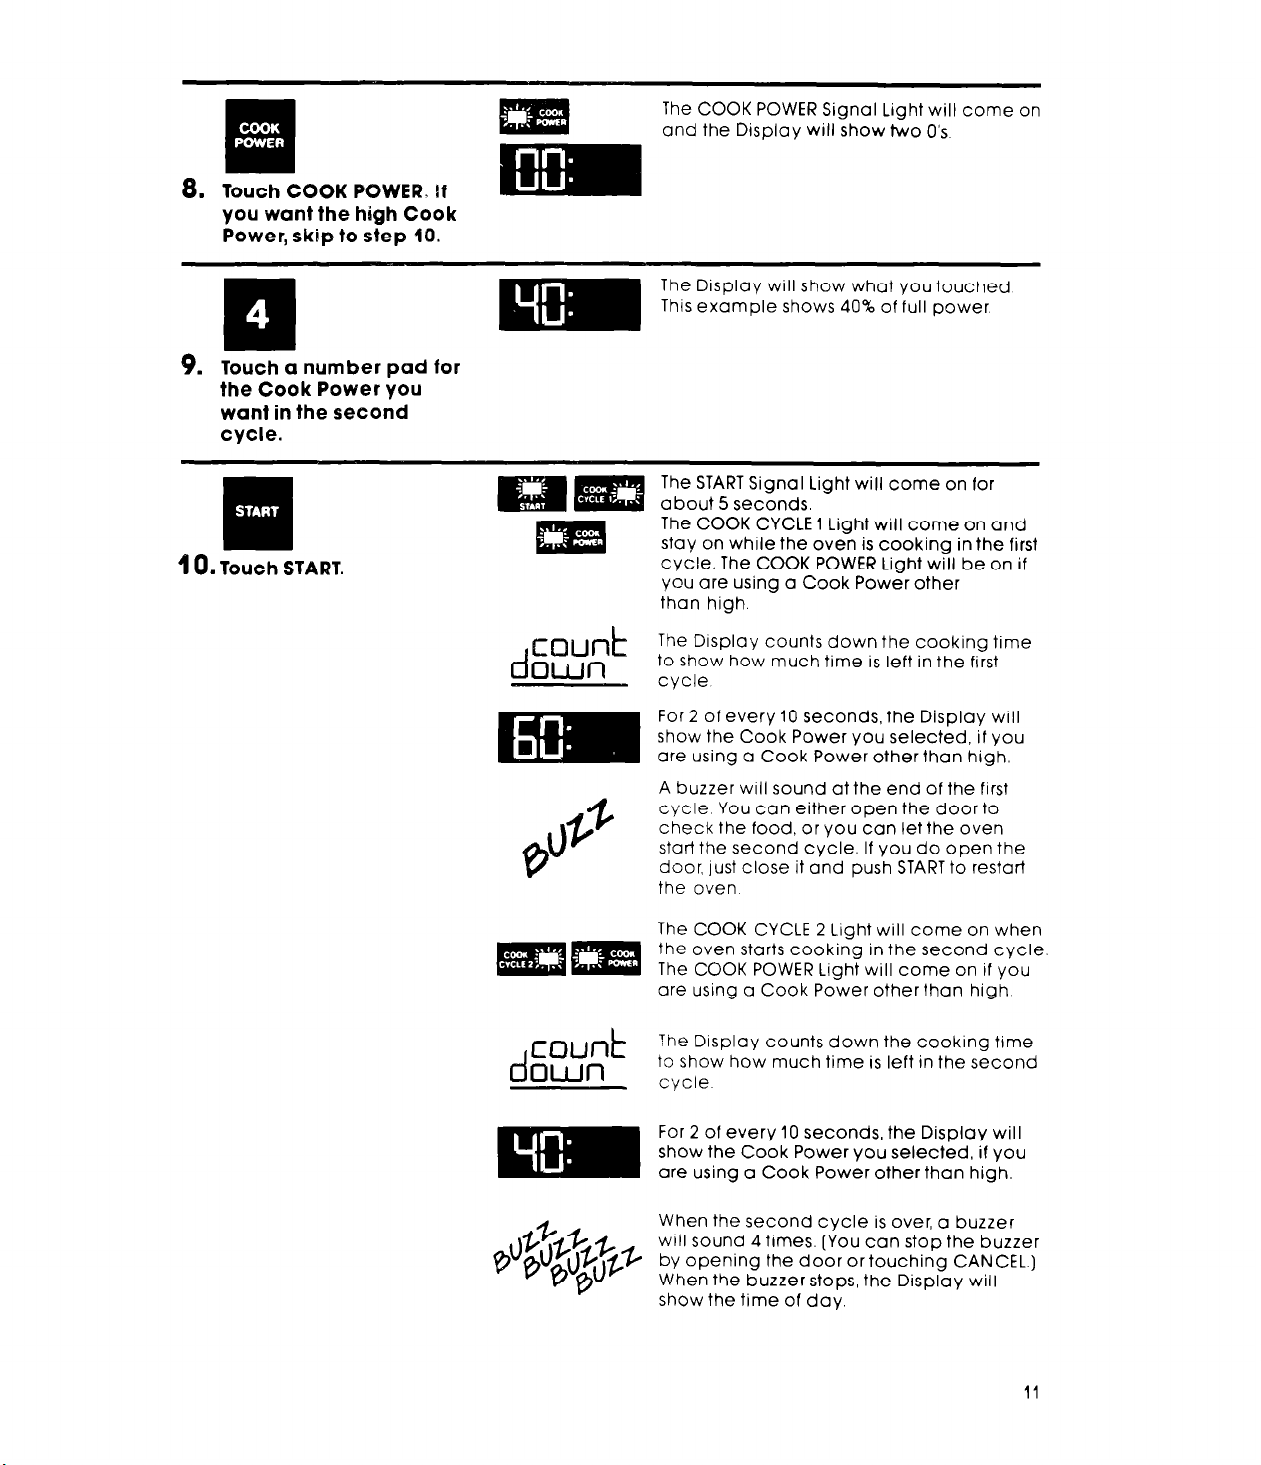
8. Touch COOK POWER, If
you want the high Cook
Power, skip to step 10.
9. Touch a number pad for
the Cook Power you
want in the second
cycle.
The COOK POWER Signal Light will come on
and the Display will show two O’s
The Display will show what you touched
This example shows 40% of full power
The START Signal Light will come on for
a bout 5 seconds.
The COOK CYCLE 1 Light will come on and
stay on while the oven is cooking in the first
cycle. The COOK POWER Light will be on if
you are using a Cook Power other
than high.
count
d
0Wl-l
count
d
own
The Display counts down the cooking time
to show how much time is left in the first
cycle
For 2 of every 10 seconds, the Display will
show the Cook Power you selected, if you
are using a Cook Power other than high.
A buzzer will sound at the end of the first
cycle You can either open the door to
check the food, or you can let the oven
start the second cycle. If you do open the
door, lust close it and push START to restart
the oven
The COOK CYCLE 2 Light will come on when
the oven starts cooking in the second cycle
The COOK POWER Light will come on if you
are using a Cook Power other than high
The Display counts down the cooking time
to show how much time is left in the second
cycle
For 2 of every 10 seconds, the Display will
show the Cook Power you selected, if you
are using a Cook Power other than high.
When the second cycle is over, a buzzer
will sound 4 times. (You can stop the buzzer
by opening the door ortouching CANCEL.)
When the buzzer stops, the Display will
show the time of day.
11
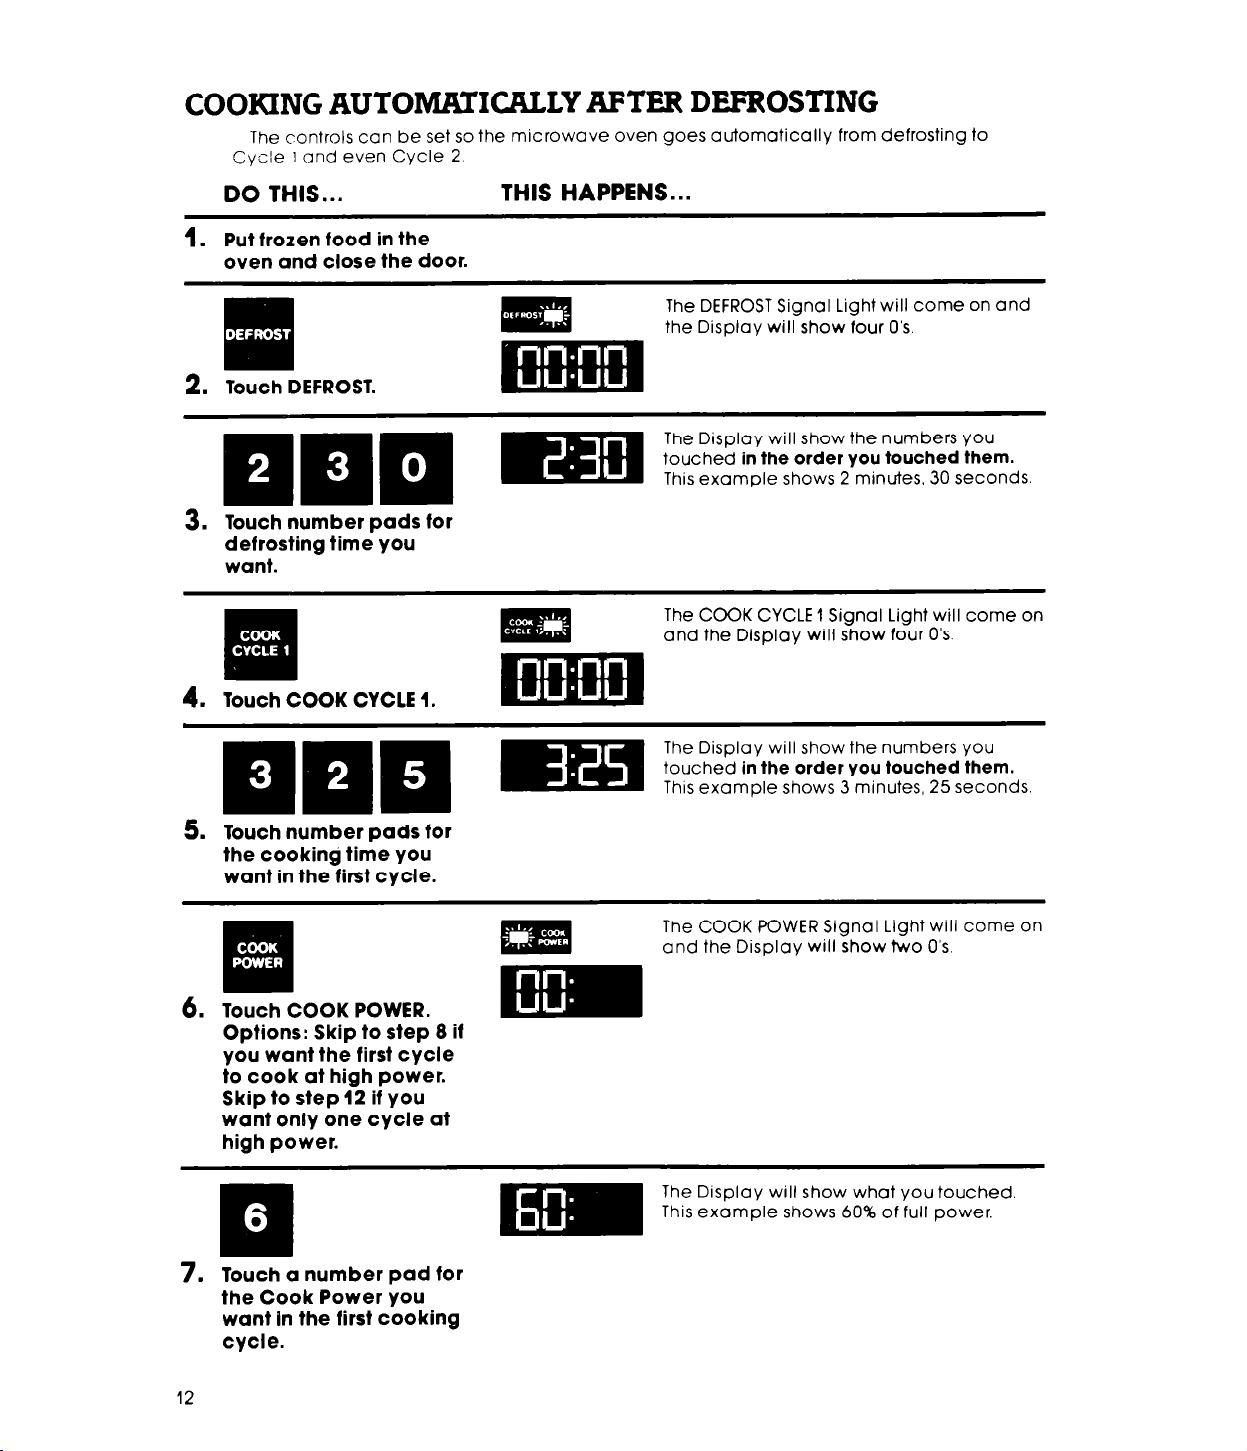
COOKING AUTOMATICALLY AFTER DEFROSTING
The controls can be set so the microwave oven goes automatically from defrosting to
Cycle 1 and even Cycle 2.
DO THIS...
1.
Put frozen food in the
oven and close the door.
I
.
q
2.
Touch DEFROST.
3. Touch number pads for
defrosting time you
want.
a.
Ia
4.
Touch COOK CYCLE 1.
THIS HAPPENS...
The DEFROST Signal Light will come on and
the Display will show four O’s
The Display will show the numbers you
touched in the order you touched them.
This example shows 2 minutes, 30 seconds
The COCK CYCLE 1 Signal Light will come on
and the Display will show four 0's.
The Display will show the numbers you
touched in the order you touched them.
This example shows 3 minutes, 25 seconds.
Touch number pads for
5.
the cooking time you
want in the first cycle.
6. Touch COOK POWER.
Options: Skip to step 8 if
you want the first cycle
to cook at high power.
Skip to step 12 if you
want only one cycle at
high power.
7. Touch a number pad for
the Cook Power you
want in the first cooking
cycle.
12
The COOK POWER Signal Light will come on
and the Display will show two O’s
The Display will show what you touched
This example shows 60% of full power.
 Loading...