

Whirlpool RM955PXL Use & Care Manual
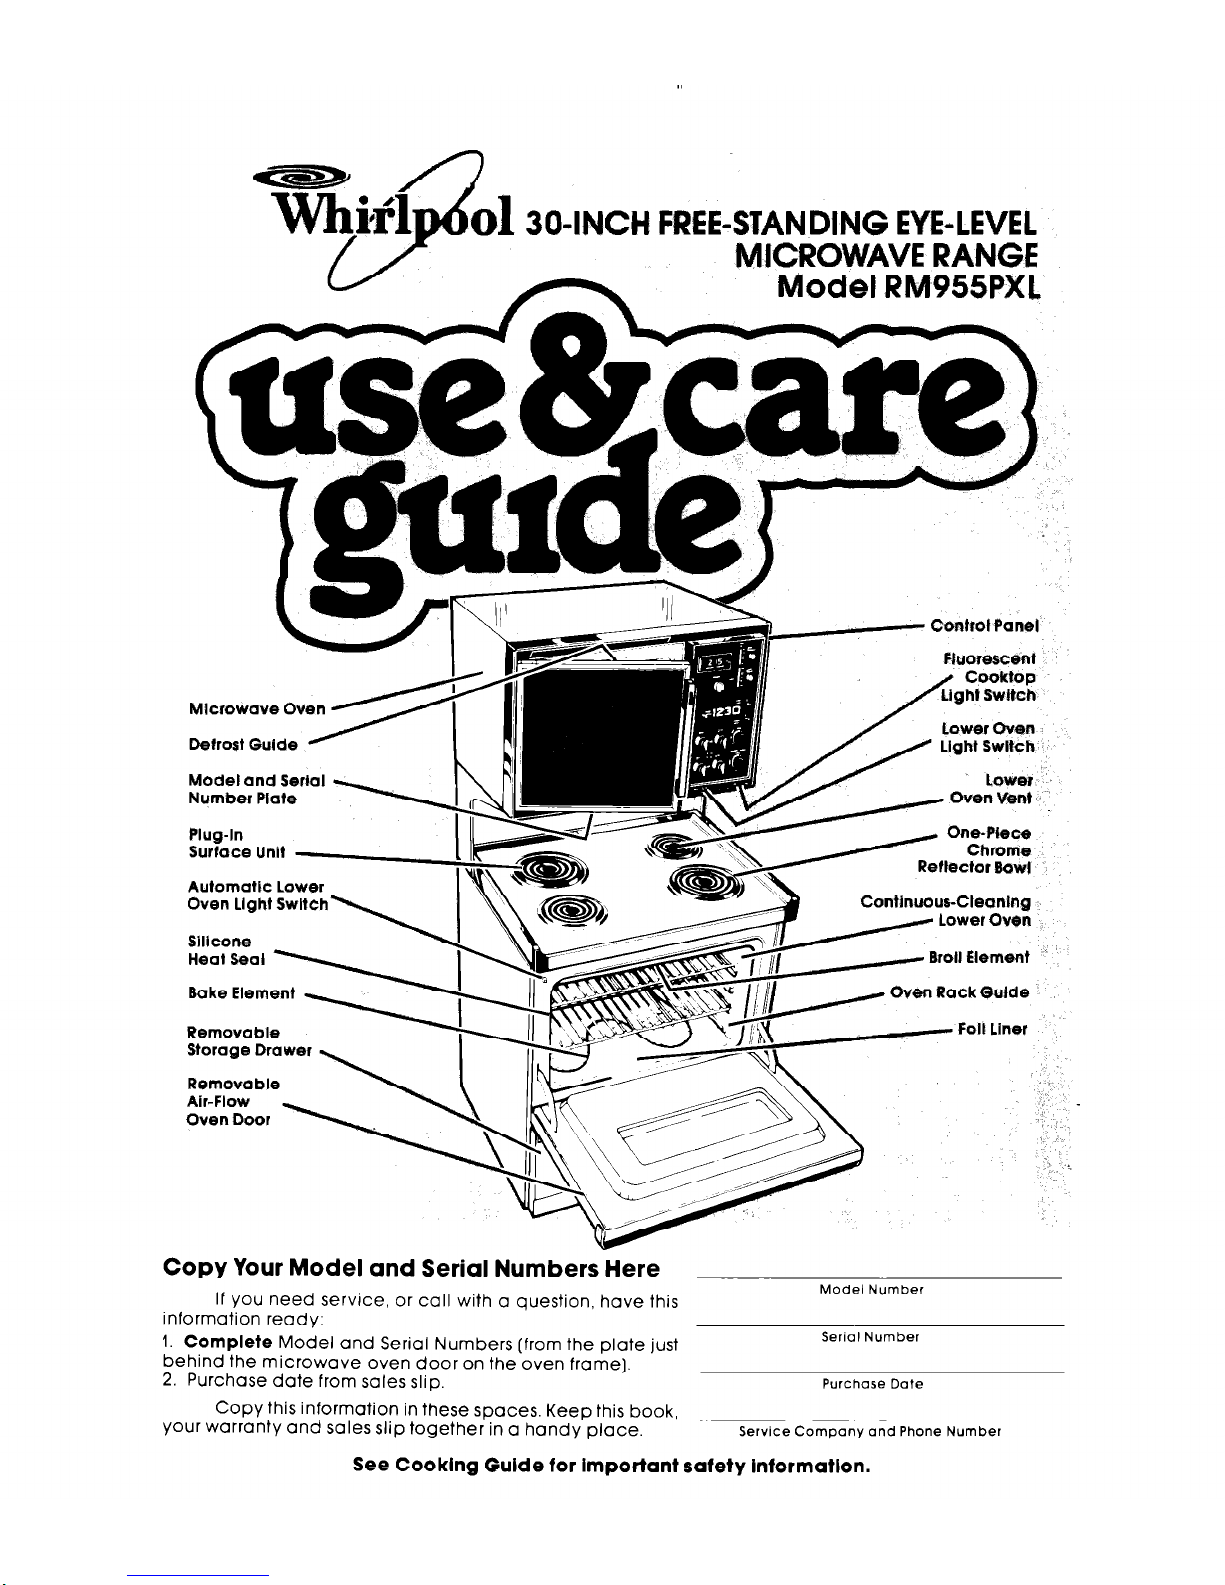
304NCH FREE-SANDING EYE-LEVEL
MCROWAVE RANGE
Model RM955PXt
FhlORWX?flnt
/
cooktop
tight Switch
Mlcrowave Ov
Detrost Guide
Model and Serial
Number Plate
Automatic Lower
Oven Light Switch
Bake Eiement
Removable
Storage Drawer
Removable
Oven Rack Guide
. I .
.,
-
Copy Your Model and Serial Numbers Here
If you need service, or call with a question, have this
information ready:
Model Number
1.
Complete
Model and Serial Numbers (from the plate just
Serial Number
behind the microwave oven door on the oven frame].
2. Purchase date from sales slip.
Purchase Date
Copy this information in these spaces. Keep this book,
your warranty and sales slip together in a handy place.
Service Company and Phone Number
See Cooklng Guide for important safety informatlon.

Your responsfbilities.. .
Proper installation and safe use of your microwave range are your
personal responsibilities. Read this”Use and Care Guide”and the
“Cooking Guide”carefully for important use and safety information.
Installation
You
must
be sure your range is...
l
installed and leveled on a floor
that will hold the weight;
l
installed in a well-ventilated
area protected from the
weather;
l
properly connected to the correct electric supply and
grounding. [See “Installation
Instructions.“)
Proper use
You must be sure your range is...
l
used only for jobs expected
of home ranges;
l
used only by people who can
operate it properly:
l
properly maintained.
Contents
Page
Page
Responsibilities ..
2
Baking or Roasting ..........
13
Installation
.......
2
Adjusting the Oven Temperature
Proper Use
............
2
Control
.........................
13
Safety ... .. ..
Precautions to Avoid Possible Ex’dosure’to
3
Using the Automatic MEALTIMER’
Clock
..............................
14
Excessive Microwave Energy
......... 4
Broiling
..............................
15
Using Your Microwave Upper
Oven
...... 4
Broiling Chart
........................
15
Setting the Controls
......
......... 5
The Cooktop Light
...................
16
Cook Power Chart
... ...........
5
The Lower Oven Light
...................
17
Defrosting
Keep Warm : 1 : : : : : : :
: : : : : : : : :
5
The Oven Vent
.........................
17
The Meal Sensor’ Temperatu&Probe
5 Optional Accessories
...................
17
6
Rotisserie
..............................
17
Meal Sensor’ Temperature Probe
Canning Kit
............................
17
Guide
.......................
...
7 Cleaning and Caring for Your Oven
......
18
Cleaning the Probe
...........
...... 7
Control Panel and Knobs
..............
18
Bi-Level Cooking Rack
................
7 Surface Units and Reflector Bowls
.......
18
Cleaning the Microwave Oven
......... 8 Lift-Up Cooktop
........................
19
Important Information
...........
...... 8
The Oven Door
.........................
20
How Microwave Ovens Work
........
.. I 0
Storage Drawer
........................
20
The Microwave Oven Light
.............
I o The Continuous-Cleaning Lower Oven
.. 21
Using Your Cooktop
and lower Oven
..... I 0
Cleaning Chart
........................
22
Surface Unit Controls
...... :.
.......... 11 If You Need Service or Assistance
.......
23
Setting the Clock
....................
.. 12
I, Before Calling for Assistance
........
23
Using the Minute Timer.
..............
12
2. If You Need Assistance
a ......
24
The Lower Oven Controls
...............
12
3. If You Need Service
.................
24
The Oven Selector
................... 12
4. If You Have a Problem
...............
24
The Oven Temperature Control
12
3
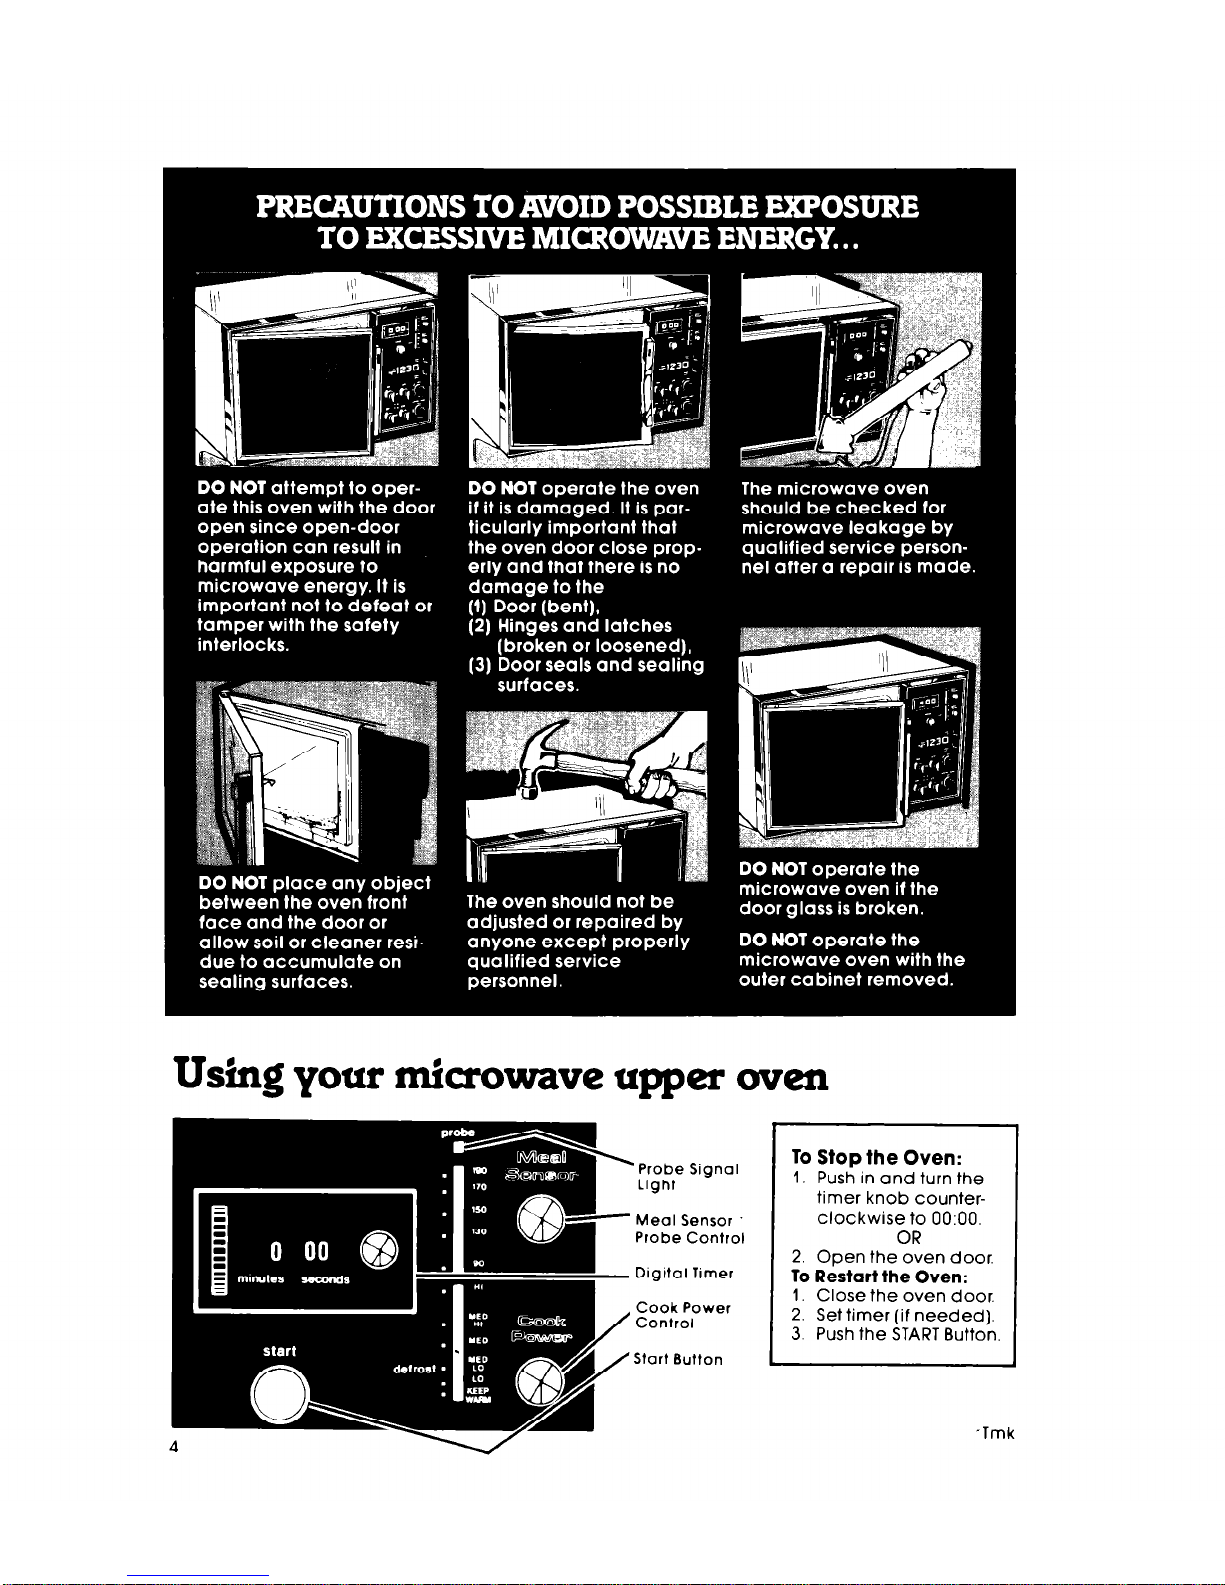
Using your microwave upper oven
‘Probe
Signal
Light
Meal Sensor
Probe Control
Digital Timer
Cook
Power
Control
Start Button
To Stop the Oven:
I, Push in and turn the
timer knob counterclockwise to 0O:OO.
OR
2. Open the oven door.
To Restart the Oven:
1. Close the oven door.
2. Set timer (if needed).
3. Push the START Button.
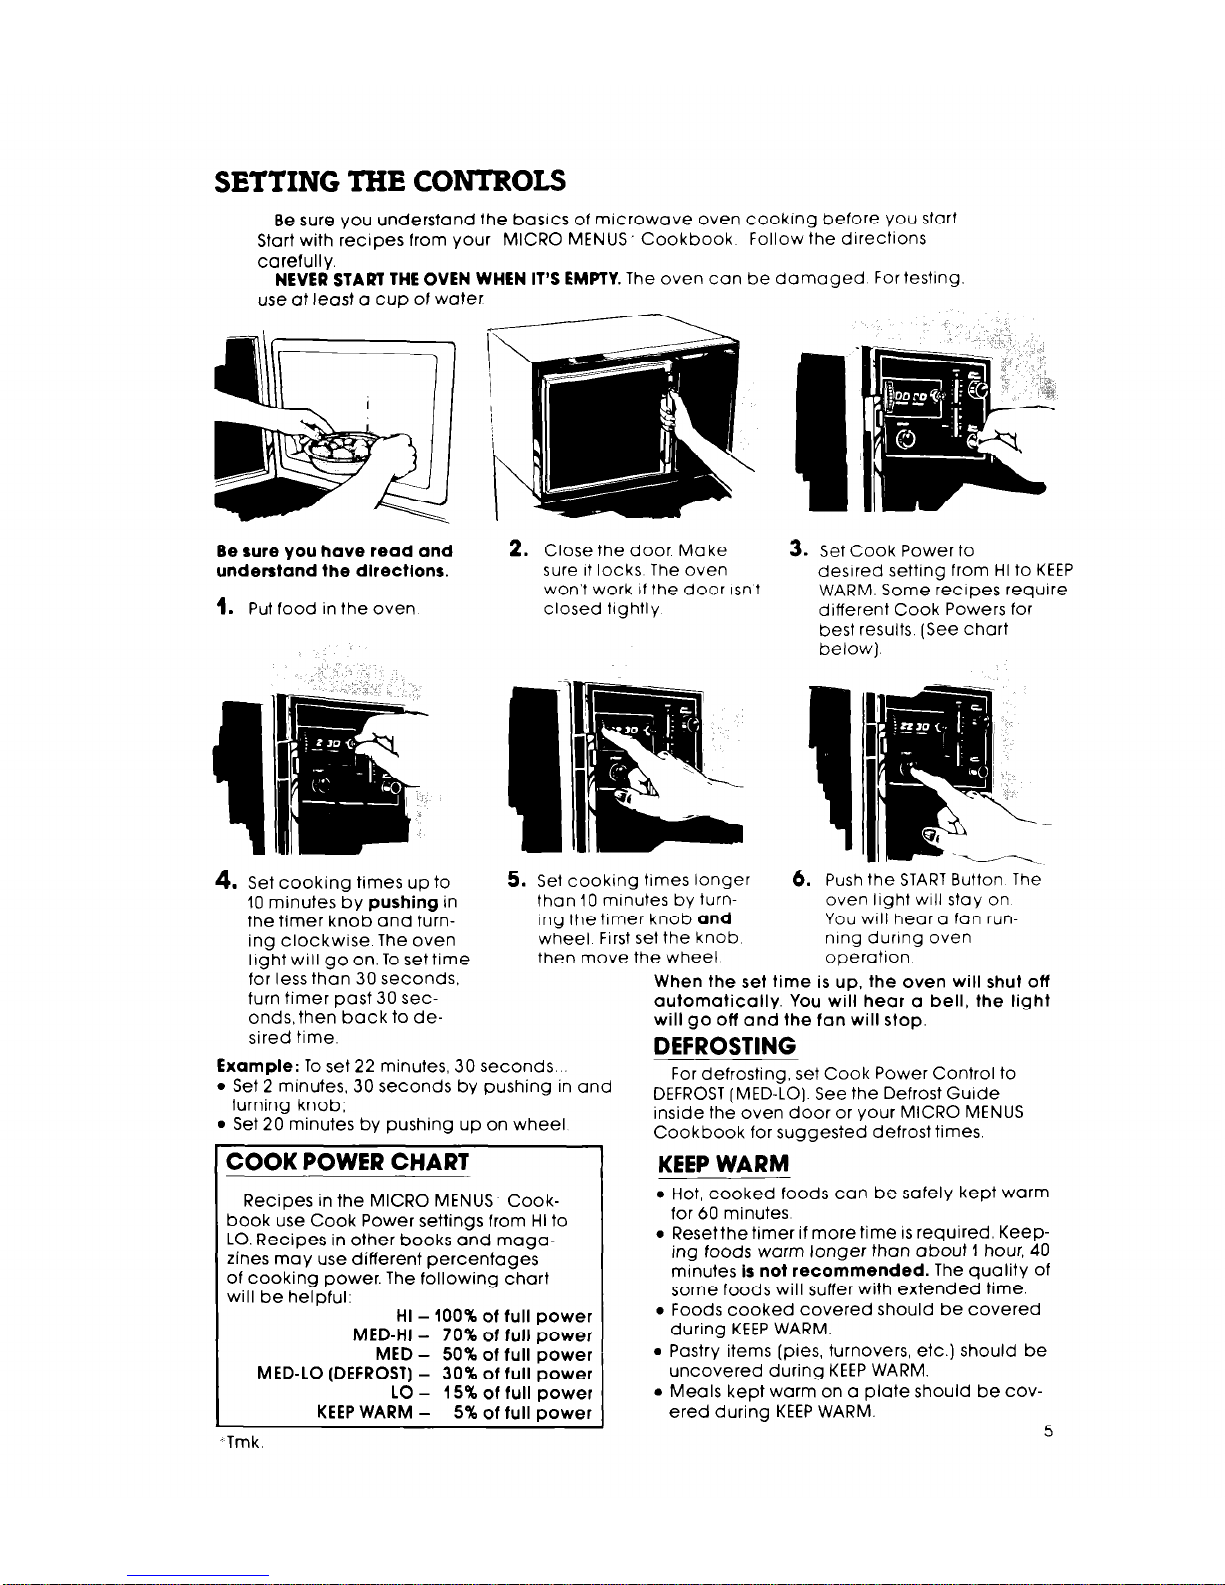
Be sure you understand the basics of microwave oven cooking before you start
Start with recipes from your MICRO MENUS, Cookbook Follow the directions
carefully.
NEVER START THE OVEN WHEN IT’S EMPTY. The oven can be damaged For testrng.
use at least a cup of water
Be sure you have read and
understand the dlrectlons.
1.
Put food in the oven
4. Set cooking times up to
10 minutes by pushing in
the timer knob and turn-
ing clockwise. The oven
light will go on.To settime
for less than 30 seconds,
turn timer past 30 sec-
onds, then back to desired time.
2.
Close the door Make
sure It locks The oven
won’t work if the door Isn’t
closed trghtly
-Tmk
3.
Set Cook Power to
desired setting from HI to KEEP
WARM. Some recipes require
different Cook Powers for
best results. (See chart
below).
5. Set cooking times longer
than 10 minutes by turnrng the trmer knob and
wheel First set the knob
then move the wheel
6.
Push the START Button The
oven light
will
stay on
You WIII hear a fan running during oven
operation
Example: To set 22 minutes, 30 seconds...
l
Set 2 minutes, 30 seconds by pushing in and
turning knob;
l
Set 20 minutes by pushing up on wheel
COOK POWER CHART
Recipes in the MICRO MENUS Cook-
book use Cook Power settings from HI to
LO. Recipes in other books and maga-
zines may use different percentages
of cooking power. The following chart
will be helpful:
HI - 100% of full power
MED-HI -
70% of full power
MED - 50% of full power
MED-LO (DEFROST] - 30% of full power
LO - 15% of full power
KEEP WARM - 5% of full power
When the set time is up, the oven will shut off
automatically. You will hear a bell, the light
will go off and the fan will stop.
DEFROSTING
For defrosting, set Cook Power Control to
DEFROST (MED-LO). See the Defrost Guide
inside the oven door or your MICRO MENUS
Cookbook for suggested defrost times.
KEEP WARM
l
Hot, cooked foods can be safely kept warm
for 60 minutes
l
Resetthetimer if more time is required. Keep-
ing foods warm longer than about 1 hour, 40
minutes is not recommended. The quality of
some foods will suffer with extended time.
l
Foods cooked covered should be covered
during KEEP WARM.
l
Pastry items [pies, turnovers, etc.) should be
uncovered during KEEP WARM.
l
Meals kept warm on a plate should be cov-
ered during KEEP WARM.
5
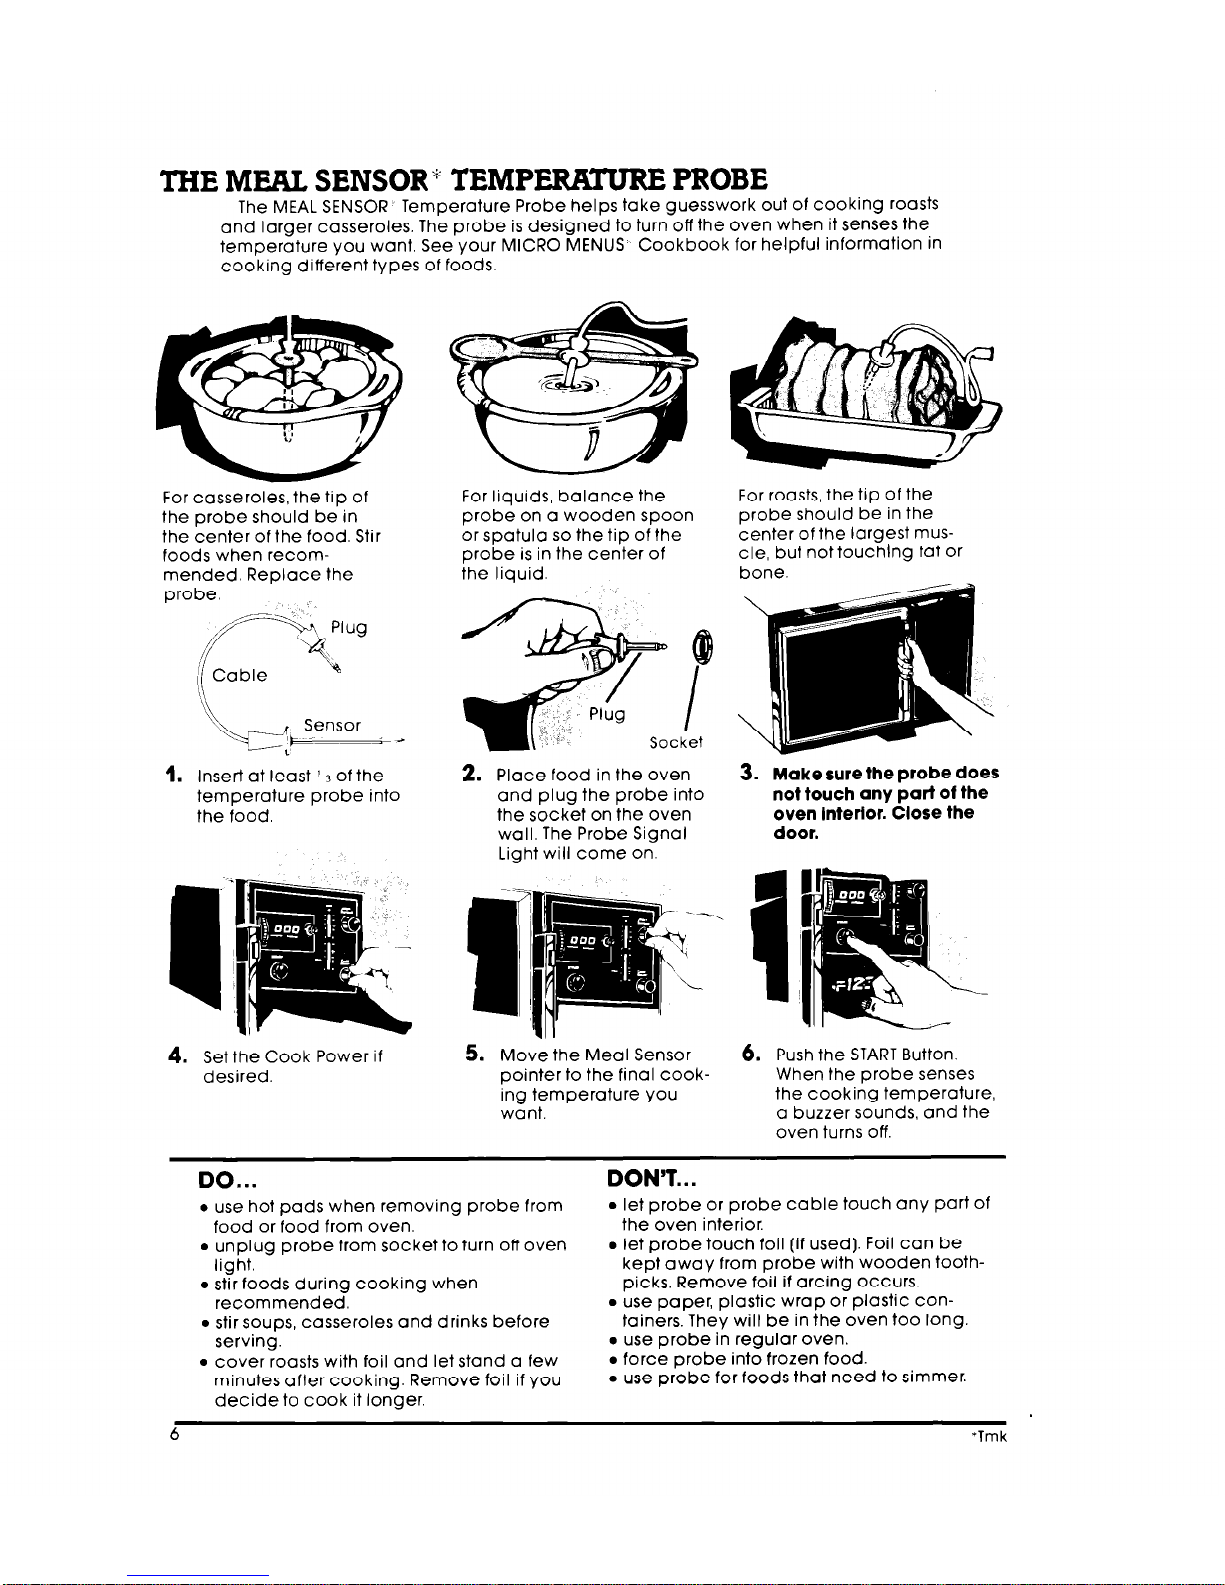
THE MEAL SENSOR” TEMPERATURE PROBE
The MEAL SENSOR
Temperature Probe helps take guesswork out of cooking roasts
and larger casseroles. The probe is designed to turn off the oven when it senses the
temperature you want. See your MICRO MENUS
Cookbook for helpful information in
cooking different types of foods
For casseroles, the tip of
the probe should be in
the center of the food. Stir
foods when recom-
mended. Replace the
probe.
Insert at least ’ 3 of the
temperature probe into
the food.
For liquids, balance the For roasts, the tip of the
probe on a wooden spoon probe should be in the
or spatula so the tip of the
center of the largest mus-
probe is in the center of
cle, but not touching fat or
the liquid.
bone.
2. Place food in the oven
and plug the probe into
the socket on the oven
wall. The Probe Signal
Light will come on.
4.
Set the Cook Power if
desired
5.
Move the Meal Sensor
pointer to the final cooking temperature you
want.
3. Make sure the probe does
not touch any part of the
oven Interlor. Close the
door.
6.
Push the START Button.
When the probe senses
the cooking temperature,
a buzzer sounds and the
oven turns off.
DO...
DON’T...
l
use hot pads when removing probe from
food or food from oven,
l
unplug probe from socket to turn off oven
light.
l
stir foods during cooking when
recommended.
l
stir soups, casseroles and drinks before
serving.
l
cover roasts with foil and let stand a few
minutes after cooking. Remove foil if you
decide to cook it longer.
l
let probe or probe cable touch any part of
the oven interior.
l
let probe touch foil (if used). Foil can be
kept away from probe with wooden tooth-
picks. Remove foil if arcing occurs.
0 use paper, plastic wrap or plastic con-
tainers. They will be in the oven too long.
l
use probe in regular oven.
l
force probe into frozen food.
l
use probe for foods that need to simmer.
6
*Tmk
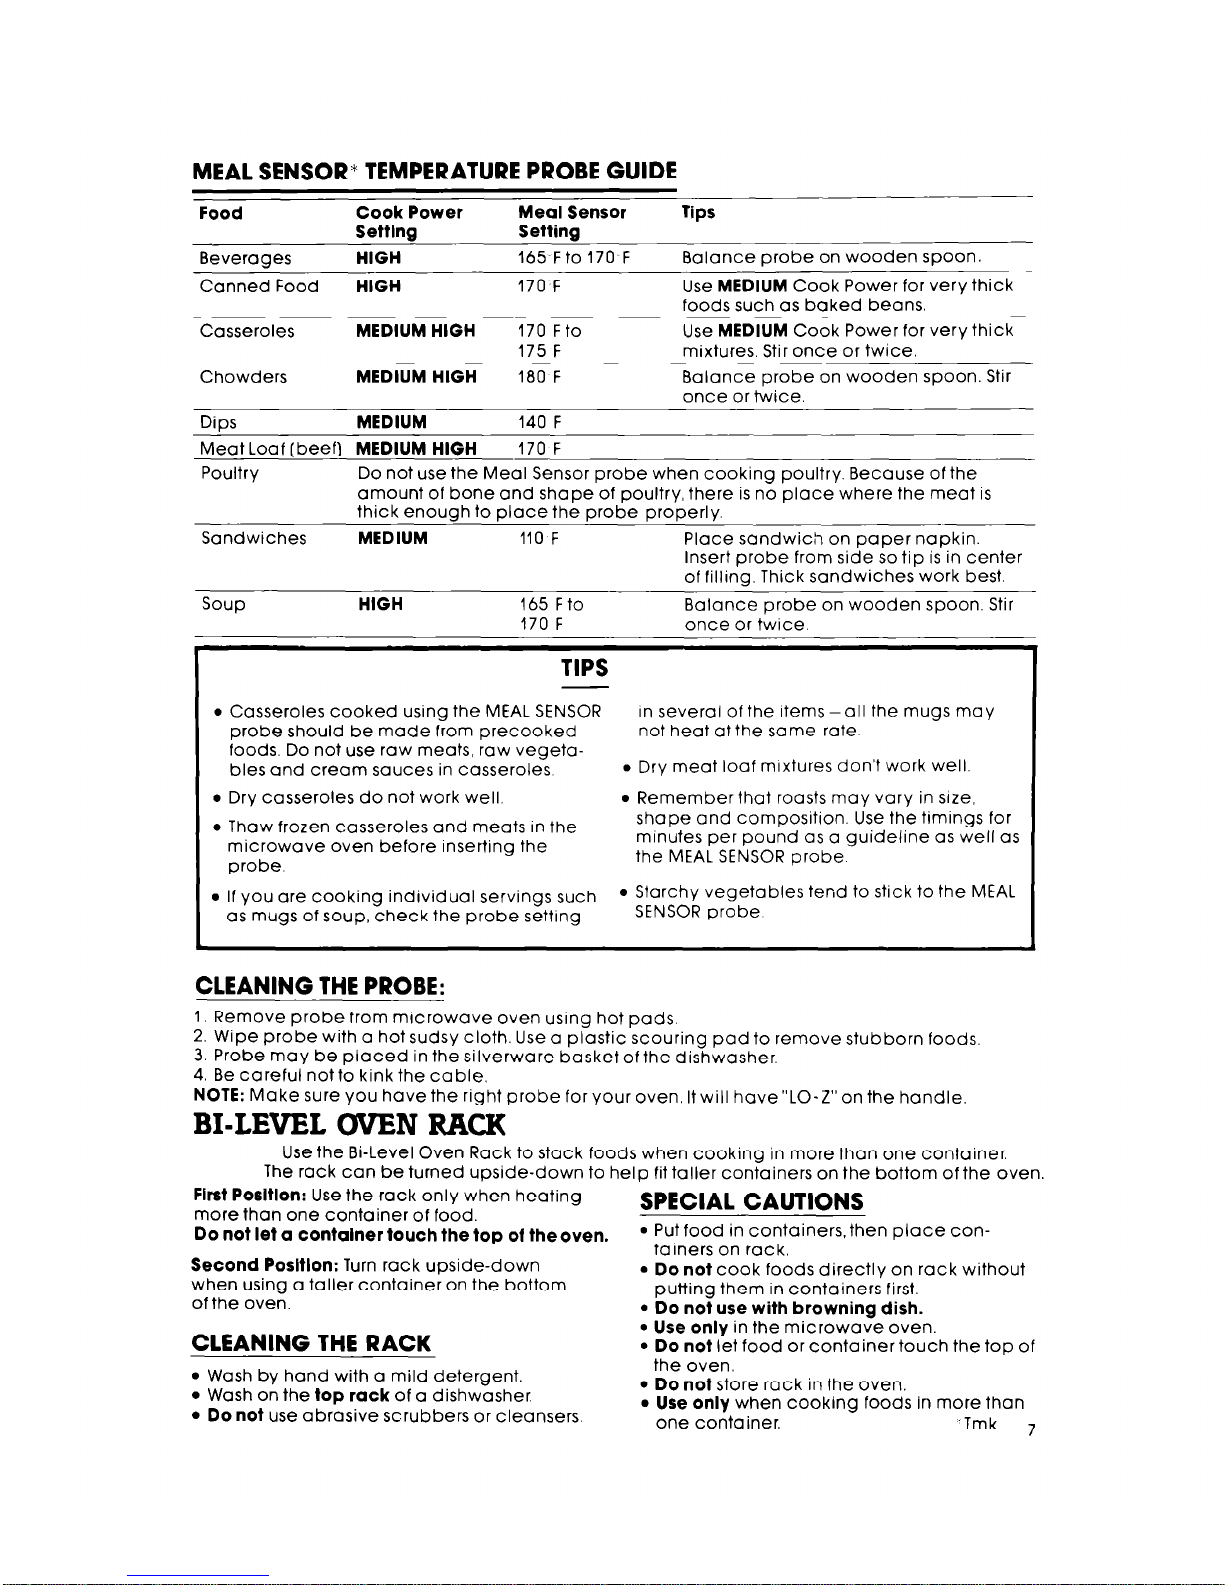
MEAL SENSOR* TEMPERATURE PROBE GUIDE
Food
Cook Power
Meal Sensor Tips
Settlng
Setting
Beverages
HIGH
165 Fto 170 F
Balance probe on wooden spoon.
Canned Food
HIGH
170
F
Use MEDIUM Cook Power for very thick
foods such as baked beans.
Casseroles
MEDIUM HIGH 170 Fto
Use MEDIUM Cook Power for very thick
175 F mixtures. Stir once or twice.
Chowders
MEDIUM HIGH 180 F Balance probe on wooden spoon. Stir
once or twice.
Dips
MEDIUM 140 F
Meat Loaf (beef) MEDIUM HIGH
170 F
Poultry
Do not use the Meal Sensor probe when cooking poultry. Because of the
amount of bone and shape of poultry, there is no place where the meat is
thick enough to place the probe properly.
Sandwiches
MEDIUM 110 F
Place sandwich on paper napkin.
Insert probe from side so tip is in center
of filling. Thick sandwiches work best.
soup
HIGH 165 Fto
Balance probe on wooden spoon. Stir
170 F
once or twice.
TIPS
l
Casseroles cooked using the MEAL SENSOR
probe should be made from precooked
foods. Do not use raw meats, raw vegetables and cream sauces in casseroles.
in several of the Items -all the mugs may
not heat at the same rate
. Dry meat loaf mixtures don’t work well
l
Dry casseroles do not work well
l
Thaw frozen casseroles and meats in the
microwave oven before inserting the
probe.
l
Remember that roasts may vary in size,
shape and composition. Use the timings for
minutes per pound as a guideline as well as
the MEAL SENSOR probe
l
If you are cooking individual servings such
l
Starchy vegetables tend to stick to the MEAL
as mugs of soup, check the probe setting
SENSOR probe
CLEANING THE PROBE:
I. Remove probe from microwave oven using hot pads.
2. Wipe probe with a hot sudsy cloth. Use a plastic scouring pad to remove stubborn foods.
3. Probe may be placed in the silverware basket of the dishwasher.
4. Be careful not to kink the cable.
NOTE: Make sure you have the right probe for your oven, It will have”LO-Z”on the handle.
BI-LEVEL OVEN RACK
Use the Bi-Level Oven Rack to stack foods when cooking in more than one container.
The rack can be turned upside-down to help fit taller containers on the bottom of the oven.
First Pooltlon: Use the rack only when heating
more than one container of food.
SPECIAL CAUTIONS
Do not let a container touch the top of theoven.
l
Put food in containers, then place containers on rack.
Second Posltlon: Turn rack upside-down
when using a taller container on the bottom
of the oven.
l
Do not cook foods directly on rack without
putting them in containers first.
l
Do not use with browning dish.
CLEANING THE RACK
l
Use only in the microwave oven.
l
Do not let food or container touch the top of
l
Wash by hand with a mild detergent.
l
Wash on the top rack of a dishwasher.
l
Do not use abrasive scrubbers or cleansers.
the oven,
l
Do not store rack in the oven.
l
Use only when cooking foods in more than
one container.
.Tmk 7
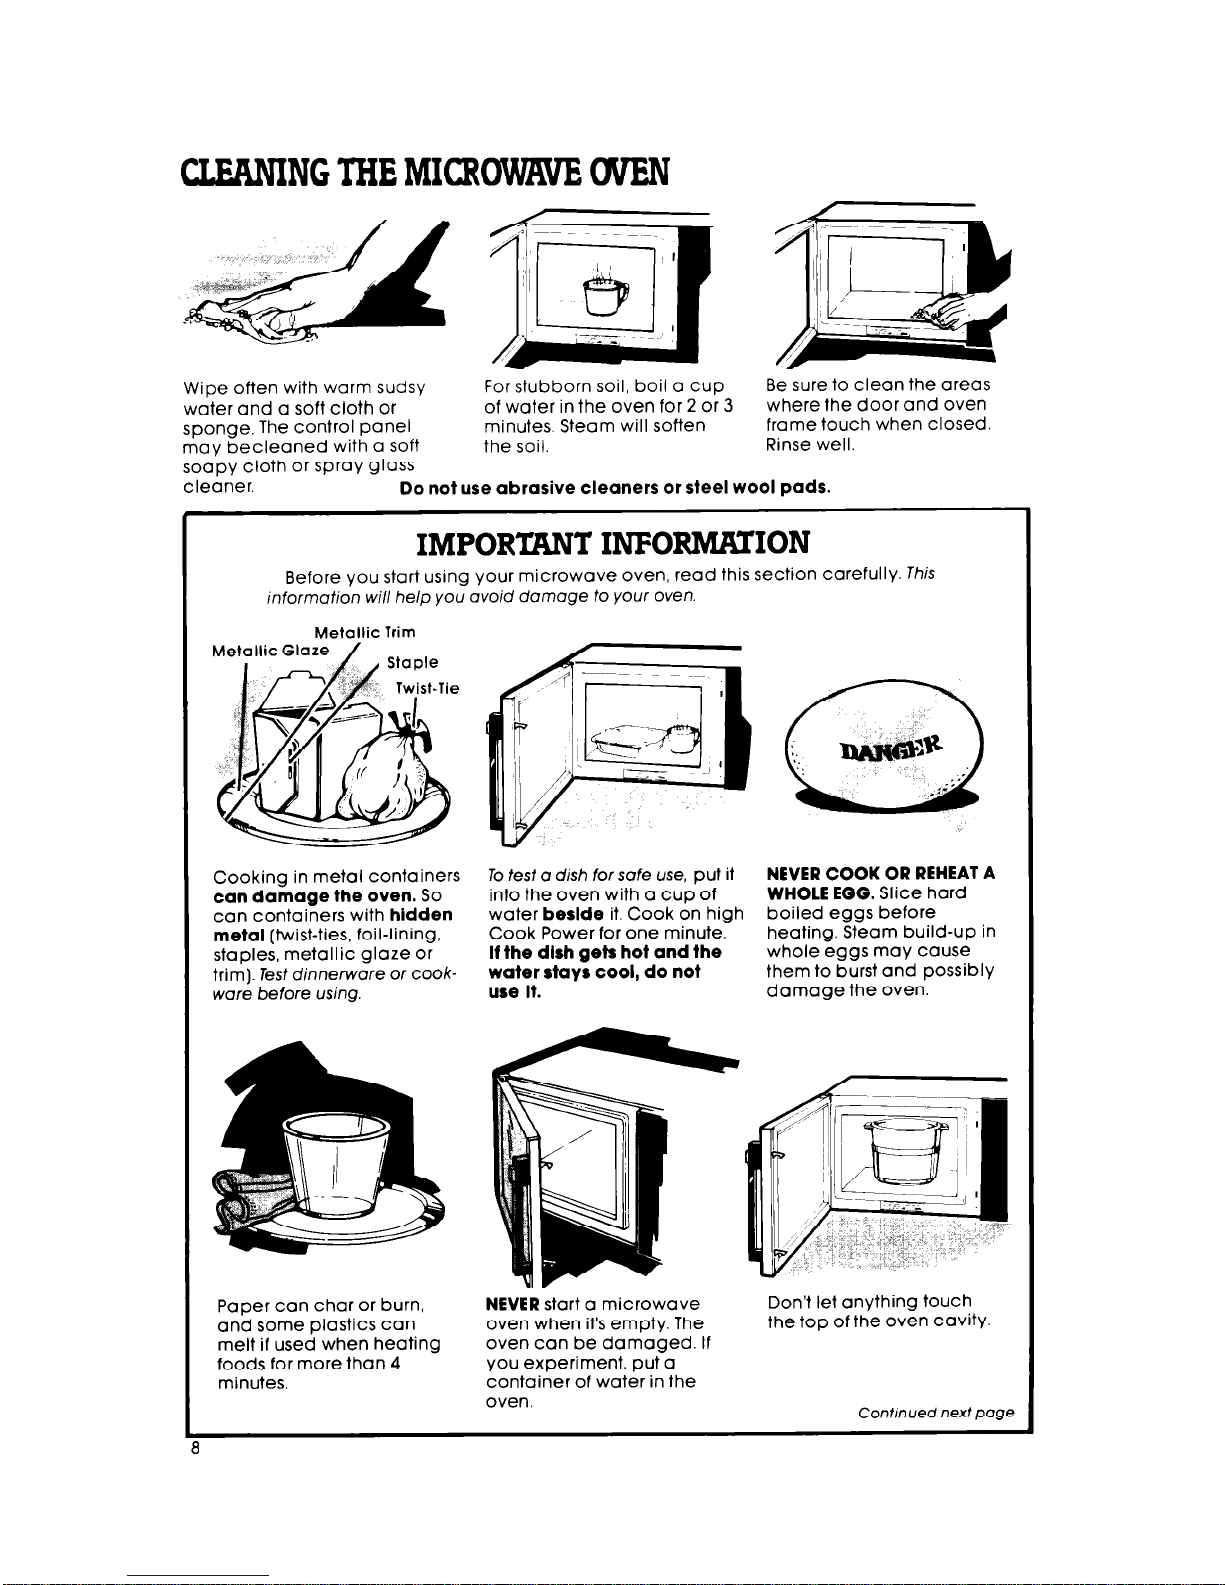
CLEANINGTHEMICROWNEUVEN
Wipe often with warm sudsy
For stubborn soil, boil a cup
Be sure to clean the areas
water and a soft cloth or
of water in the oven for 2 or 3
where the door and oven
sponge.
The control panel
minutes. Steam will soften
frame touch when closed.
may becleaned with a soft
the soil.
Rinse well.
soapy cloth or spray glass
cleaner.
Do not use abrasive cleaners or steel wool pads.
IMPORmT INFORMJXIION
Before you start using your microwave oven, read this section carefully. This
inform&on will help you avoid domoge to your oven.
Metallic Trim
Cooking in metal containers
To tesl o
dish
for safe use, put it
NEVER COOK OR REHEAT A
can damage the oven. So
into the oven with a cup of
WHOLE EGG. Slice hard
can containers with hidden
water beslde it. Cook on high
boiled eggs before
metal [twist-ties, foil-lining,
Cook Power for one minute.
heating. Steam build-up in
staples, metallic glaze or
If the dlsh gets hot and the
whole eggs may cause
trim). Test
dinnerware or cook-
water stays cool, do not
them to burst and possibly
ware before
using.
use It.
damage the oven.
Paper can char or burn,
and some plastics can
melt if used when heating
foods for more than 4
minutes.
NEVER start a microwave
oven when it’s empty. The
oven can be damaged. If
you experiment, put a
container of water in the
oven.
Don’t let anything touch
the top of the oven Cavity.
Continued next page
 Loading...