


A Note To You
2
!EZZE-
3
Getting Acquainted 5
Using Your
Microwave Oven 12
Caring For Your
Microwave Oven 34
How Your
Microwave Oven
wotks
35
Opf-at&~ev
35
Cooking Guide 40
Questions And
Answers 42
If You Need
g!t!~
43
UPPER MICROWAVE OVEN
NOTE: Use and care instructions for the lower
oven are provided in a separate manual.
Warranty
1-800-253-1301
Cdl us with questions or comments.
MODEL RM280PXB
48
,$j f]

A Note To You
Thank you for buying a WhirlpooP appliance.
You have purchased a quality, worMclass home appliance. Years of engineering experience
have gone into its manufacturing. To ensure that you will enjoy many years of trouble-free
operation, we have developed thii Use and Care Guide. It is full of valuable information on
how to operate and maintain your appliance properly and safely. Please read it carefully. Also,
please complete and mail the Ownership Registration Card provided with your appliance. This
will help us notify you about any new information on your appliance.
Your safety is important to us.
This guide contains safety symbols and statements. Please pay special attention to these
symbols and follow any instructions given. Here is a brief explanation of the use of each
symbol.
This symbol will help alert you to such
dangers as personal injury, burns, fire
and electrical shock.
This symbol will help you avoid actions
which could cause product damage
(scratches, dents, etc.) and damage to
your personal property.
Our Consumer Assistance Center number, 1-800-253-1301,
is toll-free, 24 hours a day.
If you ever have a question concerning your appliance’s operation, or if you need service, first
see “If You Need Assistance Or Service” on page 43. If you need further help, feel free to call
our Consumer Assistance Center. When calling, you will need to know your appliance’s
complete model number and serial number. You can find this information on the model and
serial number plate (see diagram in Lower Oven Use and Care Guide). For your convenience,
we have included a handy place below for you to record these numbers, the purchase date
from the sales slip and your dealer’s name and telephone number. Keep this book and the
sales slip together in a safe place for future reference.
Model Number
Serial Number
Purchase Date
Dealer Name
Dealer Phone
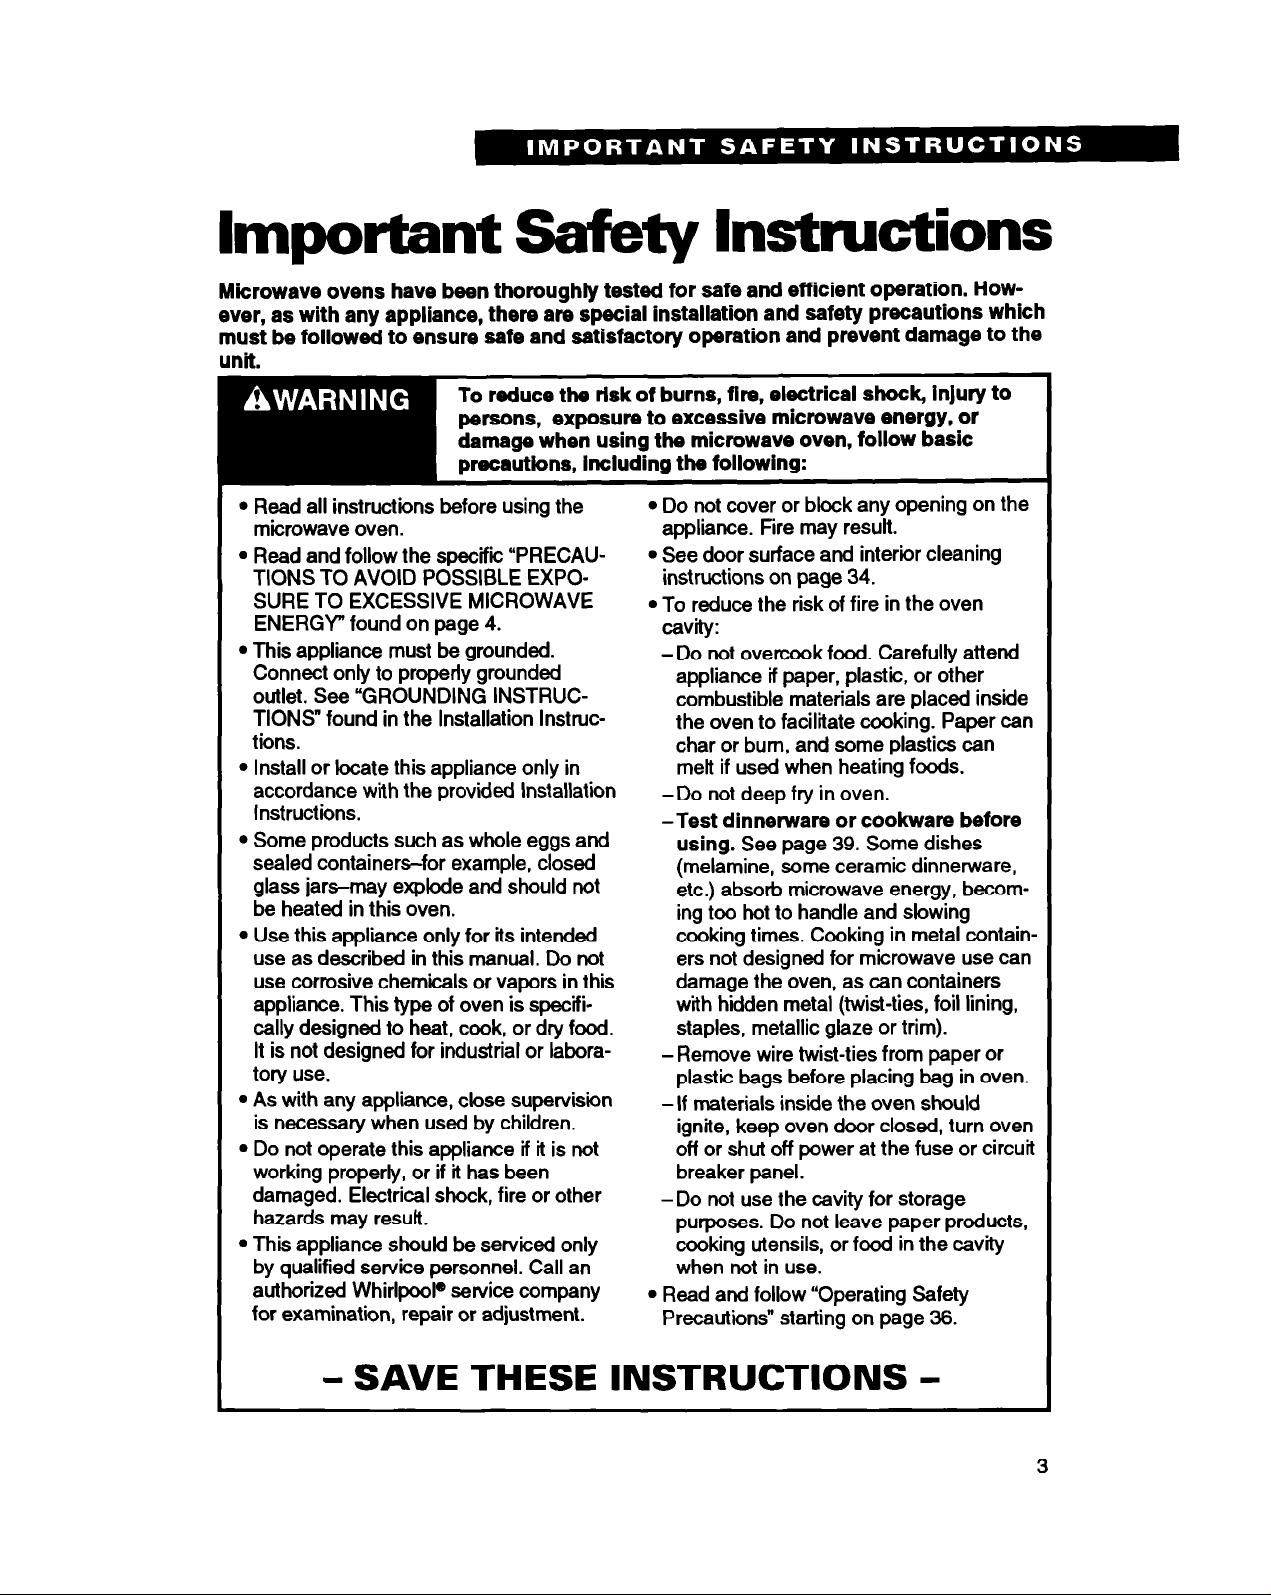
Important Safety Instructions
Microwave ovens have been thoroughly tested for safe and efficient operation. However, as with any appliance, there are special installation and safety precautions which
must be followed to ensure safe and satisfactory operation and prevent damage to the
unit.
To reduce the risk of burns, fire, electrical shock, injury to
persons, exposure to excessive microwave energy, or
damage when using the microwave oven, follow basic
precautions, including the following:
I
l
l
Read all instructions before using the
microwave oven.
l
Read and follow the specifii “PRECAUTIONS TO AVOID POSSIBLE EXPOSURE TO EXCESSIVE MICROWAVE
ENERGY found on page 4.
l
This appliance must be grounded.
Connect only to properly grounded
outlet. See “GROUNDING INSTRUCTIONS” found in the Installation Insttuctions.
l
Install or locate this appliance only in
accordance with the provided Installation
Instructions.
l
Some products such as whole eggs
sealed containers-for example, closed
glass jars-may explode and should not
be heated in this oven.
l
Use this appliance only for its intended
use as described in this manual. Do not
use corrosive chemicals or vapors in this
appliance. This type of oven is specifically designed to heat, cook, or dry food.
It is not designed for industrial or laboratory use.
l
As with any appliance, close supervision
is necessary when used by children.
l
Do not operate this appliance if it is not
working properly, or if it has been
damaged. Electrical shock, fire or other
hazards may result.
l
This appliance should be serviced only
by qualified service personnel. Call an
authorized Whirlpool@ service company
for examination, repair or adjustment.
and
Do not cover or block any opening on the
appliance. Fire may result.
l
See door surface and interior cleaning
instructions on page 34.
l
To reduce the risk of fire in the oven
cavity:
-Do not overcook food. Carefully attend
appliance if paper, plastic, or other
combustible materials are placed inside
the oven to facilitate cooking. Paper can
char or bum, and some plastics can
melt if used when heating foods.
-Do not deep fry in oven.
-Test dinnemrare or cookware before
using.
(melamine, some ceramic dinnennrare,
etc.) absorb microwave energy, becoming too hot to handle and slowing
cooking times. Cooking in metal containers not designed for microwave use can
damage the oven, as can containers
with hidden metal (twist-ties, foil lining,
staples, metallic glaze or trim).
-Remove wire twist-ties from paper or
plastic bags before placing bag in oven.
-If materials inside the oven should
ignite, keep oven door closed, turn oven
off or shut off power at the fuse or circuit
breaker panel.
-Do not use the cavity for storage
purposes. Do not leave paper products,
cooking utensils, or food in the cavity
when not in use.
l
Read and follow “Operating Safety
Precautions” starting on page 36.
See page 39. Some dishes
- SAVE THESE INSTRUCTIONS -
3

You are responsible for:
l
Reading and following the INSTALLATION
INSTRUCTIONS packed with your oven.
l
Installing and leveling the oven in a
cabinet strong enough to support its
weight, and where it is protected from the
elements. The microwave oven shoukf be
at a temperature above 50°F (10%) for
proper operation.
l
Properly connecting the oven to electrical
supply and grounding it.
l
Making sure the oven is not used by
anyone unable to operate it properly.
l
Properly maintaining the oven.
l
Using the microwave oven only for jobs
expected of a home microwave oven.
PRECAUTIONS TO AVOID POSSIBLE
EXPOSURE TO EXCESSIVE
MICROWAVE ENERGY...
Do
not
attempt to operate this oven with
the door open since open-door operation
can result in harmful exposure to microwave energy. It is important not to defeat
or tamper with the safety interlocks.
Do
not
place any object between the oven
front face and the door or allow soil or
cleaner residue to accumulate on sealing
surfaces.
Do
not
operate the oven if it is damaged.
It is particularly important that the oven
door close properly and that there is no
damage to the:
(1) Door (bent),
(2) Hinges and latches (broken or loos-
ened),
(3) Door seals and sealing surfaces.
Do
not
operate the microwave oven if the
door window is broken.
The microwave oven should be checked
for microwave leakage by qualified service
Dersonnel after a repair is made.
The oven should not be adjusted or
repaired by anyone except properly
qualified service personnel.
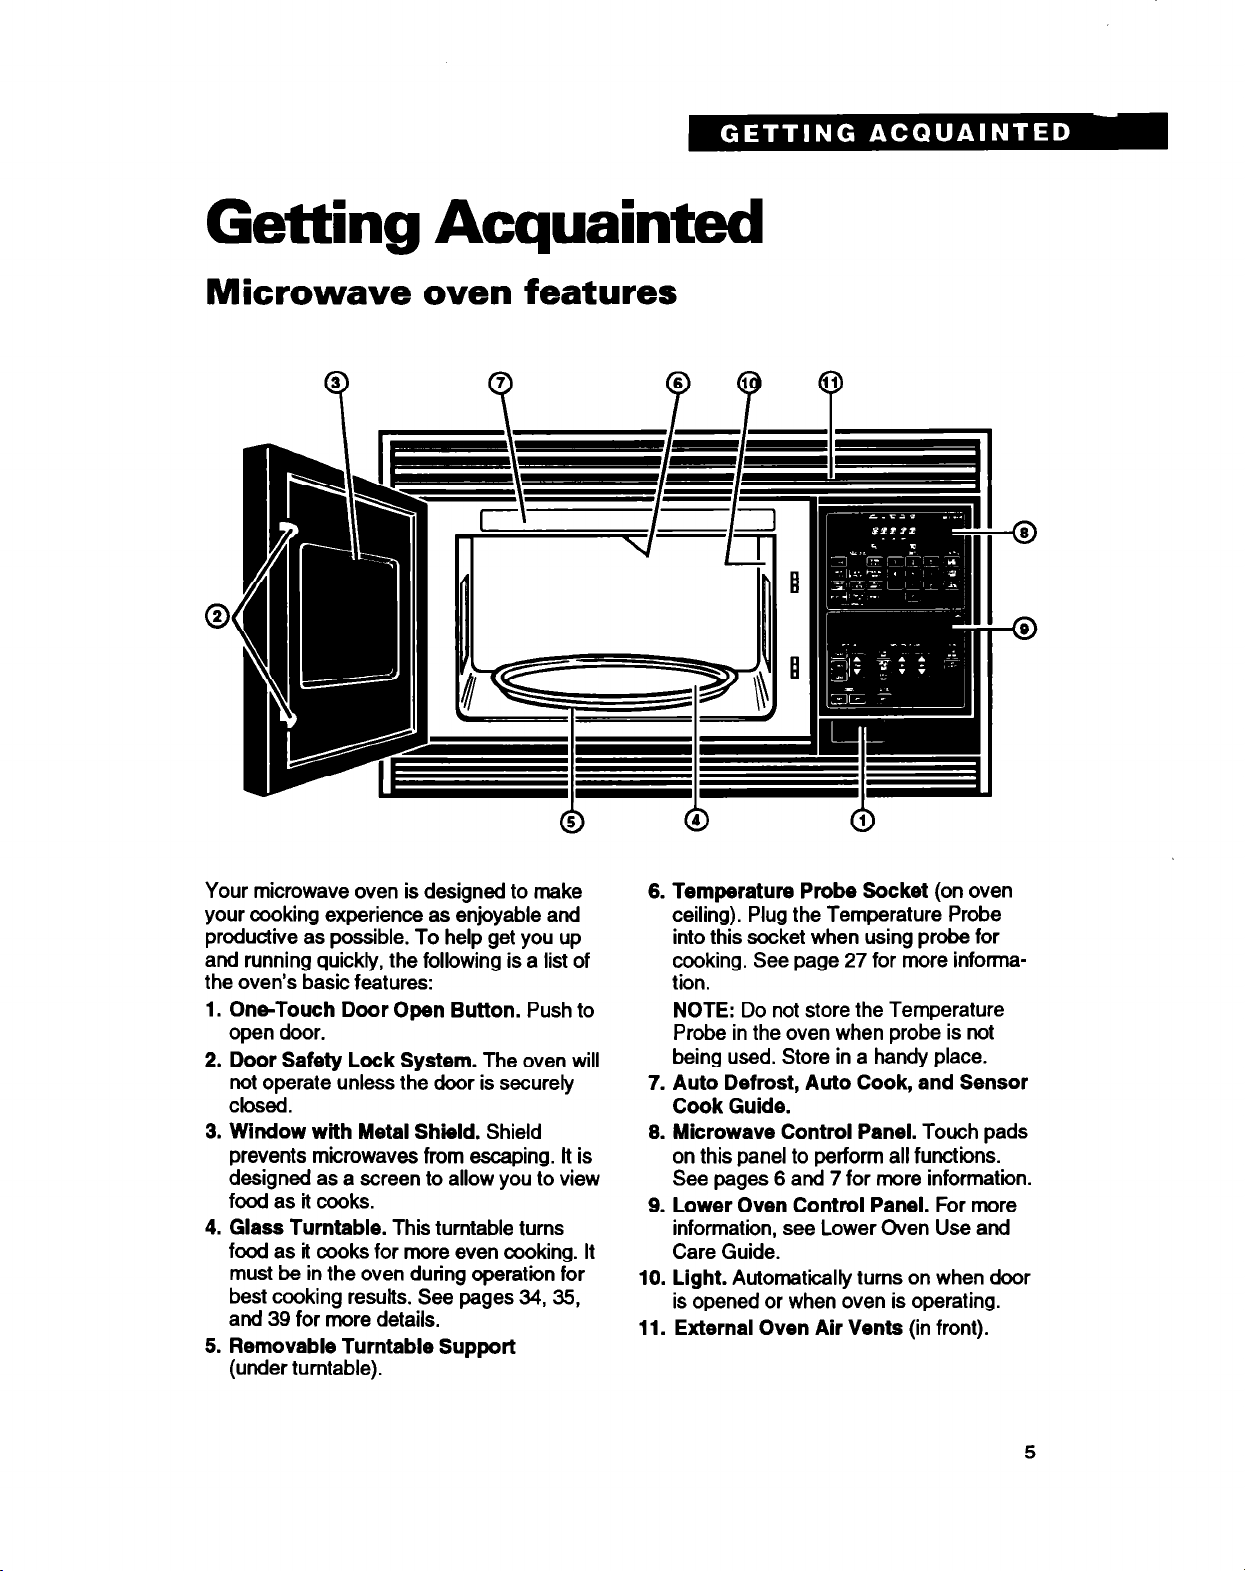
Getting Acquainted
Microwave oven features
Your microwave oven is designed to make
your cooking experience as enjoyable and
productive
and running quickly, the following is a list of
the oven’s basic features:
1. OneTouch Door Open Button.
open door.
2.
Door Safety Lock System.
not operate unless the door is securely
Closed.
3. Window with Metal Shield.
prevents microwaves from escaping. lt is
designed as a screen to allow you to view
food as it cooks.
4. Glass Turntable.
food as it cooks for more even cooking. It
must be in the oven during operation for
best cooking results. See pages 34,35,
and 39 for more details.
as
possible. To help get you up
The oven will
Shield
This turntable turns
Push to
5. Removable Turntable Support
(under turntable).
6. Temperature Probe Socket
ceiling). Plug the Temperature Probe
into this socket when using probe for
cooking. See page 27 for more information.
NOTE:
Probe in the oven when probe is not
being used. Store in a handy place.
Do not store the Temperature
(on oven
7. Auto Defrost, Auto Cook, and Sensor
Cook Guide.
6. Microwave Control Panel.
on this panel to perform all functions.
See pages 6 and 7 for more information.
9. Lower Oven Control Panel.
information, see Lower Oven Use and
Care Guide.
10. Light.
Automatically turns on when door
is opened or when oven is operating.
11. External Oven Air Vents
Touch pads
For more
(in front).
5

Control panel features
Your microwave oven control panel lets you
select the desired cooking function quickly
and easily. All you have to do is touch the
necessary Command Pad. The following is a
list of all the Command and Number Pads
located on the control panel. For more
information, see pages 12-33.
Audible signals are available to guide you
when setting and using your oven. A programming tone will sound each time you
touch a pad. Four tones signal the end of a
cooking cycle. One three-second tone
signals the end of a Minute Timer function. If
you do not hear a tone, it is because of
incorrectly entered instructions.
1. Display.
to tell you cooking time settings and
cooking functions selected. See page 12
for more information.
2.
COOK.
the oven to cook. See pages 15 and 16 for
more information.
3. AUTO COOK.
common microwave-prepared foods
without needing to program times and cook
powers. See page 22 for more information.
4. PROBE TEMP.
the Temperature Probe to cook. Touch
PROBE TEMP followed by Number Pads
to set desired final food temperature and
COOK POWER followed by a Number Pad
for the Cook Power you want. See pages
27-29 for more information.
This display includes indicators
Touch this pad when programming
Touch this pad to cook
Touch this pad when using
6
5.
POPCORN.
popcorn in your microwave oven. The
oven will automatically heat for a preset
time at a preset Cook Power. See page
31 for more information.
6. WARMMOLD.
hot, cooked foods safely warm in your
microwave oven for up to 99 minutes,
99 seconds. WARM/HOLD can be used
by itself, or it can automatically follow a
cooking cycle. See page 21 for more
information.
7. AUTO DEFROST.
lowed by Number Pads to thaw frozen
food by weight. See page 18 for more
information.
6. PERSONAL CHOICE.
recall one cooking instruction previously
programmed into memory. See page 30
for more information.
Touch this pad when popping
Touch this pad to keep
Touch this pad fol-
Touch this pad to

9. COOK POWER.
by a Number Pad to set the amount of
microwave energy released to cook the
food. The higher the number, the higher
the microwave power or “cooking speed”.
See page 16 for more information. See
the “Microwave cooking chart” on page
41 for specific Cook Powers to use for the
foods you are cooking.
10. ADD MINUTE.
for one minute or to add an extra
minute, at 100% Cook Power, to your
cooking cycle. See page 33 for more
information.
11. SENSOR COOK.
followed by a setting selection to cook
food with the sensor. The oven automatically adjusts cooking times and
powers by detecting the amount of
moisture and humidity emitted by the
food during cooking. See page 24 for
more information.
Touch this pad followed
Touch this pad to cook
Touch this pad
12. REHEAT.
many of your favorite foods automati-
cally without setting the time or Cook
Power. See page 32 for more informa-
tion.
13. Number
enter cooking times, Cook Powers,
auantities or weiahts. Use also to set the
tiinute Timer. ”
14. START/ENTER.
setting a function on the microwave
oven to start the function. If you open
the door after the oven begins to cook,
retouch START/ENTER.
15. PAUSE/TIMER.
the Minute Timer or to stop the oven
between cooking stages. See pages 14
and 20 for more information.
16. OFF/CANCEL.
an incorrect command, cancel the
Minute Timer, cancel a program during
cooking, or clear the Display. See page
14 for more information.
Touch this pad to reheat
Pads.
Touch Number Pads to
Touch this pad after
Touch this pad to set
Touch this pad to erase
Quick reference cooking guide
Your microwave oven gives you a wide range of cooking capabilities. The following chart can
be used as a quick reference when cooking. For more in-depth information, see the corresponding sections in this Use and Care Guide.
NOTE:
It may be necessary to touch OFF/CANCEL to clear the Display before setting a
If you want to . . .
Use the Minute Timer
The Minute Timer lets
you time any cooking
activities in your
kitchen.
You . . .
1.
Touch PAUSE/TIMER.
2. Touch Number Pads to enter the
desired time.
3. Touch START/ENTER.
To clear the Minute Timer:
1.
Touch PAUSWIMER.
2. Touch OFF/CANCEL.
Example . . .
. .
.
q
mmm
I l
.
q
. .
.
q
e
Iill!!
~_ .
continued on next
page
7
If you want to . . .
You . . .
Example . . .
Cook at high cook 1.
power
High power cooking is
perfect for quick
cooking of small items
and separate portions.
Cook at lower cook
powers
Cooking at lower
powers is necessary for
efficient cooking of
many foods. Failure to
use the correct Cook
Power may result in
overcooking or
undercooking.
2. Touch COOK.
3. Touch Number Pads for the
4. Touch START/ENTER.
1.
2. Touch COOK.
3. Touch Number Pads for the
4. Touch COOK POWER.
5. Touch a Number Pad for the
6. Touch START/ENTER.
Put food in the oven and close
the door.
cooking time you want.
Put food in the oven and close
the door.
cooking time you want.
Cook Power you want.
ooo
Am
m3
. *
.
q
m
aa
. . -
ml
Ia
I -
.
q
t
t
Defrost automatically
Your microwave oven the door.
automatically defrosts a
variety of common
meats at preset Cook
Powers for preset
times.
8
1.
Put food in the oven and close
2. Touch AUTO DEFROST.
3. Touch a Number Pad for the
desired setting. (See “Auto
defrost chart” on page 19.)
4. Touch Number Pads for the
weight of the item to be
defrosted. (See “Auto defrost
chart” on page 19.)
5. Touch START/ENTER.
.
ml
mm
Ra
* a
‘.
m
. .
.
If you want to . . .
You . . .
Example . . .
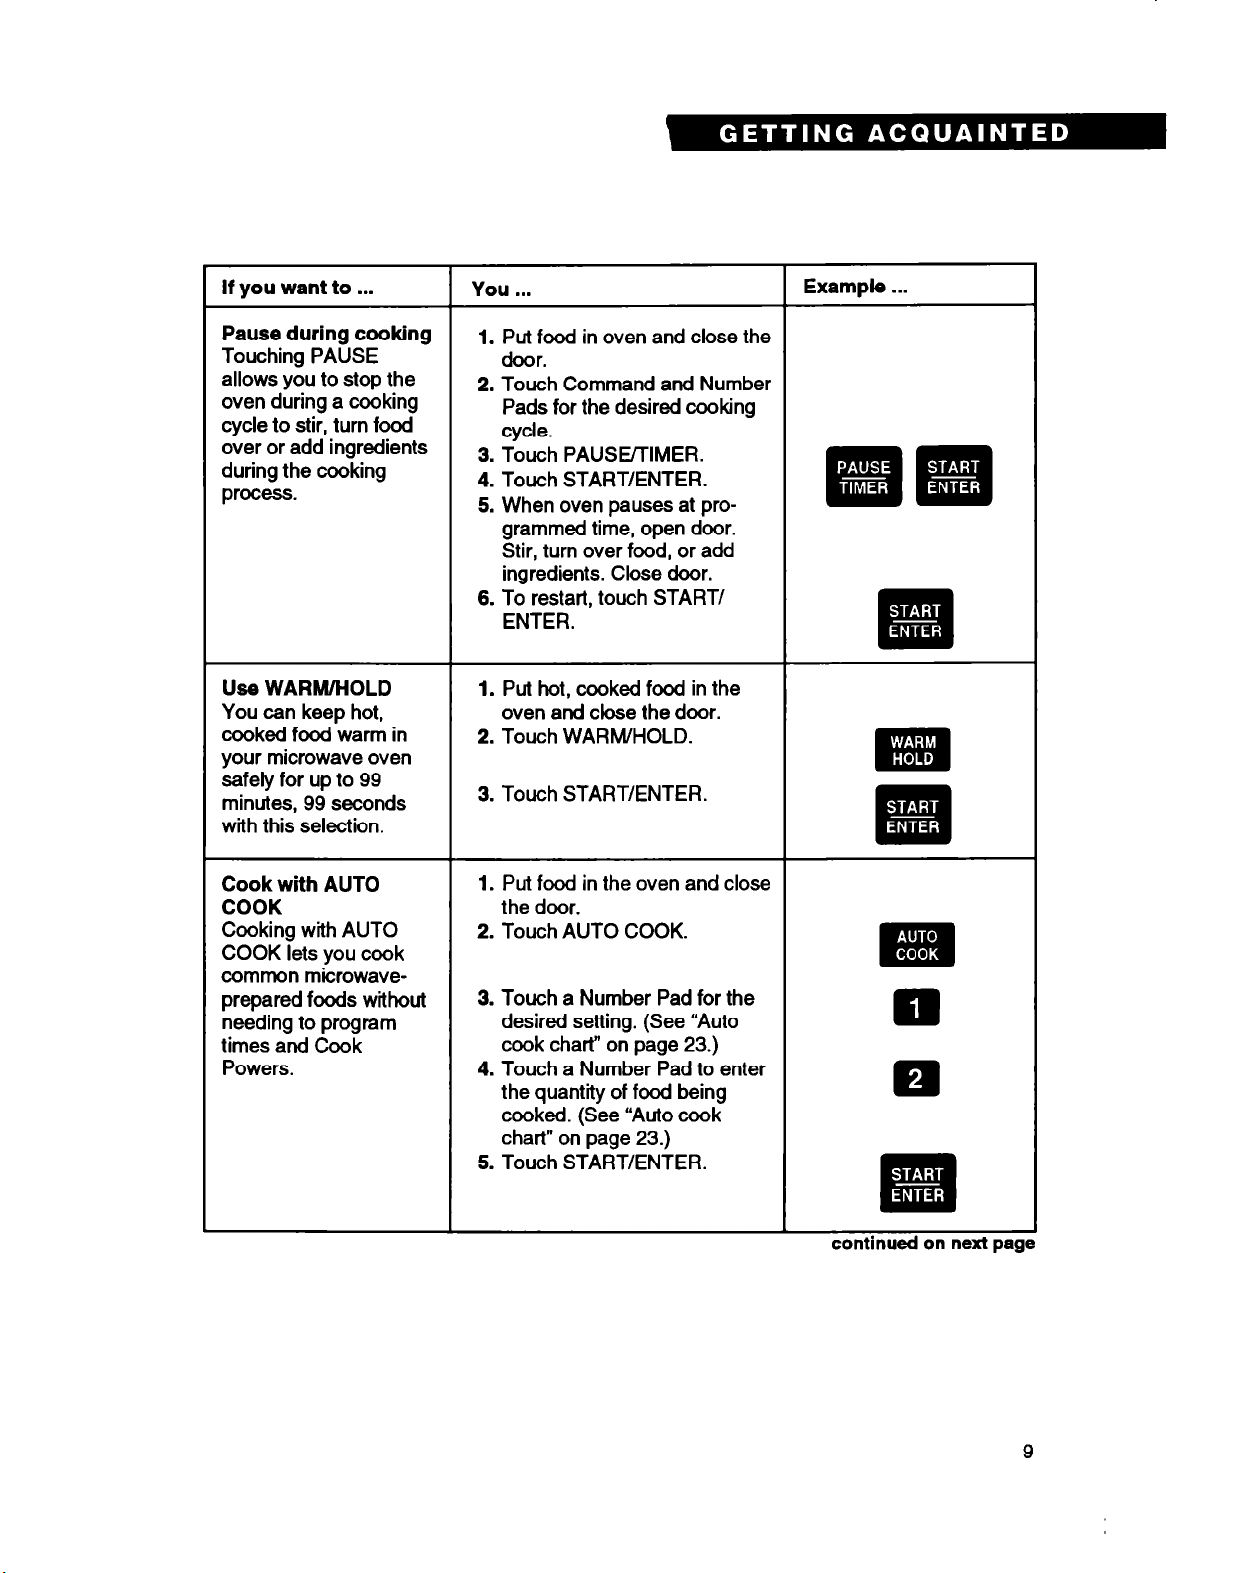
Pause during cooking
Touching PAUSE
allows you to stop the
oven during a cooking
cycle to stir, turn food
over or add ingredients
during the cooking
process.
Use WARM/HOLD
You can keep hot,
cooked food warm in
your microwave oven
safely for up to 99
minutes, 99 seconds
with this selection.
Cook with AUTO
COOK
Cooking with AUTO
COOK lets you cook
common microwaveprepared foods without
needing to program
times and Cook
Powers.
1.
Put food in oven
door.
2. Touch Command and Number
Pads for the desired cooking
cycle.
3. Touch PAUSE/TIMER.
4. Touch START/ENTER.
5. When oven pauses at programmed time, open door.
Stir, turn over food, or add
ingredients. Close door.
6. To restart, touch START/
ENTER.
1.
Put hot, cooked food in the
oven
and close the door.
2. Touch WARMHOLD.
3. Touch START/ENTER.
1.
Put food in the oven and close
the door.
2. Touch AUTO COOK.
3. Touch a Number Pad for the
desired setting. (See “Auto
cook chart” on page 23.)
4. Touch a Number Pad to enter
the quantity of food being
cooked. (See “Auto cook
chart” on page 23.)
5. Touch START/ENTER.
and
close the
q f#lij
. -
.
q
* .
a B
m
1 -
.
fllllia
continued
on next page
9

If you want to . . .
Cook with SENSOR
COOK
SENSOR COOK
automatically adjusts
cooking times and
powers by detecting the
moisture and humidity
emitted by the food as it
heats.
Cook with the Tem-
perature Probe
The Temperature Probe
lets you tell the oven to
turn off automatically
when the food reaches
a temperature you
specify. Temperature
Probe cooking ensures
that food does not
overcook or undercook.
You . . .
1.
Put food in oven
door.
2. Touch SENSOR COOK.
3. Touch a Number Pad for
desired setting. (See “Sensor
cook chart” on page 25.)
4. Touch START/ENTER.
1.
Insert at least % of Tempera-
ture Probe into food.
2. Place food in oven and plug
probe into socket on oven
ceiling.
3. Touch PROBE TEMP.
4. Touch Number Pads for food
temperature you want.
5. Touch COOK POWER, followed
by a Number Pad for the Cook
Power you want.
6. Touch START/ENTER.
and
close the
Example . . .
m
m
q
“I:
wa
DDD
mm
0’
#I
. -
.
.
10
To check probe temperature you
programmed while cooking:
Touch PROBE TEMP.

If you want to . . .
You . . .
Example . . .
Use PERSONAL
CHOICE
PERSONAL CHOICE
lets you recall one
cooking instruction
previously placed in
memory.
To program:
1,
Touch PERSONAL CHOICE
twice.
2. Touch a Command Pad for the
cooking cycle you want.
3. Touch Number Pads for the
cooking time or temperature
you want.
4. Touch COOK POWER and
then a Number Pad for the
Cook Power you want.
5. Touch PERSONAL CHOICE.
To use Personal Choice:
1.
Touch PERSONAL CHOICE.
2. Touch START/ENTER.
00
maa
m
t
Pop popcorn
POPCORN lets you pop
popcorn by touching
just one pad.
Reheat food
REHEAT lets you
reheat many foods by
touching just one pad.
Add a minute to your
cooking
Touching ADD MINUTE
lets you cook for a
minute at 100% Cook
Power.
1.
Place bag in center of upsidedown glass pie plate.
2. Touch POPCORN.
1.
Put food in oven and close the
door.
2. Touch REHEAT.
1.
Make sure food is in oven.
2. Touch ADD MINUTE.
l a’ 0.
m
11
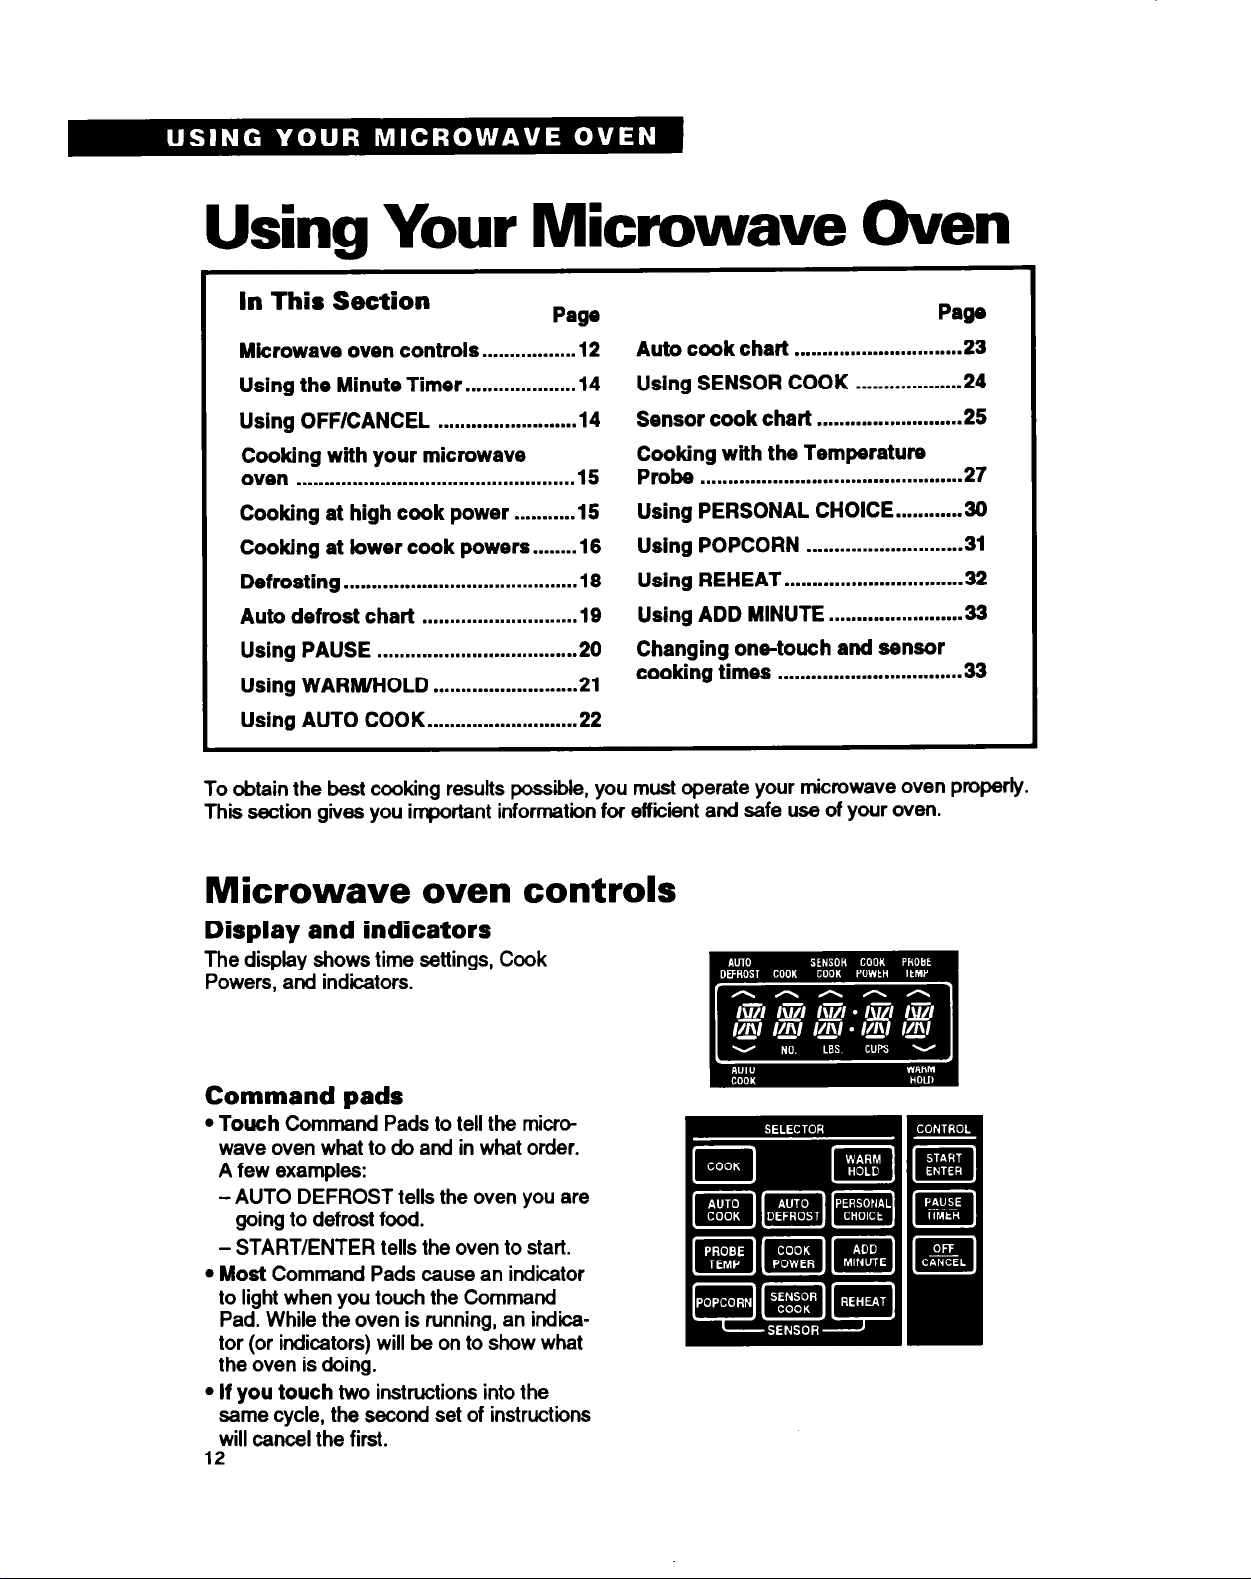
Using Your Microwave Oven
In This Section
Mkrowave
Using
Using
Cooking with your microwave
oven
Cooking
Cooking at tower cook powers..
Defrosting
Auto defrost chart
Using PAUSE
Using WARM/HOLD .......................... 21
oven
controls..
the Minute
Timer.. .................
OFF/CANCEL
.............. .12
........................
.14
.14
.................................................. 15
at high
cook power
.......... .15
..... .16
..........................................
16
............................ 19
.................................... 20
Auto cook chart
Using SENSOR
Sensor cook chart
.............................. 23
COOK
..................
.......................... 25
Cooking with the Temperature
Probe
Using PERSONAL CHOICE..
Using POPCORN
Using REHEAT
Using ADD
............................................... 27
.........
............................ 31
................................ 32
MINUTE
.......................
Changing one-touch and sensor
cooking times
................................. 33
.24
.36
.33
Using AUTO COOK ........................... 22
To obtain the best cooking results possible, you must operate your microwave oven properly.
This section gives you important information for effiiient and safe use of your oven.
Microwave oven controls
Display and indicators
The display shows time settings, Cook
Powers, and indicators.
Command pads
l
Touch
wave oven what to do and in what order.
A few examples:
- AUTO DEFROST tells the oven you are
- START/ENTER tells the oven to start.
l Most
to light when you touch the Command
Pad. While the oven is running, an indicator (or indicators) will be on to show what
the oven is doing.
l
If you touch
same cycle, the second set of instructions
will cancel the first.
12
Command Pads to tell the micro-
going to defrost food.
Command Pads cause an indicator
two instructions into the
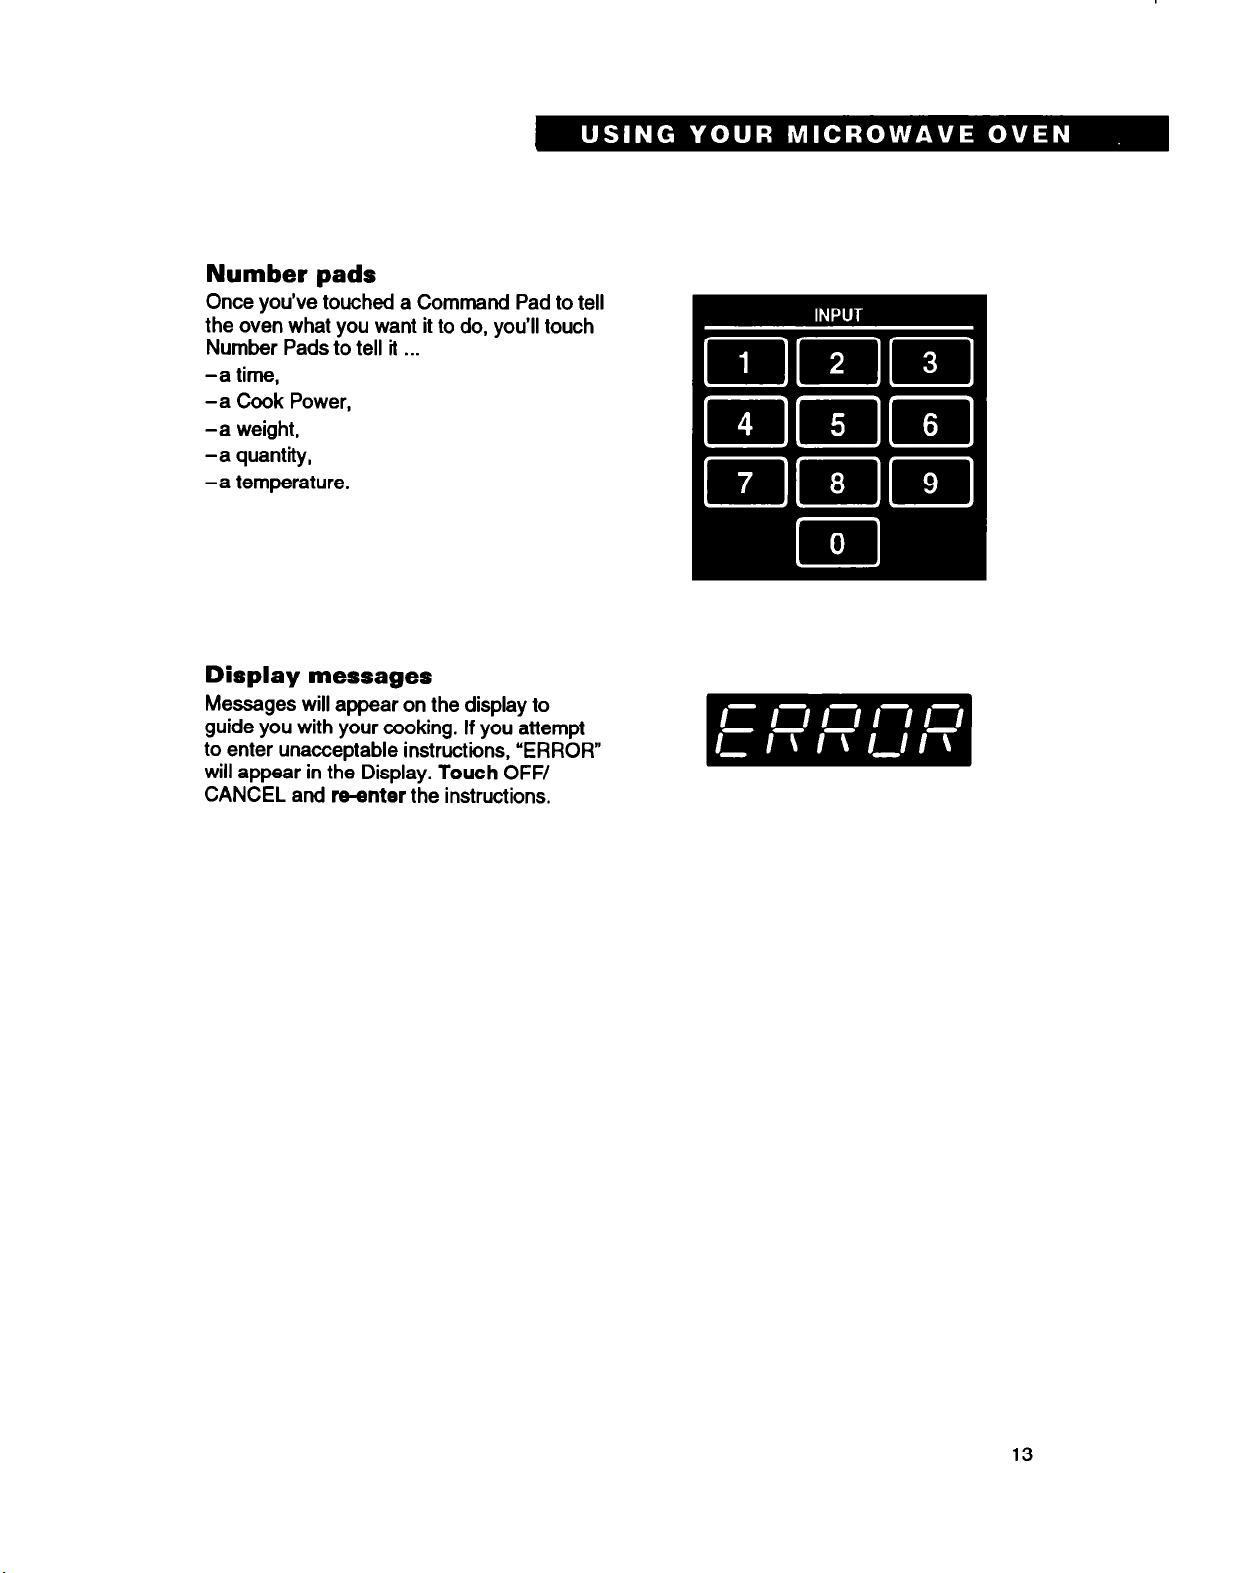
Number pads
Once you’ve touched a Command Pad to tell
the oven what you want it to do, you’ll touch
Number Pads to tell it . . .
-a time,
-a Cook Power,
-a weight,
-a quantity,
-a temperature.
Display messages
Messages will appear on the display to
guide you with your cooking. If you attempt
to enter unacceptable instructions, “ERROR
will appear in the Display. Touch OFF/
CANCEL and
m-enter
the instructions.
13

Using the Minute Timer
You can use your microwave oven as a
kitchen timer. Use the Minute Timer for
timing up to 99 minutes, 99 seconds.
1. Touch
2.
Touch
seconds you want. The Display will show
the numbers you touched
you touched them.
3 minutes.
3.
Touch START/ENTER.
count down to show you how much time
is left. During the countdown, the oven
will be dark and the fan will be off.
4.
When the set time ends,
will sound.
PAUSE/TIMER.
Number Pads for the minutes and
in the order
This example shows
The Display will
one long tone
To cancel the Minute Timer:
1. Touch
2. Touch OFF/CANCEL.
PAUSE/TIMER.
Using OFF/CANCEL
Touch
l
l
l
NOTE:
by opening the door.
touch
14
OFF/CANCEL to:
Erase
instructions if you make a mistake
during programming.
Cancel
Cancel
the Minute Timer.
a program during cooking.
You can stop the oven during a cycle
Close
the door and
START/ENTER to restart.

Cooking with your microwave oven
l
~~+gltlt t he best coo king
l
Although a new rating method*
this oven at 900 watts, you may use a
reliable cookbook and recipes developed
for microwave ovens previously rated at
700-800 watts.
l
ALWAYS cook
recommended cooking time. If necessary,
touch ADD MINUTE while the oven is
operating or after it has completed the
cooking cycle. (See page 33 for more
information.) Then check for doneness to
avoid overcooking the food.
.
.
rates
food for the minimum
Stir, turn over or rearrange
being cooked about halfway through the
cooking time for most even doneness
with all recipes.
l
If a glass cover is not available, use wax
paper, paper towels or microwaveapproved plastic wrap.
to vent steam during cooking.
* IEC-705 Ted Pdure. The IEC-705 Test Prdum b an Inismatbn-
ally recognlzd method of rethg mkrowave w&lage oulpul and doecl not
mpmsent n actual change to cutpti power or cod&g periormflnce.
Cooking at high cook power
Follow these steps to cook at
1. Put
2. Touch
food in the oven and
COOK. The Display will show
“0O:Oo”.
high power:
close
the door.
the food
Turn back
a corner
3. Touch
you want. The Display will show the
numbers you touched
touched them.
1 minute, 30 seconds.
4. Touch
automatically cook at high Cook Power.
The Display counts down the time to
show how much time is left in the cycle.
When the cooking time ends, four tones
will sound. “END” will show on the
Display.
the oven door.
NOTE:
time while cooking is in progress,
COOK,
5 seconds, then
Number Pads for the cooking time
In the order you
The example shows
START/ENTER. The oven will
Touch
If you want to change the cooking
OFF/CANCEL or
touch
touch
in the new time within
touch
START/ENTER.
open

Cooking at lower cook powers
For best results, some recipes call for lower
Cook Powers. The lower the Cook Power,
the slower the cooking. Each Number Pad
also stands for a different percentage of
Cook Power. Many microwave cookbook
recipes tell you by number, percent or name
which Cook Power to use.
The following chart gives the percentage of
Cook Power each Number Pad stands for,
and Cook Power name usually used:
Automatic 100% of full power HIGH
9=90% of full power
8=80% of full power
7=70% of full power MED-HIGH
6=60% of full power
5=50% of full power MED
4=40% of full power
3=30% of full power MED-LOW
2=20% of full power
1 =lO% of full power LOW
1.
Put
food in the oven and close the door.
2. Touch
“00:00”.
COOK. The Display will show
3. Touch
you want. The Display will show the
numbers you touched
touched them.
7 minutes, 30 seconds.
4. Touch
show “P-HI”.
16
Number Pads for the cooking time
in the order you
This example shows
COOK POWER. The Display will

5. Touch
you want. The Display will show what you
touched. This example shows you
touched Number Pad 5 for 50% of full
power.
a Number Pad for the Cook Power
6. Touch
counts down the time to show how much
cooking time is left in the cycle. When the
cooking time ends, four tones will sound.
“END” will show on the Display.
OFF/CANCEL or
clear the Display.
START/ENTER. The Display
Touch
open
the oven door to
To check Cook Power after
cooking has started:
Touch
percentage or “HI” will show in the Display
for three seconds.
COOK POWER. The Cook Power
To change Cook Power after
cooking has started:
l
Follow
Power lower than HI.
l
Touch
from a lower Cook Power to HI.
Steps 4,5 and 6 to set a Cook
COOK POWER twice to change
17

Defrosting
Your microwave oven automatically defrosts
a variety of common meats at preset Cook
Powers for preset times. The 3-stage Auto
Defrost Cycle is programmed for: Roast
Beef, Pork; Steaks, Chops, Fish; Ground
Meat; Chicken, Whole; and Chicken Pieces.
All you do is touch the Number Pad as-
1.
Put
frozen food in the oven and close the
door.
2.
Touch
DEFROST Indicator will come on and
“FOOD” will show on the Display.
3.
Choose
touching the appropriate Number Pad.
The Display will show “ENTER” and the
“LBS.” Indicator will be displayed. This
example shows an entry of “2” for Steaks,
Chops, Fish. (See the “Auto defrost chart”
on page 19 or the Cook Guide label on
the frame behind the door for Auto
Defrost settings.)
4. Touch
weight. The weight will appear on the
Display. This example shows an entry of
“2.0” for two pounds.
NOTE:
Display, touch OFF/CANCEL
over. See the “Auto defrost chart” on page
19 for weight ranges available for each
food category.
5. Touch
count down the time to show how much
defrosting time is left.
AUTO DEFROST. The AUTO
an Auto Defrost setting by
Number Pads to enter the foods
If “ERROR” appears on the
and start
START/ENTER. The Display will
signed to the desired category and enter the
weight of the items being heated. Your
microwave oven does the rest.
NOTE:
sure the Display is blank. lf the Display is not
blank, touch OFF/CANCEL once or twice.
Before using AUTO DEFROST, be
m
I .
.
q
6. After the first stage is completed, the
oven will stop, two tones will sound, and
directions will appear on the Display.
Open the door, turn meat over and
shield
shown are just examples of directions you
will see, depending on the type of meat
being thawed.)
START” will appear.
18
any warm portions. (The Displays
Close
the door. “PRESS

7.
Touch
continue to count down the second
of the defrost cycle.
START/ENTER. The Display will
stage
6. After the second stage is completed,
the oven will stop, two tones will sound,
and directions will
Open
the door,
tions and
START” will appear.
9. Touch
defrosting.
close
START/ENTER to complete
appear
shield
the door. “PRESS
on the Display.
any warm por-
’ . .
q
I .
.
Ii!
10. After defrosting,
directions will appear on the Display.
Open
the door or
the oven will stop and
touch
OFF/CANCEL.
Auto defrost chart
;EITlNG FOOD AMOUNT
1 Roast
Beef,
Pork
2 Steaks,
Chops,
Fish
3 Ground
Meat
4 Chicken,
Whole
2.5-6.0 Ibs
0.5-4.0 Ibs
0.5-3.0 Ibs
2.5-6.0 Ibs
After 1st stage, turn over and shield any warm portions
with aluminum foil.
After the 2nd stage, turn over and shield any warm portions with aluminum foil.
Stand, covered 30-60 minutes.
After the 1 st stage, turn over and shield any warm portions
with aluminum foil.
After the 2nd stage, shield any warm portions with aluminum foil.
Stand, 1 O-l 5 minutes.
Remove any thawed parts after each stage.
Stand, 5-10 minutes.
Remove giblets before freezing poultry for more uniform
defrosting.
After the 1st stage, turn over and shield any warm portions
with aluminum foil.
After the 2nd stage, shield any warm portions with alumi-
num foil.
Stand, covered 30-55 minutes.
PROCEDURE
5 Chicken
Pieces
0.5-3.0 Ibs
After the 1st stage, turn over and rearrange.
After the 2nd stage, if there are warm or thawed portions,
rearrange or remove.
Stand, lo-15 minutes.
19

NOTES:
l
If you enter an
DEFROST will only operate within the weight ranges shown in the chart.
food items to the nearest half pound.
l
To defrost Items
Cookbook provided with your oven for defrosting information.
l
To lengthen or shorten defrosting times,
times” on page 33.
amount not shown in the chart on page 19, “ERROR” will appear. AUTO
not listed in AUTO DEFROST,
use
30% Cook Power. See the Microwave
see “Changing one-touch
Using PAUSE
PAUSE allows you to stop the oven during a
cooking cycle to stir, turn food over or add
ingredients during the cooking process.
1. Put
food in the oven and
2. Touch in
cooking cycle.
instructions for the desired
3. To program the oven to pause halfway
through the cycle:
Before touching START/ENTER,
PAUSE/TIMER. If your cooking cycle is,
for example, four minutes long, the oven
will pause two minutes into the cycle.
To make the oven pause while you are
cooking:
Touch
ENTER during cooking and the oven will
pause immediately.
PAUSE/TIMER and START/
close
the door.
touch
Round
and
sensor cooking
weights of
When the oven pauses:
Two tones will sound and “PAUSE” will
show in the Display.
stir
the food. “PRESS START’ will show
in the Display.
4. Close
20
the door and
ENTER to resume cooking. When the
cooking time ends, four tones will sound.
Open
touch
the door and
START/

Using WARM/HOLD
You can keep hot, cooked foods warm in
your microwave oven safely for up to
99 minutes, 99 seconds (about 1 hour,
40 minutes). You can use WARM/HOLD by
itseff, or to follow a cooking cycle automati-
Cally.
1. Put
2.
3.
l
l
l
l
l
l
hot, cooked food in the oven and
close the door.
Touch
WARM/HOLD. The WARM/HOLD
Indicator will come on.
Touch
START/ENTER. The WARM/
HOLD Indicator will stay on. The oven
light and fan will come on.
WARM/HOLD operates
for up to
99 minutes, 99 seconds.
Opening the oven door
HOLD. Close the door and
HOLD, then
touch
cancels WARM/
touch
WARM/
START/ENTER if
additional WARM/HOLD time is desired.
Foods cooked covered
should be
covered during WARM/HOLD.
Pastry items
(pies, turnovers, etc.) should
be uncovered during WARM/HOLD.
Complete meals
kept warm on a dinner
plate should be covered during WARM/
HOLD.
Do not use
more than one complete
WARM/HOLD (about 1 hour, 40 minutes).
The quality of some foods will suffer with
extended time.
To automatically follow another cycle:
l
While you are touching in cooking
instructions,
touching START/ENTER. HOLD Indicator will come on while the
OR
l
After the oven starts operating, touch
WARM/HOLD and then
ENTER.
touch WARM/HOLD before you will hear four tones. The WARM/
touch
START/
l
When the last cooking cycle is over,
oven continues to run.
l
You can set WARM/HOLD to follow
AUTO DEFROST, COOK, SENSOR
COOK, AUTO COOK, PERSONAL
CHOICE, ADD MINUTE or Temperature
Probe cooking.
21
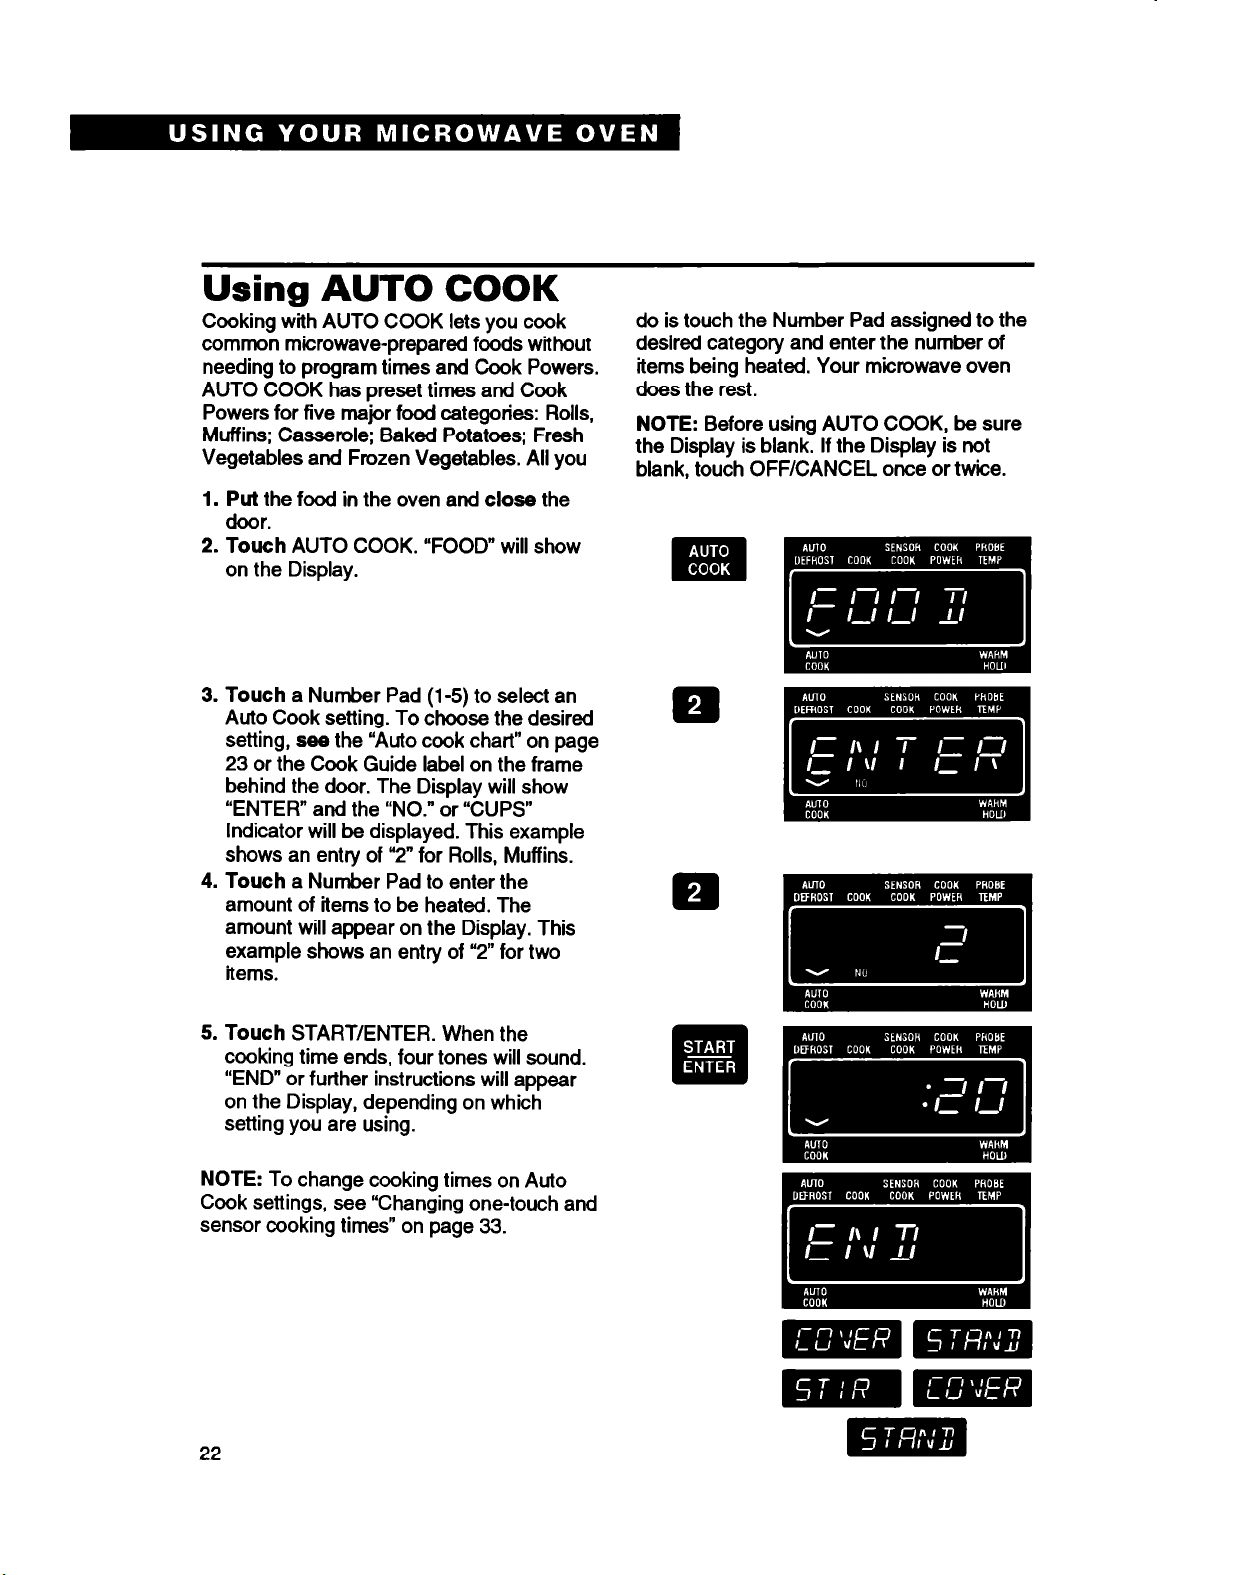
Using AUTO COOK
Cooking with AUTO COOK lets you cook
common microwave-prepared foods without
needing to program times and Cook Powers.
AUTO COOK has preset times and Cook
Powers for five major food categories: Rolls,
Muffins; Casserole; Baked Potatoes; Fresh
Vegetables and Frozen Vegetables. All you
1. Put
2.
the food in the oven and
door.
Touch
on the Display.
AUTO COOK. “FOOD” will show
close
the
do is touch the Number Pad assigned to the
desired category and enter the number of
items being heated. Your microwave oven
does the rest.
NOTE:
the Display is blank. If the Display is not
blank, touch OFF/CANCEL once or twice.
Before using AUTO COOK, be sure
3. Touch
Auto Cook setting. To choose the desired
setting, see the “Auto cook chart” on page
23 or the Cook Guide label on the frame
behind the door. The Display will show
“ENTER” and the “NO.” or “CUPS”
Indicator will be displayed. This example
shows an entry of “2” for Rolls, Muffins.
4. Touch
amount of items to be heated. The
amount will appear on the Display. This
example shows an entry of “2” for two
items.
5. Touch
cooking time ends, four tones will sound.
“END” or further instructions will appear
on the Display, depending on which
setting you are using.
NOTE:
Cook settings, see “Changing one-touch and
sensor cooking times” on page 33.
a Number Pad (l-5) to select an
a Number Pad to enter the
START/ENTER. When the
To change cooking times on Auto
m
22

Auto cook chart
SElllNG FOOD AMOUNT
1
2
Baked
Potatoes
Rolls,
1-6 med
size
l-6 pieces
Muffins
3 Fresh
vegs
l-4 cups
tables
4
Frozen
l-4 cups
Vegs
tables
PROCEDURE
Priik; place on paper towel directly on turntable. After
cooking, remove from oven and let stand wrapped in foil
5 minutes.
NOTE:
time. For small (4 ounce) potatoes, cook for shorter
time. (See “Changing one-touch and sensor cooking
times” on page 33.)
Arrange on a double layer of paper towels; cover with
another towel.
Place in a microwave-safe container. For beans, car-
rots, corn, and peas, add 1 tablespoon water per cup.
For broccoli, brussels sprouts, cabbage and cauliflower,
cook immediately after washing with no additional water.
If you like tender-crisp vegetables,
quantity for half the amount of vegetables you are
actually cooking. For example, when cooking 2 cups of
vegetables, set AUTO COOK for 1 cup. Cover with lid or
plastic wrap. After cooking, remove from oven, stir,
cover and let stand 3 to 5 minutes before serving.
Place in a microwave-safe container. Cover with lid or
plastic wrap. After cooking remove from oven, stir, cover
and let stand 3 minutes before serving.
For large (8-10 ounce) potatoes, cook for longer
set
the Auto Cook
5
Canned l-4
vegs
tables
cups
Place in a microwave-safe container. Cover with lid or
plastic wrap. After cooking remove from oven, stir, cover
and let stand 3 minutes before serving.
NOTES:
l
If you enter
will only operate with the amounts shown.
l
When cooking
“1” for 1 cup of “tender crisp” vegetables (you cannot enter 1/2 cup amounts) or touch “2” for
two cups of vegetables more fully cooked.
an amount not shown in the chart above, “ERROR” will appear. AUTO COOK
a 10 oz package of frozen vegetables (this equals about 11% cups), touch
23

Using SENSOR COOK
Cooking with SENSOR COOK takes the
guesswork out of microwave cooking. The
microwave oven automatically adjusts
cooking times and powers by detecting the
moisture and humidity emitted by the food as
it heats.
1. Put
2. Touch
food in oven and
SENSOR COOK. The SENSOR
Indicator will come on and “FOOD” will
show on the Display.
close
the door.
NOTE: Before using SENSOR COOK, be
sure the Display is blank. If the Display is
not blank, touch OFF/CANCEL once or
twice.
3. Choose
ing the appropriate Number Pad. (See the
Cook Guide label on the frame behind the
oven door for setting information.)
NOTE:
setting,
chosen setting will appear on the Display.
4. Touch
detects the moisture and humidity emitted
by the food.
NOTE:
OFF/CANCEL during this part of the
cooking cycle. The measurement will be
interrupted.
before cooking starts,
CEL and
after cooking has started,
CANCEL and
timed cycle. See page
a Sensor Cook setting by touch-
If you touch the wrong Sensor
touch
START/ENTER. The sensor now
Do not open the door or touch
If “ERROR” appears on the Display
the correct setting. The
touch
start over.
If “ERROR” appears
touch
continue
cooking using a
15
or
OFF/CAN-
OFF/
16.
5. When the Display shows the remaining
cooking time, you can
stir or season the food.
open the door to
24

6.
After cooking,
or directions will appear on the Display,
depending on which setting you are
using.
Open
CANCEL.
the oven will stop. “END”
the door or
touch OFF/
NOTE:
Cook settings, see “Changing one-touch
and sensor cooking times” on page 33.
To change cooking times on Sensor
Sensor cook chart
SENSOR
FOOD
Dinner Plate, Reheat
Potatoes
Baked potatoes
Sweet potatoes
SElTlNG AMOUNT
1
2
4 or more
ounces
1-6 med
1-6 med
PROCEDURE
Cover with wax paper.
Prick; place on turntable.
Prick; place on turntable.
COMMENTS
Stand, covered,
5 min.
Stand, wrapped
in foil, 5-l 0 min.
Stand,
in foil, 3 min.
wrapped
Fresh Vegetables,
soft
Broccoli
Brussels sprouts
Cabbage
Cauliflower
(f lowerets)
Cauliflower (whole)
Spinach
Zucchini
Fresh Vegetables,
Hard
Carrots, sliced
Corn on cob
Green beans
Winter squash,
diced
halves
3
4
Wash and place in Stand, covered,
casserole. Add 2 table- 3-5 min.
X-2 Ibs spoons of water. Cover
‘X-2 Ibs with lid for tender veg‘X-3 Ibs
X-2 cups
lmed
X-1 lb
X-2 cups
X-2 cups with lid for tender veg2-4 cups etables. Use plastic wrap
X-2 cups
‘X-2 cups
2
etables. Use plastic wrap
for tender, crisp veg-
etables. Stir before
standing, if possible.
Place in casserole. Add 9’4 Stand, covered,
to
Yz cup of water. Cover 5 min.
cover for tender, crisp
vegetables. Stir before
standing, if possible.
continued on next
page
25

FOOD
SENSOR
SEITING AMOUNT
PROCEDURE
COMMENTS
Bacon, Slices
Chicken Pieces
Hamburger
5 2-6
slices
6 1-4 Ibs
7 1-6
patties
0.5-2 Ibs Break up and put in casse-
Place bacon on paper plate,
lined with paper towel.
Bacon should not extend
over rim of plate. Cover with
paper towel. Put plate
upside down on turntable.
Place plate of bacon on top
of overturned plate.
Wash. Place in baking dish. Stand,
Cover with wax paper or
plastic wrap.
Place on microwave-safe
roasting rack. Cover with
plastic wrap or wax paper.
role. Cover with lid, wax
paper, or plastic wrap.
Drain off grease or place in
microwave-safe colander
over casserole and allow
grease to drain off. Cover
with wax paper or plastic
wrap.
covered,
5-10 min.
Stand,
covered,
5 min.
Stand,
covered,
5 min.
Fish, Seafood
Fillet, steak,
shrimp
Scallops, fresh or
frozen, thawed
Clams, fresh
26
8
‘h-1 lb Arrange in ring around
shallow glass dish. (Roll
fillet with edges underneath.) Cover with plastic
wrap.
‘X-1 lb
Place in plastic bag. Secure Stand,
end. Slit bag with knife.
Stand,
covered,
3 min.
covered,
3 min.
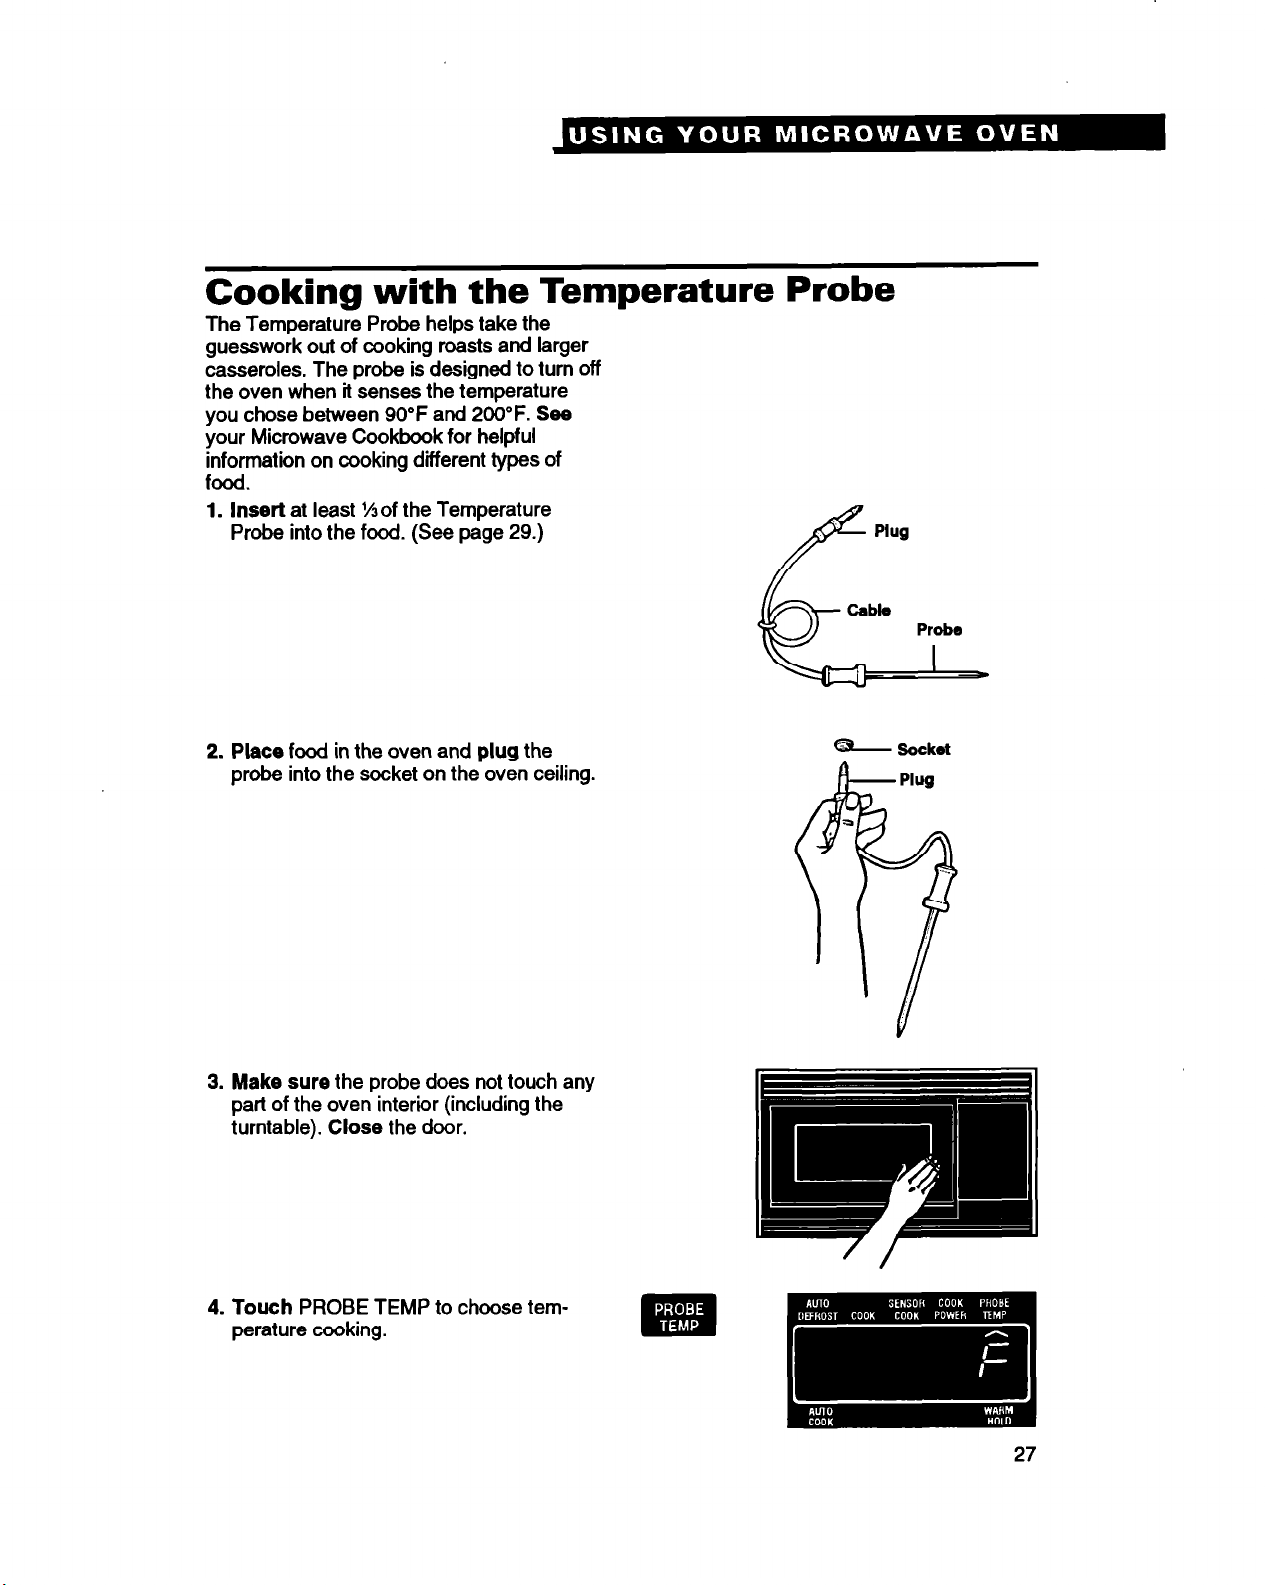
Cooking with the Temperature Probe
The Temperature Probe helps take the
guesswork out of cooking roasts
casseroles. The probe is designed to turn off
the oven when it senses the temperature
you chose between 90°F and 200°F. See
your Microwave Cookbook for helpful
information on cooking different types of
food.
1. Insert at
Probe into the food. (See page 29.)
2.
Place
probe into the socket on the oven ceiling.
least 35 of the Temperature
food in the oven and
and
plug
larger
the
f
Cable
- Socket
Plug
Probe Probe
I-
I-
3. Make sure
part of the oven interior (including the
turntable).
4. Touch
perature cooking.
the probe does not touch any
Close
the door.
PROBE TEMP to choose tem-
27

Touch
5.
perature you want.
6.
Touch
Number Pad for the Cook Power you
want.
7.
OPTIONAL: You
maintain the set temperature for up to
99 minutes, 99 seconds. After setting the
Cook Power in Step 6
WARM/HOLD.
Number Pads for the food tem-
COOK POWER followed by a
can set the oven to
above, touch
6.
Touch
temperature is lower than 9O”F, the
Display will show “COOL”. When the food
temperature reaches 9O”F, the Display
will show the actual temperature of the
food as it increases to the desired temperature. When the probe detects the
desired food temperature, the oven will
shut off.
9.
After cooking, open
OFF/CANCEL. Four tones will sound and
“END” will show on the Display, unless
you have set WARM/HOLD.
START/ENTER. When the food
the door or
touch
28

NOTES:
l
After you have programmed the oven, if
the Temperature Probe is not plugged in
properly or is defective, “End” will show on
the Display and the oven will shut off. If the
Temperature Probe is not plugged in,
“PROBE will show on the Display and the
oven will not turn on.
l
If you are In the process
of cooking using
the Temperature Probe and want to check
the temperature you have programmed,
touch
PROBE TEMP. As long as you are
touching PROBE TEMP, the programmed
temperature will be displayed.
Temperature Probe cooking
tips:
l
Stir
foods during cooking when recom-
mended.
l
Stir
soups, casseroles and drinks before
serving.
l
Cover
stand
decide to cook it longer.
l
Remove
not cooking by temperature.
l
For casseroles,
should be in the center of the food.
foods when recommended.
probe.
l
For liquids, balance
wooden spoon or spatula so the tip of the
probe is in the center of the liquid.
l
For roasts,
in the center of the largest muscle, but not
touching fat or bone.
l
Casseroles
ture Probe should be made from pre-
cooked foods. Do not use raw meats, raw
vegetables and cream sauces in casse-
roles.
l
Dry casseroles
l
Thaw
microwave oven before inserting the
probe.
roasts with foil after cooking and
a few minutes.
Remove
foil if you
the probe from the oven when
the tip of the probe
Stir
Replace
the probe on a
the tip of the probe should be
cooked using the Tempera-
do not work well.
frozen casseroles and meats in the
the
let
l
If
you
are cooking
more than one indi-
vidual serving at the same time, such as
mugs of soup,
check
the probe setting in
several of the items-all the mugs may not
heat at the same rate.
l
Dry meat loaf
l
Check
poultry with thermometer in 2-3
mixtures do not work well.
places to ensure adequate doneness.
l
Remember that
shape and composition.
roasts may vary in size,
Use
the Tempera-
ture Probe as a guide.
Don’t . . .
l
let probe or probe cable
touch any part
of the oven interior (including the turntable).
l
let probe touch foil
(if used). You can
keep foil away from probe with wooden
toothpicks.
l
use paper, plastic wrap or plastic contain-
Remove
foil if arcing occurs.
ers. They will be in the oven too long and
might distort.
l
force
probe into frozen food.
l
use probe
l
plug
for food that needs to simmer.
the pointed end of the Temperature
Probe into the socket.
Removing and cleaning the
Temperature Probe:
1.
After oven has shut
Temperature Probe using an oven mitt or
hot pad.
2.
Wipe
probe with a hot, sudsy cloth and
dry
thoroughly.
pad to remove cooked-on foods.
3. You can place probe in the silverware
basket of a dishwasher.
off, unplug
Use
a plastic scouring
the
29

Using PERSONAL CHOICE
PERSONAL CHOICE allows you to recall one
cooking instruction previously placed in memory
and begin cooking quickly. For example, if you
heat a roll every morning, program the cooking
steps into PERSONAL CHOICE. You can heat
your roll each morning by touching PERSONAL
CHOICE. PERSONAL CHOICE also allows you
to program a recipe for another person to cook at
a later time.
To program Personal Choice:
1. Touch
Display will show “0”.
PERSONAL CHOICE. The
the Display is not blank, touch OFF/
NOTE:
CHOICE, be sure the Display is blank. If
CANCEL once or twice.
Before using PERSONAL
2. Touch
Display will show ‘I?.
3.
Touch
cycle you want. (Example: COOK.) The
Display will show “0O:OO”.
4. Touch
or temperature desired. This example
shows an entry of 20 seconds.
5. Touch
Number Pad for the Cook Power desired.
This example shows an entry of “5” for
50%
6. Touch
PERSONAL CHOICE is now pro-
grammed.
PERSONAL CHOICE again. The
a Command Pad for the cooking
Number Pads for the cooking time
COOK POWER and then a
Cook Power.
PERSONAL CHOICE.
To use Personal Choice:
1. Touch
30
PERSONAL CHOICE.

2.
Touch
cook according to your preprogrammed
instructions. When cooking time ends,
four tones will sound. “END” will show on
the Display.
START/ENTER. The oven will
Remove
food from the oven.
NOTE: You
CHOICE by repeating the above instructions. A power failure will erase your Personal Choice program.
can reprogram PERSONAL
Using POPCORN
POPCORN allows you to pop popcorn by
touching just one pad.
NOTE:
the Display is blank. If the Display is not
blank, touch OFF/CANCEL once or twice.
1. Place
2. Touch
3. When the sensor detects the vapor
Before using POPCORN, be sure
bag in center of upside-down glass
pie plate and close the door.
POPCORN. “POP-” and “CORN”
will flash on the Display.
Cooking performance may vary with
brand.
which g’wes best popping results. For
best results,
Do not try
Do not reuse
NOTE:
commercially bagged microwave popcorn. If you are using a microwave
popcorn popper,
the popper for cooking time.
emitted from the food, the remainder of
the cooking time will appear.
Try
several brands to decide
use
fresh bags of popcorn.
to repot unpopped kernels.
popcorn bags.
POPCORN is designed for
follow
instructions with
NOTES:
l
Always touch
control before programming POPCORN.
l
Use
only 1 package at a time.
l
Use
only popcorn packages for microwave
oven.
l
To change cooking time,
one-touch and sensor cooking times” on
page 33.
l
If you remove the glass pie plate right
after popping popcorn, use oven mitts. The
plate will be very hot.
OFF/CANCEL to clear the
see “Changing
31

Using REHEAT
You can reheat many foods by touching just
one pad. You do not need to calculate
cooking time or Cook Power.
NOTES:
l
Before
Display is blank. If the Display is not blank,
touch OFF/CANCEL once or twice.
l
See “Reheating chart” on page 40 when
reheating with cooking time and Cook
Power.
1. Put
2. Touch
using REHEAT, be sure the
food in the oven and
REHEAT. “RE-” and “HEAT” will
flash on the Display. When the sensor
detects the vapor emitted from the food,
the remainder of the cooking time will
appear (1 min, 30 set in example).
close
the door.
3. When cooking is over,
“STAND” will flash on the Display.
the door or
touch
“COVER” and
Open
OFF/CANCEL.
4. To continue with cooking, choose
cooking time
pages 15 and 16).
and
Cook Power (see
NOTES:
l
REHEAT
1 minute after cooking, closing the door or
touching OFF/CANCEL.
l
To change
one-touch
page 33.
can be programmed within
reheating time, see “Changing
and
sensor cooking times” on
a
32

Using ADD MINUTE
ADD MINUTE allows you to cook food for
one minute or to add an extra minute, at
100% Cook Power, to your cooking cycle.
You can also use it to extend cooking time in
multiples of one minute.
NOTE:
the Display is blank. If the Display is not
blank, touch OFF/CANCEL once or twice.
1. Make sure
2. Touch
3.
NOTE: ADD MINUTE can only be entered
after closing the door, after touching OFF/
CANCEL, or during cooking.
Before using ADD MINUTE, be sure
food is in the oven and the
door is closed.
ADD MINUTE.
To extend
one minute,
edly during cooking. When the cooking
time ends, a long tone will sound. The
Display will then show “END”.
cooking time in multiples of
touch ADD
MINUTE repeat-
ADD MINUTE
-with
-to
POPCORN, AUTO COOK, AUTO
DEFROST, REHEAT, SENSOR COOK,
WARM/HOLD, or Temperature Probe
cooking.
start the oven if any program, other than
the Minute Timer, is on the Display.
cannot
be used:
Changing one-touch and sensor cooking
times
l
If you want longer
POPCORN, REHEAT, AUTO COOK,
AUTO DEFROST or SENSOR COOK,
touch COOK POWER once
ing desired setting.
l
If you want shorter
COOK POWER
desired setting.
For example,
for
touch POPCORN,
COOK POWER
time or
NOTE:
within one second after choosing desired
setting.
twice
to decrease cooking time.
You must
cooking times for
cooking times,
twice
after choosing
POPCORN
then immediately
once
to increase cooking
touch
COOK POWER
after chws-
touch
setting, first
touch
33

Caring For Your Microwave Oven
Wipe
often with warm, sudsy water and a
sponge or paper towel. You can remove the
glass turntable for cleaning; however, this
oven is designed to operate with the turntable in place.
wave oven when turntable is removed for
cleaning. See page 39 for further information
about the turntable.
Do not
operate the micro-
For stubborn soil,
oven for 2 or 3 minutes. Steam will soften
the soil.
Be sure to keep the areas clean where
the door and oven frame touch when
closed.
or detergents applied with a sponge or
paper towel when cleaning surfaces.
well.
Use only mild, nonabrasive soaps
Product Damage Hazard
Abrasive cleansers, steel-wool pads,
grii wash cloths, etc., can damage
the control panel, and the interiir and
exterior oven surfaces. Use a sponge
with a mild detergent or a paper towel
with spray glass cleaner. Apply spray
glass cleaner to paper towel; do not
spray directly on oven.
boil a
cup of water in the
Rinse
To clean turntable and turntable support,
wash
in mild, sudsy water; for heavily soiled
areas
use
a mild cleanser and scouring
sponge. The turntable and turntable support
are dishwasher-safe.

How Your Microwave Oven
works
Microwave ovens are safe. Microwave
energy is not hot. It causes food to make its
own heat, and it’s this heat that cooks the
food.
Microwaves are like TV waves or light
waves. You cannot see them, but you can
see what they do.
A magnetron in the microwave oven produces microwaves. The microwaves move
into the oven where they contact food as it
turns on the glass turntable.
The glass turntable of your microwave oven
lets microwaves pass through. Then they
bounce off a metal floor, back through the
glass turntable, and are absorbed by the
food.
Microwaves pass through most glass, paper
and plastics without heating them so food
absorbs the energy. Microwaves bounce off
metal pans so food does not absorb the
energy.
Microwaves may not reach the center of a
roast. The heat spreads to the center from
the outer, cooked areas just as in regular
oven cooking. This is one of the reasons for
letting some foods (for example, roasts or
baked potatoes) stand for a while after
cooking, or for stirring some foods during the
cooking time.
The microwaves disturb water molecules
in the food. As the molecules bounce around
bumping into each other, heat is made, like
rubbing your hands together. This is the
heat that does the cooking.
Metal floor -
Glaso hwntabk
35

Operating Safety Precautions
To reduce the risk of bums, fire, electrical shock, injury to persons, or damage
when using the microwave oven, follow
the precautions on pages 36-39.
Never cook or reheat a whole
buikfup in whole eggs may cause them to
burst and burn you, and possibly damage
the oven.
heating. In rare instances, poached eggs
have been known to explode.
poached eggs and
one minute before cutting into them.
Slice
hard-boiled eggs before
allow
egg. Steam
Cover
a standing time of
For best results stir any liquid several
times before heating or reheating.
heated in certain containers (especially
cylindrical containers) may become over-
heated. The liquid may splash out with a
loud noise during or after heating or when
adding ingredients (coffee, etc.) resulting in
harm to the oven and possible personal
injury.
Never
swing on it when the dcor is open. Injury
could result.
lean on the door or allow a child to
Liquids
Stir before heating
Use hot pads.
heat containers, but the hot food does.
36
Microwave energy does not

Do
not
do canning of foods in the oven.
Closed glass jars may explode resulting in
damage to the oven or possible personal
injury.
Do not
(baby bottles, etc.). It is difficult to maintain
the high temperature required for safe
sterilization.
Do not
utensils are not suitable and it is difficult to
maintain appropriite deep frying temperatures.
Do not
leave paper products, books or cooking
utensils in the oven when not in use. Fire
may result if someone accidentally starts the
oven.
Do not
or sides of the oven.
Do not
materials in or near the oven. Fumes can
create a fire hazard or explosion.
use the oven to sterilize objects
deep fry in the oven. Microwavable
use the oven for storage.
let food or container touch the top
heat, store or use flammable
Do not
Do not overcook potatoes.
result. At the end of the recommended
cooking time potatoes should be slightly firm
because they will continue cooking during
standing time.
potatoes in foil and
They will finish cooking while standing.
If a fire should start in the oven cavity:
l
Do not open the oven door.
l
Touch OFF/CANCEL to turn oven off.
l
Unplug the oven or turn off the power at
After microwaving, wrap
set aside
Fire could
for 5 minutes.
the main power supply.
37
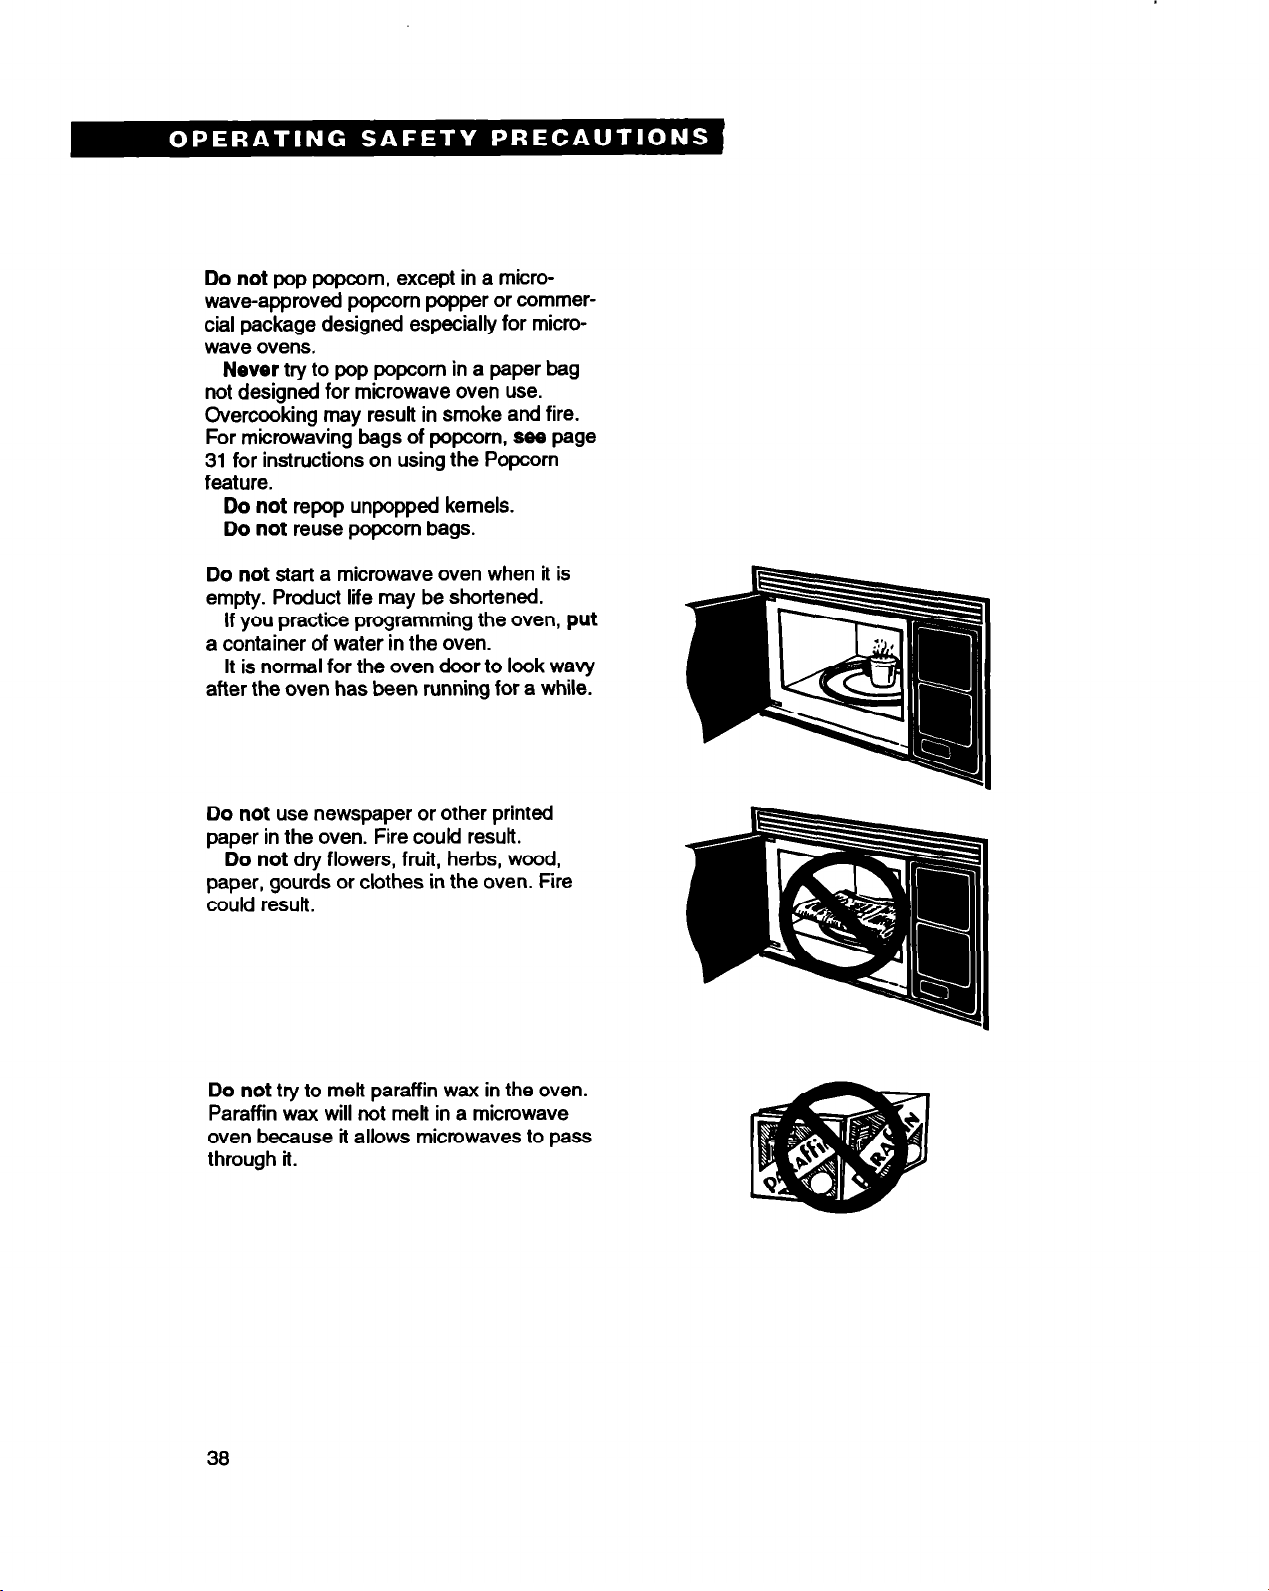
Do not
wave-approved popcorn popper or commercial package designed especially for microwave ovens.
not designed for microwave oven use.
Overcooking may result in smoke and fire.
For microwaving bags of popcorn, sea page
31 for instructions on using the Popcorn
feature.
pop popcorn, except in a micro-
Never try to pop
Do not
Do not
repop unpopped kernels.
reuse popcorn bags.
popcorn in a paper bag
Do not
empty. Product life may be shortened.
a
after the oven has been running for a while.
Do not
paper in the oven. Fire could result.
paper, gourds or clothes in the oven. Fire
could result.
Do not
Paraffin wax will not melt in a microwave
oven because it allows microwaves to pass
through it.
start a microwave oven when it is
If you practice programming the oven,
container of water in the oven.
It is normal for the oven door to look wavy
use newspaper or other printed
Do not
dry flowers, fruit, herbs, wood,
try to melt paraffin wax in the oven.
put
38

Do not
the glass turntable is securely in place and
can rotate freely. The turntable can rotate in
either direction.
side up in oven. Carefully
on glass turntable to avoid possible breakage.
removing from oven to avoid possible
breakage. lf glass turntable cracks or
breaks, contact your Whirlpool dealer for a
replacement.
browning dish bottom must be at least
%s inch above the glass turntable. Follow
directions supplied with browning dish.
operate the microwave oven unless
Make sure
the glass turntable is correct-
place
cookware
Handle glass turntable with care
When you use a browning dish, the
when
General information
Jo ted a dish for safe use,
oven with a cup of water beside it. Cook at
100% Cook Power for one minute. If the
.
dish gets hot and water stays cool, do
not use
ceramic dinnenvare, etc.) absorb microwave
energy, becoming too hot to handle and
slowing cooking times.
it. Some dishes (melamine, some
Product Damage Hazard
Remove wire twist-ties from paper or
plastic bags before placing bag in
oven. Cooking in metal containers not
designed for microwave use could
damage the oven, as can containers
with hidden metal (twist-ties, foil lining,
staples, metallic glaze or trim).
put it into the
-
I
39

Cooking Guide
Reheating chart
Times are approximate and may need to be adjusted to individual taste. NOTE: See “Using
REHEAT” on page
ITEM
Most (Chicken pieces,
chops,
hamburgers, meat
loaf slices)
1 serving
2 senrings
Mwt Slices (Beef, ham,
pork, turkey) 1 or more
servings
Stirrable Casseroles nd
Main Dishas
1 sawing
2 servings
4-6 servings
Nonstirrable Cassaroles
and Main Dishss
1 serving
2 servings
46 servings
32
for instructions on how to reheat by touching just one Command Pad.
1
i
45 see1 min per sewing at 50%
l-2 min at 70%
2H-4% min at 70%
2-4 min at 100%
4-6minatlOO%
6-6 min at 100%
Soup. Cream
I
1 lcub.
1 1 can (10% 02)
soup, Clear
I
1 WP
1 can (10% 02)
Pizza
1 dice
l.Slice
2 slices
2 slices
Vegetables
1 serving
2 servings
Baked Potato
Breads
(Dinner or breakfast mll)
1 roll
2 rolls
4 rolls
Pie
whole
1 slice
3-4X min at 50%
I
5-7 min at 50%
2X-3X min at 100%
4-5% min at 100%
15-25 set at 100%
3040 set at 100%
l-2 min at 50%
2-3 min at 50%
5-7 min at 70%
30 set at 100%

Microwave cooking chart
Times are approximate
NOTE: See “Using AUTO COOK” on page 22 or “Using SENSOR COOK” on page 24 for
instructions on how to cook without entering cooking times or Cook Powers.
TS. POULTRY. FISH. SEAFOOQ
Allow standing time after cooking.
and
may need to be adjusted to individual taste.
TARLES [cow
Cook at 160% Cook Power.
.
COOK
FOOD
Bacon
Ground Beef 100%
POWER TlME
100%
45secto
1 min15sac
per slii
4-6 min
for Casse-
roles (1 lb)
Hamburger
Patties (2)
Hamburger
Pattii (4)
Meat Loaf
(1 X Ibs)
Chicken
100%
100% 1 st side 2lh min
100%
100%
1st side 2 min
2ndside 1Yzto
2X min
2nd side 2-3 min
1319 min
6-9 minllb
PleCeS
Internal temperature should be 185°F after
standing.
Turkey
Breast
Internal temperature should be 185°F after
standing.
Fish Fillets
(1 lb)
Scallops
100%
m 76% 8-12 minllb
100%
100%
5min
5-6 min
3’/&5lh min
and Shrimp
(1 14
FOOD
I
Carrots
(1 lb)
Cauliflower
(medium head)
Corn on the Cob
I:{
Potatoes, Baked
(4 medium)
Squash, Summer
FOOD
Applesauce
(4 servings)
Baked
Apples (4)
Chocolate
(melt 1
squ=)
Eggs,
Scrambled
(2)
(4)
Hot Cereals
(1 serving)
(4 servings)
TIME
8-12 min
6-9 min
4-9 min
6-16 min
13-19 min
(1 lb)
3-8 min
COOK
POWER TIME
100% 7-10 min
100% 4-6 min
50% 1-2 min
100%
1 min 15 sac
to 1 min 45 set
2-3 min
100%
1 X-5 min
4X-7 min
Cook at 100% Cook Power.
FOOD
Beans, Green or Yellow
(1 lb)
Broccoli
(1 lb)
TlME
6-12 min
6-10 min
Nachos
(large plate)
Water for
Beverage
(1 cup)
(2
ups)
50%
100%
1 Yz-https://manualmachine.com/z min
2X-4 tin
4X-6 min
41

Questions And Answers
QUESTIONS
Can I operate my microwave oven without
the turntable or turn the turntable over to
accommodate a large dish?
Can I use a rack in my microwave oven so
that I may reheat or cook on two levels at a
time?
Can I use either metal or aluminum pans in
my microwave oven?
Is it normal for the turntable to turn in either
direction?
Sometimes the door of my microwave oven
appears wavy. Is this normal?
ANSWERS
No. If you remove or turn over the turntable,
you will get poor cooking results. Dishes
used in your oven must fit on the turntable.
You can use a rack only if rack is supplied
with your microwave oven. Use of any rack
not supplied with the microwave oven can
result in poor cooking performance and/or
arcing.
Useable metal includes aluminum foil for
shielding (use small, flat pieces), small
skewers and shallow foil trays (if tray is
a/4 inch deep and filled with food to absorb
microwave energy). Never allow metal to
touch walls or door.
Yes. The turntable rotates clockwise or
counterclockwise, depending on the rotation
of the motor when the cooking cycle begins.
This appearance is normal and does not
affect the operation of your oven.
What are the humming noises that I hear
when my microwave oven is operating?
Why does the dish become hot when I
microwave food in it? I thought that this
should not happen.
What does “standing time” mean?
Can I pop popcorn in my microwave oven?
How do I get the best results?
42
You hear the sound of the transformer wher
the magnetron tube cycles on.
As the food becomes hot it will conduct the
heat to the dish. Be prepared to use hot
pads to remove food after cooking.
“Standing time” means that food should be
taken out of the oven and covered for
additional time after cooking. This process
allows the cooking to finish, saves energy
and frees the oven for another purpose.
Yes. Pop packaged microwave popcorn
following manufacturer’s guidelines or use
the preprogrammed POPCORN pad. Do noi
use regular paper bags. Use the “listening
test” by stopping the oven as soon as the
popping slows to a “pop” every one or two
seconds. Do not try to repop unpopped
kernels. You can also use special microwave poppers. When using a popper, be
sure to follow manufacturer’s directions. Do
not pop popcorn in glass utensils.

If You Need Assistance
Or Service
This section is designed to help you save the cost of a service call. Part 1 of this section
outlines possible problems, their causes, and actions you can take to solve each problem.
Parts 2 and 3 tell you what to do if you still need assistance or service. When calling our
Consumer Assistance Center for help or calling for service, please provide a detailed descrip-
tion of the problem, your appliance’s complete model and serial numbers and the purchase
date. (See page 2.) This information will help us respond properly to your request.
1. Before calling for assistance . . .
Performance problems often result from little things you can find and fix without tools of any
kind. Please check the chart below for problems you can fix. It could save you the cost of a
service call.
PROBLEM
Nothing will
operate
The microwave
oven will not timer.
run
The unit is not wired into a live
circuit with the proper voltage.
A household fuse has blown or Replace household fuse or reset
a circuit breaker has tripped.
The electric company has
experienced a power failure.
You are using the oven as a
If you are using the Temperature Probe, probe is not
plugged tightly into its socket.
The door is not firmly closed Firmly close and latch door.
and latched.
You did not touch START/
ENTER.
You did not follow directions
exactly.
An operation that was pro-
grammed earlier is still running. previous programming.
POSSIBLE CAUSE
SOLUTION
Contact a qualified Whirlpool@ service
technician to wire unit into a live circuit
with the proper voltage. (See Installation Instructions.)
circuit breaker.
Check electric company for a power
failure.
Touch PAUSE/TIMER and OFF/
CANCEL to cancel the Minute Timer.
Plug Temperature Probe tightly into its
socket.
Touch START/ENTER.
Check instructions for the function you
are operating.
Touch OFF/CANCEL twice to cancel
Microwave
cooking times
seem too long
The electric supply to your
home is low or lower than
normal.
The Cook Power is not at the
recommended setting.
There is not enough cooking
time for the amount of food
being cooked.
Your electric company can tell you if
the line voltage is low.
Check “Microwave cooking chart” on
page
41.
Allow for more time when cooking
more food at one time.
continued on

PROBLEM
Turntable will
not turn
The Display
shows a time
counting down
but the oven is
not cooking
POSSIBLE CAUSE
Turntable is not correctly in
place.
Support is not operating
correctly.
You have set the controls as
a kiichen timer.
SOLUTION
Make sure turntable is correct-side up
and is sitting securely on support.
Remove turntable and restart oven. If
turntable support does not move, call
an authorized Whirlpool service
technician for repair. Cooking without
the turntable can give you poor results
Touch PAUS~IMER
CANCEL to cancel the Minute Timer.
and
OFF/
You
do not hear
the Program-
ming Tone
The microwave
oven turns off
too soon or not
soonenough
when using the
Temperature
Probe
The command is not correct. Re-enter command.
Probe is not inserted far Make sure probe is at least ‘55 way into
enough into food. food.
Probe is not positioned in Place tip of probe in center of food.
food correctly.
Probe is touching bone or fat.
Heat has not had enough
time to go through all the after cooking.
food.
Probe is loose in socket.
Cook Power is not set correctly.
Probe temperature is not set
correctly.
Move probe away from bone or fat.
Allow roasts to stand for a few minutes
Plug probe tightly into its socket.
Re-enter Cook Power.
Re-enter probe temperature.
44

2. If you need assistance . . .
Call Whirlpool Consumer Assistance
Center telephone number. Dial toll-free
from anywhere in the U.S.A.:
l-500-253-1 301
and talk with one of our trained consultants.
The consultant can instruct you in how to
obtain satisfactory operation from your
appliance or, if service is necessary, recom-
mend a qualified service company in your
area.
If you prefer, write to:
Mr. William Clark
Consumer Assistance Representative
Whirlpool Corporation
2000 M-69
Benton Harbor, Ml 49022
Please include a daytime phone number in
your correspondence.
3. If you need service . . .
Whirlpool has a nation-
wide network of autho-
SE!!!; rized Whirlpoop service
w
service technicians are trained to fulfill the
product warranty and provide after-warranty
service, anywhere in the United States. To
locate the authorized Whirlpool service
company in your area, call our Consumer
Assistance Center telephone number (see
Step 2) or look in your telephone directory
Yellow Pages under:
companies. Whirlpool
4. If you are not satisfied with
how the problem was
solved . . .
l
Contact the Major Appliance Consumer
Action Panel (MACAP). MACAP is a group
of independent consumer experts that
voices consumer views at the highest
levels of the major appliance industry.
l
Contact MACAP only when the dealer,
authorized servicer and Whirlpool have
failed to resolve your problem.
Major Appliance Consumer Action
Panel
20 North Wacker Drive
Chicago, IL 60606
l
MACAP will in turn inform us of your
action.
l APPUAMCE-HOUSEHOlB
MAJOR, SERVICE k REPUR
- Sex WhIrlpool Applhcea or
Aulhodzd Whlr@d Sruica
(Exa~b: x-c! SewIce CO.) (Gnmpk: XV2 Sewke Co.)
‘wAs4llNo MACHINES L
DRYERS, SERVICE L REPAlR
- Sm WhIrlpool Appliencer or
Aulhorked Whirlpool Sotim
45

VVHIRLPOOL”
Microwave Oven/Range
Warranty
LENGTH OF WARRANTY
FULL ONE-YEAR WARRANTY
From Date of Purchase
LIMITED FOUR-YEAR
WARRANTY
Second Through Fifth Year
From Date of Purchase
WHIRLPOOL WILL NOT PAY FOR
A. Service calls to:
1. Correct the installation of your microwave oven/range.
2. Instruct you how to use your microwave oven/range.
3. Replace house fuses or correct house wiring.
4. Replace owner accessible light bulbs.
B. Repairs when your microwave oven/range is used in other than normal, single-family
household use.
C. Pickup and delivery. Your microwave oven/range is designed to be repaired in the home.
D. Damage to your microwave oven/range caused by accident, misuse, fire, flood, acts of
God or use of products not approved by Whirlpool.
E. Any labor costs during limited warranty.
F. Repairs to parts or systems caused by unauthorized modifications made to the appliance
WHIRLPOOL CORPORATION SHALL NOT BE LIABLE FOR INCIDENTAL OR CONSEQUENTIAL DAMAGES. Some states do not allow the exclusion or limitation of incidental or
consequential damages, so this limitation or exclusion may not apply to you. This warranty
gives you specific legal rights, and you may also have other rights which vary from state to
state.
WHIRLPOOL WILL PAY FOR
FSP@ replacement parts and repair labor to correct
defects in materials or workmanship. Service must be
provided by an authorized Whirlpool service company.
FSP replacement magnetron tube on microwave ovens
if defective in materials or workmanship.
5/93
Outside the United States, a different warranty may apply. For details, please contact your
authorized Whirlpool distributor or military exchange.
If you need service, first see the “Assistance or Service” section of this book. After checking
“Assistance or Service,” additional help can be found by calling our Consumer Assistance
Center telephone number, l-800-253-1 301, from anywhere in the U.S.A.
Printed on recycled paper-
10% post ccmsumer waste
50% recovered materials
PART NO. 3188192
(D 1994 Whirlpool Corporation @Registered Trademark 01 Whirlpool, U.S.A.
Printed in U.S.A.
 Loading...