

Whirlpool RM280PXA User Manual
A Note To You
2
IrSEYW
3
Getting Acquainted 5
Using Your
Microwave Oven 12
Caring For Your
Microwave Oven 34
Hqw Your
$rhswave Oven
35
OyE-tj$sllfetY
36
Cooking Guide
40
Questions And
Answers
42
If Yqu Need
p=
43
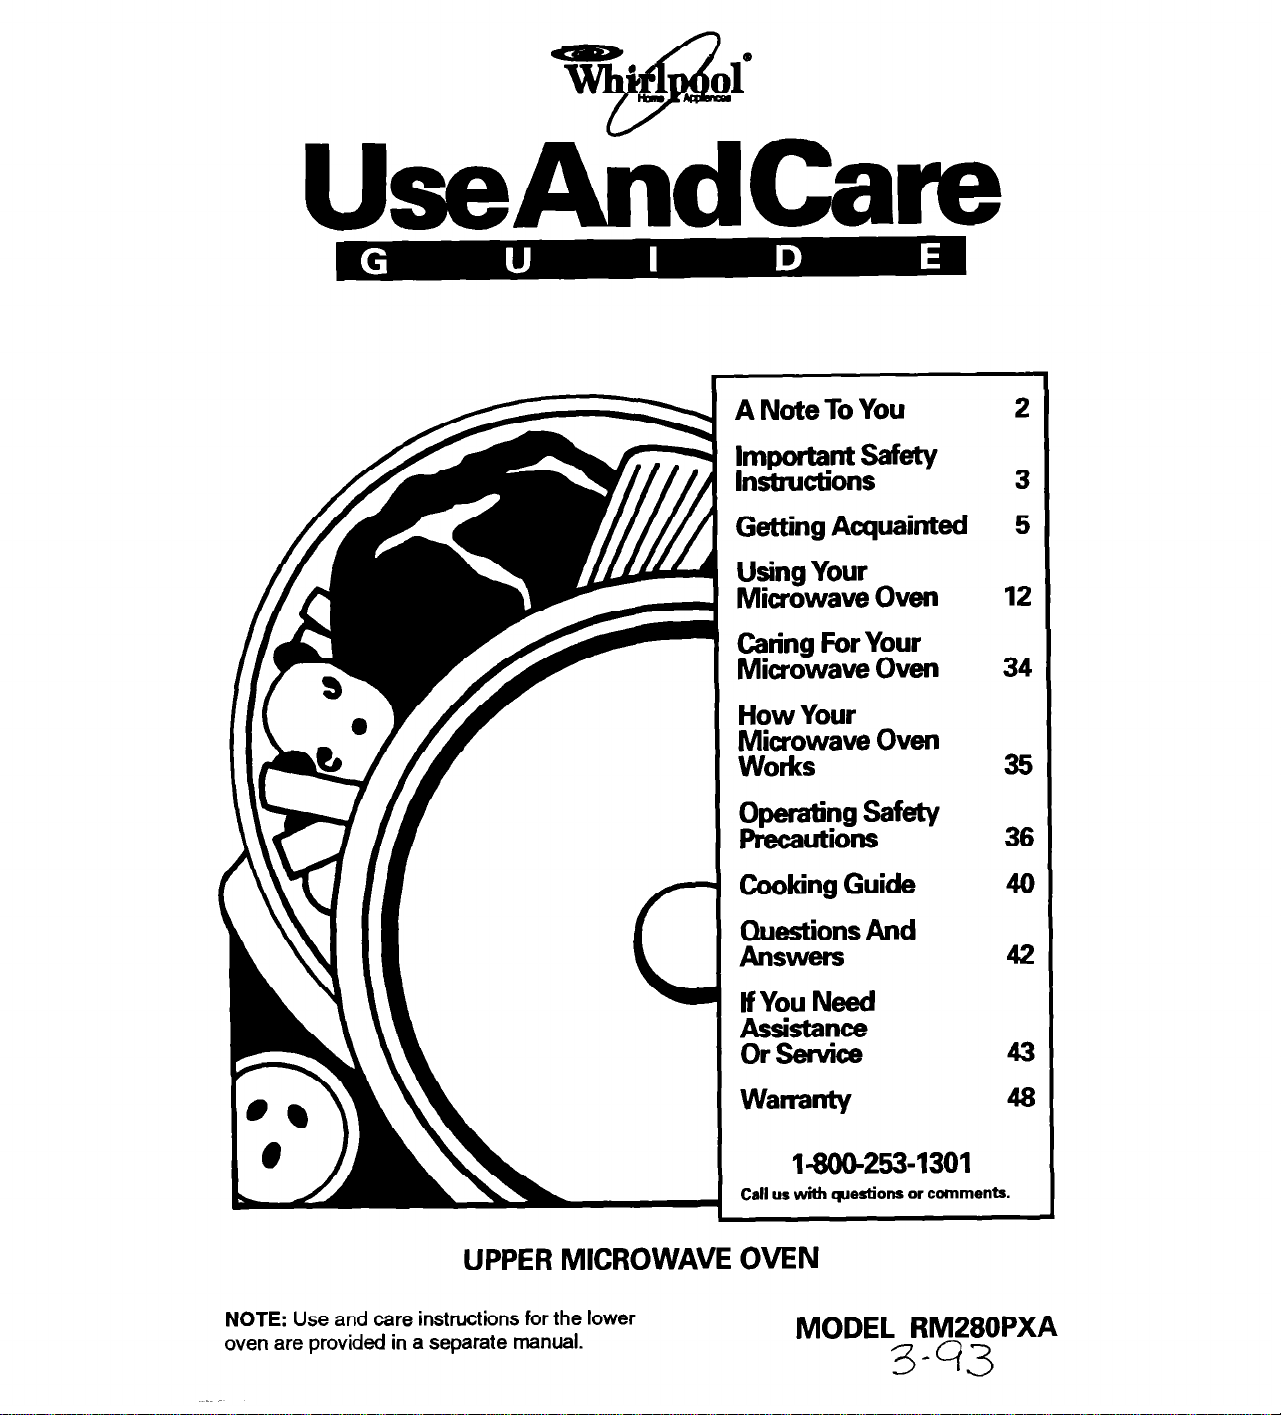
UPPER MICROWAVE OVEN
NOTE: Use and care instructions for the lower
oven are provided in a separate manual.
Warranty
1-800-253-1301
Call us with questions or comments.
MODEL RM280PXA
3-43
48
A Note To You
Thank you for buying a Whirlpool appliance.
You have purchased a quality, worMclass home appliance. Years of engineering experience
have gone into its manufacturing. To ensure that you will enjoy many years of trouble-free
operation, we have developed this Use
how to operate and maintain your appliance properly and safely. Please read it carefully. Also,
please complete and mail the Ownership Registration Card provided with your appliance. This
will help us notify you about any new information on your appliance.
Your safety is important to us.
This guide contains safety symbols and statements. Please pay special attention to these
symbols and follow any instructions given. Here is a brief explanation of the use of each
symbol.
and
Care Guide. lt is full of valuable information on
This symbol will help alert you to such
dangers as personal injury, burns, fire and
electrical shock.
This symbol will help you avoid actions
which could cause product damage
(scratches, dents, etc.) and damage to your
personal property.
Our Consumer Assistance Center number, l-800-253-1 301,
is toll-free, 24 hours a day.
If you ever have a question concerning your appliance’s operation, or if you need service, first
see “If You Need Assistance Or Service” on page 43. If you need further help, feel free to call
our Consumer Assistance Center. When calling, you will need to know your appliance’s
complete model number and serial number. You can find this information on the model and
serial number plate (see diagram in Lower Oven Use and Care Guide). For your convenience,
we have included a handy place below for you to record these numbers, the purchase date
from the sales slip and your dealers name and telephone number. Keep this book and the
sales slip together in a safe place for future reference.
Model
Number
Serial Number
Purchase Date
Dealer Name
Dealer Phone
2
lmt3ortant
-m- - --
SafeW Instructions
I
Microwave ovens have been thoroughly tested for safe and efficient operation.
HOW-
ever, as with any appliance, there are special installation and safety precautions which
must be followed to ensure safe and satisfactory operation and prevent damage to the
unit.
To reduce the risk of burns, fire,
electrical shock, injury to
persons, exposure to excessive microwave energy, or
damage when using the microwave oven, follow basic
precautions, Including the following:
l
l
Read all instructions before using the
microwave oven.
l
Read and follow the specific “PRECAUTIONS TO AVOID POSSIBLE EXPOSURE TO EXCESSIVE MICROWAVE
ENERGY’ found on page 4.
l
This appliance must be grounded.
Connect only to properly grounded
outlet. See “GROUNDING INSTRUCTIONS” found in the Installation Instructions.
l
Install or locate this appliance only in g
accordance with the provided Installation
Instructions.
l
Some products such as whole eggs and
sealed containers-for example, closed
glass jars-may explode and should not
be heated in this oven.
l
Use this appliance only for its intended cooking times. Cooking in metal containuse as described in this manual. Do not
Do not cover or block any opening on the
appliance. Fire may result.
l
See door surface and interior cleaning
instructions on page 34.
l
To reduce the risk of fire in the oven
cavity:
-Do not overcook food. Carefully attend
appliance if paper, plastic, or other
combustible materials are placed inside
the oven to facilitate cooking. Paper can
char or bum, and some plastics can
melt if used when heating foods.
-Do not deep fry in oven.
-Test dinnerware or cookware before
using. See page 39. Some dishes
(melamine, some ceramic dinnennrare,
etc.) absorb microwave energy, becoming too hot to handle and slowing
ers not designed for microwave use can
use corrosive chemicals or vapors in this damage the oven, as can containers
appliance. This type of oven is specifi- with hidden metal (twist-ties, foil lining,
cally designed to heat, cook, or dry food.
It is not designed for industrial or laboratory use.
l
As with any appliance, close supervision
is necessary when used by children.
l
Do not operate this appliance if it is not
staples, metallic glaze or trim).
-Remove wire twist-ties from paper or
plastic bags before placing bag in oven.
-If materials inside the oven should
ignite, keep oven door closed, turn oven
off or shut off power at the fuse or circuit
working properly, or if it has been breaker panel.
damaged. Electrical shock, fire or other
hazards may result.
l
This appliance should be serviced only
-Do not use the cavity for storage
purposes. Do not leave paper products,
cooking utensils, or food in the cavity
by qualified service personnel. Call an when not in use.
authorized WhirlpoolSM service company
for examination, repair or adjustment.
l
Read and follow “Operating Safety
Precautions” starting on page 36.
- SAVE THESE INSTRUCTIONS -
3
You are responsible for:
l Reading and following the INSTALLATION
INSTRUCTIONS packed with your oven.
l Installing and leveling the oven in a
cabinet strong enough to support its
weight, and where it is protected from the
elements. The microwave oven should be
at a temperature above 50°F (10°C) for
proper operation.
l Properly connecting the oven to electrical
supply and grounding it.
l Making sure the oven is not used by
anyone unable to operate it properly.
l Properly maintaining the oven.
l Using the microwave oven only for jobs
expected of a home microwave oven.
PRECAUTIONS TO AVOID POSSIBLE
EXPOSURE TO EXCESSIVE
MICROWAVE ENERGY...
Do not attempt to operate this oven with
the door open since open-door operation
can result in harmful exposure to microwave energy. It is important not to defeat
or tamper with the safety interlocks,
Do not place any object between the oven
front face and the door or allow soil or The microwave oven should be checked
cleaner residue to accumulate on sealing
surfaces. personnel after a repair is made.
Do not operate the oven if it is damaged.
It is particularly important that the oven
door close properly and that there is no
damage to the:
4
(1) Door (bent),
(2) Hinges and latches (broken or loos-
ened),
(3) Door seals and sealing surfaces.
Do not operate the microwave oven if the
door window is broken.
for microwave leakage by qualified service
The oven should not be adjusted or
repaired by anyone except properly
qualified service personnel.
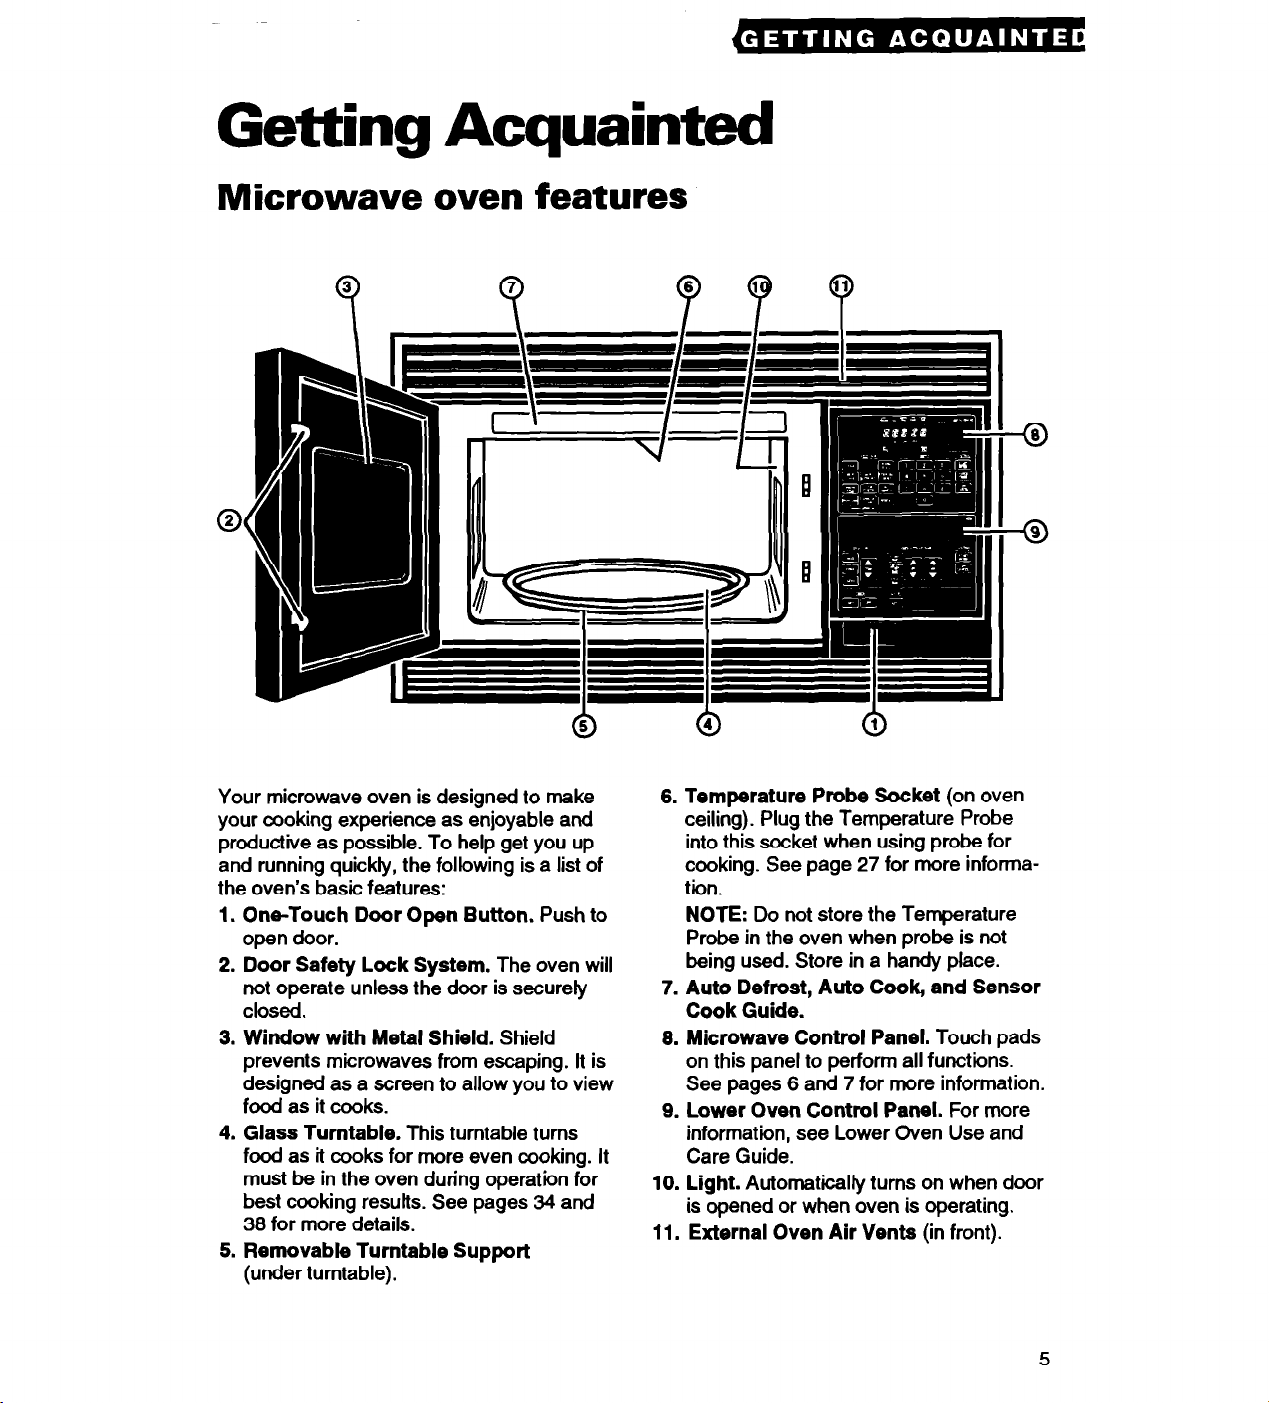
Getting Acquainted
Microwave oven features
Your microwave oven is designed to make
your cooking experience as enjoyable and
productive as possible. To help get you up
and running quickly, the following is a list of
the oven’s basic features:
1. One-Touch Door Open Button. Push to
open door.
2. Door Safety Lock System. The oven will
not operate unless the door is securefy
ClOSd.
3. Window with Metal Shield. Shield
prevents microwaves from escaping. It is
designed as a screen to allow you to view
food as it cooks.
4. Glass Turntable. This turntable turns
food as it cooks for more even cooking. It
must be in the oven during operation for
best cooking results. See pages 64 and
38 for more details.
5. Removable Turntable Support
(under turntable).
6. Temperature Probe Socket (on oven
ceiling). Plug the Temperature Probe
into this socket when using probe for
cooking. See page 27 for more information.
NOTE: Do not store the Temperature
Probe in the oven when probe is not
being used. Store in a handy place.
7. Auto Defrost, Auto Cook, and Sensor
Cook Guide.
8. Microwave Control Panel. Touch pads
on this panel to perform all functions.
See pages 6 and 7 for more information.
9. Lower Oven Control Panel. For more
information, see Lower Oven Use and
Care Guide.
10. Light. Automaticalfy turns on when door
is opened or when oven is operating.
11. External Oven Air Vents (in front).
5
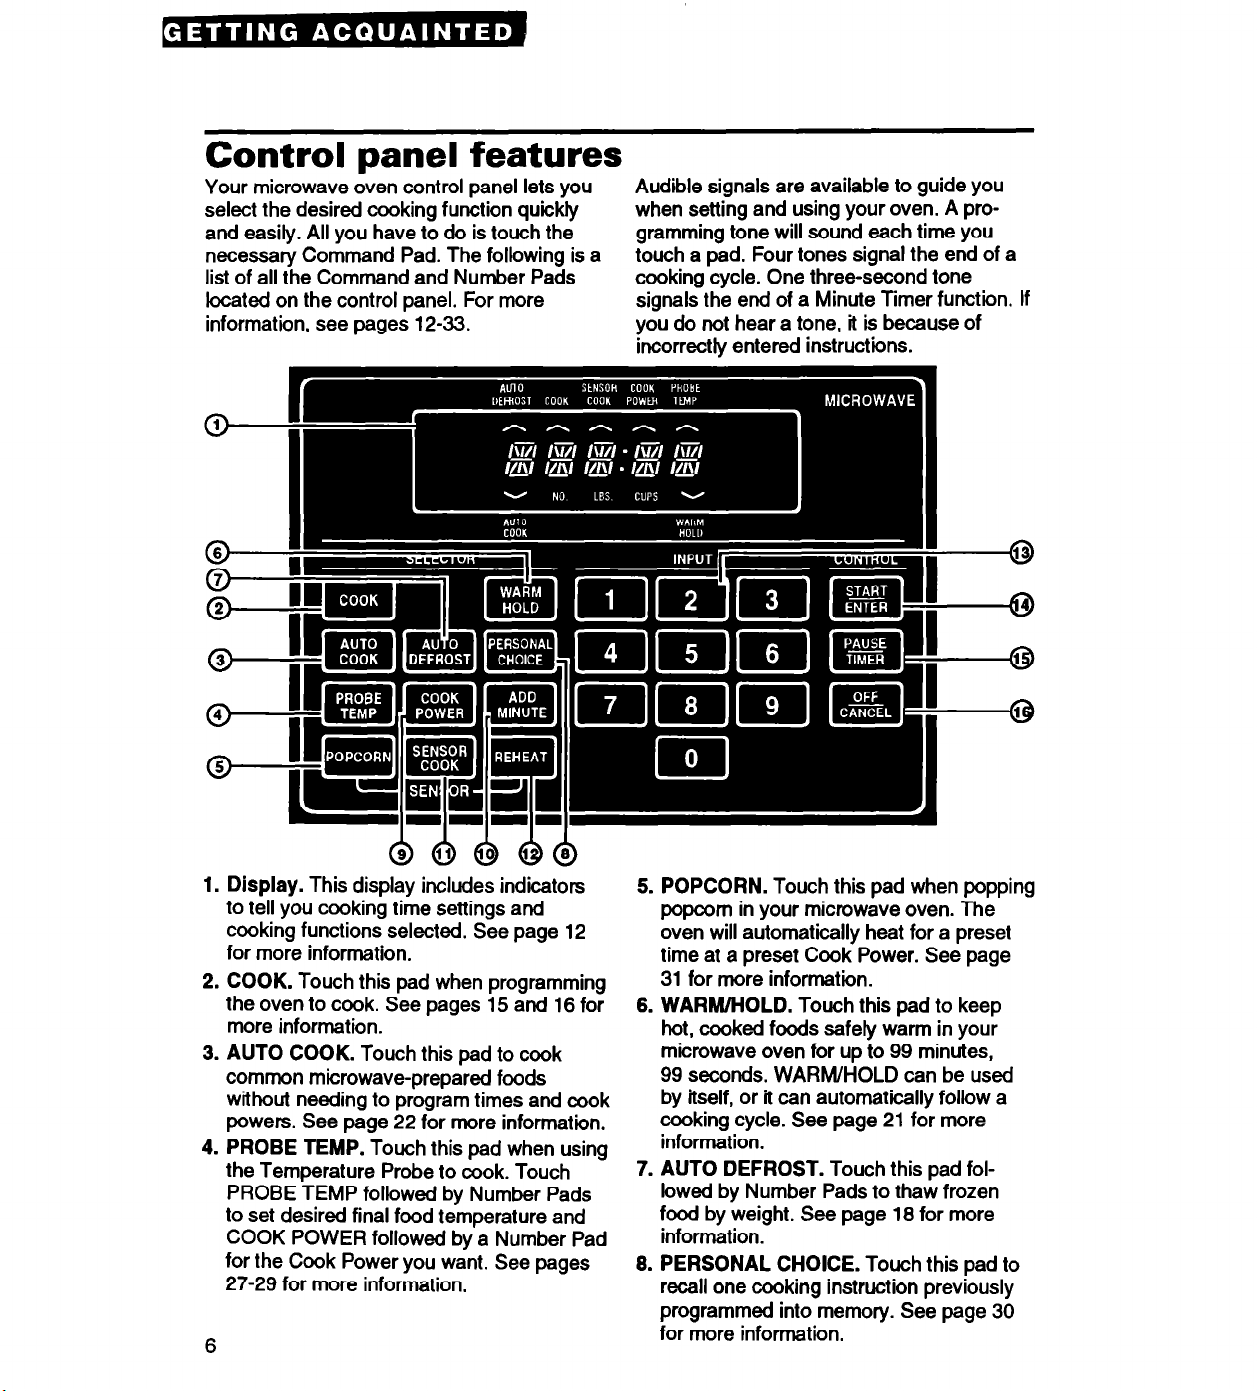
Control panel features
Your microwave oven control panel lets you
select the desired cooking function quickly
and easily. All you have to do is touch the
necessary Command Pad. The following is a
list of all the Command and Number Pads
located on the control panel. For more
information, see pages 12-33.
Audible signals are available to guide you
when setting and using your oven. A programming tone will sound each time you
touch a pad. Four tones signal the end of a
cooking cycle. One three-second tone
signals the end of a Minute Timer function. If
you do not hear a tone, it is because of
incorrectly entered instructions.
1. Display. This display includes indicators
to tell you cooking time settings and
cooking functions selected. See page 12
for more information.
2. COOK. Touch this pad when programming
the oven to cook. See pages 15 and 16 for
more information.
3. AUTO COOK. Touch this pad to cook
common microwave-prepared foods
without needing to program times and cook
powers. See page 22 for more information.
4. PROBE TEMP. Touch this pad when using
the Temperature Probe to cook. Touch
PROBE TEMP followed by Number Pads
to set desired final food temperature and
COOK POWER followed by a Number Pad
for the Cook Power you want. See pages
27-29 for more information.
6
5. POPCORN. Touch this pad when popping
popcorn in your microwave oven. The
oven will automatically heat for a preset
time at a preset Cook Power. See page
31 for more information.
6. WARM/HOLD. Touch this pad to keep
hot, cooked foods safely warm in your
microwave oven for up to 99 minutes,
99 seconds. WARM/HOLD can be used
by itself, or it can automatically follow a
cooking cycle. See page 21 for more
information.
7. AUTO DEFROST. Touch this pad followed by Number Pads to thaw frozen
food by weight. See page 18 for more
information.
8. PERSONAL CHOICE. Touch this pad to
recall one cooking instruction previously
programmed into memory. See page 30
for more information.
9. COOK POWER. Touch this pad followed
by a Number Pad to set the amount of
microwave energy released to cook the
food. The higher the number, the higher
the microwave power or “cooking speed”.
See page 16 for more information. See
the “Microwave cooking chart” on page
41 for specific Cook Powers to use for the
foods you are cooking.
10. ADD MINUTE. Touch this pad to cook
for one minute or to add an extra
minute, at 100% Cook Power, to your
cooking cycle. See page 33 for more
information.
11. SENSOR COOK. Touch this pad
followed by a setting selection to cook
food with the sensor. The oven automatically adjusts cooking times and
powers by detecting the amount of
moisture and humidity emitted by the
food during cooking. See page 24 for
more information.
12. REHEAT. Touch this pad to reheat
many of your favorite foods automatically without setting the time or Cook
Power. See page 32 for more information.
13. Number Pads. Touch Number Pads to
enter cooking times, Cook Powers,
auantities or weiahts. Use also to set the
f&nute Timer. ”
14. START/ENTER. Touch this pad after
setting a function on the microwave
oven to start the function. If you open
the door after the oven begins to cook,
retouch START/ENTER.
15. PAUSE/TIMER. Touch this pad to set
the Minute Timer or to stop the oven
between cooking stages. See pages 14
and 20 for more information.
16. OFF/CANCEL. Touch this pad to erase
an incorrect command, cancel the
Minute Timer, cancel a program during
cooking, or clear the Display. See page
14 for more information.
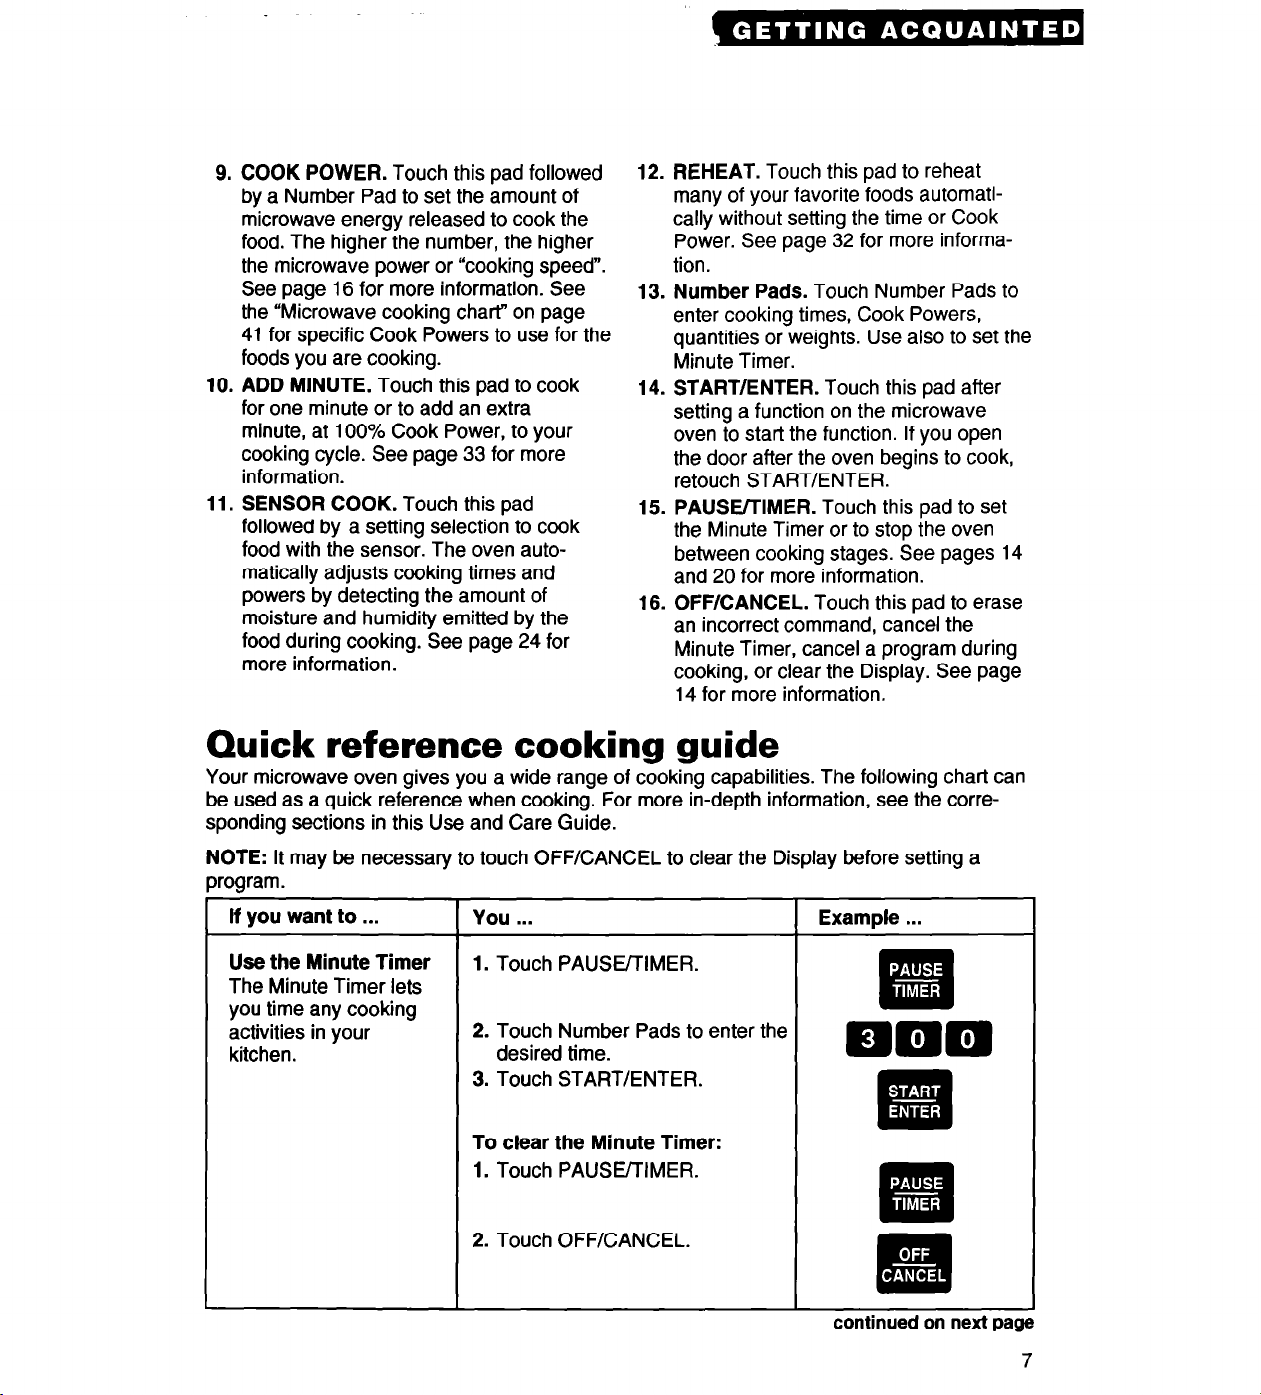
Quick reference cooking guide
Your microwave oven gives you a wide range of cooking capabilities. The following chart can
be used as a quick reference when cooking. For more in-depth information, see the corre-
sponding sections in this Use and Care Guide.
NOTE: It may be necessary to touch OFF/CANCEL to clear the Display before setting a
rogram.
If you want to . . .
Use the Minute Timer
The Minute Timer lets
you time any cooking
activities in your
kitchen.
You . . .
1. Touch PAUSE/TIMER.
2. Touch Number Pads to enter the
desired time.
3. Touch START/ENTER.
To clear the Minute Timer:
1. Touch PAUSE/TIMER.
2. Touch OFF/CANCEL.
Example . . .
on next page
7
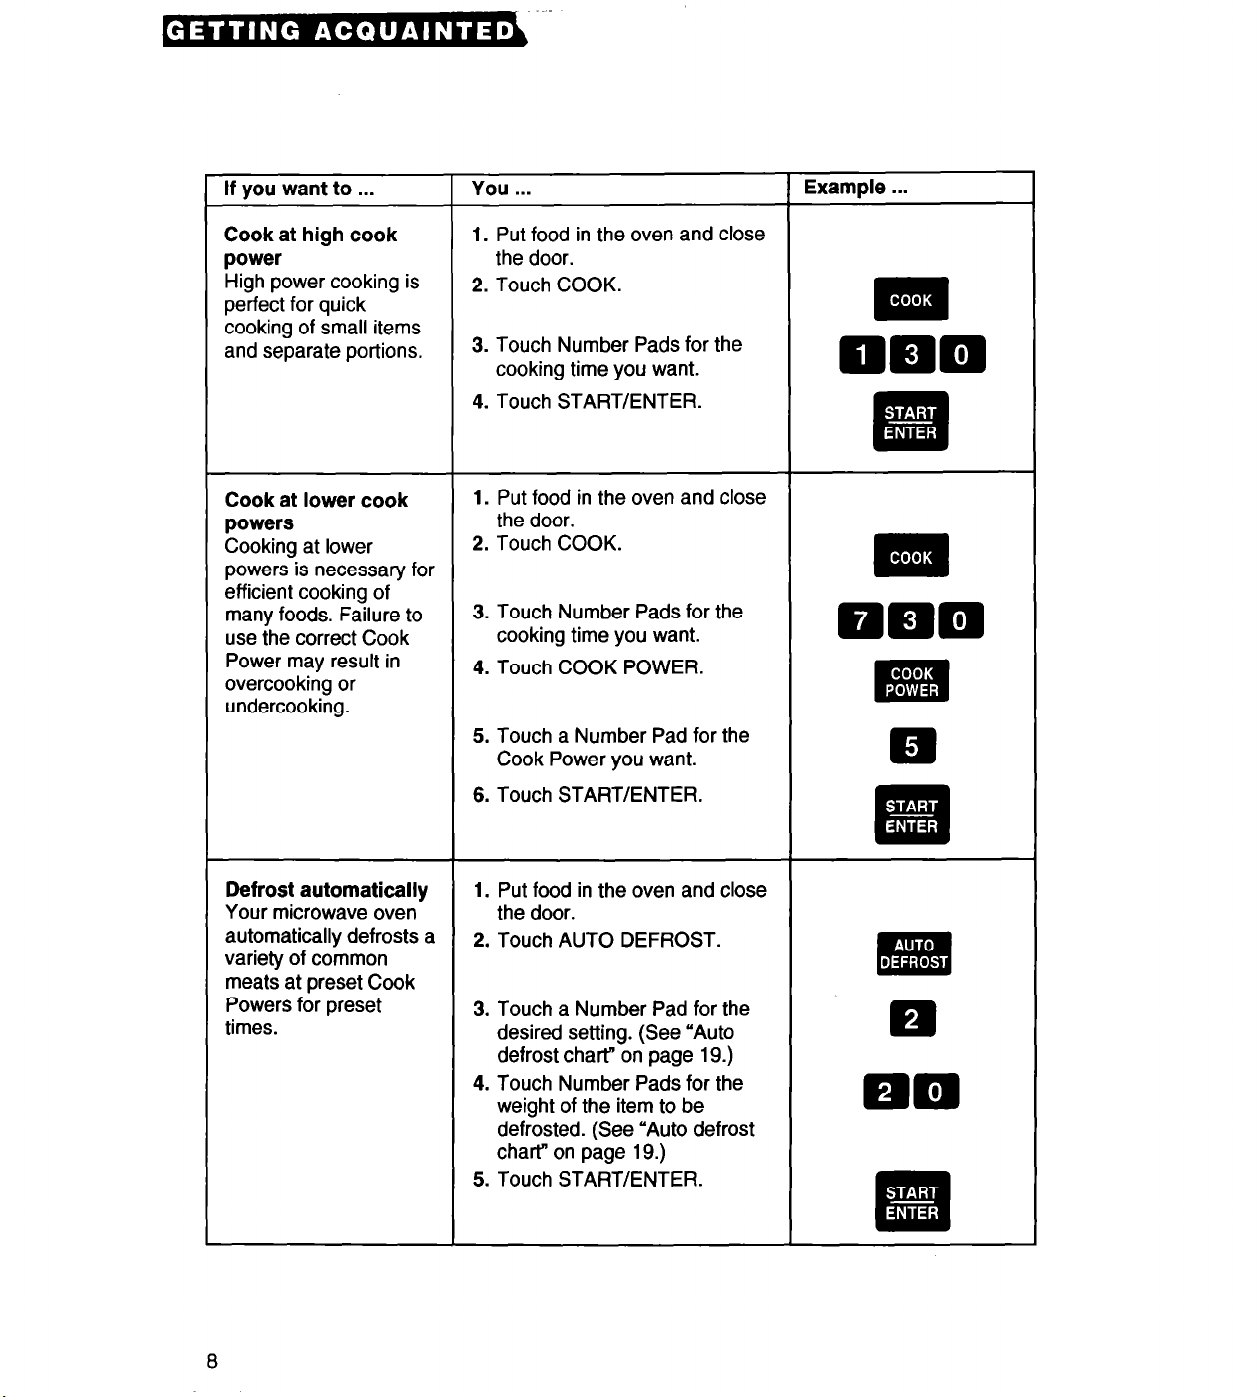
If vou want to . . .
I You . . .
1 Example . . .
Cook at high cook
power
High power cooking is
perfect for quick
cooking of small items
and separate portions.
Cook at lower cook
powers
Cooking at lower
powers is necessary for
efficient cooking of
many foods. Failure to
use the correct Cook
Power may result in
overcooking or
undercooking.
1. Put food in the oven and close
the door.
2. Touch COOK.
3. Touch Number Pads for the
cooking time you want.
4. Touch START/ENTER.
1. Put food in the oven and close
the door.
2. Touch COOK.
3. Touch Number Pads for the
cooking time you want.
4. Touch COOK POWER.
5. Touch a Number Pad for the
Cook Power you want.
6. Touch START/ENTER.
Defrost automatically
Your microwave oven
automatically defrosts a
variety of common
meats at preset Cook
Powers for preset
times.
8
1. Put food in the oven and close
the door.
2. Touch AUTO DEFROST.
3. Touch a Number Pad for the
desired setting. (See “Auto
defrost chart” on page 19.)
4. Touch Number Pads for the
weight of the item to be
defrosted. (See “Auto defrost
chart” on page 19.)
5. Touch START/ENTER.
If you want to . . .
You . . .
Example . . .
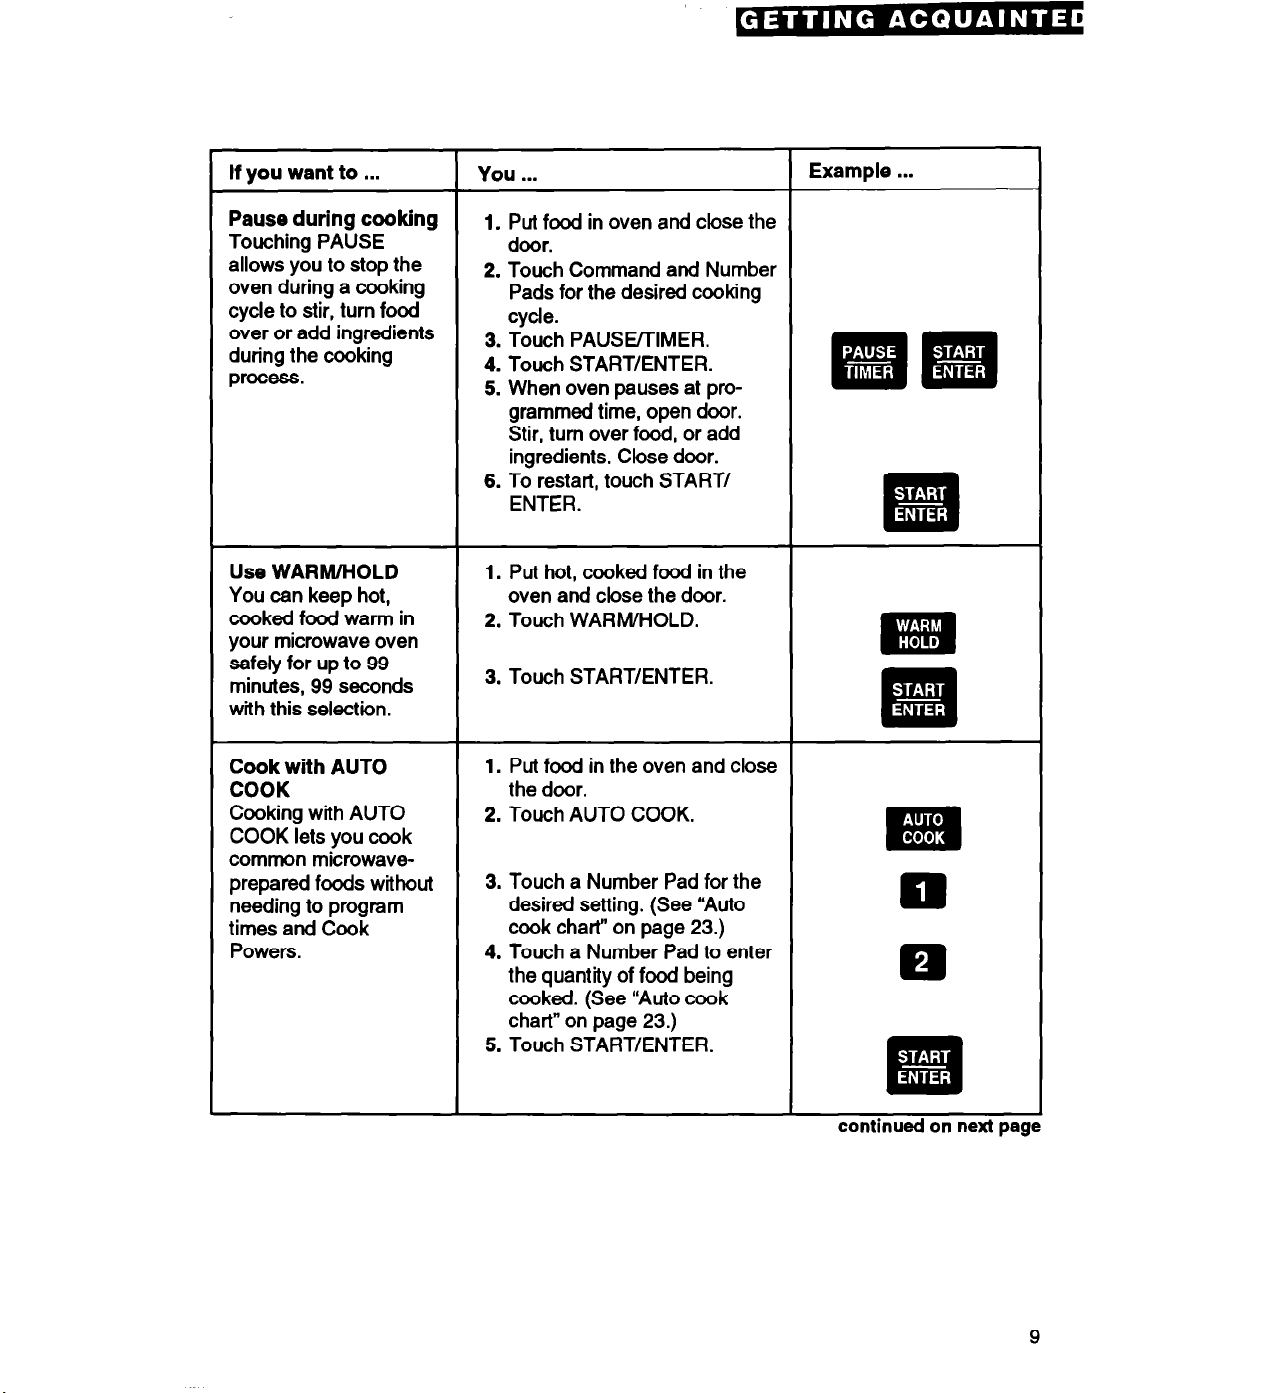
Pause during cooking
Touching PAUSE
allows you to stop the
oven during a cooking
cycle to stir, turn food
over or add ingredients
during the cooking
process.
Use WARM/HOLD
You can keep hot,
cooked food warm in
your microwave oven
safely for up to 99
minutes, 99 seconds
with this selection.
Cook with AUTO
COOK
Cooking with AUTO
COOK lets you cook
common microwave-
prepared foods without
needing to program
times and Cook
Powers.
1. Put food in oven and close the
door.
2. Touch Command and Number
Pads for the desired cooking
cycle.
3. Touch PAUSE/TIMER.
4. Touch START/ENTER.
5. When oven pauses at programmed time, open door.
Stir, turn over food, or add
ingredients. Close door.
6. To restart, touch START/
ENTER.
1. Put hot, cooked food in the
oven and close the door.
2. Touch WARM/HOLD.
3. Touch START/ENTER.
1. Put food in the oven and close
the door.
2. Touch AUTO COOK.
3. Touch a Number Pad for the
desired setting. (See “Auto
cook chart” on page 23.)
4. Touch a Number Pad to enter
the quantity of food being
cooked. (See “Auto cook
chart” on page 23.)
5. Touch START/ENTER.
q m
I .
. ,
Em
* -
Mill
continued on
next
paw
9
If you want to . . .
You
. . .
Example
. . .
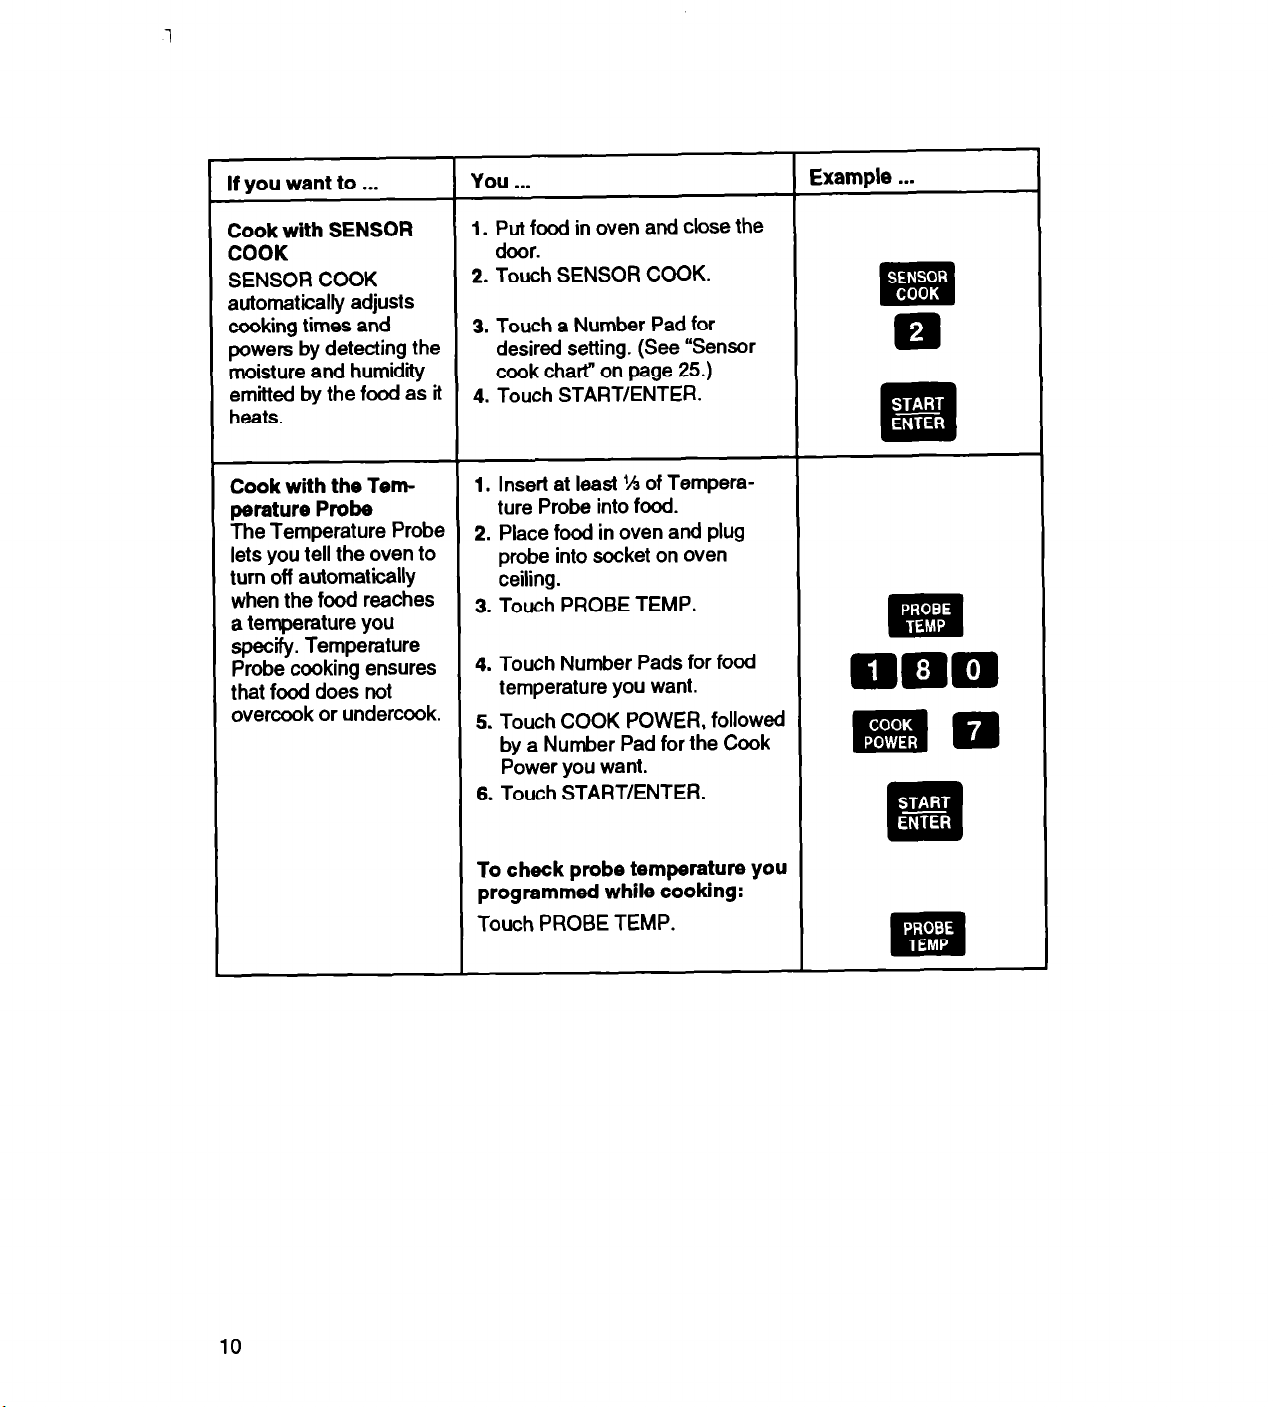
Cook with SENSOR
COOK
SENSOR COOK
automatically adjusts
cooking times and
powers by detecting the
moisture and humidity
emitted by the food as it
heats.
Cook with the Tern
perature Probe
The Temperature Probe
lets you tell the oven to
turn off automatically
when the food reaches
a temperature you
specify. Temperature
Probe cooking ensures
that food does not
overcook or undercook.
1. Put food in oven and close the
door.
2. Touch SENSOR COOK.
3. Touch a Number Pad for
desired setting. (See “Sensor
cook chart” on page 25.)
4. Touch START/ENTER.
1. Insert at least I/J of Temperature Probe into food.
2. Place food in oven and plug
probe into socket on oven
ceiling.
3. Touch PROBE TEMP.
4. Touch Number Pads for food
temperature you want.
5. Touch COOK POWER, followed
by a Number Pad for the Cook
Power you want.
6. Touch START/ENTER.
To check probe temperature you
programmed while cooking:
Touch PROBE TEMP.
000
mm
mil
m
fliil3
Gm
il!ii!
Ra
0.
mm
. -
9-e:
I -
m-0:
.
.
.
10
If you want to . . .
You . . . Example . . .
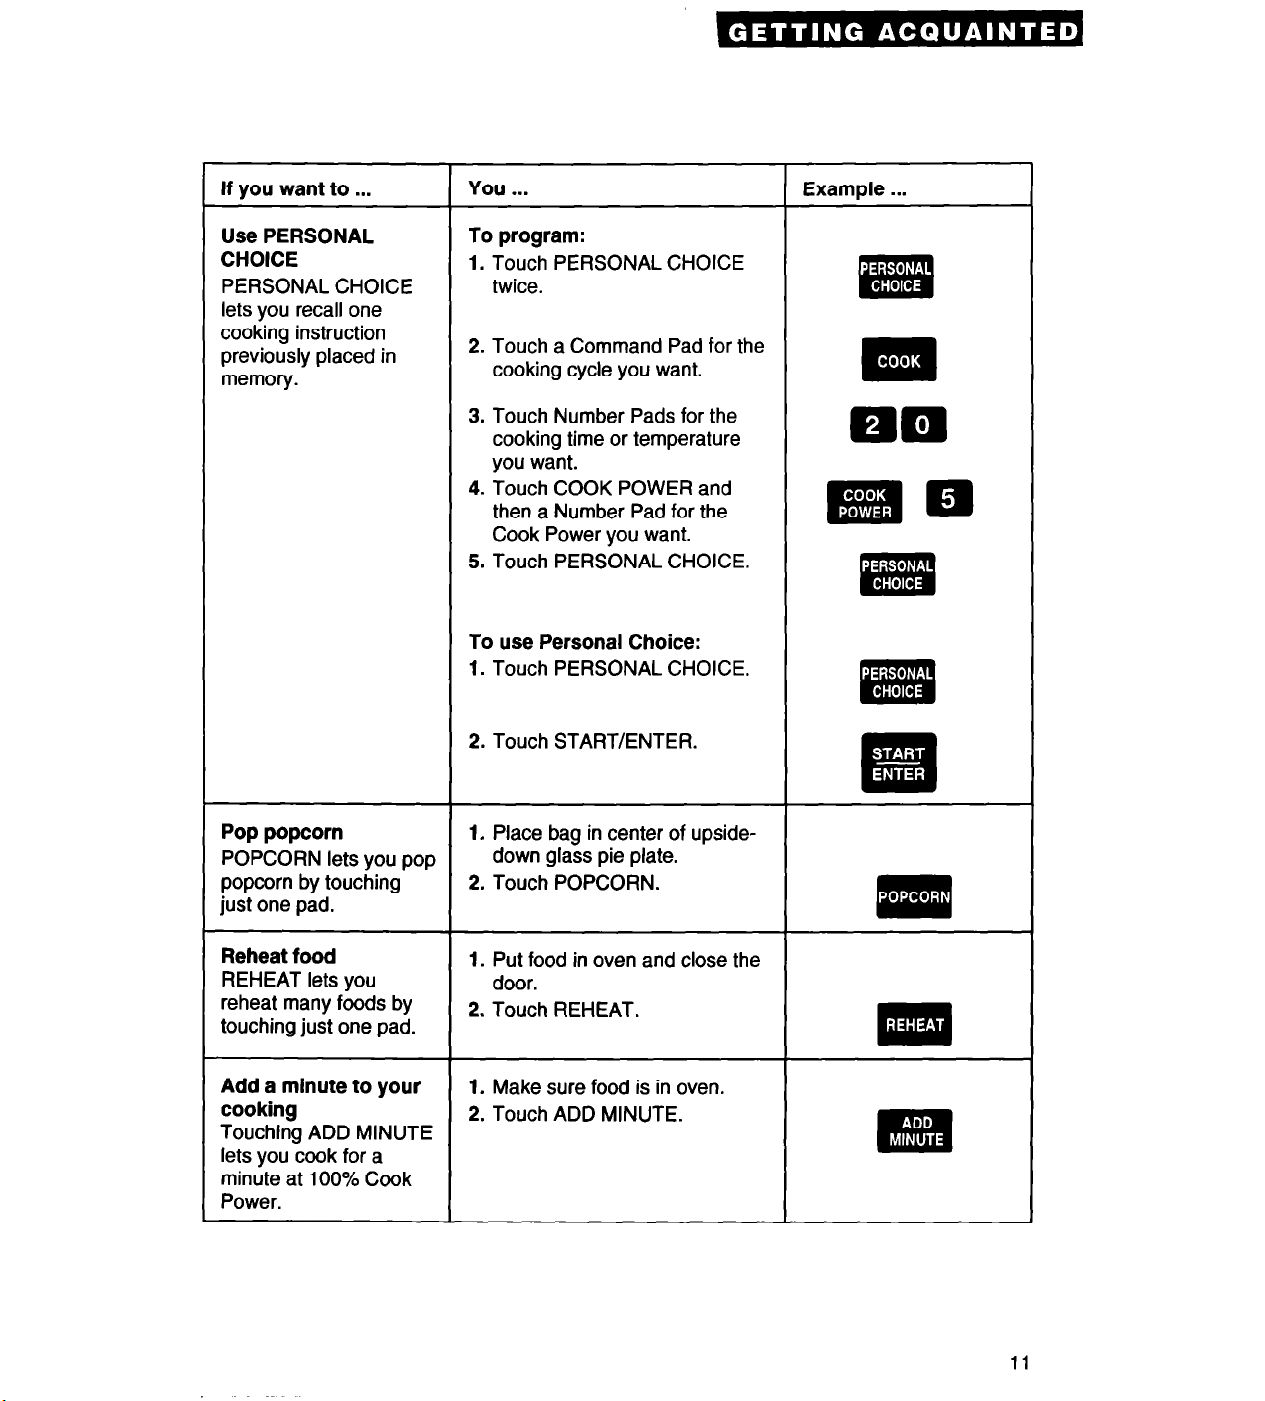
Use PERSONAL
CHOICE
PERSONAL CHOICE
lets you recall one
cooking instruction
previously placed in
memory.
To program:
1. Touch PERSONAL CHOICE
twice.
2. Touch a Command Pad for the
cooking cycle you want.
3. Touch Number Pads for the
cooking time or temperature
you want.
4. Touch COOK POWER and
then a Number Pad for the
Cook Power you want.
5. Touch PERSONAL CHOICE.
To use Personal Choice:
1. Touch PERSONAL CHOICE.
2. Touch START/ENTER.
m
A
m’m
1 .
.
EB
Pop popcorn 1. Place bag in center of upsidePOPCORN lets you pop
popcorn by touching
down glass pie plate.
2. Touch POPCORN.
just one pad.
Reheat food
REHEAT lets you
reheat many foods by
1. Put food in oven and close the
door.
2. Touch REHEAT.
touching just one pad.
Add a minute to your
cooking
1. Make sure food is in oven.
2. Touch ADD MINUTE.
Touching ADD MINUTE
lets you cook for a
minute at 100% Cook
Power.
‘.’ .’
m
11
Using Your Microwave Oven
In This Section
Microwave
Using the
Using
Cooking with your microwave
oven
Cooking at high cook power
Cooking at lower cook powers..
Defrosting .........................................
Auto defrost chart
Using PAUSE ....................................
Using
Using AUTO COOK
To obtain the best cooking results possible, you must operate your microwave oven properly.
This section gives you important information for efficient and safe use of your oven.
oven controls..
Minute Timer..
OFF/CANCEL
................................................... 15
WARM/HOLD
.................
........................
............................
.........................
...........................
Page
..............
..........
..... .16
.I2
.14
.I4
.15
.18
19
20
.21
22
Auto cook chart
Using
Sensor cook chart
Cooking with the Temperature
Probe
Using
Using POPCORN
Using
Using
Changing one-touch and sensor
cooking times
SENSOR
...............................................
PERSONAL
REHEAT..
ADD MINUTE
.............................. 23
COOK ..................
.......................... 25
CHOICE..
............................ 31
.............................
.......................
................................
Page
.24
27
......... .30
.32
.33
.33
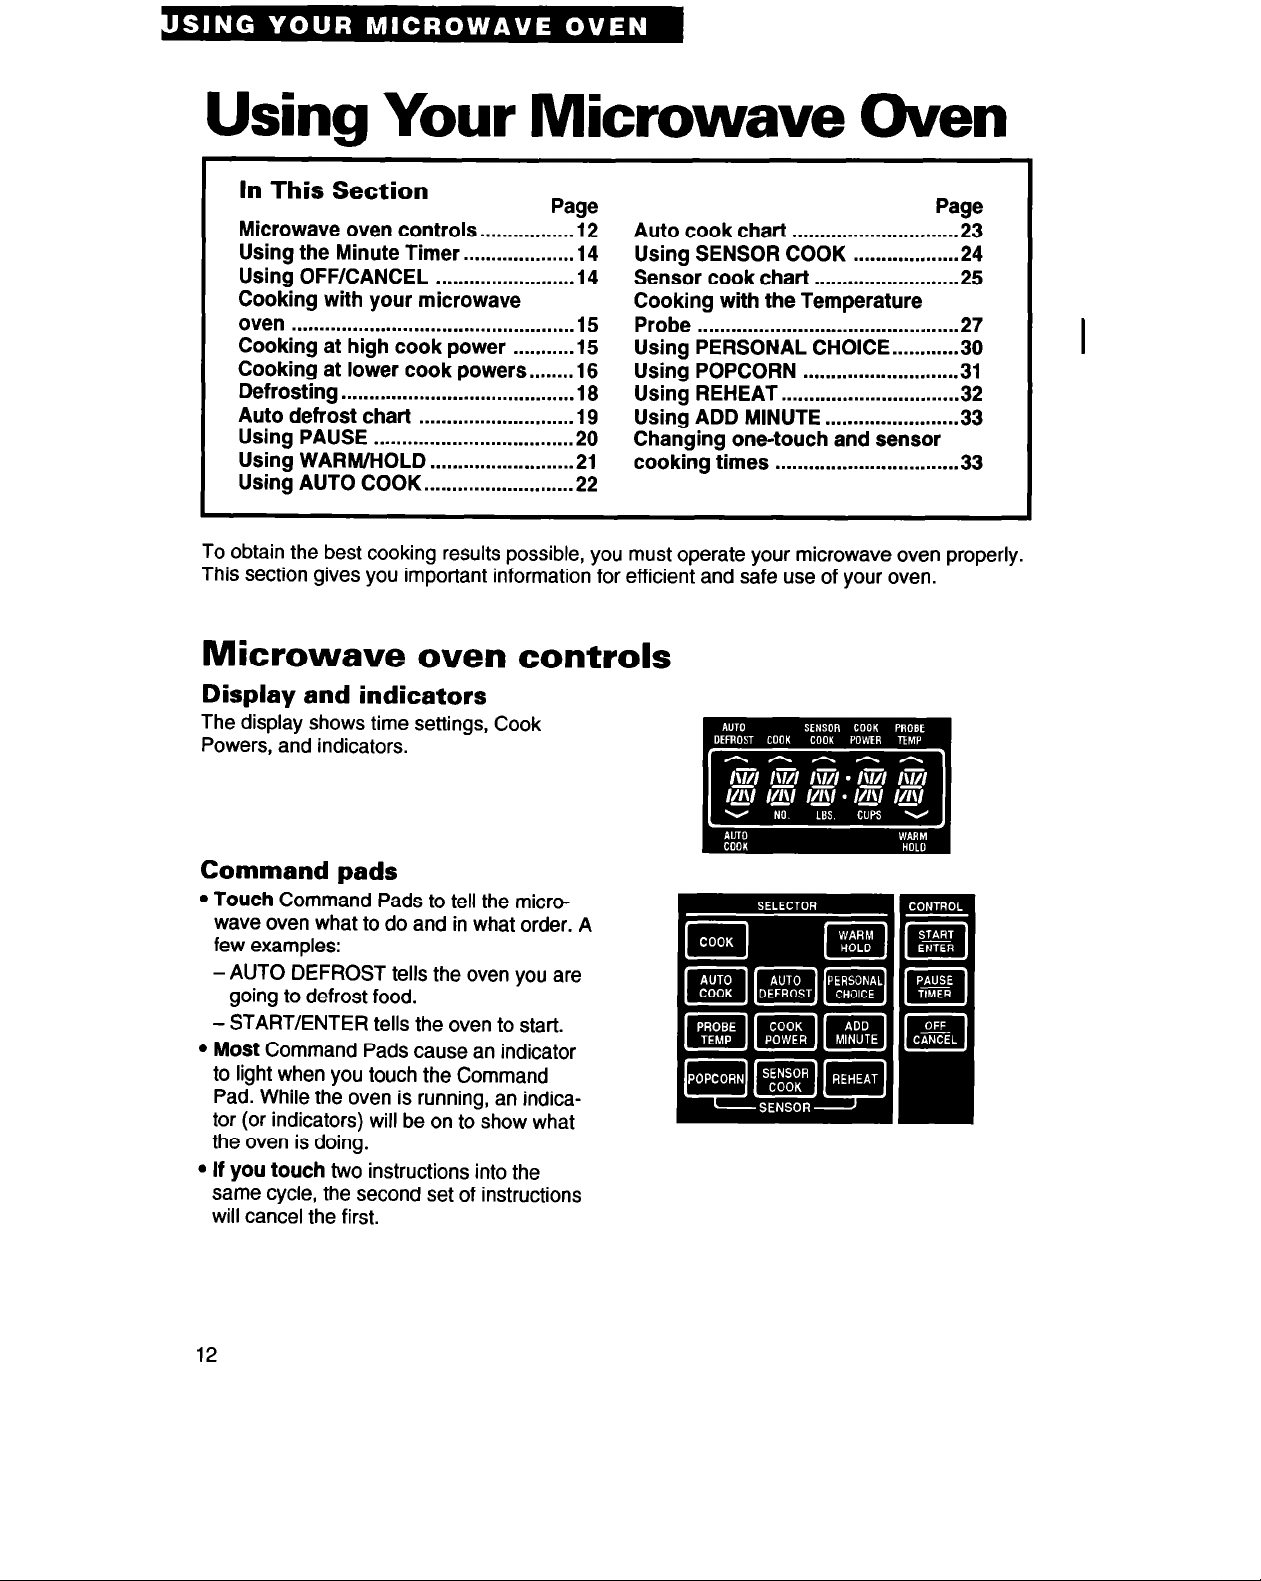
Microwave oven controls
Display and indicators
The display shows time settings, Cook
Powers, and indicators.
Command pads
l Touch Command Pads to tell the micro-
wave oven what to do and in what order. A
few examples:
- AUTO DEFROST tells the oven you are
going to defrost food.
- START/ENTER tells the oven to start.
l Most Command Pads cause an indicator
to light when you touch the Command
Pad. While the oven is running, an indicator (or indicators) will be on to show what
the oven is doing.
l If you touch two instructions into the
same cycle, the second set of instructions
will cancel the first.
12
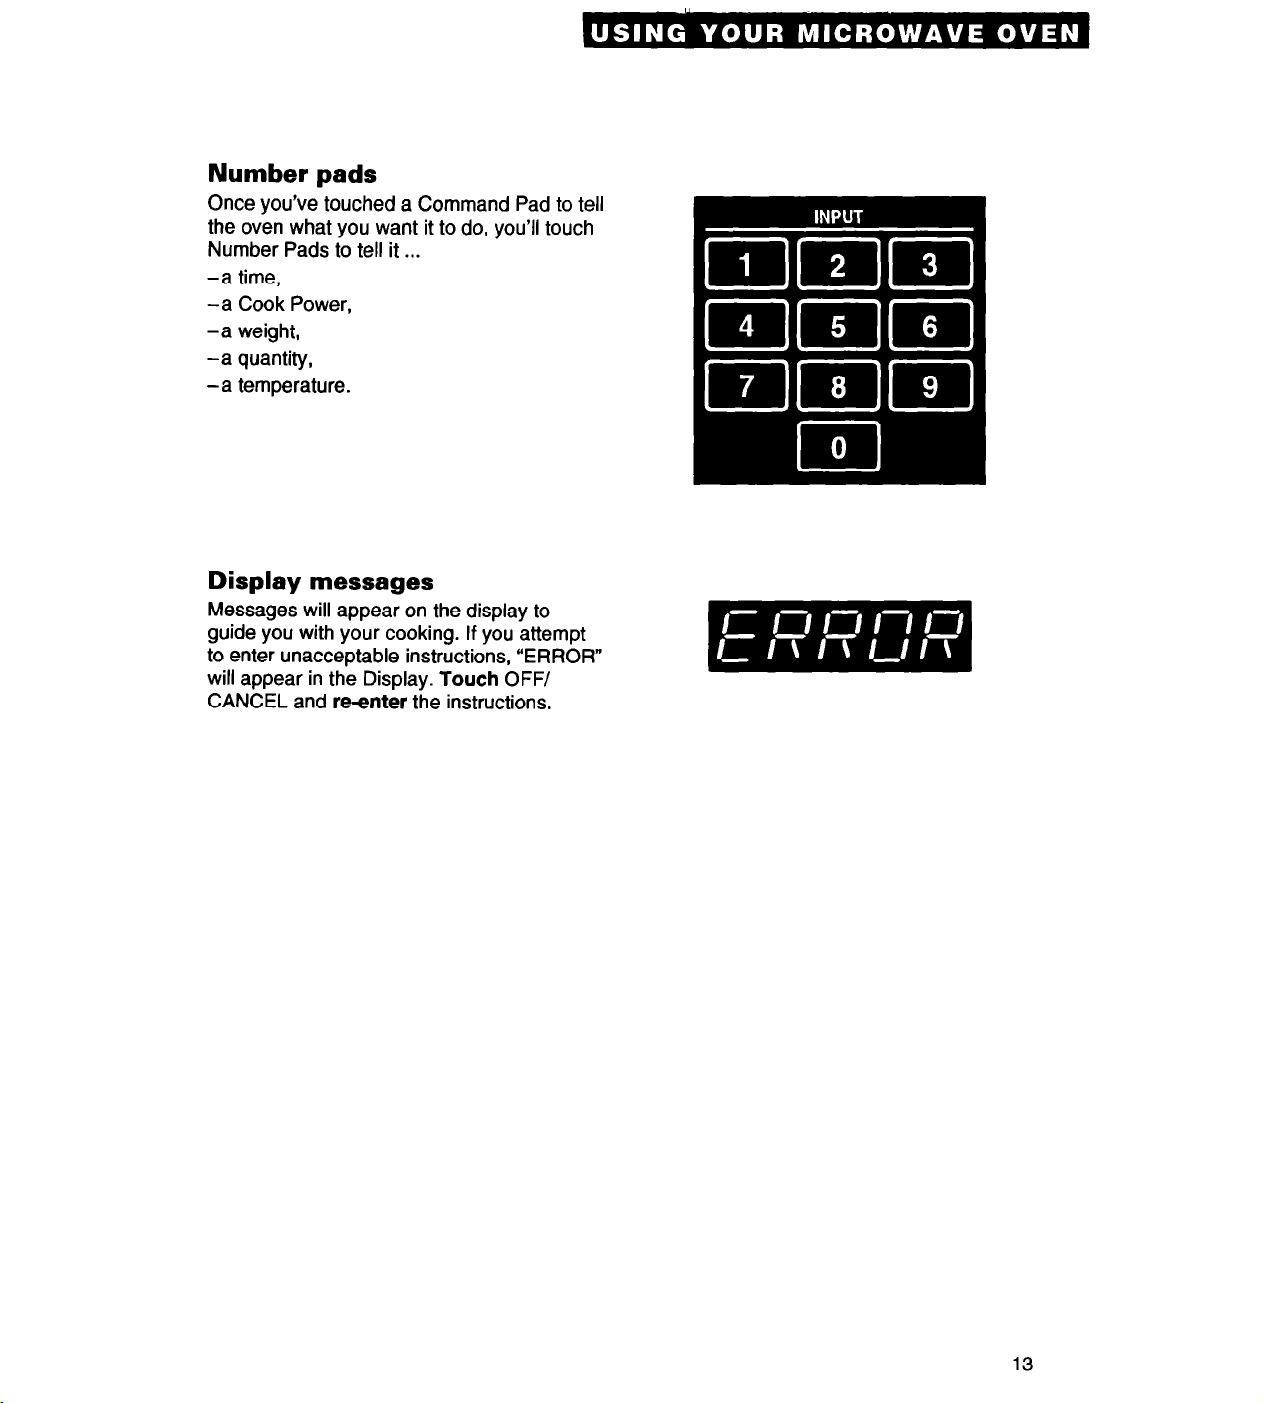
Number pads
Once you’ve touched a Command Pad to tell
the oven what you want it to do, you’ll touch
Number Pads to tell it . . .
-a time,
-a Cook Power,
-a weight,
-a quantity,
-a temperature.
Display messages
Messages will appear on the display to
guide you with your cooking. If you attempt
to enter unacceptable instructions, “ERROR”
will appear in the Display. Touch OFF/
CANCEL and reenter the instructions.
13
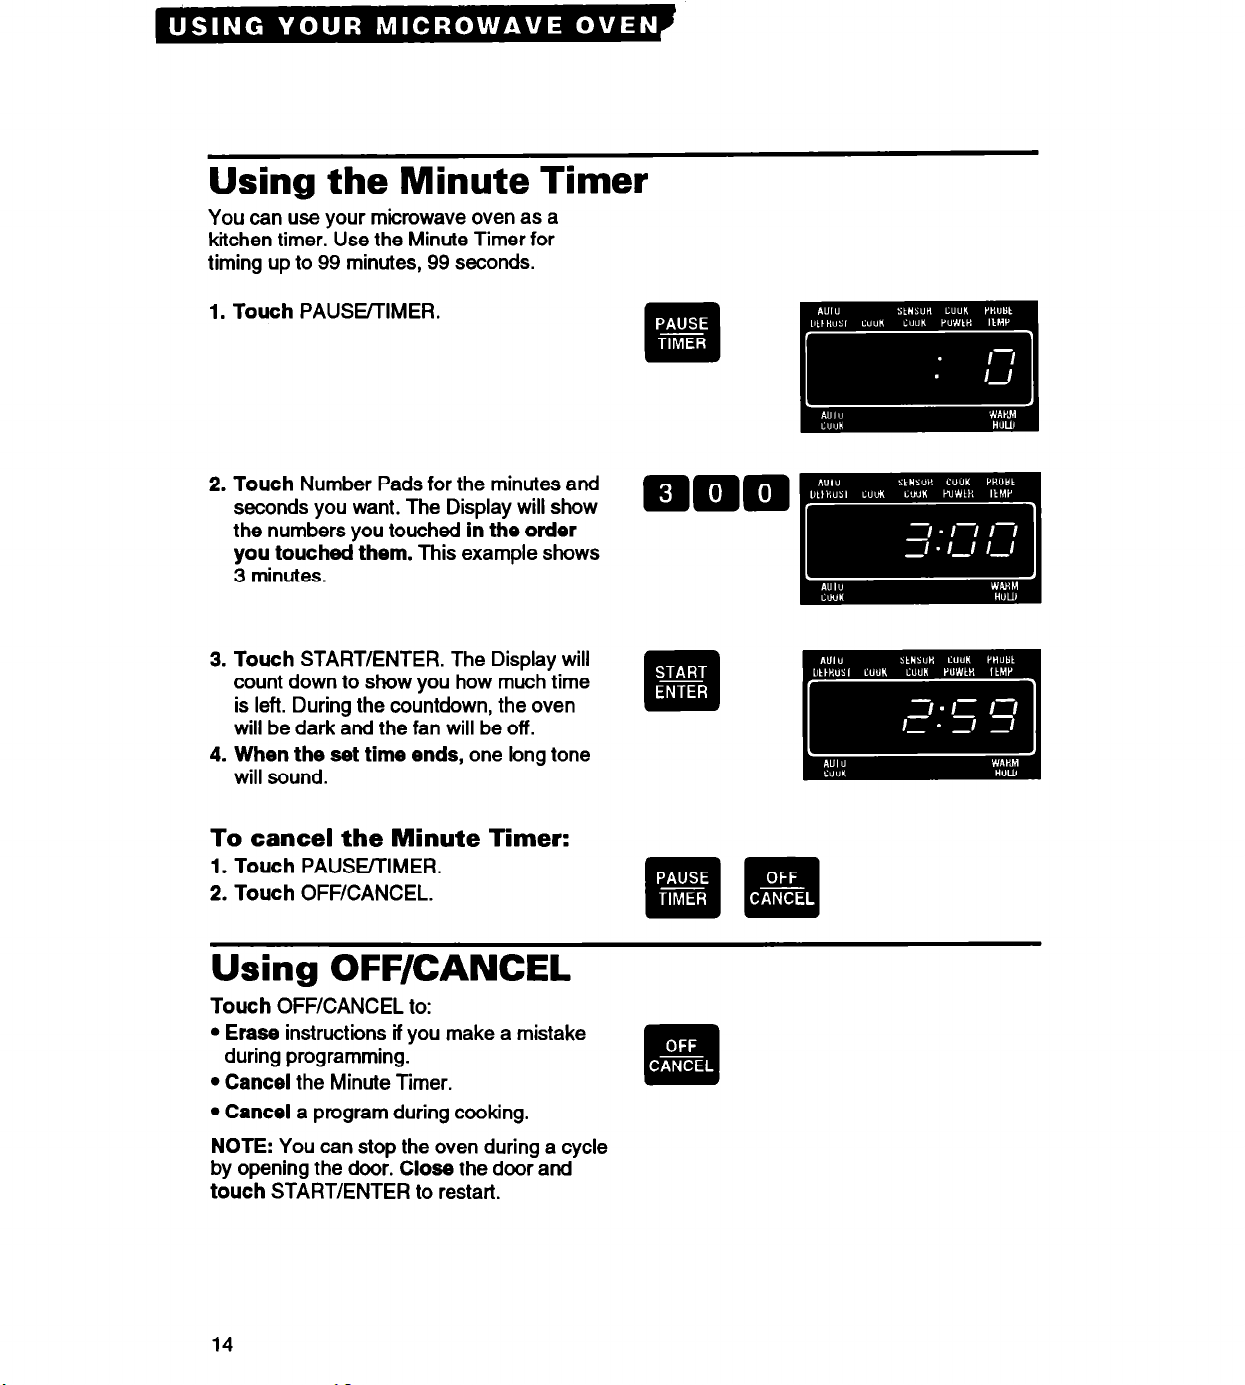
Using the Minute Timer
You can use your microwave oven as a
kitchen timer. Use the Minute Timer for
timing up to 99 minutes, 99 seconds.
1. Touch PAUSE/TIMER.
2. Touch Number Pads for the minutes and
seconds you want. The Display will show
the numbers you touched in the order
you touched them. This example shows
3 minutes.
3. Touch START/ENTER. The Display will
count down to show you how much time
is left. During the countdown, the oven
will be dark and the fan will be off.
4. When the set time ends, one long tone
will sound.
To cancel the Minute Timer:
1. Touch PAUSWIMER.
2. Touch OFF/CANCEL.
. I
.
Iii!!
1 l
.
q
Using OFF/CANCEL
Tout h OFFKANC EL to:
l
Erase instructions if you make a mistake
during programming.
l
Cancel the Minute Timer.
l
Cancel a program during cooking.
NOTE: You can stop the oven during a cycle
by opening the door. Close the door and
touch START/ENTER to restart.
14
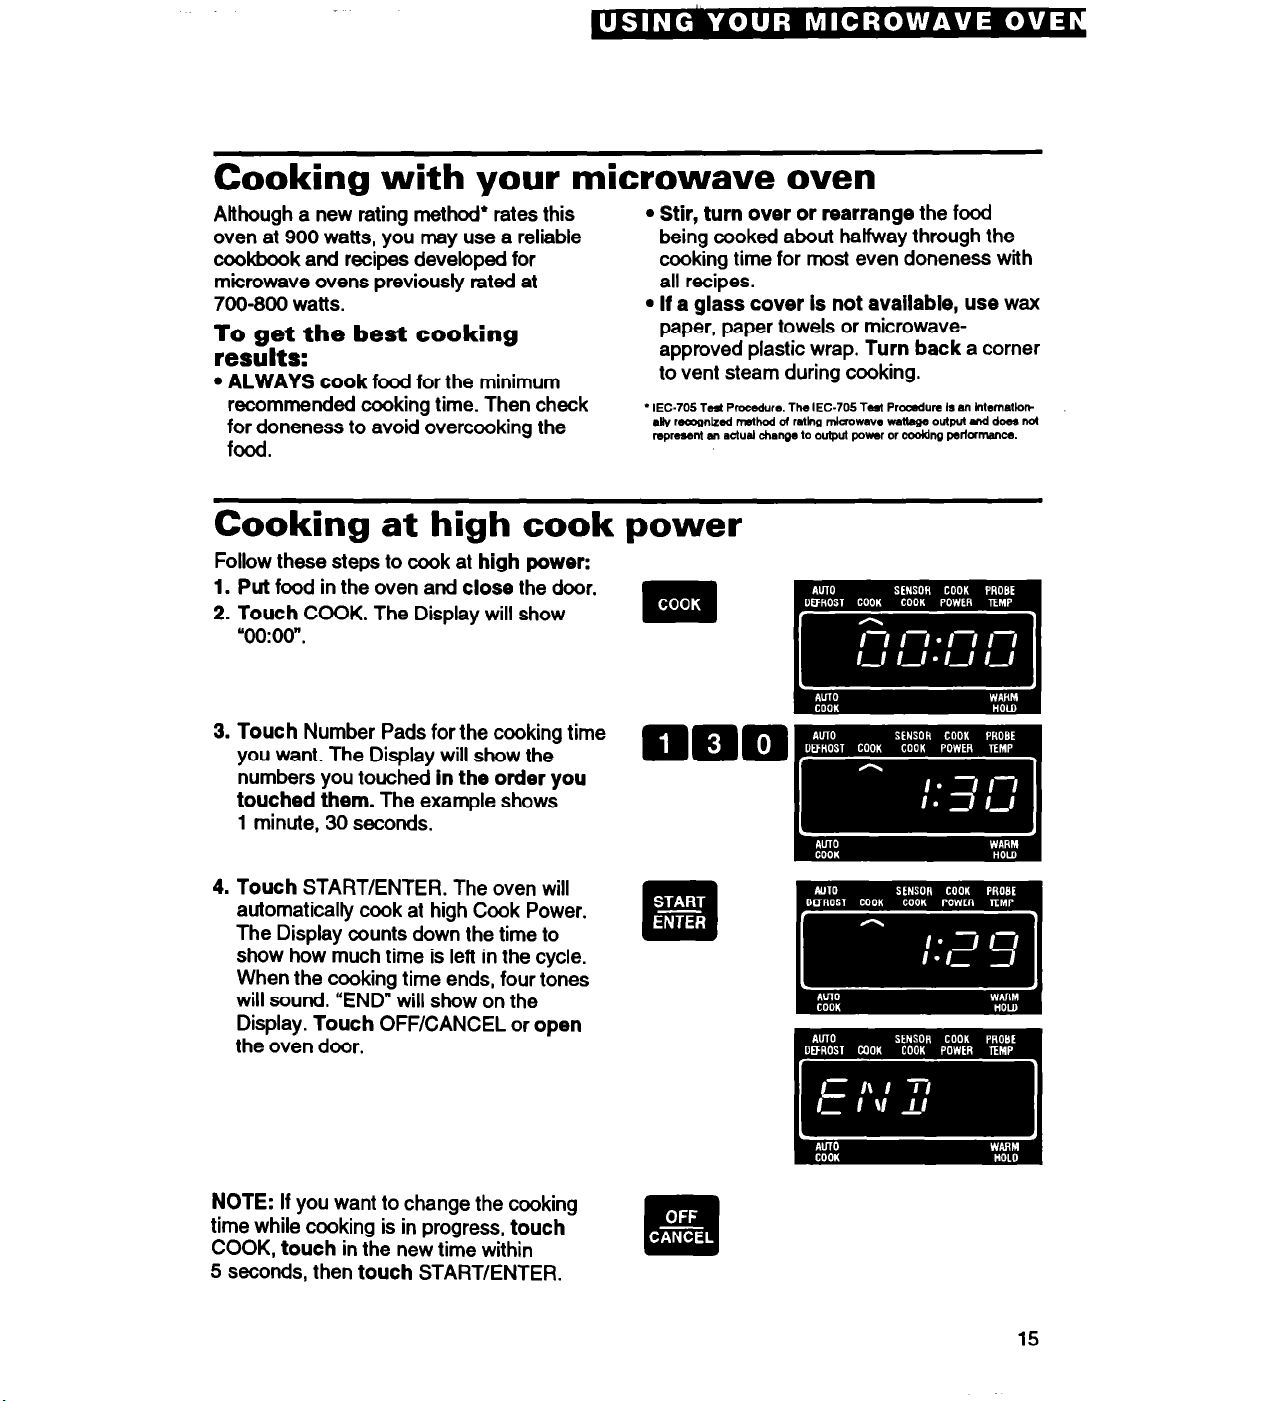
Cooking with your microwave oven
l
Although a new rating method* rates this
oven at 900 watts, you may use a reliable
mkbook and recipes developed for
microwave ovens previously fated at
700-800 watts.
l$g;;the best cooking
:
l
ALWAYS cook food for the minimum
recommended cooking time. Then check
for doneness to avoid overcooking the
food.
Stir, turn over or rearrange the food
being cooked about halfway through the
cooking time for most even doneness with
all recipes.
l
If a glass cover Is not available, use wax
paper, paper towels or microwaveapproved plastic wrap. Turn back a corner
to vent steam during cooking.
Cooking at high cook power
Follow these steps to cook at high power:
1. Put food in the oven and close the door.
2. Touch COOK. The Display will show
“00:00”.
3. Touch Number Pads for the cooking time
you want. The Display will show the
numbers you touched in the order you
touched them. The example shows
1 minute, 30 seconds.
4. Touch START/ENTER. The oven will
automatically cook at high Cook Power.
The Display counts down the time to
show how much time is left in the cycle.
When the cooking time ends, four tones
will sound. “END” will show on the
Display. Touch OFF/CANCEL or open
the oven door.
NOTE: If you want to change the cooking
time while cooking is in progress, touch
COOK, touch in the new time within
5 seconds, then touch START/ENTER.
15
 Loading...