

Whirlpool RJE-3750 User Manual

30~INCHFREE-STANDINGELECTRiCRANGE
Model RJE-3750
Control Panel
Oven Vent
Model and Serial
Number Plate
Automatic Oven
Light Switch
Air-How Oven
.._.
Copy Your Model and Serial Numbers Here
U’hen vou rleed service. or call wth a questIon.
have this Informatlorl read>
1 Complete Model and Serial Numbers (from the
plate lust behind the top of the oven door)
2 Purchase date from sales slip
Copy this lrlformatlon In these spaces Keep this
book. your warranty and sales slip together in a handy
place
See Cooking Guide for important safety information.
\\y
\
Purchase Date
Serwce Company and Phone Numhw
Surface Units
Enamel Reflector
Broil Element
Bake Element
Plug-hl
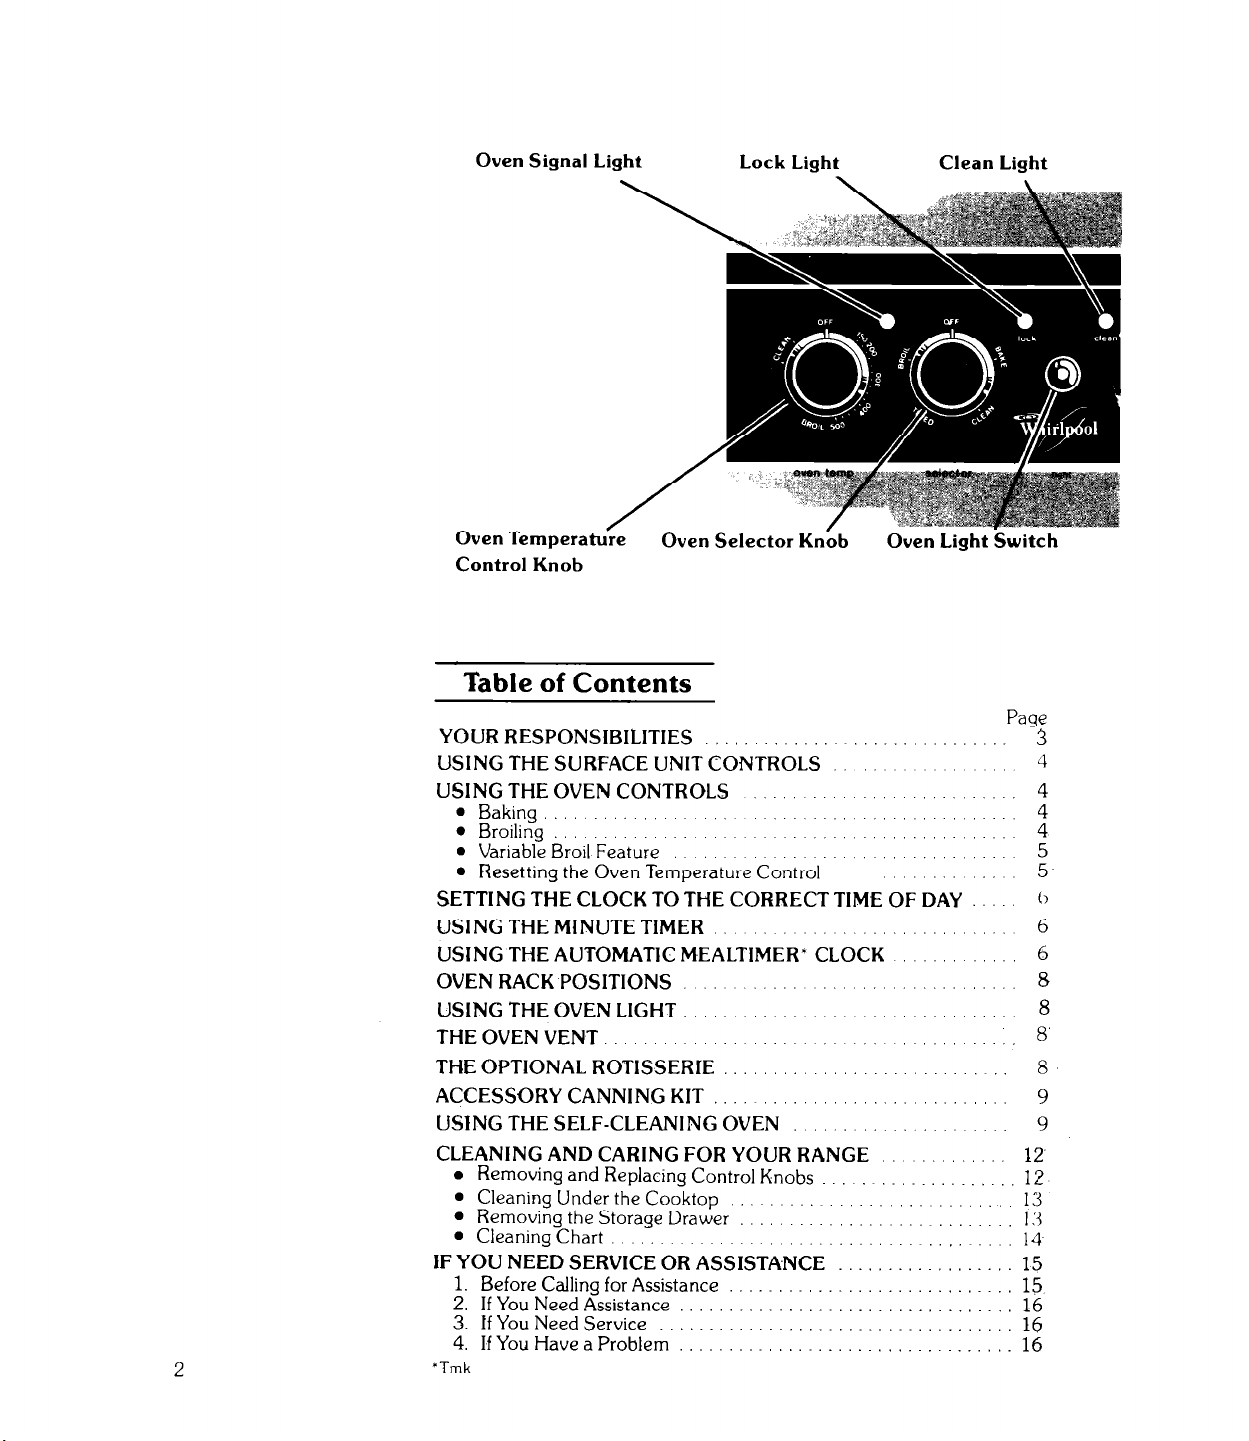
Oven Signal Light
Lock Light
Clean Light
Oven Temperat&e
Control Knob
Oven Selector K&b
Oven Light Switch
Table of Contents
YOUR RESPONSIBILITIES
.............
USING THE SURFACE UNIT CONTROLS
USING THE OVEN CONTROLS
l
Baking ..............
l
Broiling
l
Variable Broil Feature
l
Resetting the Oven Temperature Control
............
.......
....................
SETTING THE CLOCK TO THE CORRECT TIME OF DAY
USING THE MINUTE TIMER
..................
USING THE AUTOMATlC MEALTIMER’ CLOCK
OVENRACKPOSITIONS
USING THE OVEN LIGHT
THE OVEN VENT
... ......
.... ....
..................
THE OPTIONAL ROTISSERIE ............................
ACCESSORY CANNING KIT .............................
USING THE SELF-CLEANING OVEN
......................
CLEANING AND CARING FOR YOUR RANGE
.
Removing and Replacing Control Knobs ..................
.
Cleaning Under the Cooktop ........................
.
Removing the Storage Drawer
.
Cleaning Chart
...............................
...........................
IF YOU NEED SERVICE OR ASSISTANCE ..................
1. Before Calling for Assistance
2. If You Need Assistance
3. If You Need Service
....................................
4. If You Have a Problem
‘Tmk
.............................
..................................
..................................
............
....
.... ......
.......
..... .......
............
.........
........
Page
3
4
4
z
5
5
(1
6
6
8
8
8’ ...
8
9
9
12
12
13
I :i
14
15
15
16
16
16
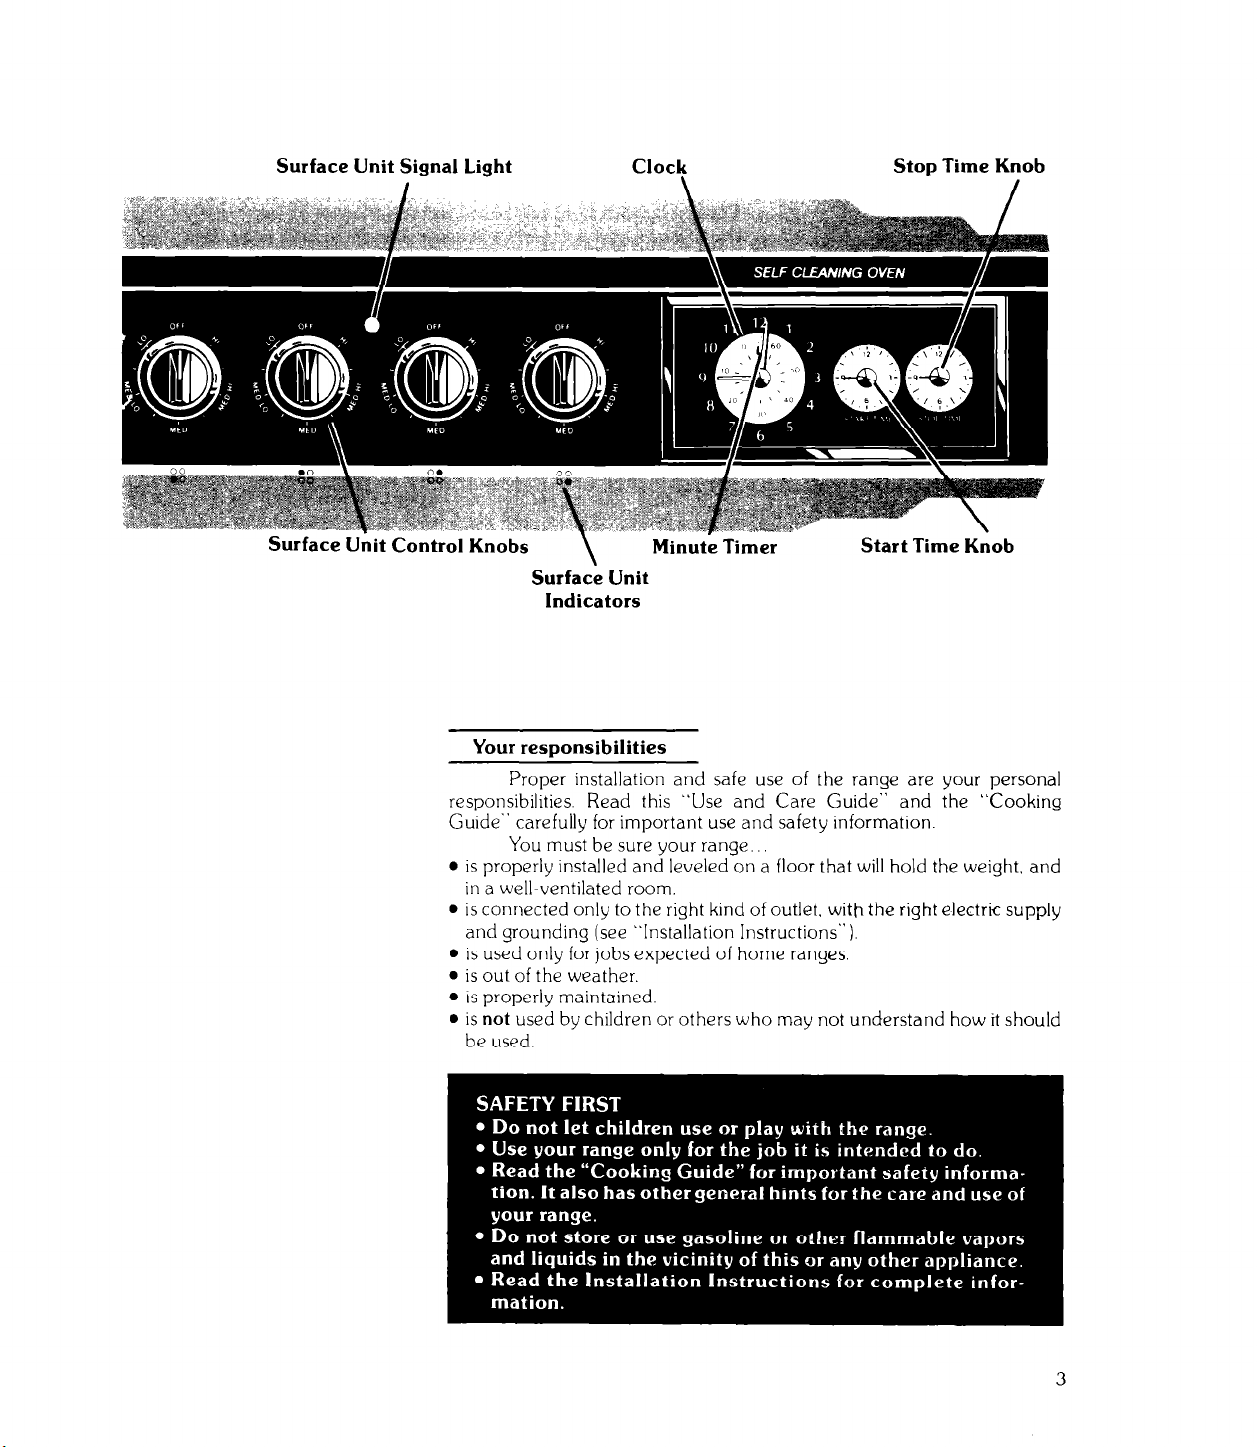
Surface Unit Signal Light Clocl$
Stop Time Knob
Surface Unit Control Knobs
Your responsibilities
responsibilities. Read this
Guide” carefully for important use and safety mformation.
l
is properly installed and leveled on a floor that will hold the weight, and
in a wellIventilated room.
l
is connected only to the right kind of outlet. with the right electric supply
and grounding (see “Installation Instructions”).
l
IS used only for jobs expected of home ranges
l
is out of the weather.
l
IS properly maintained
l
is
not
be used
\
Minute Timer
Start Time Knob
Surface Unit
Indicators
Proper installation and safe use of the range are your personal
“Use and Care Guide” and the “Cooking
You must be sure your range..
used by children or others who may not understand how it should
3
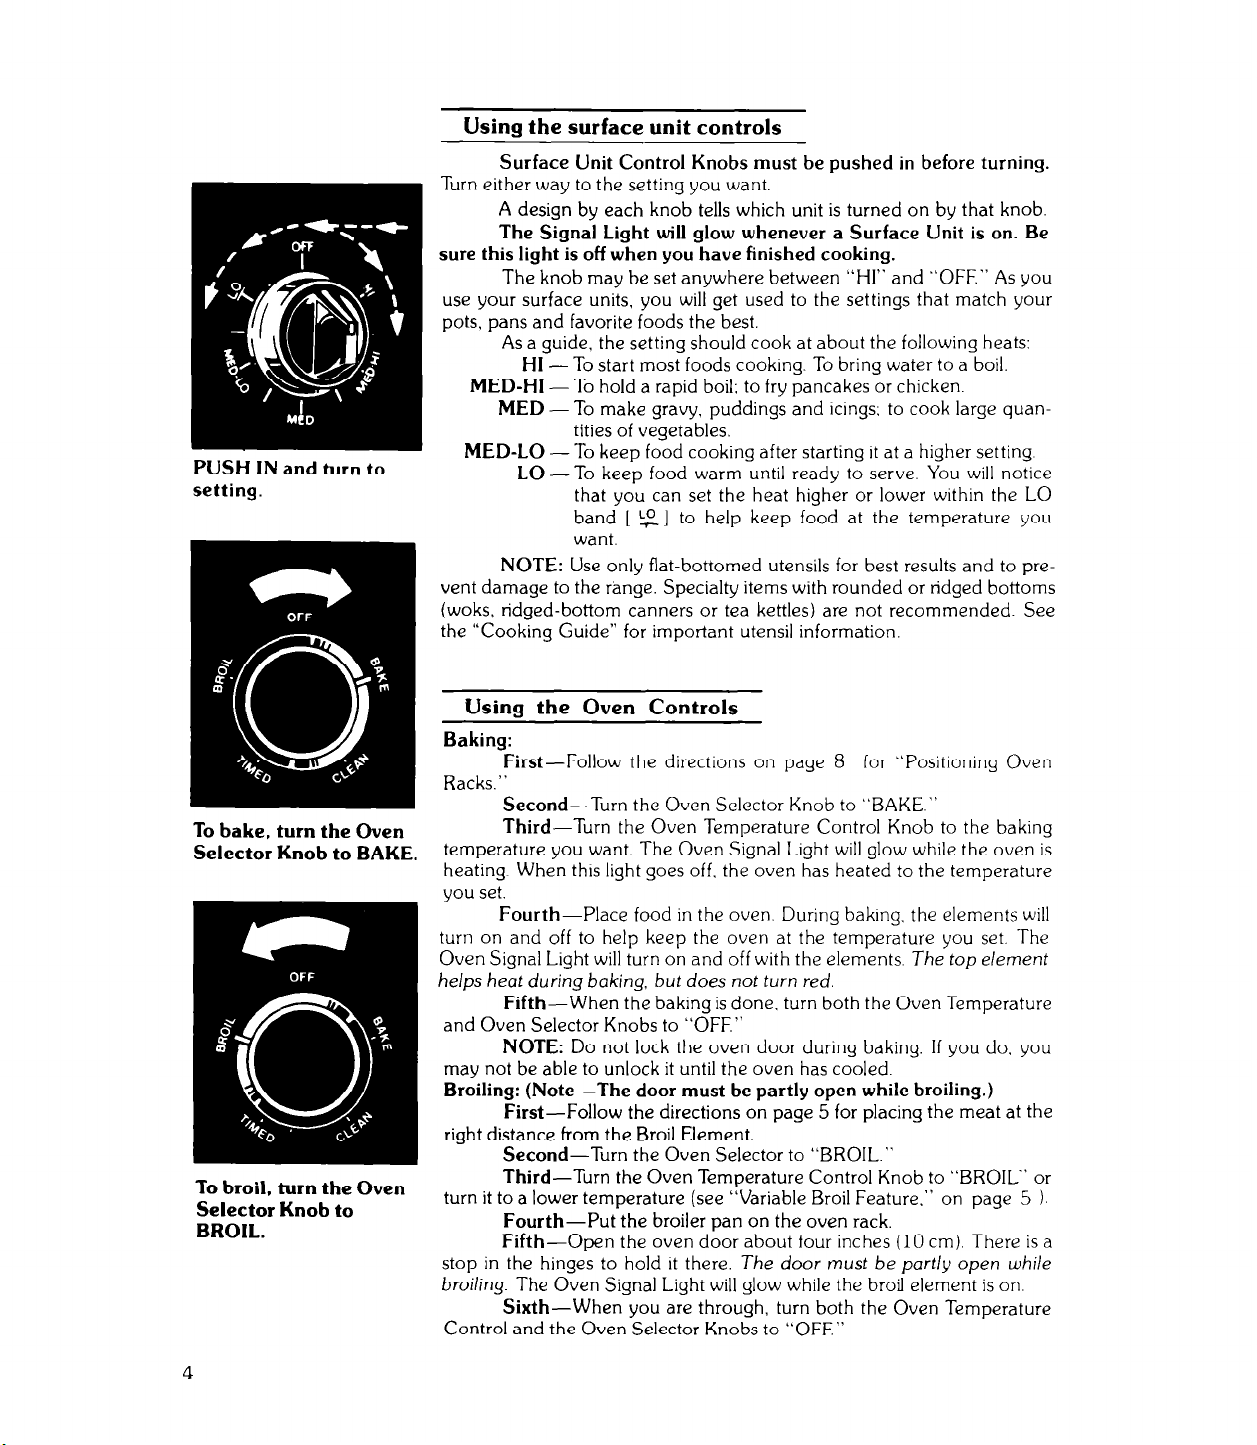
PUSH IN and
setting.
turn to
Usinn the surface unit controls
Surface Unit Control Knobs must be pushed in before turning.
Turn either way to the setting you want.
A design by each knob tells which unit is turned on by that knob.
The Signal Light will glow whenever a Surface Unit is on. Be
sure this light is off when you have finished cooking.
The knob may be set anywhere between “HI” and “OFF.” As you
use your surface units, you will get used to the settings that match your
pots, pans and favorite foods the best.
As a guide, the setting should cook at about the following heats:
HI -To start most foods cooklng. To bring water to a boil.
MED-HI -To hold a rapid boil; to fry pancakes or chjcken.
MED -To make gravy, puddings and Icings; to cook large quan-
tities of vegetables.
MED-LO - To keep food cooking after starting It at a higher setting.
LO-To keep food warm until ready to serve. You will notice
that you can set the heat higher or lower within the LO
band [ ‘21 to help keep food at the temperature you
want.
NOTE: Use only flat-bottomed utensils for best results and to prevent damage to the range. Specialty items with rounded or ridged bottoms
(woks, ridged-bottom canners or tea kettles) are not recommended. See
the “Cooking Guide” for important utensil information.
To bake, turn the Oven
Selector Knob to BAKE.
To broil, turn the Oven
Selector Knob to
BROIL.
Using the Oven Controls
Baking:
First-Follow the directions on page 8 for “Positioning Oven
Racks.”
Second-Turn the Oven Selector Knob to “BAKE.”
Third-Turn the Oven Temperature Control Knob to the baking
temperature you want. The Oven Signal Light will glow while the oven is
heating When this light goes off. the oven has heated to the temperature
you set.
Fourth-Place food in the oven. During baking. the elements will
turn on and off to help keep the oven at the temperature you set. The
Oven Signal Light will turn on and off with the elements.
helps heat during baking, but does not
turn
red.
The top element
Fifth-When the baking is done. turn both the Oven Temperature
and Oven Selector Knobs to “OFF,”
NOTE: Do
not lock the oven door during baking. If you do. you
may not be able to unlock it until the oven has cooled.
Broiling: (Note-The door must be partly open while broiling.)
First-Follow
the directions on page 5 for placing the meat at the
right distance from the Broil Element.
Second-Turn the Oven Selector to “BROIL.”
Third-Turn
the Oven Temperature Control Knob to “BROIL” or
turn it to a lower temperature (see “Variable Broil Feature.” on page 5 ).
Fourth-Put the broiler pan on the oven rack.
Fifth-Open the oven door about four inches (10 cm). There is a
stop in the hinges to hold It there.
broiling.
The Oven Signal Light will glow while the broil element is on.
Sixth-When
you are through, turn both the Oven Temperature
The door must be part/y open while
Control and the Oven Selector Knobs to “OFF.”
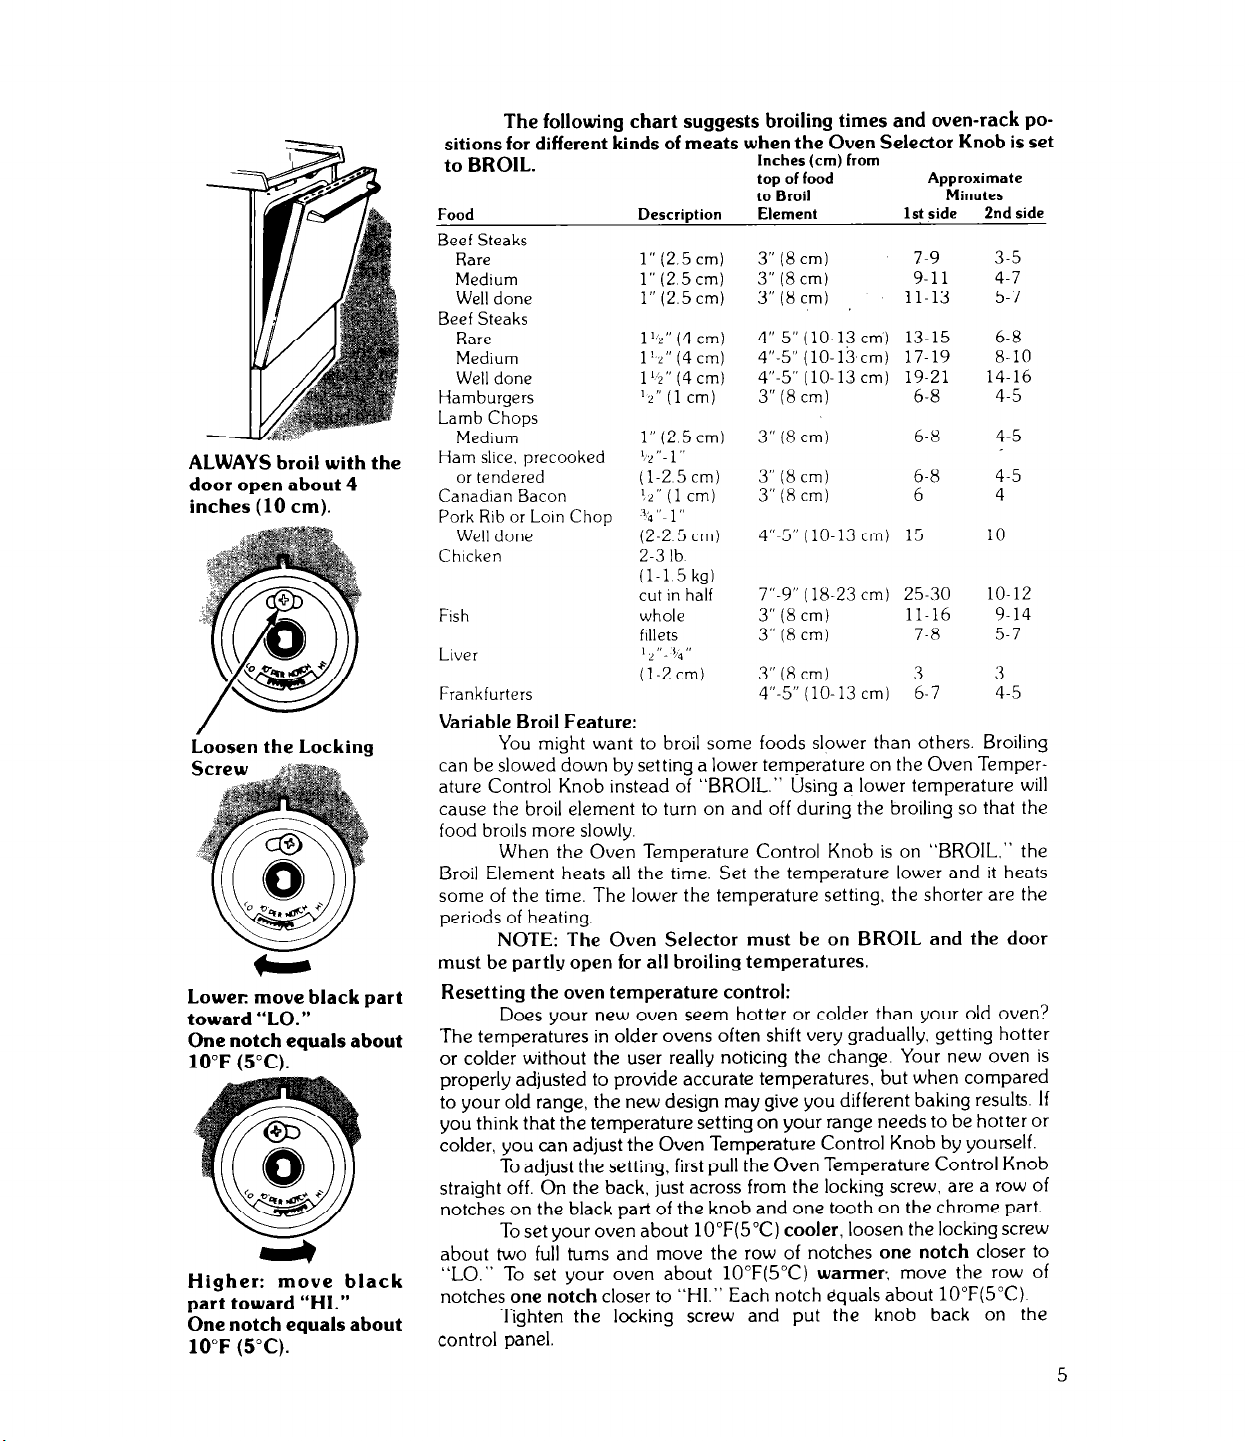
ALWAYS broil with the
door open about 4
inches (10 cm).
Loosen the Locking
Lower: move black part
toward “LO.”
One notch equals about
10°F (5°C).
Higher: move black
part toward “HI.”
One notch equals about
10°F (5°C).
The following chart suggests broiling times
sitions for different kinds of meats when the
to BROIL.
Food Description Element
Inches (cm) from
top of food
to Broil
Oven Selector
and oven-rack po-
Knob is set
Approximate
Minutes
1st side
2nd side
Beef Steaks
Rare
Medium 1” (2 5 cm)
Well done
Beef Steaks
Rare
Medium
Well done
Hamburgers
Lamb Chops
Medium
Ham slice, precooked
or tendered (l-2 5cm)
Canadian Bacon
Pork Rib or Loin Chop
Well done (2-2 5 cm)
Chicken 2-3 lb
Fish
Liver
Frankfurters
1” (2.5 cm)
1” (2.5 cm)
1 ‘5” (4 cm)
1!2” (4 cm)
1 Ii” (4 cm)
‘2” (1 cm)
1” (2 5 cm)
12 “. 1 ”
!L” (1 cm)
$ “- 1 ”
(l-l 5 kg)
cut in half
whole
fillets
1 L “. ‘& ”
(l-2 cm)
3”
(8 cm)
3”
(8 cm)
3” (8 cm)
4”-5”
(lo-13 cm)
4”-5” (lo-13,cm)
4”-5” (lo- 13 cm)
3” (8 cm) 6-8 4-5
3”
(8 cm)
3” (8 cm)
3” (8 cm)
4”-5” (lo-13 cm) 15
7”-9” (18.23 cm) 25-30
3” (8 cm) 11-16
3” (8 cm) 7-8
3” (8 cm) 3
4”-5” (lo-13 cm)
7-9
9-11
11-13
13-15
17-19 8-10
19-21 14-16
6-8
6-8
6
6-7
3-5
4-7
5-7
6-8
4-5
4-5
4
10
10-12
9-14
5-7
3
4-5
Variable Broil Feature:
You might want to broil some foods slower than others. Broiling
can be slowed down by setting a lower temperature on the Oven Temperature Control Knob instead of “BROIL.” Using a lower temperature will
cause the broil element to turn on and off during the broiling so that the
food broils more slowly.
When the Oven Temperature Control Knob is on “BROIL.” the
Broil Element heats all the time. Set the temperature lower and it heats
some of the time. The lower the temperature setting, the shorter are the
periods of heating.
NOTE: The Oven Selector must be on BROIL and the door
must be partly open for all broiling temperatures.
Resetting the oven temperature control:
Does your new oven seem hotter or colder than your old oven?
The temperatures in older ovens often shift very gradually, getting hotter
or colder without the user really noticing the change. Your new oven is
properly adjusted to provide accurate temperatures, but when compared
to your old range, the new design may give you different baking results If
you think that the temperature setting on your range needs to be hotter or
colder, you can adjust the Oven Tempemture Control Knob by yourself.
To adjust the setting, first pull the Oven Temperature Control Knob
straight off. On the back, just across from the locking screw, are a row of
notches on the black part of the knob and one tooth on the chrome part.
To set your oven about lO”F(5”C) cooler, loosen the locking screw
about two full turns and move the row of notches
“LO.” To set your oven about lO”F(5”C)
notches
one notch
closer to “HI.” Each notch equals about lO”F(5”C)
warmer.
one notch
closer to
move the row of
Tighten the locking screw and put the knob back on the
control panel.
5
 Loading...