

Whirlpool RJE-3000 User Manual
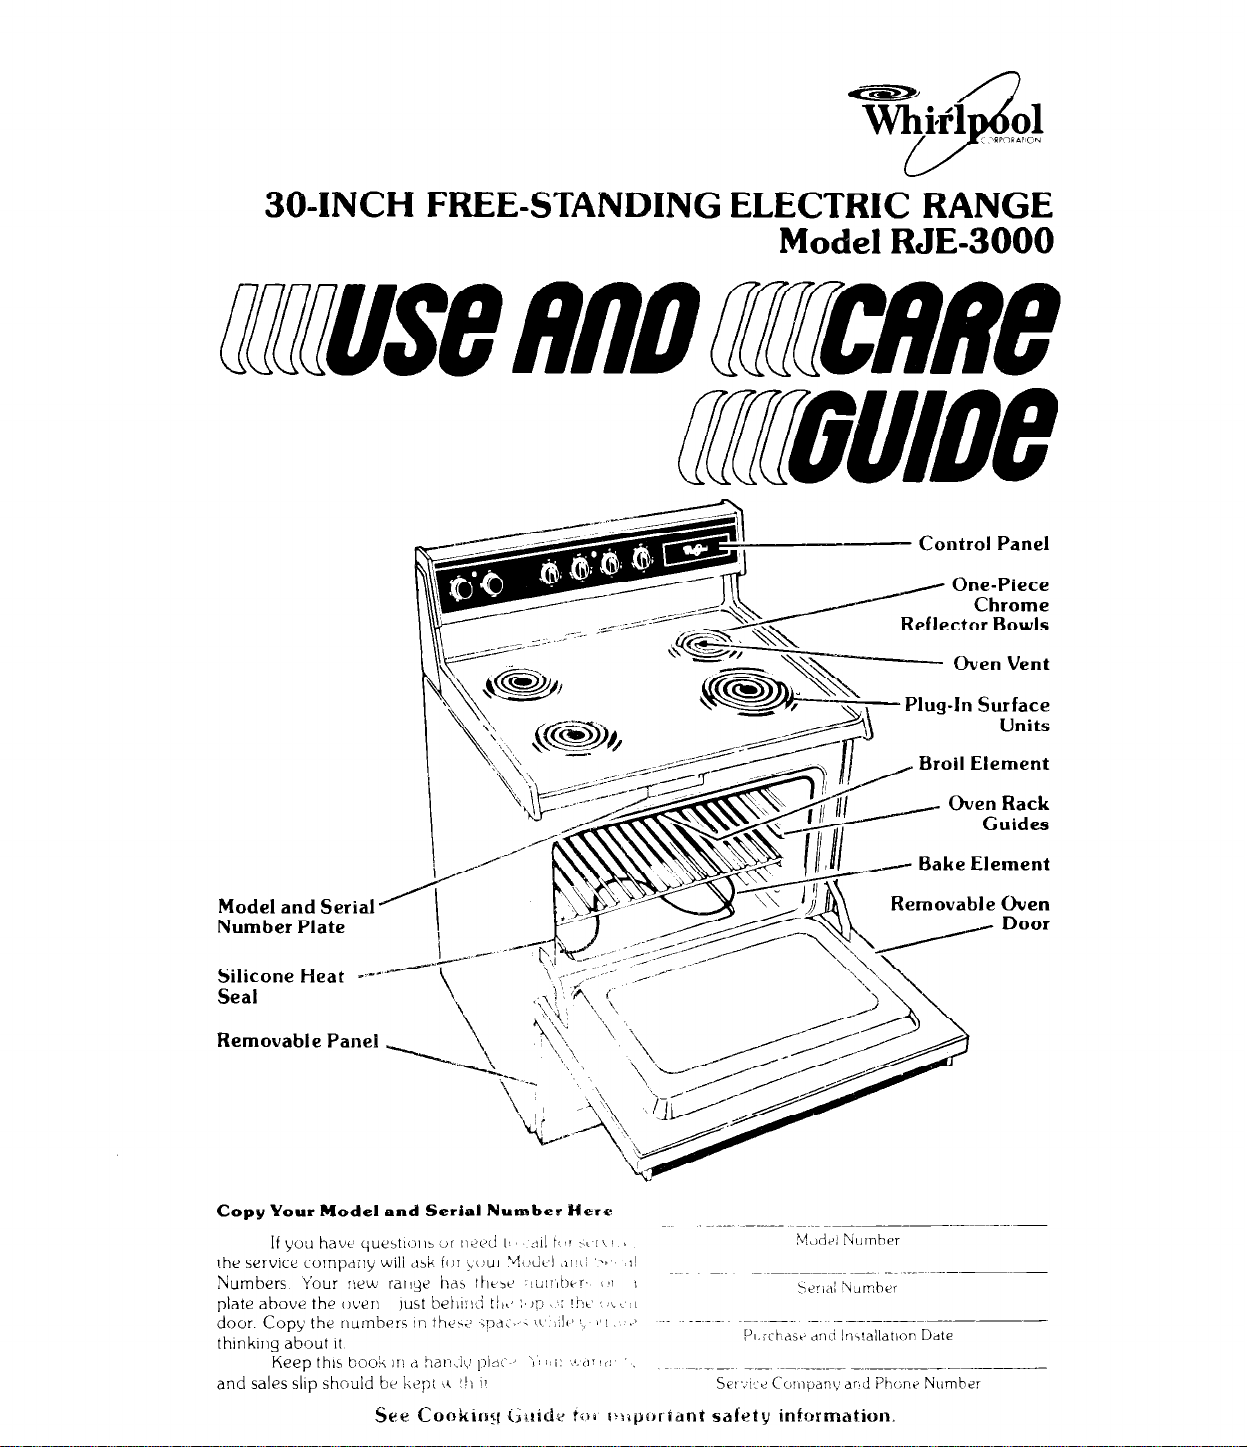
304NCH FREE-STANDING ELECTRIC RANGE
Model RJE-3000
- Control Panel
Oven Vent
Plug-ln Surface
Units
Broil Element
Model and Serial
Number Plate
Silicone f-feat
Seal
Removable Panel
Bake Element
Removable Oven
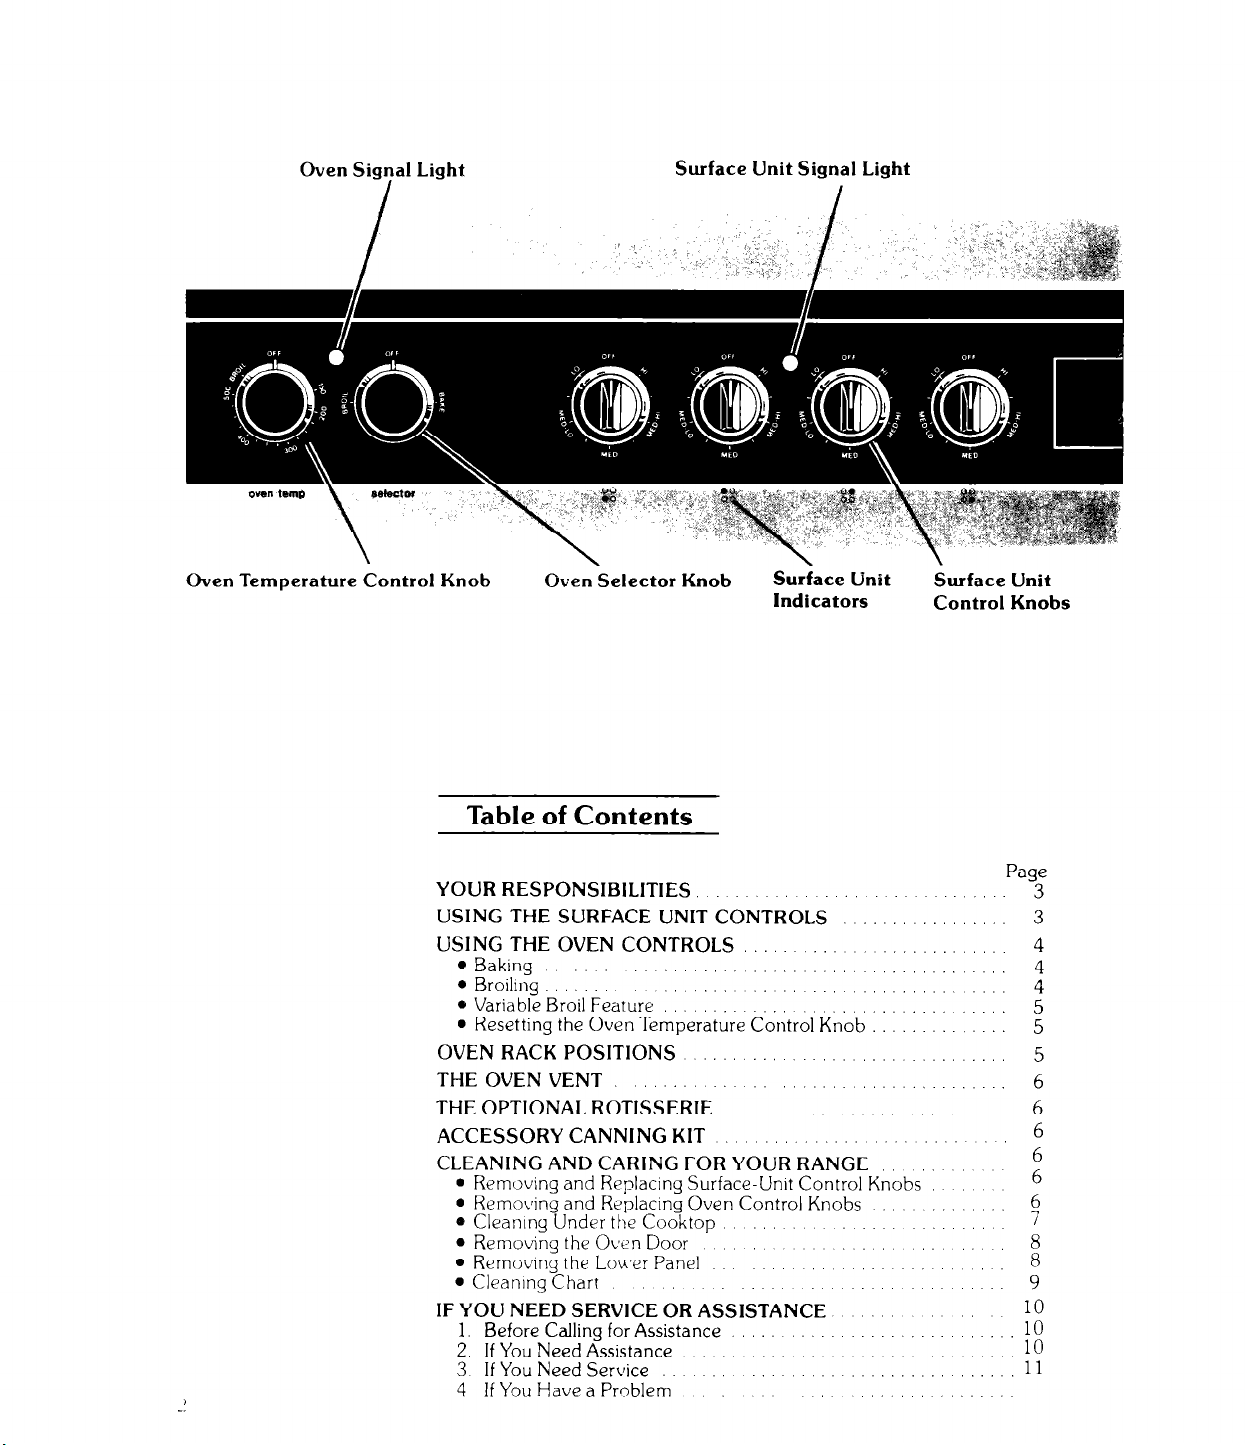
Oven Signal Light
Surface Unit Signal Light
Oven Temperature Control Knob
Table of Contents
YOUR RESPONSIBlLlTlES,
USING THE SURFACE UNIT CONTROLS
USING THE OVEN CONTROLS
. Baking
. Broiling
* Variable Broil Feature
l
Resetting the Oven Temperature Control Kno’d : : : : : : :
OVEN RACK POSITIONS ..,, ..,, ..,..,
THE OVEN VENT
THE OPTIONAL ROTISSERIE
ACCESSORY CANNING KIT
CLEANING AND CARING FOR YOUR RANGE
l
Removing and Replacing Surface-Unit Control Knobs
l
Remolfing and Replacing Oven Control Knobs
0 Cleaning Under the Cooktop
l
Removing the Oven Door
l
Removing the Lou,er Panel
l
Cleaning Chart
IF YOU NEED SERVICE OR ASSISTANCE
1. Before Calling for Assistance
2. If You Need Assistance
3 If You Need Service
4 If You Have a Prnblem
Oven-Selector Knob
S&ace Unit
Indicators
,, ,.,
:
: : : : 1 : : : : : : : :
Surface Unit
Control Knobs
Page
3
6
7
: ii
Your responsibilities
Proper installation and safe use of the range are your personal
responsibilities. Read this
Guide” carefully for important use and safety information.
You must be sure your range.
l
is properly installed and leveled on a floor that will hold the weight, and
in a well-ventilated room.
l
isconnected only to the right kind of outlet, with the right electric supply
and grounding (see “Installation Instructions”).
l
is used only for jobs expected of home ranges.
l
is out of the weather
l
is properly maintained.
l
is not used by children or others who may not understand how it should
be used
“Use and Care Guide” and the “Cooking
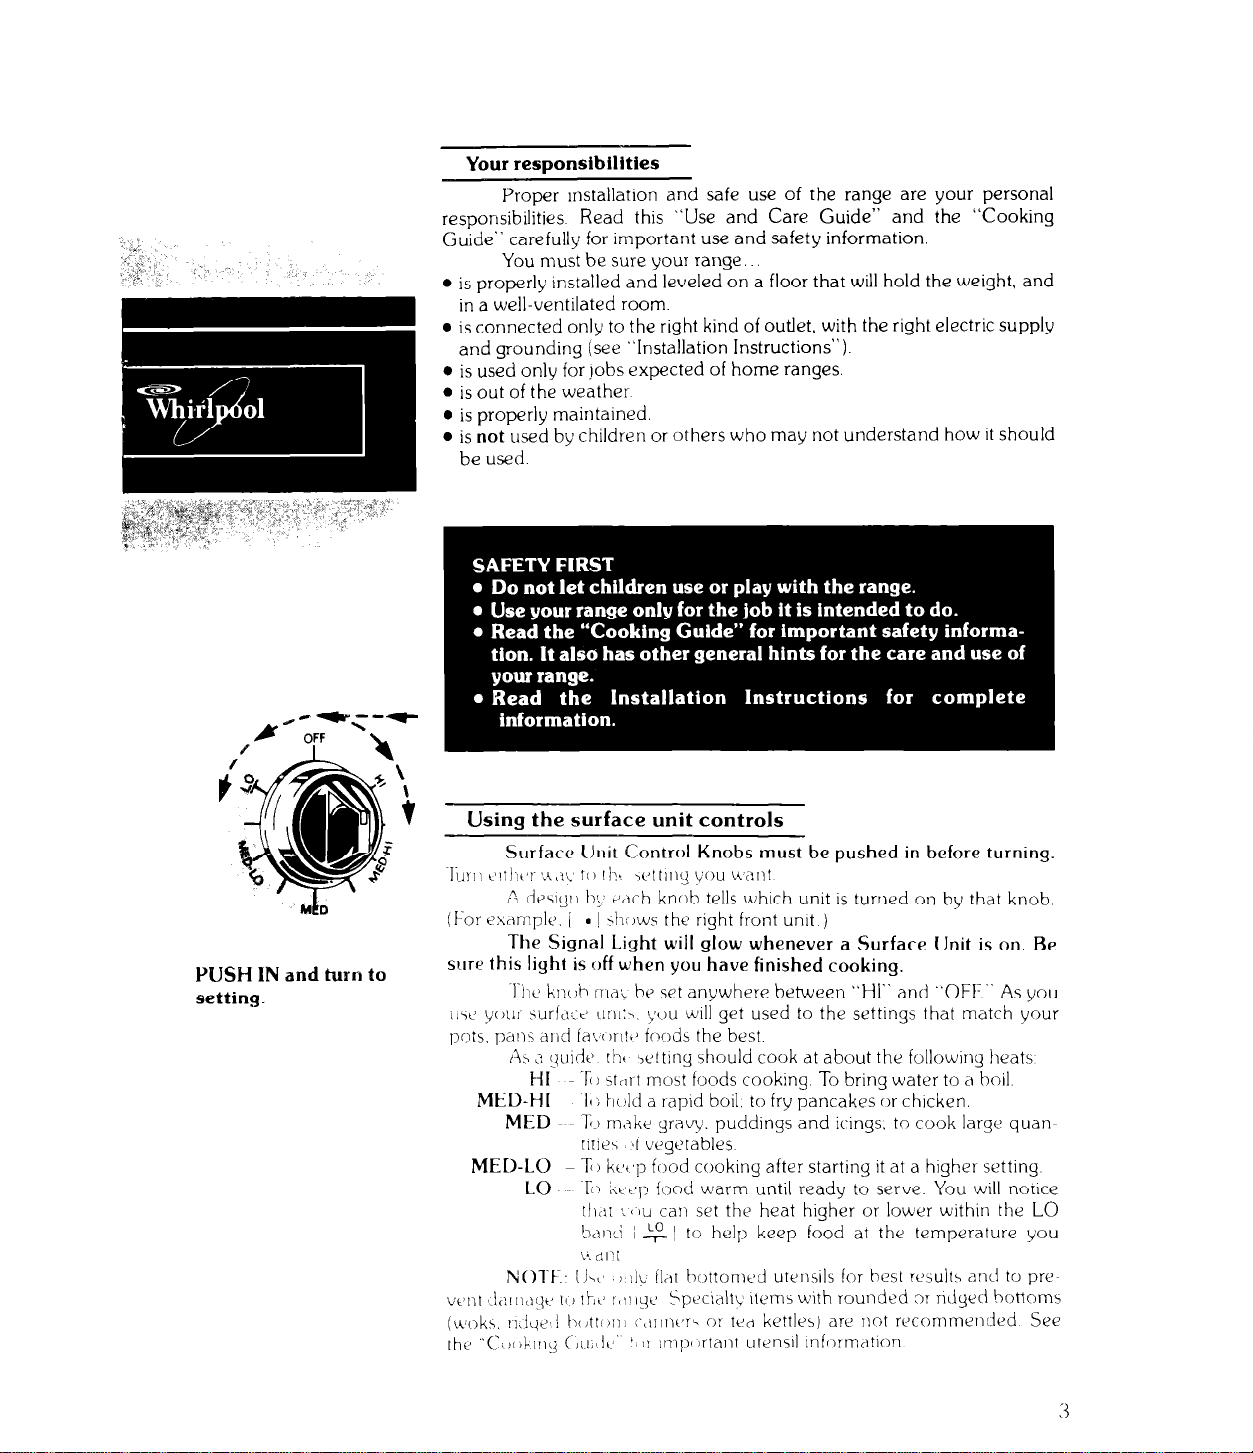
YUSH 1N and turn to
setting.
Using the surface unit controls
Surface Ultit Control Knobs must be pushed in before turning.
-hIIll c’!tt.,c’l-:i,ii, t0 th >C’ltlliIJ VOIJ iidllt
A des~gt~ b; ?(lch knob tells which unit is turned on by that knob
(For exrlrripk. j
The Signal Light will glow whenever a Surface Unit is on, Be
SIUW
this light
l‘the kt:cli-1 ITI~< be set anywhere between “HI” and “OFF“ As you
IIW your ‘;urfd::tJ LI~II:~. ~CJU WIII get used to the settings that match your
pots. pans aid fn~.orr!~~ foodc the best.
AS Lo c~u~dt~ r!lt ‘,tl! tiny should cook at about the following heats
MED-HI Tj hold a laptd boil. to fry pancakes or chlcken.
MED ~~ T-1 rn,jkr yravg. puddings and icings. to cook large quan-
MED-LO ~ T) ko+,p food cooking after starting It at a higher setting
LO
I\i()-ft: [J\r’ >
ve’nt ‘.l<:lIl<iqi’ Ii1 IhL l<l’lyt’
(tboks, rl,i& i h(,trc,n~ :‘,~nn~‘r~ or tt’d kettles) are not recommended See
[ht, “c‘s !i ,L,!,!g ( ,,I,# Ita’ ‘I r:
. ! \h:)ws the right front unit )
is
off when you have finished cooking.
F3I -FI itrlrt most foods cooklng To bring water to d boil.
titles >t vegetables
E-i ~,t~~~p food warm until ready to serve. You will notice
tt~(:r :ou car> set the heat higher or lower within the LO
ball:: i 7- , Lo 1 to help keep food at the temperature you
L- rll‘i
!ii, fldr
hottomt~d
utensIIs for besl rtsulls and to prc-
‘;peclJt\ 1tem5 with rounded DT ridged bottoms
imp lftilnt
uten5ll
Infr)rrndtmn
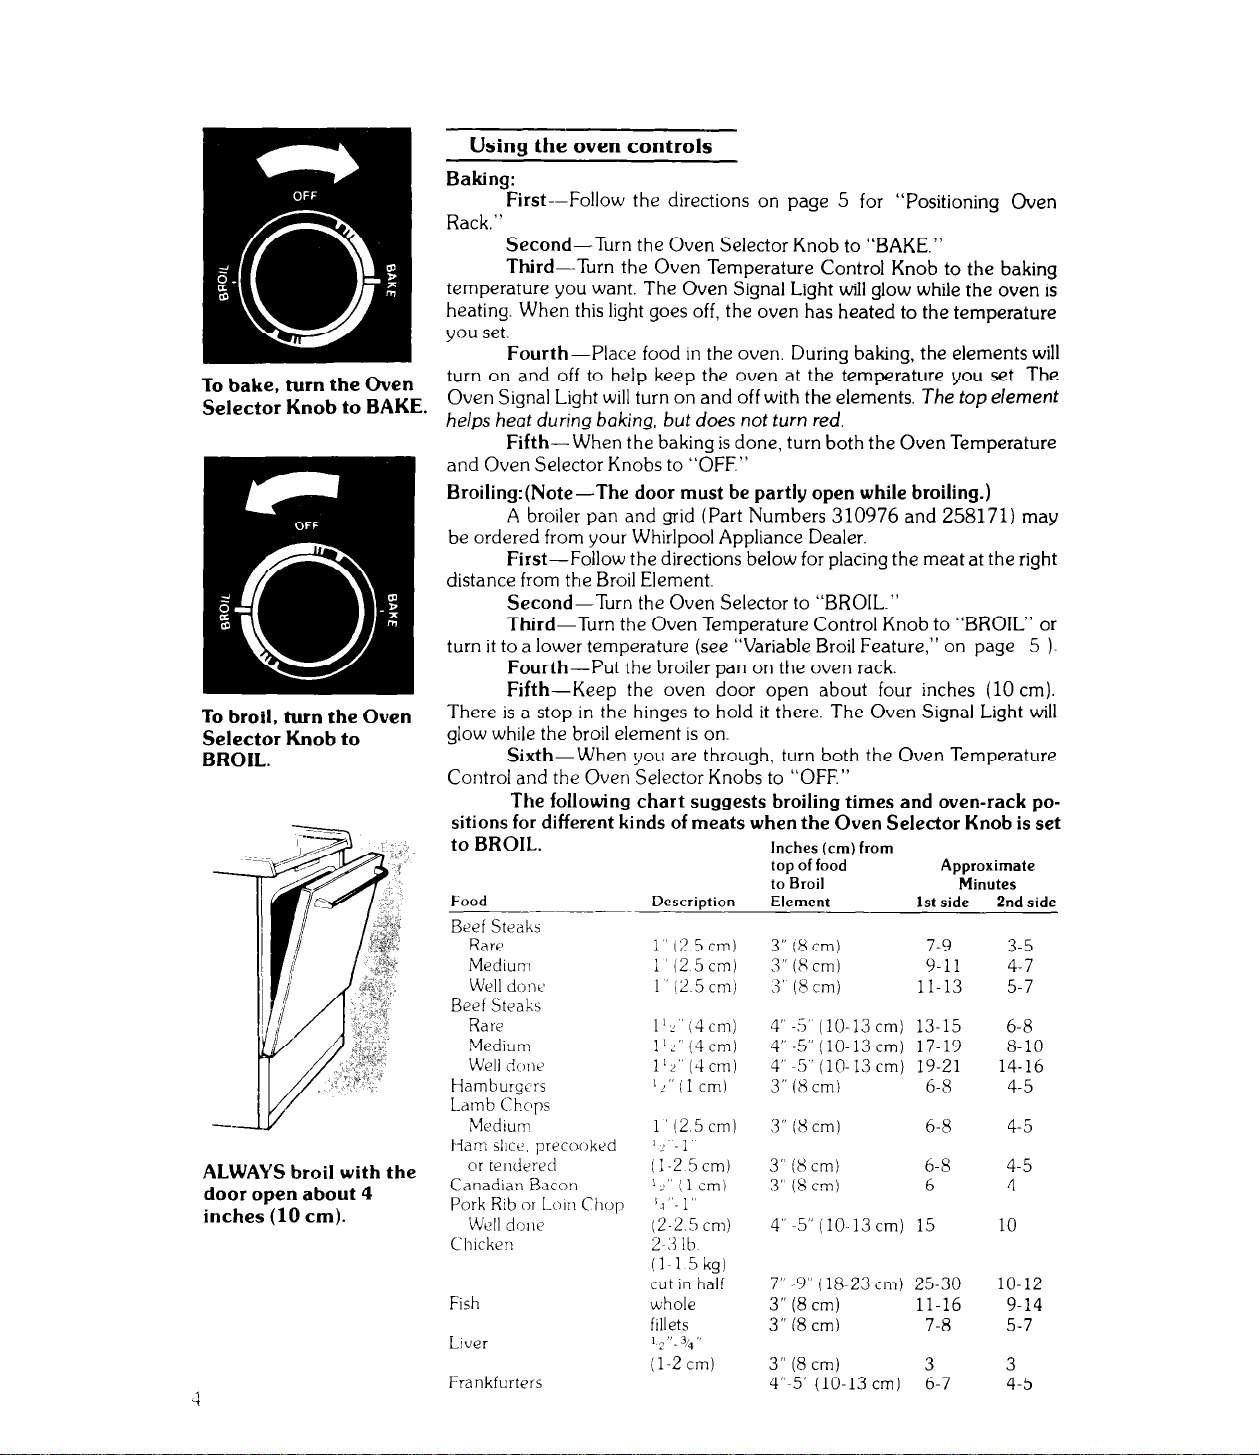
To bake, turn the Oven
Selector Knob to BAKE.
To broil, turn the Oven
Selector Knob to
BROIL.
ALWAYS broil with the
door open about 4
inches (10 cm).
Using the oven controls
Baking:
First--Follow
Rack.”
Second-Turn the Oven Selector Knob to “BAKE.”
Third-Turn the Oven Temperature Control Knob to the baking
temperature you want. The Oven Signal Light will glow while the oven is
heating. When this light goes off, the oven has heated to the temperature
you set.
Fourth-Place
turn on and off to help keep the oven at the temperature you set. The
Oven Signal Light will turn on and off with the elements. The top
helps heat
during baking,
Fifth-
and Oven Selector Knobs to “OFF.”
Broiling:(Note-The door must be partly open while broiling.)
A broiler pan and grid (Part Numbers 310976 and 258171) may
be ordered from your Whirlpool Appliance Dealer.
First-Follow
distance from the Broil Element.
Second-Turn the Oven Selector to “BROIL.”
Third-Turn
turn it to a lower temperature (see “Variable Broil Feature,” on page
Fourth-Put the
Fifth-Keep
There is a stop in the hinges to hold it there. The Oven Signal Light will
glow while the broil element is on.
Sixth-When you are through, turn both the Oven Temperature
Control and the Oven Selector Knobs to “OFF.”
The following chart suggests broiling times and oven-rack positions for different kinds of meats when the Oven Selector Knob is set
to BROIL.
Food
Beef Steaks
Rare
Mediunl
Well done
Beef Steaks
Rare
Medium
Well dew
Hamburgers
Lamb Chops
Medium
Ham slice. precooked
or tendered
Canadian Bacon
Pork Rib or Loin Chop
Well dolw (2-2 5 cm)
Chicken
Fish whole
Liver
Frankfurters
the directions on page 5 for “Positioning Oven
food in the oven. During baking, the elements will
element
but does
When the baking is done, turn both the Oven Temperature
the directions below for placing the meat at the right
the Oven Temperature Control Knob to “BROIL” or
broiler pan on the oven rack.
the oven door open about four inches (10 cm).
Description
1” (2.5 cm)
1’ (2 5 cm)
1 12 5 cm)
l’i ‘i4cm)
1’:’ (4 cm)
l’r”(dcm)
‘i”(l cm)
1’ (2 5 cm)
not
turn red.
Inches (cm) from
top of food Approximate
to Broil Minutes
Element 1st side 2nd side
3” (8 cm)
3” (8 cm)
7-9
Y-11
.i’ (8 cm) 11-13
4”-5’ (10.13cm) 13-15
4”-5”(10-13cm) 17-19
4” -5” (lo- 13 cm) 19-21
3” (8 cm) 6-8
3” (8 cm) 6-8
3-5
4-7
5-7
6-8
8-10
14-16
4-5
4-5
1 “. 1 ” 2
II-2 5cmj
Id” ( 1 cm)
I4 “. 1 ”
3” (8 cm) 6-8
3” (8 cm)
6
4” -5” (lo-13 cm) 15
4-5
4
10
2-3 lb
(1-l 5 kg)
cut in half
fillets
12”.3,4”
(1-2 cm)
7” -9” (18-23 cm) 25-30
3” (8 cm) 11-16
3” (8 cm) 7-a
3” (8
cm)
4”-5’ (lo-13 cm)
3
6-7
10-12
9-14
5-7
3
4-5
5 )-
 Loading...