

Whirlpool RHH 4300 User Manual
INSTALLATION
and
OPERATING INSTRUCTIONS
f
or
whirlpool
CONVERTIBLE RANGE HOOD
RHH 4300 SERIES
INSTALLATION INSTRUCTIONS
Your range hood has been designed to filter out smoke,
odors and grease which rise from the cooking surface.
Before you begin the installation be sure that all parts and
accessories are removed from carton. For best results and
ease in the installation of this range hood, read the
TO INSTALL
YOUR HOOD CAN BE INSTALLED VENTLESS WHERE AIR IS
CIRCULATED BACK INTO THE ROOM THROUGH THE
FILTER OR VENTED WHERE AIR IS TAKEN OUT OF YOUR
KITCHEN. For most efficient operation, top of hood should be
approximately 66 inches (137.6 cm) from the floor.
For vented applications, see Figures 4, 5, and 6. Typical
1.
vented installations are shown for the 7” Round Vertical,
3% x 10 Vertical, and the 3% x 10 Horizontal Discharge
respectively. Choose the best method for your installation.
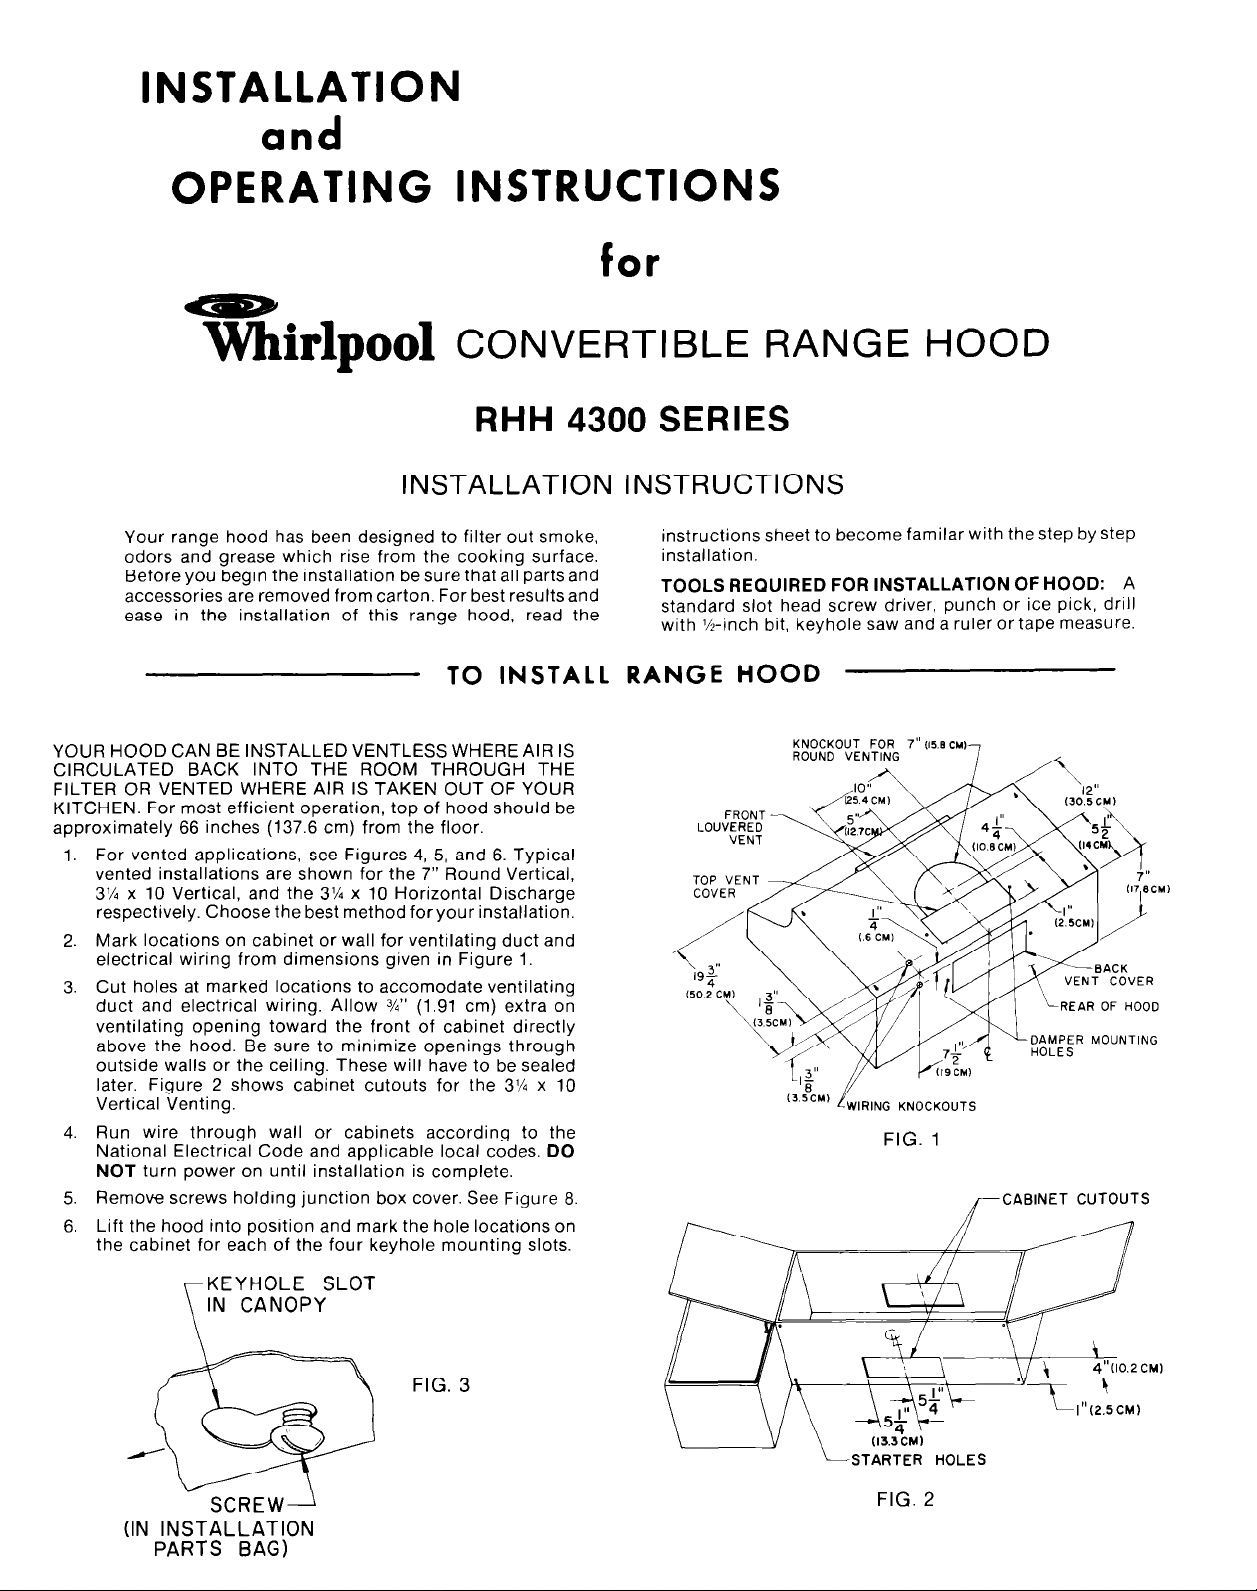
Mark locations on cabinet or wall for ventilating duct and
2.
electrical wiring from dimensions given in Figure 1.
Cut holes at marked locations to accomodate ventilating
3.
duct and electrrcal wiring. Allow %” (1.91 cm) extra on
ventilating opening toward the front of cabinet directly
above the hood. Be sure to minimize openings through
outside walls or the ceiling. These will have to be sealed
later. Figure 2 shows cabinet cutouts for the 3% x 10
Vertical Venting.
4.
Run wire through wall or cabinets according to the
National Electrrcal Code and applicable local codes.
NOT
turn power on until installation is complete.
Remove screws holdrng junction box cover. See Figure 6.
5.
Lift the hood into posrtion and mark the hole locations on
6.
the cabinet for each of the four keyhole mounting slots.
DO
instructions sheet to become familar with the step by step
installation.
TOOLS REQUIRED FOR INSTALLATION OF HOOD:
standard slot head screw driver, punch or ice pick, drill
with X-inch bit, keyhole saw and a ruler or tape measure.
RANGE HOOD
KNOCKOUT FOR 7” (15.8 CM)
ROUND VENTING
&,R,NG KNOCKOUTS
FIG. 1
7 x
CABINET CUTOUTS
A
A
REAR OF HOOD
KEYHOLE SLOT
IN CANOPY
SCREW\
(IN INSTALLATION
PARTS BAG)
FIG. 3
LSTARTER HOLES
FIG. 2

LOCATE AS FAR
FROM HOOD AS
POSSIBLE
FIG. 4
VERTICAL VENTING
7” ROUND
7.
Remove the hood and start all four screws in the center of
the narrow neck of the keynole slot marked on the cabinet
bottom. See Figure 3.
Remove proper venting knockout. If 7” (17.8 cm) round
8.
vertical venting, entire top knockout including rectangular
portion must be removed The best performance from your
hood, with most air taken from the kitchen and when the
hood is most quiet, comes when you top vent with 7” round
duct pipe as shown in Figure 4.
FOR RECTANGULAR VENTING: There are predrilled
holes on hood so you can attach damper to hood with
small sheet metal screws included.
9.
Install proper ductwork. For round vented installations, a
round damper should be placed in the ductwork to prevent
air infiltration.
Lift the hood into position simultaneously feeding the
10.
electrical wire through the knockout.
Tighten four mounting screws to secure hood to cabinet.
11.
Be sure the screw heads are in the narrow neck of the
keyhole slot.
12.
Complete electrical wiring in the junction box according
to the National Electrical Code and applicable local codes,
13
Replace junction box cover
Seal holes around ventilating pipe and wiring passing
14.
through ceiling or outside wall with caulking or insulation
to prevent heat loss.
YRAIN CAP
IF RAIN CAP HAS
A DAMPER, REMOVE
DAMPER BLADE
FROM HOOD.
VERTICAL VENTING
~~‘x IO” RECTANGULAR
‘ER
FIG. 5
IF RAIN CAP HAS IF RAIN CAP HAS
A DAMPER, REMOVE A DAMPER, REMOVE
DAMPER
BLADE DAMPER BLADE
FROM HOOD. FROM HOOD.
FIG. 6
FOR VENTLESS
INSTALLATION
1. To convert your range hood to ventless, remove the
discharge grill shown in Figure 7 by pulling with fingers.
Remove the metal back seal from behind the louver.
2. Replace discharge grill and secure with plastic rivets by
pushing with thumb.
3. Follow instructions under “Vented Installations” for wiring
and mounting. .Omit ductwork preparations.
4. Install charcoal filter from ventless kit
filter.
(See Figure 8).
behind aluminum
HORIZONTAL VENTING HORIZONTAL VENTING
rDlSCHARGE GRILL rDlSCHARGE GRILL
FIG. 7
 Loading...