

Page 1
6gb33012.fm5 Page 10 Thursday, February 8, 2001 5:47 PM
GB INSTRUCTIONS FOR USE
PRODUCT DESCRIPTION
REPLACING BULBS
BEFORE USING THE REFRIGERATOR
SAFEGUARDING THE ENVIRONMENT
PRECAUTIONS AND GENERAL
RECOMMENDATIONS
HOW TO OPERATE THE REFRIGERATOR
COMPARTMENT
HOW TO DEFROST THE REFRIGERATOR
CARE AND MAINTENANCE
PAGE
PAGE
PAGE
PAGE
PAGE
PAGE
PAGE
PAGE
11
11
12
12
12
13
14
14
TROUBLESHOOTING GUIDE
AFTER-SALES SERVICE
INSTALLATION
ELECTRICAL CONNECTION
10
PAGE
PAGE
PAGE
PAGE
15
15
15
16
Page 2
6gb33012.fm5 Page 11 Thursday, February 8, 2001 5:47 PM
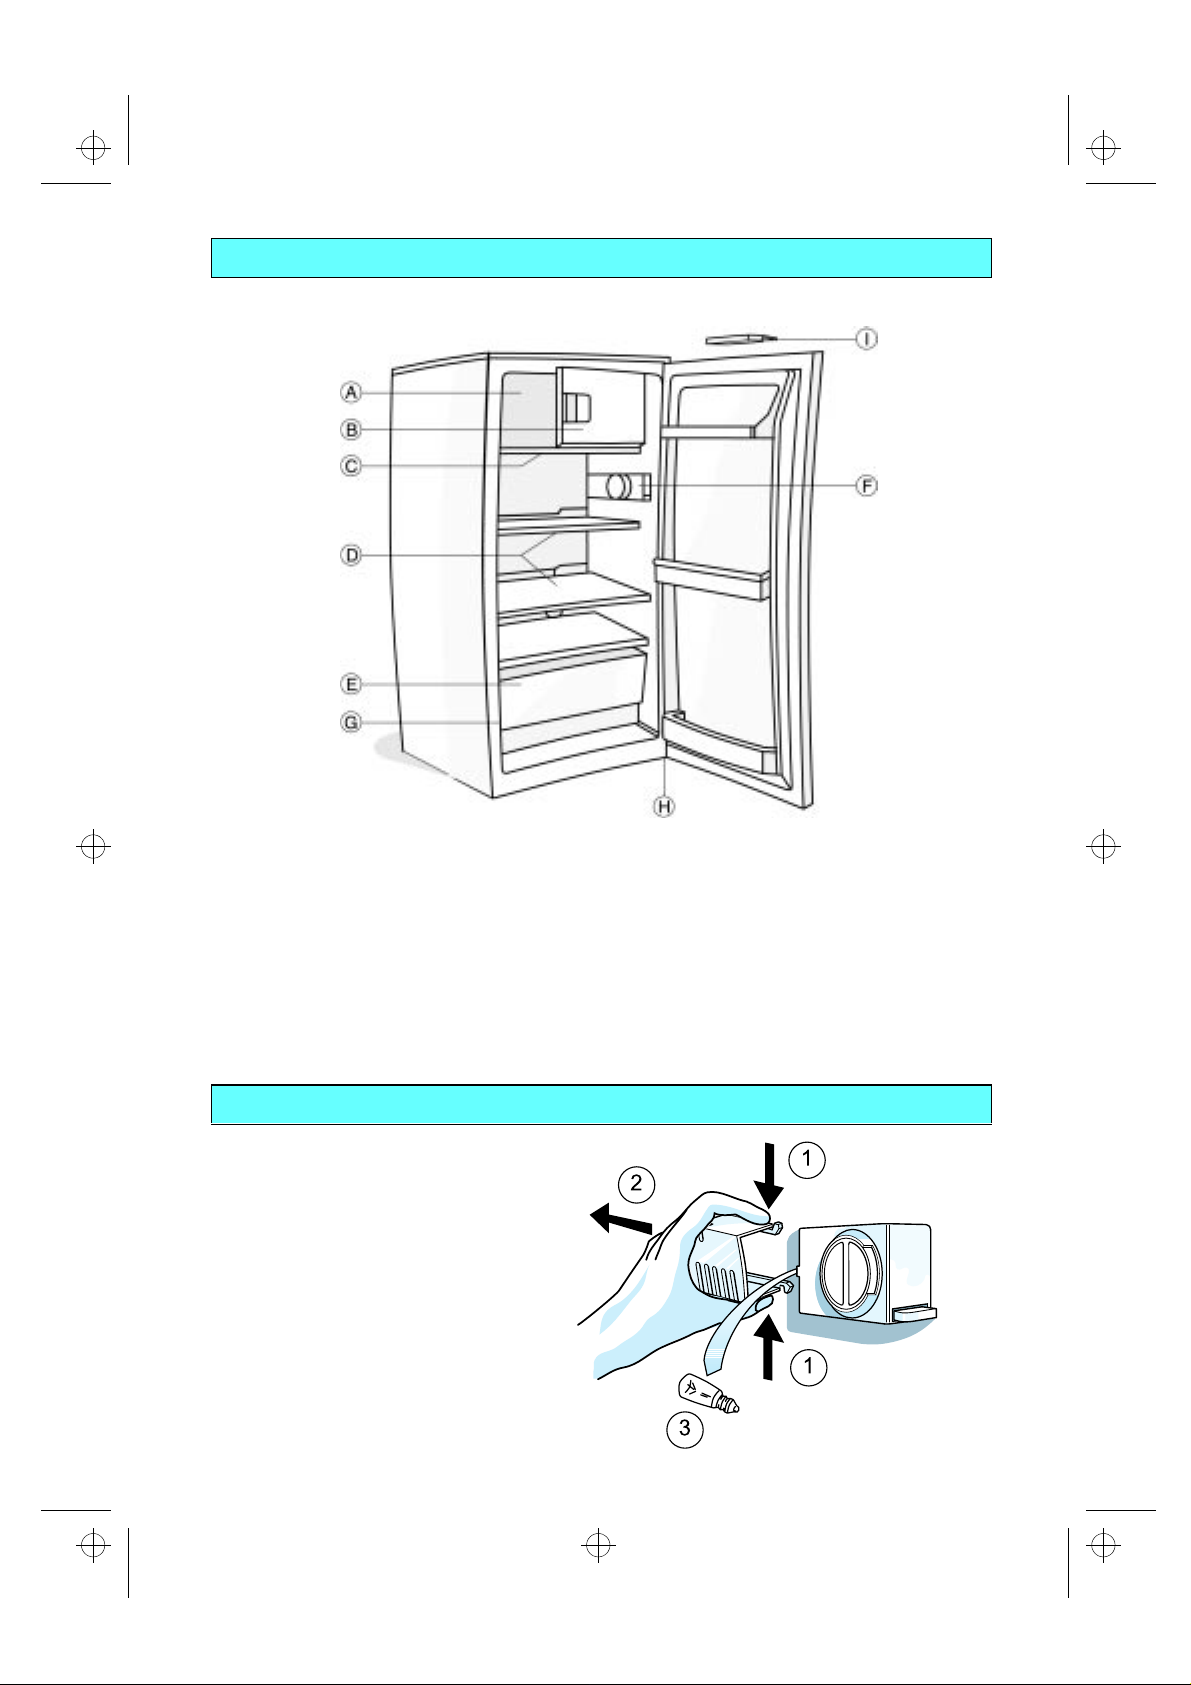
PRODUCT DESCRIPTION
A Low temperature compartment
B Low temperature compartment door
C Water collection tray
D Adjustable shelves and grids
E Crisper drawer
F Temperature adjustment thermostat
G Rating plate (at the side of the cripser drawer)
H Adjustable foot
I Door seal spacers for transport purposes (remove and discard)
REPLACING BULBS
Replacing bulbs
1. Press as shown in the figure.
2. Pull towards the inside of the
appliance.
3. Replace the bulb (max 15W).
11
Page 3
6gb33012.fm5 Page 12 Thursday, February 8, 2001 5:47 PM
BEFORE USING THE REFRIGERATOR
• Your new appliance is exclusively for
domestic use.
• The low temperature compartment can be
used to make ice cubes.
• Defrosting is a manual or semi-automatic
procedure. The refrigerator compartment
is designed for the storage of fresh food and
beverages.
• To get the most out of your new appliance,
read the user handbook thoroughly. The
handbook contains a description of the
appliance and useful tips for storing food.
• Discard the door seal spacer shown at point
I of the figure.
SAFEGUARDING THE ENVIRONMENT
1. Packing
The packaging material is entirely recyclable,
and marked with the recycling symbol.
Follow local regulations for scrapping.
Keep the packaging materials (plastic bags,
polystyrene parts, etc.) out of reach of children,
as they are potentially dangerous.
2. Appliance
The appliance is made using recyclable
materials. Dispose of the appliance in co nformity
with local environmental regulations.
Make the appliance unusable by cutting off the
power cord. The appliance must be delivered to
an authorised collection centre for the recovery
of refrigerant gas.
• Keep this handbook for future consultation.
• After unpacking the appliance, make sure
that the door shuts properly. Any damage
must be reported to your dealer within 24
hours after delivery of the appliance.
• Wait at least two hours before connecting
the appliance to the power supply in order
to ensure the refrigerant circuit is fully
efficient.
• Installation of the appliance and electrical
connections must be carried out by a
qualified electrician, in accordance with the
manufacturer's instructions and local
regulations.
Information:
This appliance does not contain CFCs (replaced
with R134a) or HFCs (replaced with R600a Isobutane). For more information, refer to the
identification data plate affixed to the appliance.
Appliances with Isobutane (R600a)
Isobutane is a natural gas having low
environmental impact. Caution is required,
however, since isobutane is flammable.
Therefore, it is essential to ensure that
refrigerant pipelines are not damaged.
PRECAUTIONS AND GENERAL RECOMMENDATIONS
• Use the refrigerator compartment only for
storing fresh foods and the low temperature
compartment only for making ice cubes.
• Do not cover or obstruct the air vents of the
appliance.
• Do not store liquids in glass containers in the
low temperature compartment - risk of bursting.
• Do not eat ice cubes or ice lollies immediately
after taking them out of the low temperature
compartment - risk of “cold” burns.
• Do not allow children to play or hide inside
the appliance - risk of becoming trapped and
suffocating.
12
• Before servicing or cleaning the appliance,
unplug it from the mains or disconnect the
electrical power supply.
• The power cable may only be replaced by an
authorised person.
Declaration of conformity
This appliance is intended to come into contact with
foodstuffs and conforms to D.L. 108 of 25.01.1992
(European Directive 89/109/EEC).
Page 4
6gb33012.fm5 Page 13 Thursday, February 8, 2001 5:47 PM
HOW TO OPERATE THE
REFRIGERATOR COMPARTMENT
Switching on the appliance
Starting up the appliance
Plug in the appliance.
•
The inside light, where provided, switches on
•
when the refrigerator door is opened.
Adjusting the temperature
Ensure the water collection tray, located
below the low temperature compartment,
touches the rear wall of the refrigerator unit.
The thermostat, located on the right hand side of
the refrigerator compartment, is used to adjust
the internal temperature.
To adjust the temperature in the refrigerator
compartment, turn the thermostat control knob:
Lowest numbers
•
internal temperatures;
Numbers
•
temperature;
Highest numbers
•
internal temperatures.
Thermostat set to z or : the appliance is
switched off although it remains connected to the
mains power supply.
Note:
The ambient air temperature, the frequency of
door opening and the position of the appliance
can affect internal temperatures. These factors
must be taken into account when setting the
thermostat.
Position of water collection tray
when the room temperature is above 25°C, pull
the water collection tray forwards, aligning it with
the two small dots on the right-hand side of the
refrigerator unit
3-4
(Fig. 1)
1-2
for a
for the
MEDIUM
for the
5-7
.
LEAST COLD
internal
COLDEST
:
(Fig. 1)
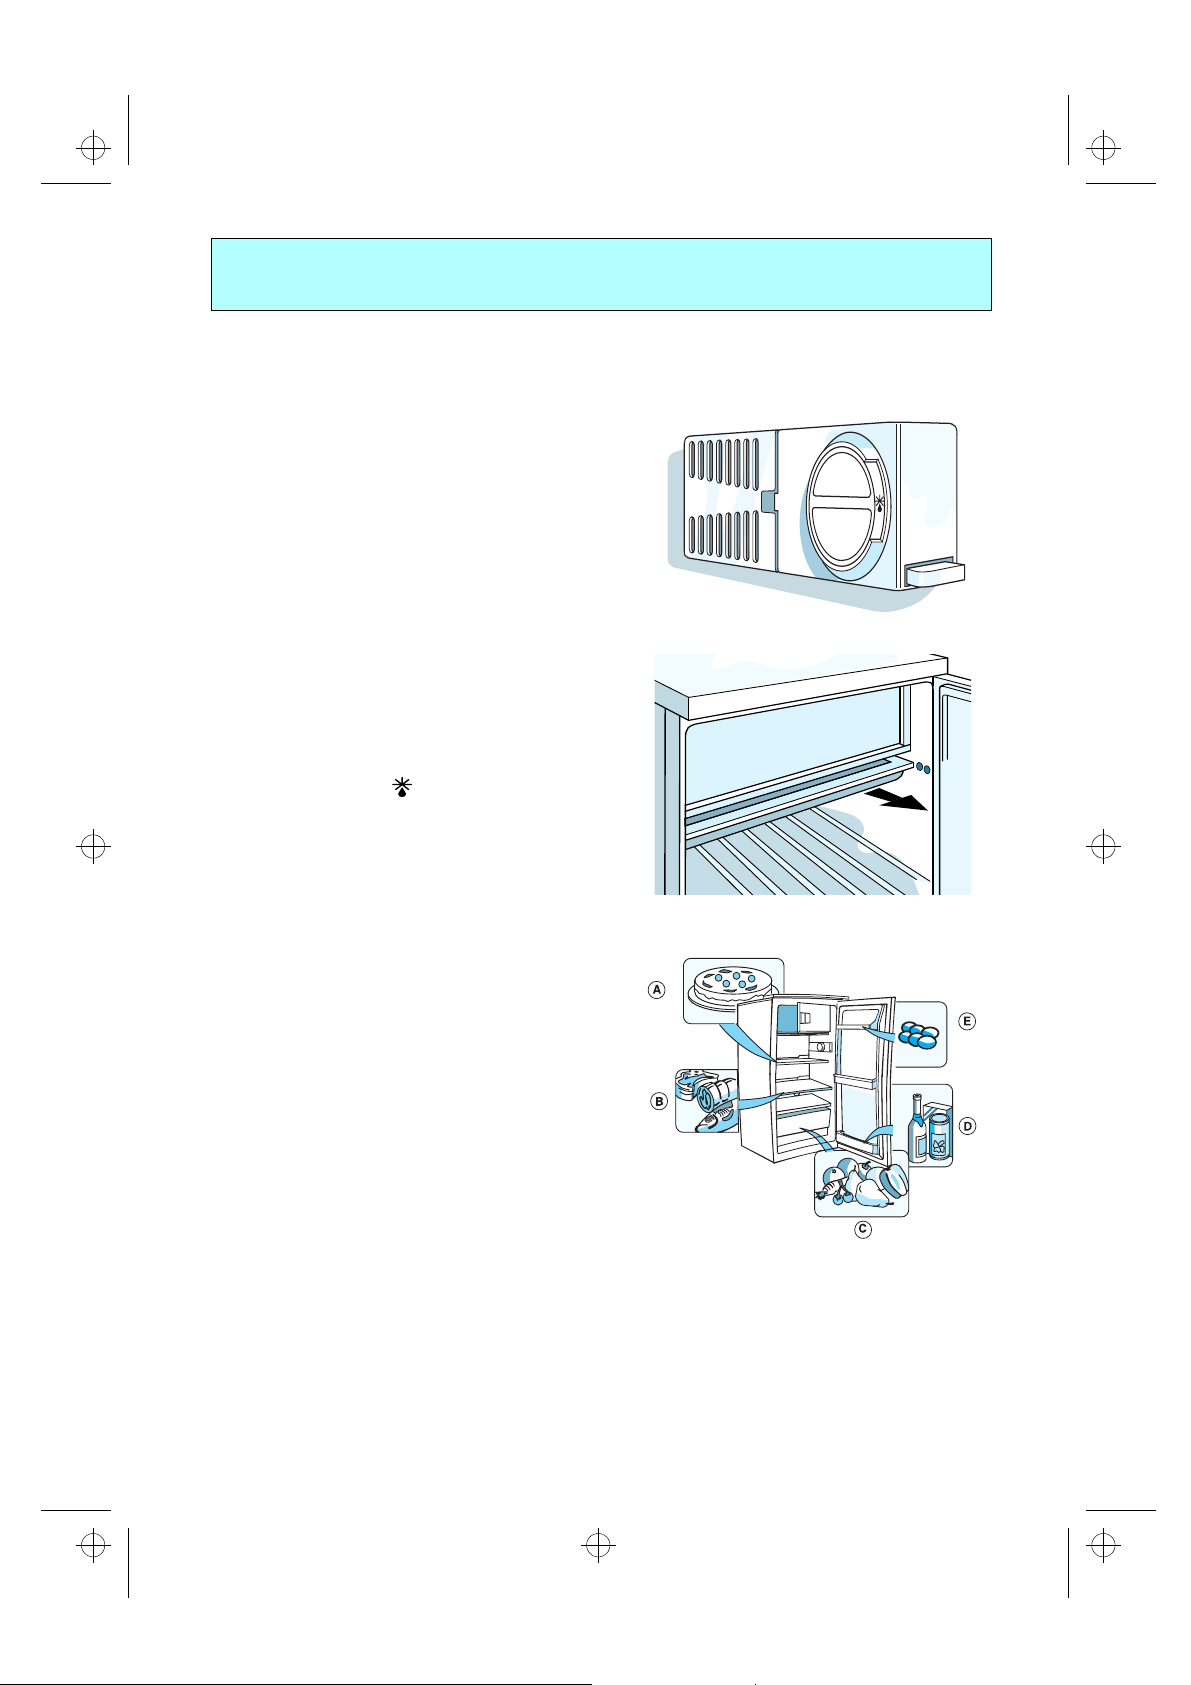
Using the refrigerator compartment
Position food as follows:
A
Cooked foods, cakes, soup/pasta:
grid below the low temperature compartment.
B
Fish, meat, cold cuts:
crisper drawer.
C
Fruit and vegetables:
drawer.
D
Bottles, canned produce
trays in the inner door.
E
: use the special compartment in the
Eggs
inner door.
on the grid above the
in the special crisper
: use the door
on the
Notes:
The space between the shelves and the rear
•
wall of the refrigerator compartment must be
unobstructed to allow circulation of air.
Do not place food in direct contact with the
•
rear wall of the refrigerator compartment.
Do not place hot food in the refrigerator.
•
Store liquids in closed containers.
•
13
Page 5
6gb33012.fm5 Page 14 Thursday, February 8, 2001 5:47 PM
HOW TO DEFROST THE REFRIGERATOR
Defrost the appliance when the ice on the walls
reaches a thickness of about 3 mm.
Ensure the water collection tray is empty and
properly positioned below the low temperature
compartment.
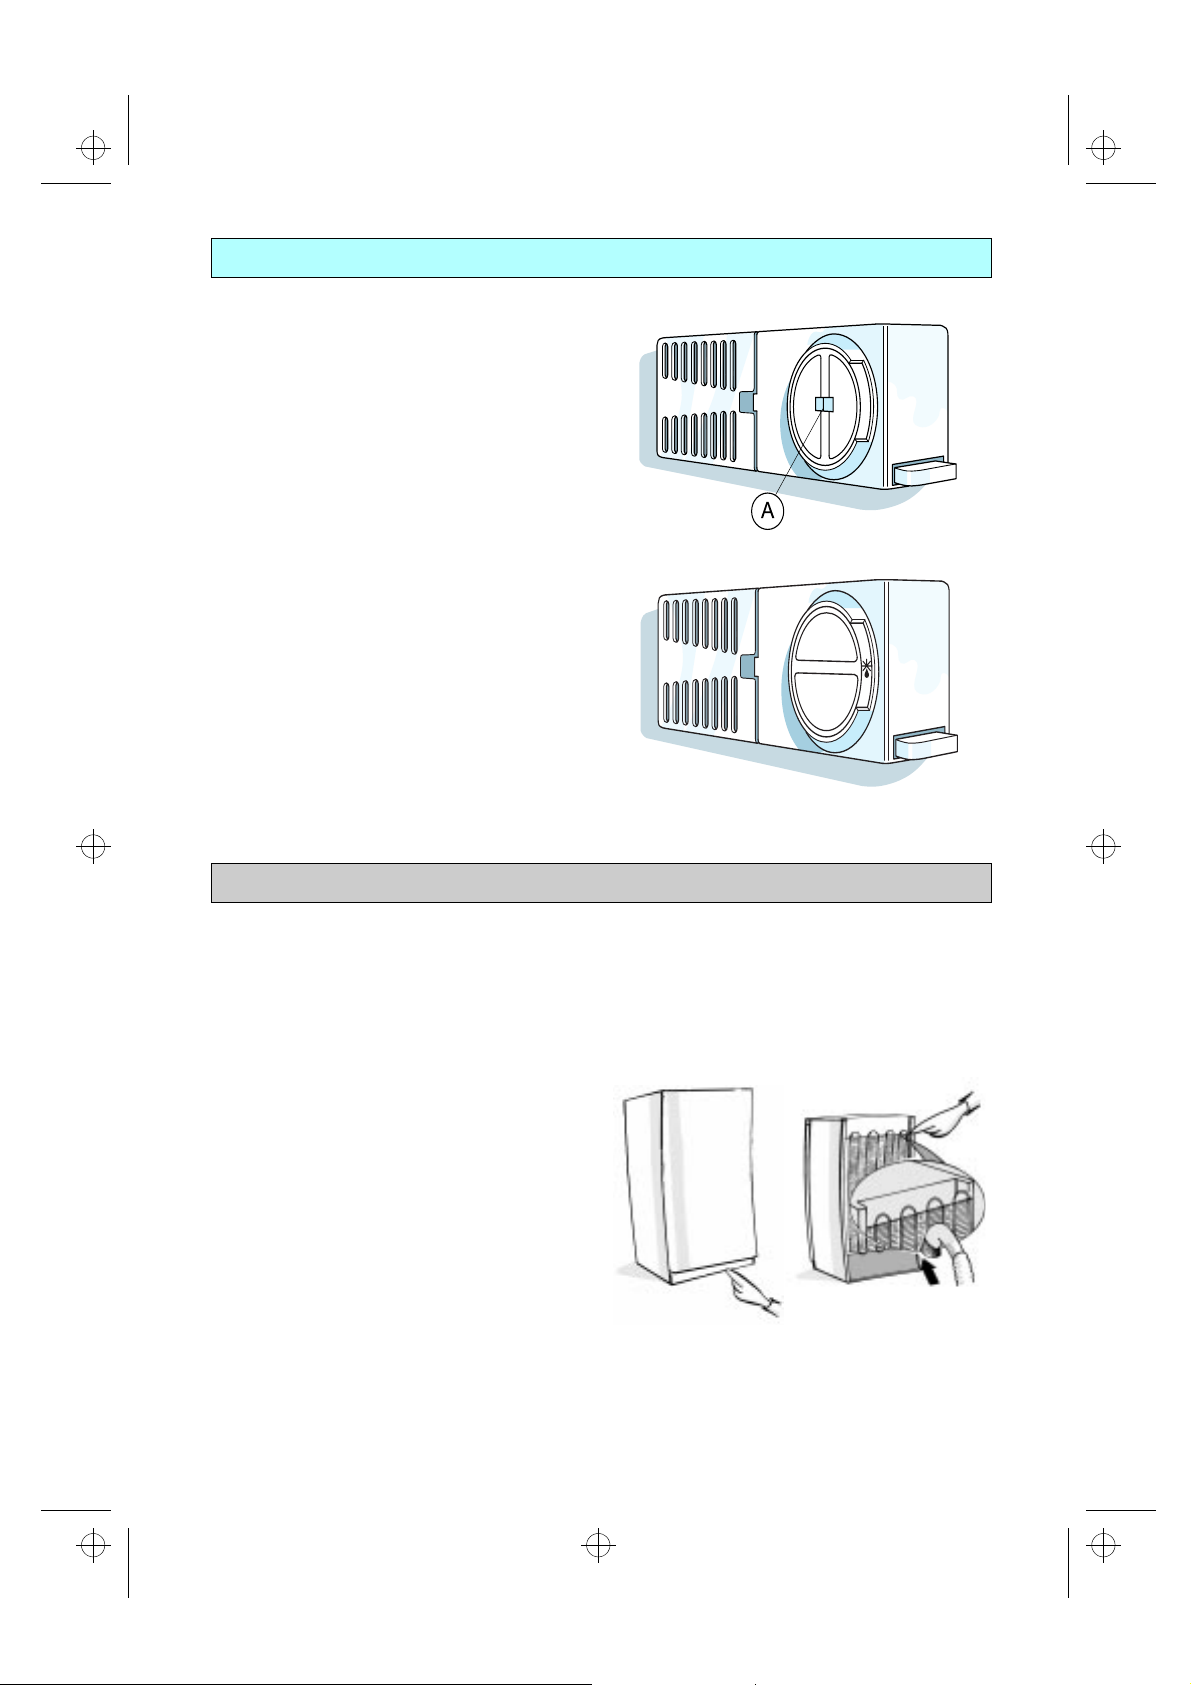
Semi-automatic defrost (Fig. 1)
• Press the button (A) in the middle of the
thermostat knob and close the door. Once all
the ice has melted, the button will return to its
original position and the refrigerator will
automatically start functioning again.
Manual defrost (Fig. 2)
For appliances without defrost button:
• Turn the thermostat knob to the defrost position.
• After defrosting, turn the knob back to its
original position.
It is not necessary to empty the rest of the
refrigerator.
Do not use sharp objects or metal
instruments to remove ice.
(Fig. 1)
CARE AND MAINTENANCE
Before any cleaning or maintenance operation,
unplug the appliance from the mains or
disconnect the electrical power supply.
• Clean the interior periodically with a sponge
soaked in warm water and/or neutral
detergent. Do not use abrasive substances.
• Rinse the interior and dry thoroughly.
• Clean the inside of the low temperature
compartment when defrosting.
• Clean the outside with a damp cloth.
Do not use abrasive products, scourers,
stain-removers (e.g. acetone,
trichloroethylene) or vinegar.
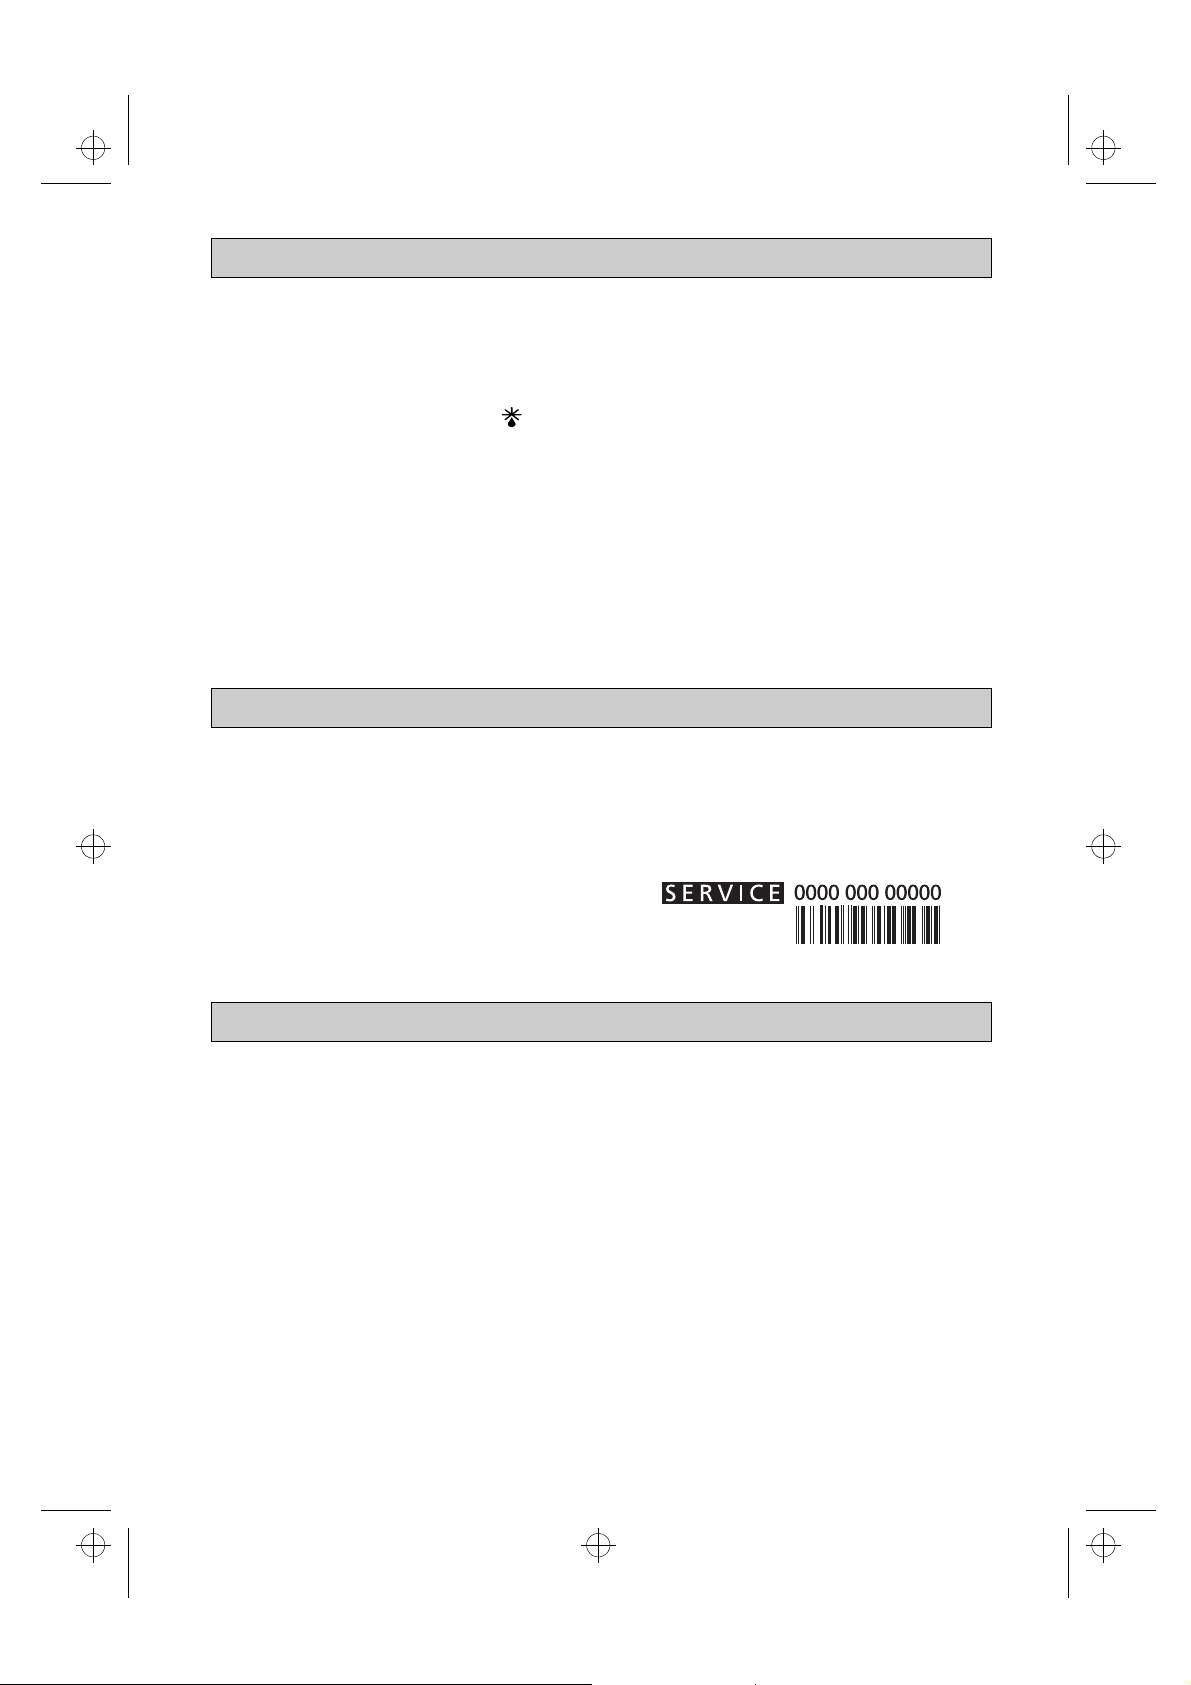
• Periodically clean air vents and the
condenser at the rear of the appliance with a
vacuum cleaner or a brush.
Prolonged disuse
1. Empty the refrigerator.
2. Disconnect the appliance from the power
supply.
3. Defrost and clean the interior.
(Fig. 2)
4. In the event of prolonged disuse, leave the
door open to prevent the formation of mould,
odours and oxidation.
5. Clean the appliance.
.
14
Page 6
6gb33012.fm5 Page 15 Thursday, February 8, 2001 5:47 PM
TROUBLESHOOTING GUIDE
1. The appliance is not working.
• Is there a power failure?
• Is the power cord in perfect condition?
• Is the plug properly inserted in the socket?
• Has the fuse blown?
• Is the thermostat set to z (Stop) or
(defrost)?
2. Temperature inside the compartments is
not low enough.
• Is the door shut properly?
• Is there an excessive frost build-up in the low
temperature compartment ?
• Is the appliance installed near a he at source ?
• Is the thermostat setting correct?
• Are the air circulation vents blocked?
3. Temperature inside the refrigerator
compartment is too low.
• Is the thermostat setting correct?
4. The appliance is excessively noisy.
• Has the appliance been installed correctly?
• Are the pipes at the back touchin g
or vibrating?
5. Water collects at the bottom of the
refrigerator compartment.
• Is the thermostat setting correct?
6. The inside light is not working
• Is there a power failure?
• If not, unplug the appliance from
the mains, remove the cover and check the
bulb has not come loose. If necessary, replace
the bulb with a new one (max 15 W).
Notes:
• Gurgling and hissing noises due to
expansion in the refrigerant circuit
are normal.
•
•
AFTER-SALES SERVICE
Before contacting After-Sales Service:
1. See if you can solve the problem yourself
with the help of the “Troubleshooting Guide”.
2. Switch the appliance on again to see if the
problem has been solved. If it has not,
disconnect the appliance from the power
supply and wait for about an hour before
switching on again.
3. If the problem persists after this course of
action, contact After-sales Service.
INSTALLATION
• Install the appliance away from heat sources.
Installation in a hot environment, direct
exposure to the sun or installation near heat
sources (heaters, radiators, cookers) will
increase power consumption and should
therefore be avoided.
• Leave at least 5 cm clearance above the
appliance and ensure any adjacent units
allow sufficient space for air circulation.
• Install the appliance in a dry, well-ventilated
place, and ensure it is level, using the front
adjustment foot if necessary.
• Ensure the air circulation grille on top of the
appliance is unobstructed in order to
guarantee circulation of air.
• Clean the interior and fit the accessories
supplied.
• Fill the ice cube tray (if provided) with water
and place it in the low temperature
compartment.
Specify:
• The nature of the problem.
• The model.
• The Service number (the number after the
word SERVICE on the data plate on the
inside of the appliance).
• Your full address.
• Your telephone number and area code.
Electrical connection
• Electrical connections must be made in
accordance with local regulations.
• Voltage and power consumption are
indicated on the rating plate inside the
appliance at the bottom left hand side, at the
side of the crisper drawer.
• Regulations require that the appliance is
earthed. The manufacturer declines all
liability for injury to persons or animals
and for damage to property resulting from
failure to observe the above procedures
and reminders.
• If the plug and socket are not of the same
type, have the socket replaced by a qualified
electrician.
Do not use extension leads or adaptors.
15
Page 7
6gb33012.fm5 Page 16 Thursday, February 8, 2001 5:47 PM
ELECTRICAL CONNECTION
For Great Britain only
Warning
earthed
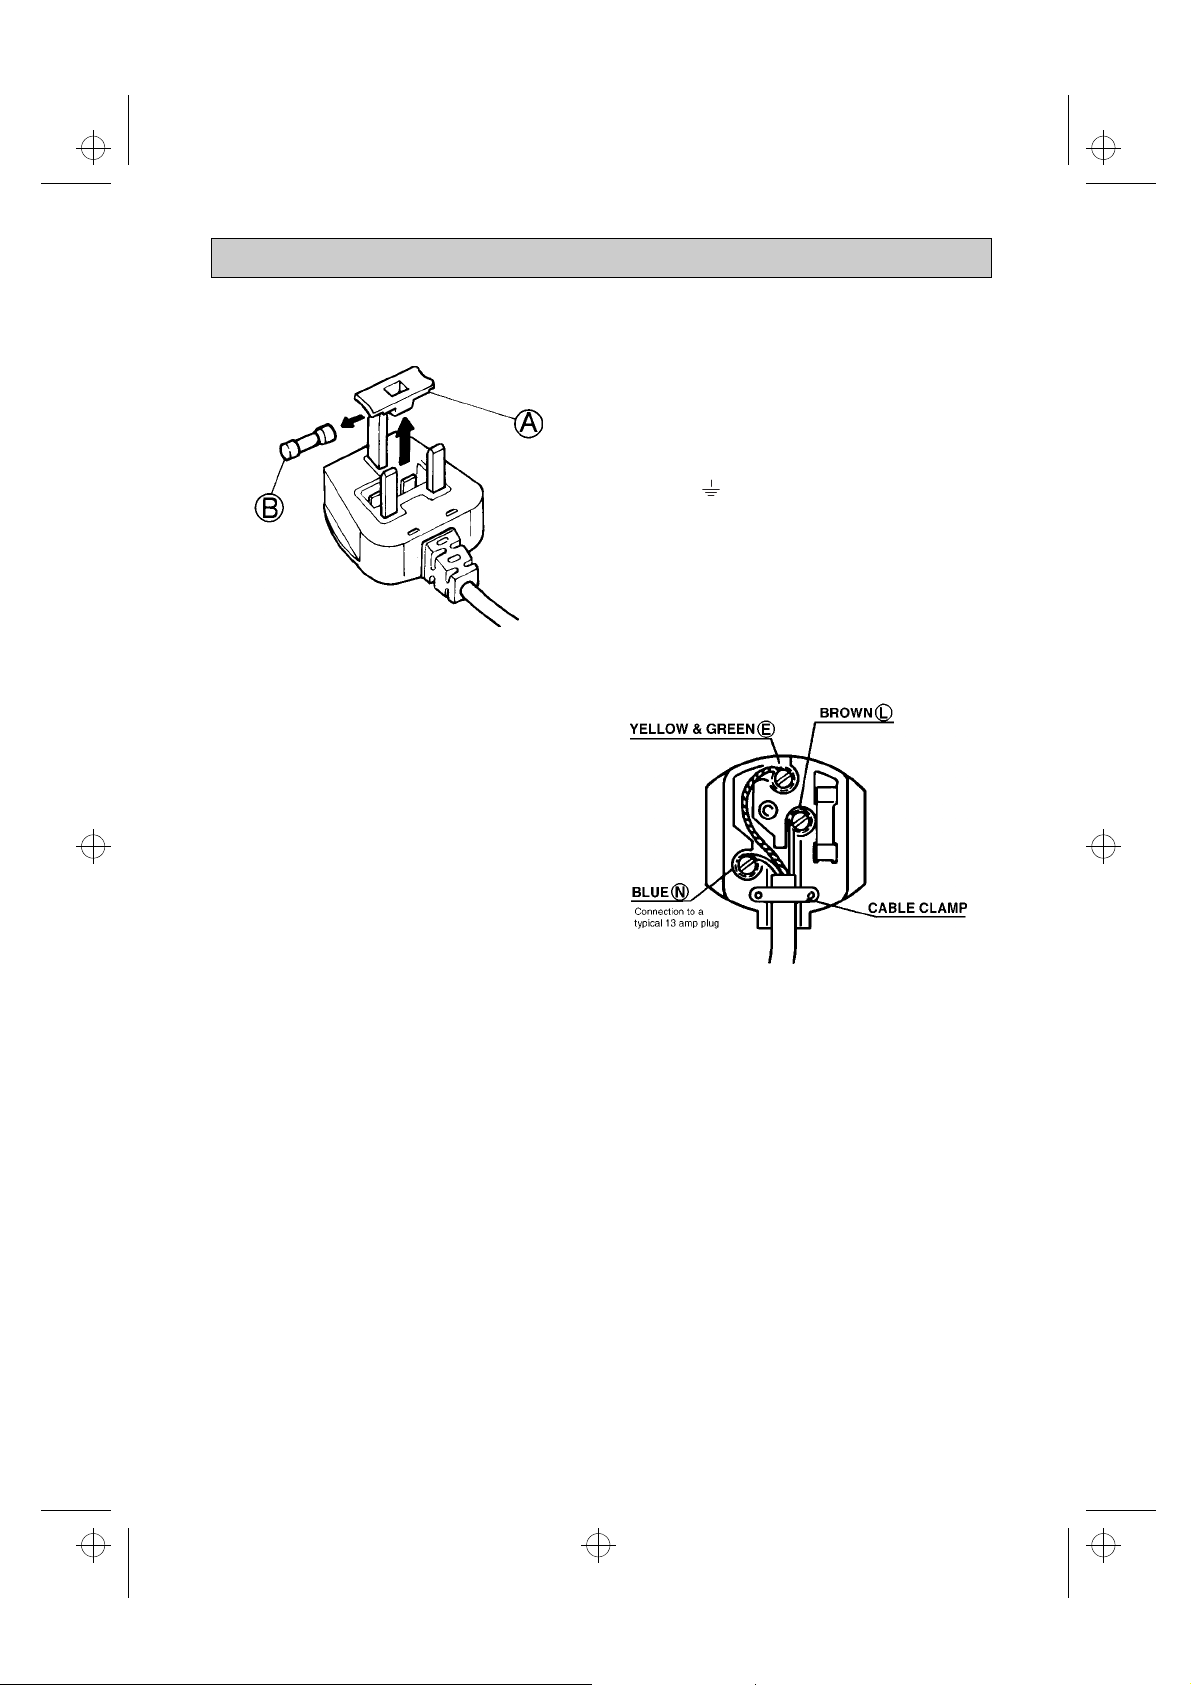
Fuse replacement
If the mains lead of this appliance is fitted with a
BS 1363A 13amp fused plug, to change a fuse in
this type of plug use an A.S.T.A. approved fuse
to BS 1362 type and proceed as follows:
1. Remove the fuse cover (A) and fuse (B).
2. Fit replacement 13A fuse into fuse cover.
3. Refit both into plug.
- this appliance must be
The wires in the mains lead are coloured in
accordance with the following code:
BLUE - “NEUTRAL” (“N”)
BROWN - “LIVE” (“L”)
GREEN AND YELLOW - “EARTH” (“E”)
1. The GREEN AND YELLOW wire must be
connected to the terminal in the plug which is
marked with the letter “E” or by the Earth
symbol or coloured green or green and
yellow.
2. The BLUE wire must be connected to the
terminal which is marked with the letter “N” or
coloured black.
3. The BROWN wire must be connected to the
terminal which is marked with the letter “L” or
coloured red.
Important:
The fuse cover must be refitted when changing a
fuse and if the fuse cover is lost the plug must not
be used until a correct replacement is fitted.
Correct replacement are identified by the colour
insert or the colour embossed in words on the
base of the plug.
Replacement fuse covers are available from
your local electrical store.
Connection to a rewirable plug
If the fitted plug is not suitable for your socket
outlet, then it should be cut off and dispos ed of in
order to avoid a possible shock hazard should it
be inserted into a 13A socket elsewhere.
A suitable alternative plug should then be fitted
to the cable.
16
For the Republic of Ireland only
• The information given in respect of Great
Britain will frequently apply, but a third type of
plug and socket is also used, the 2-pin, side
earth type. In this case, the wire which is
coloured GREEN AND YELLOW must be
connected to the EARTH contact, and the
two wires to the two pins, irrespective of
colour. The supply to the socket must be
fitted with a 16 amp fuse.
 Loading...