


NUTID
GB
OV9


ENGLISH 4
ENGLISH 4
Table of contents
Safety information 4
Product description 6
Control panel 8
Daily use 8
Cooking tables 14
Cleaning and maintenance 16
What to do if ... 19
Technical data 21
Installation 22
Electrical connection 24
Environmental concerns 24
Electrical connection for
Great Britain and Ireland only 25
IKEA GUARANTE 26
Safety Information
Your safety and that of others are very
important
This manual and the appliance itself provide
important safety warnings, to be read and
observed at all times.
This is the danger symbol, pertaining to
safety, which alerts users to potential
risks to themselves and others.
All safety warnings are preceded by the
danger symbol and the following terms:
DANGER! Indicates a hazardous
situation which, if not avoided, will
cause serious injury.
WARNING! Indicates a hazardous
situation which, if not avoided, could
cause serious injury.
All safety warnings give specic details of
the potential risk present and indicate how
to reduce risk of injury, damage and electric
shock resulting from improper use of the
appliance. Carefully observe the following
instructions:
The appliance must be disconnected from the power supply before carrying
out any installation work.
Electrical installation and maintenance -
must be carried out by a qualied
technician, in compliance with the
manufacturer’s instructions and local
safety regulations. Do not repair or
replace any part of the appliance unless
specically stated in the user manual.
Regulations require that the appliance is earthed.
The power cable must be long enough for connecting the appliance, once
tted in its housing, to the power supply
socket.
For installation to comply with current safety regulations, an all-pole
disconnect switch with minimum contact
gap of 3 mm must be utilized.
Do not use multiple plug adapters or extension leads.
Do not pull the power supply cable in order to unplug the appliance.
The electrical components must not be accessible to the user after installation.
Do not touch the appliance with any wet part of the body and do not operate it
when barefoot.
This appliance is designed solely for use as a domestic appliance for
cooking food. No other type of use is
permitted (e.g.: heating rooms). The
Manufacturer declines all responsibility
for inappropriate use or incorrect setting
of the controls.
The appliance is not intended for use by persons (including children) with any
physical, sensory or mental impairment,
or without experience and knowledge
of the appliance, unless supervised or
previously instructed in its use by those
responsible for their safety.

ENGLISH 5
The accessible parts of the appliance may become very hot during use. Young
children should be kept away from the
appliance and supervised to ensure that
they do not play with it.
During and after use, do not touch the heating elements or interior surfaces
of the appliance - risk of burns. Do not
allow the appliance to come into contact
with cloths or other ammable materials
until all the components have cooled
sufciently.
At the end of cooking, exercise caution when opening the appliance
door, letting the hot air or steam exit
gradually before accessing the oven.
When the appliance door is shut, hot air
is vented from the aperture above the
control panel. Do not obstruct the vent
apertures.
Use oven gloves to remove pans and accessories, taking care not to touch the
heating elements.
Do not place ammable materials in or near the appliance: a re may break out
if the appliance is inadvertently switched
on.
Do not heat or cook sealed jars or containers in the appliance. The pressure
that builds up inside might cause the jar
to explode, damaging the appliance.
Do not use containers made of synthetic materials.
Overheated oils and fats catch re easily. Always remain vigilant when
cooking foods rich in fat and oil.
Never leave the appliance unattended during food drying.
If alcoholic beverages are used when cooking foods (e.g. rum, cognac, wine),
remember that alcohol evaporates at
high temperatures. As a result, there is a
risk that vapours released by the alcohol
may catch re upon coming into contact
with the electrical heating element.
Scrapping of household appliances
This appliance is manufactured with recyclable or reusable materials.
Dispose of it in accordance with local
waste disposal regulations. Before
scrapping, cut off the power supply
cable.
For further information on the treatment, recovery and recycling of household
electrical appliances, contact your
competent local authority, the collection
service for household waste or the store
where you purchased the appliance.
ENGLISH 6
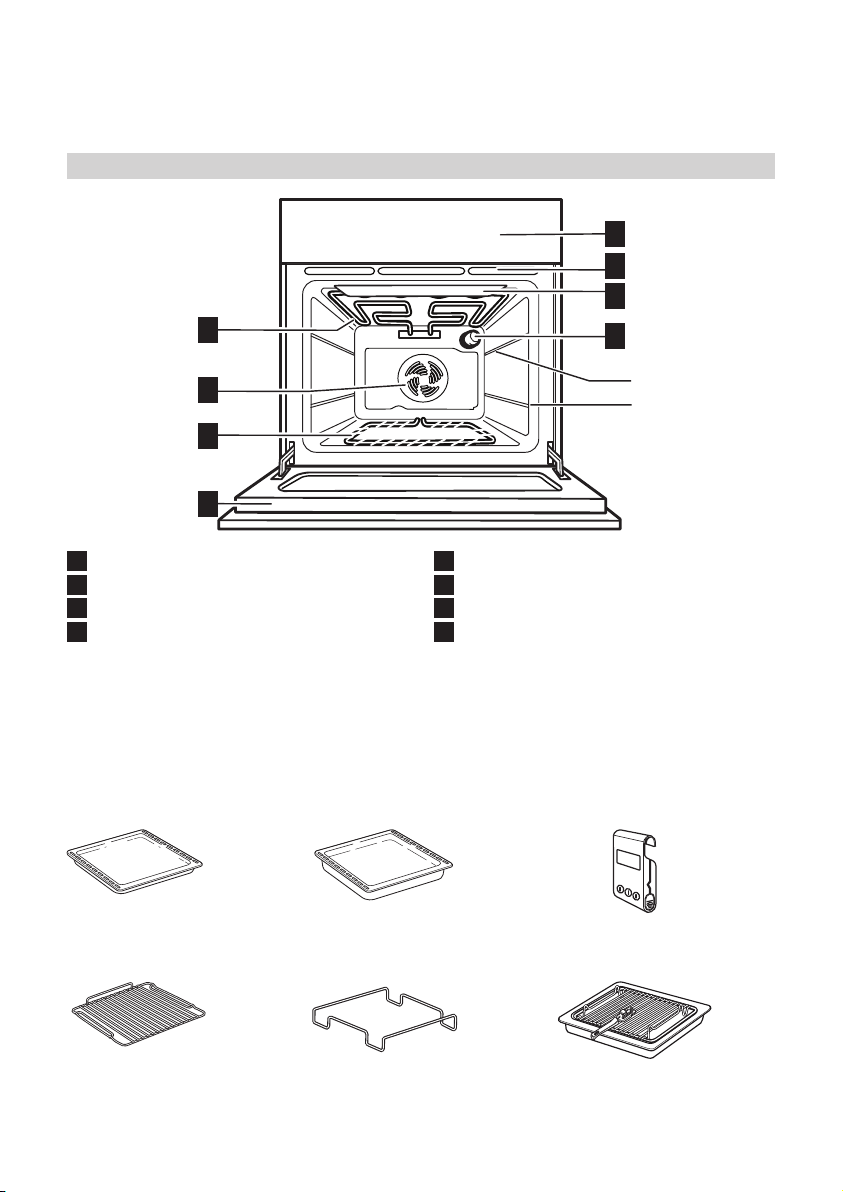
Product description
1
2
3
4
5
6
7
8
1
Control panel
2
Cooling fan
3
Grill safety guard
4
Upper heating element/Grill
1) The cooling fan may continue running even after the
oven is switched off. During the pyro-clean cycle the
fan runs faster than during normal cooking functions.
1)
(hidden)
2)
Accessories
Baking tray
2x
Wire Shelf
Drip tray
1x
Drip tray support
Top shelf
Bottom shelf
5
Rear oven lamp
6
Oven fan
7
Bottom heating element (not visible)
8
Oven cool door
2) Prevents food from coming into direct contact with
the grill. Nevertheless, you are advised not to touch
the safety guard whilst the oven is on.
Thermometer
1x
Grill Pan Set
1x
1x
1x
ENGLISH 7
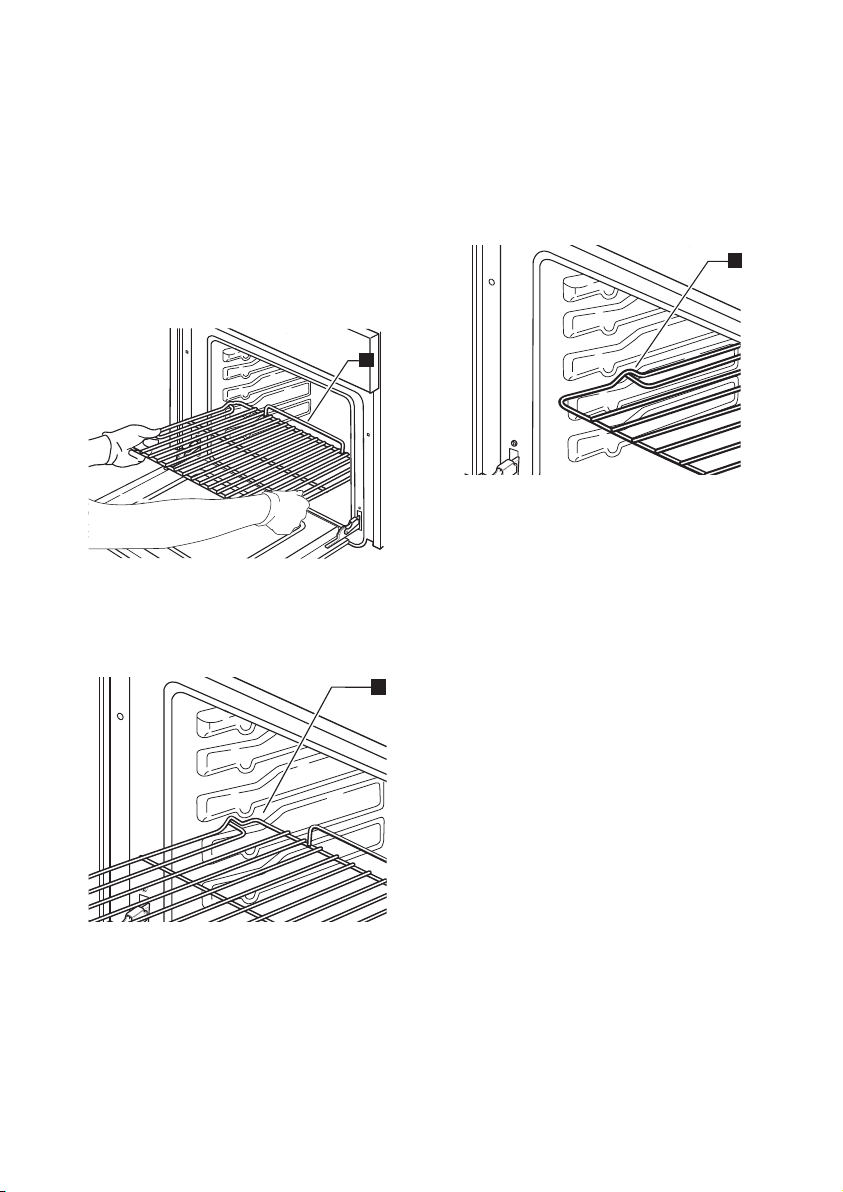
A
B
C
Inserting wire shelves and other
accessories in the oven
The wire shelf and other accessories are
provided with a locking mechanism to
prevent their unintentional removal.
Insert the wire shelf horizontally, with the 1.
raised part “A” upwards (Fig. 1).
Fig. 1
Angle the wire shelf when it reaches the 2.
locking position “B” (Fig. 2).
Return the wire shelf to the horizontal 3.
position and push it in fully to “C”
(Fig. 3).
Fig. 3
To remove the wire shelf proceed in 4.
reverse order.
The other accessories, like the drip tray
and baking tray, are inserted in exactly the
same way. The protrusion on the at surface
enables the accessories to lock in place.
Fig. 2
ENGLISH 8
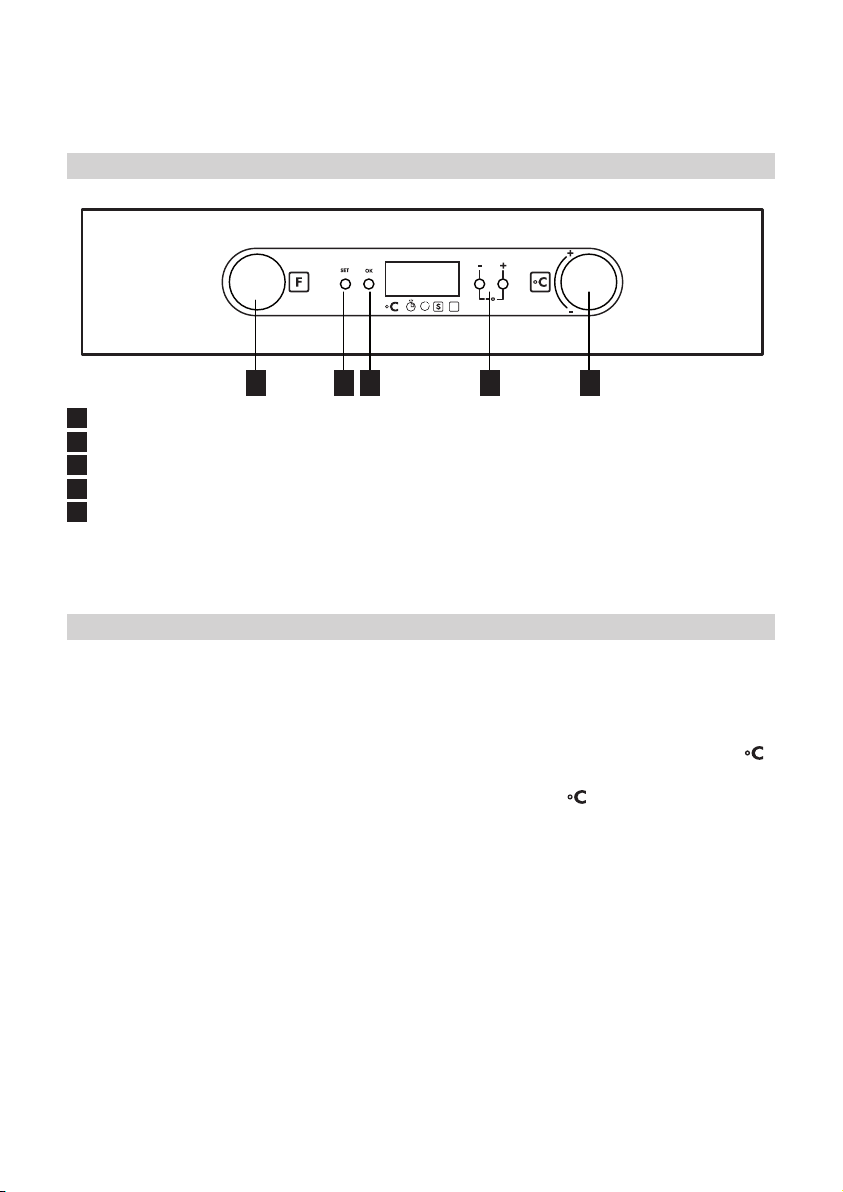
Control panel
A B C D E
A
Function selector knob
B
Programming button: (“set”)
C
Conrmation button (“ok”)
D
Buttons for changing time (“-” “+”)
E
Thermostat knob
Retractable knobs
To use this type of knob, press it in the middle.
The knob comes out. Turn it to the required position. -
Once cooking is over, turn the knob to 0
and press it again to restore it to its original
position.
Daily use
Oven activation
When the oven is connected to the power
supply for the rst time, or after a power
failure, the display indicates “12:00”.
Clock selection and modication:
1. Press the “set” button. The time ashes
on the display.
2. Press the “-” or “+” button to set the
hour.
3. Press the “set” button and “-” or “+” to
set the minutes.
4. Press the “ok” button to conrm.
To modify the time:
Keep the “ok” button pressed for 3 seconds,
until the time ashes on the display. Repeat
the steps described above.
Cooking function selection
1. Turn the knob A to the required function.
2. Turn the knob E to select the
temperature, or the power level in the
Grill and Turbogrill functions. To conrm
the temperature or predened power
level, go to point 3.
For the “Defrost” function, go straight to
point 3.
3. Press the “ok” button to conrm; the
oven switches on. The indicator near
lights up.
4. The indicator
oven temperature reaches the selected
temperature.
To modify the temperature:
1. Turn the knob E and select the required
temperature again.
NB:
To cancel any selection made, turn the knob
A to “0”. Otherwise, press the “set” button to
switch the oven off, maintaining
the previously selected functions.
Cooking duration selection
Select the cooking duration (available with
all the functions except the special functions)
to switch the oven on for a specic
period of time. At the end of this time the
goes off when the
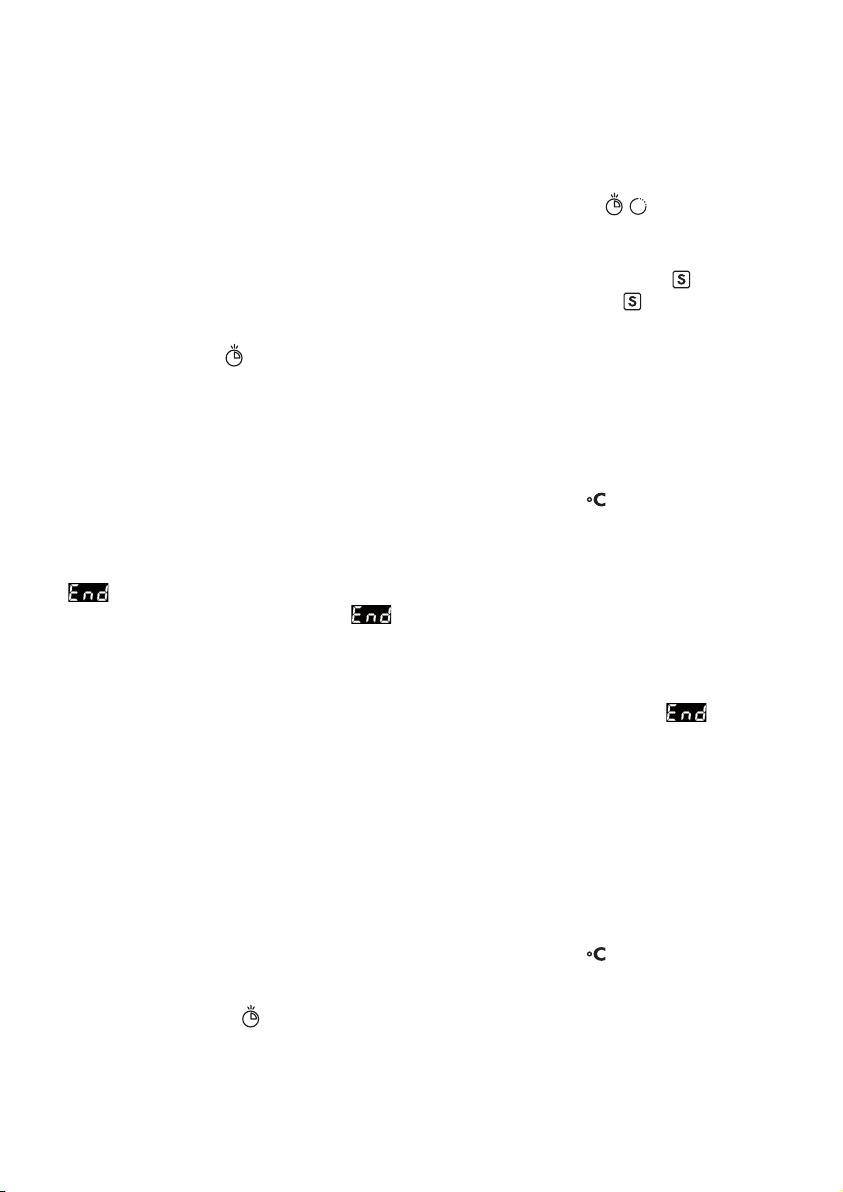
ENGLISH 9
oven will switch off automatically. The
maximum programmable cooking duration
is 6 hours.
1. Set the function and the temperature
(see the section: “Cooking function
selection”) up to point 2 without
conrming with the “ok” button.
2. Press the “set” button (the indicator q on
the display lights up next to the cooking
duration symbol
select the required cooking duration with
the “-” or “+” buttons.
3. Press the “ok” button to conrm the
selection; the oven switches on and the
display will show the remaining cooking
duration.
4. To modify the previously set
temperature, turn the knob E.
To return to the remaining cooking
duration, wait 5 seconds.
appears on the display:
At the end of the previously set time,
appears on the display and a buzzer
sounds.
The oven will switch off automatically.
The cooking duration can be modied with
the “-” or “+” buttons. Return to point 3 of
the section “Cooking duration selection”.
1. Turn the knob A to “0”.
The time of day reappears on the display.
End of cooking time selection
Use this function to preset the end of cooking
time. The maximum programmable time is
23 hours and 59 minutes.
1. Proceed as described in points 1 and
2 of the section “Cooking duration
selection”.
2. Press the “set” button to set the end of
cooking time: the indicator q lights up
next to the symbol
3. Set the end of cooking time with the “-”
or “+” buttons.
4. Press the “ok” button to conrm the end
of cooking time.
The oven will switch on automatically at
) and, within 8 min.,
.
the end of cooking time minus the cooking
duration: the indicators on the display
q above the symbols
succession.
Special Functions
Turn the knob A to the function
light up near the symbol
Pizza
Function at a constant temperature of 250°C
suitable for baking pizzas.
1. Turn the knob E until the message “P1”
appears on the display, followed after 2
seconds by the predened temperature
of 250°C.
2. Press the “ok” button to conrm.
3. The indicator at
goes off when the temperature of 250°C
is reached, a factory-set time of 12
minutes ashes on the display and a
buzzer sounds.
4. Place food in the oven.
5. The preset time can be modied with the
“+” “-” buttons.
6. Press the “ok” button to conrm.
7. At the end of the set time, the oven
automatically switches off,
appears on the display and a buzzer
sounds.
Food warmer
This keeps the oven at a constant
temperature of 60°C.
1. Turn the knob E until the message “P2”
appears on the display, followed after 2
seconds by the predened temperature
of 60°C.
2. Press the “ok” button to conrm.
3. The indicator at
goes off when the temperature of 60°C is
reached, a factory-set time of 10 minutes
ashes on the display and a buzzer
sounds.
4. Place food in the oven.
5. The preset time can be modied with the
“+” or “-” buttons.
6. Press the “ok” button to conrm.
light up in
: q will
.
on the control panel
on the control panel
 Loading...