

Page 1
61002008GB.fm Page 3 Tuesday, September 16, 2008 5:20 PM
INSTRUCTIONS FOR USE
INSTALLATION NOTICES .............................4
SAFEGUARDING THE
ENVIRONMENT.............................................. 5
IMPORTANT NOTES......................................5
BEFORE USING THE OVEN...........................6
OVEN ACCESSORIES.....................................7
CARE AND MAINTENANCE.......................... 8
TROUBLESHOOTING GUIDE .....................12
AFTER SALES SERVICE................................12
To make the most of your new oven, read the user's instructions carefully and kee p th em o n ha nd
for consultation in the future.
3
Page 2
61002008GB.fm Page 4 Tuesday, September 16, 2008 5:20 PM
INSTALLATION NOTICES
Recommendations
IMPORTANT: Disconnect the oven from the mains before carrying out any installation work
or servicing.
Installation must be carried out by a qualified technician in accordance with the manufacturer's
•
instructions and in compliance with local regulations.
Unpack the oven and make sure that the oven has not been damaged during transport and that the
•
oven door closes properly.
Preparing the housing unit
Kitchen units in contact with the oven must be heat resistant (90 °C min).
•
Cut the kitchen unit and worktop to fit before installing the oven. Carefully remove any shavings or
•
sawdust that could prevent the oven from running properly.
•
The bottom of the oven must not be accessible after installation.
During installation make sure that the sides of the oven do not touch the adjacent units.
•
If you are not sure contact the dealer or the nearest service centre.
•
For correct appliance operation, the minimum opening required between the worktop and
the top of the oven must not be obstructed.
Electrical connection
Regulations require that the appliance be earthed.
Connection to the mains must be carried out by a qualified technician in accordance with the
•
manufacturer's instructions and in compliance with local regulations.
The installer is responsible for connecting appliances correctly to the mains and for observing the safety
•
regulations.
The oven power cable must be long enough to connect the built-in oven to the mains.
•
Observance of safety directives requires that a multi-pole switch with a minimum contact gap of 3 mm
•
be used for the installation.
After the oven has been installed, the electrical components must be inaccessible.
•
Connecting the oven to the power supply
Make sure that the voltage indicated on the rating plate is the same as the mains voltage.
•
The rating plate is on the front edge of the oven (visible when the door is open).
If the power cable is not present proceed as follows:
•
Remove the two fastening screws of the terminal box cover located on the bottom part of the
1.
oven's rear covering.
Remove the cover to gain access to the terminal box and insert the power cable (see table) through
2.
the opening located on the bottom of the oven.
Power supply cable table
N° of conductors Type of cable
1N+
Connect the cable to the terminal box, tighten the screws as far as they will go and secure it to the
3.
cable fastener.
Put the cover back on by inserting the two blades in the slots and fasten it with the two screws.
4.
~
H05 RR-F 3 X 1.5 mm²
4
Page 3
61002008GB.fm Page 5 Tuesday, September 16, 2008 5:20 PM
SAFEGUARDING THE ENVIRONMENT
Disposal of packaging materials
The packaging material is 100% recyclable and is
•
marked with the recycle symbol .
The various parts of the packing must therefore
•
be disposed of responsibly and in full compliance
with local authority regulations governing waste
disposal.
Disposal of used household appliances
The appliances are built from recyclable or
•
reusable materials. When scrapping them,
comply with local waste-disposal regulations.
Before scrapping, cut off the power cords so that
the appliances cannot be connected to the mains
IMPORTANT NOTES
This oven is designed solely for use as a home
•
appliance for cooking food. Other uses are not
allowed. The Manufacturer declines any liability
for improper use or incorrect setting of the
controls.
Any repairs or adjustments must be carried out
•
exclusively by a qualified technician.
Do not expose the oven to atmospheric agents.
•
Do not place heavy objects on the door as they
•
could damage it and the hinges.
Do not cling to the door.
•
Do not hang anything heavy on the oven door
•
handle.
Do not cover the bottom of the oven with
•
aluminium foil or other objects.
The oven door must close properly. The door
•
seals must be kept clean.
Never pour water directly inside the oven when
•
hot. This could damage the enamel.
The juices of fruit dripping from the pan could
•
leave permanent stains. It is advisable to clean the
oven before reusing it.
To avoid scratching the coating, do not drag pots
•
and pans on the bottom of the oven.
Oven
This appliance is marked according to the European
Directive 2002/96/EC, Waste Electrical and Electronic
Equipment (WEEE).
By ensuring that this appliance is scrapped suitably, you
can help prevent potentially damaging consequences for
the environment and health.
The symbol on the appliance, or on the accompanying
documentation, indicates that this product must not be
treated as household waste, but must be delivered to the
nearest collection centre for the recycling of electrical and
electronic appliances.
Disposal must be carried out in accordance with local
environmental regulations for waste disposal.
For further information on the treatment, recovery and
recycling of this appliance, contact your competent local
authority, the collection service for household waste or the
shop where you purchased the appliance.
Energy saving
Only pre-heat the oven if specified in the cooking
•
table of the Product Description Sheet or in your
recipe.
Use dark, black enamelled baking moulds as they
•
absorb heat very well.
Residual condensate, after cooking, could
•
eventually damage the oven and surrounding
cabinets. It is advisable to:
- set the temperatures recommended in the
cooking tables;
- dry the wet parts when the oven is cold.
Overheated fats and oils catch fire easily. Heating
•
oils and fats inside the oven is dangerous.
Do not touch the oven with wet parts of the
•
body, or use it when barefoot.
Do not pull the appliance or the power cable to
•
unplug it.
5
Page 4
61002008GB.fm Page 6 Tuesday, September 16, 2008 5:20 PM
The appliance must not be used be people
•
(including children) with limited physical, sensory
or mental abilities, or without experience or
expertise, unless they have received instructions
for using it from those responsible for their
safety.
The accessible parts can become very hot during
•
use. Keep children away
The appliance becomes very hot during use. Be
•
careful not to touch the heating elements inside
the oven.
Do not allow children to touch:
•
- the oven and its controls, especially when in
operation and immediately afterwards to
avoid injury;
- packing materials (bags, polystyrene, metal
parts, etc.);
- the oven to be scrapped.
Make sure the electrical cables of other
•
appliances used near the oven do not touch hot
parts or become caught in the oven door.
The oven has an air cooling system to prevent the
•
front part and the cabinet cavity from becoming
too hot.
Do not place flammable materials in the oven or
•
near it: they may catch fire if the oven is
inadvertently switched on.
Use oven gloves to remove pans and accessories
•
when the oven is hot.
If alcoholic beverages (e.g. rum, cognac, wine,
•
etc.) are added when roasting or baking cakes,
remember that alcohol evaporates at high
temperatures. The alcohol vapours may catch
fire when coming into contact with the heating
element.
Do not heat or cook food in tins or sealed
•
containers in the oven. The pressure created
inside could cause the tin or container to burst,
damaging the oven.
Do not use containers in synthetic material for
•
cooking (unless suitable; see the Manufacturer's
indications), as they could melt at high
temperatures.
Do not pull out the accessories when fully
•
loaded. Use maximum caution.
Preheat the oven before putting hot food in it.
•
Important:
located between the control panel and the oven
door. Do not obstruct the ventilation openings.
Hot air exits through an opening
BEFORE USING THE OVEN
Remove the accessories from the oven and heat
•
it 200°C for about an hour to eliminate the smell
of the protective grease and insulating materials.
Keep the window open during this operation.
Before use, remove:
•
- stickers on the front and oven door, except
for the rating plate;
- cardboard protection and protective plastic
film from the front panel controls and other
parts of the oven;
- any sticky labels from the accessories (for
example, under the drip tray).
6
Page 5
61002008GB.fm Page 7 Tuesday, September 16, 2008 5:20 PM
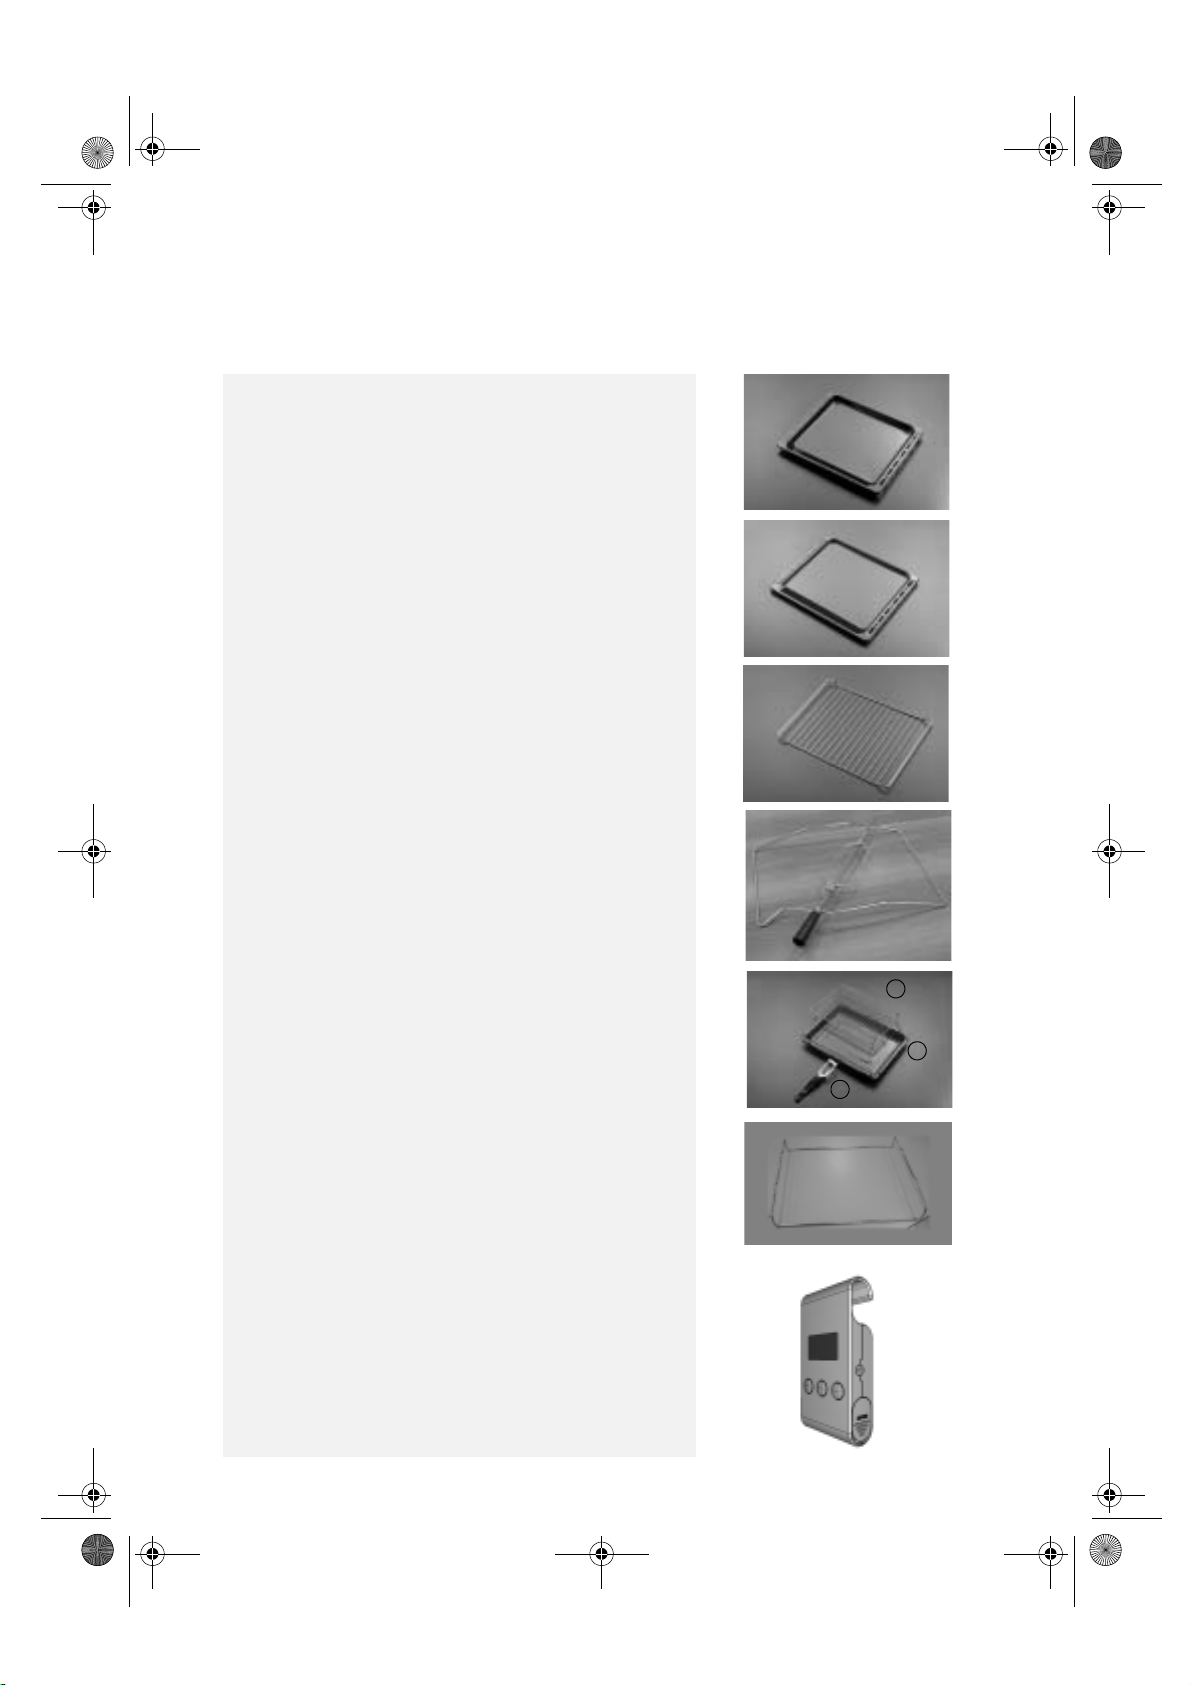
OVEN ACCESSORIES
Accessories supplied depend on the model. The
accessories provided with the oven are listed in the
Product Description Sheet provided separately (under
Accessories).
Drip tray (1)
The drip tray is designed to collect fat and food particles when it
is positioned under the grid or as a plate, such as when cooking
meat, chicken and fish with or without vegetables. Pour a little
water into the drip tray to prevent spatters of fat and smoke.
Baking tray (2)
For cooking biscuits, cakes and pizzas.
Grid (3)
Th e g rid c an be u sed to grill food or as a s uppo rt for ba king trays ,
cake tins and other cooking receptacles. It can be placed on any
of the runners in the oven. The grid can be inserted with its
curved side facing upwards or downwards.
Turnspit (4)
Use the turnspit as indicated in the relevant chapter in the
Product Description Sheet supplied separately.
1
2
3
4
Grill pan set (5)
The set comprises a grid (5a), an enamel drip tray (5b) and one
or two handles (5c).
This set must be placed on the grid (3) and used with the Grill
function.
Drip tray support (6)
Use the support to directly serve the food cooked in the drip
tray or on the baking plate.
Place the trip tray or baking plate containing the food, in the
special holders as indicated in the photo 2.
Meat Probe (7)
A thermometer for measuring the temperature inside food
during the various cooking phases.
5a
5b
5c
5
6
7
7
Page 6
61002008GB.fm Page 8 Tuesday, September 16, 2008 5:20 PM
CARE AND MAINTENANCE
Important:
never clean the appliance with steam
cleaning equipment.
Exterior of the oven
Clean with a damp cloth. If it is very dirty, add a
•
few drops of washing up detergent to the water.
Wipe with a dry cloth.
Do not use corrosive or abrasive detergents,
•
which dull the surface.
In the event that one of these products comes
into contact with the oven, immediately clean it
using a damp cloth.
Slight differences in colour on the front of the
•
appliance are determined by the different
materials used, such as glass, plastic and metal.
Ovens with aluminium front panel
Clean using a delicate detergent and a soft
•
window cleaning cloth or a microfibre cloth that
does not leave fibres on the surface. Wipe
horizontally, without exerting pressure.
Do not use corrosive products, hard sponges or
•
rough cloths. Clean the aluminium surfaces with
a dry cloth.
Accessories
Soak the accessories in water with washing up
•
detergent immediately after use. Food residues
can be easily removed using a brush or sponge.
Self-cleaning function (pyrolysis) Your
oven is self-cleaning
It does this by burning off the fat spatters produced
inside the oven during cooking, at a temperature of
approx. 500 °C. At this high temperature, the
deposits turn into a light ash which can be easily
wiped away with a damp cloth, when the oven is
cool.
It is not necessary to select the pyrolytic function
•
after every use, only when the oven is very dirty.
If the oven is fitted under a hob, make sure that
•
during the self-clean cycle (pyrolisis) all burners
or electric hotplates are turned off.
Remove all accessories before running the
•
pyrolytic function.
For optimal door cleaning results, wipe away any
•
large deposits with a damp sponge before
running the pyrolitic function.
To make this function more efficient, the oven
•
has 2 pyrolytic cleaning cycles:
- an energy saving one (PYRO EXPRESS) which
consumes 25% less energy than the standard
cycle. Used after the second or third time you
cook meat, this feature will ensure the oven
remains clean.
- a standard one (PYRO), suitable for cleaning a
very dirty oven.
6th Sense models automatically detect how dirty
the inside of the oven is and set the ideal cleaning
time.
As a safety measure, the oven door locks
•
automatically after selecting the pyrolytic cycle.
Due to the very high temperature inside the
appliance during the self-cleaning cycle, the oven
door will not open even by turning the selector
to 0.
When to clean by pyrolysis
If your oven smokes during pre-heating or if there
is a lot of smoke during a cooking cycle, run the
pyrolytic cycle. You can also use this function if
there is an unpleasant smell after cooking various
foods (lamb, fish, grilled food…).
FOOD WITH
LITTLE
SPATTERING
FOOD THAT
SPATTERS
FOOD THAT
SPATTERS BADLY
Biscuits, legumes, sweets,
quiches, soufflés.
Foodstuffs that do not
spatter.
Meat, fish (in a heatresistant dish), stuffed
vegetables.
Large pieces of meat on
the spit.
8
Page 7
61002008GB.fm Page 9 Tuesday, September 16, 2008 5:20 PM
Attention: When carrying out the following operations it
is advisable to wear protective gloves. These instructions
should be carefully followed both to prevent injury and in
order not to damage the oven door and hinges.
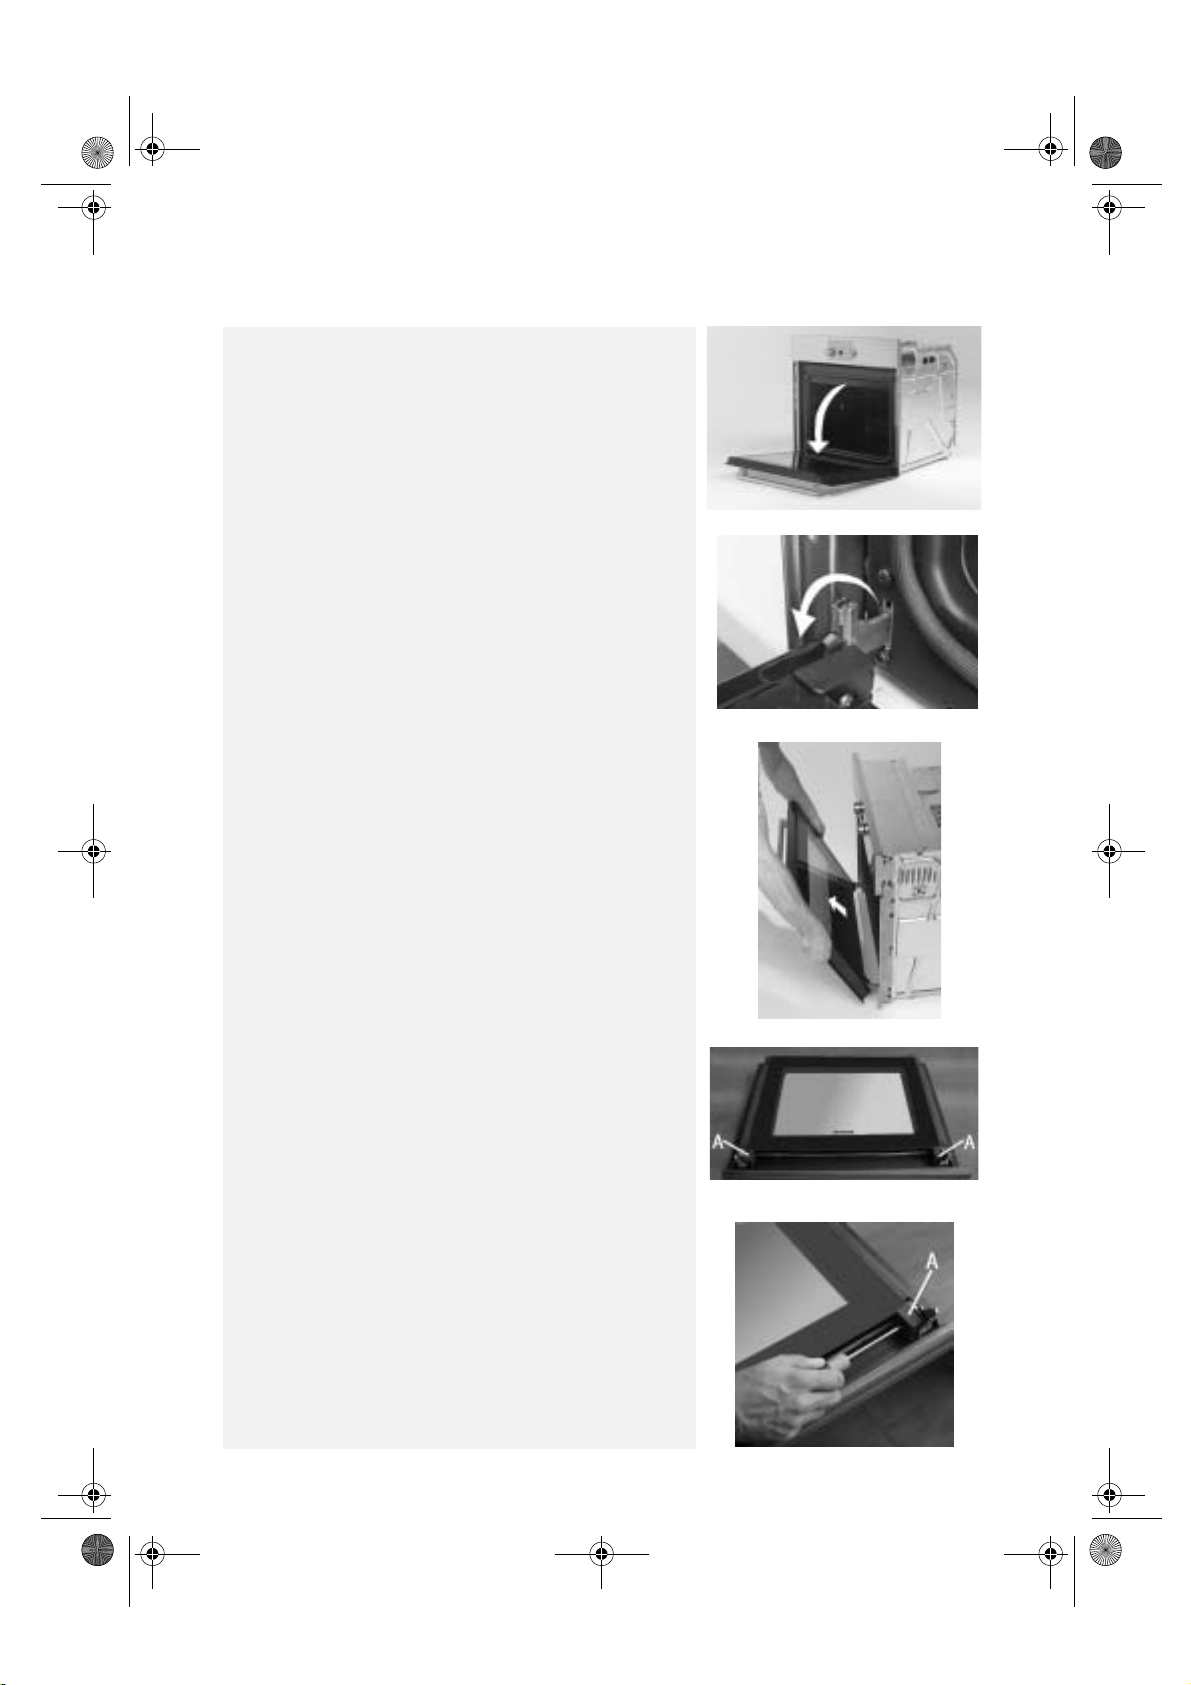
How to remove the oven door:
Open the oven door fully (see fig. 1).
1.
Lift the two catches and push them forwards as far as they
2.
go (see fig. 2).
1
2
Remove the door by closing it partially and pulling it
3.
upwards (see fig. 3).
To remove the oven door:
Place the oven door on a horizontal surface (fig. 1).
1.
Unscrew the 2 glass support screws
2.
screwdriver (fig. 1, fig. 2).
(A)
3
1
using a
2
9
Page 8
61002008GB.fm Page 10 Tuesday, September 16, 2008 5:20 PM
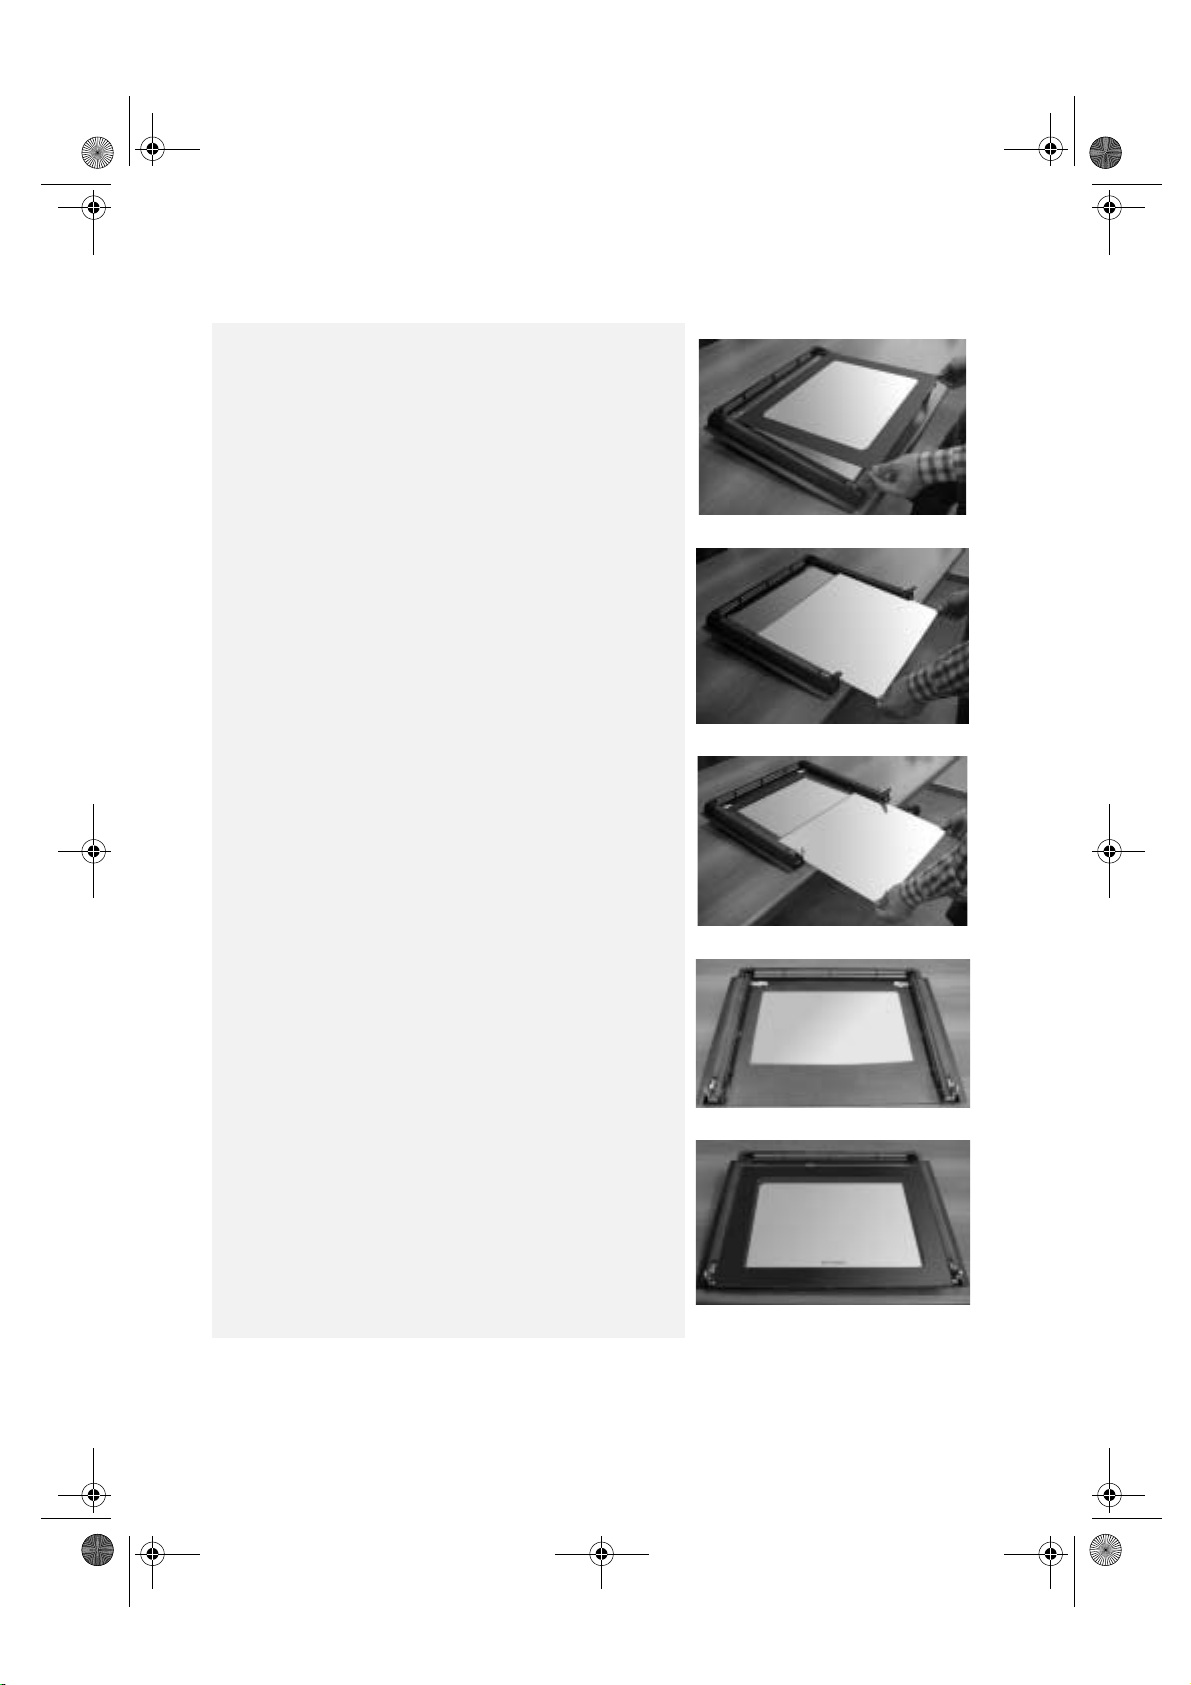
Lift the bottom of the first sheet of glass and remove it
3.
(fig. 3).
Then remove the 2 remaining sheets of glass (fig. 4, fig. 5).
4.
3
4
Refit the sheets of glass in reverse order making sure that
5.
the word SAFEGLASS on the last sheet is facing upwards
(fig. 7).
10
5
6
7
Page 9
61002008GB.fm Page 11 Tuesday, September 16, 2008 5:20 PM
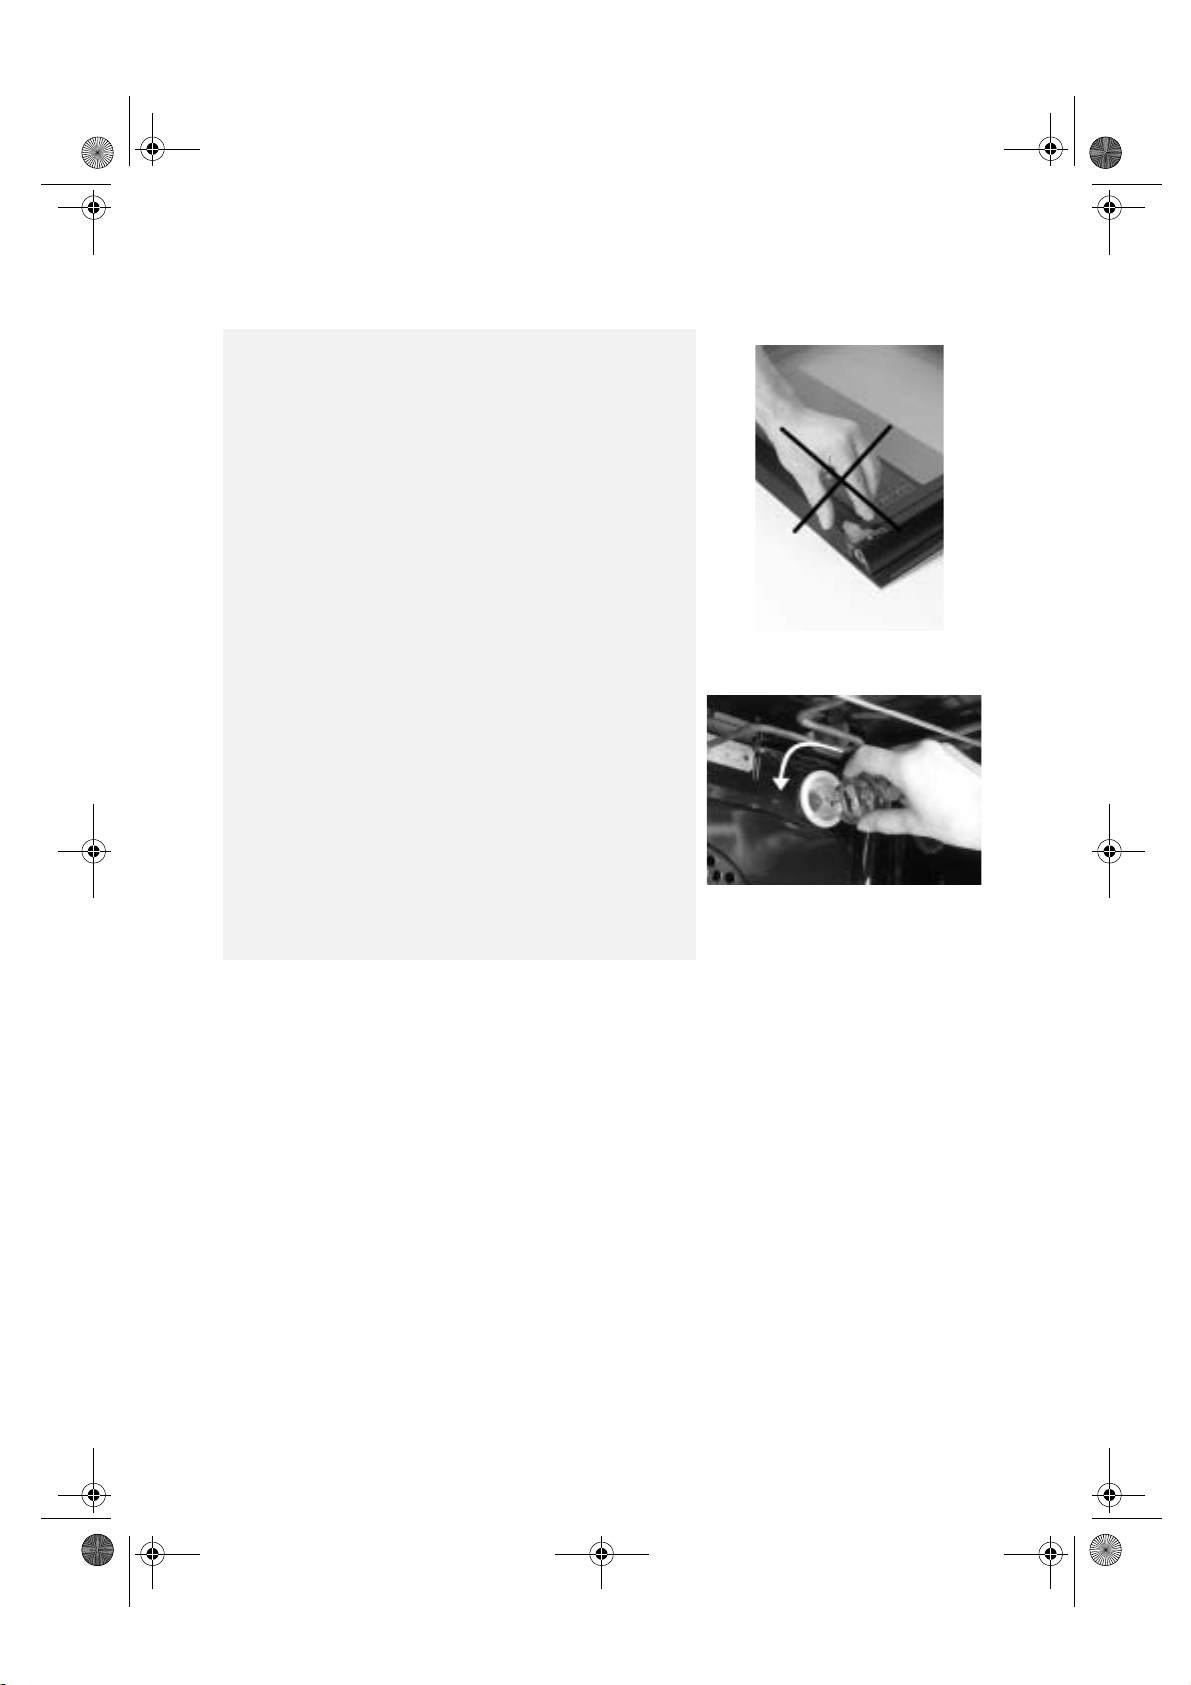
Pay attention to the hinges when cleaning and/or removing the
door (fig. 8).
To remount the door:
Insert the hinges into their grooves and lower the door
1.
fully.
Lower the two catches.
2.
Close the oven door fully.
3.
Attention:
to prevent injury and in order not to damage the oven door and
hinges.
These instructions should be carefully followed both
Changing the rear oven lamp bulb:
Disconnect the oven from the electrical supply.
1.
Let the oven cool before turning the lamp cover left to
2.
unscrew it (see fig. 9).
Change the bulb (see note).
3.
Screw the lamp cover back on.
4.
Reconnect the oven to the electrical supply.
5.
Note: use only 25 W/230 V, E-14 type, T500 °C bulbs
available from After Sales Service.
IMPORTANT: Do not use the oven until the lamp cover
has been repositioned.
8
9
11
Page 10
61002008GB.fm Page 12 Tuesday, September 16, 2008 5:20 PM
TROUBLESHOOTING GUIDE
Oven not working:
Check for the presence of mains electrical power
•
and if the oven is connected to the electrical
supply.
Turn off the oven and restart it to see if the fault
•
persists.
The door is locked and will not release:
Turn off the oven and restart it to see if the fault
•
persists.
AFTER SALES SERVICE
Before you call the After Sales Service
Try to solve the problem yourself following
1.
the points described in “Troubleshooting
Guide”.
Turn the appliance off and on again, to make
2.
sure that the problem has been solved.
If after the above checks the fault still occurs,
get in touch with the nearest After Sales
Service.
Please give:
a short description of the fault;
•
the oven type and model;
•
the service number (number after the word
•
Service on the rating plate), located on the
right hand edge of the oven cavity (visible
when the oven door is open). The service
number is also indicated on the guarantee
booklet;
your full address;
•
your telephone number.
•
IMPORTANT:
Check that the oven control knob is not turned
•
to “0” or to “lamp” .
If the electronic programmer (depending on
model) display presents the message
“ ”, consult the product description
sheet provided separately and/or the
electronic programmer description.
- If the electronic programmer (depending on
the model) presents the message “
contact the nearest After Sales Service.
Specify in this case the number that follows
the letter “F”.
If any repairs are required, please contact an
authorised After Sales Service
that original spare parts will be used and repairs
carried out correctly).
Failure to comply with these instructions may
compromise the safety and quality of the
product.
DECLARATION OF CONFORMITY
This oven is designed to come into contact with
•
food and complies with regulation (EC)
no.1935/2004.
It is designed to be used only as a cooking
•
appliance. Any other use (e.g. for heating rooms)
is deemed improper and therefore dangerous.
This appliance has been designed, manufactured
•
and put on the market in compliance with:
- the safety requirements of “Low Voltage”
Directive 2006/95/EC (replacing 73/23 EEC
as amended).
- the protection requirements of “EMC”
Directive 89/336/EEC.
- the requirements of Directive 93/68/EEC.
(to guarantee
F XX
”,
12
 Loading...