

Page 1
NUTID OV9 PRODUCT DESCRIPTION SHEET
GB
To p
shelf
Bottom
shelf
1)
The cooling fan may continue running even after the oven is
switched off. During the pyro-clean cycle the fan runs faster than
during normal cooking functions.
2)
Prevents food from coming into direct contact with the grill.
Nevertheless, you are advised not to touch the safety guard whilst
the oven is on.
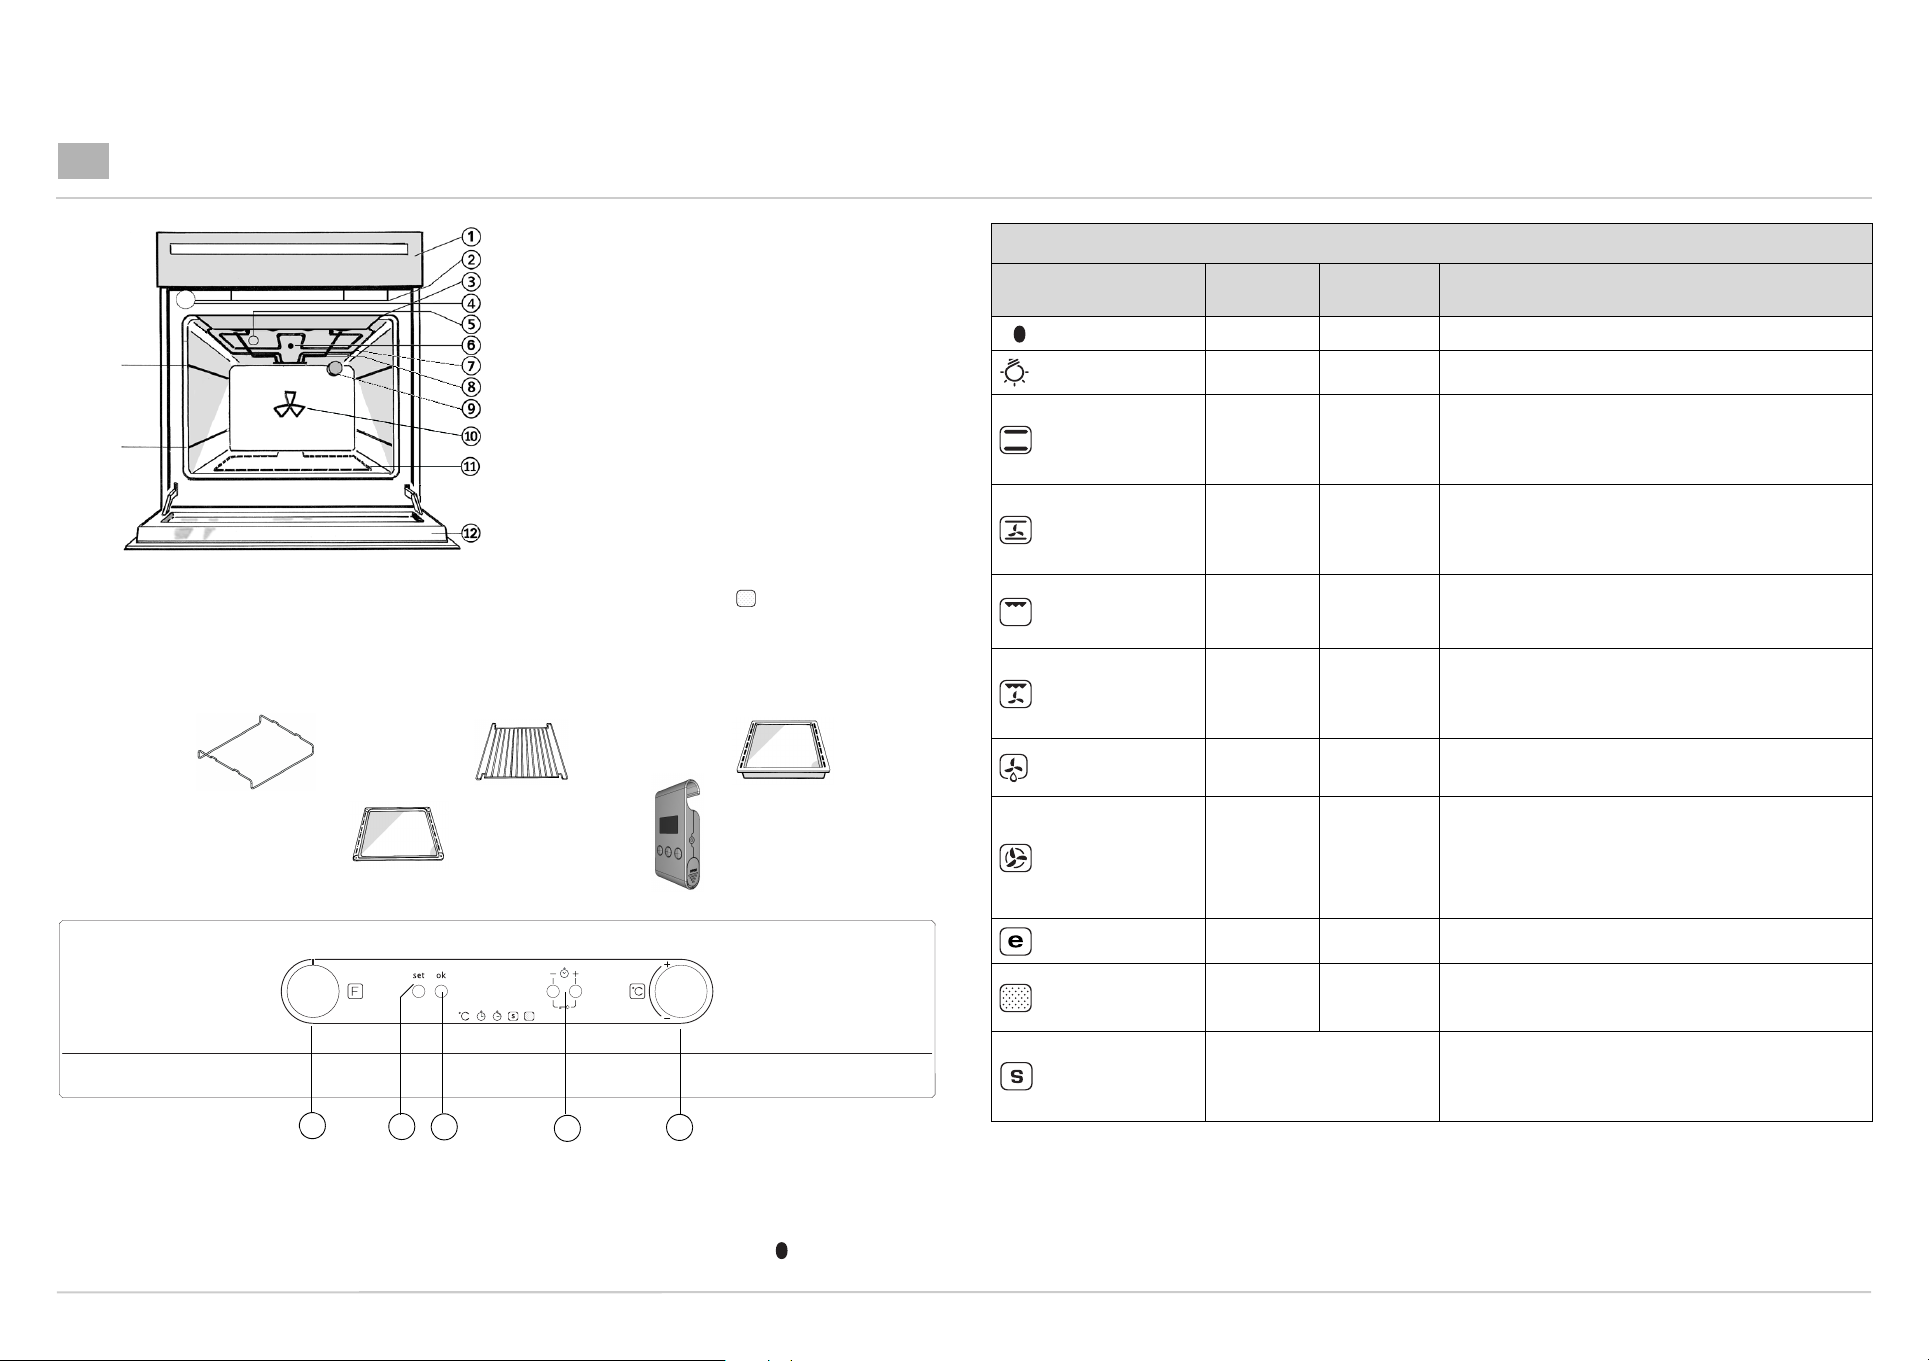
ACCESSORIES
1 Tr a y
support:
2 Baking tray:
1 Wire Shelf:
CONTROL PANEL
1
1. Function selector knob
2. Programming button: (“set”)
3. Confirmation button (“ok”)
4. Buttons for changing time (“-” “+”)
5. Thermostat knob
2
3
1. Control panel
2. Cooling fan
3. Grill safety guard
4. Door lock
1)
(hidden)
3)
2)
5. Catalyser
6. Upper heating element safety guard
7. Grill heating element
8. Upper heating element
9. Rear oven lamp
10. Oven fan
11. Lower heating element (hidden)
12. Oven cool door
3)
During the pyrolysis function an automatic “door lock” device is
activated, the indicator lights up at “ ” on the programmer
display, and the lamp remains off.
The oven door will heat up during pyro-cleaning hence children
must be kept well clear of the appliance.
1 Grill Pan Set:
1 Meat probe:
4
5
Retractable knobs
• To use this type of knob, press it in the middle.
• The knob comes out.
• Turn it to the required position.
Once cooking is over, turn the knob to and press it again to
restore it to its original position.
Oven function chart
Function
Oven OFF
LAMP
CONVENTIONAL
CONVECTION BAKE
GRILL
TURBO GRILL
DEFROST
FORCED AIR
ECO-FUNCTION
PYRO-CLEANING
SPECIAL FUNCTION
Preset
temperature
225°C 50 - 250°C
200°C 50 - 250°C
3 1 - 3
3 1 - 3
- -
200°C 50 - 250°C
225°C 50 - 250°C
-
P2: 6O°C /Keep warm
Important notes:
During the self-clean cycle (pyrolysis) make sure to remove all the accessories supplied, to prevent any further increase in
the outside temperature of the door and to ensure more efficient cleaning of the bottom part of the oven.
Te m p e r a t u r e
Further details can
be found in the
programmer
description sheet
P1: 250°C / Pizza
range
- Oven Off.
-
Description of function
Oven light switching on.
Function suitable for cooking any type of dish on one level. Preheat the
oven to the required temperature and place the food in it when the set
temperature is reached. It is advisable to use the second or third level for
cooking. This function is also suitable for cooking ready frozen food; follow
the instructions on the food package.
For baking cakes with liquid filling (sweet or savoury), pizzas on a single or
double level. For cooking on two levels, switch the position of the food
halfway through cooking in order to obtain more even results. Preheat the
oven to the required temperature and place the food in it when the set
temperature is reached.
To grill steak, kebabs and sausages, gratinate vegetables and toast bread.
Preheat the oven for 3 - 5 min. It is advisable to place food on the 4th or 5th
level. When grilling meat, use the drip-tray to collect the cooking juices.
Position it on the 3rd/4th level, adding approx. half a litre of water.
To roast large joints of meat (legs, roast beef, chickens). Position the food
on the middle levels. Use the drip-tray to collect the cooking juices.
Position it on the 1st/2nd level, adding approx. half a litre of water. The
oven does not have to be preheated. The oven door must remain closed
during cooking. With this function it is possible to use the spit, if provided.
To speed up food defrosting. It is advisable to place food on the middle
level. It is advisable to leave food in its packaging in order to prevent it from
drying on the outside.
To cook even different foods requiring the same cooking temperature on
up to two shelves at the same time (e.g. fish, vegetables, cakes). This
function can be used to cook without odours being transferred from one
food to another. It is advisable to use the 3rd level to cook on a single shelf.
To cook on two shelves, it is advisable to use the 1st and 3rd level. Preheat
the oven to the required temperature and place the food in it when the set
temperature is reached
Energy-saving function suitable for warming food and to complete cooking.
Self-cleaning time can be set from a minimum of 1h/30 min. to a maximum
of 3 hours. Refer to the programmer card for further details.
Pizza: function for baking homemade pizza. The oven automatically
preheats to the correct cooking temperature
Place food in the oven when the required temperature is reached.
Warm keeping: function for keeping just-cooked food (e.g. meat, fried
food, flans) hot and crisp
5019 610 56254
OVN 618/OVN 918
Page 2
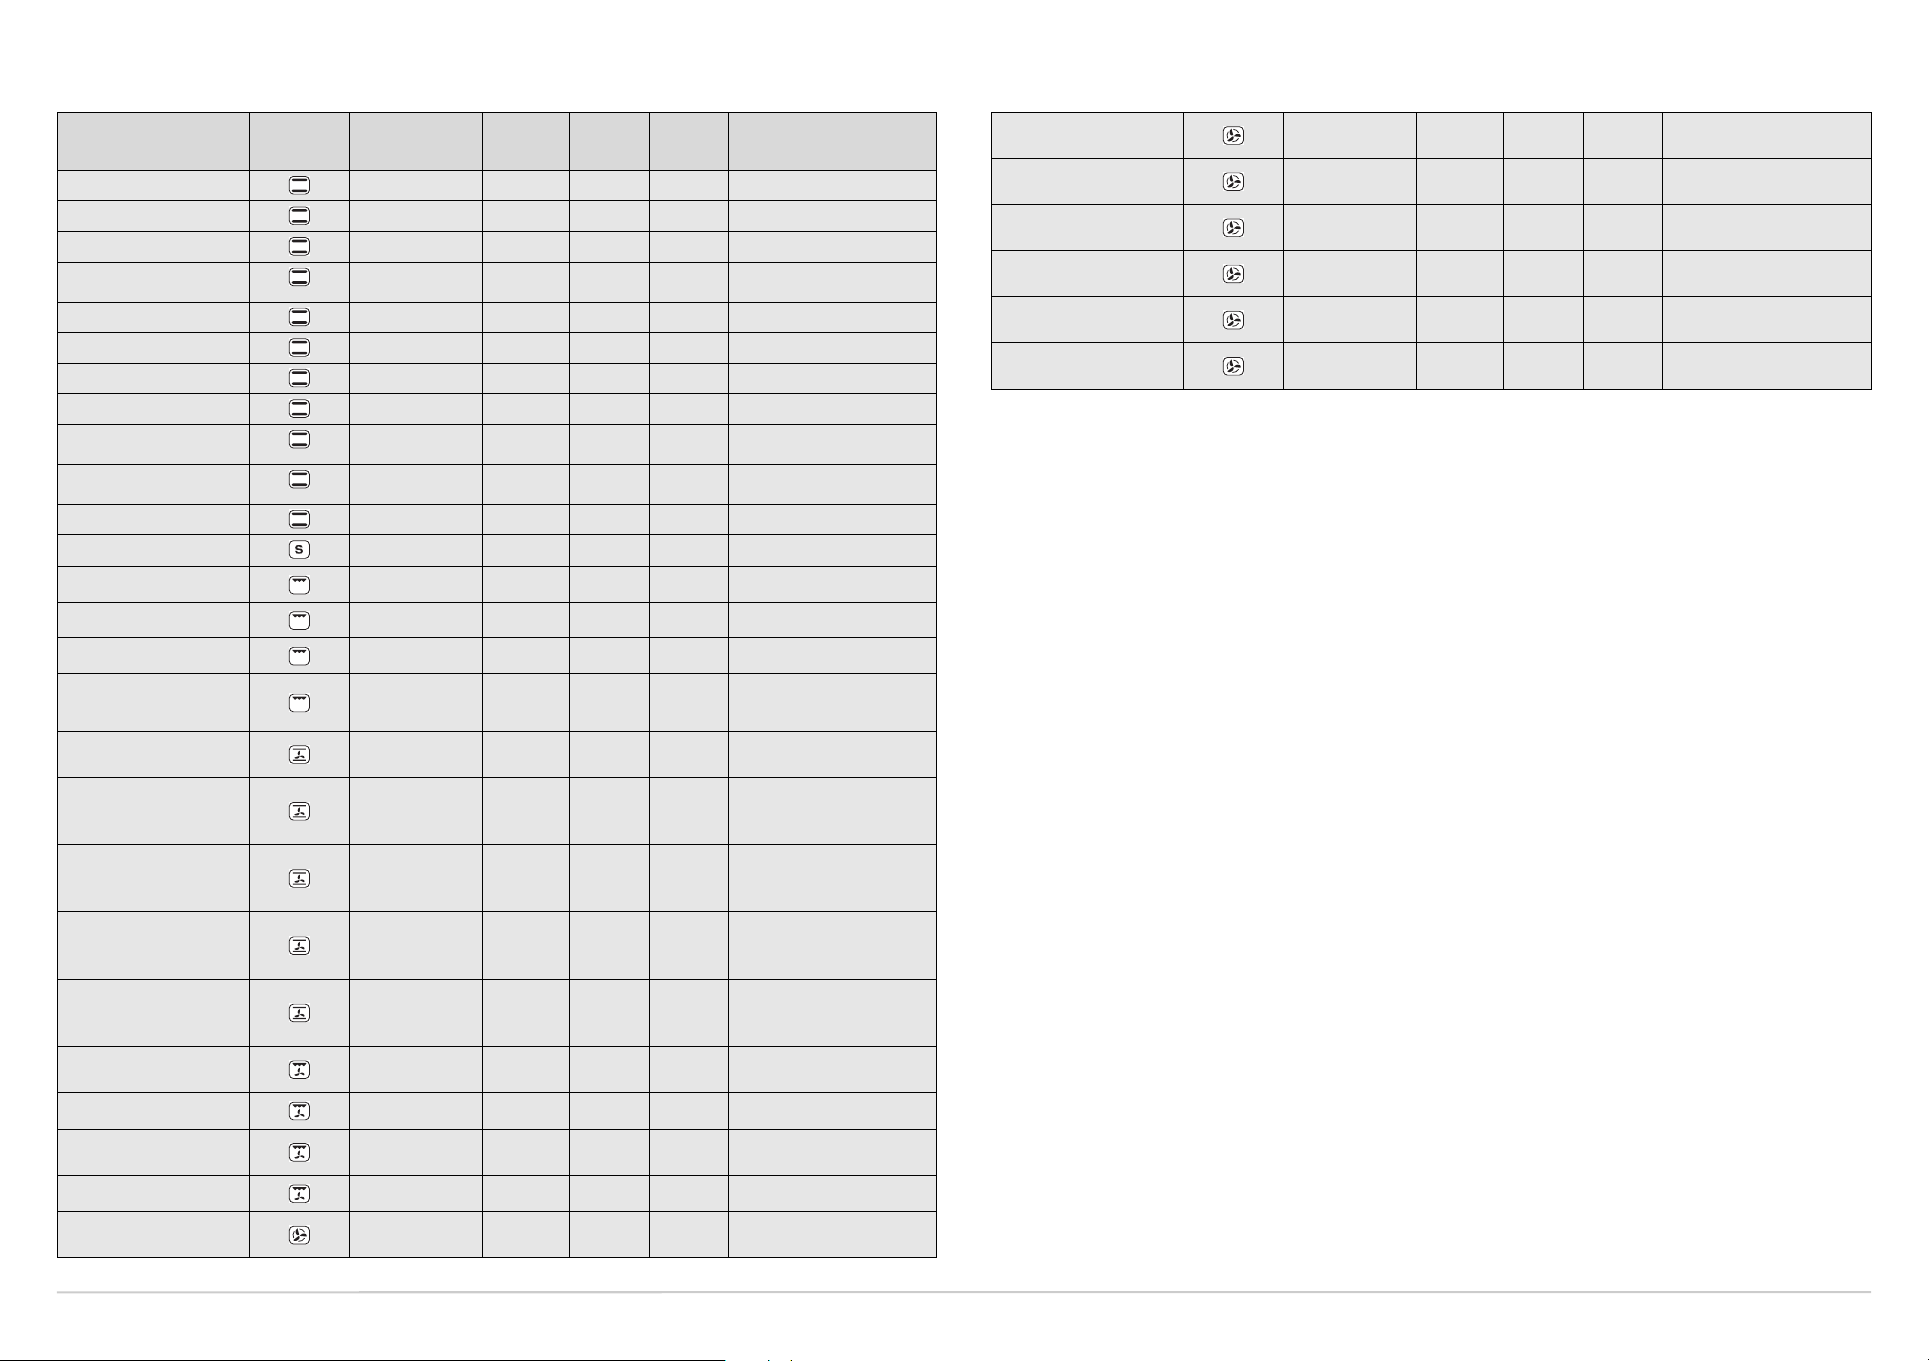
COOKING TABLES
RECIPE FUNCTION PREHEATING LEVEL
Leavened cakes X 2 160 - 180 35 - 55 grill + cake tin
Biscuits/Tartlets X 3 170 - 180 15 - 40 baking tray
Choux pastry X 3 180 30 - 40 baking tray
Vols-au-vent/Puff pastry
crackers
Meringues X 3 90 120 - 130 baking tray
Lamb/Veal/Beef/Pork X 2 190 - 200 90 - 110 drip-tray or grill + pyrex dish
Chicken/Rabbit/Duck X 2 190 - 200 65 - 85 drip-tray or grill + pyrex dish
Turkey/Goose X 2 190 - 200 140 - 180 drip-tray or grill + pyrex dish
Baked fish/en papillote
(fillet, whole)
Lasagna/Baked pasta/
Cannelloni/Flans
Bread / Focaccia X 2 190 - 230 15 - 50 drip-tray or baking tray
Pizza X 2 auto 10 - 15 drip-tray or baking tray
To a s t X 4 3 2 - 5 grill
Gratinated vegetables X 3 3 10 - 20 grill + pyrex dish
Grilled fish fillets and steaks X 4 3 20 - 30 grill + pyrex dish
X 3 180 - 200 20 - 30 baking tray
X 2 180 - 200 50 - 60 drip-tray or grill + pyrex dish
X 2 190 - 200 45 - 55 grill + pyrex dish
(from
bottom)
TEMP
(°C)
TIME
(min)
ACCESSORIES AND
NOTES
Choux pastry X 1 and 3 180 35 - 45 level 3 baking tray
level 1 drip-tray
Vols-au-vent/Puff pastry
crackers
Lasagna & Meat X 1 and 3 200 50 - 100 level 3 grill + pyrex dish
Meat & Potatoes X 1 and 3 200 45 - 100 level 3 grill + pyrex dish
Fish & Vegetables X 1 and 3 180 30 - 50 level 3 grill + pyrex dish
Meringues X 1 and 3 90 120 - 150 level 3 baking tray
N.B: GRILL, turn meats halfway through cooking time.
X 1 and 3 180 - 200 20 - 40 level 3 baking tray
level 1 drip-tray
level 1 drip-tray
level 1 drip-tray
level 1 drip-tray
level 1 drip-tray
Sausages/Kebabs/Spare ribs/
Hamburgers
Filled pies (cheesecake,
strudel, apple pie)
Meat & potato pies
(vegetable pie, quiche
lorraine)
Stuffed vegetables
(tomatoes, peppers,
courgettes, aubergines)
Meat & potato pies
(vegetable pie, quiche
lorraine)
Pizzas/Focaccia X 1 and 3 230 - 250 12 - 30 baking tray+drip-tray
Roast chicken - 2 2 50 - 60 grill+drip-tray with water on
Roast potatoes - 3 3 40 - 55 drip-tray
Roast Beef underdone - 2 3 30 - 50 grill+drip-tray with water on
Leg of lamb/Knuckle - 2 2 55 - 70 grill + drip-tray
Biscuits/Tartlets X 1 and 3 160 - 170 20 - 40 level 3 baking tray
X 4 3 25 - 35 grill+drip-tray with water on
1st level, turn halfway through
cooking
X 2 180 - 200 50 - 60 drip-tray or grill + pyrex dish
X 2 180 - 200 35 - 55 grill + cake tin
X 2 180 - 200 40 - 60 grill + pyrex dish
X 1 and 3 180 - 190 45 - 55 grill + pyrex dish
Switch the levels halfway
through cooking
Switch the levels halfway
through cooking
1st level
1st level
level 1 drip-tray
Page 3

GB
NUTID ELECTRONIC TIMER INSTRUCTIONS
Electronic timer
1
Function selector knob
Programming button: (“set”)
Confirm button (“ok”)
Time values modification buttons (“-” “+”)
Oven thermostat knob
2
3
Display
4
5
Oven activation
When the oven is connected to the power supply for the first time, or after a power failure, the display indicates “12:00”.
Clock selection and modification:
1. Press the “set” button. The time flashes on the display.
2. Press the “-” or “+” button to set the hour.
3. Press the “set” button and “-” or “+” to set the minutes.
4. Press the “ok” button to confirm.
To modify the time:
Keep the “ok” button pressed for 3 seconds, until the time flashes on the display. Repeat the steps described above.
Cooking function selection
1. Turn the knob to the required function.
2. Turn the knob to select the temperature, or the power level in the Grill and Turbogrill functions. To confirm the
temperature or predefined power level, go to point 3.
For the “Defrost” function, go straight to point 3.
3. Press the “ok” button to confirm; the oven switches on. The indicator near lights up.
4. The indicator goes off when the oven temperature reaches the selected temperature.
To modify the temperature:
1. Turn the knob and select the required temperature again.
NB:
To cancel any selection made, turn the knob to “”. Otherwise, press the “set” button to switch the oven off, maintaining
the previously selected functions.
Cooking duration selection
Select the cooking duration (available with all the functions except the special functions) to switch the oven on for a specific
period of time. At the end of this time the oven will switch off automatically. The maximum programmable cooking duration is
6 hours.
1. Set the function and the temperature (see the section: “Cooking function selection”) up to point 2 without confirming with
the “ok” button.
2. Press the “set” button (the indicator on the display lights up next to the cooking duration symbol ) and, within 8 min.,
select the required cooking duration with the “-” or “+” buttons.
3. Press the “ok” button to confirm the selection; the oven switches on and the display will show the remaining cooking
duration.
4. To modify the previously set temperature, turn the knob
To return to the remaining cooking duration, wait 5 seconds.
.
appears on the display:
At the end of the previously set time, appears on the display and a buzzer sounds.
The oven will switch off automatically.
The cooking duration can be modified with the “-” or “+” buttons. Return to point 3 of the section “Cooking duration
selection”.
1. Turn the knob
The time of day reappears on the display.
to “”.
End of cooking time selection
Use this function to preset the end of cooking time. The maximum programmable time is 23 hours and 59 minutes.
1. Proceed as described in points 1 and 2 of the section “Cooking duration selection”.
2. Press the “set” button to set the end of cooking time: the indicator lights up next to the symbol .
3. Set the end of cooking time with the “-” or “+” buttons.
4. Press the “ok” button to confirm the end of cooking time.
The oven will switch on automatically at the end of cooking time minus the cooking duration: the indicators on the display
above the symbols light up in succession.
Special Functions
Turn the knob to the function : will light up near the symbol .
Pizza
Function at a constant temperature of 250°C suitable for baking pizzas.
1. Turn the knob
of 250°C.
2. Press the “ok” button to confirm.
3. The indicator at on the control panel goes off when the temperature of 250°C is reached, a factory-set time of
12 minutes flashes on the display and a buzzer sounds.
4. Place food in the oven.
5. The preset time can be modified with the “+” “-” buttons.
6. Press the “ok” button to confirm.
7. At the end of the set time, the oven automatically switches off, appears on the display and a buzzer sounds.
Food warmer
This keeps the oven at a constant temperature of 60°C.
1. Turn the knob
of 60°C.
2. Press the “ok” button to confirm.
3. The indicator at on the control panel goes off when the temperature of 60°C is reached, a factory-set time of 10 minutes
flashes on the display and a buzzer sounds.
4. Place food in the oven.
5. The preset time can be modified with the “+” or “-” buttons.
6. Press the “ok” button to confirm.
7. At the end of the set time, the oven automatically switches off, appears on the display and a buzzer sounds.
until the message “P1” appears on the display, followed after 2 seconds by the predefined temperature
until the message “P2” appears on the display, followed after 2 seconds by the predefined temperature
Page 4

GB
NUTID ELECTRONIC TIMER INSTRUCTIONS
“Pyrolysis” function
1. Turn the knob to the Pyrolysis automatic cleaning function and for 2 seconds the display will show Cln (cleaning);
the selector will automatically set a minimum duration of
2. To modify the automatic cleaning cycle duration, use the “+” “-” buttons. The maximum programme duration is 3 hours.
To set the end of the pyrolysis cycle, proceed as follows:
1. Press the “set” button to set the end of pyrolysis duration.
The indicator next to the symbol lights up.
2. Set the end of the pyrolysis cycle with the “+” “-” buttons.
3. Press the “ok” button to confirm the end of pyrolysis duration.
The oven will switch on automatically at the end of the pyrolysis cycle minus the cycle duration (previously set).
The indicators above the symbols light up in succession.
4. To increase the pyrolysis duration, press the “set” button and set the new cycle duration with the “+” button.
5. Confirm with the “ok” button.
At the end of the set time, a buzzer sounds and the display will show .
6. Press “ok” to stop the buzzer.
7. Turn the knob
to “”: the time will reappear on the display.
1:30.
Timer
The timer can only be used when the oven is not in use and allows a maximum time of 6 hours to be set.
To set the timer:
1. Leave knob
2. Press the “set” button. the indicator lights up next to the symbol .
Use the “-” or “+” buttons to set the required time.
3. Press the “ok” button to confirm the selection.
At the end of the set time:
A buzzer sounds and flashes on the display.
Press the “ok” button: the buzzer stops. The time of day reappears on the display.
turned to “”. The display shows the time of the day.
Child Safety (Lock)
1. After turning the knob to “”, press the “-” and “+” buttons together for 3 seconds.
Note:
Activation of the LOCK function is indicated by an acoustic signal, whereas the symbol appears on the display.
Once set, the display will continue to indicate the time.
2. The oven functions cannot be used after Safety Lock activation.
3. To deactivate the lock, repeat the sequence described in point 1.
 Loading...