

Page 1

FRAMTID
GB
OV5
Page 2

Page 3

ENGLISH 4
Page 4
ENGLISH 4
Table of contents
Safety information 4
Product description 6
Control panel 8
Daily use 8
Cooking tables 11
Cleaning and maintenance 13
What to do if ... 16
Technical data 18
Installation 19
Electrical connection 21
Environmental concerns 21
Electrical connection for
Great Britain and Ireland only 22
IKEA GUARANTE 23
Safety Information
Your safety and that of others are very
important
This manual and the appliance itself provide
important safety warnings, to be read and
observed at all times.
This is the danger symbol, pertaining to
safety, which alerts users to potential
risks to themselves and others.
All safety warnings are preceded by the
danger symbol and the following terms:
DANGER! Indicates a hazardous
situation which, if not avoided, will
cause serious injury.
WARNING! Indicates a hazardous
situation which, if not avoided, could
cause serious injury.
All safety warnings give specic details of
the potential risk present and indicate how
to reduce risk of injury, damage and electric
shock resulting from improper use of the
appliance. Carefully observe the following
instructions:
The appliance must be disconnected from the power supply before carrying
out any installation work.
Electrical installation and maintenance -
must be carried out by a qualied
technician, in compliance with the
manufacturer’s instructions and local
safety regulations. Do not repair or
replace any part of the appliance unless
specically stated in the user manual.
Regulations require that the appliance is earthed.
The power cable must be long enough for connecting the appliance, once
tted in its housing, to the power supply
socket.
For installation to comply with current safety regulations, an all-pole
disconnect switch with minimum contact
gap of 3 mm must be utilized.
Do not use multiple plug adapters or extension leads.
Do not pull the power supply cable in order to unplug the appliance.
The electrical components must not be accessible to the user after installation.
Do not touch the appliance with any wet part of the body and do not operate it
when barefoot.
This appliance is designed solely for use as a domestic appliance for
cooking food. No other type of use is
permitted (e.g.: heating rooms). The
Manufacturer declines all responsibility
for inappropriate use or incorrect setting
of the controls.
The appliance is not intended for use by persons (including children) with any
physical, sensory or mental impairment,
or without experience and knowledge
of the appliance, unless supervised or
previously instructed in its use by those
responsible for their safety.
Page 5

ENGLISH 5
The accessible parts of the appliance may become very hot during use. Young
children should be kept away from the
appliance and supervised to ensure that
they do not play with it.
During and after use, do not touch the heating elements or interior surfaces
of the appliance - risk of burns. Do not
allow the appliance to come into contact
with cloths or other ammable materials
until all the components have cooled
sufciently.
At the end of cooking, exercise caution when opening the appliance
door, letting the hot air or steam exit
gradually before accessing the oven.
When the appliance door is shut, hot air
is vented from the aperture above the
control panel. Do not obstruct the vent
apertures.
Use oven gloves to remove pans and accessories, taking care not to touch the
heating elements.
Do not place ammable materials in or near the appliance: a re may break out
if the appliance is inadvertently switched
on.
Do not heat or cook sealed jars or containers in the appliance. The pressure
that builds up inside might cause the jar
to explode, damaging the appliance.
Do not use containers made of synthetic materials.
Overheated oils and fats catch re easily. Always remain vigilant when
cooking foods rich in fat and oil.
Never leave the appliance unattended during food drying.
If alcoholic beverages are used when cooking foods (e.g. rum, cognac, wine),
remember that alcohol evaporates at
high temperatures. As a result, there is a
risk that vapours released by the alcohol
may catch re upon coming into contact
with the electrical heating element.
Scrapping of household appliances
This appliance is manufactured with recyclable or reusable materials.
Dispose of it in accordance with local
waste disposal regulations. Before
scrapping, cut off the power supply
cable.
For further information on the treatment, recovery and recycling of household
electrical appliances, contact your
competent local authority, the collection
service for household waste or the store
where you purchased the appliance.
Page 6
ENGLISH 6
Product description
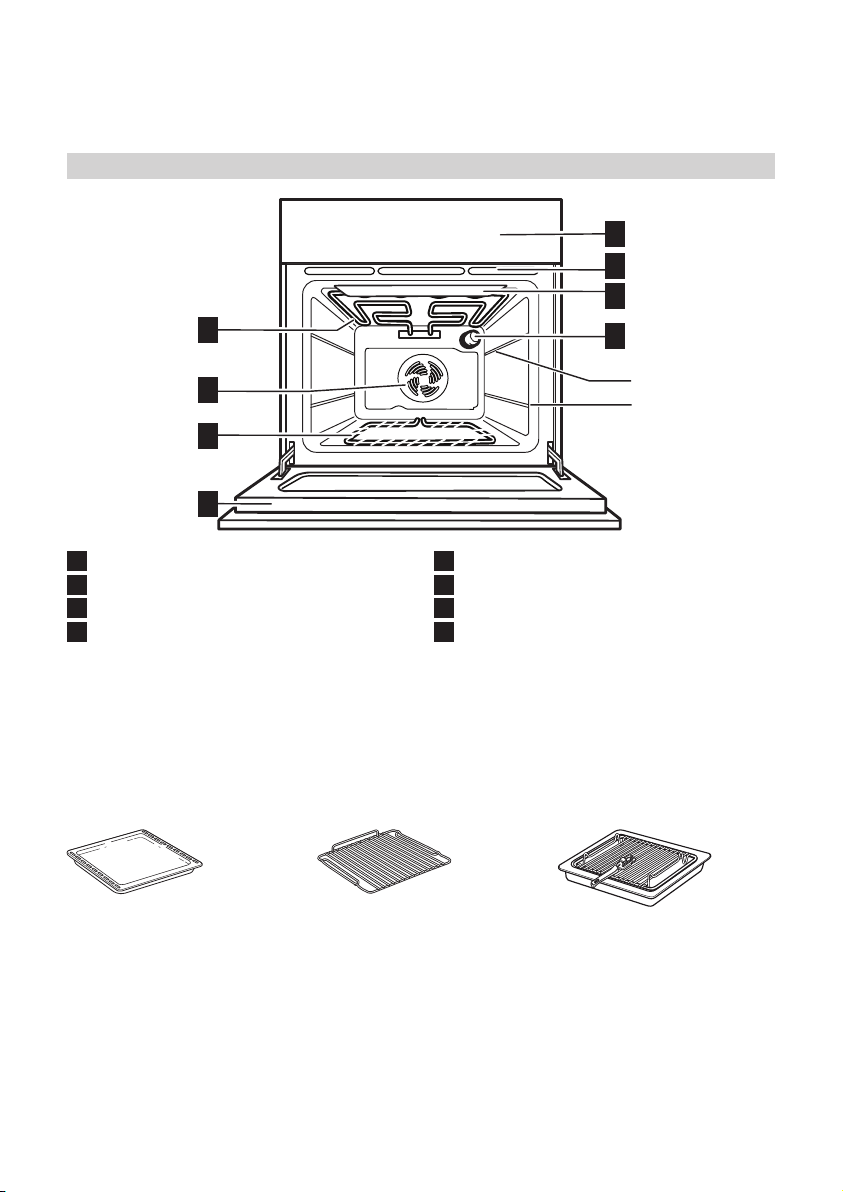
1
2
3
4
5
6
7
8
1
Control panel
2
Cooling fan
3
Grill safety guard
4
Upper heating element/Grill
1) The cooling fan may continue running even after the
oven is switched off.
1)
(hidden)
2)
Accessories
Baking tray
1x
Wire Shelf
1x
Top shelf
Bottom shelf
5
Rear oven lamp
6
Oven fan
7
Bottom heating element (not visible)
8
Oven cool door
2) Prevents food from coming into direct contact with
the grill. Nevertheless, you are advised not to touch
the safety guard whilst the oven is on.
Grill Pan Set
1x
Page 7
ENGLISH 7
A
B
C
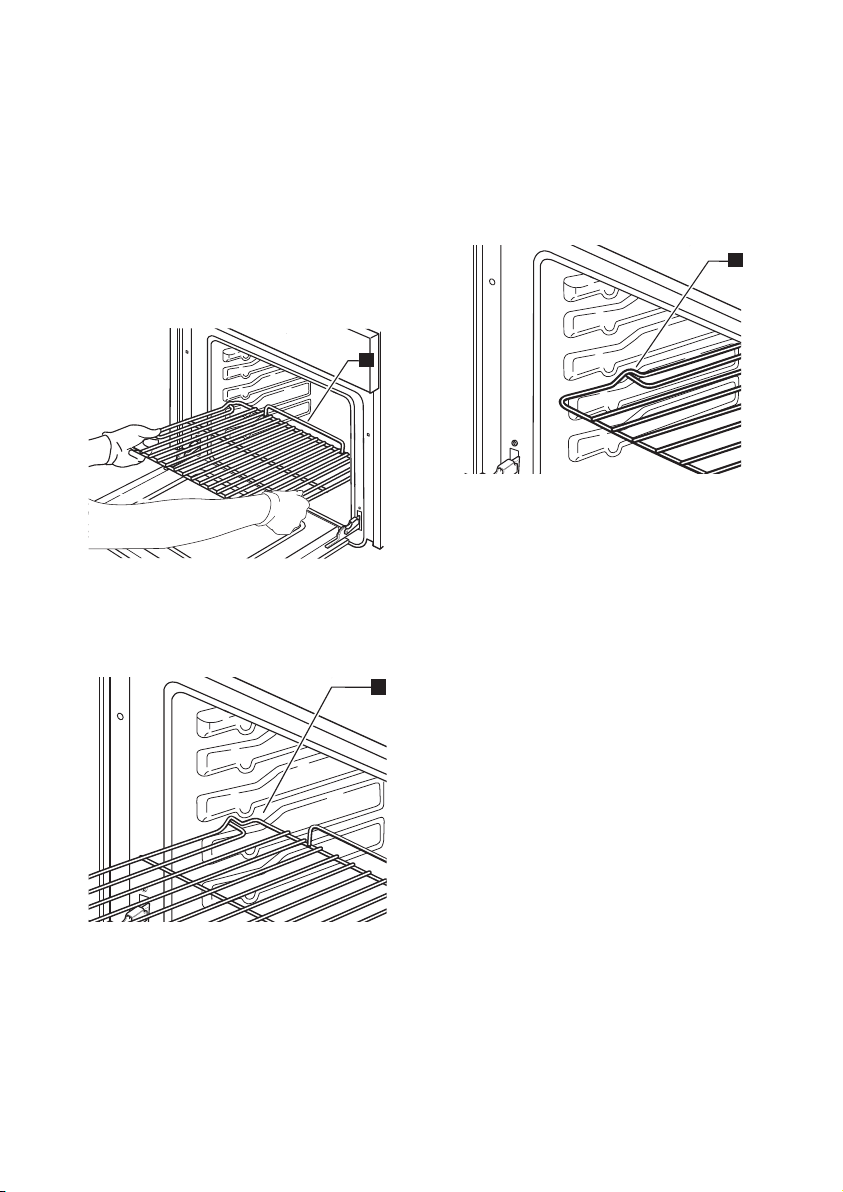
Inserting wire shelves and other
accessories in the oven
The wire shelf and other accessories are
provided with a locking mechanism to
prevent their unintentional removal.
Insert the wire shelf horizontally, with the 1.
raised part “A” upwards (Fig. 1).
Fig. 1
Angle the wire shelf when it reaches the 2.
locking position “B” (Fig. 2).
Return the wire shelf to the horizontal 3.
position and push it in fully to “C”
(Fig. 3).
Fig. 3
To remove the wire shelf proceed in 4.
reverse order.
The other accessories, like the drip tray
and baking tray, are inserted in exactly the
same way. The protrusion on the at surface
enables the accessories to lock in place.
Fig. 2
Page 8
ENGLISH 8
°C
15
100
50
150
250
200
90
30
75
105
120
45
60
0
15
90
30
75
105
120
45
60
0
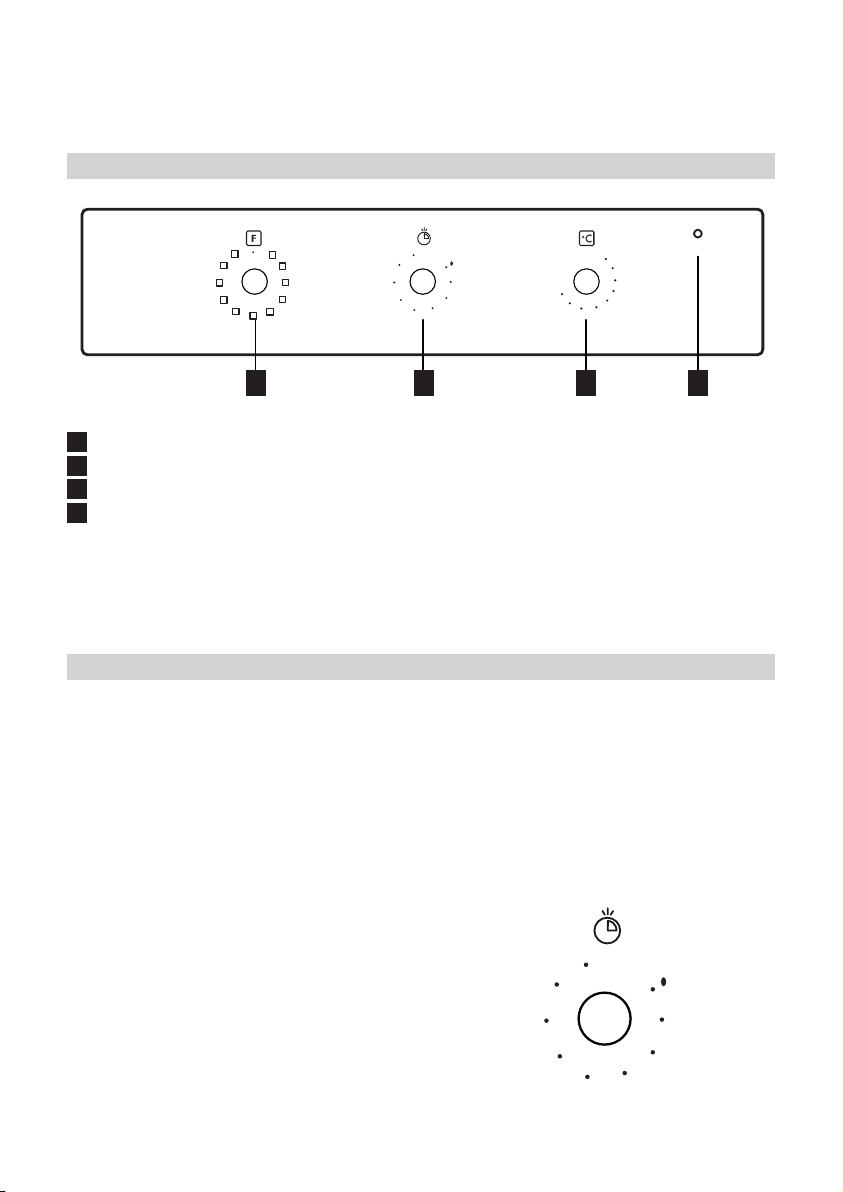
Control panel
A B C D
A
Function selector knob
B
Cooking time selector knob
C
Thermostat knob
D
Thermostat red led.
Daily use
How to operate the oven
Turn the selector knob to the required •
function.
Select a cooking time using the cooking •
time selector knob.
The oven light switches on.
Turn the thermostat knob clockwise •
to the required temperature. The red
thermostat led lights up, switching
off again when the oven reaches the
selected temperature.
At the end of cooking time:
Turn the knobs to “• 0” .
Cooking time selector
This selector can be used to set a cooking
time of between 1 and 180 minutes.
To set cooking time, after selecting the
required cooking function, turn the knob
right round in a clockwise direction and then
turn it back in the opposite direction to the
desired cooking duration. At the end of the
set cooking time the oven switches off and
the selector remains positioned at “0”.
Important: when the selector is positioned
at “0” the oven will not switch on.
To switch the oven on, cooking time must be
set.
Page 9
ENGLISH 9
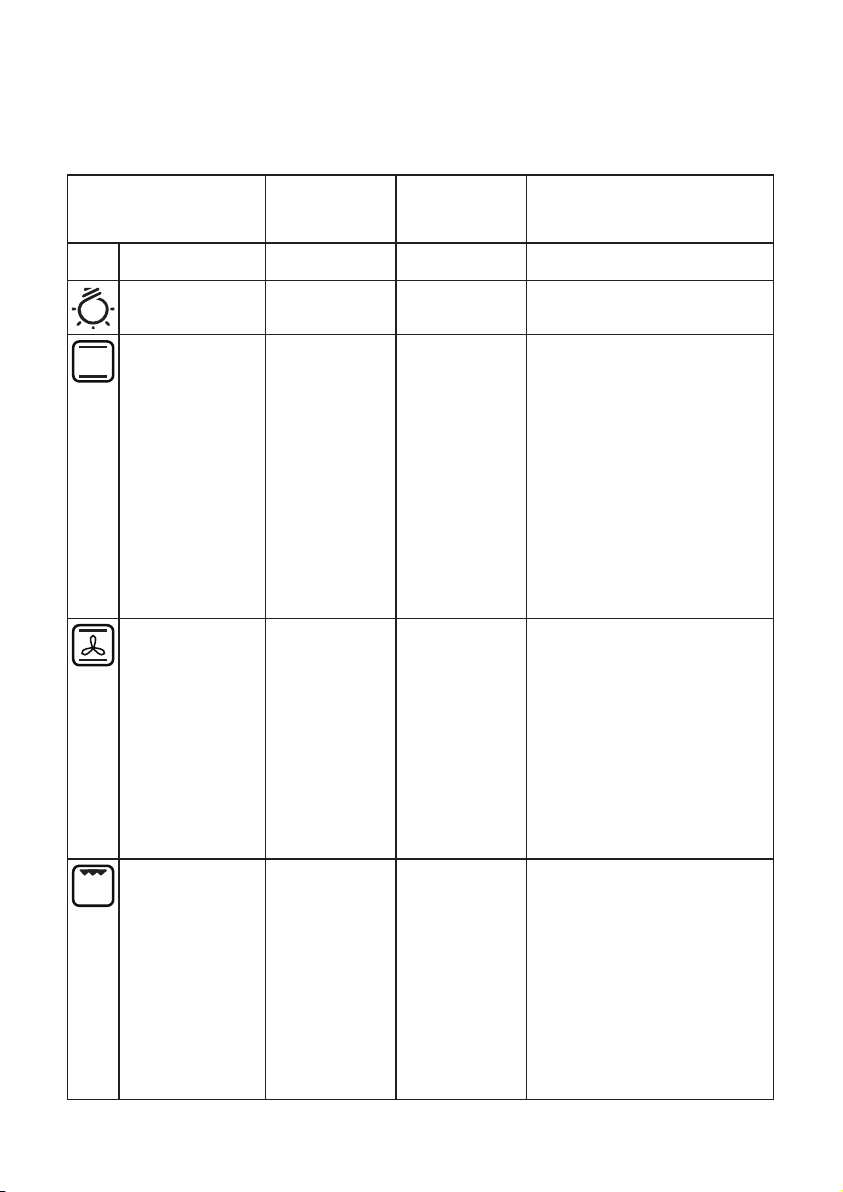
Oven Functions table
Function Preset
temperature /
Power level
OVEN OFF – – Oven OFF.
0
LAMP – – To switch on the oven light.
CONVENTIONAL 225°C 50 - 250°C Function suitable for cooking
CONVECTION
BAKE
GRILL – – To grill steak, kebabs and
200°C 50 - 250°C For baking cakes with liquid
Temperature
range /
Grill range
Description of function
any type of dish on one
level. Preheat the oven to the
required temperature and
place the food in it when the
set temperature is reached. It
is advisable to use the second
or third level for cooking. This
function is also suitable for
cooking frozen convenience
foods;
Follow the instructions on the
food packaging.
lling (sweet or savoury),
pizzas on a single or double
level. When cooking on two
levels, switch the position of
the dishes halfway through
cooking to cook food more
evenly. Preheat the oven to
the required temperature and
place the food in it when the
set temperature is reached.
sausages, to cook vegetables
au gratin and to toast bread.
Preheat the oven for 3 - 5 min.
Place food on the 4th or 5th
shelf.
When grilling meat, use the
drip tray to collect the cooking
juices. Position it on the 3rd/4th
shelf, adding approx. half a
litre of water.
Page 10
ENGLISH 10
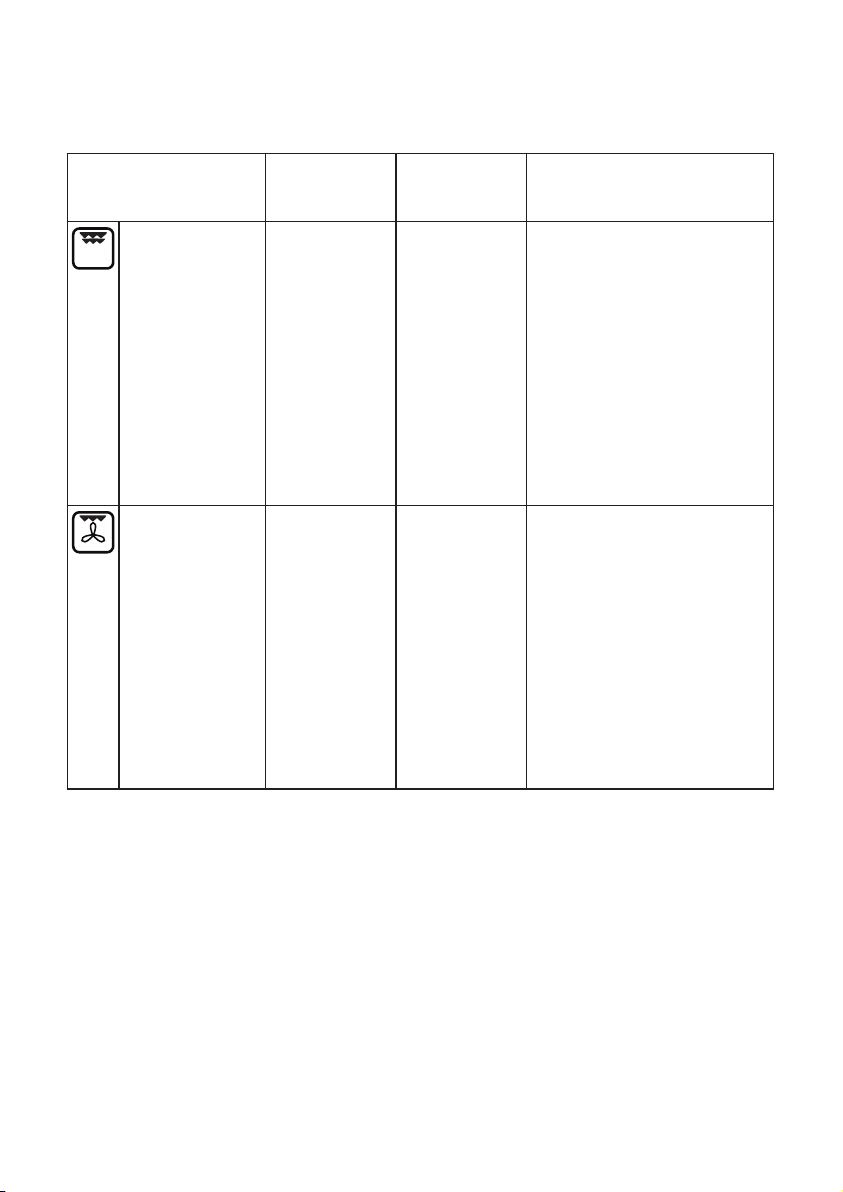
Function Preset
temperature /
Power level
DUAL GRILL – – To cook meat (smoked bacon,
TURBO GRILL – – To roast large joints of meat
Temperature
range /
Grill range
Description of function
steaks, sausages, etc.) and for
making toast.
This function activates the
entire top grill element.
Pre-heat the oven for 5 min.
with the door closed.
Arrange food on the wire shelf.
When cooking meat, to avoid
spatters of fat and
smoke, pour a little water into
the drip tray.
Turn the food during grilling.
(legs, roast beef, chickens).
Position the food on the middle
shelves. Use the drip tray to
collect the cooking juices.
Position it on the 1st/2nd shelf,
adding approx. half a litre
of water. The oven does not
have to be preheated. During
cooking the oven door must
remain closed.
With this function you can also
use the turnspit, if provided.
Page 11
ENGLISH 11
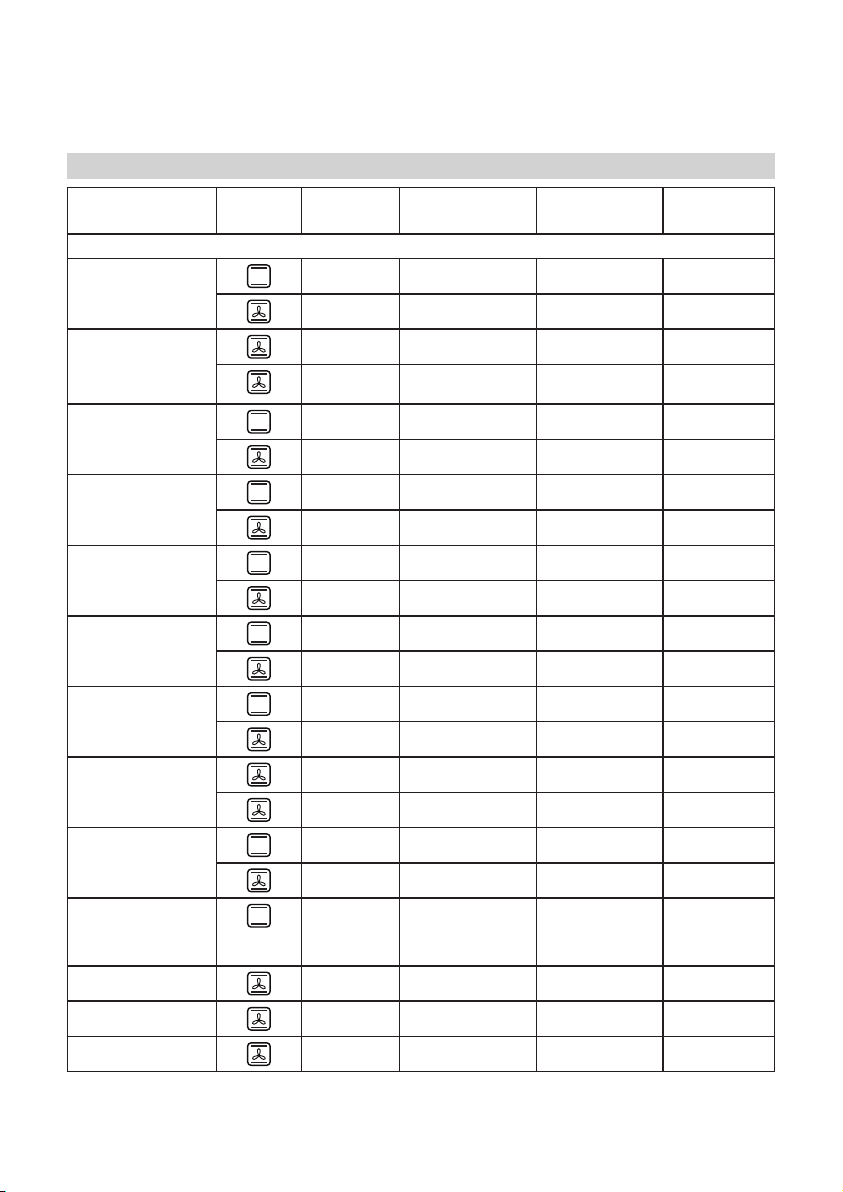
Cooking tables
Type of food Function Preheating Shelf (from the
bottom)
SWEETS, PASTRY, ETC
Leavened cakes
X 2 150-175 35-90
X 2-4 150-170 30-90
Temperature
(°C)
Cooking time
(min)
Filled pies
(cheesecake,
strudel, fruit pie)
Biscuits/tartlets
Choux buns
Meringues
Bread/pizza/
focaccia
Frozen pizza
Savoury pies
(vegetable pie,
quiche)
Vols-au-vent /Puff
pastry crackers
Lasagne, baked
pasta, cannelloni,
ans
Lasagna & Meat
X 2 150-190 30-85
X 2-4 150-190 35-90
X 2 160-175 20-45
X 2-4 160-170 20-45
X 2 175-200 30-40
X 2-4 170-190 35-45
X 2 100 110-150
X 2-4 100 130-150
X 2 190-250 12-50
X 2-4 190-250 20-45
X 2 250 10-15
X 2-4 250 10-20
X 2 175-200 45-55
X 2-4 175-190 45-60
X 2 175-200 20-30
X 2-4 175-200 20-40
X 2 200 45-55
X 2-4 200 50-100
Meat & Potatoes
Fish & Vegetables
X 2-4 200 45-100
X 2-4 175 30-50
Page 12
ENGLISH 12
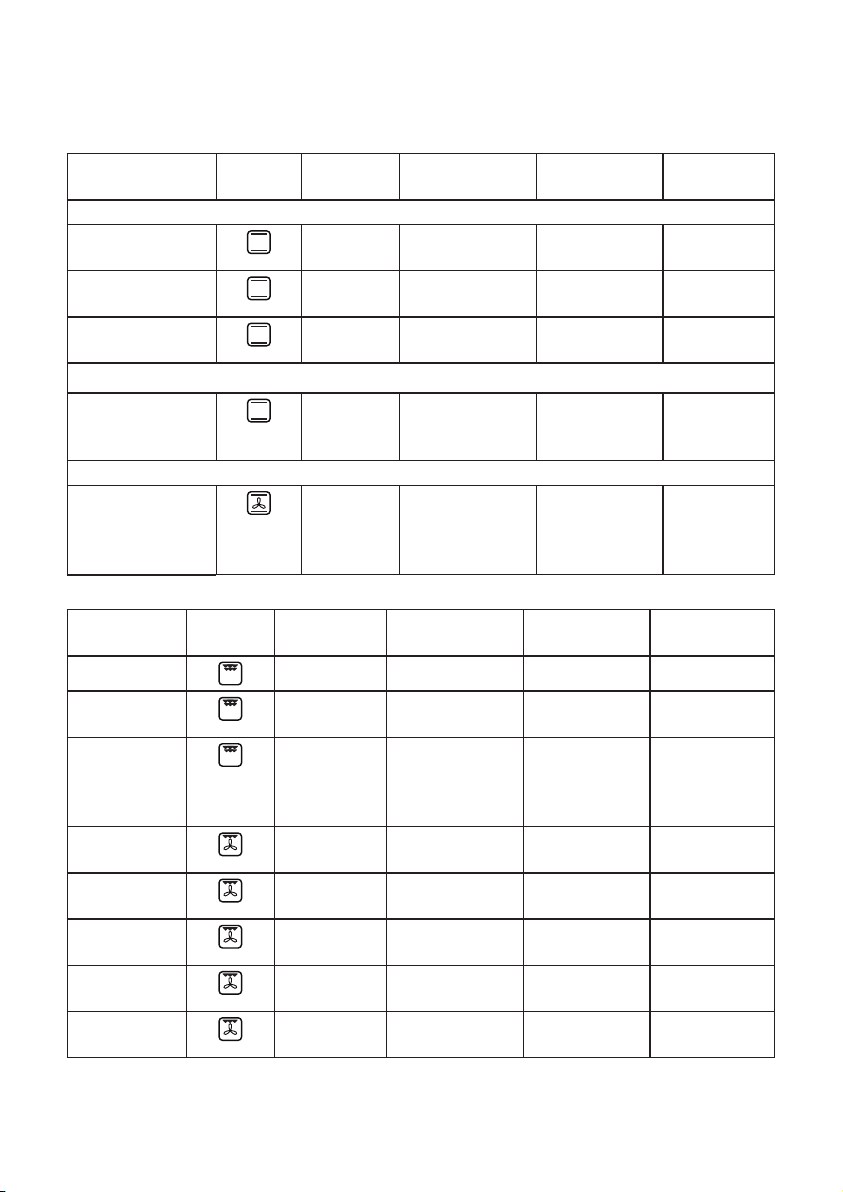
Type of food Function Preheating Shelf (from the
bottom)
MEAT
Lamb/Veal/Beef/
Pork 1Kg
Chicken/Rabbit/
Duck 1Kg
Turkey/Goose
3Kg
FISH
Baked sh/en
papillote (llet,
whole)
VEGETABLES
Stuffed vegetables
(tomatoes,
courgettes,
aubergines)
Cooking table with GRILL function
Type of food Function Preheating Shelf (from the
Toast
Fish llets /
steaks
Sausages/
kebabs/
spare ribs/
hamburgers
Roast chicken
1 - 1.3 Kg
Roast beef
rare 1Kg
Leg of lamb/
knuckle
Roast
potatoes
Vegetable
gratin
X 2 200 80-110
X 2 200 50-100
X 1/2 200 80-130
X 2 175-200 40-60
X 2 175-200 50-60
bottom)
X 4 200 2-5
X 4 200 20-30
X 4 200 30-40
– 2 200 55-70
– 2 200 35-45
– 2 200 60-90
– 2 200 45-55
– 2 200 20-30
Temperature
(°C)
Temperature
(°C)
Cooking time
(min)
Cooking time
(min)
Note: cooking temperatures and times are for guidance only.
Page 13
ENGLISH 13
i
i
i
Cleaning and maintenance
CLEANING
WARNING!
Never use steam cleaning equipment. Only clean the oven when it is cool to the touch.
Disconnect the appliance from the power supply.
Oven exterior
IMPORTANT: do not use corrosive or
abrasive detergents. If any of these
products accidentally comes into contact
with the appliance, clean immediately with
a damp cloth.
Clean the surfaces with a damp cloth. •
If it is very dirty, add a few drops of
washing up detergent to the water.
Finish off with a dry cloth.
Oven interior
IMPORTANT: do not use abrasive
sponges or metallic scrapers or scourers.
Over time, these can ruin enamelled surfaces
and the oven door glass.
After every use, allow the oven to cool •
then clean it preferably while it is still
warm in order to remove built-up dirt
and stains caused by food residues (e.g.
food with a high sugar content).
Use proprietary oven detergents and follow •
the manufacturer’s instructions to the letter.
Clean the door glass with a suitable •
liquid detergent. The oven door can
be removed to facilitate cleaning (see
MAINTENANCE).
NOTE: during prolonged cooking of foods
with a high water content (e.g. pizza,
vegetables, etc.) condensation may form on
the inside of the door and around the seal.
When the oven is cold, dry the inside of the
door with a cloth or sponge.
Accessories
Soak the accessories in water with •
washing up detergent immediately after
use, handling them with oven gloves if
still hot.
Food residues can be easily removed •
using a brush or sponge.
Cleaning the rear wall and catalytic side
panels of the oven (if present):
IMPORTANT: do not use corrosive or
abrasive detergents, coarse brushes,
pot scourers or oven sprays which could
damage the catalytic surface and ruin its
self-cleaning properties.
Operate the oven empty with the forced •
air function at 200°C for about one hour.
Next, leave the appliance to cool down •
before removing any food residue with
a sponge.
Cleaning cycle of ovens with Pyrolytic
function (if present):
WARNING!
Do not touch the oven during the •
pyrolysis cycle.
Keep children away from the oven •
during the pyrolysis cycle.
This function burns off spatters produced
inside the oven during cooking at a
temperature of approx. 500°C. At this high
temperature, the deposits turn into a light
ash which can be easily wiped away with
a damp cloth, when the oven is cool. Do
not select the pyrolysis function after every
use, only when the oven is very dirty or
produces smoke or fumes while preheating
or cooking.
If the oven is installed below a hob, •
make sure that all burners or electric
hotplates are switched off during the
self-cleaning (pyrolysis) function.
Remove all accessories before running •
the pyrolysis function.
Page 14
ENGLISH 14
A
B
B
C
D
The appliance could be equipped with 2 •
pyrolysis functions:
Energy-saving cycle (PYRO EXPRESS/•
ECO): which consumes approximately
25% less energy than the standard
cycle. Select it at regular intervals (after
cooking meat on 2 or 3 consecutive
occasions).
Standard cycle (PYRO): which is suitable •
for cleaning a very dirty oven.
In any case, after a certain number of •
uses and depending on how dirty the
oven is, a message on the oven display
advises you to run a self-cleaning cycle.
NOTE: during the pyrolysis function, the
oven door will not open; it will remain
locked until the temperature inside the oven
has returned to an acceptably safe level.
MAINTENANCE
WARNING!
Use safety gloves. Ensure the oven is cold before carrying out the following operations.
Disconnect the oven from the power supply. -
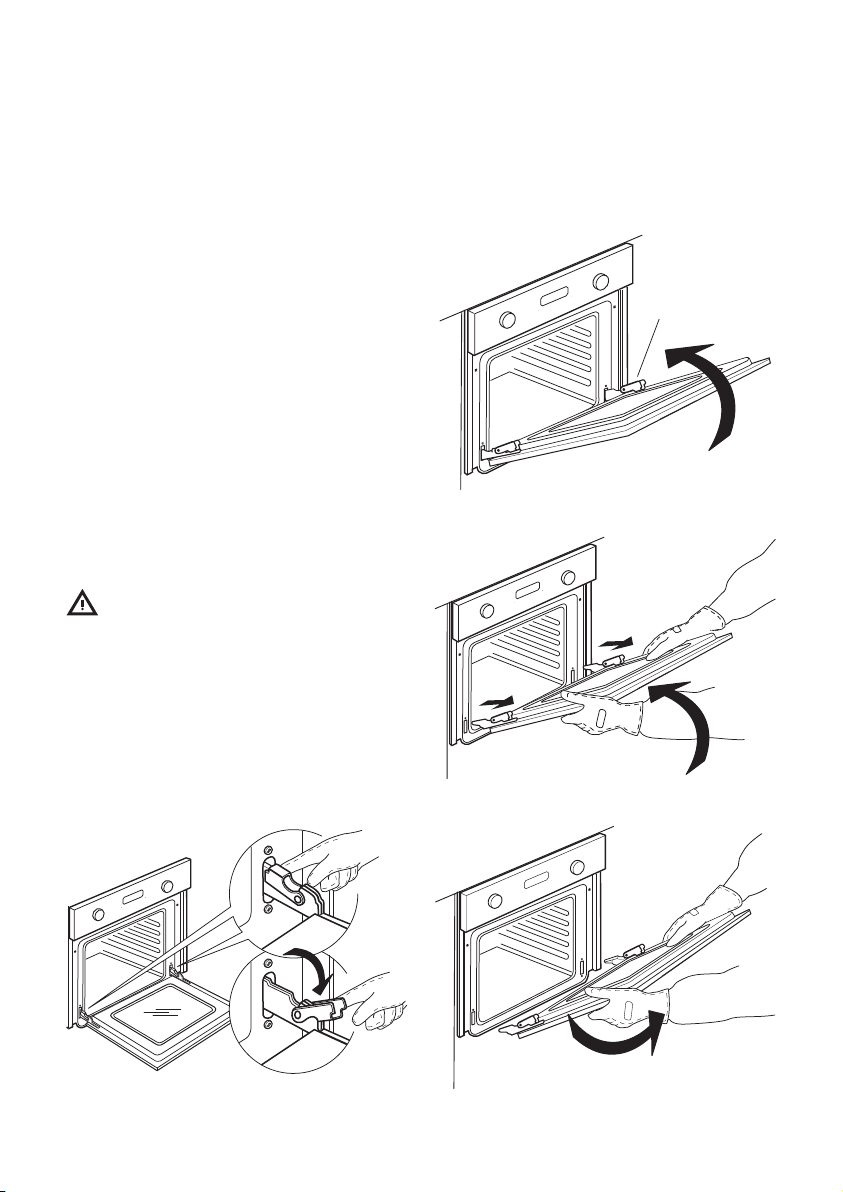
To remove the door
Open the door fully.1.
Lift the catches and push them forwards 2.
as far as they will go (Fig. 1).
Close the door as far as it will go (A), lift 3.
it up (B) and turn it (C) until it is released
(D) (Fig. 2, 3, 4).
Fig. 2
Fig. 3
Fig. 1
Fig. 4
Page 15
ENGLISH 15
To ret the door
Insert the hinges in their seats.1.
Open the door fully.2.
Lower the two catches.3.
Close the door4.
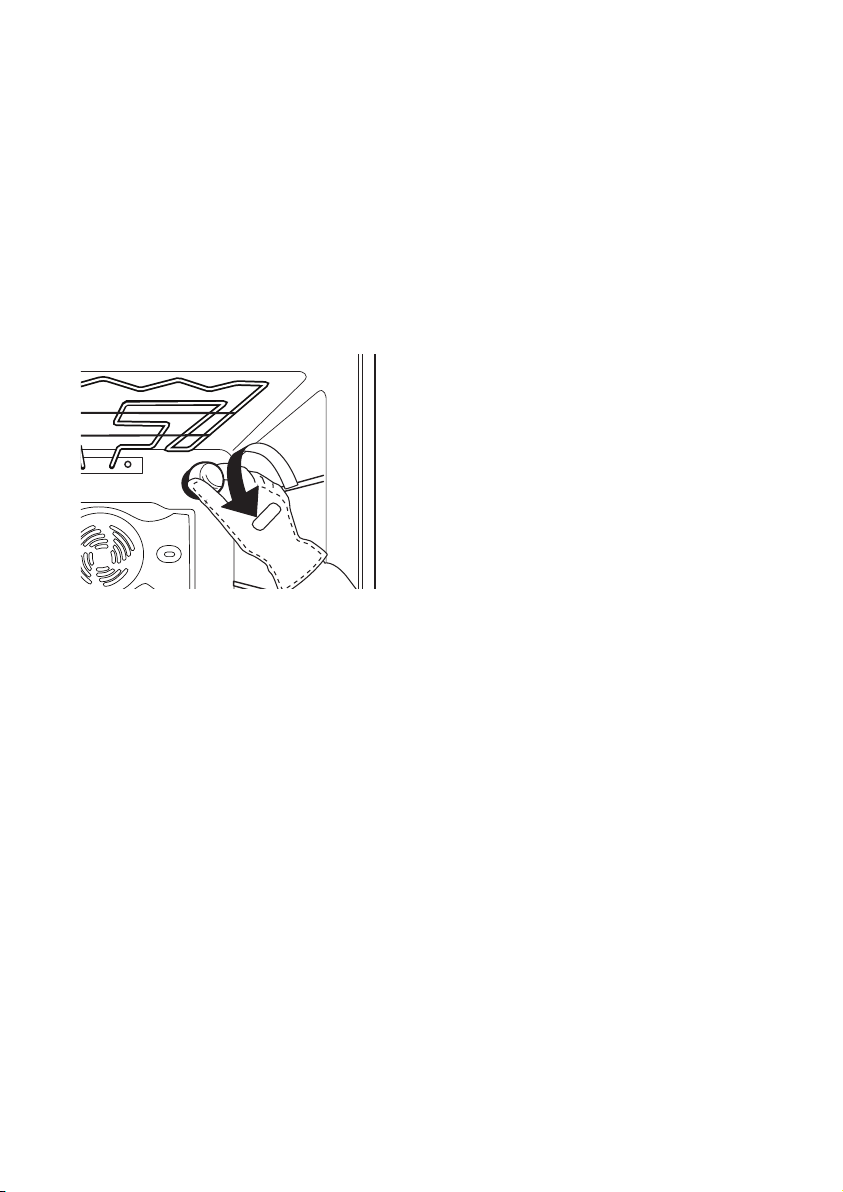
To replace the rear lamp
Disconnect the oven from the power supply.1.
Fig. 5
Unscrew the lamp cover (Fig. 5), replace 2.
the lamp (see note for lamp type) and
screw the lamp cover back on.
Reconnect the oven to the power supply.3.
NOTE:
Only use 25-40W/230V type E-14, T300°C
incandescent lamps.
Lamps are available from IKEA After Sales
Service.
Page 16
ENGLISH 16
What to do if ...
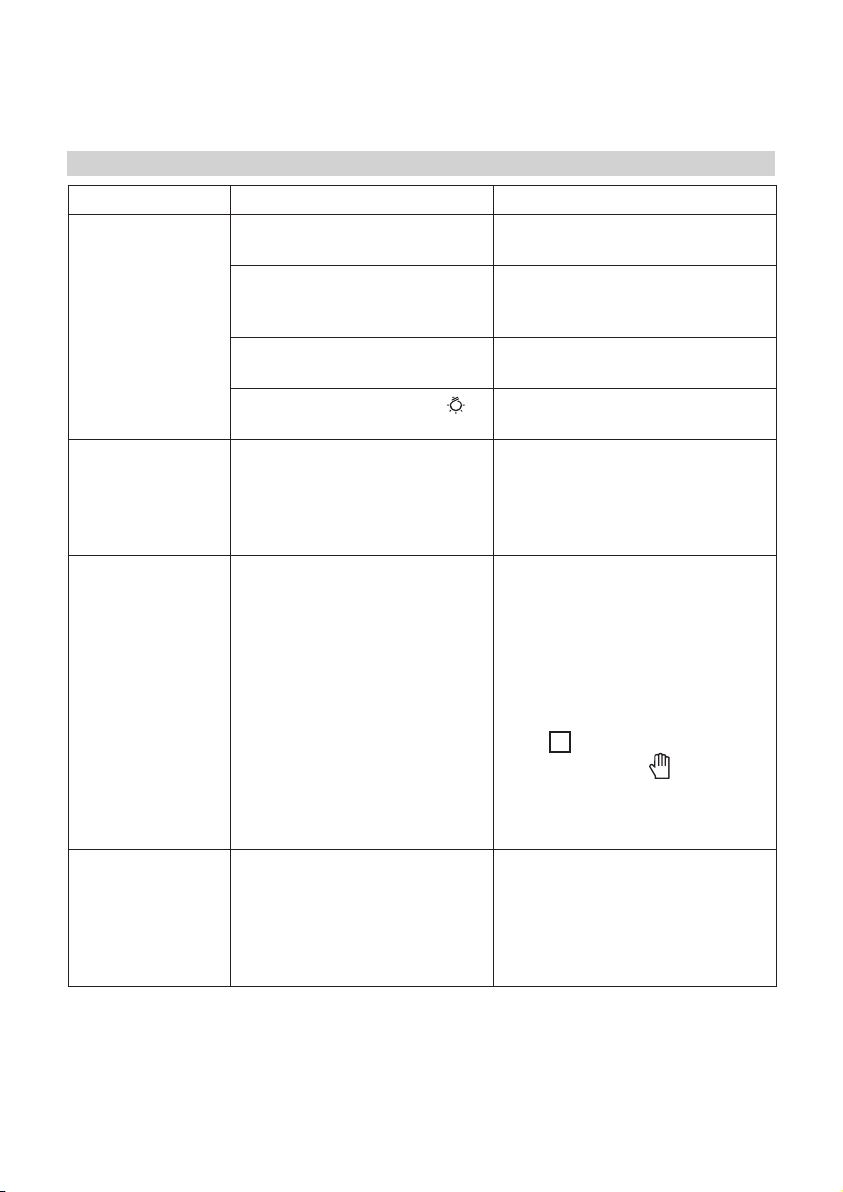
Problem Possible cause Solution
The oven does not
work:
The oven door is
locked and will
not release (Nutid
OV9 – Framtid
OV9 version)
The oven door is
locked and will not
release (Framtid
OV5 – Datid OV7
version)
The electronic
programmer does
not work (Nutid
and Framtid OV9
version)
No electrical power supply. Verify the presence of mains
electrical power
The oven is not plugged into the
mains socket.
The selector knob is set to “0”. Turn the selector knob to select a
The selector knob is set to “
Electrical malfunction due to
voltage uctuations.
Electrical malfunction due to
voltage uctuations.
Electrical malfunction due to
voltage uctuations.
Connect the oven to the power
supply.
cooking function.
Turn the selector knob to select a
”.
cooking function.
Switch the oven off and then on
again to see if the fault has been
eliminated.
For Framtid OV5
Set the function selector knob to “0”.
Set the timer to 5 min and wait for the oven door to be
released.
For Datid OV7
Set the function selector knob -
F
.
to
Set the clock to -
“Control panel”)
Wait 2 minutes for the door to be
released.
If the electronic programmer
(depending on the model) shows
“F HH”, contact the nearest AfterSales Service
Specify in this case the number
that follows the letter “F”.
(see
Energy consumption with a standard load and pastry function Kwh
Page 17
ENGLISH 17
Before calling the After-Sales Service:
See if you can solve the problem 1.
yourself with the help of the suggestions
given in the “What to do if ...” table.
Switch the appliance off and back on 2.
again it to see if the fault persists.
If after the above checks the fault still occurs,
contact IKEA After Sales Service.
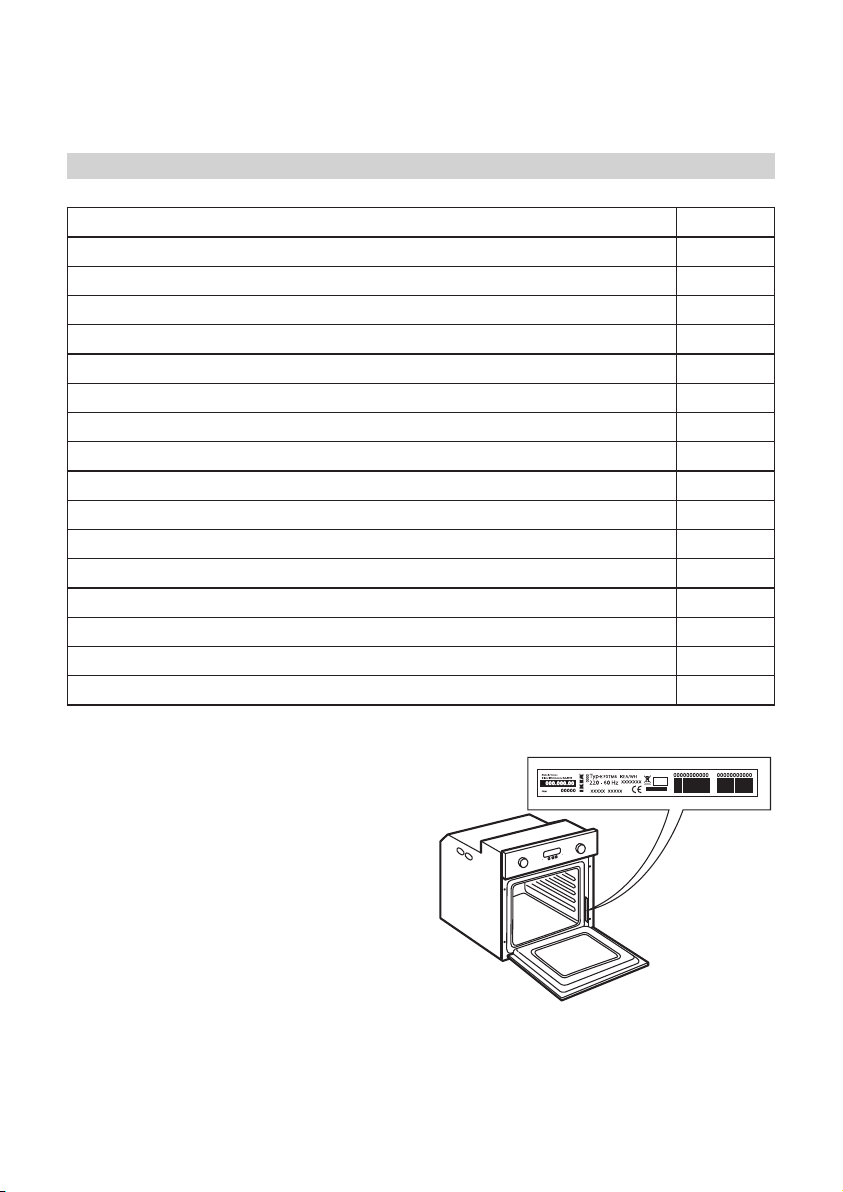
Always specify:
a brief description of the fault;•
the type and exact model of the oven;•
the service number (number after the •
word Service on the rating plate),
located on the right hand edge of the
oven cavity (visible when the oven door
is open);
your full address;•
your telephone number. •
If any repairs are required, please contact
IKEA After Sales Service (to guarantee that
original spare parts will be used and repairs
carried out correctly).
Page 18
ENGLISH 18
Technical data
Dimensions
Width 595
Height 595
Depth 538
Usable Volumes (L) 59
Area of largest baking sheet (net surface) cm
Top+ bottom heating element W 2050
Grill W 1400
Defrost W 45
Cooling Fan W 21
Dual Grill W 2300
Oven Lamp W 40
Total rating W 2400
Number of functions 5
Energy consumptions kWh 0,79
Energy consumptions with a standard load and top + bottom heating kWh 0,79
Energy Consumpion with a standard load and ventilated kWh 0,90
2
1200
The technical informations are situated in the rating plate inside the appliance.
Page 19

ENGLISH 19
Installation
After unpacking the oven, make sure that
it has not been damaged during transport
and that the oven door closes properly. In
the event of problems, contact the dealer or
your nearest After-sales Service. To prevent
any damage, only remove the oven from
its polystyrene foam base at the time of
installation.
Preparing the housing unit
Kitchen units in contact with the oven •
must be heat resistant (min 90°C).
Carry out all cabinet cutting work before •
tting the oven in the housing and
carefully remove all wood chips and
sawdust.
After installation, the bottom of the oven •
must no longer be accessible.
For correct appliance operation, do •
not obstruct the minimum gap between
the worktop and the upper edge of the
oven.
General recommendations
Before use
Remove cardboard protection pieces, -
protective lm and adhesive labels from
accessories.
Remove the accessories from the oven -
and heat it at 200° for about an hour
to eliminate the smell and fumes from
the insulating materials and protective
grease.
During use
Do not place heavy objects on the door as they could damage it.
Do not cling to the door or hang anything from the handle.
Do not cover the inside of the oven with aluminium foil.
Never pour water into the inside of a hot oven; this could damage the enamel
coating.
Never drag pots or pans across the bottom of the oven as this could damage
the enamel coating.
Make sure that the electrical cables of other appliances do not touch hot parts
of the oven or become trapped in the
door.
Do not expose the oven to atmospheric agents.
Page 20
ENGLISH 20
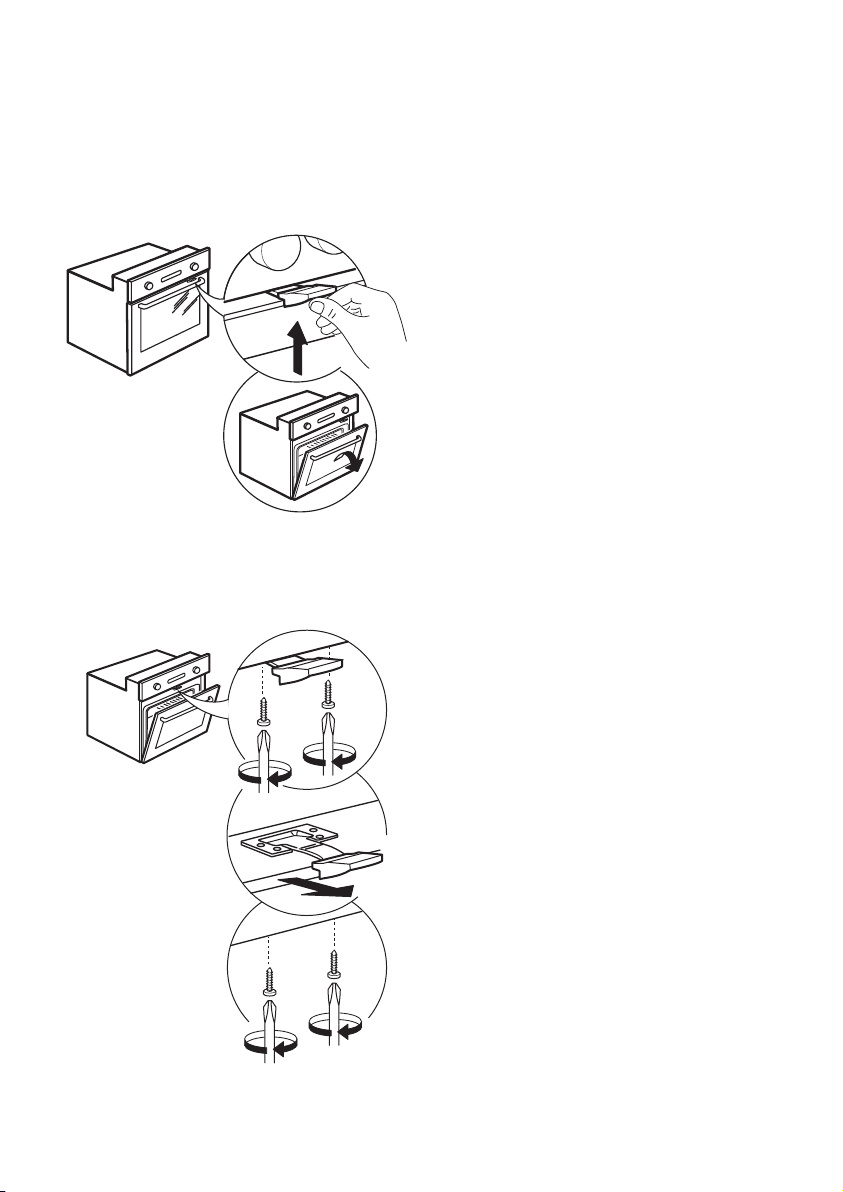
Door lock device
To open the door with the door lock device
see Fig 1.
Fig. 1
The door lock device can be removed by
following the sequence of images (see
Fig. 2).
Fig. 2
Page 21
ENGLISH 21
Electrical connection
Make sure the power voltage specied on
the appliance rating plate is the same as
the mains voltage. The rating plate is on
the front edge of the oven (visible when the
door is open).
Power cable replacement (type H05 RR-F 3
x 1,5 mm2) must be carried out by a qualied
electrician. Contact IKEA After Sales Service.
Environmental concerns
Disposal of packing material
The packing material is 100% recyclable -
and is marked with the recycle
symbol (
packing must therefore be disposed of
responsibly and in full compliance with
local authority regulations governing
waste disposal.
Scrapping the product
This appliance is marked in compliance -
with European Directive 2002/96/
EC, Waste Electrical and Electronic
Equipment (WEEE).
By ensuring this product is disposed -
of correctly, you will help prevent
potential negative consequences for
the environment and human health,
which could otherwise be caused by
inappropriate waste handling of this
product.
The symbol -
on the accompanying documentation
indicates that it should not be treated
as domestic waste but must be taken
to an appropriate collection centre for
the recycling of electrical and electronic
equipment.
). The various parts of the
on the product or
Energy saving
Only pre-heat the oven if specied in the cooking table or your recipe.
Use dark lacquered or enamelled baking moulds as they absorb heat far
better.
Switch the oven off 10/15 minutes before the set cooking time. Food requiring
prolonged cooking will continue to cook
even once the oven is switched off.
Declaration of conformity
This oven, which is intended to come into contact with foodstuffs, complies
with European Regulation ( )
n. 1935/2004 and has been designed,
manufactured and sold in conformity
with the safety requirements of the
“Low Voltage” directive 2006/95/
CE (which replaces 73/23/CEE and
subsequent amendments), the protection
requirements of “EMC” 2004/108/CE.
Page 22
ENGLISH 22
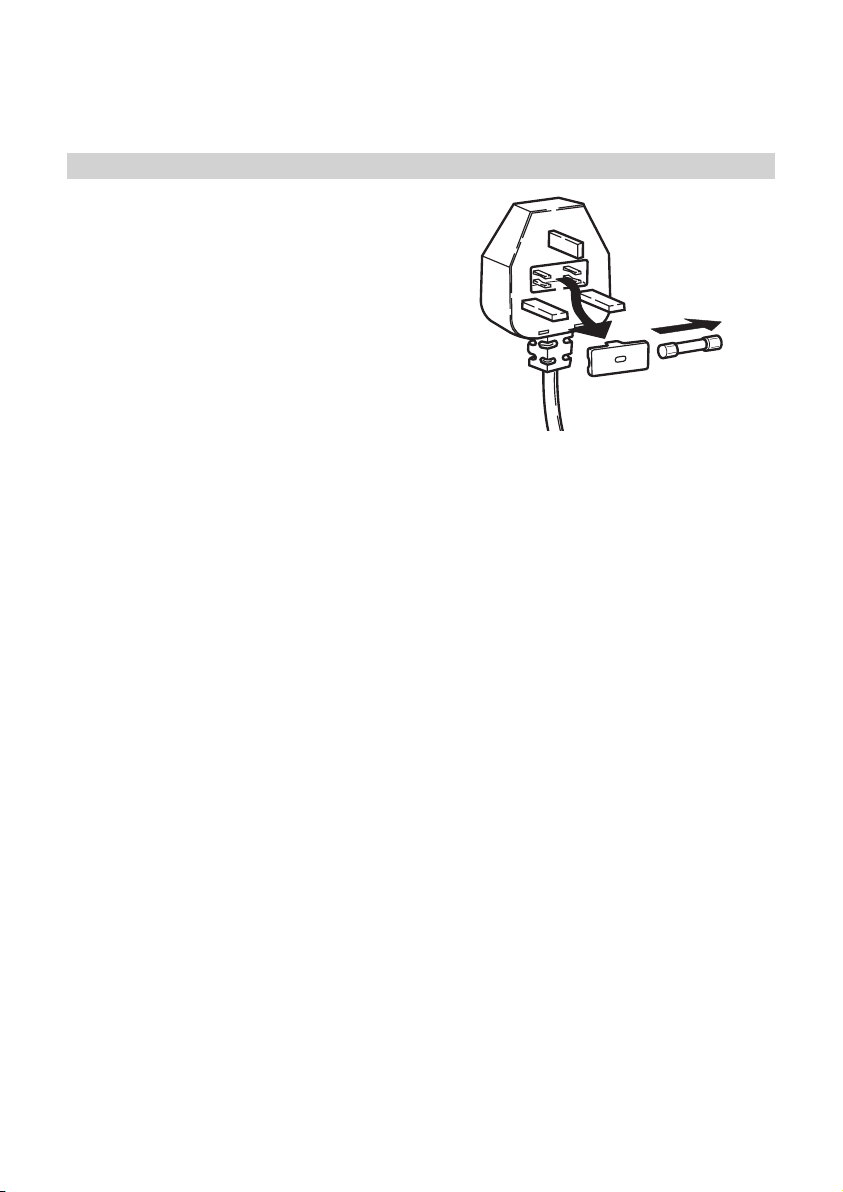
Electrical connection for Great Britain and Ireland only
Warning - this appliance must be earthed
Fuse replacement
If the mains lead of this appliance is tted
with a BS 1363A 13amp fused plug, to
change a fuse in this type of plug use an
A.S.T.A. approved fuse to BS 1362 type and
proceed as follows:
Remove the fuse cover (1. A) and fuse (B).
Fit replacement 13A fuse into fuse cover.2.
Ret both into plug.3.
Important:
The fuse cover must be retted when
changing a fuse and if the fuse cover is lost
the plug must not be used until a correct
replacement is tted.
Correct replacement are identied by the
colour insert or the colour embossed in
words on the base of the plug.
Replacement fuse covers are available from
your local electrical store.
For the Republic of Ireland only
The information given in respect of Great
Britain will frequently apply, but a third type
of plug and socket is also used, the 2-pin,
side earth type.
Socket outlet / plug (valid for both
countries)
If the tted plug is not suitable for your
socket outlet, please contact After-sales
Service for further instruction. Please do
not attempt to change plug yourself. This
procedure needs to be carried out by a
qualied technician in compliance with
the manufactures instructions and current
standard safety regulations.
Page 23

ENGLISH 23
Ikea guarantee
How long is the IKEA guarantee valid?
This guarantee is valid for ve (5) years
from the original date of purchase of your
appliance at IKEA, unless the appliance is
named LAGAN in which case two (2) years of
guarantee apply. The original sales receipt,
is required as proof of purchase. If service
work is carried out under guarantee, this
will not extend the guarantee period for the
appliance.
Which appliances are not covered by the
IKEA ve (5) years guarantee?
The range of appliances named LAGAN and
all appliances purchased in IKEA before 1st of
August 2007.
Who will execute the service?
IKEA service provider will provide the
service through its own service operations or
authorized service partner network.
What does this guarantee cover?
The guarantee covers faults of the appliance,
which have been caused by faulty construction
or material faults from the date of purchase
from IKEA. This guarantee applies to domestic
use only. The exceptions are specied under
the headline “What is not covered under this
guarantee?” Within the guarantee period,
the costs to remedy the fault e.g. repairs,
parts, labour and travel will be covered,
provided that the appliance is accessible for
repair without special expenditure. On these
conditions the EU guidelines (Nr. 99/44/
EG) and the respective local regulations
are applicable. Replaced parts become the
property of IKEA.
What will IKEA do to correct the problem?
IKEA appointed service provider will examine
the product and decide, at its sole discretion,
if it is covered under this guarantee. If
considered covered, IKEA Service Provider
or its authorized service partner through its
own service operations, will then, at its sole
discretion, either repair the defective product
or replace it with the same or a comparable
product.
What is not covered under this guarantee?
• Normal wear and tear.
• Deliberate or negligent damage, damage
caused by failure to observe operating
instructions, incorrect installation or by
connection to the wrong voltage, damage
caused by chemical or electrochemical
reaction, rust, corrosion or water damage
including but not limited to damage
caused by excessive lime in the water
supply, damage caused by abnormal
environmental conditions.
• Consumable parts including batteries and
lamps.
• Non-functional and decorative parts which
do not affect normal use of the appliance,
including any scratches and possible color
differences.
• Accidental damage caused by foreign
objects or substances and cleaning or
unblocking of lters, drainage systems or
soap drawers.
• Damage to the following parts: ceramic
glass, accessories, crockery and cutlery
baskets, feed and drainage pipes, seals,
lamps and lamp covers, screens, knobs,
casings and parts of casings. Unless such
damages can be proved to have been
caused by production faults.
• Cases where no fault could be found during
a technician’s visit.
• Repairs not carried out by our appointed
service providers and/or an authorized
service contractual partner or where nonoriginal parts have been used.
• Repairs caused by installation which is
faulty or not according to specication.
• The use of the appliance in a non-domestic
environment i.e. professional use.
• Transportation damages. If a customer
transports the product to his home or
another address, IKEA is not liable for any
damage that may occur during transport.
However, if IKEA delivers the product to the
customer’s delivery address, then damage
to the product that occurs during this
delivery will be covered by IKEA.
Page 24
ENGLISH 24
• Cost for carrying out the initial installation of
the IKEA appliance.
However, if an IKEA appointed Service
Provider or its authorized service partner
repairs or replaces the appliance under
the terms of this guarantee, the appointed
Service Provider or its authorized service
partner will reinstall the repaired appliance
or install the replacement, if necessary. This
does not apply within Ireland, customer
should contact the local IKEA dedicated
after sales line or the appointed Service
Provider for further information.
These restrictions do not apply to fault-free
work carried out by a qualied specialist
using our original parts in order to adapt the
appliance to the technical safety specications
of another EU country.
How country law applies
The IKEA guarantee gives you specic legal
rights, which cover or exceed all the local legal
demands.
However these conditions do not limit in any
way consumer rights described in the local
legislation.
Area of validity
For appliances which are purchased in one EU
country and taken to another EU country, the
services will be provided in the framework of
the guarantee conditions normal in the new
country.
An obligation to carry out services in the
framework of the guarantee exists only if
the appliance complies and is installed in
accordance with:
- the technical specications of the country in
which the guarantee claim is made;
- the Assembly Instructions and User Manual
Safety Information.
The dedicated AFTER SALES for IKEA
appliances
Please don’t hesitate to contact IKEA
appointed After Sales Service Provider to:
• make a service request under this
guarantee;
• ask for clarications on installation of the
IKEA appliance in the dedicated IKEA
kitchen furniture;
• ask for clarication on functions of IKEA
appliances.
To ensure that we provide you with the best
assistance, please read carefully the Assembly
Instructions and/or the User Manual before
contacting us.
How to reach us if you need our service
Please refer to the last page
of this manual for the full list
of IKEA appointed After Sales
Service Provider and relative
national phone numbers.
In order to provide you a quicker
service, we recommend to use the
specic phone numbers listed on this
manual. Always refer to the numbers
listed in the booklet of the specic
appliance you need an assistance for.
Please also always refer to the IKEA
article number (8 digit code) and 12
digit service number placed on the
rating plate of your appliance.
SAVE THE SALES RECEIPT!
It is your proof of purchase and required
for the guarantee to apply. The sales
receipt also reports the IKEA name and
article number (8 digit code) for each of
the appliances you have purchased.
Do you need extra help?
For any additional questions not related
to After Sales of your appliances please
contact your nearest IKEA store call centre.
We recommend you read the appliance
documentation carefully before contacting us.
Page 25
25
BELGIË - BELGIQUE - BELGIEN
Telefoon/Numéro de téléphone/Telefon-Nummer: 026200311
Tarief/Tarif/Tarif: Lokaal tarief/Prix d’un appel local/Ortstarif
Openingstijd: Maandag - Vrijdag 8.00 - 20.00
Heures d’ouverture: Lundi - Vendredi 8.00 - 20.00
Öffnungszeiten: Montag - Freitag 8.00 - 20.00
ČESKÁ REPUBLIKA
Telefonní číslo: 225376400
Sazba: Místní sazba
Pracovní doba: Pondělí - Pátek 8.00 - 20.00
DANMARK
Telefonnummer: 70150909
Takst: Lokal takst
Åbningstid: Mandag - fredag 9.00 - 21.00
Lørdag 9.00 - 18.00
DEUTSCHLAND
Telefon-Nummer: 06929993602
Tarif: Ortstarif
Öffnungszeiten: Montag - Freitag 8.00 - 20.00
ΕΛΛΑΔΑ
Τηλεφωνικός αριθμός: 2109696497
Χρέωση: Τοπική χρέωση
Ώρες λειτουργίας: Δευτέρα - Παρασκευή 8.00 - 20.00
ESPAÑA
Teléfono: 913754126
Tarifa: Tarifa local
Horario: Lunes - Viernes 8.00 - 20.00
(España Continental)
FRANCE
Numéro de téléphone: 0170480513
Tarif: Prix d’un appel local
Heures d’ouverture: Lundi - Vendredi 9.00 - 21.00
ÍSLAND
Símanúmer: 5852409
Kostnaður við símtal: Almennt mínútuverð
Opnunartími: Mánudaga - Föstudaga 9.00 - 17.00
ITALIA
Telefono: 0238591334
Tariffa: Tariffa locale
Orari d’apertura: Lunedì - Venerdì 8.00 - 20.00
MAGYARORSZÁG
Telefon szám: (06-1)-3285308
Tarifa: Helyi tarifa
Nyitvatartási idő: Hétfőtől Péntekig 8.00 - 20.00
NEDERLAND
Telefoon: 09002354532
en/of 0900 BEL IKEA
Tarief: Lokaal tarief € 0,10 p/min
Openingstijd: Maandag t/m - Vrijdag 9.00 - 21.00
Zaterdag 9.00 - 20.00
Zondag 9.00 - 18.00
(Åbent udvalgte søndage, se IKEA.dk)
NORGE
Telefon nummer: 23500112
Takst: Lokal takst
Åpningstider: Mandag - fredag 8.00 - 20.00
ÖSTERREICH
Telefon-Nummer: 013602771461
Tarif: Ortstarif
Öffnungszeiten: Montag - Freitag 8.00 - 20.00
POLSKA
Numer telefonu: 225844203
Stawka: Koszt połączenia według taryfy
operatora
Godziny otwarcia: Poniedziałek - Piątek 8.00-20.00
PORTUGAL
Telefone: 213164011
Tarifa: Tarifa local
Horário: Segunda - Sexta 9.00 - 21.00
REPUBLIC OF IRELAND
Phone number: 016590276
Rate: Local rate
Opening hours: Monday - Friday 8.00 - 20.00
РОССИЯ
Телефонный номер: 84957059426
Стоимость звонка: Местная стоимость звонка
Время работы: Понедельник - Пятница 8.00 - 20.00
(Московское время)
SCHWEIZ - SUISSE - SVIZZERA
Telefon-Nummer/Numéro de téléphone/Telefono: 0225675345
Tarif/Tarif/Tariffa: Ortstarif/Prix d’un appel local/Tariffa locale
Öffnungszeiten: Montag - Freitag 8.00 - 20.00
Heures d’ouverture: Lundi - Vendredi 8.00 - 20.00
Orario d’apertura: Lunedì - Venerdì 8.00 - 20.00
SLOVENSKO
Telefónne číslo: (02) 50102658
Cena za hovor: Cena za miestny hovor
Pracovná doba: Pondelok až piatok 8.00 - 20.00
SUOMI
Puhelinnumero: 0981710374
Hinta: Yksikköhinta
Aukioloaika: Maanantaista perjantaihin 8.00 - 20.00
SVERIGE
Telefon nummer: 0775-700 500
Taxa: Lokal samtal
Öppet tider: Måndag - Fredag 8.30 - 20.00
Lördag - Söndag 9.30 - 18.00
UNITED KINGDOM
Phone number: 02076601517
Rate: Local rate
Opening hours: Monday - Friday 9.00 - 21.00
Page 26

5019 610 01186
© Inter IKEA Systems B.V. 2011 AA-515817-1
 Loading...