

Whirlpool MW8700XL Use And Care Manual
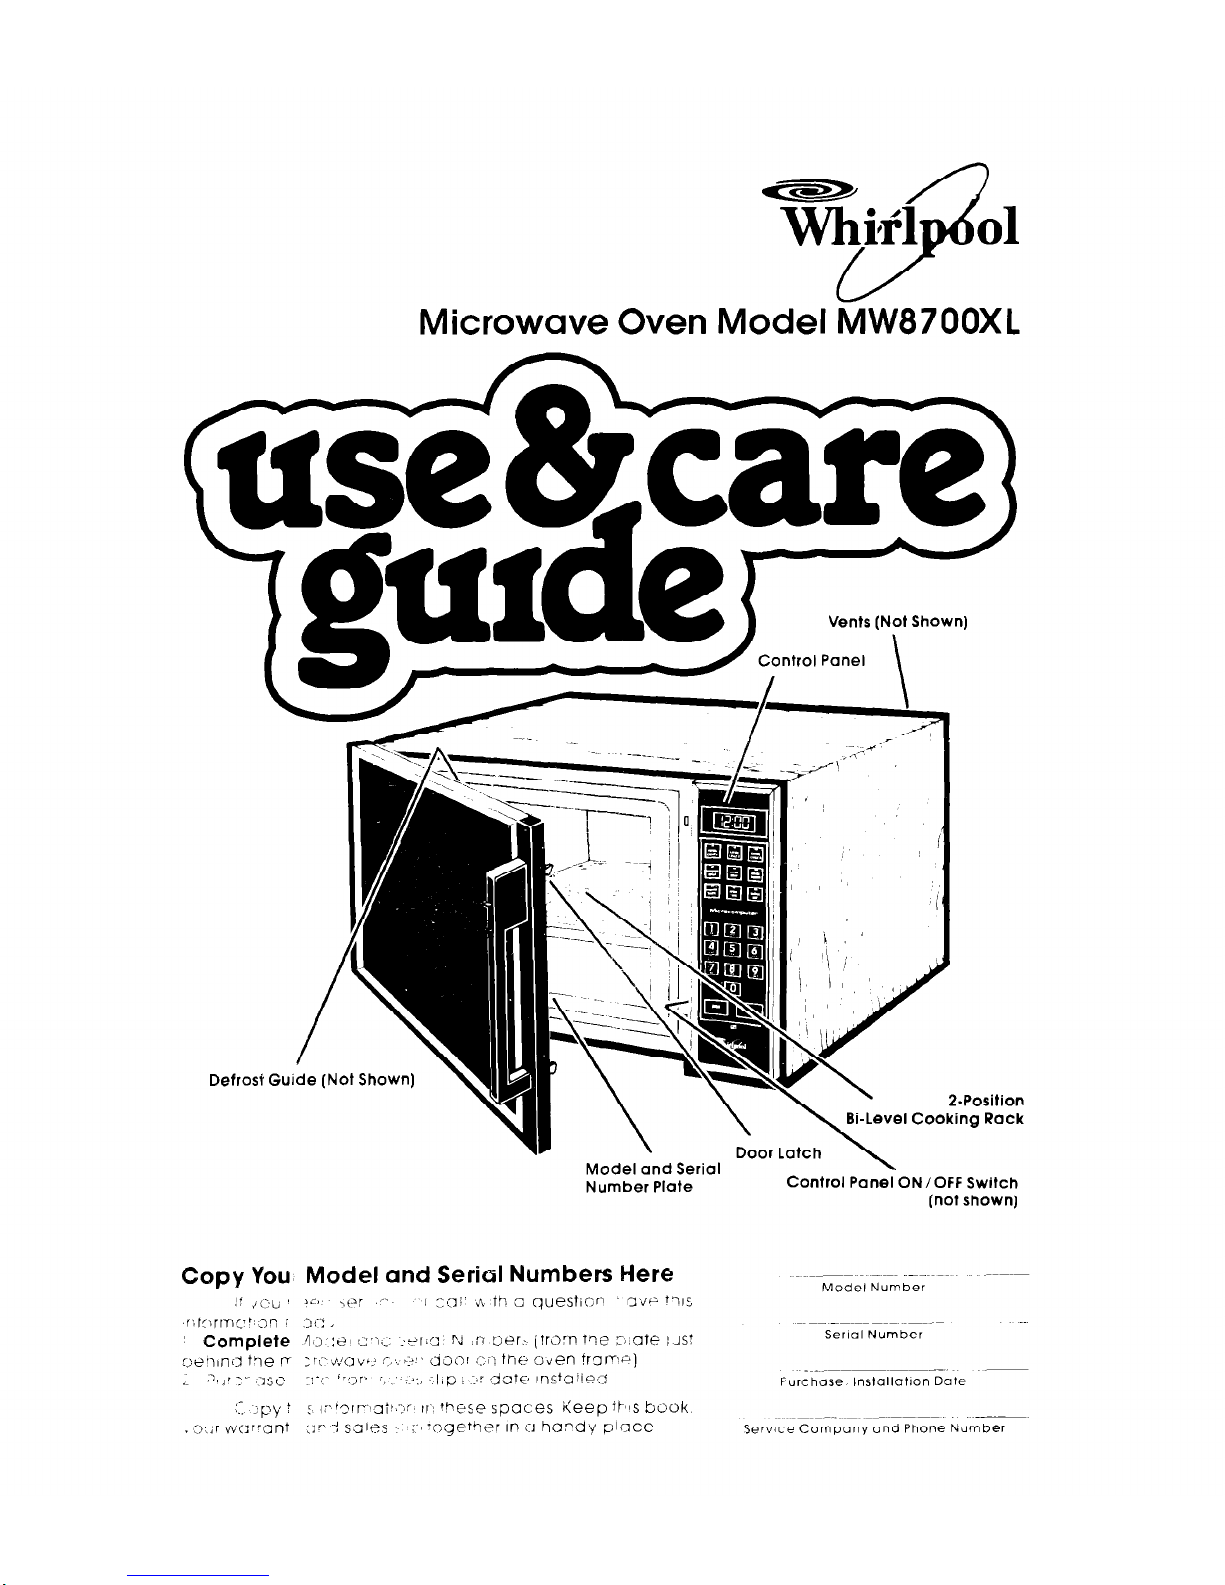
Microwave Oven Model MW87OOXL
Defrost Guide (N
\
2-Position
Bi-Level Cooking Rack
\
Door Latch
\
Model and Serial
Number Plate
Control Pan~ON/OFF Switch
(not shown)
Contents
Page
Responsibilities ,_ 2
Installation 2
Proper, Safe Use
3
Precautions to Avoid Possible
Exposure to Excessive
Microwave Energy 3
Using Your Microwave Oven 4
Setting The Clock 5
Using the Minute Timer 5
Cooking in One Cycle 6
High Cook Power 6
Lower Cook Powers 7
Defrosting 8
Faster or Slower Defrosting 9
Cooking in More Than One
Cycle 9
Cooking Automatically after
Defrosting 11
Page
Cooking with The Temperature
Probe ., ., ., 14
Cooking to a Serving Time 16
Serve Time and the Temperature
Probe ..,.........,.,.,..,.,., 17
Changing or CancellIng
Instructions 17
O?her Operating Instructions 17
Cleaning the Microwave Oven 17
Bi-Level Cooking Rack 18
Replacing the Light Bulb 18
Important Information 19
How Microwave Ovens Work 2 1
Building In Your Microwave Oven 21
If You Need Service or Assistance 22
1. Before Calling for Assistance 22
2. If You Need Assistance 22
3. If You Need Service 23
4. If You Have a Problem 23
kur responsfbilities.. .
Fill out and return the “Microwave Registration Card”attached to the oven door.
Installation
1. Empty the microwave
oven and clean Inside It with
c soft, damp cloth
2
. Put the oven or a cart,
3.
Do not block vents
counter, table oi shelf that is
on back of the oven.
strong enough to hold the
Blocking vents can cause
oven. (The control side of the
poor cooking results.
unit is the heavy side.
Handling can be tricky.)
4. For your surety, this oven must be
grounded. DO NOT REMOVE THE THIRD PRONG
FROM THE PLUG. You must have a qualified
electrician put in the right outlet if Yours does
not have the 3-prong plug-in, or if the outlet
IS
net grounded according to National Electri-
cal Codes and local codes or ordinances
The outlet must supply 120 volts, 60 Hz., A.C.
When the over> is on, it will use about 1375
watts. It shoula not share a circuit with another
appliance
5. Put about tine cup (250 mLj of cold water
In a glass contolner In the oven Close the
door Make sure It locks Follow the directions
on page 4 to set the oven to COOK for 1’ z
minures. When the time is up, the water should
be heated.
6.
Fill out and return the “Microwave Registration Card” attached to the oven door. If
the card is missing, please send the model
and serial number of your microwave oven,
with your name and address to...
WhIrlpool Corporation
Microwave Registration Department
Admirlistrative Center
2000 U S 33 North
Benton Harbor, Michigan 49022
This information will help us reach you if
there IS ever a need to pass along information
aboul Your mlcrowave oven
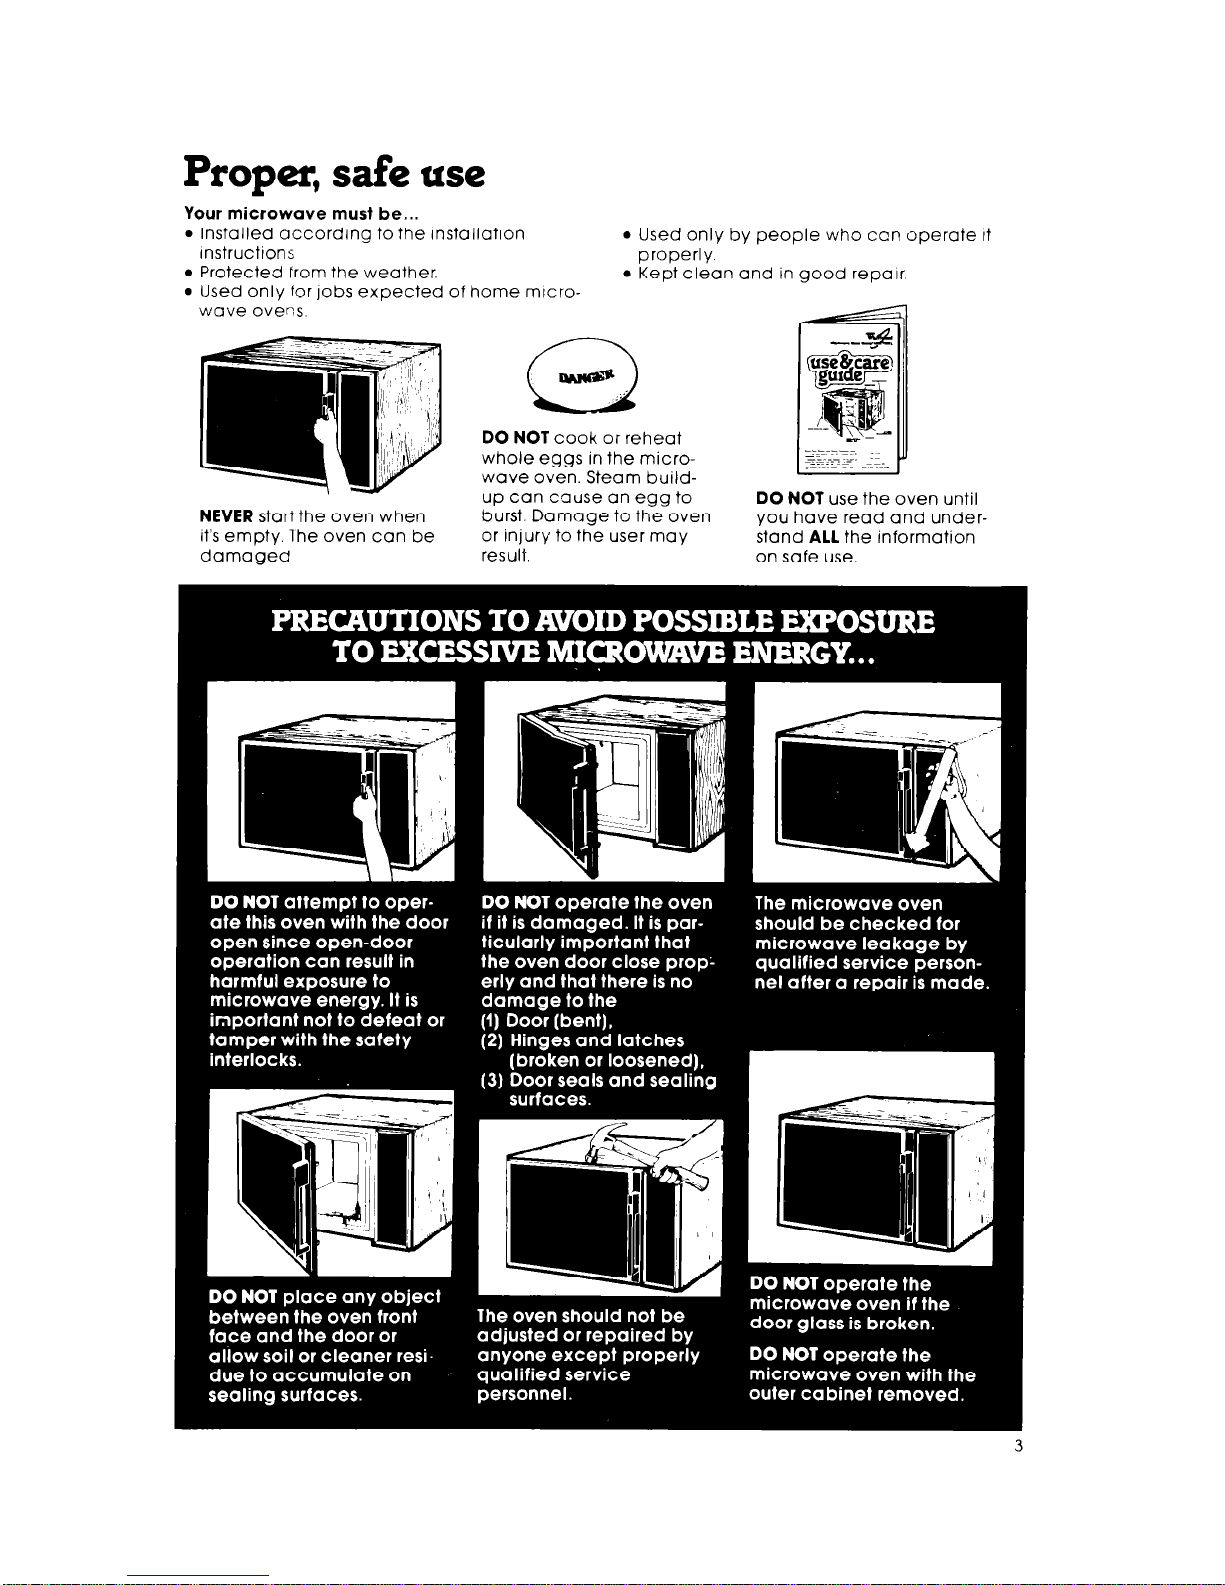
Proper, safe use
Your microwave must be...
l
Installed according to the installation
Instructions
l
Protected from the weather.
l
Used only for jobs expected of home mrcrowove ovens.
l
Used only by people who can operate It
properly.
l
Kept clean and in good repair
NEVER start the oven when
it’s empty. lhe oven can be
damagea
DO NOT cook or reheat
whole eggs in the microwave oven. Steam buildup can cause an egg to
burst. Damage to the oven
or injury to the user may
result.
DO NOT use the oven until
you have read and understand ALL the information
on safe use.
Using your microwave oven
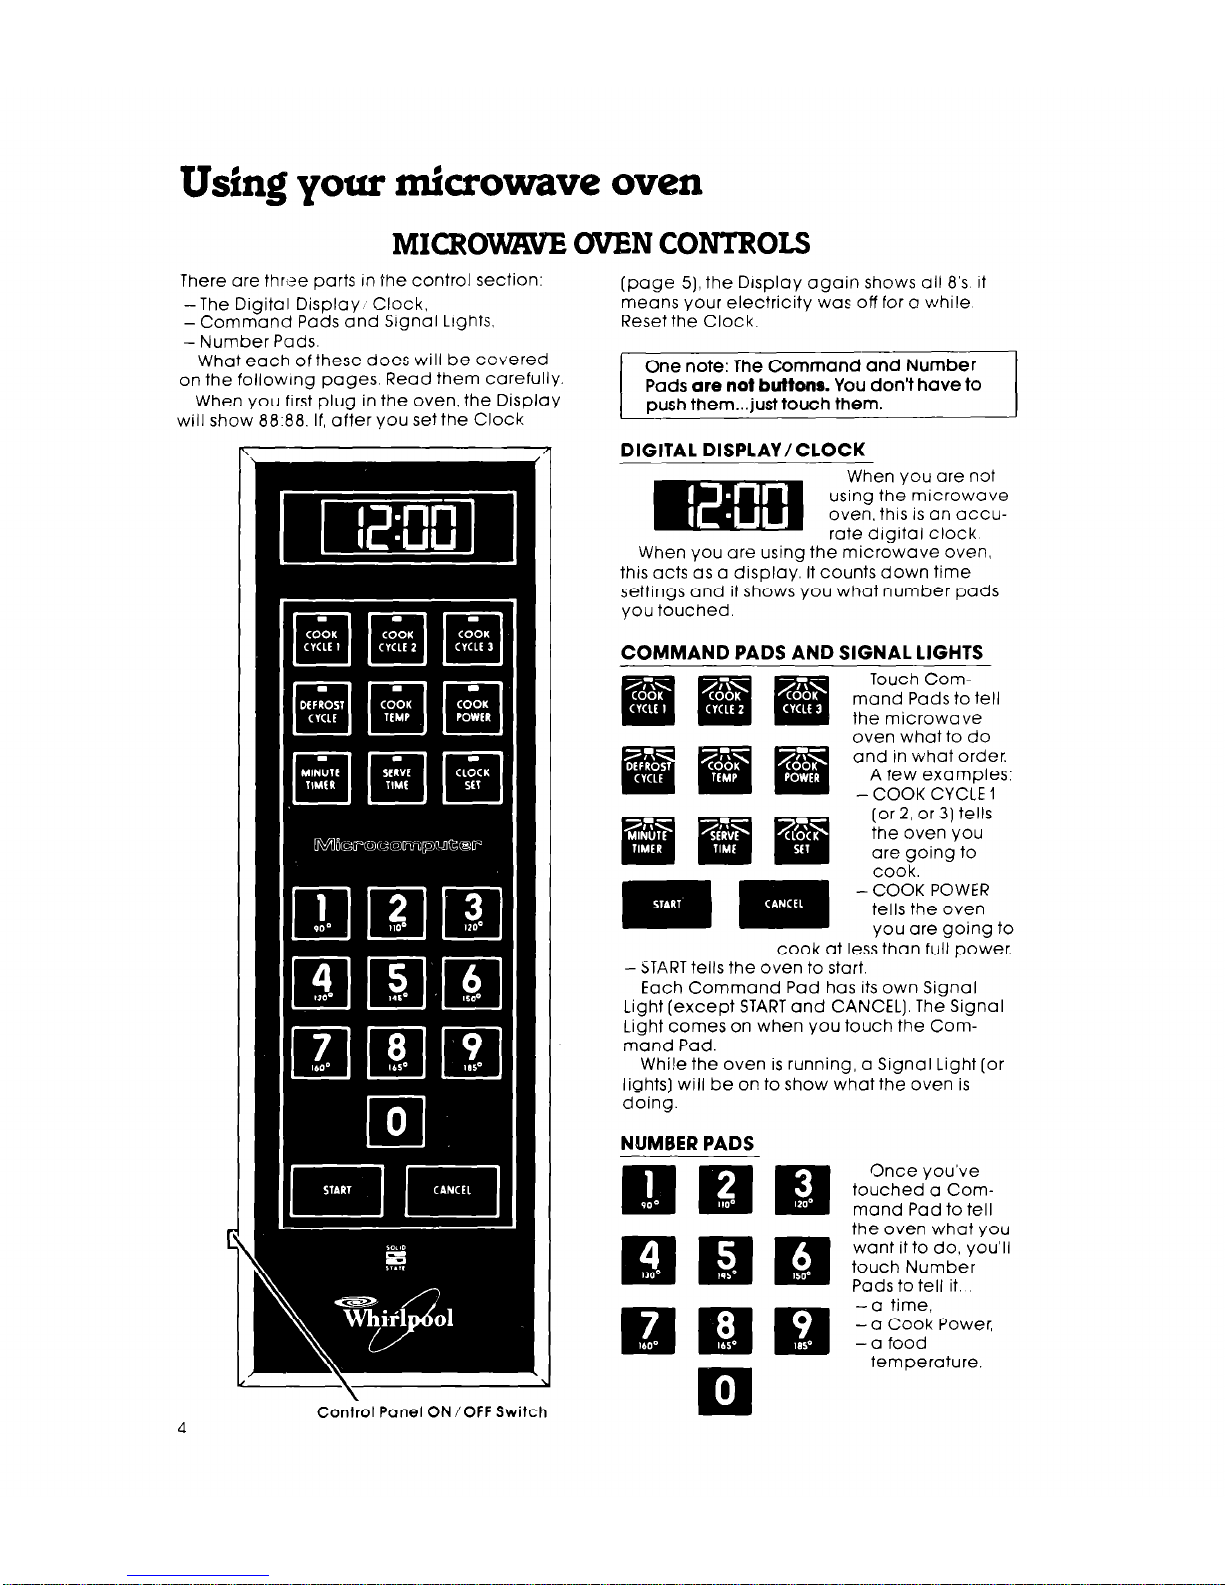
MICROWWE OVEN CONTROLS
There are three ports In the control section:
-The Digital Display Clock,
-
Command Pods and Signal Lights,
- Number Pods.
What each of these does will be covered
on the following pages. Read them carefully.
When you first plug in the oven, the Display
will show 88:88. If, after you set the Clock
a
Con&l Panel ON /OFF Switch
(page 5), the Display again shows @II 8’s it
means your electricity ‘was off for a while
Reset the Clock.
One note: The Command and Number
Pads are not buttons. You don’t have to
Dush them...iust touch them.
DIGITAL DISPLAY /CLOCK
~-
When you are using the micr6wave oven,
this acts OS a display. It counts down time
settings and it shows you what number pods
you touched.
COMMAND PADS AND SIGNAL LIGHTS
Touch Command Pods to tell
the microwave
oven what to do
and in what order.
A few examples:
-COOK CYCLE 1
cook at less than full power.
-
START tells the oven to start.
Each Command Pod has its own Signal
Light (except START and CANCEL). The Signal
Light comes on when you touch the Command Pod.
While the oven is running, o Signal Light [or
lights] will be on to show what the oven is
doing.
NUMBER PADS
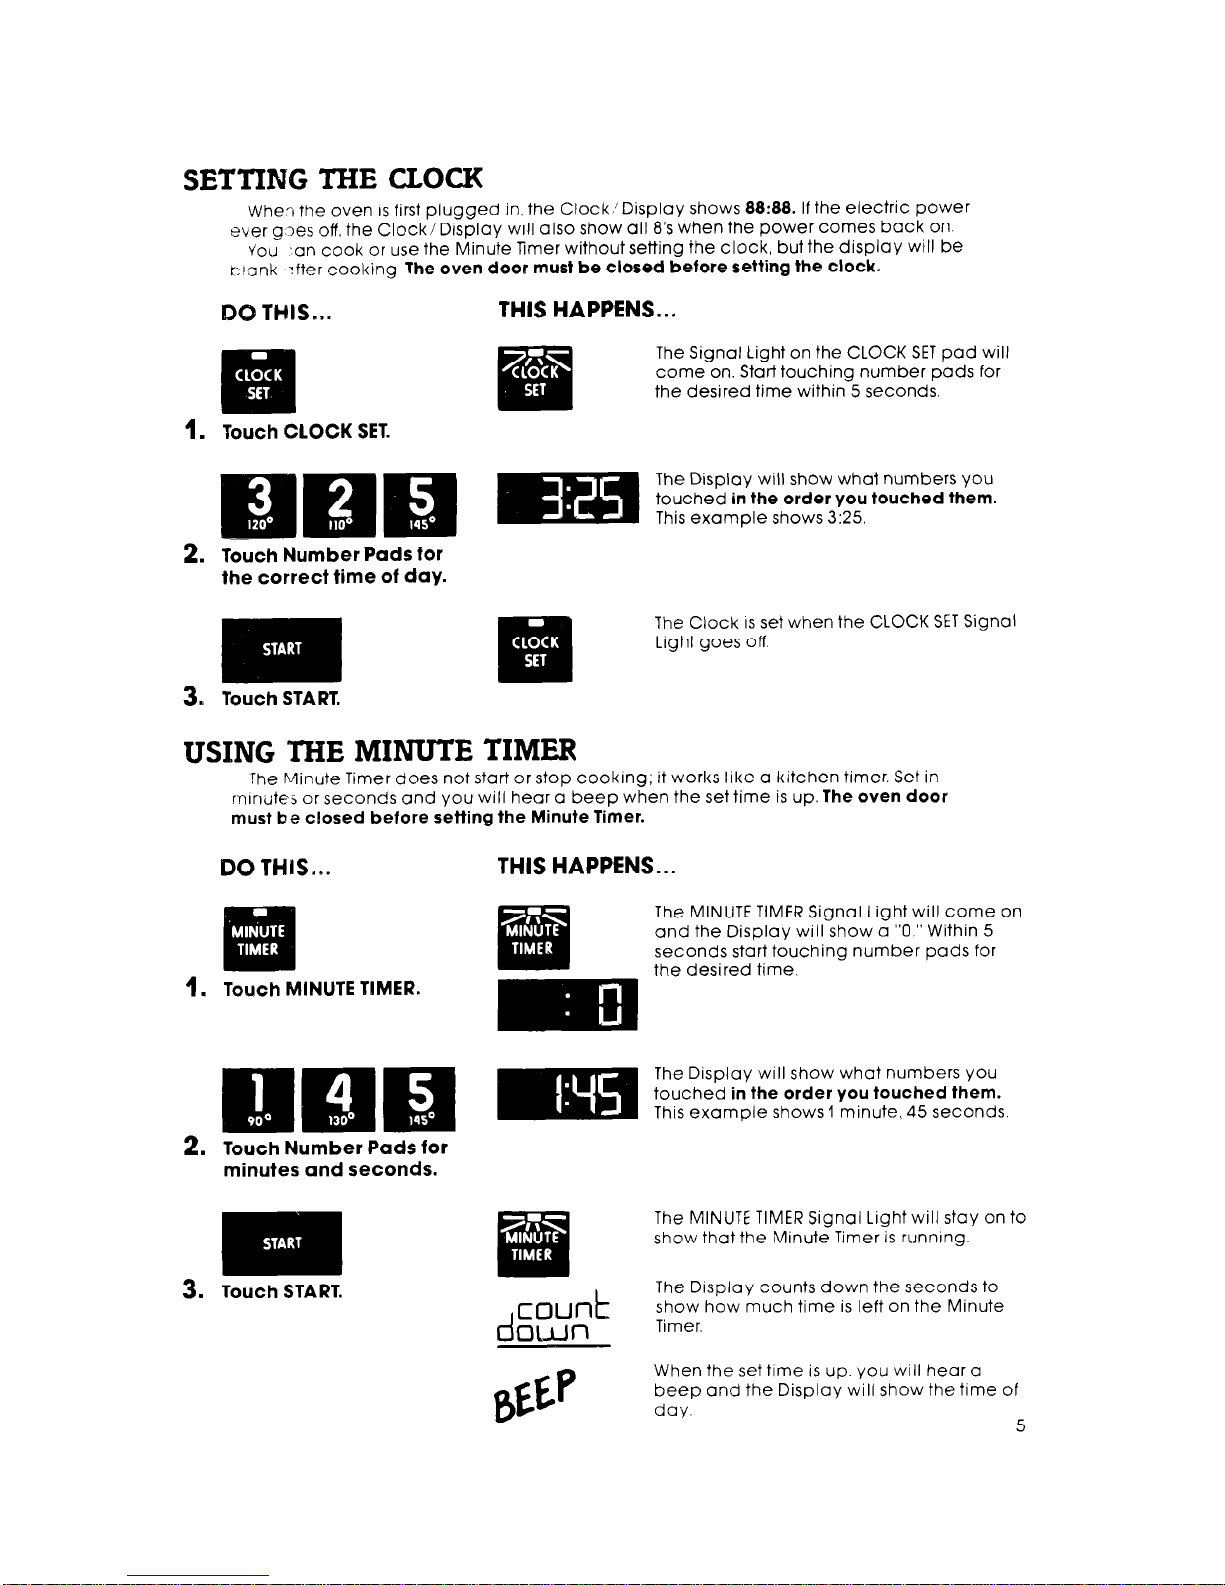
SETTING THE CLOCK
When the oven
IS
first plugged in, the Clock/Display shows 88:88. If the electric power
ever q3es off, the Clock/ Display will olso show all 8’s when the power comes bock on.
vou an cook or use the Minute Timer without setting the clock, but the display will be
r:lank after cooking The oven door must be closed before setting the clock.
QO THIS...
1. Touch CLOCK SET.
THIS HAPPENS...
The Signal Light on the CLOCK SET pod will
come on. Start touching number pods for
the desired time within 5 seconds.
The Display will show what numbers you
touched in the order you touched them.
This example shows 3:25.
2. Touch Number Pads tor
the correct time of day.
The Clock is set when the CLOCK SET Signal
Lrght goes off
3. Touch START,
USING THE MINUTE TIMER
The Minute Timer does not start or stop cooking; it works like o kitchen timer. Set in
mrnutes or seconds and you will hear a beep when the set time is up. The oven door
must be closed before setting the Minute Timer.
DO THIS...
THIS HAPPENS...
Touch MINUTE TIMER.
Touch Number Pads for
minutes and seconds.
Touch START.
The MINUTE TIMER Signal Light will come on
and the Display will show CI “0.” Within 5
seconds start touching number pods for
the desired time.
The Display will show what numbers you
touched in the order you touched them.
This example shows 1 minute, 45 seconds.
The MINUTE TIMER Signal Light will stay on to
show that the Minute Timer is running.
The Display counts down the seconds to
d
count
show how much time is left on the Minute
own
Timer.
P
When the set time is up. you will hear o
beep and the Display will show the time of
day.
5
1.
The Mini.lte Timer can be used when the oven is cooking.
2.
Opening the microwave oven door does not stop the Minute Timer.
3.
If you open oven door and reset the Minute Timer touch START twice to start the
Minute Elmer and to restart the oven.
To change or cancel the Minute Timer:
I. Touch MINUTE TIMER.
2. Touch number 0 to cancel,
or
2. Touch desired new number pads to change.
Then:
3. Touch START.
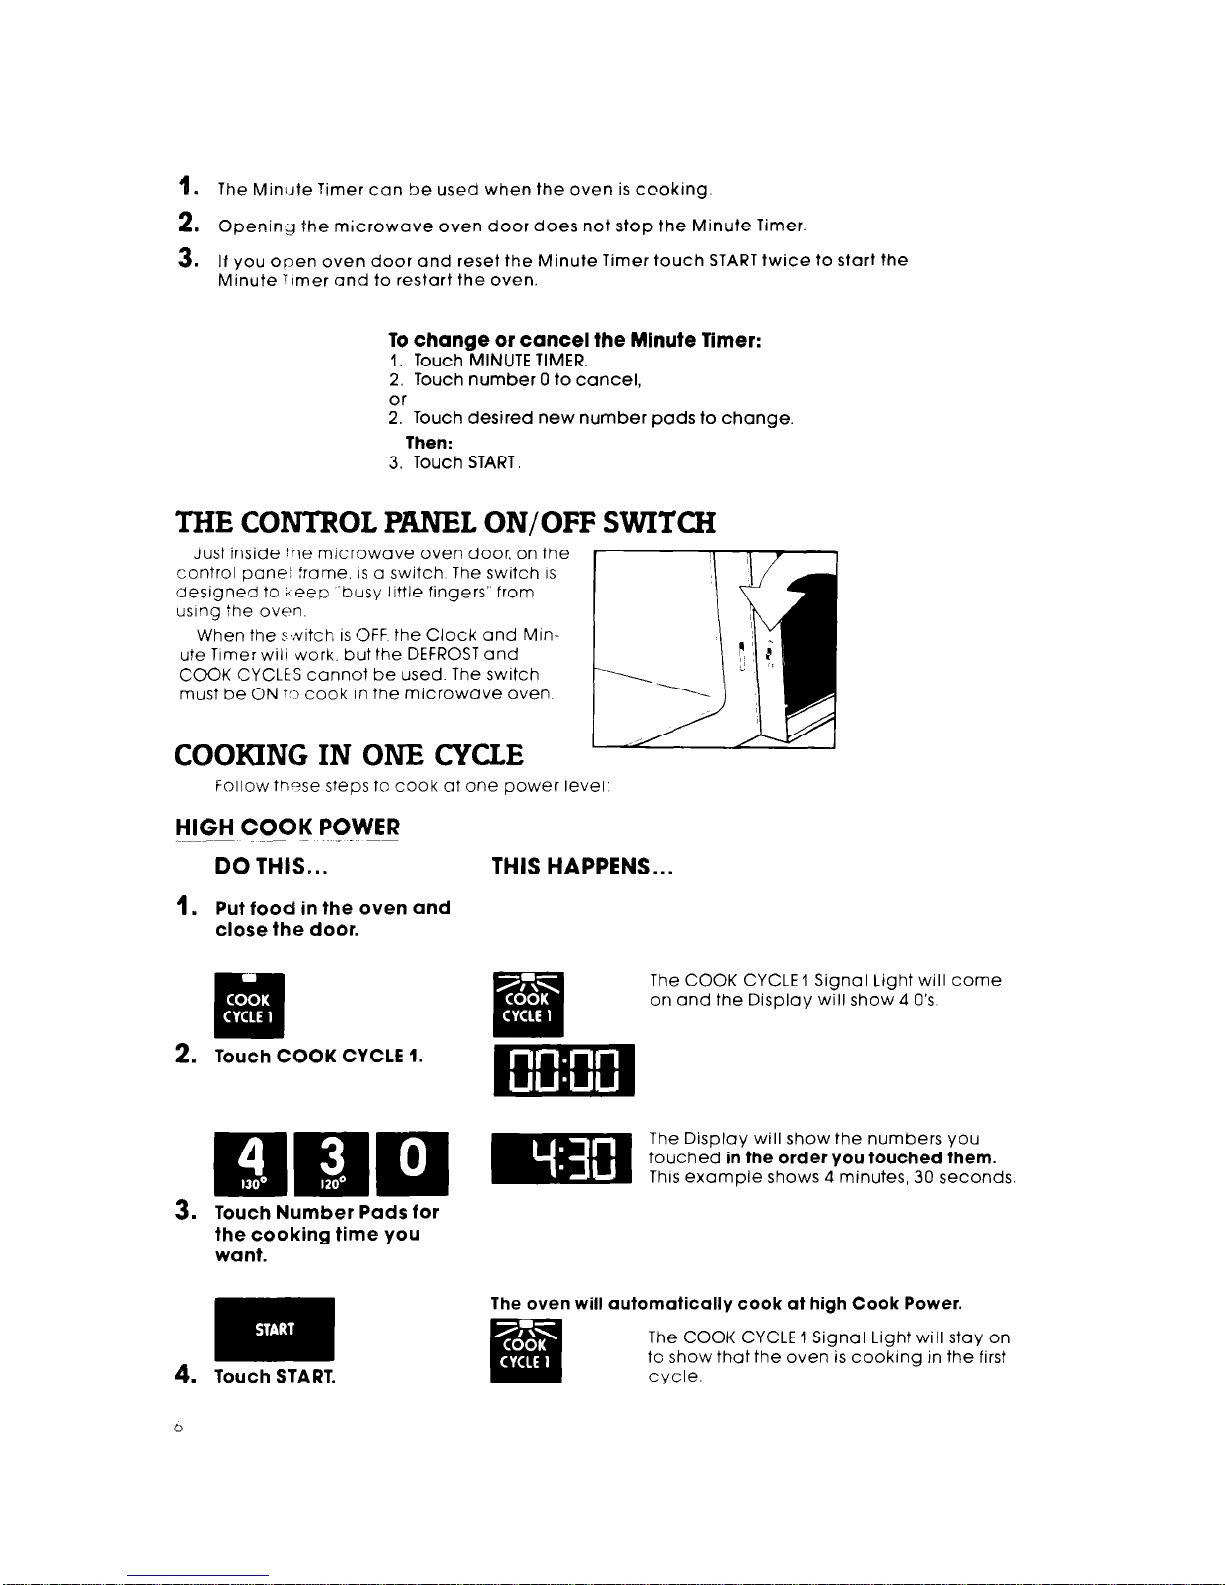
THE CONTROL PANEL ON/OFF SWITCH
Just inside trle microwave oven door, on the
control pane! frame, IS a switch. The switch IS
designed to L een “busy little fingers” from
using the oven.
When the suitch is OFF. the Clock and Minute Timer wili work, but the DEFROST and
COOK CYCLkS cannot be used. The switch
must be ON :,I cook In the microwave oven.
COOKING IN ONE CYCLE
Follow th?se steps to cook at one power level,
HIGH COOK POWER
DO THIS...
1.
Put food in the oven and
close the door.
2.
Touch COOK CYCLE 1.
THIS HAPPENS...
The COOK CYCLE 1 Signal Light will come
on and the Display will show 4 0’s.
The Display will show the numbers you
touched in the order you touched them.
This example shows 4 minutes, 30 seconds.
3. Touch Number
Pads for
the cooking time you
want.
The oven will automatically cook at high Cook Power.
The COOK CYCLE 1 Signal Light will stay on
tc show that the oven is cooking in the first
cycle.
The Display counts down the time to show
how
much cooking time is left in the first
cycle.
When the cooking time ends you will hear
4 beeps [You can stop the beeping by
opening the oven door ortouching CANCEL) When the beeping stops, the Display
will show the time of day.
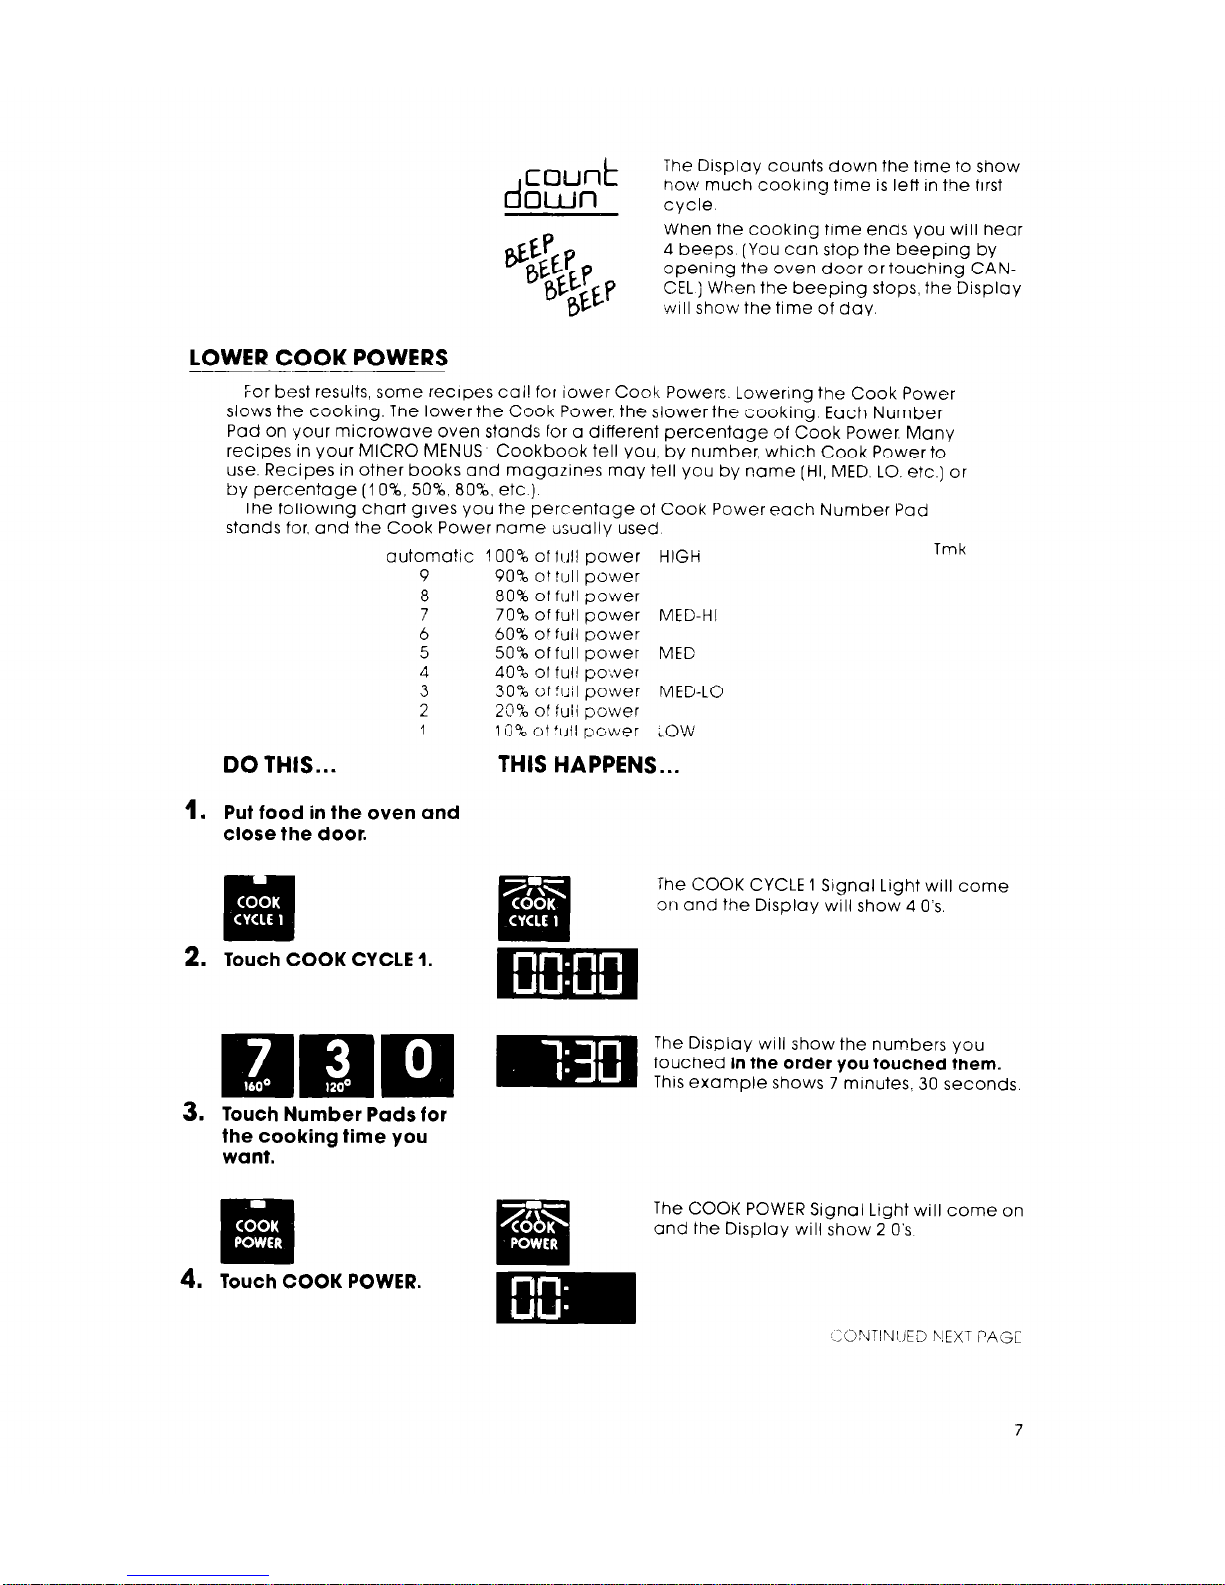
LOWER COOK POWERS
ior best results, some recipes call for iower Cook Powers. Lowering the Cook Power
slows the cooking. The lower the Cook Power. the slower the cooking. Each Number
Pad on your microwave oven stands for a different percentage of Cook Power. Many
recipes in your MICRO MENUS
Cookbook tell you, by number, which Cook Power to
use. Recipes in other books and magazines may tell you by name (HI, MED. LO. etc.] or
by percentage (1 O%, 50%, 808, etc.).
The following chart gives you the percentage of Cook Power each Number Pad
stands for, and the Cook Power name us~ually used
DO THIS...
automatic 2 00% of frill power
HIGH
9
90%
of flJll power
8
80% ot full power
7
70% of full power
MED.HI
6
60% of full power
5 50% of full power
MED
4 40% ot tul! poLver
3
30% of !uil power MED-LO
2 20% of fuii power
1 10% of flail power
LOW
THIS HAPPENS...
Tmk
1.
Put food in the oven and
close the door.
2.
Touch COOK CYCLE 1.
The COOK CYCLE 1 Signal Light will come
on and the Display will show 4 0‘s.
The Display will show the numbers you
touched in the order you touched them.
This example shows 7 minutes, 30 seconds.
3. Touch Number Pads for
the cooking time you
want.
The COOK POWER Signal Light will come on
and the Display will show 2 0‘s.
4.
Touch COOK POWER.
I:ONTINI:ED T\!EXT PAGE

mCc~vVt c :jC r .*:r’. ‘il- P\ ,! j
The Display WIII show what you touched
Thus example shows 60% of full power
5. Touch a Number Pad for
the Cook Power you
want.
d
count
own
Iam
The COOK CYCLE 1 and COOK POWER Sig-
nal Lights will stay on to show that the oven
is cooking in the first cycle at a Cook
Power other than hrgh.
The Drsplay counts down the time to show
how much cooking time is left in the first
cycle
For 2 of every IO seconds, the Display WIII
show the Cook Power you selected.
When the cooking trme ends. you will hear
4 beeps. (You can stop the beeping by
opening the door or by touching CANCEL.)
When the beeping stops. the Display WIII
show the time of day
Use DEFROST CYCLE to thaw froren food before cookrng. for suggested defrost trmes.
check the guide on the Inside of the oven door or rn your MICRO MENUS
Cookbook
Tmk
DO THIS...
THIS HAPPENS...
Put frozen food in the
oven and close the
door.
The DEFROST CYCLE Signal Light will come
on and the Drsplay will show 4 0’s.
Touch DEFROST CYCLE.
Touch Number Pads for
the defrosting time you
want.
Touch START.
The DEFROST CYCLE Signal Lights will stay
on to show that the oven is in the Defrost
Cycle
d
count
own
The Display counts down the time to show
how much defrosting time is left.
 Loading...