

Whirlpool MW8500XR, MW850EXR User Manual

MICROWAVE
OVEN
Models MW85OOXR
MW850EXR
rs. Freezers. Relrlgerator-Freezers Ice Makers, Dishwashers. Built-In Ovens and Surface Units. Ranges. Microwave Ovens. Trash Compactors. Room Air Condltloners, Dehumldlfl

Contents
Parts and Features
Before You Install
Your Microwave Oven
Before You Use Your
Mlcrowave Oven.
Precautions to Avoid ‘Possible
Exposure to Excessive
Microwave Energy
Important Safety Instructions
Uslng Your Microwave Oven.
Microwave Oven Controls
Setting the Clock
Cooring at High Cook Power
Cooliing at Lower Cook Powers
Defrosting
CooM:ing Automatrcal& $tei’
Defrosting
Minute Timer
Parts and features
Page
2
Changing or Adding lnstructlons
Cancelling Instructions
3
Programming Tone
Other Operating Hints
3
Operatlng Safety Precchtions.
lnstallatlon Instructions
Grounding Instructions
3
Building in Your Microwave Oven
4
Caring for Your Microwave Oven.
5
Cleaning the Microwave Oven
5
Replacing the Light Bulb
6
How Your Microwave Oven Works
6
If You Need Service or Assistance.
7
4. Before Calling for Assistance
9
2. If You Need Assistance
ICI
12
-a-1, . . . . I . A . .
t31~60 wnlrlpool c;orporanon
3. IfYou Need Service
4. If You Have a Problem
Cops your Model and Serial Numbers here...
II yoc; iced service or call
this information ready
1
Complete
plate lust behind the microwave oven door on
the oven frame)
2 Purchase date from sales slip
Copy
book, your warranty and sales slip together in a
handy place
Model and Serial Numbers (from the
this
informatlon in these spaces Keep this
with
a question, have
Model Number
Serial Number
Purchase Dote
~-____
Service Company Phone Number
iilml
DEFROST GUIDE DEFROST GUIDE
(Behlnd Oven Door) (Behlnd Oven Door)
iI
MODEL AND SERIAL MODEL AND SERIAL
NUMBER PLATE
(Behlnd Oven Door]
-DOOR LATCH
VENTS VENTS
CONTROL CONTROL
PANEL PANEL
1
2
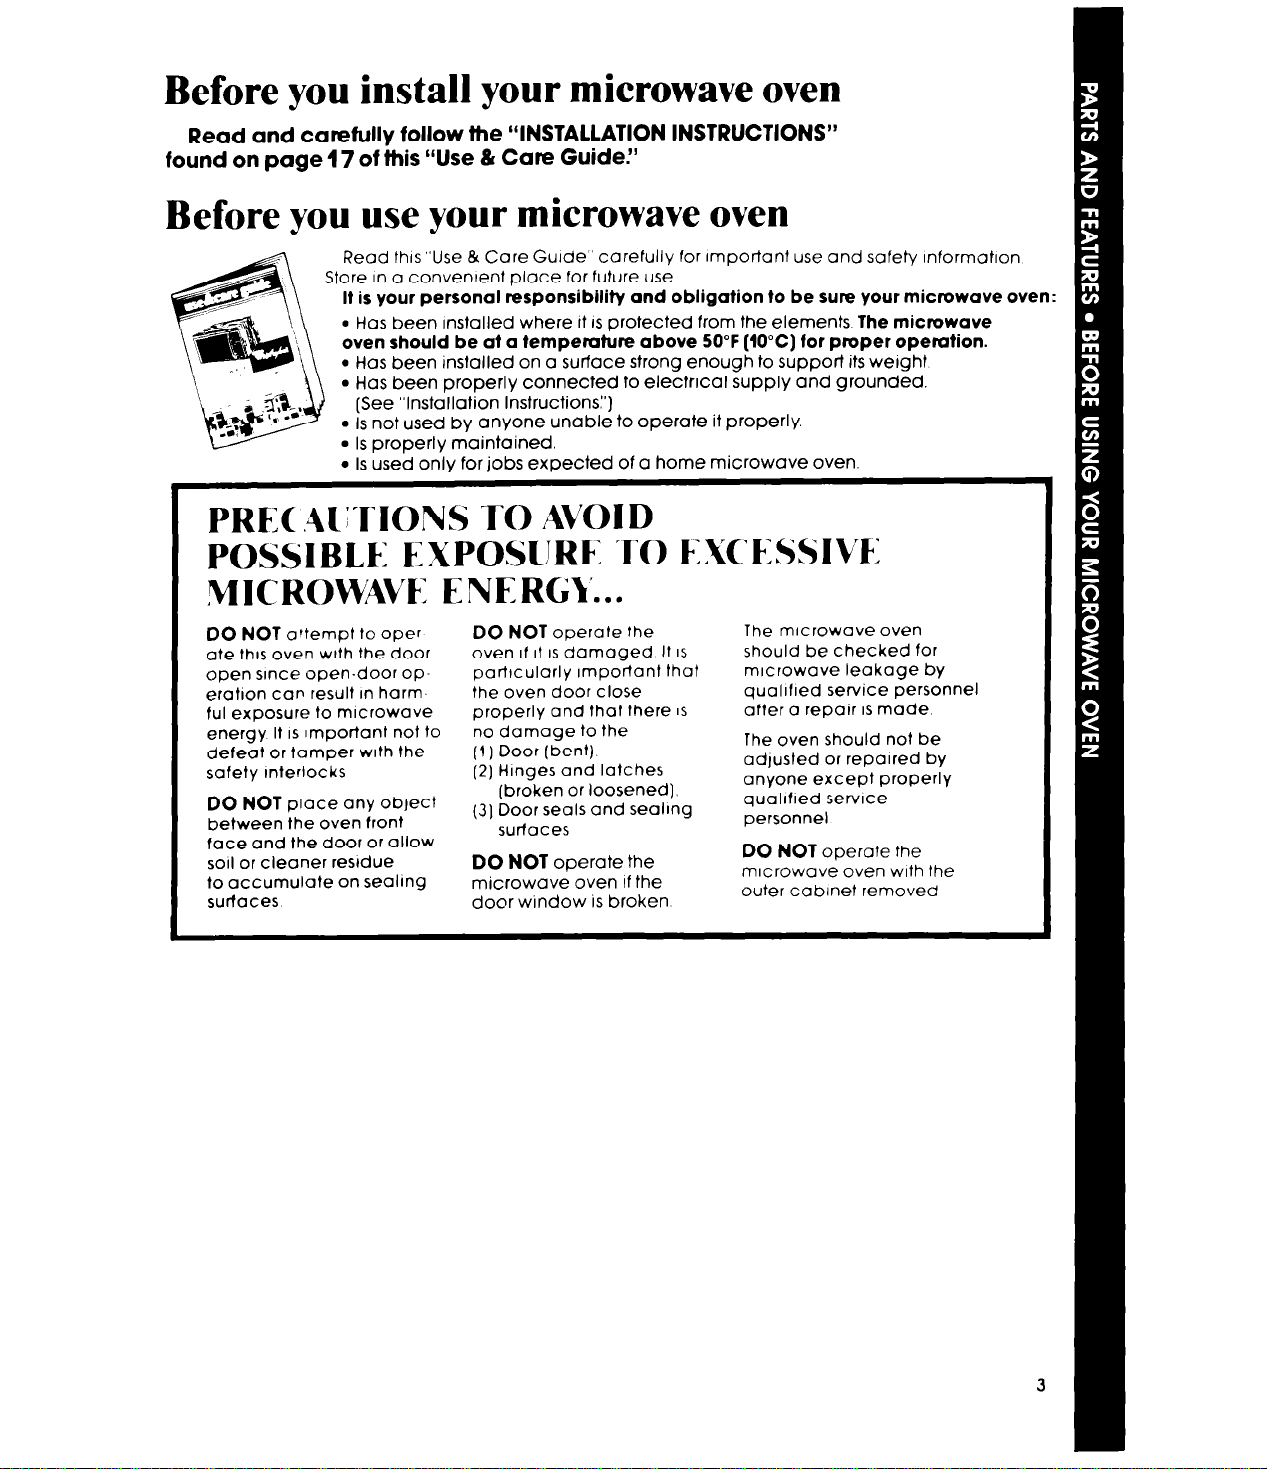
Before you install your microwave oven
Read and carefully follow the “INSTALLATION INSTRUCTIONS”
found on page 17 of this “Use & Care Guide!’
Before you use your microwave oven
Read thrs”Use & Care Guide” carefully for rmportant use and safety Inform&
Store
In a conventent place for future use
It is your personal responsibility and obligation to be sure your microwave
l
Has been rnstalled where rt IS protected from the elements The microwave
oven should be at a temperature above 50°F (10°C) for proper operation.
l
Has been installed on a surface strong enough to support its weight
l
Has been properly connected to electrical supply and grounded
[See “Installation Instructions:‘)
. IS not used by anyone unable to operate it properly.
l
Is properly maintained.
l
Is used only for jobs expected of a home microwave oven.
PRE(:( .41JIONS TO AVOID
POSSIBLE EXPOSURE TO EXCESSIVE
MICROWAVE ENERGY...
DO NOT attempt to oper
ate thrs oven wtth the door
open srnce open-door operatron can result rn harmful exposure to microwave
energy It is Important not to
defeat or tamper with the
safety rnterlocks
DO NOT place any obtect
between the oven front
face and the door or allow
so11 or cleaner residue
to accumulate on sealing
surfaces
DO NOT operate the
oven if II IS damaged It IS
partrcularly Important that mrcrowave leakage by
the oven door close qualified service personnel
properly and that there IS after a reparr IS made
no damage to the
(I ) Door (bent)
12) Hinges and latches
[broken or loosened).
(3) Door seals and sealrng
surfaces
DO NOT operate the
microwave oven If the
door window is broken
The microwave oven
should be checked for
The oven should not be
adtusted or repaired by
anyone except properly
qualified servrce
personnel
DO NOT operate the
microwave oven with the
outer cabinet removed
Microwave ovens have been used successfully in homes for a number of
years. They are thoroughly tested for safe and efficient operation. However,
as with any appliance, there are special installation and safety precautions
which must be followed to ensure safe and satisfactory operation and prevent
damage to the unit.
WARNING - To reduce the risk of burns,
electric shock, fire, Injury to persons or exposure to excessive microwave energy:
1. Read ~111 instructions before using
ippliance.
2. Read and follow the specific “PRECAUrlONS TO AVOID POSSIBLE EXPOSURE TO
IXCESSIVE MICROWAVE ENERGY” found
In page 3.
3. This appliance must be grounded. Conlect only to properly grounded outlet. See
‘GROUNDING INSTRUCTIONS” found on
Dage 18,
1. Install or locate this appliance only in
Jccordance with the provided “IN;TALLATlON INSTRUCTIONS” found on
2age 17.
5. Some products such as whole eggs and
;ealed containers - for example, closed
Jlass jars - may explode and should not
De heated in this oven
5. Use this appliance only for Its intended
Jse as described in this manual.
7. As with any appliance, close supervi;ion is necessary when used by children.
3. Do not operate this appliance if it has a
jamaged cord or plug, if it is not working
oroperly, or if it has been damaged or
dropped. Electric shock, fire or other hazIrds may result.
?. This appliance should be serviced only
oy qualified service personnel. Call a
Nhirlpool authorized TECH-CARE@ Service
Zompany for examination, repair or
adjustment.
IO.
Do not cover or block any opening on
he appliance, for fire may result.
11.
Do not use outdoors for damage to the
oven or electric shock may result.
12. Do not immerse cord or plug in water
for electric shock may result.
13. Keep cord away from heated surfaces
for electric shock may result.
14. Do not let cord hang over edge of table
or counter for electric shock may result.
15.
See door surface cleaning instructions
on page19.
16.
To reduce the risk of fire or fire in the
oven cavity:
a. Do not overcook food. Carefully attend
appliance if paper, plastic, or other combustible materials are placed inside the
oven to facilitate cooking. Paper can char
or burn, and some plastics can melt if used
when heating foods.
b. Test dinnerware or cookware before
using. See page 16. Some dishes (melamine, Centura? etc.) absorb microwave en-
ergy, becoming too hot to handle and
slowing cooking times. Remove wire twistties from paper or plastic bags before
placing bag in oven. Cooking in metal
containers can damage the oven. So can
containers with hidden metal (twist-ties, foil
lining, staples, metallic glaze or trim.)
c. If materials inside the oven should ignite,
keep oven door closed, turn oven off, and
disconnect the power cord, or shut off
power at the fuse or circuit breaker panel.
17. Read and follow “OPERATING SAFETY
PRECAUTIONS” starting on page 15.
SAW THESE INSTRUCTIONS

Using your microwave oven
Microwave oven controls
There are three parts in the control section:
-The Digital Display/Clock, and Indicator Lights
-Command Pads
- Number Pads
Instructions for each control are covered on the
following pages Read them carefully.
When you first plug in the oven, the Display will
show 88:88. If, after you set the Clock (page 6), the
Display again shows all 8’s, it means your electricity was off for a while. Reset the Clock.
Digital displav/clock and
indicator iighfs
Command pads
on the tone you hear when touching any pad
When you are not
using the microwave
oven, this is an
accurate digital
clock. When you are
using the microwave
oven, this displays
time and Cook Power
settings, indicator
lights and shows you
what Number Pads
you touched.
Touch Command
Pads to tell the microwave oven what to
do and in what order.
A few examples:
-CLOCK SET tells the
oven you are going
to set the clock.
- START tells the oven
to start. See page
13 for information
Each Command Pad (except START and CANCEL]
lights an Indicator Light on the digital display.
The Indicator Light comes on when you touch the
Command Pad.
While the oven is running, an Indicator Light (or
lights will be on to show what the oven is doing.
Number Pads
DDD 2jggigF
m p p ;~~~mderPadsto
- a Cook Power.
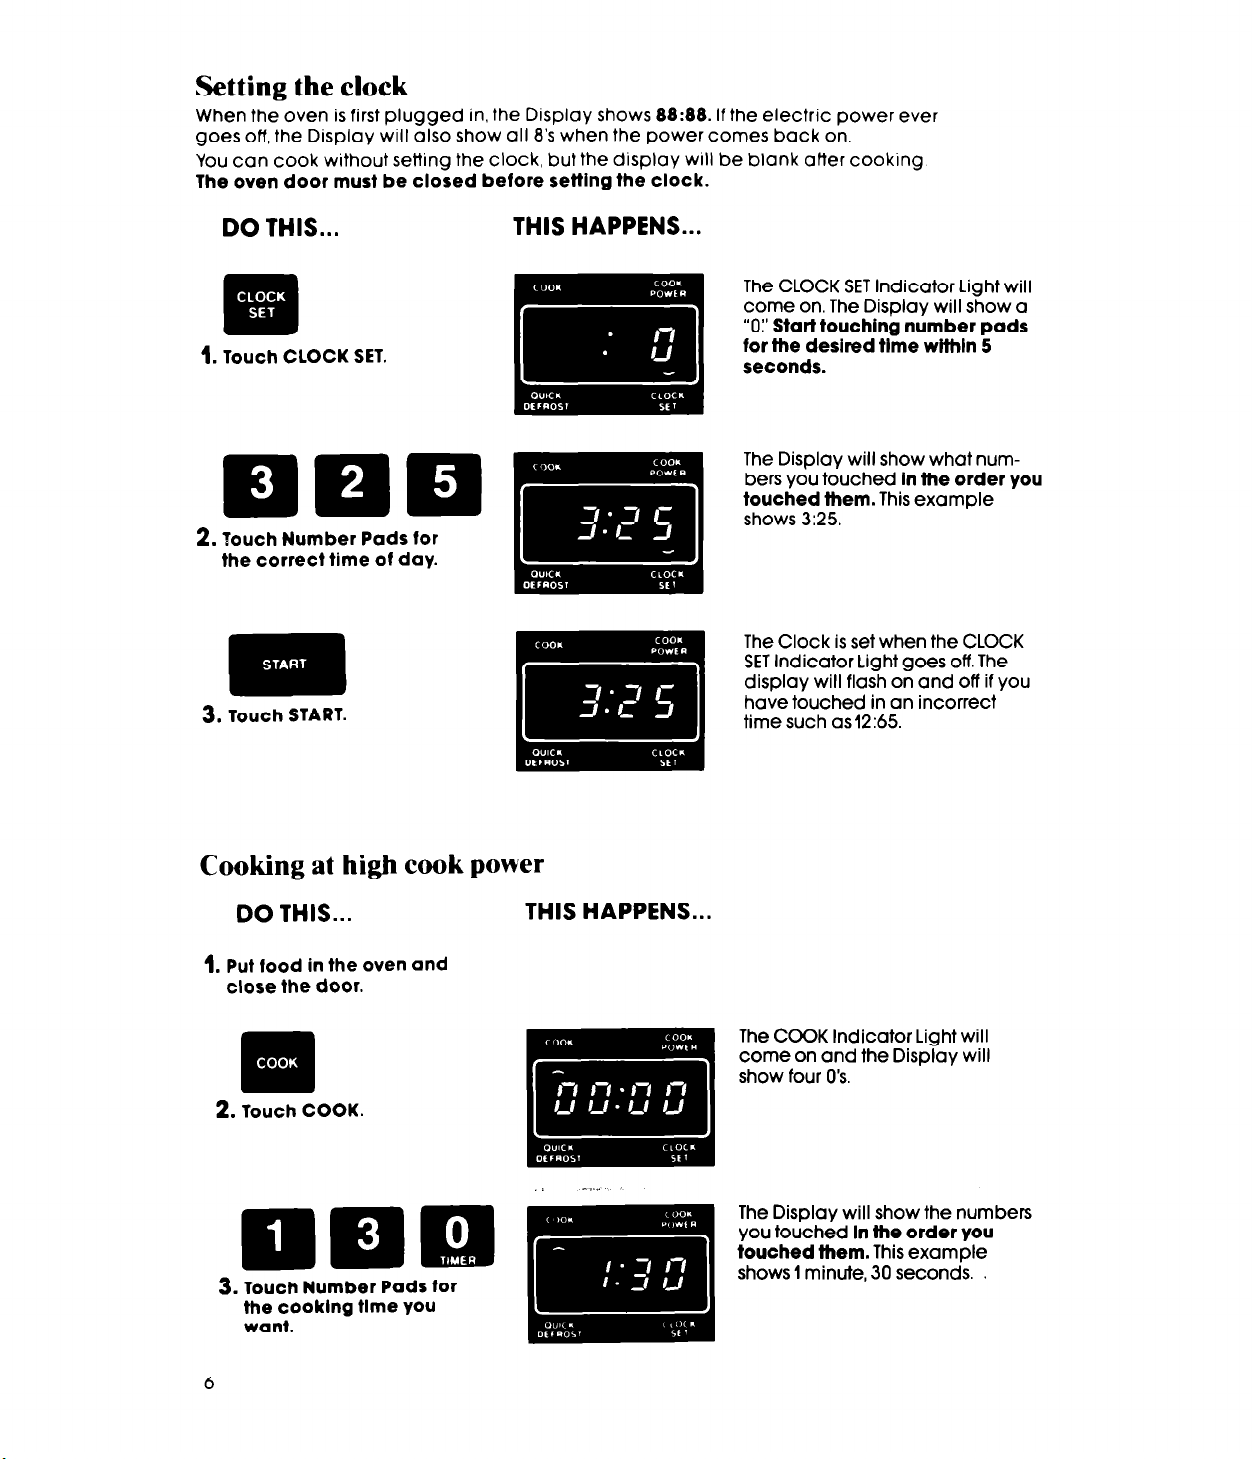
Setting the clock
When the oven is first plugged in, the Display shows 88:88. If the electric power ever
goes off, the Display will also show all 8’s when the power comes back on.
You can cook without setting the clock, but the display WIII be blank atter cooking
The oven door must be closed before setting the clock.
DO THIS...
.
IIn
1. Touch CLOCK SET.
Elmm
2. Touch Number Pads for
the correct time of day.
3.
Touch START.
THIS HAPPENS...
The CLOCK SET Indicator Light will
come on. The Display will show a
“0:’ Start touching number pads
for the desired tlme within 5
seconds.
The Display will show what num-
bers you touched in the order you
touched them. This example
shows 3125.
The Clock is set when the CLOCK
SET Indicator Light goes off. The
display will flash on and off if you
have touched in an incorrect
time such as 12:65.
Cooking at high cook power
DO THIS...
1.
Put food in the oven and
close the door.
2.
Touch COOK.
3. Touch Number Pads for
the cooklng tlme you
want.
6
THIS HAPPENS...
The COOK Indicator Light will
come on and the Display will
show four 0’s.
The Display will show the numbers
you touched In the order you
iouched them. This example
shows 1 minute, 30 seconds.

will automatically
4.
Touch START.
The oven
count
d
own
P
T$&
tiEP
Changing the cooking time
You can change the cooking time anytime dunng the cycle
1 TouchCOOK
2 Touch numbers for new time
3 Touch START
The COOK cycle WIII continue cooktng for the new time
cook at high Cook Power.
The COCK Indicator Light will stay
on to show that the oven is
cooking.
The Display counts down the time
to show how much cooking time is
left in the Cook cycle.
When the cooking time ends you
will hear 4 beeps. (You can stop
the beeping by opening the oven
door or touching CANCEL.) When
the beeping stops, the Display will
show the time of day.
Cooking at lower Cook Powers
For best results, some recipes call for lower Cook Powers. The lower the Cook Power, the
slower the cooking. Each Number Pad on your microwave oven stands for a different
percentage of Cook Power Many recipes in your MICRO MENUS@Cookbook tell you, by
number, which Cook Power to use. Recipes in other books and magazines may tell you
by name (HI, MED, LO, etc.) or percentage (10% 50% 80%. etc 1.
The following chart gives you the percentage of Cook Power each Number Pod stands
for, and Cook Power name usually used
automatic 100% of full power HIGH
9 90% of full power
80% of full power
8
70% of full power MED-HIGH
7
60% of full power
6
50% of ful! power MED
5
DO THIS...
1.
Put food in the oven and
close the door.
2.
Touch COOK.
THIS HAPPENS...
4 40% of full power
3 30% of full power MED-LOW
2 20% of full power
I do% of full power LOW
0 no power [fan and light
will be off]
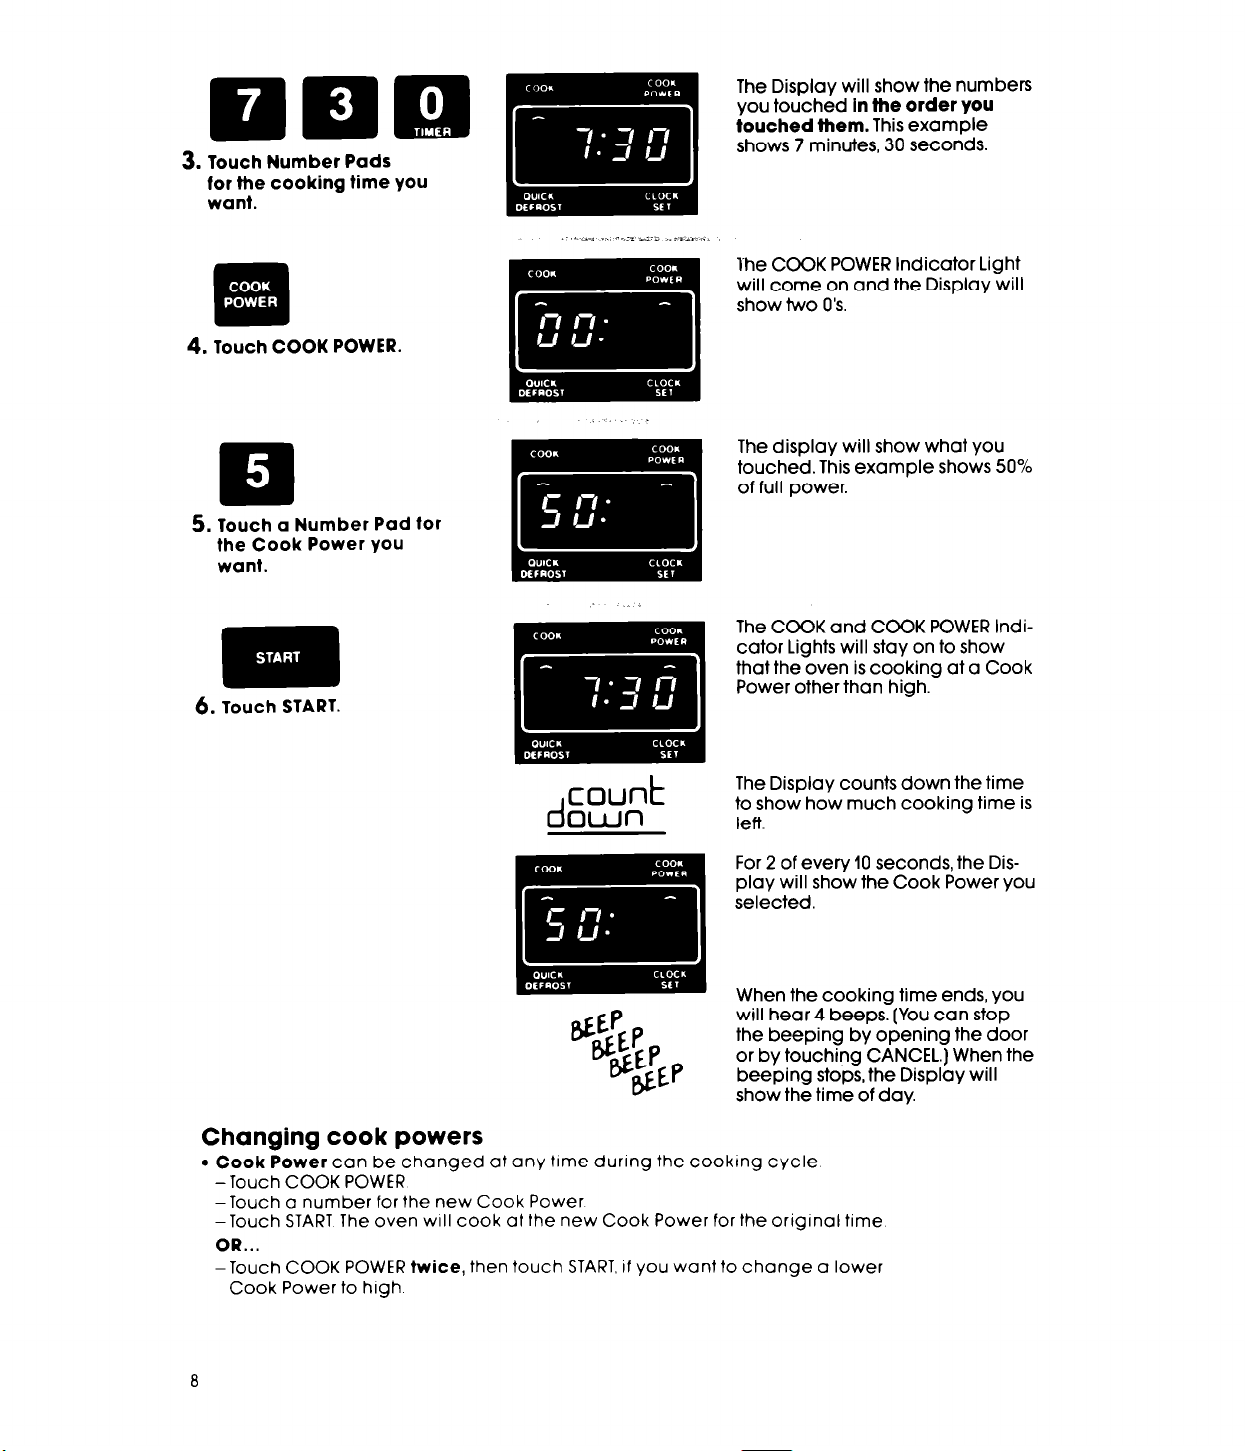
Touch Number Pads
for the cooking time you
want.
4.
Touch COOK POWER.
5. Touch a Number Pad for
the Cook Power you
want.
6. Touch START.
The Display will show the numbers
you touched
touched them.
shows 7 minutes, 30 seconds.
The COOK POWER Indicator Light
will come on and the Display will
show two O’s
The display will show what you
touched. This example shows 50%
of full power.
The COOK and COOK POWER Indicator Lights will stay on to show
that the oven is cooking at a Cook
Power other than high.
in the order you
This example
count
d
own
The Display counts down the time
to show how much cooking time is
left
For 2 of every 10 seconds, the Display will show the Cook Power you
selected.
When the cooking time ends, you
will hear 4 beeps. (You can stop
the beeping by opening the door
or by touching CANCEL.) When the
beeping stops, the Display will
show the time of day.
Changing cook powers
l
Cook Power can be changed at any time during the cookrng cycle
-Touch COOK POWER
-Touch a number for the new Cook Power
-Touch START The oven will cook at the new Cook Power for the original time
OR...
-Touch COOK POWER twice, then touch START, if you wont to change a lower
Cook Power to high
 Loading...