

Whirlpool MW3600XS Use & Care Manual
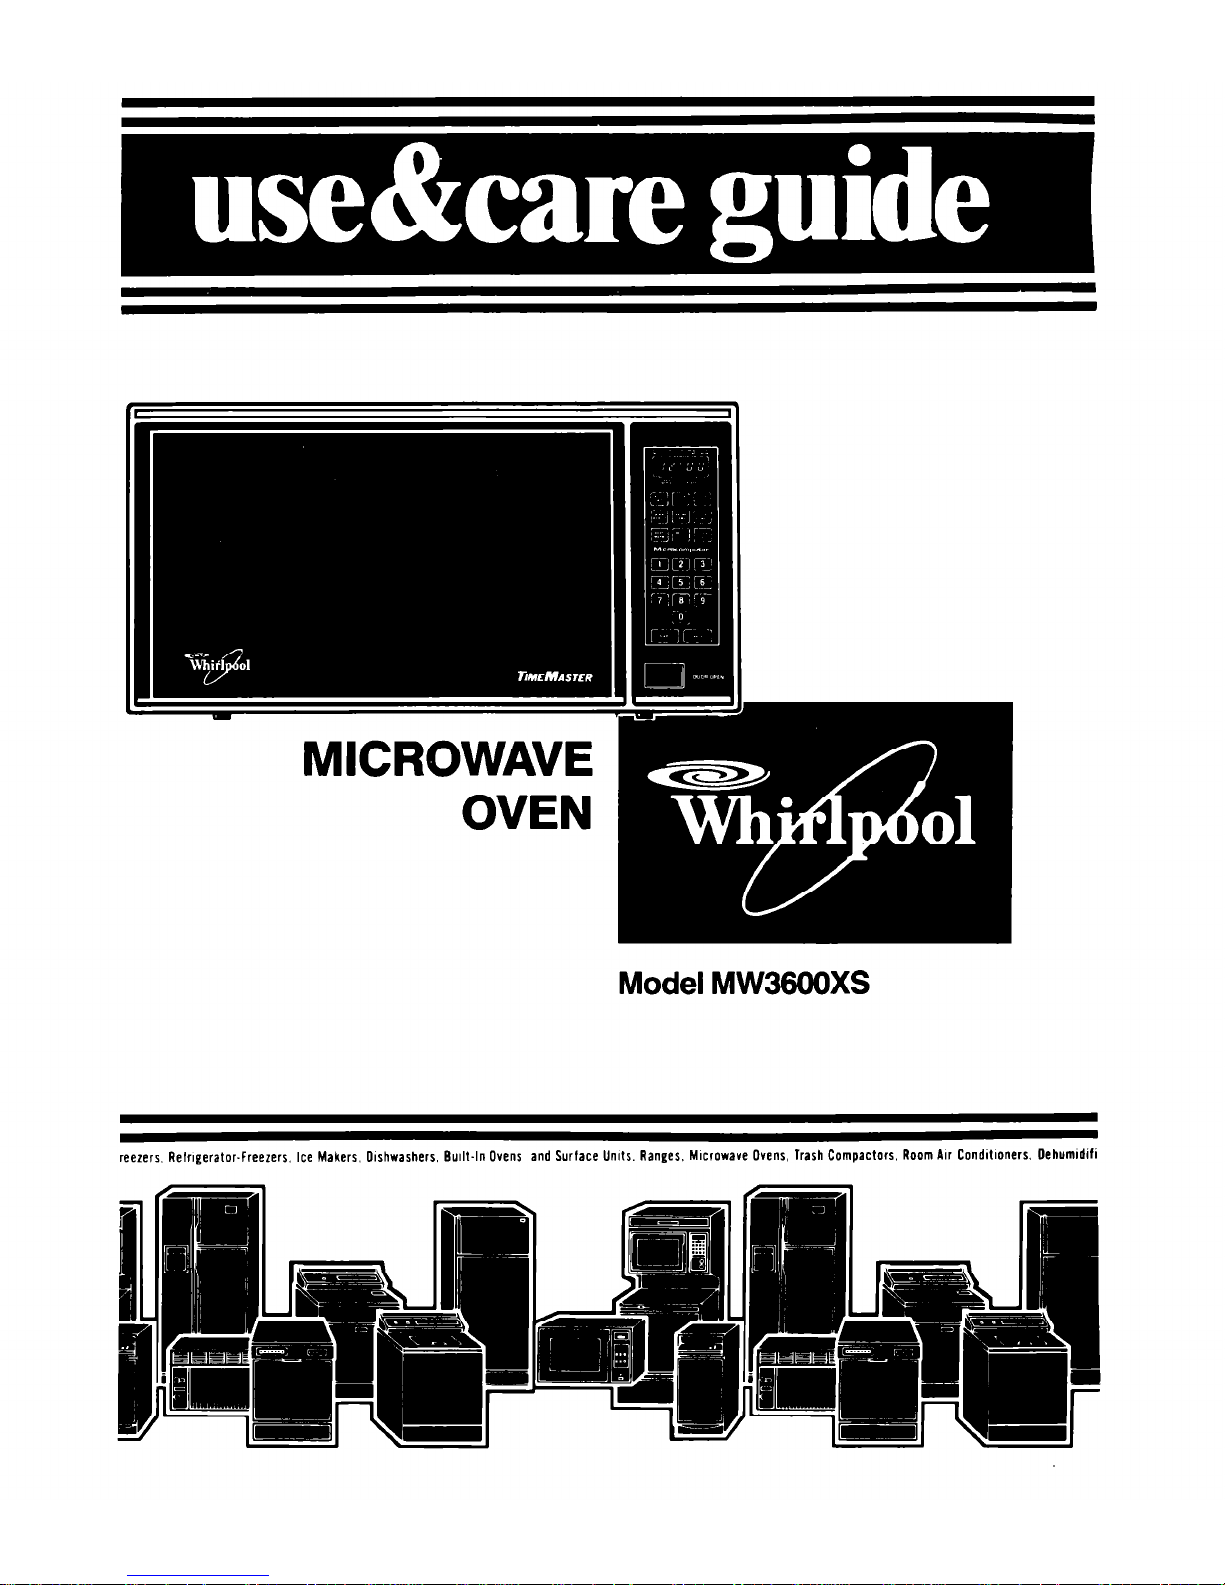
Model MW36OOXS
reezers. Relrlgerator-freezers, Ice Makers, Olshwashers, Etullt-In Ovens and Surface Units. Ranges. Mlcrnwave Ovens, Trash Compactors, Room Air Condllloners. Oehumldifi
Contents
Parts and Features
Before You Install Your
Mlcrowave Oven.
Before You Use Your Microwave Oven
Precautions to Avoid Posslble
Exposure to Excessive
Mlcrowave Energy
Important Safety Instructions
Uslng Your Microwave Oven.
Microwave Oven Controls
Programming Tone
Setting the Clock
Cooking in Your Microwave Oven
Cook in One Cycle
High Cook Power.
Lower Cook Powers
Using AUTO SET
Defrosting
3
3
3
4
5
5
6
6
6
7
7
8
9
11
Page
Cooking in More Than One Cycle
13
Cooking with the Temperature Probe
15
Using PAUSE .
18
Using KEEP WARM
19
Minute Timer
20
Delayed Start .
21
Other Operating Hints
22
Bi-Level Cooking Rack..
23
Installation Instructions
24
Grounding Instructions.
25
Custom Mounting the Microwave
Oven.
26
Caring for Your Microwave Oven.
26
Cleaning the Microwave Oven
26
How Your Microwave Oven Works .
27
Operating Safety Precautions.
28
If You Need Service or Assistance. .
28
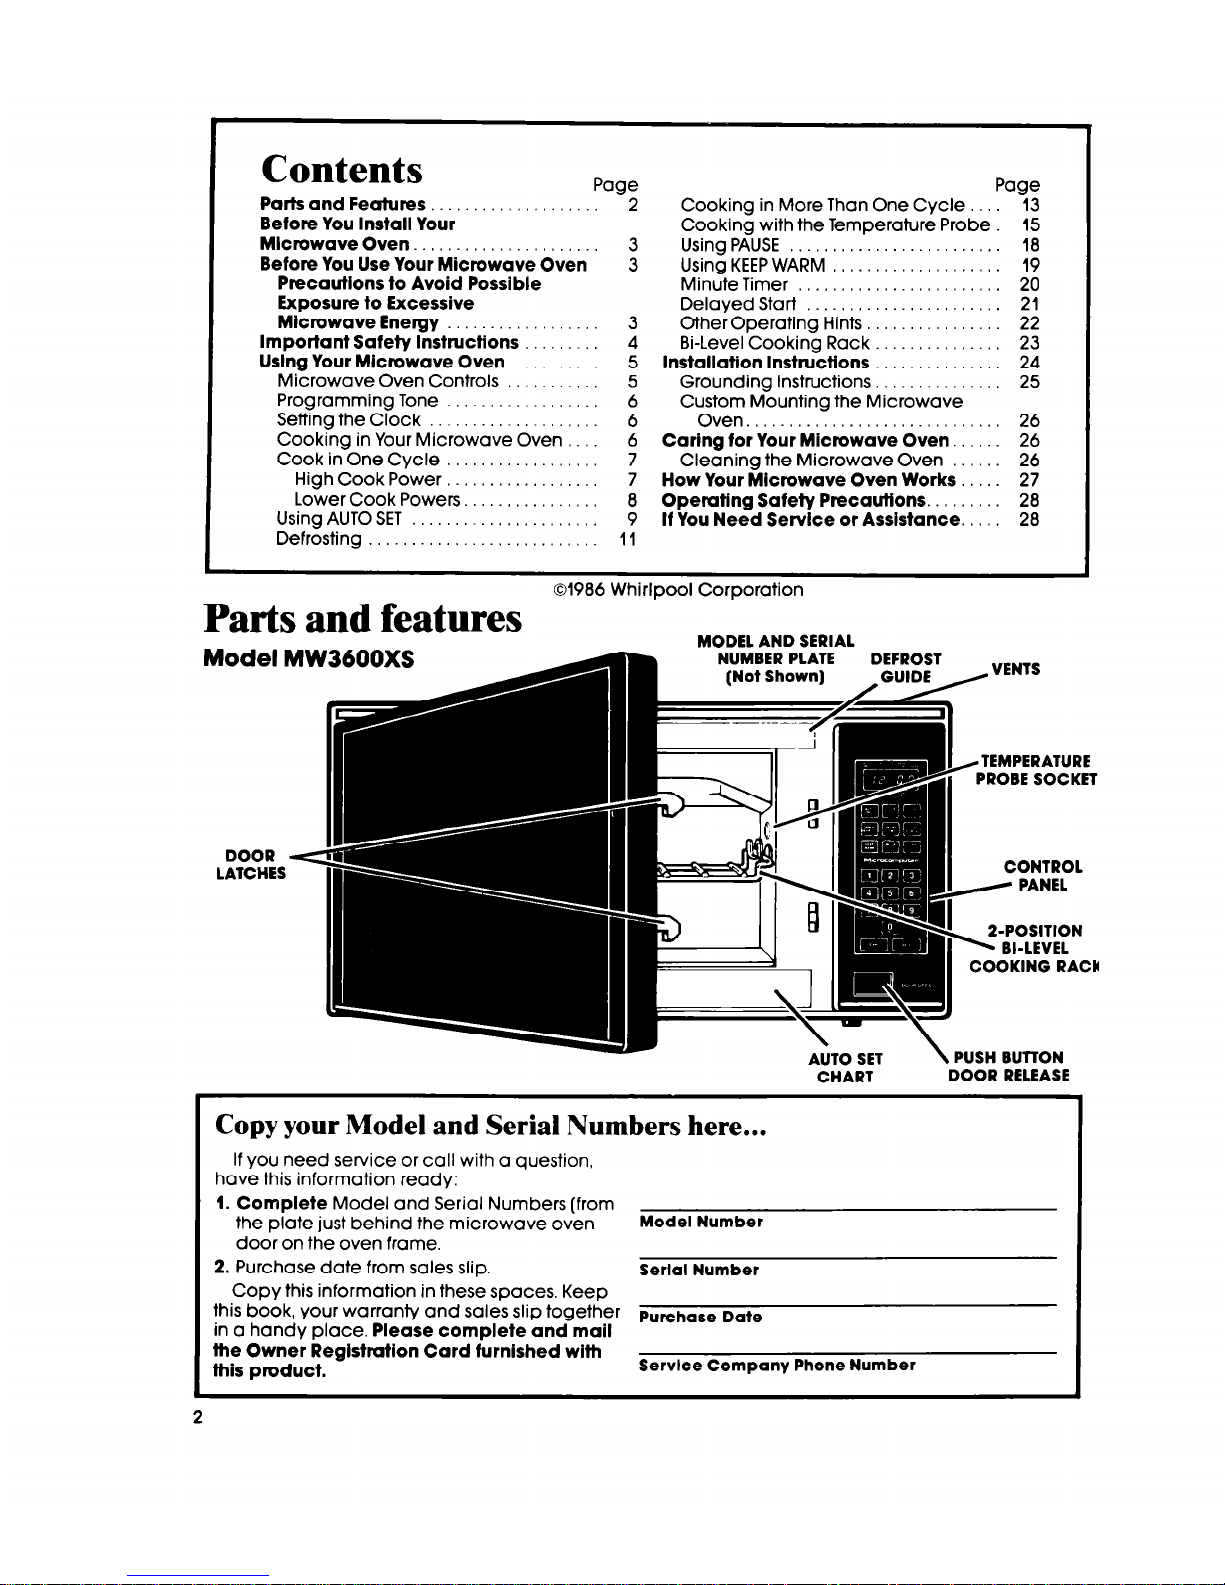
Parts and features
01986 Whirlpool Corporation
MODEL AND SERIAL
oxs
II
CONTROL
/ PANEL
II
A P-POSITION
BI-LEVEL
COOKING RAW
A&O SET
\
PUSH BUTTON
CHART
DOOR RELEASE
Copy your Model and Serial Numbers here...
If you need service or call with a question,
have this information ready:
1. Complete Model and Serial Numbers (from
the plate just behind the microwave oven
Model Number
door on the oven frame.
2. Purchase date from sales slip.
Serial Number
Copy this information in these spaces Keep
this book, your warranty and
SdeS
slip together
in a handy place. Please complete and mail
Purchare Da+e
the Owner Registration Card furnished with
this product.
Service Company Phone Number
2
HII out and return the “MIcrowave Reglstratlon Card” Included wlth your oven. If the card is
missing, please send the model number of your microwave oven with your name and address to...
Whirlpool Corporation
Microwave Registration Department
Administrative Center
2000 U.S. 33 North
Benton Harbor, Michigan 49022
This information will help us reach you if there is ever a need to pass along information about your
microwave oven.
Before you install your microwave oven
Read and carefully follow the 6‘INSTALLATION INSTRUCTIONS”
found on page 24 of this “Use & Care Guide.”
Before you use your microwave oven
Read this “Use & Care Guide” carefully for important use and safety information
Store in a convenient place for future use.
It is your personal responsibility and obligation to be sure your microwave oven:
l
Has been Installed where it is protected from the elements. The microwave
oven should be at a temperature above 50°F (10%) for proper operation.
l
Has been installed on a surface strong enough to support its weight
l
Has been properly connected to electrical supply and grounded.
(See “Installation Instructionsl’)
l
Is not used by anyone unable to operate it properly.
l
Is properly maintained.
l
Is used only for jobs expected of a home microwave oven
PRECAUTIONS TO AVOID
POSSIBLE EXPOSURE TO EXCESSIVE
MICROWAW ENERGY.
DO NOT
attempt to operate this oven with the door
open since open-door
operation can result in
harmful exposure to microwave energy. It is important
not to defeat or tamper
with the safety interlocks.
DO NOT
place any object between the oven front
face and the door or allow
soil or cleaner residue to
accumulate on the sealing
surfaces.
DO NOT
operate the oven
if it is damaged. It is particularly important that the
oven door close properly
and that there is no
damage to the
(I] Door [bent),
(2) Hinges and latches
(broken or loosened),
(3) Door seals and sealing
surfaces.
DO NOT
operate the
microwave oven if the door
window is broken.
The microwave oven
should be checked for
microwave leakage by
qualified service personnel
after a repair is made.
The oven should not be
adjusted or repaired by
anyone except properly
qualified service
personnel.
DO NOT
operate the
microwave oven with the
outer cabinet removed.
IMPORTANT SAFETY INSTRUCTION
Microwave ovens have been used successfully In homes for a number of
Years. They are thoroughly tested for safe and efficient operation. However,
as wlth any appliance, there are special installation and safety precautions
which must be followed to ensure safe and satisfactory operation and prevent
damage to the unit.
WARNING
-To reduce the risk of burns, electric shock,
fire, injury to persons or exposure to excessive microwave energy:
1.
Read all instructions before using
appliance.
2. Read and follow the specific “PRECAUTIONS TO AVOID POSSIBLE EXPOSURE TO
EXCESSIVE MICROWAVE ENERGY” found
on page 3.
3. This appliance must be grounded. Connect only to properly grounded outlet. See
“GROUNDING INSTRUCTIONS” found on
page 25.
4. Install or locate this appliance only in
accordance with the provided “INSTALLATION INSTRUCTIONS” iound on
page 24.
5. Some products such as whole eggs and
sealed containers - for example, closed
glass jars - may explode and should not
be heated in this oven.
6.
Use this appliance only for its intended
use as described in this manual.
7. As with any appliance, close supervision is necessary when used by children.
8.
Do not operate this appliance if it has a
damaged cord or plug, if it is not working
properly, or if it has been damaged or
dropped. Electric shock, fire or other hazards may result.
9. This appliance should be serviced only
by qualified service personnel. Call a
Whirlpool authorized TECH-CARE” Service
Company for examination, repair or
adjustment.
10.
Do not cover or block any opening on
the appliance, for fire may result.
11.
Do not use outdoors for damage to the
oven or electric shock may result.
12. Do not immerse cord or plug in water
for electric shock may result.
13. Keep cord away from heated surfaces
for electric shock may result.
14. Do not let cord hang over edge of table
or counter for electric shock may result.
15.
See door surface cleaning instructions
on page 26.
16.
To reduce the risk of fire or fire in the
oven cavity:
a. Do not overcook food. Carefully attend
appliance if paper, plastic, or other combustible materials are placed inside the
oven to facilitate cooking. Paper can char
or burn, and some plastics can melt if used
when heating foods.
b. Test dinnerware or cookware before
using. See page 30. Some dishes (mela-
mine, Centura,” etc.) absorb microwave energy, becoming too hot to handle and
slowing cooking times. Remove wire twistties from paper or plastic bags before
placing bag in oven. Cooking in metal
containers can damage the oven. So can
containers with hidden metal (twist-ties, foil
lining, staples, metallic glaze or trim.]
c. If materials inside the oven should ignite,
keep oven door closed, turn oven off, and
disconnect the power cord, or shut off
power at the fuse or circuit breaker panel.
17. Read and follow “OPERATING SAFETY
PRECAUTIONS” starting on page 28.
SAVE THESE INSTRUCTIONS
L
4
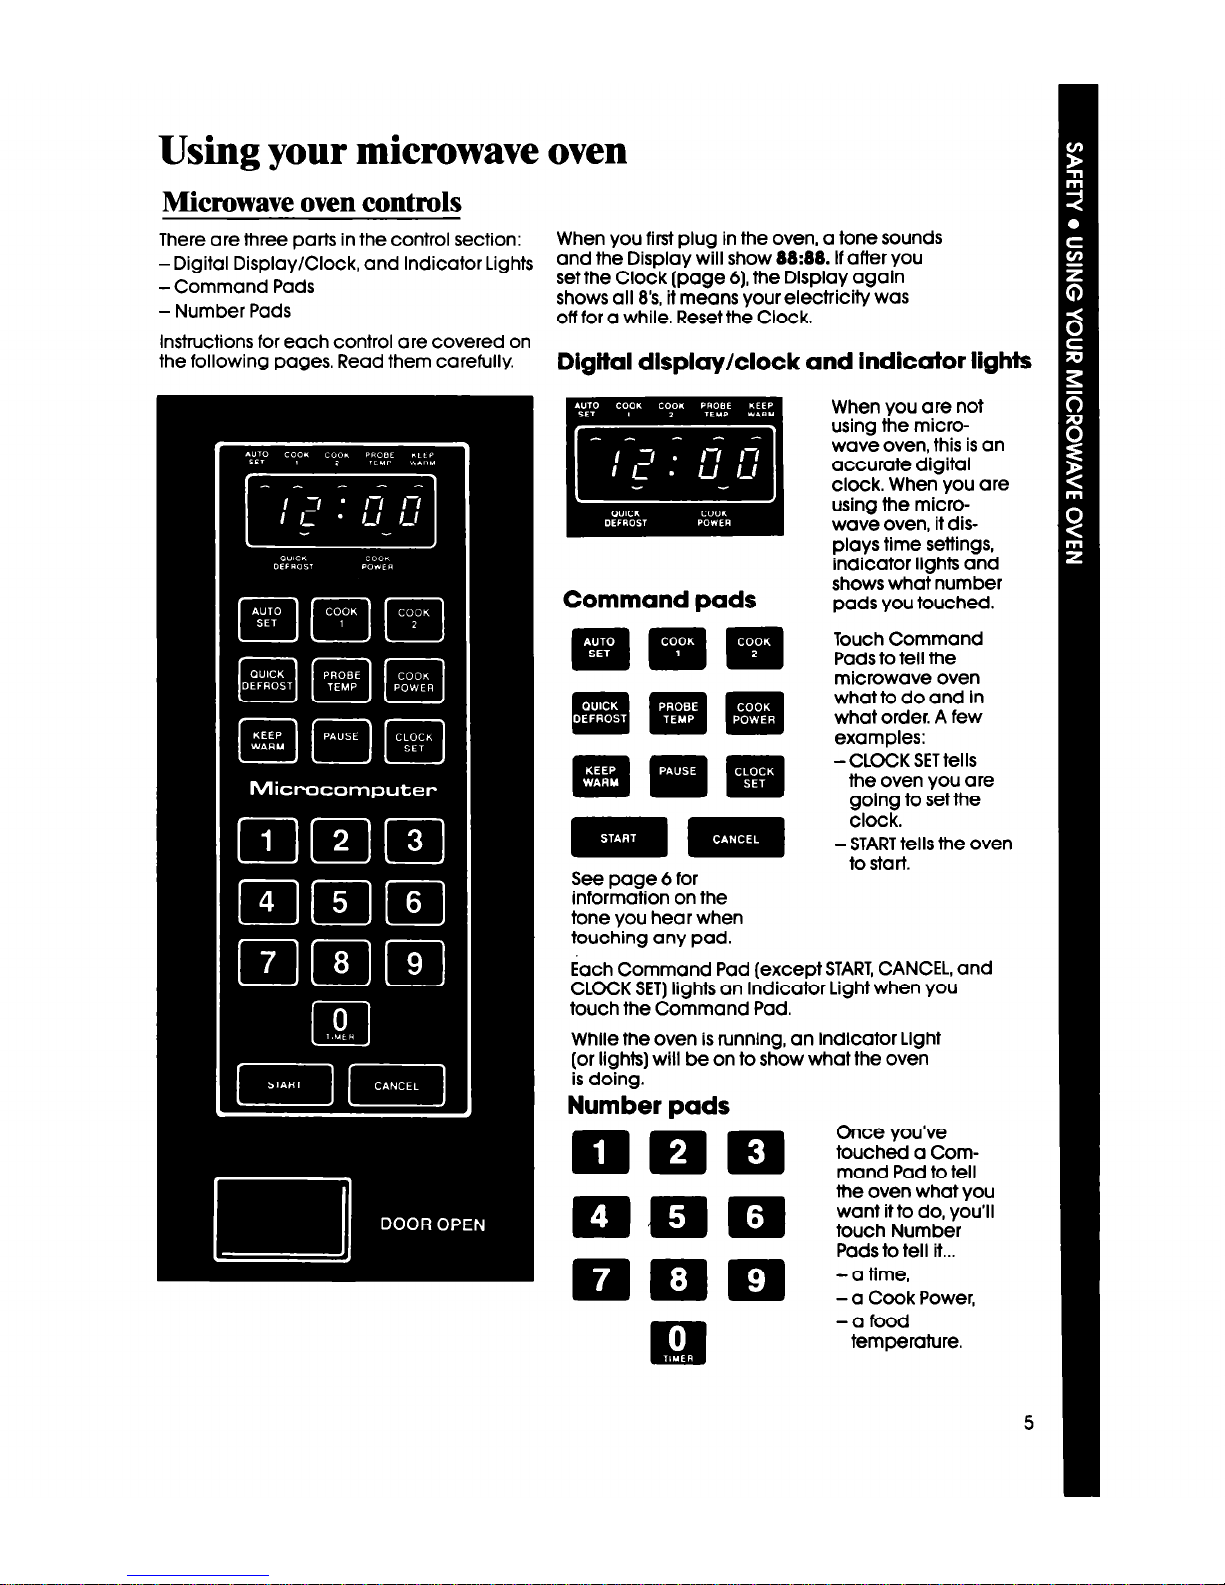
Using your microwave oven
Microwave oven controls
There are three parts in the control section:
-Digital Display/Clock, and Indicator Lights
- Command Pads
- Number Pads
Instructions for each control are covered on
the following pages. Read them carefully.
Command pads
mmm
See page 6 for
information on the
tone you hear when
touching any pad.
When you first plug in the oven, a tone sounds
and the Display will show 88:88. If after you
set the Clock (page 6) the Display again
shows all S’s, it means your electricity was
off for a while. Reset the Clock.
Digital display/clock and indicator lights
When you are not
using the microwave oven, this is an
accurate digital
clock. When you are
using the microwave oven, it displays time settings,
indicator lights and
shows what number
pads you touched.
Touch Command
Pads to tell the
microwave oven
what to do and in
what order. A few
examples:
-CLOCK SET tells
the oven you are
going to set the
clock.
- START tells the oven
to start.
Each Command Pad (except START, CANCEL, and
CLOCK SET) lights an Indicator Light when you
touch the Command Pad.
While the oven is running, an Indicator Light
(or lights) will be on to show what the oven
is doing.
Number pads
Once you’ve
touched a Corn
mand Pad to tel;
mmm
the oven what you
want it to do, you’ll
touch Number
Pads to tell it...
-attme
-a CookPower,
- a food
temperature.
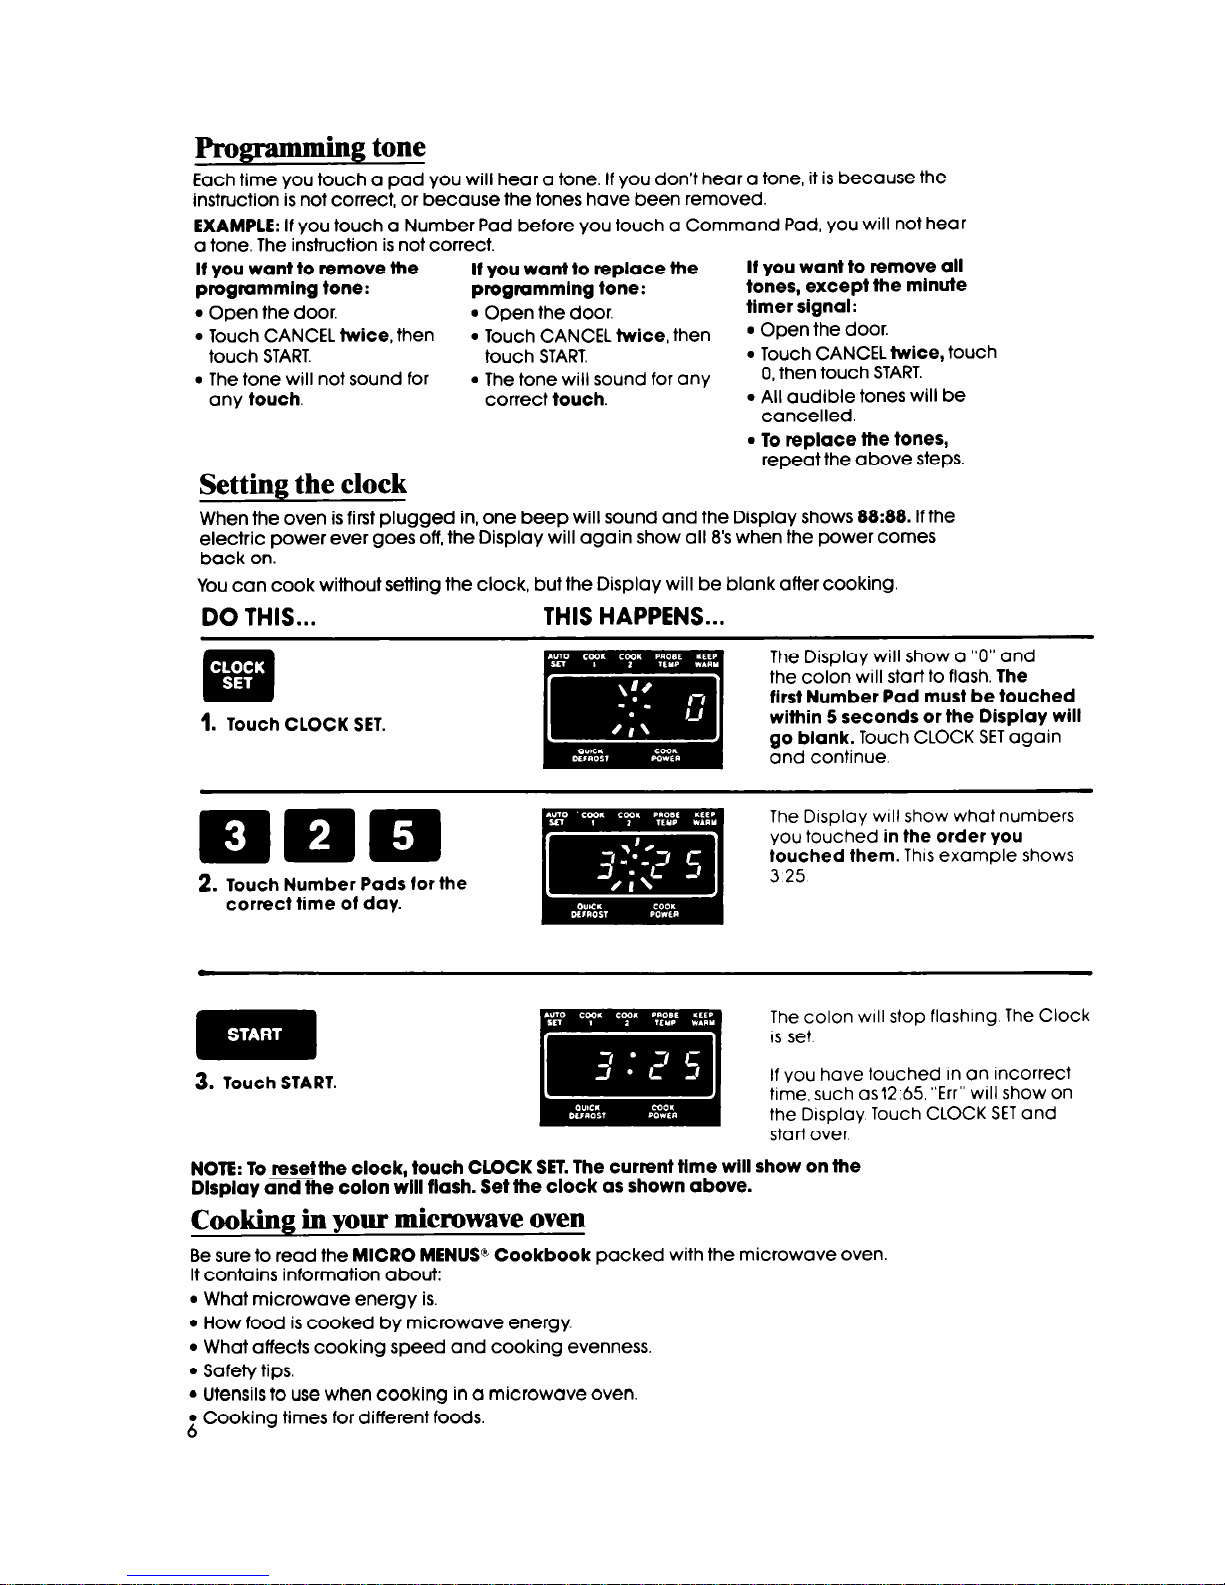
Fr0gramming tone
Each time you touch a pad you will hear a tone. If you don’t hear a tone, it is because the
instruction is not correct, or because the tones have been removed.
EXAMPLE: If you touch a Number Pad before you touch a Command Pad, you will not hear
a tone. The instruction is not correct.
If you want to remove the If you want to replace the
If you want to remove all
programmlng tone:
programmtng tone:
tones, except the mlnute
l
Open the door.
l
Open the door.
timer signal:
l
Touch CANCEL twice, then
l
Touch CANCEL twice, then
l
Open the door.
touch START.
touch START.
l
Touch CANCEL twice, touch
l
The tone will not sound for
l
The tone will sound for any
0, then touch START.
any touch.
correct touch.
l
All audible tones will be
cancelled.
0 To replace the tones,
repeat the above steps.
Setting the clock
When the oven is first plugged in, one beep will sound and the Display shows 88:88. If the
electric power ever goes off, the Display will again show all 8’s when the power comes
back on.
You can cook without setting the clock, but the Display will be blank after cooking.
DO THIS... THIS HAPPENS...
The Display will show a “0” and
the colon will start to flash. The
first Number Pad must be touched
within 5 seconds or the Display will
go blank. Touch CLOCK SET again
and continue.
2. Touch Number Pads for the
correct time of day.
The D~sploy WIII show what numbers
you touched in the order you
touched them. This example shows
3 25
3.
Touch START.
The colon WIII stop flashing The Clock
IS set
If you have touched in an incorrect
time, such as12 65, “Err” will show on
the Display Touch CLOCK SET and
start over
NOTE: To resetthe clock, touch CLOCK SET. The current tlme will show on the
Display and the colon will flash. Set the clock as shown above.
Cooking in your microwave oven
Be sure to read the MICRO MENUS% Cookbook packed with the microwave oven.
It contains information about:
l
What microwave energy is.
l
How food is cooked by microwave energy.
l
What affects cooking speed and cooking evenness.
l
Safety tips.
6 Utensils to use when cooking in a microwave oven.
l
Cooking times for different foods.
6
Important things to remember to get the best cooking results.
l
ALWAYS cook food for the minimum recommended cooking time. If necessary, add time
in one or two minute periods, then check for doneness to avoid overcooking the food.
l
Stir, turn or rearrange the food being cooked about halfway through the cooking time
for most even doneness with all recipes.
l
If a glass cover is not available, use waxpaper, paper towels or microwave approved
plastic wrap. Turn back a corner to vent steam during cooking.
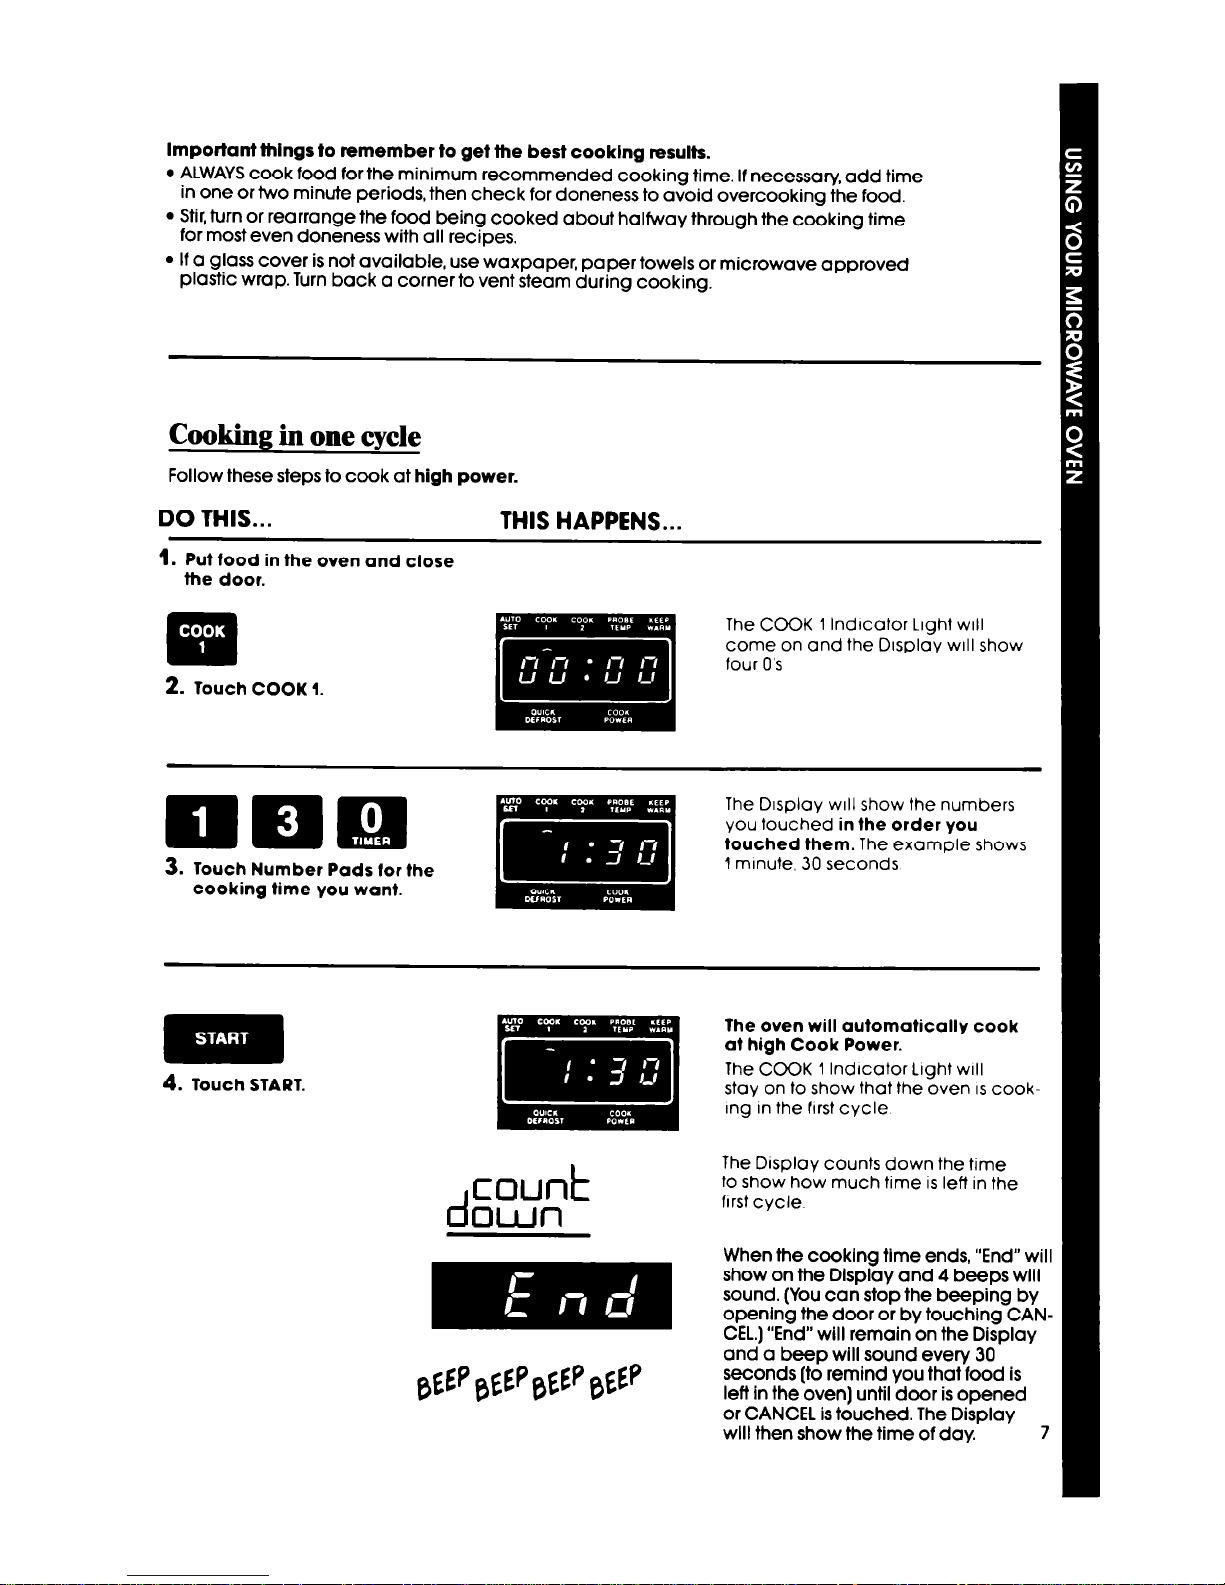
Cooking in one cycle
Follow these steps to cook at high power.
DO THIS...
THIS HAPPENS...
1.
Put food in the oven and close
the door.
The COOK 1 lndlcalor Light WIII
come on and the Display WIII show
four O’s
3. Touch Number Pads for the
cooking time you want.
The Display
will
show the numbers
you touched in the order you
touched them. The example shows
1 minute. 30 seconds
4.
Touch START.
d
COUd
ClWfl
The oven will automatically cook
at high Cook Power.
The COOK 1 Indicator Light
will
stay on to show that the oven
IS
cook-
Ing in the first cycle
The Display counts down the time
to show how much time is lett in the
first cycle
When the cooklng time ends, “End” will
show on the Display and 4 beeps will
sound. (You can stop the beeping by
opening the door or by touching CAN-
CEL.) “End” will remain on the Display
and a beep will sound every 30
seconds (to remind you that food is
left in the oven) until door is opened
or CANCEL is touched. The Display
will then show the time of day.
7
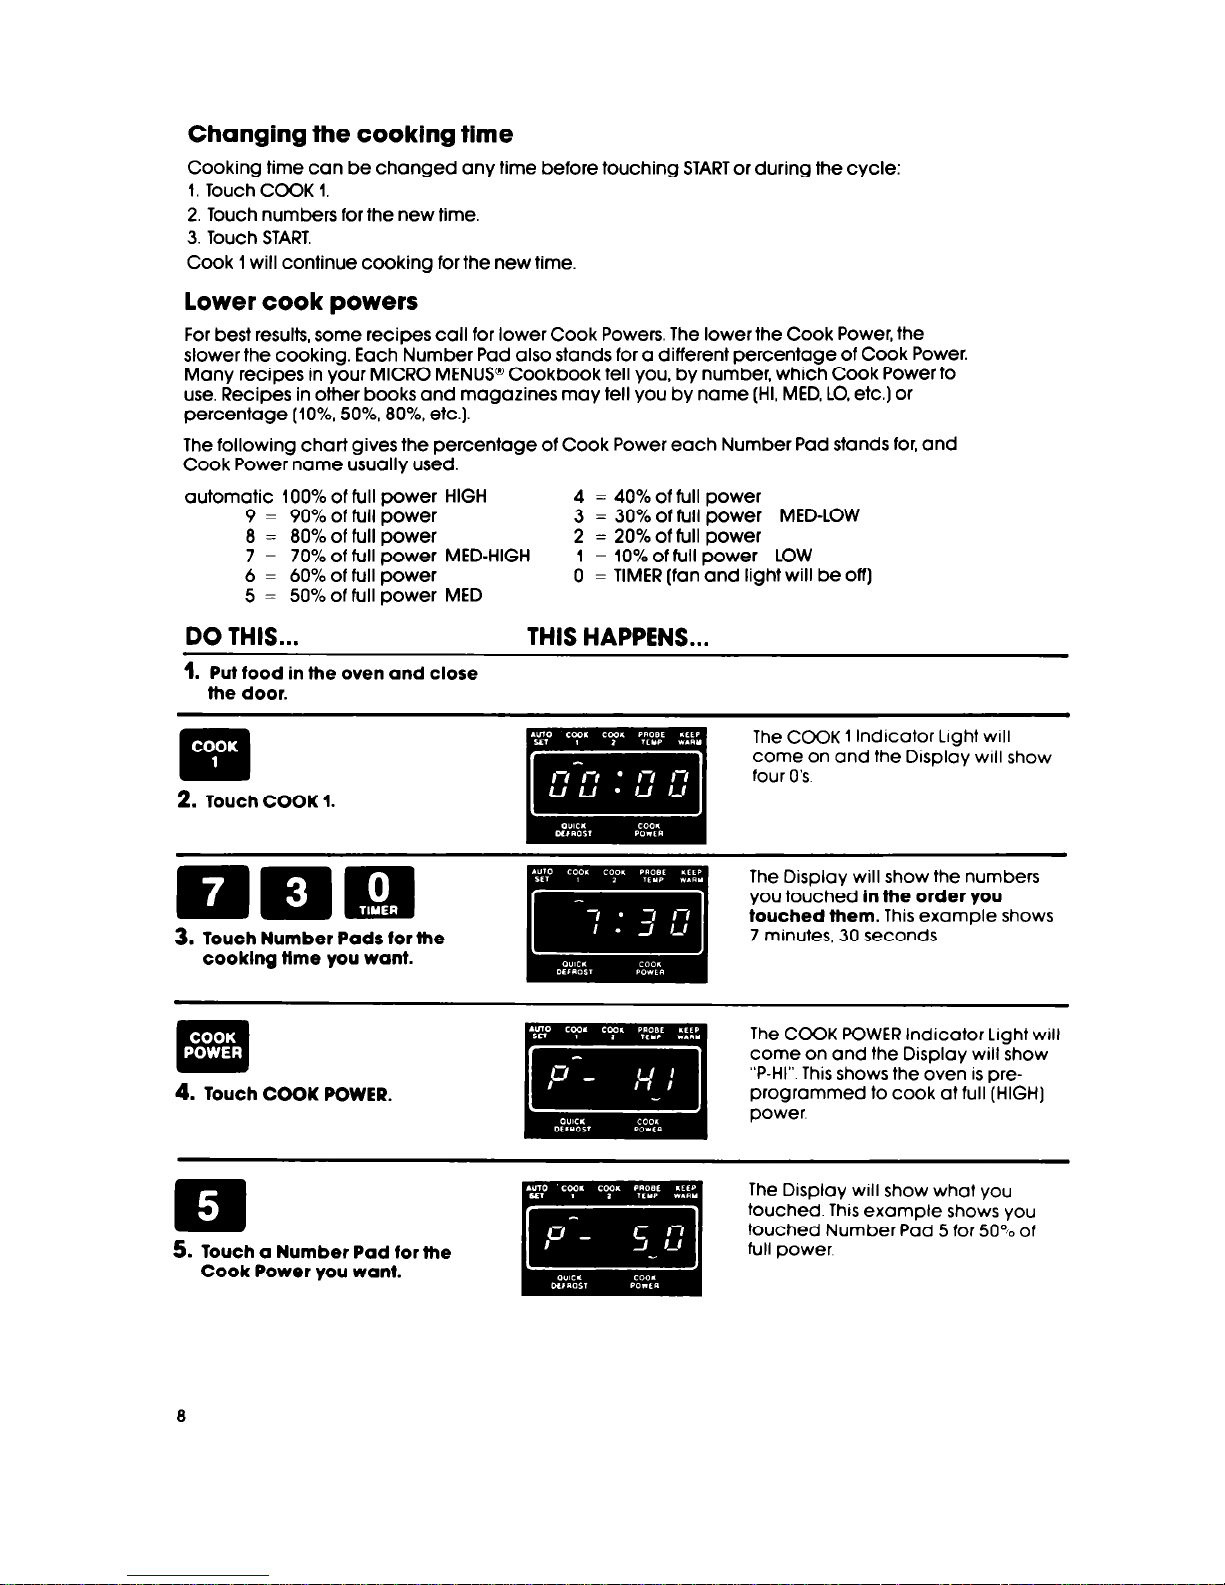
Changing the cooking time
Cooking time can be changed any time before touching START or during the cycle:
1. Touch COOK 1.
2. Touch numbers for the new time.
3. Touch START.
Cook 1 will continue cooking for the new time.
lower cook powers
For best results, some recipes call for lower Cook Powers. The lower the Cook Power, the
slower the cooking. Each Number Pad also stands for a different percentage of Cook Power.
Many recipes in your MICRO MENUS@ Cookbook tell you, by number, which Cook Power to
use. Recipes in other books and magazines may tell you by name (HI, MED, LO, etc.) or
percentage (lo%, 50%, 80%, etc.).
The following chart gives the percentage of Cook Power each Number Pad stands for, and
Cook Power name usually used.
automatic 100% of full power HIGH
9 = 90% of full power
8 = 80% of full power
7 = 70% of full power MED-HIGH
6 = 60% of full power
5 = 50% of full power MED
4 = 40% of full power
3 = 30% of full power MED-LOW
2 = 20%of full power
1 = 10% of full power LOW
0 = TIMER [fan and light will be off)
DO THIS...
THIS HAPPENS...
1. Put food in the oven and close
the door.
The
COOK
1 lndicotor Light will
come on and the Display WIII show
four 0’s.
3. Touch Number Pads for the
cooklng ttme you want.
The Display will show the numbers
you touched in the order you
touched them. This example shows
7 minutes, 30 seconds.
. .
M!
‘. .
4. Touch COOK POWER.
The COOK POWER Indicator Light will
come on and the Display will show
“P-HI”. This shows the oven is preprogrammed to cook at full (HIGH]
power.
5. Touch a Number Pad for the
Cook Power you want.
The Display will show what you
touched. This example shows you
touched Number Pad 5 for 50% of
full power.
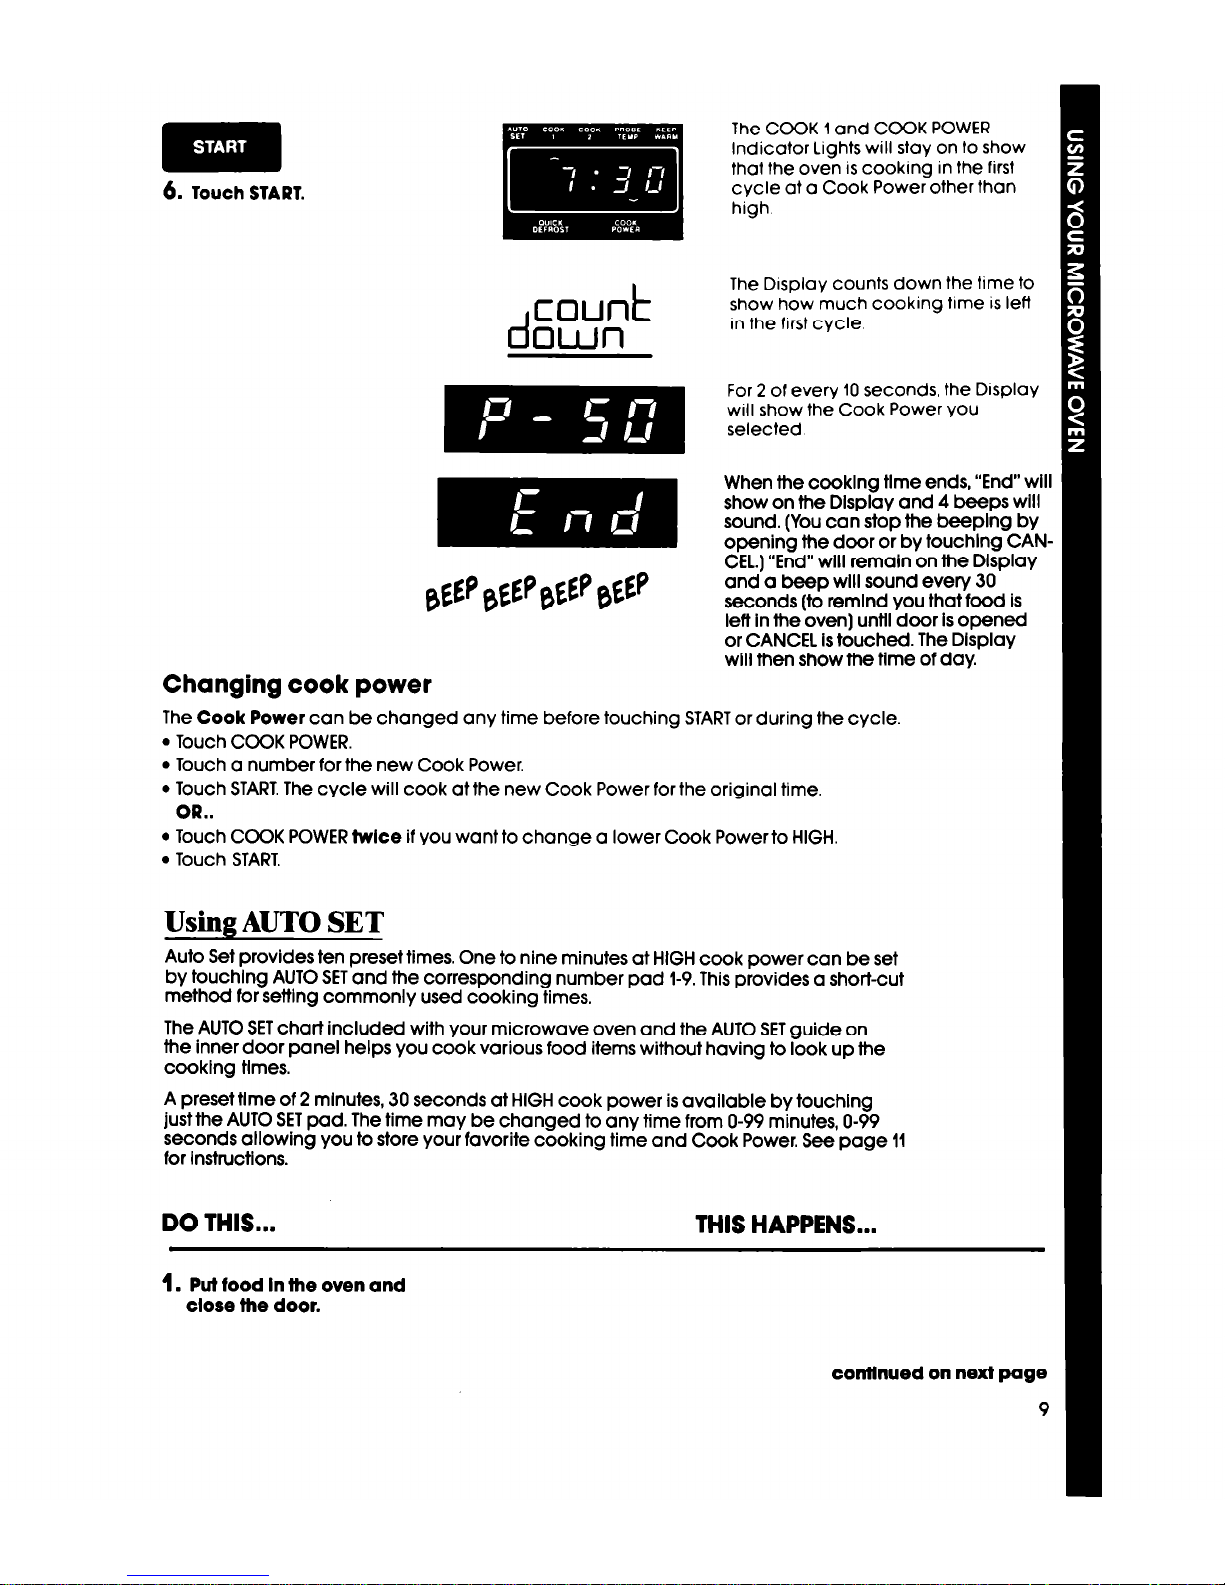
6. Touch START.
d
count
own
Changing cook power
The COOK 1 and COCK POWER
Indicator Lights will stay on to show
that the oven is cooking in the first
cycle at o Cook Power other than
high
The Display counts down the time to
show how much cooking time is left
In the first cycle
For 2 of every 10 seconds, the Display
will show the Cook Power you
selected
When the cooklng time ends, “End” will
show on the Display and 4 beeps will
sound. (You can stop the beeplng by
opening the door or by fouchlng CANCEL.) “End” will remain on the Display
and a beep will sound every 30
seconds (to remind you that food is
left In the oven] unfil door Is opened
or CANCEL Is touched. The Display
will then show the tlme of day.
The Cook Power can be changed any time before touching START or during the cycle
. Touch COOK POWER.
l
Touch a number for the new Cook Power.
l
Touch START. The cycle will cook at the new Cook Power for the original time.
OR..
l
Touch COOK POWER lwlce if you want to change a lower Cook Power to HIGH.
l
Touch START.
Using AUTO SET
Auto Set provides fen presettimes. One to nine minutes at HIGH cook power can be set
by touching AUTO SET and the corresponding number pad 1-9. This provides a short-cut
method for sefflng commonly used cooking times.
The AUTO SET chart included with your microwave oven and the AUTO SET guide on
the inner door panel helps you cook various food items without having to look up the
cooklng times.
A preset time of 2 mlnufes, 30 seconds at HIGH cook power is avallable by touching
just the AUTO SET pad. The time may be changed to any time from O-99 minutes, O-99
seconds allowing you to store your favorite cooking time and Cook Power. See page 11
for Instructions.
DO THIS...
THIS HAPPENS...
1. Puf food In the oven and
close the door.
conflnued on next page
9
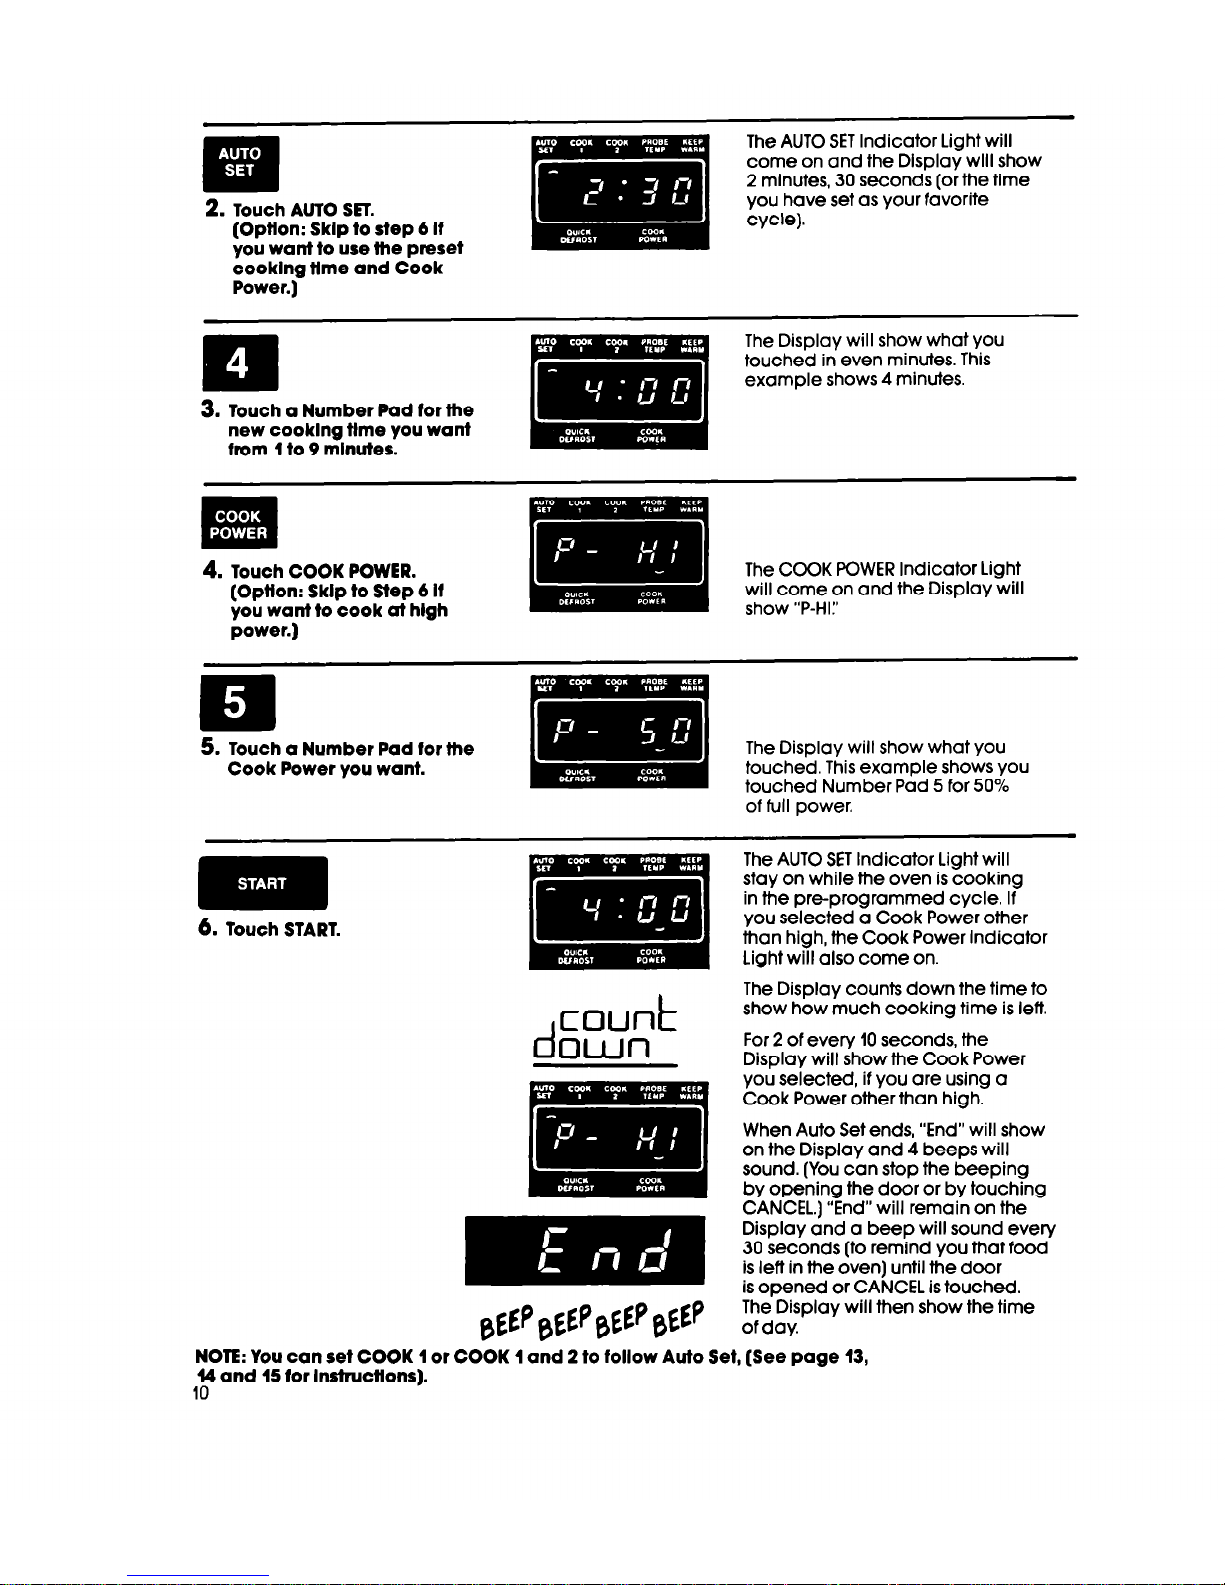
2. Touch AUTO SEl.
(Optton: Sklp to step 6 If
you want to use the preset
cooking ttme and Cook
Power.)
The AUTO SET Indicator Light will
come on and the Display will show
2 mlnufes, 30 seconds (or the time
you have set as your favorite
cycle).
m
A
3. Touch a Number Pad for the
new cooklng ttme you want
from 1 to 9 minutes.
The Display will show what you
touched in even minutes. This
example shows 4 minutes.
. .
m
‘. -
4. Touch COOK POWER.
(Option: Sklp to Step 6 If
you want to cook at hlgh
The COCK POWER Indicator Light
will come on and the Display will
show “P-HI:’
power.)
5. Touch a Number Pad for the
Cook Power you want.
The Display will show what you
touched. This example shows you
touched Number Pad 5 for 50%
of full power.
6. Touch START.
d
count
own
The AUTO SET Indicator Light will
stay on while the oven is cooking
in the preprogrammed cycle. If
you selected a Cook Power other
than high, the Cook Power Indicator
Light will also come on.
The Display counts down the time to
show how much cooking time is left.
For 2 of every 10 seconds, the
Display will show the Cook Power
you selected, if you are using a
Cook Power other than high.
When Auto Set ends, “End” will show
on the Display and 4 beeps will
sound. (You can stop the beeping
by opening the door or by touching
CANCEL.) “End” will remain on the
Display and a beep will sound every
30 seconds (to remind you that food
is left in fhe oven) until the door
is opened or CANCEL is touched.
The Display will then show the time
of day.
NOTE: You can set COOK 1 or COOK 1 and 2 to follow Auto Set, (See page 13,
14 and 15 for
10
Instructtons).
 Loading...