

Whirlpool MMV5207AA-AC User Manual

Over The Range
Microwave Oven
Use & Care Guide
Model MMV5207AA/AC
Important Safety Instructions .................. 2-4
Features ........................................................ 5-6
Operating Instructions ........................... 7-22
Care and Cleaning ................................ 23-24
Cooking Utensils ......................................... 25
Troubleshooting .................................... 26-27
Warranty ........................................................ 28
Guide d’utilisation et d’entretien ............. 29
Guía de Uso y Cuidado ................................ 57
Keep instructions for future reference.
Be sure manual stays with oven.
Form No. B/11/04 ©2004 Maytag Appliances 3828W5A4122 Part No. 8112P270-60

Important Safety Instructions
Installer: Please leave this guide with this appliance.
Consumer: Please read and keep this Use & Care Guide for
future reference.
Keep sales receipt and/or cancelled check as proof of
purchase.
Model Number ________________________________
Serial Number_________________________________
Date of Purchase ______________________________
In our continuing effort to improve the quality and
performance of our appliances, it may be necessary to
make changes to the appliance without revising this
guide.
If you have questions, write us (include your model
number and phone number) or call:
Maytag Services
Attn: CAIR® Center
P.O. Box 2370
Cleveland, TN 37320-2370
1-800-688-9900 U.S.A
1-800-688-2002 Canada
1-800-688-2080
(U.S.A TTY for hearing or speech impaired)
(Mon.-Fri., 8 a.m.-8 p.m. Eastern Time)
Internet: http://www.maytag.com
SM
CAUTION
To avoid personal injury or property damage, observe the
following:
1. Do not deep fat fry in oven. Fat could overheat and be
hazardous to handle.
2. Do not cook or reheat eggs in shell or with an
unbroken yolk using microwave energy. Pressure may
build up and erupt. Pierce yolk with fork or knife before
cooking.
3. Pierce skin of potatoes, tomatoes, and similar foods
before cooking with microwave energy. When skin is
pierced, steam escapes evenly.
4. Do not operate oven without load or food in oven cavity.
5. Use only popcorn in packages designed and labeled for
microwave use. Popping time varies depending on oven
wattage. Do not continue to heat after popping has
stopped. Popcorn will scorch or burn. Do not leave oven
unattended.
6. Do not use regular cooking thermometers in oven.
Most cooking thermometers contain mercury and may
cause an electrical arc, malfunction, or damage to oven.
What You Need to Know About
Safety Instructions
Warning and Important Safety Instructions appearing in this
Use & Care Guide are not meant to cover all possible
conditions and situations that may occur. Common sense,
caution, and care must be exercised when installing,
maintaining, or operating microwave.
Always contact your dealer, distributor, service agent, or
manufacturer about problems or conditions you do not
understand.
Recognize Safety Symbols, Words,
Labels
DANGER
DANGER – Immediate hazards which WILL result in
severe personal injury or death.
WARNING
WARNING – Hazards or unsafe practices which COULD
result in severe personal injury or death.
7. Do not use metal utensils in oven.
8. Never use paper, plastic, or other combustible materials
that are not intended for cooking.
9. When cooking with paper, plastic, or other combustible
materials, follow manufacturer's recommendations on
product use.
10. Do not use paper towels which contain nylon or other
synthetic fibers. Heated synthetics could melt and
cause paper to ignite.
11. Do not heat sealed containers or plastic bags in
oven. Food or liquid could expand quickly and cause
container or bag to break. Pierce or open container or
bag before cooking.
12. To avoid pacemaker malfunction, consult physician or
pacemaker manufacturer about effects of microwave
energy on pacemaker.
CAUTION
CAUTION – Hazards or unsafe practices which COULD
result in minor personal injury.
2

Important Safety Instructions
WARNING
• To avoid risk of electrical shock or death, this oven
must be grounded.
• To avoid risk of electrical shock or death, do not alter
the plug.
Grounding Instructions
Oven MUST be grounded. Grounding
reduces risk of electric shock by
providing an escape wire for the
electric current if an electrical short
occurs. This oven is equipped with a
cord having a grounding wire with a grounding plug. The
plug must be plugged into an outlet that is properly
installed and grounded. See Installation Instructions.
Consult a qualified electrician or servicer if grounding
instructions are not completely understood, or if doubt
exists as to whether the oven is properly grounded.
Do not use an extension cord. If the product power cord
is too short, have a qualified electrician install a three-slot
receptacle. This oven should be plugged into a separate
60 hertz circuit with the electrical rating as shown in
specifications table. When the oven is on a circuit with other
equipment, an increase in cooking times may be required
and fuses can be blown.
Microwave operates on standard household current, 110120V.
• Relocate the microwave oven with respect to the receiver.
• Move the microwave oven away from the receiver.
• Plug the microwave oven into a different outlet so that the
microwave oven and the receiver are on different branch
circuits.
The manufacturer is not responsible for any radio or
television interference caused by unauthorized
modification to this microwave oven. It is the responsibility
of the user to correct such interference.
Precautions to Avoid Possible
Exposure to Excessive
Microwave Energy
A. DO NOT attempt to operate this oven with the door open
since open door operation can result in harmful exposure
to microwave energy. It is important not to defeat or
tamper with the safety interlocks.
B. DO NOT place any object between the oven front
face and the door to allow soil or cleaner residue to
accumulate on sealing surfaces.
C. DO NOT operate the oven if it is damaged. It is
particularly important that oven door close properly and
that there is no damage to:
1. door (bent),
2. hinges and latches (broken or loosened),
3. door seals and sealing surfaces.
D. Oven should not be adjusted or repaired by anyone
except properly qualified service personnel.
Federal Communications
Commission Radio Frequency
Interference Statement
(U.S.A. Only)
This equipment generates and uses ISM frequency energy
and if not installed and used properly, that is in strict
accordance with the manufacturer's instructions, may
cause interference to radio and television reception. It has
been type tested and found to comply with limits for ISM
Equipment pursuant to part 18 of FCC Rules, which are
designed to provide reasonable protection against such
interference in a residential installation.
However, there is no guarantee that interference will not
occur in a particular installation. If this equipment does
cause interference to radio or television reception, which
can be determined by turning the equipment off and on, the
user is encouraged to try to correct the interference by one
or more of the following:
• Reorient the receiving antenna of the radio or television.
SAVE THESE INSTRUCTIONS
WARNING
Liquids such as water, coffee, or tea are able to be
overheated beyond the boiling point without appearing to
be boiling due to surface tension of the liquid. Visible
bubbling or boiling when the container is removed from
the microwave oven is not always present. THIS COULD
RESULT IN VERY HOT LIQUIDS SUDDENLY BOILING
OVER WHEN A SPOON OR OTHER UTENSIL IS
INSERTED INTO THE LIQUID. To reduce the risk of
injury to persons:
1. Do not overheat the liquid.
2. Stir the liquid both before and halfway through heating it.
3. Do not use straight-sided containers with narrow
necks.
4. After heating, allow the container to stand in the
microwave oven for a short time before removing the
container.
5. Use extreme care when inserting a spoon or other
utensil into the container.
3

Important Safety Instructions
WARNING
When using electrical appliances, basic safety
precautions should be followed to reduce the risk
of burns, electric shock, fire, or injury to persons or
exposure to excessive microwave energy.
1. READ all instructions before using oven.
2. READ AND FOLLOW the specific
“PRECAUTIONS TO AVOID POSSIBLE
EXPOSURE TO EXCESSIVE MICROWAVE
ENERGY” on page 3.
3. Install or locate this oven ONLY in accordance
with the installation instructions in this manual.
4. Some products such as whole eggs and sealed
containers –for example, closed glass jars –are
able to explode and SHOULD NOT be HEATED
in this oven.
5. Use this oven ONLY for its intended use as
described in this manual. Do not use corrosive
chemicals or vapors in this oven. This type of
oven is specifically designed to heat, cook, or
dry food. It is not designed for industrial or
laboratory use.
6. As with any appliance, CLOSE SUPERVISION
is necessary when used by CHILDREN or
INFIRM PERSONS.
7. See door cleaning instructions in the Care and
Cleaning section.
8. Baby food jars shall be open when heated and
contents stirred or shaken before consumption,
in order to avoid burns.
9. DO NOT use this oven for commercial purposes.
It is made for household use only.
10. DO NOT heat baby bottles in oven.
11. DO NOT operate this oven if it has a damaged
cord or plug, if it is not working properly, or if it
has been damaged or dropped.
12. This oven, including power cord, must be
serviced ONLY by qualified service personnel.
Special tools are required to service oven.
Contact nearest authorized service facility for
examination, repair, or adjustment.
13. DO NOT cover or block filter or other openings
on oven.
14. DO NOT store this oven outdoors. DO NOT
use this product near water –for example,
near a kitchen sink, in a wet basement, near a
swimming pool or similar locations.
15. DO NOT immerse cord or plug in water.
16. Keep cord AWAY from HEATED surfaces.
17. DO NOT let cord hang over edge of table or
counter.
18. Clean the ventilating hood frequently.
19. Do not allow grease to accumulate on the hood
or filters.
20. Use care when cleaning the ventilating hood
fil-ters. Corrosive cleaning agents such as lyebased oven cleaners may damage the filters.
21. When flaming foods under the hood, turn the
fan on.
22. Suitable for use above both gas and electric
cooking equipment 36 inches or less wide.
To avoid risk of fire in the oven cavity:
a. DO NOT overcook food. Carefully attend oven when
paper, plastic, or other combustible materials are
placed inside the oven to facilitate cooking.
b. Remove wire twist-ties from paper or plastic bags
before placing bag in oven.
SAVE THESE INSTRUCTIONS
CAUTION
c. If materials inside the oven ignite, keep oven door
CLOSED, turn oven off and disconnect the power cord,
or shut off power at the fuse or circuit breaker panel.
d. DO NOT use the cavity for storage. DO NOT leave
paper products, cooking utensils, or food in the cavity
when not in use.
4

Features
Door Handle
Window with
Metal Shield
Model and Serial
Model and Serial
Number Plate
Metal Rack
Cooking Guide
Vent Grille
OVEN SPECIFICATIONS
Power Supply
Input Power
120 VAC,
60 Hz
1,700 W (MMV5207AA)
1,500 W (MMV5207AC)
Door Safety
Lock System
Defrost
Plate
Use the DEFROST PLATE provided for
complete defrosting of larger food items.
1
2
3
Glass Tray
Grease Filter
Oven Control
Cooktop/Countertop Light
1. Glass Tray
2. Support
3. Hub
Panel
Cooking Power
1,100 W (MMV5207AA)
1,000 W (MMV5207AC)
(IEC 60705 Standard)
Frequency
Rated Current
2,450 MHz
14.5 A (MMV5207AA)
12.8 A (MMV5207AC)
Outer Dimensions
(WxHxD)
Cavity Volume
Net Weight
15
29
/16"
5
x 15
2.0 Cu. Ft.
65 lbs.
/8"
x 16
7
/16"
/AC
1
2
3
5
6
8
9
4
7
10
11
The glass tray moves in both directions to help cook food more
evenly. Do not operate the microwave oven without the glass tray in
place.
To install:
1. Place the hub stem into the hole at the center of the cavity bottom.
2. Place the support on the oven cavity bottom.
3. Place the glass tray on the support. Position the cut out groove in
the center of the glass tray over the roller on the hub. At the same
time, position the rollers of the support inside the ridges of the
front and back of the glass tray. The tray will not move properly
unless all rollers are positioned properly under the glass tray.
15
16
18
19
21
23
24
26
27
12
13
14
17
20
22
25
28
5

Features
FEATURES
NOTE: Styling and features vary by
model.
1. DISPLAY: The Display includes a
clock and indicators to tell you time
of day, cooking time setting and
cooking functions selected.
2. POPCORN: Touch this pad
when popping popcorn in your
microwave oven. The oven’s
sensor will tell the oven how
long to cook depending on the
amount of humidity it detects
from the popcorn.
3. COOK: Touch this pad to cook
Potato, Vegetable, Casserole, Rice
and Frozen Entree. The oven’s
sensor will tell the oven how long to
cook depending on the amount of
humidity coming from the food.
4. REHEAT: Touch this pad to reheat
Pizza, Dinner Plate, Soup/Sauce,
and Casserole. The oven’s sensor
will tell the oven how long to
cook depending on the amount of
humidity coming from the food.
5. POULTRY: Touch this pad to cook
chicken wings, chicken nuggets,
Spicy chicken and Mexican
chicken.
6. SOFTEN: Touch this pad to soften
Butter, Ice Cream, Cream Cheese
and Frozen Juice.
7. MELT: Touch this pad to melt
Butter, Chocolate, Cheese and
Marshmallows.
9. TIME DEFROST: Touch this pad to
defrost most other frozen foods.
10. RAPID DEFROST: This pad
provides RAPID defrost for 1.0
pound of frozen food.
11. CLOCK: Touch this pad to enter the
time of day.
12. HOLD WARM: Touch this pad to
keep hot, cooked foods warm in
your microwave oven for up to 90
minutes.
13. ADD 30 SEC.: Touch this pad to
set and start quickly at 100% power
level.
14. CUSTOM PROGRAM: Touch
this pad to recall one cooking
instruction previously programmed
into memory.
15. NUMBER: Touch number pads to
enter cooking time, power level,
quantities, or weights.
16. MORE+: Touch this pad to add ten
seconds of cooking time each time
you press it.
17. LESS-: Touch this pad to subtract
ten seconds of cooking time each
time you press it.
18. POWER LEVEL: Touch this pad to
select a cooking power level.
19. CONTROL SETUP: Touch this
pad to change the oven’s default
settings for sound, clock, display
speed and defrost weight.
20. COOK TIME: Touch this pad to to
set a cooking time.
21. STOP/CLEAR: Touch this pad to
stop the oven or to clear all entries.
22. ENTER/START: Touch this pad
to start a function. If you open the
door after oven begins to cook,
touch ENTER/START again.
23. KITCHEN TIMER: Touch this pad
to set the kitchen timer.
24. LIGHT TIMER: Touch this pad to
set the light timer.
25. LIGHT HI/LO/OFF: Touch this pad
to turn on the cooktop/ countertop
light.
26. VENT ON/OFF: Touch this pad to
turn the fan on/off.
27. VENT 5-SPEED: Touch this pad to
choose one of 5 fan speeds.
28. VENT AUTO TIME SET: Touch this
pad when setting ventilation time.
(1, 3, 5, 10, 30 minutes.)
8. AUTO DEFROST: Meat, poultry,
fish and bread. Touch this pad to
select food type and defrost food by
weight.
6

Operating Instructions
LEARN ABOUT YOUR
MICROWAVE OVEN
This section discusses the concepts
behind microwave cooking and
introduces you to the basics you need
to know to operate your microwave
oven. Please read this information
before use.
CAUTION
➣ To avoid risk of personal
injury or property damage, do
not run oven empty.
➣ To avoid risk of personal
injury or property damage, do
not use stoneware, aluminum
foil, metal utensils, or metal
trimmed utensils in the oven.
CLOCK
This oven includes a 12-hour clock.
Example: To set 8:00 AM.
KITCHEN TIMER
You can use your microwave oven as a
timer. Use the Timer for timing up to 99
minutes, 99 seconds.
Example: To set for 3 minutes.
1. Touch KITCHEN
TIMER pad.
2. Enter the time by
using the number
key pad.
3. Touch ENTER/
START pad.
When the time is
over, you will hear
beeps and END
will display.
CONTROL SETUP
You can change the default values for
beep sound, clock, display speed and
defrost weight.
See following chart for more information.
VENT FAN
The fan moves steam and other vapors
from the cooking surface. There are
five speeds.
Example for Level 4:
1. Touch ON/OFF
pad. This shows
the last level until
you select the fan
speed level.
2. Touch until level
4 appears in the
display.
Touch ON/OFF pad to turn off fan
when desired.
NOTE: If the temperature from the
range or cooktop below the oven gets
too hot, the exhaust fan in the vent
hood will automatically turn on at the
LEVEL 4 setting to protect the oven.
It may stay on up to an hour to cool the
oven. When this occurs, the ON/OFF
button will not turn the fan off.
1. Touch CLOCK
pad.
2. Enter the time by
using the number
key pad.
3. Touch ENTER/
START pad.
(Press number 1
for AM, number 2
for PM.)
4. Touch ENTER/
START pad.
No. Function
1 Beep ON/ 1 Sound ON
OFF control 2 Sound OFF
2 Clock display 1 Clock ON
control 2 Clock OFF
3 Display 1 Slow speed
2 Normal speed
3 Fast speed
4 Defrost weight 1 Lbs.
mode selected 2 Kg.
Example: To change defrost weight
mode (from Lbs. to Kg).
No. Result
1. Touch CONTROL
SETUP pad.
2. Touch number 4
pad.
3. Touch number 2
pad.
VENT AUTO TIME SET
Example: To set 30 minutes for
level 4.
1. Touch ON/OFF
pad.
2. Touch until level
4 appears in the
display.
3. Touch Auto Time
Set pad 5 times.
LIGHT HI/LO/OFF
Touch LIGHT HI/
LO/OFF pad once
for bright light,
twice for night light,
or three times to
turn the light off.
7

Operating Instructions
CHILD LOCK
You may lock the control panel to
prevent the microwave from being
accidentally started or used by
children.
The Child Lock feature is also useful
when cleaning the control panel. Child
Lock prevents accidental programming
when wiping the control panel.
Example: To set the child lock.
1. Touch STOP/
CLEAR pad.
2. Touch and hold
ENTER/START
pad more than
4 seconds.
LOCKED will
appear in the
display window
with two beeps.
Example: To cancel the child lock.
1. Touch and hold
ENTER/START
pad more than
4 seconds.
LOCKED will
disappear and you
hear two beeps.
ADD 30 SEC.
LIGHT TIMER
You can set the LIGHT to turn on and
off automatically at any time. The light
comes on at the same time every day
until reset.
Example: Turn on 2:00 AM, turn off
7:00 AM.
1. Touch LIGHT
TIMER pad.
2. Enter the time
you want the
LIGHT to turn on.
3. Touch ENTER/
START pad.
(Press number 1
for AM, number 2
for PM.)
4. Touch ENTER/
START pad
again.
5. Enter the time
you want the
LIGHT to turn off.
6. Touch ENTER/
START pad.
(Press number 1
for AM, number 2
for PM.)
7. Touch ENTER/
START pad.
HOLD WARM
You can keep cooked food warm in
your microwave oven for up to 90
minutes. You can use HOLD WARM
by itself or to follow a cooking cycle
automatically.
Example: To use HOLD WARM.
1. Touch HOLD
WARM pad.
2. Touch ENTER/
START pad.
NOTE:
• HOLD WARM operates for up to 90
minutes.
• Food cooked covered should be
covered during HOLD WARM.
• Pastry items (pies, turnovers, etc.)
should be uncovered during HOLD
WAR M.
• Complete meals kept warm on a
dinner plate can be covered during
HOLD WARM.
Food
Type
Liquid 1-2 cups
Dry 5-10 ozs.
Recommended
Quantity
A time-saving pad, this simplified
control lets you quickly set and start
microwave cooking without the need to
touch the ENTER/ START pad.
Example: To set ADD 30 SEC. for
2 minutes.
1. Touch ADD 30
SEC. pad 4 times.
The oven begins
cooking and
display shows
time counting
down.
NOTE:
• To reset the time to turn on and off
the LIGHT, repeat steps 1 to 7.
Example: To cancel the LIGHT
TIMER.
1. Touch LIGHT
TIMER pad.
2. Touch STOP/
CLEAR pad.
NOTE:
• If you want to cancel the LIGHT
TIMER in operation, touch
the pad.
8
To make HOLD WARM automatically follow another cycle:
• While you are programming the
cooking instructions, touch HOLD
WARM before touching ENTER/
START.
• When the last cooking cycle is over,
you will hear two beeps and “HOLD
WARM” will appear in the oven
display.
• You can set HOLD WARM to follow
AUTO DEFROST, or multi-cycle
cooking.

Operating Instructions
CUSTOM PROGRAM
CUSTOM PROGRAM lets you recall
one cooking instruction previously
placed in memory and begin cooking
quickly.
Example: To cook for 2 minutes.
1. Touch CUSTOM
PROGRAM pad.
2. Enter the cook
time.
3. Touch ENTER/
START pad.
Example: To recall the custom
program.
1. Touch CUSTOM
PROGRAM pad.
2. Touch ENTER/
START pad.
When the cook
time is over, you
will hear four
beeps and COOK
END will display.
MORE+/LESS-
By using the MORE+ or LESS- keys, all
of the pre-programmed cook and time
cook features can be adjusted to cook
food for a longer or shorter time.
Pressing MORE+ will add 10 seconds
of cooking time each time you press
it. Pressing LESS- will subtract 10
seconds of cooking time each time you
press it.
COOKING AT HIGH
POWER LEVELS
Example: To cook food for 8 minutes
30 seconds at 100% power.
1. Enter the cook
time.
2. Touch ENTER/
START pad.
When the cook
time is over, you
will hear four
beeps and COOK
END will display.
COOKING AT LOWER
POWER LEVELS
HIGH power cooking does not always
give you the best results with foods
that need slower cooking, such as
roasts, baked goods, or custards. Your
oven has 10 power settings in addition
to HIGH.
Example: To cook food for 7 minutes
30 seconds at 70% power.
1. Enter the cook
time.
2. Touch POWER
LEVEL pad.
3. Enter the power
level.
4. Touch ENTER/
START pad.
When the cook
time is over, you
will hear four
beeps and COOK
END will display.
COOKING WITH
MORE THAN ONE
COOK CYCLE
For best results, some recipes call for
one Power Level for a certain length
of time, and another Power Level for
another length of time.Your oven can
be set to change from one to another
automatically, for up to three cycles if
the first heating cycle is defrost.
Example: To cook food for 3 minutes
at 100% power and then 70% power
for 7 minutes 30 seconds.
1. Enter the first
cook time.
2. Touch COOK
TIME pad.
3. Enter the second
cook time.
4. Touch POWER
LEVEL pad.
5. Enter the power
level.
6. Touch ENTER/
START pad.
When the cook time
is over, you will hear
four beeps and
COOK END will
display.
See cooking guide for Lower Power
Levels, page 10.
9

Operating Instructions
COOKING GUIDE FOR LOWER POWER LEVELS
The 10 power levels in addition to HIGH allow you to choose the best power level for the food you are cooking. Below
are listed all the power levels, examples of foods best cooked at each level, and the amount of microwave power you are
using.
POWER LEVEL MICROWAVE OUTPUT USE
10 High 100% • Boil water.
9 90% • Reheat meat slices quickly.
8 80% • All reheating.
• Cook ground beef.
• Make candy.
• Cook fresh fruits and vegetables.
• Cook fish and poultry.
• Preheat browning dish.
• Reheat beverages.
• Bacon slices.
• Saute onions, celery, and green pepper.
• Cook scrambled eggs.
7 70% • Cook breads and cereal products.
• Cook cheese dishes, veal.
• Cook cakes, muffins, brownies, cupcakes.
6 60% • Cook pasta.
5 50% • Cook meats, whole poultry.
• Cook custard.
• Cook whole chicken, turkey, spare ribs, rib roast, sirloin roast.
4 40% • Cook less tender cuts of meat.
• Reheat frozen convenience foods.
3 30% • Thaw meat, poultry, and seafood.
• Cook small quantities of food.
• Finish cooking casserole, stew, and some sauces.
2 20% • Soften butter and cream cheese.
• Heat small amounts of food.
1 10% • Soften ice cream.
• Raise yeast dough.
0 • Standing time.
10
Operating Instructions
SENSOR OPERATING
INSTRUCTIONS
Sensor Cook allows you to cook most
of your favorite foods without selecting
cooking times and power levels. The
display will indicate sensor category
during the initial sensing period. The
oven automatically determines required
cooking time for each food item. When
the internal sensor detects a certain
amount of humidity coming from the
food, it will tell the oven how much
longer to heat. The display will show
the remaining heating time. For best
results for cooking by Sensor, follow
these recommendations:
1. Food cooked with the sensor
system should be at normal storage
temperature.
2. Glass Tray and outside of container
should be dry to assure best cooking
results.
3. Match the amount to the size of the
container. Fill containers at least half
full for best results.
4. Be sure the outside of the cooking
container and the inside of the
microwave oven are dry before
placing food in the oven. Beads of
moisture turning into steam can
mislead the sensor.
ADDING OR SUBTRACTING
COOK TIME
By using the MORE+ or LESS- pads
all of the sensor cook and time cook
settings can be adjusted to cook food
for a longer or shorter time. Pressing
MORE+ will add 10 seconds of cooking
time each time you press it. Pressing
LESS- will subtract 10 seconds of
cooking time each time you press it.
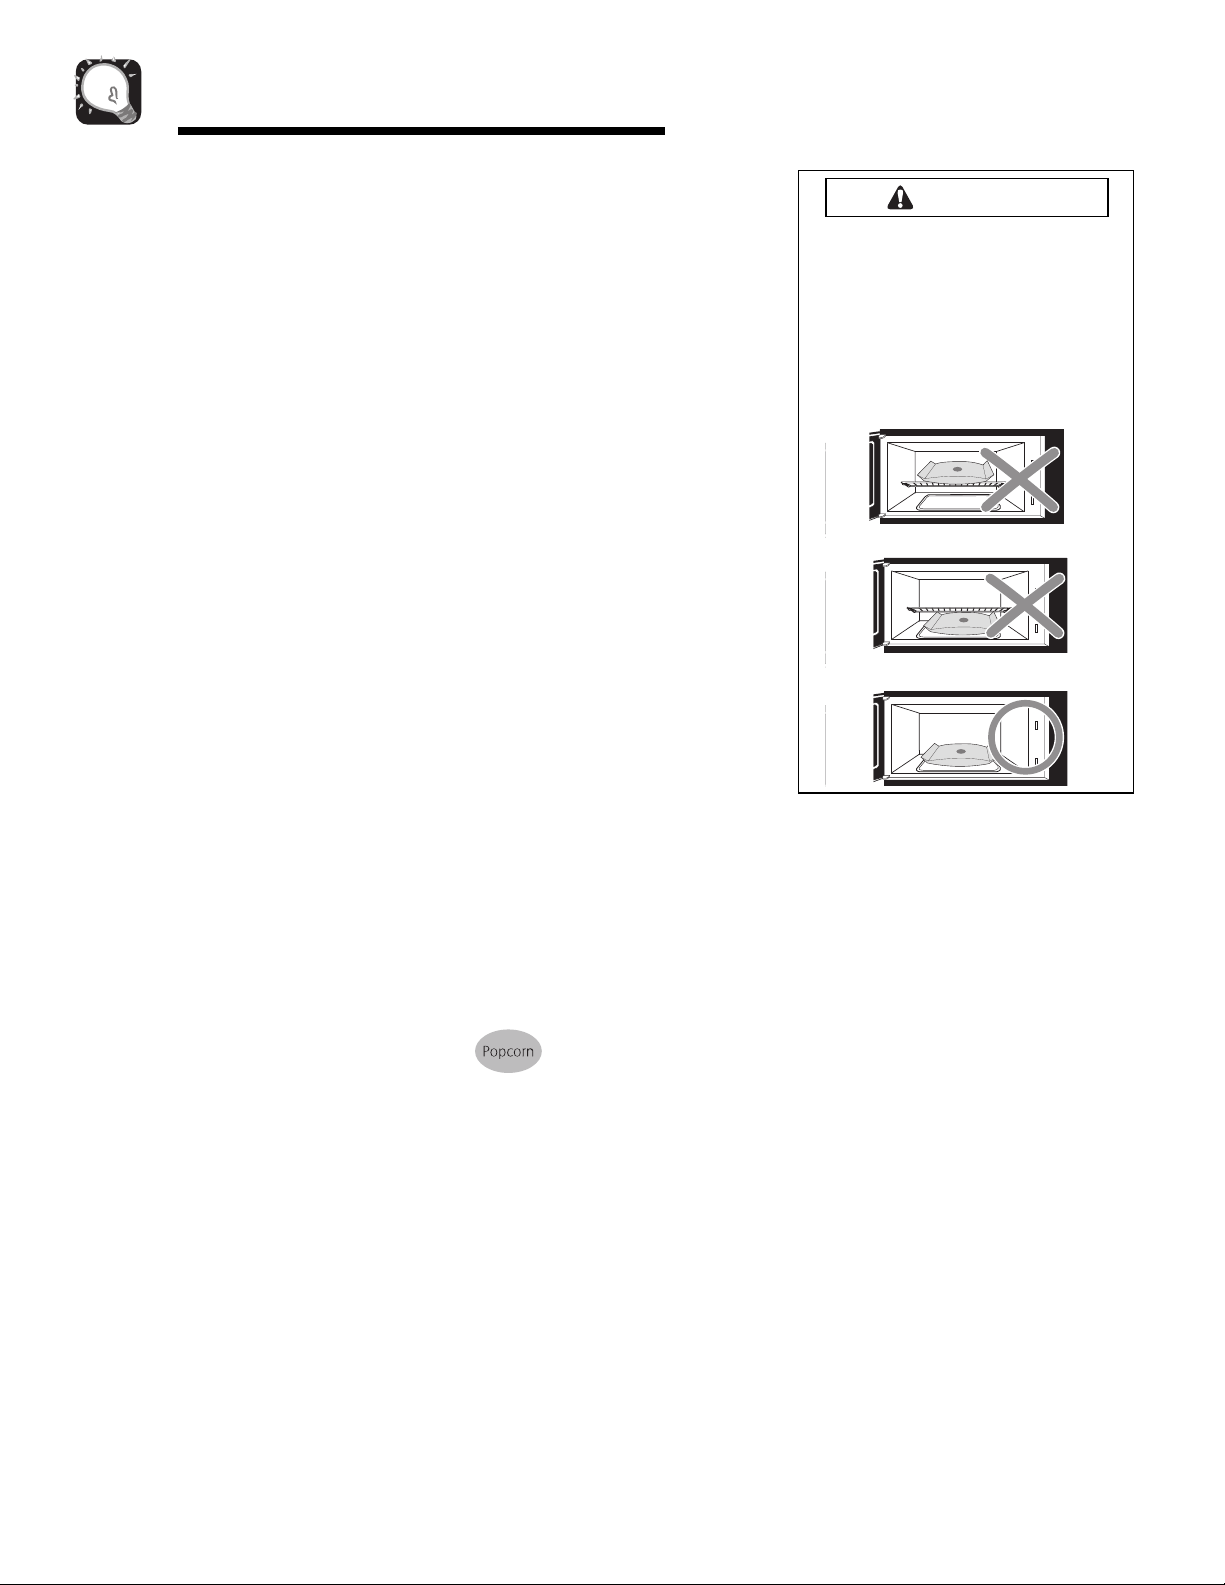
CAUTION
➣ DO NOT leave microwave
oven unattended while
popping corn.
➣ When popping commercially
packaged popcorn, remove
the rack from the oven;
Do not place the bag of
microwave popcorn on the
rack or under the rack.
3. Foods should always be covered
loosely with microwavable plastic
wrap, waxed paper, or a lid.
4. Do not open the door or touch
the STOP/CLEAR pad during the
sensing time. When sensing time is
over, the oven beeps twice and the
remaining cooking time will appear
in the display window. At this time
you can open the door to stir, turn, or
rearrange the food.
SENSOR COOKING
GUIDE
Appropriate containers and coverings
help assure good Sensor cooking
results.
1. Always use microwavable containers and cover them with lids or
vented plastic wrap.
2. Never use tight-sealing plastic
covers. They can prevent steam
from escaping and cause food to
overcook.
SENSOR POPCORN
SENSOR POPCORN lets you pop 3.0
and 3.5 ounce bags of commercially
packaged microwave popcorn. Pop
only one package at a time. If you are
using a microwave popcorn popper,
follow manufacturer’s instructions.
Example: To pop popcorn.
1. Touch POPCORN
pad. When the
cook time is over,
you will hear four
beeps and COOK
END will display:
•
Recommended amounts:
3.0-3.5 ozs.
11

Operating Instructions
SENSOR COOK
Using SENSOR COOK lets you heat
common microwave-prepared foods
without needing to program times
and Cook Powers. SENSOR COOK
has preset Cook Power for 7 food
categories.
Example: To cook rice.
1. Touch COOK
pad.
2. Choose food
category.
SENSOR COOK TABLE
Category Touch Pad Amount
Number
Baked Potato 1 1 - 4 EA
Fresh Vegetable 2 1 - 4 cups
Frozen Vegetable 3 1 - 4 cups
Canned Vegetable 4 1 - 4 cups
Casserole 5 1 - 4 cups
Rice 6 ½ - 2 cups
Frozen Entree 7 10 - 21 ozs
When the cook time is over, you will
hear four beeps and COOK END will
display.
POULTRY
The oven uses low power to cook
poultry (chicken wings, chicken
nuggets, Spicy chicken and Mexican
chicken) See the following table.
Example: To cook 6 ozs. chicken
wings.
1. Touch POULTRY
pad.
2. Choose food
category. Touch
the 1 pad for
chicken wings.
3. Choose amount
by touching the 1
pad for 6 ozs.
4. Touch ENTER/
START pad.
POULTRY TABLE
Category Touch Pad Amount
Number
Chicken wings 1 6, 12 ozs.
Chicken nuggets 2 4, 8 ozs.
Spicy chicken 3 2, 4 servings
Mexican chicken 4 2, 4 servings
SOFTEN TABLE
Category Touch Pad Amount
Number
Butter 1 1,2,3 sticks
Ice cream 2 Pint,Quart,
Half gallon
Cream cheese 3 3, 8 ozs.
Frozen juice 4 6,12,16 ozs.
MELT
The oven uses low power to melt
foods (butter or margarine, chocolate,
marshmallows, or processed cheese
food). See the following table.
Example: To melt 8 ozs. chocolate.
1. Touch MELT pad.
2. Choose food
category. Touch 2
pad for chocolate.
3. Choose food
amount. Touch 2
pad for 8 ozs.
4. Touch ENTER/
START pad.
SENSOR REHEAT
Using SENSOR REHEAT lets you heat
common microwave-prepared foods
without needing to program times and
Power levels.
Example: To reheat 2 slices of pizza.
1. Touch REHEAT
pad.
2. Choose food
category.
SENSOR REHEAT TABLE
Category Touch Pad Amount
Number
Pizza slice 1 1 - 3 slices
Dinner plate 2 1 - 2 servings
Soup/Sauce 3 1 - 4 cups
Casserole 4 1 - 4 cups
SOFTEN
The oven uses low power to soften
foods (butter, ice cream, cream cheese,
and frozen juice) See the following
table.
Example: To soften quart of ice
cream.
1. Touch SOFTEN
pad.
2. Choose food
category. Touch
2 pad for ice
cream.
3. Choose food
amount. Touch 2
pad for quart.
4. Touch ENTER/
START pad.
MELT TABLE
Category Touch Pad Amount
Number
Butter/Margarine 1 1, 2, 3 sticks
Chocolate 2 4, 8 ozs.
Cheese 3 8, 16 ozs.
Marshmallows 4 5, 10 ozs.
12

Operating Instructions
SENSOR COOK TABLE
CATEGORY DIRECTIONS AMOUNT
Baked Potato
Pierce each potato with a fork and place on the oven tray around the
edge, at least one inch apart.
1 - 4 medium approx.
8 -10 ozs. each
Fresh
Vegetable
Frozen
Vegetable
VEGETABLE
Canned
Vegetable
Casserole
Rice
Frozen
Entrée
Prepare as desired, wash, and leave residual water on the vegetables.
Place in an appropriately-sized microwave container, cover with
plastic wrap and vent.
Remove from package, rinse off frost under running water. Place in
an appropriately-sized microwave container, cover with plastic wrap
and vent.
Remove from the outer display can.
Place in an appropriately sized microwave container, cover with plastic
wrap and vent.
After cooking, stir and allow to stand for 3 minutes.
Assemble the ingredients per the recipe in a 1-2 quart casserole.
Cooking with plastic wrap and vent.
After cooking, stir and allow to stand for 3 minutes.
Add twice the amount of water to the rice.
Use a microwave container large enough to prevent water from boiling
over dish. Cover with plastic wrap or lid.
Remove from outer display package. Slit cover. If not in microwavesafe container, place on plate, cover with plastic wrap and vent.
1 - 4 cups
1 - 4 cups
1 - 4 cups
1 - 4 cups
½ - 2 cups
10 - 21 ozs.
SENSOR REHEAT TABLE
CATEGORY DIRECTIONS AMOUNT
Pizza Slice
Dinner Plate
Soup/Sauce
Casserole
This is a reheat function for leftover pizza.
Place on paper towel on a microwave safe plate.
Place on a low plate.
Cover with vented plastic wrap.
Let stand 3 minutes.
Place in shallow microwavable casserole.
Cover with vented plastic wrap.
After cooking, stir and let stand 3 minutes.
Cover dish containing the casserole with plastic wrap and vent.
After cooking, stir and allow to stand for 3 minutes.
1 - 3 slices
(3 - 5 ozs. each)
1 - 2 servings
1 - 4 cups
1 - 4 cups
13

Operating Instructions
POULTRY TABLE
CATEGORY DIRECTIONS AMOUNT
Chicken wings
Frozen, Precooked
Chicken nuggets
Frozen, Precooked
Spicy chicken
Mexican
chicken
Place in a single layer around the edge of a dinner plate or serving platter.
Place in a single layer around the edge of a dinner plate.
- 2 servings (double the ingredients for 4 servings)
• 1 ½ pounds skinless, chicken pieces
• 1 teaspoon cayenne pepper
• 1 ½ tablespoon paprika
• ½ teaspoon pepper
• ½ cup hot sauce or 1 tablespoon Tabasco sauce
• ½ cup barbecue sauce of choice
Mix everything in an 8 X 8- inch glass dish or similar dish and cover with plastic
wrap.
Cook on ‘Spicy chicken’. Stir and serve as is or place under a broiler for a few
minutes for additional browning.
- 2 servings (double the ingredients for 4 servings)
• ½ medium onion, chopped
• ½ green bell pepper, diced
• ½ cup frozen peas
• ½ cup long grain rice
• 1 cup water
• ½
cup salsa
• 1 ½ pounds skinless, chicken pieces, legs, thighs, breasts, wings, or
combination of all
• 1 teaspoon cumin
• Salt and pepper to taste
• ½ cup green olives w/pimentos
Place onions and peppers in an 8 X 8-inch glass dish or similar container and
microwave for 3 minutes.
Add peas, rice, water, salsa, chicken, and cumin.
Season with salt and pepper.
Cover with plastic wrap and cook on ‘Mexican chicken’. Stir in the olives
and serve as is or place under a broiler for a few minutes to add additional
browning.
6 or 12 ozs.
4 or 8 ozs.
2 or 4 servings
2 or 4 servings
14

Operating Instructions
SOFTEN TABLE
CATEGORY DIRECTIONS AMOUNT
Butter
Unwrap and place in microwavable container.
Butter will be at room temperature and ready for use in recipe.
1, 2 or 3 sticks
Ice Cream
Cream cheese
Frozen
juice
Place container in oven.
Ice cream will be soft enough to make scooping easier.
Unwrap and place in microwavable container.
Cream cheese will be at room temperature and ready for use in recipe.
Remove top.
Place in oven.
Frozen juice will be soft enough to easily mix with water.
Pint, Quart, Half gallon
3 or 8 ozs.
6, 12 or 16 ozs.
MELT TABLE
CATEGORY DIRECTIONS AMOUNT
Butter or
Margarine
Chocolate
Cheese
Unwrap and place in microwavable container.
No need to cover butter.
Stir at the end of cooking to complete melting.
Chocolate chips or squares of baking chocolate may be used.
Unwrap squares and place in microwavable container. Stir at the end of cycle to
complete melting.
Use processed cheese food only. Cut into cubes.
Place in a single layer in microwavable container.
Stir at the end of cooking to complete melting.
1, 2 or 3 sticks
4 or 8 ozs.
8 or 16 ozs.
Marshmallows
Large or miniature marshmallows may be used. Place in microwavable
container.
Stir at the end of cycle to complete melting.
15
5 or 10 ozs.

Operating Instructions
AUTO DEFROST
Four defrost choices are preset in the
oven. The defrost feature provides
you with the best defrosting method
for frozen foods, because the oven
automatically sets the defrosting
times for each food item according
to the weight you enter. For added
convenience, the AUTO DEFROST
includes a built-in tone mechanism
that reminds you to check, turn
over, separate, or rearrange the food
during the defrost cycle. Four different
defrosting options are provided.
1. MEAT
2. POULTRY
3. FISH
4. BREAD
After touching AUTO DEFROST once,
select the food category. Available
weight ranges for Meat, Poultry and
Fish are 0.1 to 6.0 lbs. The available
weight range for Bread is 0.1 to 1.0 lb.
Example : To defrost 1.2 lbs of
meat.
1. Touch AUTO
DEFROST pad.
2. Choose food
category.
3. Enter the weight.
4. Touch ENTER/
START pad.
NOTE: After you touch ENTER/START,
the display counts down the defrost
time. The oven will beep once during
the Defrost cycle. At this time, open the
door and turn, separate, or rearrange
the food as needed. Remove any
portions that have thawed then return
frozen portions to the oven and touch
ENTER/START to resume the defrost
cycle. The oven will not stop during
the BEEP unless the door is opened.
For best results:
• Remove fish, shellfish, meat, and
poultry from its original closed
paper or plastic package (wrapper).
Otherwise, the wrap will hold steam
and juice close to the foods, which
can cause the outer surface of the
foods to cook.
• Form the meat into the shape of a
doughnut before freezing. When
defrosting, scrape off thawed meat
when the beep sounds and continue
defrosting.
• Place foods in a shallow glass baking
dish or a on a microwave roasting
rack to catch drippings.
• Foods should still be somewhat icy
in the center when removed from the
oven.
AUTO DEFROST TABLE
Category Food
MEAT
0.1 to 6.0 lbs
POULTRY
0.1 to 6.0 lbs
FISH
0.1 to 6.0 lbs
BREAD
0.1 to 1.0 lb
BEEF
Ground beef, Round steak,
Cubes for stew, Tenderloin
steak, Pot roast, Rib roast,
Rump roast, Chuck roast,
Hamburger patty.
LAMB
Chops(1-inch thick),
Rolled roast
PORK
Chops(1/2-inch thick), Hot
dogs, Spareribs, Countrystyle
ribs.
Rolled roast, Sausage.
POULTRY
Whole (under 4 lbs), Cut up,
Breasts (boneless)
CORNISH HENS
Whole
TURKEY
Breast (under 6 lbs)
FISH
Fillets, Whole Steaks
SHELLFISH
Crab meat, Lobster tails,
Shrimp, Scallops
MUFFINS
ROLL CAKE
DEFROST TIPS
• When using AUTO DEFROST, the
weight to be entered is the net weight
in pounds and tenths of pounds
(the weight of the food minus the
container).
• Use AUTO DEFROST only for raw
food. AUTO DEFROST gives best
results when food to be thawed is a
minimum of 0°F (taken directly from a
true freezer). If food has been stored
in a refrigerator-freezer that does
not maintain a temperature of 5°F or
below, always program a lower food
weight (for a shorter defrosting time)
to prevent cooking the food.
• If the food is stored outside the
freezer for up to 20 minutes, enter a
lower food weight.
• The shape of the package alters the
defrosting time. Shallow rectangular
packets defrost more quickly than a
deep block.
• Separate pieces as they begin to
defrost. Separated pieces defrost
more easily.
• You can use small pieces of aluminum foil to shield foods like
chicken wings, leg tips, and fish tails,
but the foil must not touch the side
of the oven. Foil causes arcing, which
can damage the oven lining.
• Shield areas of food with small pieces
of foil if they start to become warm.
• For better results, a preset standing
time is included in the defrosting
time.
• For best results, elevate food to
be defrosted on a microwave safe
roasting rack. This prevents the
possibility of warm meat juices
cooking food during defrost.
• A DEFROST PLATE is provided for
complete defrosting of larger food
items. Place the defrost plate on the
glass tray plastic side down. Place the
item to be defrosted directly on the
defrost plate.
16
Operating Instructions
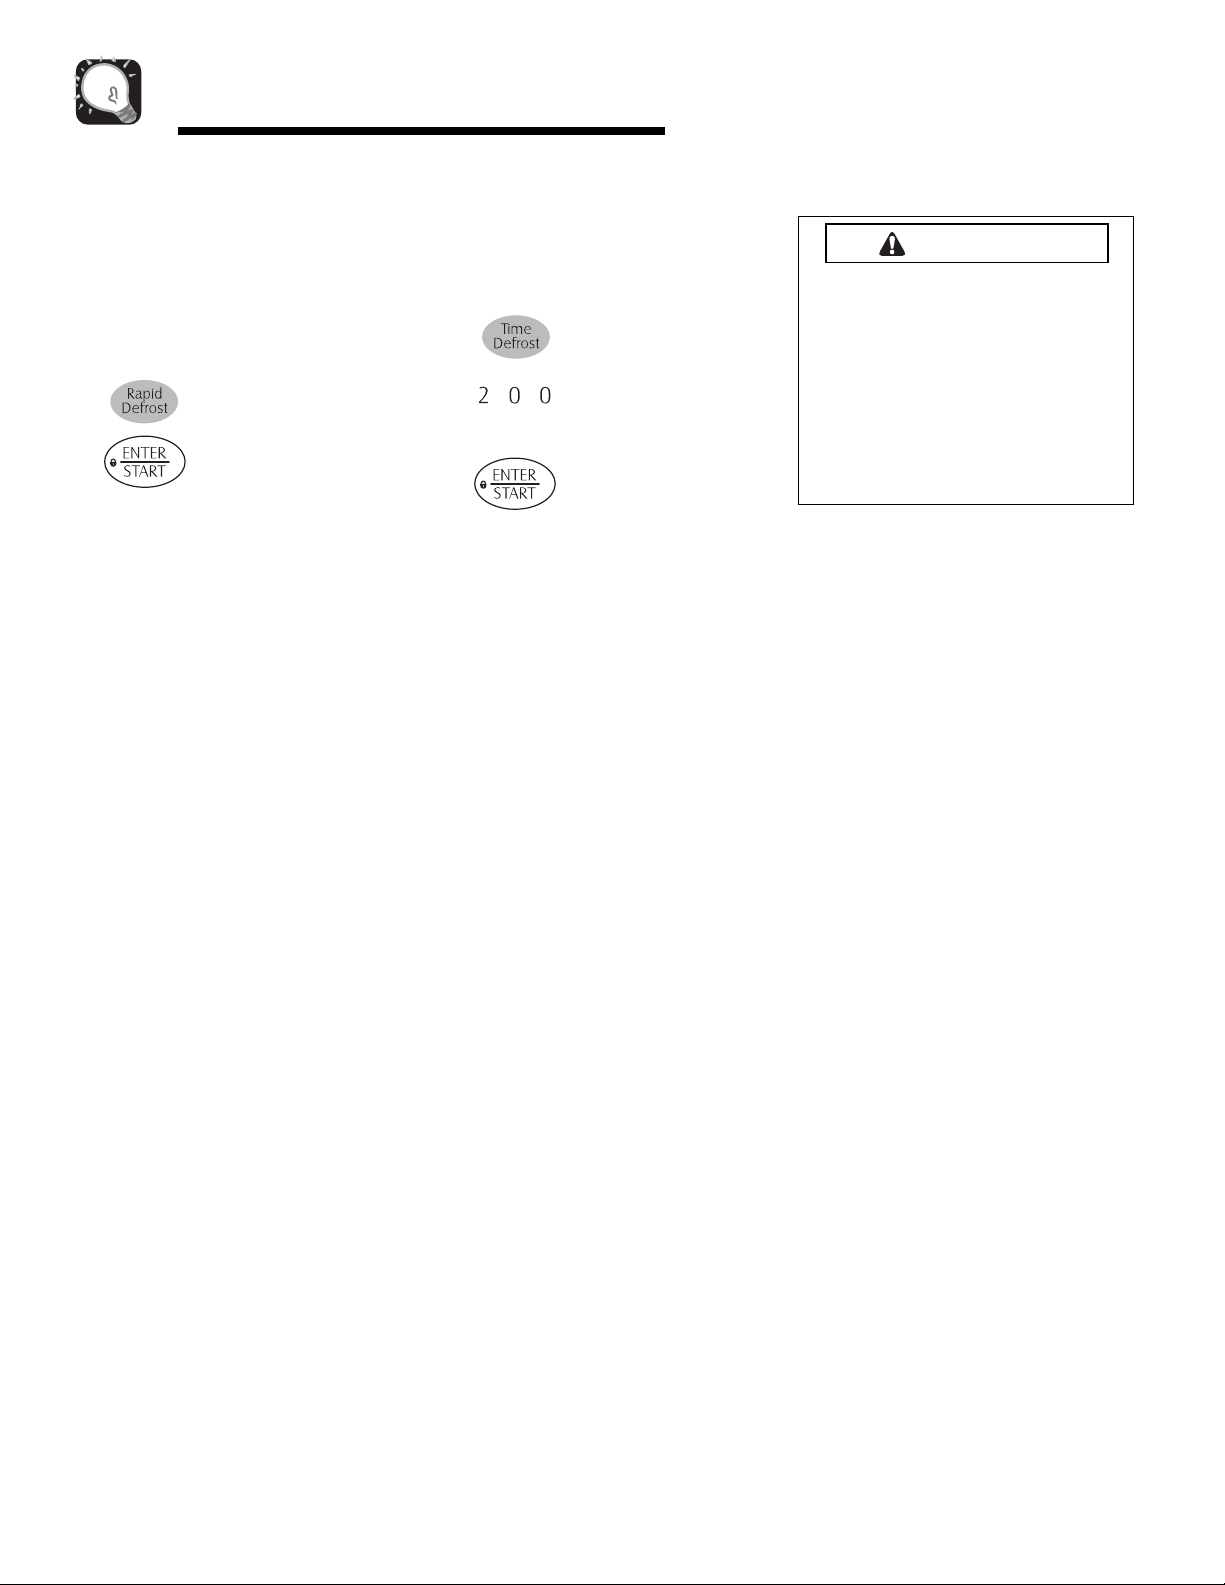
RAPID DEFROST
The RAPID DEFROST feature provides
a rapid defrost for 1.0 pound frozen
food. The oven automatically sets the
defrosting time for ground beef.
Example: To defrost 1lb. ground
beef.
1. Touch RAPID
DEFROST pad.
2. Touch ENTER/
START pad.
TIME DEFROST
This feature allows you to choose the
time you want to defrost.
Example: To defrost for 2 minutes.
1. Touch TIME
DEFROST pad.
2. Enter the
defrosting time
you want.
3. Touch ENTER/
START
pad.(Defrost
starts)
When the defrost time is over, you will
hear four beeps and COOK END will
display.
METAL RACK
CAUTION
To avoid risk of property damage:
• Do not use rack to pop
popcorn.
• Rack must be on the four
plastic supports when used.
• Use the rack only when cooking
food on rack position.
• Do not cook with rack on floor
of the oven.
The metal rack gives you extra space
when cooking in more than one
container at the same time.
To use rack:
1. Place rack securely in the four plastic
supports.
• Rack MUST NOT touch metal walls
or back of microwave oven.
2. Place equal amounts of food both
ABOVE AND BELOW rack.
• Amount of food must be
approximately the same to balance
out cooking energy.
17

Operating Instructions
GETTING THE BEST
COOKING RESULTS
To get the best results from your
microwave oven, read and follow the
guidelines below.
• Storage Temperature: Foods taken
from the freezer or refrigerator take
longer to cook than the same foods at
room temperature.
The time for recipes in this book is
based on the normal storage
temperature of the food.
• Size: Small pieces of food cook faster
than large ones, pieces similar in
size and shape cook more evenly. For
even cooking, reduce the power when
cooking large pieces of food.
• Natural moisture: Very moist foods
cook more evenly because microwave
energy is attracted to water
molecules.
• Stir foods such as casseroles and
vegetables from the outside to the
center to distribute the heat evenly
and speed cooking. Constant stirring
is not necessary.
• Turn over foods like pork chops,
baking potatoes, roasts, or whole
cauliflower halfway through the
cooking time to expose all sides
equally to microwave energy.
• Place delicate areas of foods, such
as asparagus tips, toward the center
of the dish.
• Arrange unevenly shaped foods,
such as chicken pieces or salmon
steaks, with the thicker, meatier parts
toward the outside of the dish.
• Shield, with small pieces of
aluminum foil, parts of food that may
cook quickly, such as wing tips and
leg ends of poultry.
• Let it stand: After you remove the
food from the microwave, cover food
with foil or casserole lid and let it
stand to finish cooking in the center
and avoid overcooking the outer
edges. The length of standing time
depends on the density and surface
area of the food.
• Wrapping in waxed paper or
paper towel: Sandwiches and many
other foods containing prebaked
bread should be wrapped prior to
microwaving to prevent drying out.
FISH AND SHELLFISH
Cooking Fish and Shellfish:
General Directions
• Prepare the fish for cooking.
- Completely defrost the fish or
shellfish.
- Arrange unevenly shaped pieces
with thicker parts toward the
outside of the dish. Arrange shellfish
in a single layer for even cooking.
- The type of cover you use depends
on how you cook. Poached fish
needs a microwavable lid or vented
plastic wrap.
- Baked fish, coated fish, or fish in
sauce needs to be covered lightly
with waxed paper to keep the
coating crisp and sauce from getting
watery.
- Always set the shortest cooking
time. Fish is done when it turns
opaque and the thickest part begins
to flake. Shellfish is done when the
shell turns from pink to red and the
flesh is opaque and firm.
FISH AND SHELLFISH COOKING TABLE
FISH POWER LEVEL COOKING TIME DIRECTIONS
1
Fish fillets HI 3
Fish steaks HI 4
Whole fish 7 41/2-6 minutes
Scallops HI 31/2-5 minutes
Shrimp, shelled HI 3
/2-41/2 minutes
1
/2-51/2 minutes
1
/2-5 minutes
18
Arrange fish in a single layer with thickest portion
toward outside edge of 1
baking dish. Brush with melted butter and season,
if desired. Cook covered with vented plastic wrap.
Let stand covered 2 minutes. If you are cooking
more than 1 lb. of fish, turn the fish halfway
through cooking.
Arrange in a single layer. Prepare as directed
above, except stir instead of turning the shellfish.
1
/2 quart microwavable

Operating Instructions
APPETIZERS/SAUCES/
SOUPS
Cooking Appetizers: Tips and
Techniques
Recommended
• Crisp crackers, such as melba
toast, shredded wheat, and crisp
rye crackers are best for microwave
use.Wait until party time to add the
spreads. Place a paper towel under
the crackers while they cook in the
microwave oven to absorb extra
moisture.
• Arrange individual appetizers in a
circle for even cooking.
• Stir dips to distribute heat and
shorten cooking time.
Cooking Sauces: Tips and
Techniques
• Use a microwavable casserole or
glass measuring cup that is at least 2
or 3 times the volume of the sauce.
• Sauces made with cornstarch thicken
more rapidly than those made with
flour.
• Cook sauces made with cornstarch
or flour uncovered so you may stir
them 2 or 3 times during cooking for
a smooth consistency.
• To adapt a conventional sauce or
gravy recipe, reduce the amount of
liquid slightly.
Cooking Soups: Tips and
Techniques
• Cook soups in a microwavable dish
which holds double the volume of the
recipe ingredients to prevent boilover, especially if you use cream or
milk in the soup.
• Generally, cover microwaved soups
with VENTED plastic wrap or a
microwavable lid.
• Cover foods to retain moisture.
Uncover foods to retain crispness.
• Avoid overcooking by using the
minimum suggested time. Add more
time, if necessary, only after checking
the food.
• Stirring occasionally will help blend
flavors, distribute heat evenly, and
may even shorten the cooking time.
• When converting a conventional soup
recipe to cook in the microwave,
reduce the liquid, salt, and strong
seasonings.
Not Recommended
• Appetizers with a crisp coating or puff
pastry are best done in a conventional
oven with dry heat.
• Breaded products can be warmed in
the microwave oven but will not come
out crisp.
MEAT
Cooking Meat: General Directions
• Prepare the meat for cooking.
- Defrost completely.
- Trim off excess fat to avoid
spattering.
- Place the meat, fat side down,
on a microwavable rack in a
microwavable dish.
- Use oven cooking bag for less
tender cuts of meat.
- Arrange the meat so that thicker
portions are toward the outside of
the dish.
- Cover the meat with waxed paper to
prevent spattering.
• Tend the meat as it cooks.
- Drain juices as they accumulate to
reduce spattering and keep from
overcooking the bottom of the meat.
- Shield thin or bony portions with
strips of foil to prevent overcooking.
NOTE: Keep the foil at least 1 inch
from the oven walls, and do not cover
more than one-third of the meat with
foil at any one time.
• Let the meat stand covered with
foil 10-15 minutes after you remove
it from the oven. The internal
temperature of the meat may rise
from 5-10° F during standing time.
The Meat Cooking Table on the next
page provides detailed directions,
Power Level, and Cooking Time settings
for most cuts of meat.
19

Operating Instructions
MEAT COOKING TABLE
MEAT
BEEF
Hamburgers,
Fresh or defrosted
(4 ozs. each)
1 patty
2 patties
4 patties
Sirloin tip roast
(3-4 lbs.)
LAMB
Lamb roast, rolled
boneless (3-4 lbs.)
PORK
Bacon slices
2 slices
4 slices
6 slices
10 slices
Chops
(5-7 ozs. each)
2 chops
4 chops
Loin Roast,
rolled, boneless
(3½- 4½ lbs.)
Sausage links,
Fresh or Frozen,
defrosted
(1-2 ozs. each)
2 links
4 links
6 links
10 links
POWER
LEVEL
HI
5
5
HI
3
3
HI
COOKING
TIME
1-1½ minutes
1½-2 minutes
2½-3½ minutes
8-10 minutes
per pound
RARE (135°F)
11-13 minutes
per pound
MEDIUM (155°F)
11-12 minutes
per pound
RARE (135°F)
12-13 minutes
per pound
MEDIUM (145°F)
13-14 minutes
per pound
WELL (155°F)
1½-2 minutes
2-3 minutes
4-5 minutes
7-8 minutes
18-20 minutes
per pound
15-17 minutes
per pound
25-27 minutes
per pound
45-60 seconds
1-1½ minutes
1½-2 minutes
1¾-2 minutes
DIRECTIONS
Form patties with depression in center of each.
Place on microwavable roasting rack. Brush with browning
agent, if desired. Cover with waxed paper.
Turn over halfway through cooking.
Let stand covered 1 minute.
Place roast fat side down on microwavable roasting rack.
Add desired seasonings and cover with waxed paper.
Turn meat over halfway through cooking and shield if
necessary. Remove roast from microwave oven when
desired temperature is reached. Let stand covered with foil
15 minutes. (Temperature may rise about 10°F).
Place roast fat side down on microwavable roasting rack.
Brush lamb with marinade or desired seasonings such as
rosemary, thyme or marjoram. Cover with waxed paper.
Turn roast over after 15 minutes, and again after 30 minutes.
Shield if necessary.
Remove roast from microwave when desired temperature
is reached. Let stand covered with foil 15 minutes.
(Temperature may rise about 10°F).
Place bacon slices on microwavable roasting rack.
Cover with paper towels.
After cooking, let stand 1 minute.
Place chops in microwavable baking dish.
Add desired seasonings and cover with vented plastic wrap.
Cook until no longer pink or until internal temperature
reaches 170° F. Turn chops over halfway through cooking.
Let stand covered 5 minutes.
(Temperature may rise about 10°F).
Place roast in cooking bag in microwavable dish.
Add seasonings and browning agent if desired. Close bag
loosely with microwavable closure or string. After cooking,
let stand in bag 15 minutes. (Temperature may rise about
10°F.) Internal temperature of pork should reach 170°F
before serving.
Pierce links and place on microwavable roasting rack.
Cover with waxed paper or paper towel.
Turn over halfway through cooking.
After cooking, let stand covered 1 minute.
20

Operating Instructions
POULTRY
Cooking Poultry: General Directions
• Prepare the poultry for cooking.
- Defrost completely.
- Arrange poultry pieces with thicker pieces at the outside
edge of the baking dish. When cooking legs, arrange them
like the spokes of a wheel.
- Cover the baking dish with waxed paper to reduce
spattering.
- Use a browning agent or cook with a sauce to give a
browned appearance.
POULTRY COOKING TABLE
POULTRY
Chicken pieces
(2½-3 lbs.)
Chicken whole
(3-3½ lbs.)
Cornish Hens
whole
(1-1½ lbs. each)
POWER
LEVEL
HI
HI
HI
COOKING
TIME
4½-5½ minutes
per pound
12-13 minutes
per pound
6-7 minutes
per pound
• Watch the poultry as it cooks.
- Drain and discard juices as they accumulate.
- Shield thin or bony pieces with small strips of aluminum foil
to prevent overcooking. Keep foil at least 1 inch from the
oven walls and other pieces of foil.
• Poultry is done when it is no longer pink and the juices run
clear. When done, the temperature in the thigh meat should
be 180-185°F.
• Let the poultry stand after cooking covered with foil for 10
minutes.
The Poultry Cooking Table below provides detailed directions,
Power Level, and Cooking Time settings for most cuts and
types of poultry.
DIRECTIONS
Before cooking, wash pieces and shake the water off.
Place pieces in a single layer in a microwavable baking
dish with thicker pieces to the outside. Brush with butter or
browning agent and seasonings if desired. Cover with
waxed paper. Cook until no longer pink and juices run
clear. Let stand covered 5 minutes.
Before cooking, wash and shake off water. Place breast
side down on a microwavable roasting rack. Brush with
butter, or browning agent and seasoning if desired. Cover
with waxed paper. Cook 1/3 of estimated time. Turn breast
side up, brush with butter, or browning agent. Replace
waxed paper. Cook 1/3 of estimated time again. Shield if
necessary. Cook remaining 1/3 of estimated time or until no
longer pink and juices run clear. Let stand covered with foil
10 minutes. (The temperature may rise about 10°F.) The
temperature in the thigh should be 180°F-185°F when
the poultry is done.
Before cooking, wash and shake the water off.
Tie wings to body of hen and the legs to tail. Place hens
breast side down on microwavable rack. Cover with waxed
paper. Turn breast side up halfway through cooking. Shield
bone ends of drumsticks with foil.
Remove and discard drippings. Brush with butter or
browning agent and seasonings if desired. Cook until
no longer pink and juices run clear. Remove hens from
microwave when they reach desired temperature.
Let stand covered with foil 5 minutes. (Temperature may
rise about 10°F). Temperature in breast should be 170°F
before serving.
21

Operating Instructions
PASTA AND RICE
Microwave cooking and conventional cooking of pasta,
rice, and cereal require about the same amount of time, but
the microwave is a more convenient method because you
can cook and serve in the same dish. There is no stirring
needed and leftover pasta tastes just like fresh cooked when
reheated in the microwave oven.
PASTA COOKING TABLE
PASTA
Spaghetti
4 cups water
Add 8 ozs. spaghetti
Macaroni
3 cups water
Add 2 cups macaroni
Lasagna noodles
4 cups water
Add 8 ozs. lasagna
noodles
Egg noodles
6 cups water
Add 4 cups noodles
POWER
LEVEL
HI
5
HI
5
HI
5
HI
5
COOKING
TIME
9-10 minutes
7½-8½ minutes
6-7 minutes
5½-6½ minutes
7-8 minutes
11-12½ minutes
8-10 minutes
5½-6½ minutes
Combine hot tap water and salt, if desired.
Use a 2-quart microwavable baking dish and cover with
vented plastic wrap for spaghetti and lasagna noodles.
Use microwavable lid or vented plastic wrap for macaroni
and egg noodles.
Cook as directed in chart or until water boils.
Stir in pasta; cook covered as directed in chart or until tender.
Drain in a colander.
Cooking Pasta and Rice: Tips and Techniques
• If you are planning to use rice or pasta in a casserole,
undercook it so it is still firm.
• Allow for standing time with rice, but not for pasta.
• The Pasta and Rice Cooking Tables below provide specific
directions, with Power Level and cooking time settings for
most common types of pasta and rice.
DIRECTIONS
RICE COOKING TABLE
RICE
Long grain
2¼ cups water
Add 1 cup rice
Brown
2½ cups water
Add 1 cup rice
Long grain and wild
rice mix
21/3 cups water
Add 6 ozs. package
Quick cooking
1 cup water
Add 1 cup rice
POWER
LEVEL
HI
5
HI
5
HI
5
HI
COOKING
TIME
4½-5½ minutes
14 minutes
4½-5½ minutes
28 minutes
4-5 minutes
24 minutes
2-3 minutes
DIRECTIONS
Combine hot tap water and salt, if desired, in 2 quart
microwavable casserole.
Cover with microwavable lid or vented plastic wrap.
Cook as directed in chart or until water boils.
Stir in rice and any seasonings.
Cook covered as directed in chart or until water is absorbed and
rice is tender.
Let stand covered 5 to 10 minutes.
Fluff with fork.
Cook water until it boils.
Stir rice into boiling water and let stand, covered 5 to 10 minutes
or until water is absorbed and rice is tender.
Fluff with fork.
22
Care and Cleaning
CARE AND CLEANING
For best performance and safety,
keep the oven clean inside and outside. Take special care to keep the
inner door panel and the oven front
frame free of food or grease build-up.
Never use rough powder or pads.
Wipe the microwave oven inside and
out, including the hood bottom cover,
with a soft cloth and a warm (not hot)
mild detergent solution. Then rinse and
wipe dry. Use a chrome cleaner and
polish on chrome, metal and aluminum
surfaces. Wipe spatters immediately
with a wet paper towel, especially after
cooking chicken or bacon. Clean your
oven weekly or more often, if needed.
METAL RACK
Wash the metal rack with a mild
soap and a soft or nylon scrub brush.
Dry completely. Do not use abrasive
scrubbers or cleaners to clean rack.
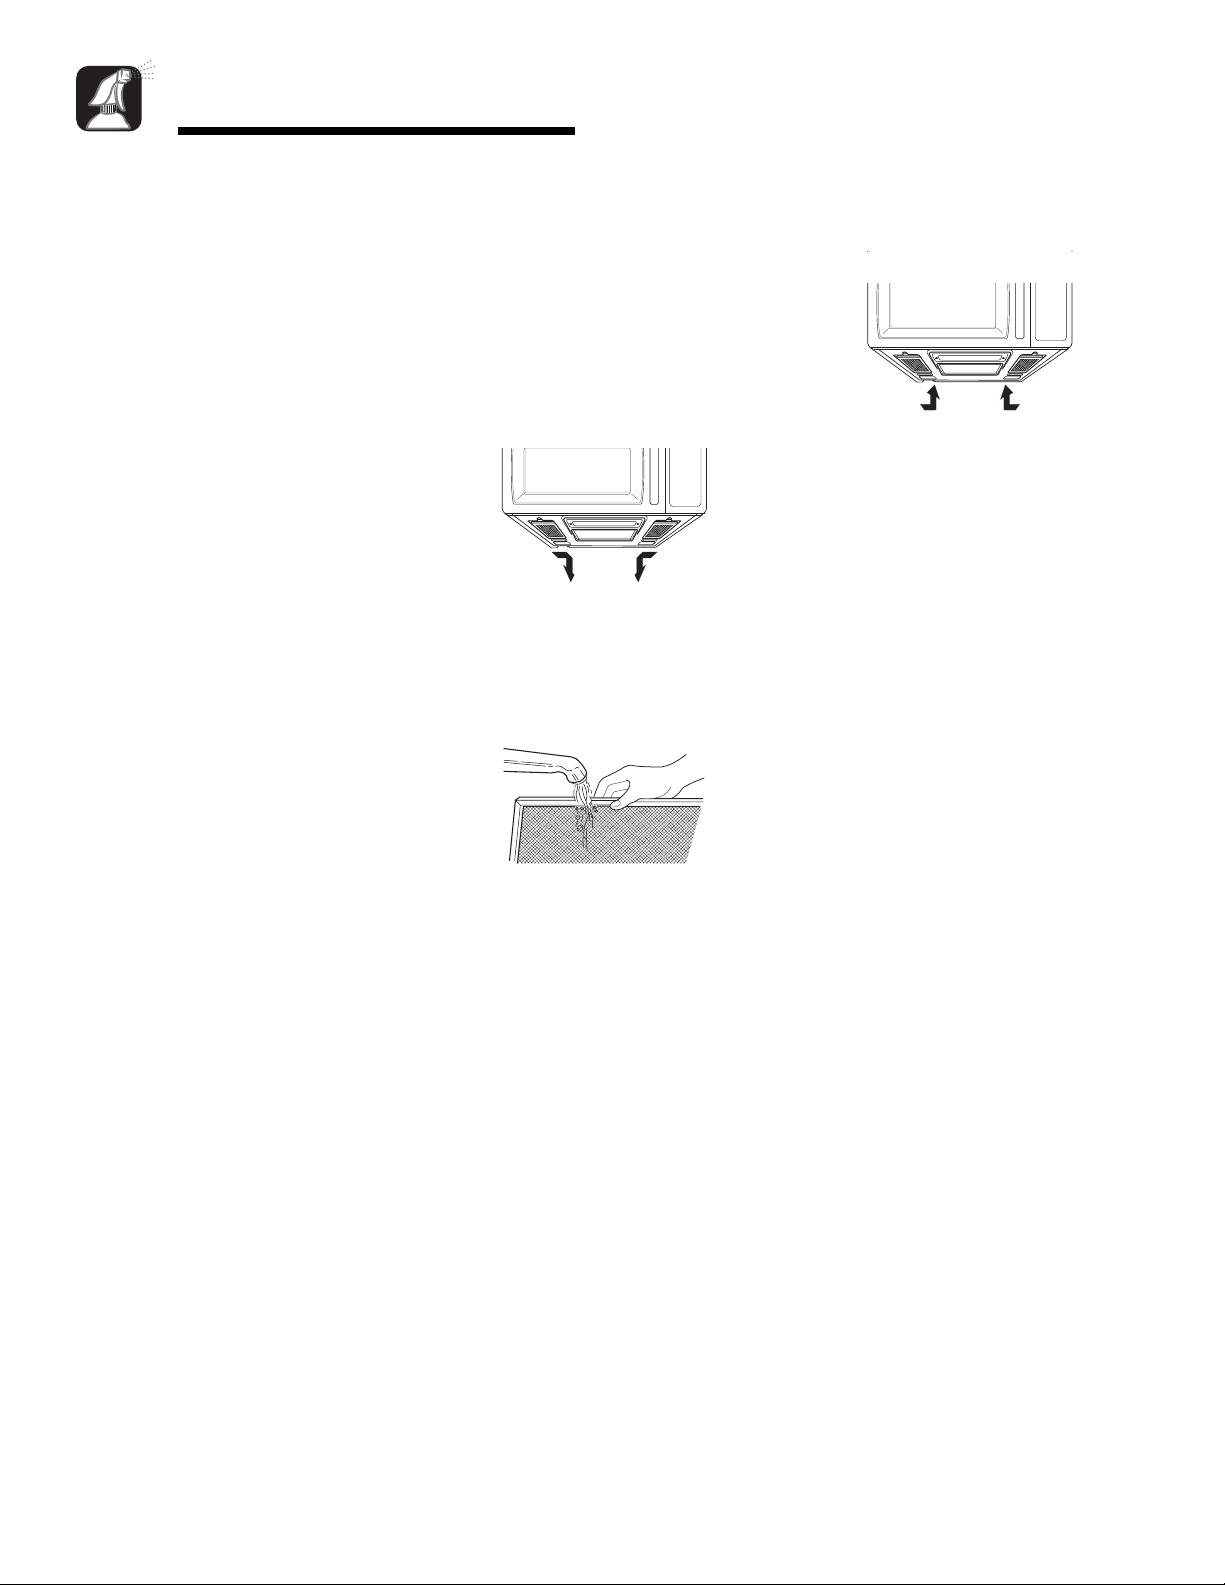
CLEANING THE GREASE
FILTER
The grease filter should be removed
and cleaned often, at least once a
month.
1. To remove grease filter, slide filter
to the side. Pull filter downward and
push to the other side. The filter will
drop out.
2. Soak grease filter in hot water and
a mild detergent. Rinse well and
shake to dry. Do not use ammonia
or place in a dishwasher. The
aluminum will darken.
3. To reinstall the filter, slide it into the
side slot, then push up and toward
oven center to lock.
23

Care and Cleaning
CHARCOAL FILTER
REPLACEMENT
CAUTION
To avoid risk of personal injury or
property damage, do not operate
oven hood without filters in place.
If your oven is vented inside, the
charcoal filter should be replaced
every 6 to 12 months, and more often
if necessary. The charcoal filter cannot
be cleaned. To order a new charcoal
filter, contact the Parts Department at
your nearest Authorized Service Center
or call
1-800-688-9900 (inside U.S.A) or
1-800-688-2002 (Canada). Order
Charcoal Filter kit #: MVHRK5.
1. Unplug the oven or turn off power at
the main power supply.
2. Remove the two vent grille mounting
screws. (2 middle screws)
5. Slide a new charcoal filter into place.
The filter should rest at the angle
shown.
6. Slide the bottom of the grille into
place. Push the top until it snaps into
place. Replace the mounting screws.
Turn the power back on at the main
power supply and set the clock.
COOKTOP/NIGHT LIGHT
REPLACEMENT
CAUTION
To avoid personal injury or
property damage, wear gloves
when replacing light bulb.
OVEN LIGHT
REPLACEMENT
1. Unplug oven or turn off power at the
main power supply.
2. Remove the vent cover mounting
screws. (2 middle screws)
3. Tip the cover forward, then lift out to
remove.
4. Lift up the bulb holder.
5.
Remove bulb holder.
3. Push the right side lower part of the
charcoal filter.
4. Remove old filter.
1. Unplug the oven or turn off power at
the main power supply.
2. Remove the bulb cover mounting
screws.
3. Replace bulb(s) with 20 watt
appliance bulb(s).
4. Replace bulb cover, and mounting
screws.
5. Turn the power back on at the main
power supply.
6. Replace bulb with a 30 or 40 watt
appliance bulb.
7. Replace the bulb holder.
8. Slide the bottom of the vent cover
into place. Push the top until it snaps
into place. Replace the mounting
screws. Turn the power back on at
the main power supply.
24

Cooking Utensils
MICROWAVE UTENSIL GUIDE
USE
OVENPROOF GLASS (treated for
high intensity heat):
Utility dishes, loaf dishes, pie
plates, cake plates, liquid
measuring cups, casseroles and
bowls without metallic trim.
CHINA:
Bowls, cups, serving plates and
platters without metallic trim.
PLASTIC:
Plastic wrap (as a cover)-- lay the
plastic wrap loosely over the dish
and press it to the sides.
Vent plastic wrap by turning back
one edge slightly to allow excess
steam to escape. The dish should
be deep enough so that the plastic
wrap will not touch the food.
As the food heats it may melt the
plastic wrap wherever the wrap
touches the food.
Use plastic dishes, cups, semirigid
freezer containers and plastic
bags only for short cooking times.
Use these with care because the
plastic may soften from the heat of
the food.
PAPER:
Paper towels, waxed paper, paper
napkins, and paper plates with no
metallic trim or design. Look for
the manufacturer's label for use in
the microwave oven.
DO NOT USE
METAL UTENSILS:
Metal shields the food from microwave energy and produces uneven
cooking. Also avoid metal skewers, thermometers or foil trays. Metal
utensils can cause arcing, which can damage your microwave oven.
METAL DECORATION:
Metal-trimmed or metal-banded dinnerware, casserole dishes, etc. The
metal trim interferes with normal cooking and may damage the oven.
ALUMINUM FOIL:
Avoid large sheets of aluminum foil because they hinder cooking and may
cause harmful arcing. Use small pieces of foil to shield poultry legs and
wings. Keep ALL aluminum foil at least 1 inch from the side walls and door
of the oven.
WOOD:
Wooden bowls and boards will dry out and may split or crack when you use
them in the microwave oven. Baskets react in the same way.
TIGHTLY COVERED UTENSILS:
Be sure to leave openings for steam to escape from covered utensils.
Pierce plastic pouches of vegetables or other food items before cooking.
Tightly closed pouches could explode.
BROWN PAPER:
Avoid using brown paper bags.
They absorb too much heat and could burn.
FLAWED OR CHIPPED UTENSILS:
Any utensil that is cracked, flawed, or chipped may break in the oven.
METAL TWIST TIES:
Remove metal twist ties from plastic or paper bags.
They become hot and could cause a fire.
25

Troubleshooting
Before Calling for Service
Check the following list to be sure a service call is necessary. Reviewing additional information on items to check may prevent
an unneeded service call.
PROBLEM
If nothing on the oven operates
If the oven interior light does not work
If oven will not cook
If oven takes longer than normal to cook
or cooks too rapidly
If the time of day clock does not always
keep correct time
If food cooks unevenly
If food is undercooked
POSSIBLE CAUSES
• check for a blown circuit fuse or a tripped main circuit breaker.
• check if oven is properly connected to electric circuit in house.
• check that controls are set properly.
• the light bulb is loose or defective.
• check that control panel was programmed correctly.
• check that door is firmly closed.
• check that Enter/Start Pad was touched.
• check that timer wasn’t started instead of a cook function.
• be sure the Power Level is programmed properly.
• check that the power cord is fully inserted into the outlet receptacle.
• be sure the oven is the only appliance on the electrical circuit.
• be sure food is evenly shaped.
• be sure food is completely defrosted before cooking.
• check placement of aluminum foil strips used to prevent overcooking.
• check recipe to be sure all directions (amount, time, and power levels) were
correctly followed.
• be sure microwave oven is on a separate circuit.
• be sure food is completely defrosted before cooking.
If food is overcooked
If arcing (sparks) occur
If the display shows a time counting
down but the oven is not cooking
Vent fan starts automatically
• check recipe to be sure all directions (amount, power level, time, size of dish) were
followed.
• be sure microwavable dishes were used.
• be sure wire twist ties were not used.
• be sure oven was not operated when empty.
• make sure metal rack (if used) is properly installed on 4 supports.
• check that door is firmly closed.
• check that timer was not started instead of a cooking function.
• If the temperature gets too hot around the microwave oven, the fan in the vent
hood will automatically turn on at the LEVEL 4 setting to cool the oven. It may stay
on up to an hour to cool the oven.
26
 Loading...