

Whirlpool MH6600XWl, MH66OOXXO User Manual

MICROWAVE
COMBINATION
Model MH6600XWl
Model MH66OOXXO
!ezers Ice Makers Dishwashers. Buill-In Ovens and Surlace Units. Ranges. Microwave Ovens. Trash Compactors. Room Air Conditioners Oehumldiliers. Automatic Washers. Clelhes Dryers Freezer% Relrigef
Contents
Parts and Features
Before You Install Your
Mlorowave Oven.
Before You Use Your Mlcrowave Oven
Precautions to Avold Poulble Minute Tlmer
Exposure to Excesrlve
Mlcrowave Energy
Important Safety lnstfucttons
Using Your Mlcrowave Oven
Microwave Oven Controls
Audible Signals
Seitlng the Clock
Cooking in Your Microwave Oven
Cooking at High Cook Power
Cooklng at Lower Cook Powers
.................... 2 Defrosting ...........................
..................... 3
....................
......... 4
.......... 5 Carlng for the Filters
........... 5
..................... 6
....................
0199l Whirlpool Corporatlon
Page
Using KEEP WARM
Using AUTO START.
3 Ofher Operating Hints
Accessory Kits
3 Caring for Your Mlcrowave Oven
Cleaning the Microwave Oven
Replaclng the CooMop and Oven
Lights .............................
6 Operating Safety Precautions
...
........ 7 Mlcrowave Oven WarrantY
..... 8
7 If You Need Service or Assistance
Page
10
.................... 14
................... 15
............... 17
........................ 18
....................... 19
..... 19
...... 19
................. 19
21
.. 1. .... 22
.... 24
........... 28
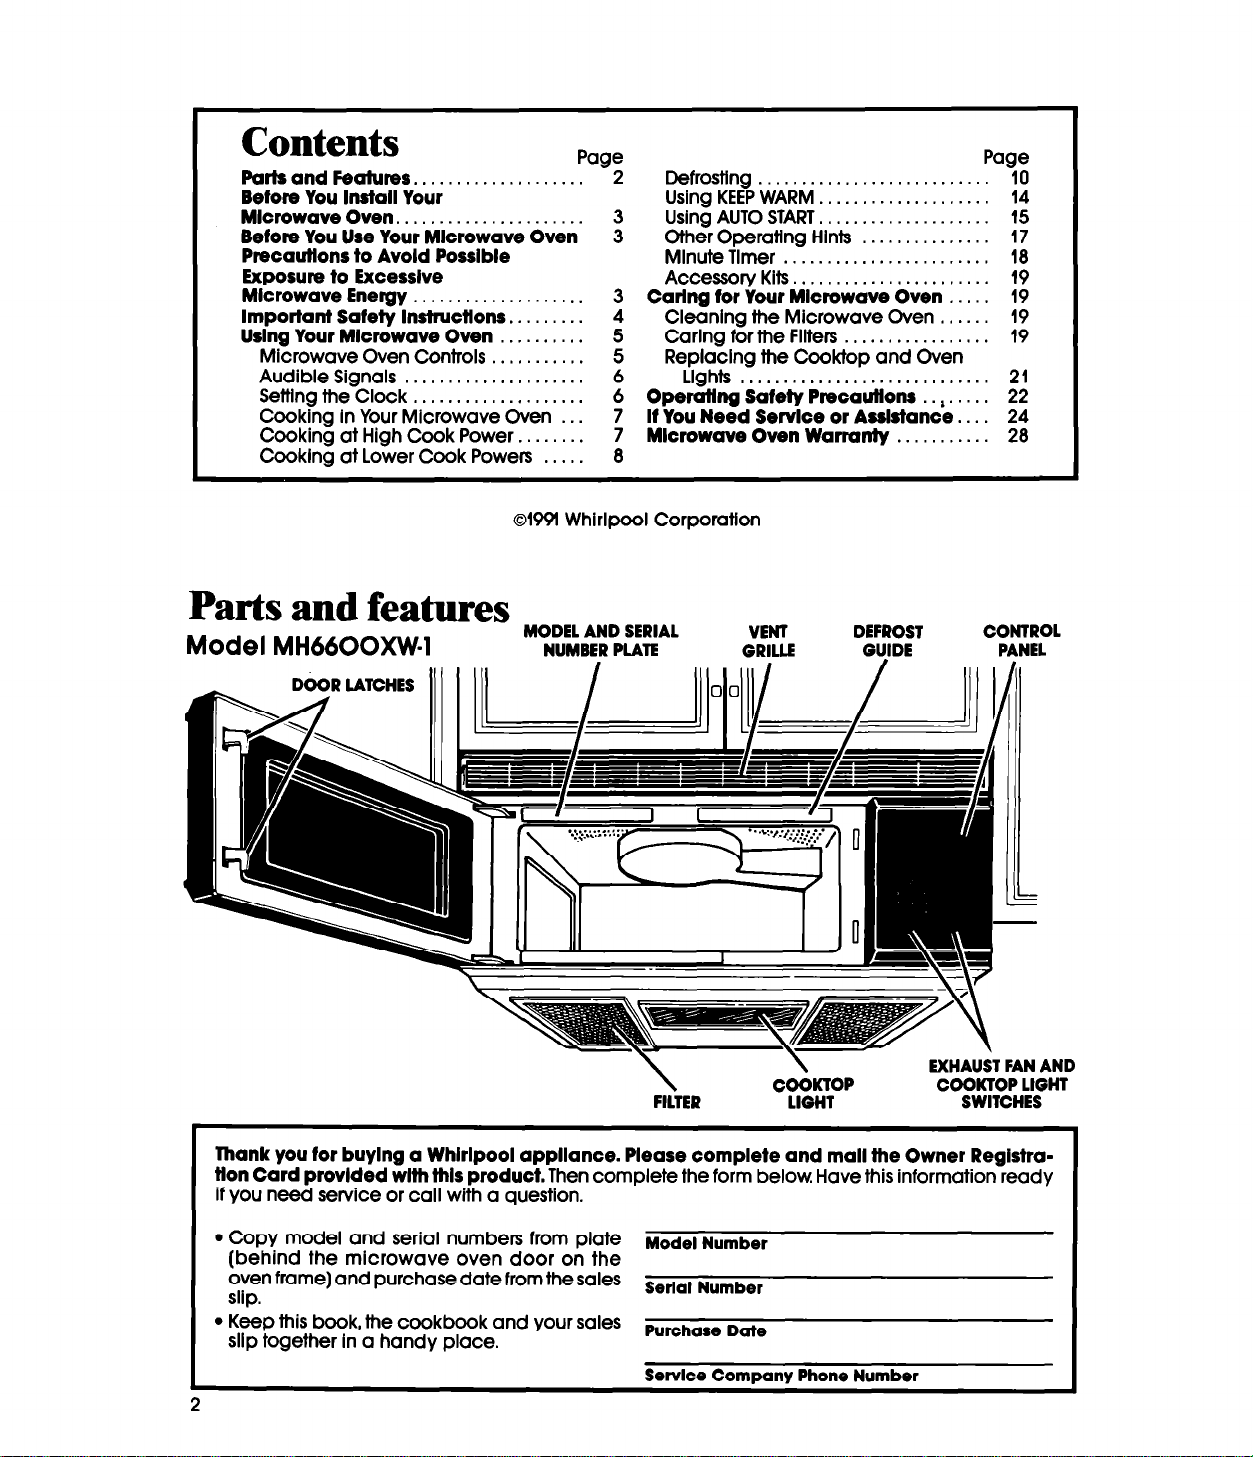
Parts and features
Model MH6600XW-1
MODEL AND
NUMBER PLATE
SERIAL
VENT
GRILLE
DEFROST
GUIDE PANEL
II/I III I lll”lolll/ / III IAl
\
\
FILTER
Thank you for buying a Whlrlpool appliance. Please complete and mall the Owner Reglstratlon Card provlded with this product. Then complete the form below. Have this information ready
if you need service or call with a question.
CGOKTOP
LIGHT
EXHAUST FAN AND
COOKTOP
SWITCHES
CONTROL
LIGHT
. Copy model and serial numbers from plate Model Number
(behind the microwave oven door on the
oven frame) and purchase date from the sales
slip.
l Keep this book, the cookbook and your sales
slip together in a handy place.
2
Serial Number
Purchase Date
Servloe Company Phone Number

Fill out and return the Microwave Registration Card included with your oven. lf the card is
missing, please send the model number and serial number of your
name and address to...
Whirlpool Corporation
Microwave Registration Department
$;O!ipgtive Center
Benton Harbor, Michigan 49022
This information will help us reach you if there is ever a need to pass along information about your
microwave oven.
tTIiCrOWaVe Oven with Your
Before you install your microwave oven
Read and carefully toiiow the INSTALLATION INSTRUCTIONS packed with your oven.
Before you use your microwave oven
Read this Use and Care Guide carefully for important use and safety information.
Store in a convenient place for future use.
it is your responsibility to be sure your microwave oven:
l Has been installed where it is protected from the weather. The microwave oven
should be at a temperature above 50°F (WC) for proper operation.
l Has been properly connected to electrical supply and grounded.
(See Installation Instructions.)
l Is not used by children or anyone unable to operate it properly.
l Is properly maintained.
l Is used only for jobs expected of a home microwave oven.
PRECAUTIONS TO AVOID
POSSIBLE EXPOSURE TO EXCESSIVE
MICROWAW ENERGY...
DO NOT attempt to operate this oven with the door
open since open-door operation can result in harm-
ful exposure to microwave
energy. It is important not to
defeat or tamper with the
safety interlocks.
DO NOT place any object
between the oven front
face and the door or allow
soil or cleaner residue
to accumu(ate on sealing
surfaces.
DO NOT operate the
oven if it is damaged. it is
particularly important that
the oven door close
properly and that there is
no damage to the
(1) Door (bent),
(2) Hinges and latches
(broken or loosened],
(3) Door seals and sealing
surfaces.
DO NOT operate the
microwave oven if the
door window is broken.
The microwave oven
should be checked for
microwave leakage by
qualified service personnel
after a repair is made.
The oven should not be
adjusted or repaired by
anyone except properly
qualified service
personnel.
DO NOT operate the
microwave oven with
the outer cabinet removed.

IMPORTANT SAFETY INSTRUCTIONS
Microwave ovens have been thoroughly tested for safe and efficient
operation. However, as with any appliance, there are special lnstallatlon
and safety precautions which must be followed to ensure safe and
satisfactory operation and prevent damage to the unit.
To reduce the risk of fire, electrlcal shock, injury to persons,
or damage when using the mlcrowave oven, follow basic
precautions, including the following:
1.
Read all instructions before using the
microwave oven.
2. Read and follow the s cific “PRECAU-
TIONS TO AVOID POSSIB
EXCESSIVE MICROWAVE ENERGY” found
on page 3.
3. This ap liance must be grounded. Connect only o roperly rounded outlet. See
“GROUNDIN INSTRU TIONS” found in the
Installation Instructions.
4. Install or locpte this appliance only in
accorgance with me provided lnstallatlon
Instructions.
5. Some products such as whole eggs and
sealed containers - for exam le, closed
glass jars be heated in this oven.
6.
Use this appliance only for its intended
use as described in this manual. Do not use
corrosive chemicals or vapors in this appliance. This type of oven is specifically de-
signed to heat, cook, or dry food. It is not
designed for industrial or laboratory use.
7. As with any appliance, close supervi-
sion is necessary when used by children.
8.
Do not operate this appliance if it has a
damaged cord or plug, if it is not working
properly, or if it has been damaged or
dropped. Electric shock, fire or other hazards may result.
9. This a pliance should be serviced only
by quali ied service personnel. Call an au-
thonzed WhirlpoolSM service company for
examination, repair or adjustment.
10.
the appliance. Fire may result.
11.
Do not store or use this appliance outdoors. Do not use this roduct near water for example, near a
basement, or near a swimming Pool1 and
the like.
12. See door surface and interior cleaning
instructions on page 19.
13.
cavity:
% 8
may
explode
P
Do not cover or block any opening on
To reduce the risk of fire in the oven
I?
E EXPOSURE TO
an
should not with hidden metal (twist-ties, foil lining,
cf
itchen sink, in a wet R
a. Do not overcook food. Carefully attend
appliance if paper, plastic, or other com-
bustible materials are placed inside the
oven to facilitate cooking. Paper can char
or burn, and some plastics can melt if used
when heating foods.
b’ Do not deep fry in oven’
c. Test dlnnerware or cookware before
using. See page 24. Some dishes
(melamine, Centura,@ etc.) absorb microwave energy, becoming too hot to handle
and slowing cooking times. Remove wire
twist-ties from paper or plastic bags before
placing bag in oven. Cooking In metal
containers not designed for microwave use
can damage the oven, as can containers
ples, metallic glaze or trim.]
d. If materials inside the oven should ignite,
keep oven door closed, turn oven off, and
disconnect the power cord, or shut off
power at the fuse or circuit breaker panel.
e. Do not use the cavity for storage purposes.
Do not leave paper products, cooking
utensils, or food in the cavity when not in use.
14. l?ead and follow “Operating Safety Pre-
caut’ons” start’ng On page 22’
15.
Because of the automatic exhaust fan
feature, the following cautions must be
observed:
a. Do not leave the area when using your
cooktop at a high setting. Accidental fires
from boilovers or spatterin
unit could spread, especia
fan is operating.
b. Do not allow rease and soil to build up
in the grease fi ter. Exhaust fan efficiency B
will decrease and fire may result. Clean
often following the filter cleaning instructions on pages 19 and 20.
c. Do not change the cooktop or oven
lights without turning the power
main power supply,
trical shock may resul .
d. Do not flame foods on a cooktop surface
below this unit. The fan, if operating, may
spread the flame and cause personal in-
jury or property damage.
\
on the surface
ly if the exhaust 9
off
at the
see page 21). Elec-
Sta-
4
SAW THESE INSTRUCTIONS

Using your microwave oven
Microwave Oven Controls
There are four park in the control section:
-The Digital Display/Clock and Indicator
Lights
-Command Pads
- Number Pads
- Fan and Light Pads
lnstnrctions for each control are covered on the
following pages. Read them carefully.
When you first plug in the oven, a tone sounds
and the Display will show 88:88. If affer you set
the Clock (page 6), the Display again shows
all 8’s; your electricity was off for a while.
Reset the Clock.
Touch Command
Pads to tell the microwave oven what to do
and in what order. A
few examples:
-CLOCK SET fells the
oven you are going
to set the clock.
- START fells the clock
to start.
See page 6 for
information on the
tone you hear when
touching any pad.
Each Command Pad
(except START and
CANCEL) lights an
Indicator Light on the
digital display.
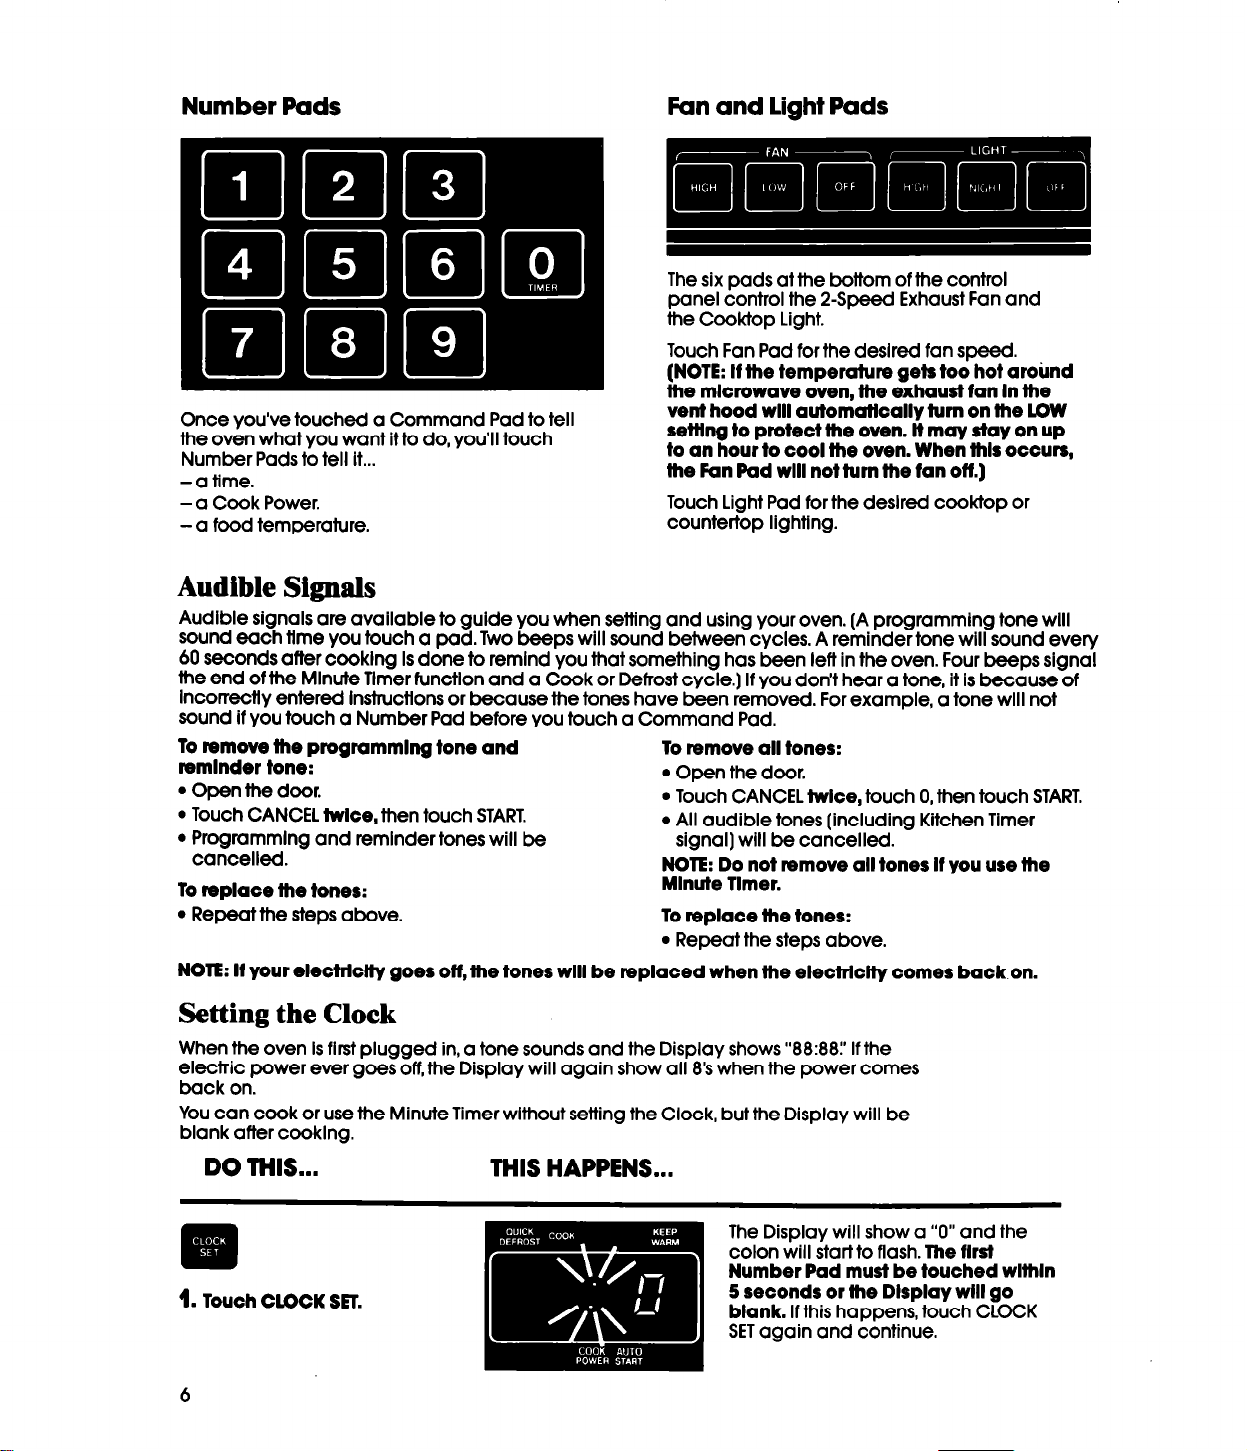
Number Pads
Fan and light Pads
The six pads at the bottom of the control
panel control the 2-Speed Exhaust Fan and
the Cooktop Light.
Touch Fan Pad for the desired fan speed.
(NOTE: if the temperature gets too hot aroirnd
the microwave oven, the exhaust fan in the
Once you’ve touched a Command Pad to fell
ihe oven what you want if to do, you’ll touch
Number Pads to fell if...
-a time.
- a Cook Power.
-a food temperature.
vent hood will automatically turn on the LOW
setting to protect the oven. it may stay on up
to an hour to cool the oven. When this occurs,
the Pan Pad will not turn the fan off.)
Touch Light Pad for the desired cooktop or
countertop lighting.
Audible Signals
Audible signals are available to guide you when setting and using your oven. (A programming tone wlil
sound each time you touch a pad. Two beeps will sound between cycles. A reminder tone will sound every
60 seconds after cooklng Is done to remlnd you that something has been left in the oven. Four beeps signal
the end of the Mlnute Tlmer function and a Cook or Defrost cycle.] If you don’t hear a tone, if is because of
Incorrectly entered InstructIons or because the tones have been removed. For example, a tone will not
sound if you touch a Number Pad before you touch a Command Pad.
lo remove the programming tone and
reminder tone:
l Open the door.
l Touch CANCEL twice, then touch START.
l Programming and remlnder tones will be
cancelled.
To replace the tones:
l Repeat the steps above.
NOTE: If your electricity goes off, the tones will be replaced when the eiectricfty comes back on.
To remove ail tones:
l Open the door.
l Touch CANCEL twice, touch 0, then touch START.
l All audible tones (including Kitchen Timer
signal] will be canceiled.
NOTE: Do not remove ail tones if you use the
Minute Timer.
To replace the tones:
l Repeat the steps above.
Setting the Clock
When the oven Is first plugged in, a tone sounds and the Display shows “88:88:’ If the
electric power ever goes off, the Display will again show ail 8’s when the power comes
back on.
You can cook or use the Minute Timer wlfhout setting the Clock, but the Display will be
blank after cooklng.
DO THIS...
THIS HAPPENS...
The Display will show a “0” and the
colon will start to flash. The first
Number Pad must be touched within
5 seconds or the Display will go
blank. If this happens, touch CLOCK
SET again and continue.

The Display will
you touched in
touched them.
show what numbers
the order you
This example shows
3:25.
2. Touch Number Pads for the
correct time of day.
The colon will stop flashing. The Clock
is set
3.
Touch START.
If you have touched In an Incorrect
time, such as12:65,“Err” will show on
the Display. Touch Number Pads to reenter the time of day. If you have not
entered the time of day within approxlmately eight seconds, you must touch
CLOCK SET and start over.
NOTE: To reset the Clock, touch CLOCK SET. The current time will show on the Display
and the colon will flash. Continue to set the Clock as shown above.
Cooking in Your Microwave Oven
Although a new rating method* rates this oven at 800 waits, you may use a reliable
cookbook with recipes developed for 650-700 wait microwave ovens.
Be sure to read the MICRO MENUS@ Cookbook packed with the microwave oven.
It contains information about:
l What microwave energy is.
l How food is cooked by microwave energy.
l What affects cooking speed and cooking evenness.
l Safely tips.
l Utensils to use when cooking in a microwave oven.
l Cooking times for different foods.
fmpottant things to remember to get the best cooking results:
l ALWAYS cook food for the MINIMUM recommended cooking time. If necessary, add time
in one or two minute periods, then check for doneness to avoid overcooking the food.
l Stir, turn or rearrange the food being cooked about halfway through the cooking time for
most even doneness with all recipes.
l If a glass cover is not available, use waxpaper, paper towels or microwave approved
plastic wrap. Turn back a corner to vent steam during cooking.
‘IEC-705 Test Procedure.
rating microwave wattage output and does not represent an actual change to output power
or cooking performance.
The IEC-705 Test Procedure is an internationally-recognized method of
Cooking at High Cook Power
Follow these steps to cook at HIGH power.
DO THIS... THIS HAPPEN-S...
1.
Put food in the oven and
close the door.
conttnued on next page 7
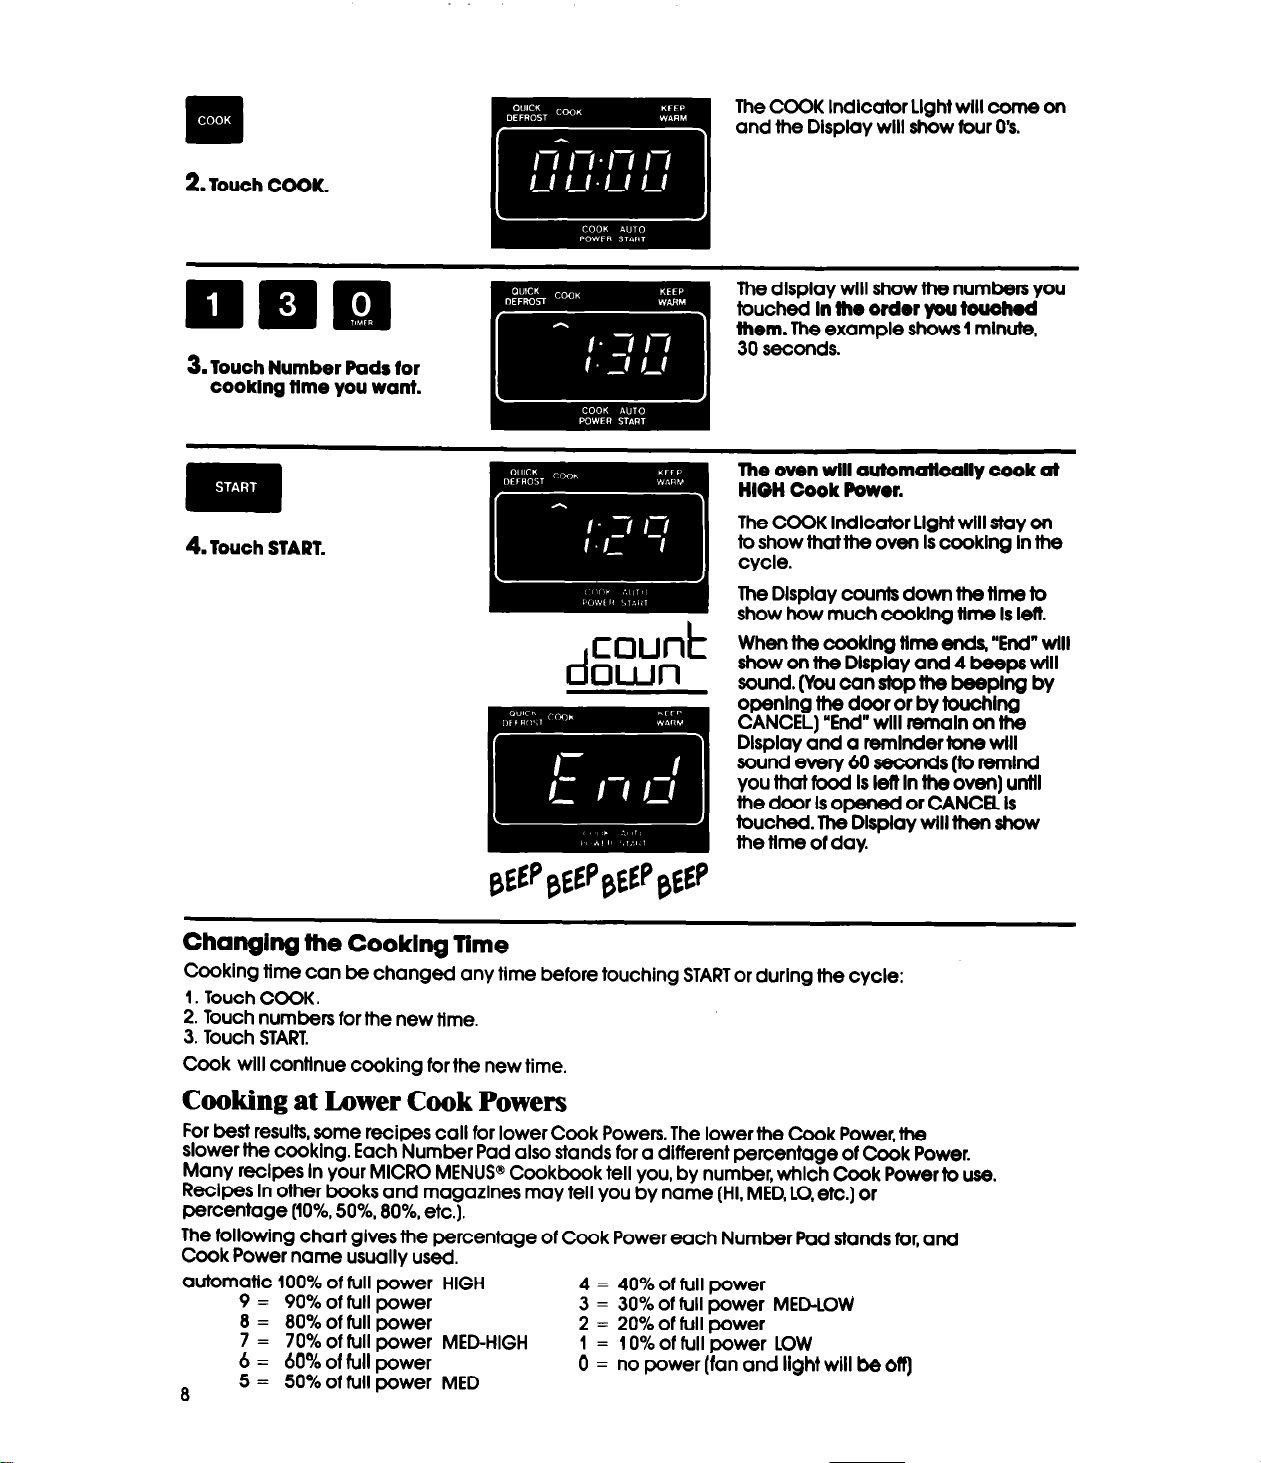
2. Touch COOK.
The COOK lndlcator Llght will come on
and the Dlspiay will show four 0’s.
nnn
UrcEia
3. Touch Number Pads for
cooking fime you want.
4.
Touch START.
The display will
touched in the order you touohed
them. The example shows 1 minute,
-==-=I 30seconds.
The oven will automaffoaily cook af
HIOH Cook Powor.
The COOK lndlcator Light will stay on
lo show that the oven Is cooklng In the
cycle.
The Display counts down the time to
show how much cooklng time Is left.
count
d
0Wt-l
When the cooklng time ends, “End” will
show on the Display and 4 beeps will
sound. (You can stop the beeping by
openlng the door or by touching
CANCEL) “End” will remain on the
Display and a reminder tone will
sound every 60 seconds (to remind
you that food is left In the oven] unttl
the door Is opened or CANCEL is
touched. The Dlspiay will then show
the time of day.
show the numbers you
Changing the Cooklng Time
Cooking time can be changed any tlme before touching START or durlng the cycle:
1. Touch COOK.
2.
Touch numbers for the new time.
3. Touch START.
Cook will continue cooking for the new time.
Cooking at Lower Cook Powers
For best results, some recipes call for lower Cook Powers. The lower the Cook Power, the
slower the cooklng. Each Number Pad also stands for a different percentage of Cook Power.
Many recipes In your MICRO MENUS@ Cookbook tell you, by number, which Cook Power to use.
Recipes In other books and magazlnes may tell you by name (HI. MED, LO, etc.] or
percentage (lo%, 50%, 80%, etc.].
The following chart gtves the percentage of Cook Power each Number Pad stands for, and
Cook Power name usually used.
automatic
8
100% of full power HIGH
9 = 90% of full power
8 = 80% of full power
7 = 70% of full power MEPHIGH
6 = 60% of full power
5 = 50% of full power MED
4 = 40% of full power
3 = 30% of full power MEDLOW
2 = 20% of full power
1 = 10% of full power LOW
0 = no power (fan and light will be
off)
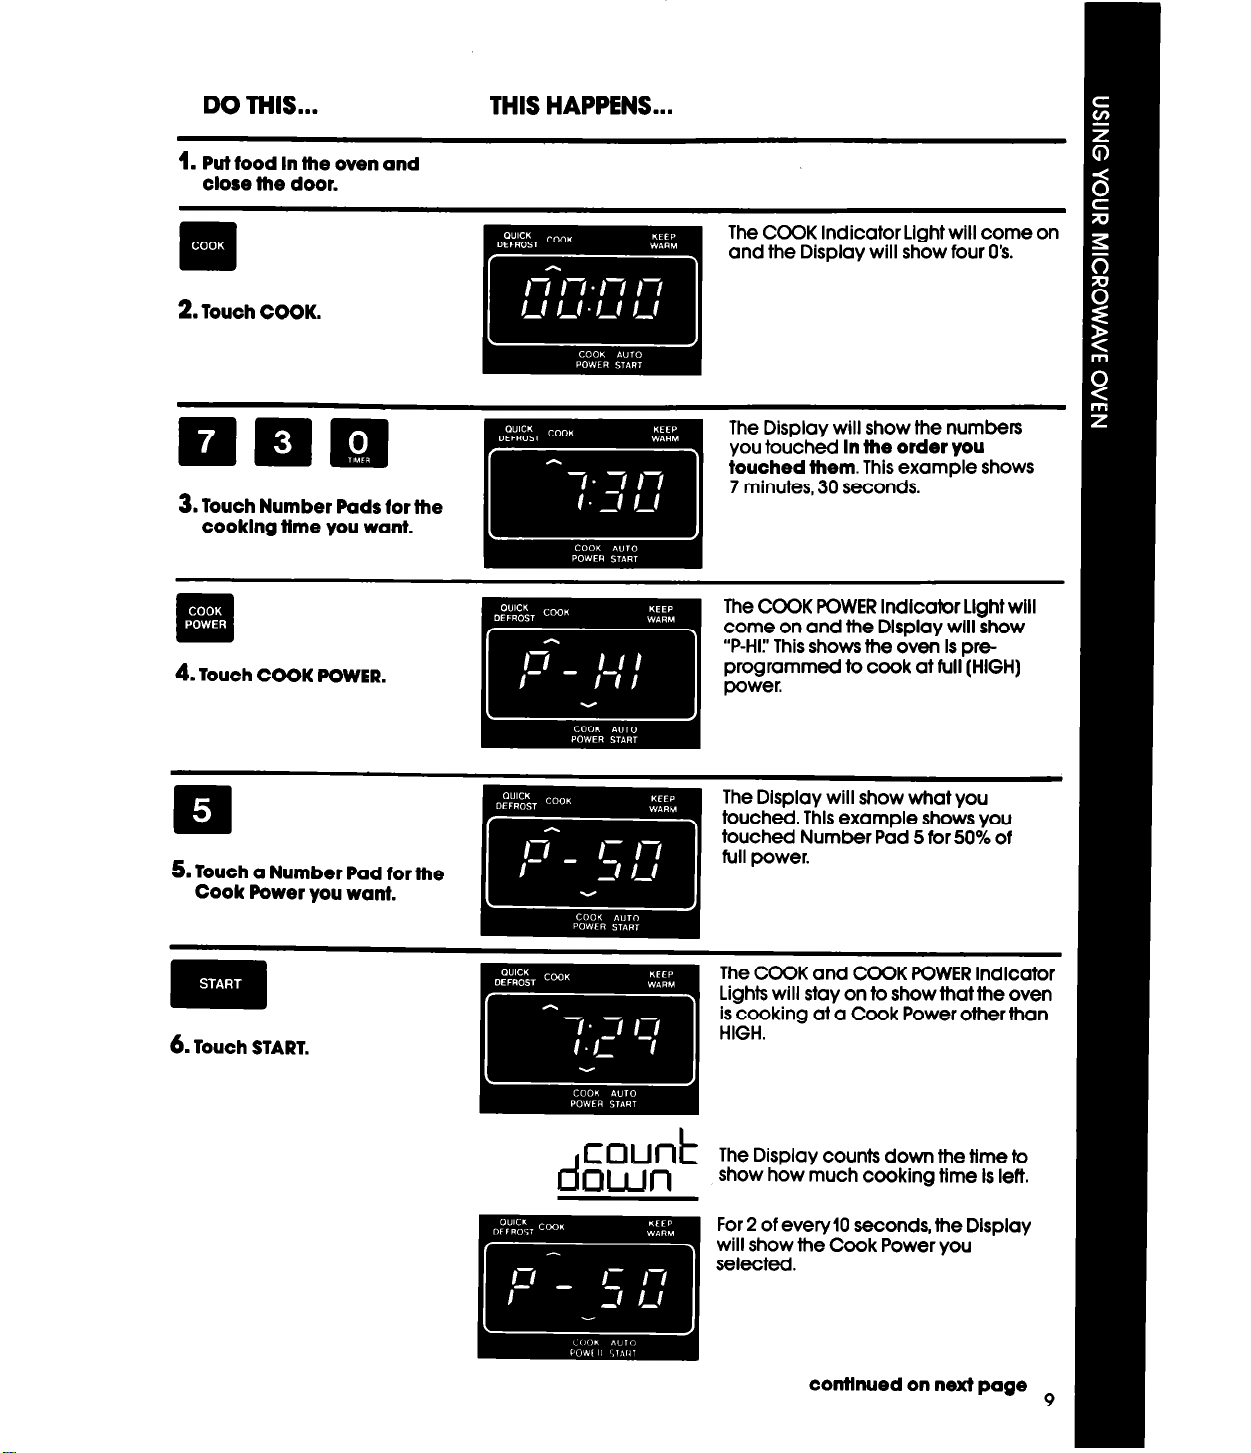
DO THIS...
1.
Put food in the oven and
close the door.
THIS HAPPENS...
. .
q
2.
Touch COCK.
3. Touch Number Pads for the
cooking time you want.
me
*a .
q
4.
Touch COOK POWER.
The COOK Indicator Llght will come on
and the Display will show four 0’s.
touched them. This example shows
The COOK POWER lndlcator Llght will
come on and the Display will show
“P-HI:’ This shows the &en Is pre
programmed to cook at full (HIGH)
power.
The Display will show what you
touched. Thls example shows you
touched Number Pad 5 for 50% of
full power.
count
d
0Wl-l
The COOK and COOK POWER Indicator
Lights will stay on to show that the oven
is cooking at a Cook Power other than
HIGH.
The Display counts down the time to
show how much cooking time Is left.
For 2 of every10 seconds, the Display
will show the Cook Power you
Selected.
continued on next page
9
 Loading...