

Whirlpool LFB2611LT, LFB2611LQ Owner's Manual

IRONING STATION
Use & Care Guide
In the U.S.A., for questions about features, operation, performance,
parts, accessories or service, call: 1-800-253-1301.
In Canada, for product-related questions call: 1-800-461-5681,
for parts, accessories, installation and service call: 1-800-807-6777
www.whirlpool.com or www.whirlpool.com/canada
or visit our website at...
STATION DE
REPASSAGE
Guide d’utilisation et d’entretien
Au Canada, pour des questions concernant le produit,
composez le 1-800-461-5681, pour pièces, accessoires,
installation ou service le 1-800-807-6777
ou visitez notre site web à
www.whirlpool.com/canada
Table of Contents/Table des matières.............2
8537103A
TABLE OF CONTENTS
TABLE DES MATIÈRES
IRONING STATION SAFETY .........................................................2
PARTS AND FEATURES................................................................3
IRONING STATION USE ................................................................4
Position the Ironing Station..........................................................4
Adjusting Ironing Board Height....................................................4
Begin Ironing ................................................................................4
IRONING STATION CARE .............................................................4
Replacing Cover and Pad............................................................4
Ordering Replacement Cover and Pad .......................................4
Installing or Changing the Light Bulb...........................................4
Cleaning........................................................................................4
ASSISTANCE OR SERVICE...........................................................5
In the U.S.A. .................................................................................5
In Canada ..................................................................................... 5
WARRANTY ....................................................................................6
SÉCURITÉ DE LA STATION DE REPASSAGE.............................7
PIÈCES ET CARACTÉRISTIQUES ................................................8
UTILISATION DE LA STATION DE REPASSAGE ........................8
Déploiement de la station de repassage.....................................8
Réglage de la hauteur d'utilisation de la table de repassage......8
Repassage....................................................................................9
ENTRETIEN DE LA STATION DE REPASSAGE...........................9
Remplacement de la housse et de la thibaude ...........................9
Commande pour remplacement de la housse
et de la thibaude...........................................................................9
Installation/remplacement de la lampe........................................9
Nettoyage .....................................................................................9
ASSISTANCE OU SERVICE.........................................................10
Aux États-Unis............................................................................10
Au Canada..................................................................................10
GARANTIE.....................................................................................11
®
IRONING STATION SAFETY
Your safety and the safety of others are very important.
We have provided many important safety messages in this manual and on your appliance. Always read and obey all
safety messages.
This is the safety alert symbol.
This symbol alerts you to potential hazards that can kill or hurt you and others.
All safety messages will follow the safety alert symbol and either the word “DANGER” or
“WARNING.” These words mean:
You can be killed or seriously injured if you don't
immediately follow instructions.
can be killed or seriously injured if you don't
You
follow instructions.
All safety messages will tell you what the potential hazard is, tell you how to reduce the chance of injury, and tell you
what can
happen if the instructions are not followed.
Tip Over Hazard
Do not use ironing station until completely
installed.
Doing so can result in serious injury or cuts.
2
IMPORTANT SAFETY INSTRUCTIONS
When using the ironing station, basic precautions should always be followed, including the following:
■ Read all instructions.
■ Use ironing station only for intended use.
■ Never yank cord to disconnect from outlet; instead
grasp plug and pull to disconnect.
■ To reduce the risk of electrical shock, do not
■ Close supervision is necessary for any appliance being
used by or near children.
■ To reduce the likelihood of circuit overload, do not
operate another appliance on the same circuit.
disassemble or attempt to repair the ironing station,
call a qualified serviceperson for examination or
repair. Incorrect reassembly or repair could cause a
risk of fire, electrical shock, or injury to persons
when the ironing station is used.
SAVE THESE INSTRUCTIONS
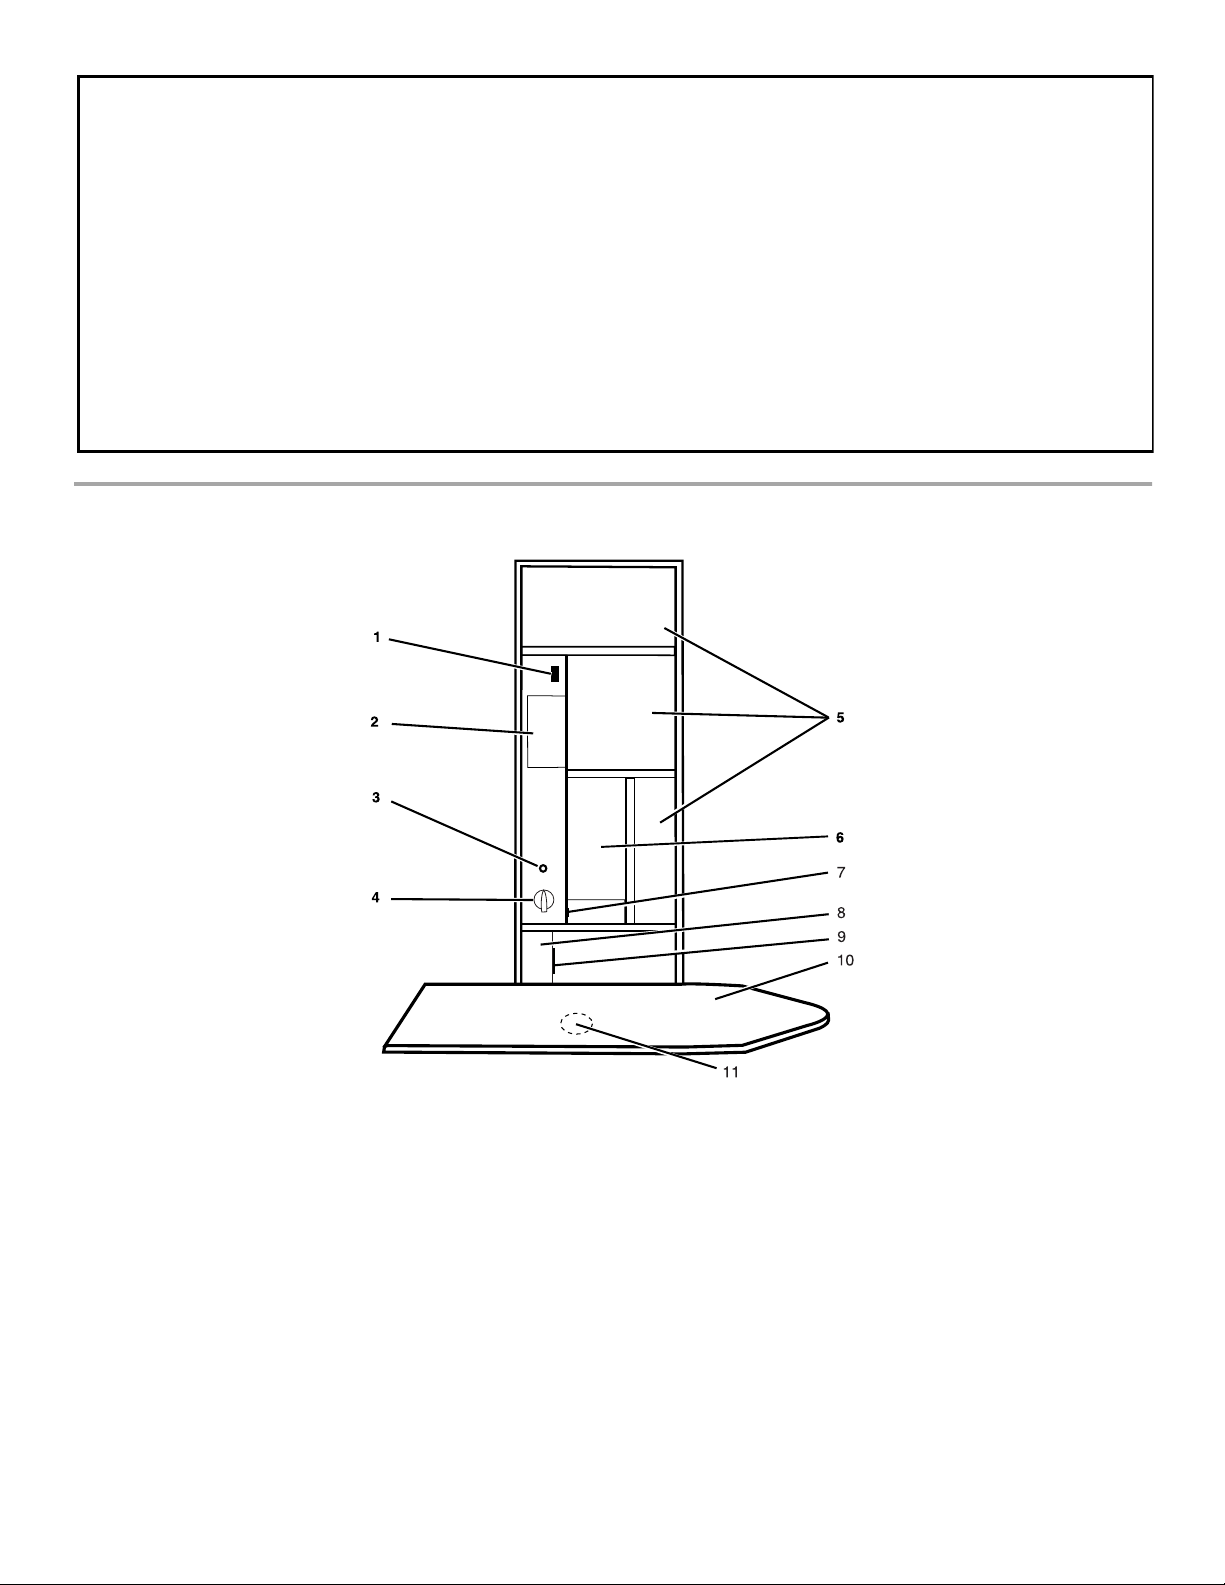
PARTS AND FEATURES
1. Automatic cutoff switch
2. Light shield
3. Indicator light
4. Timer knob/on-off switch
5. Storage areas
6. Iron storage area (iron not included)
7. Electrical outlet
8. Electrical junction box
9. Model/Serial number plate
10. Ironing board
11. Tension knob (on underside of board)
3
IRONING STATION USE
IRONING STATION CARE
Position the Ironing Station
1. Open door as widely as possible.
2. Hold onto the nose end of the board, pulling it forward,
lowering it to the normal ironing position.
3. If desired, board can be swiveled. Tension can be adjusted by
turning knob on underside of board.
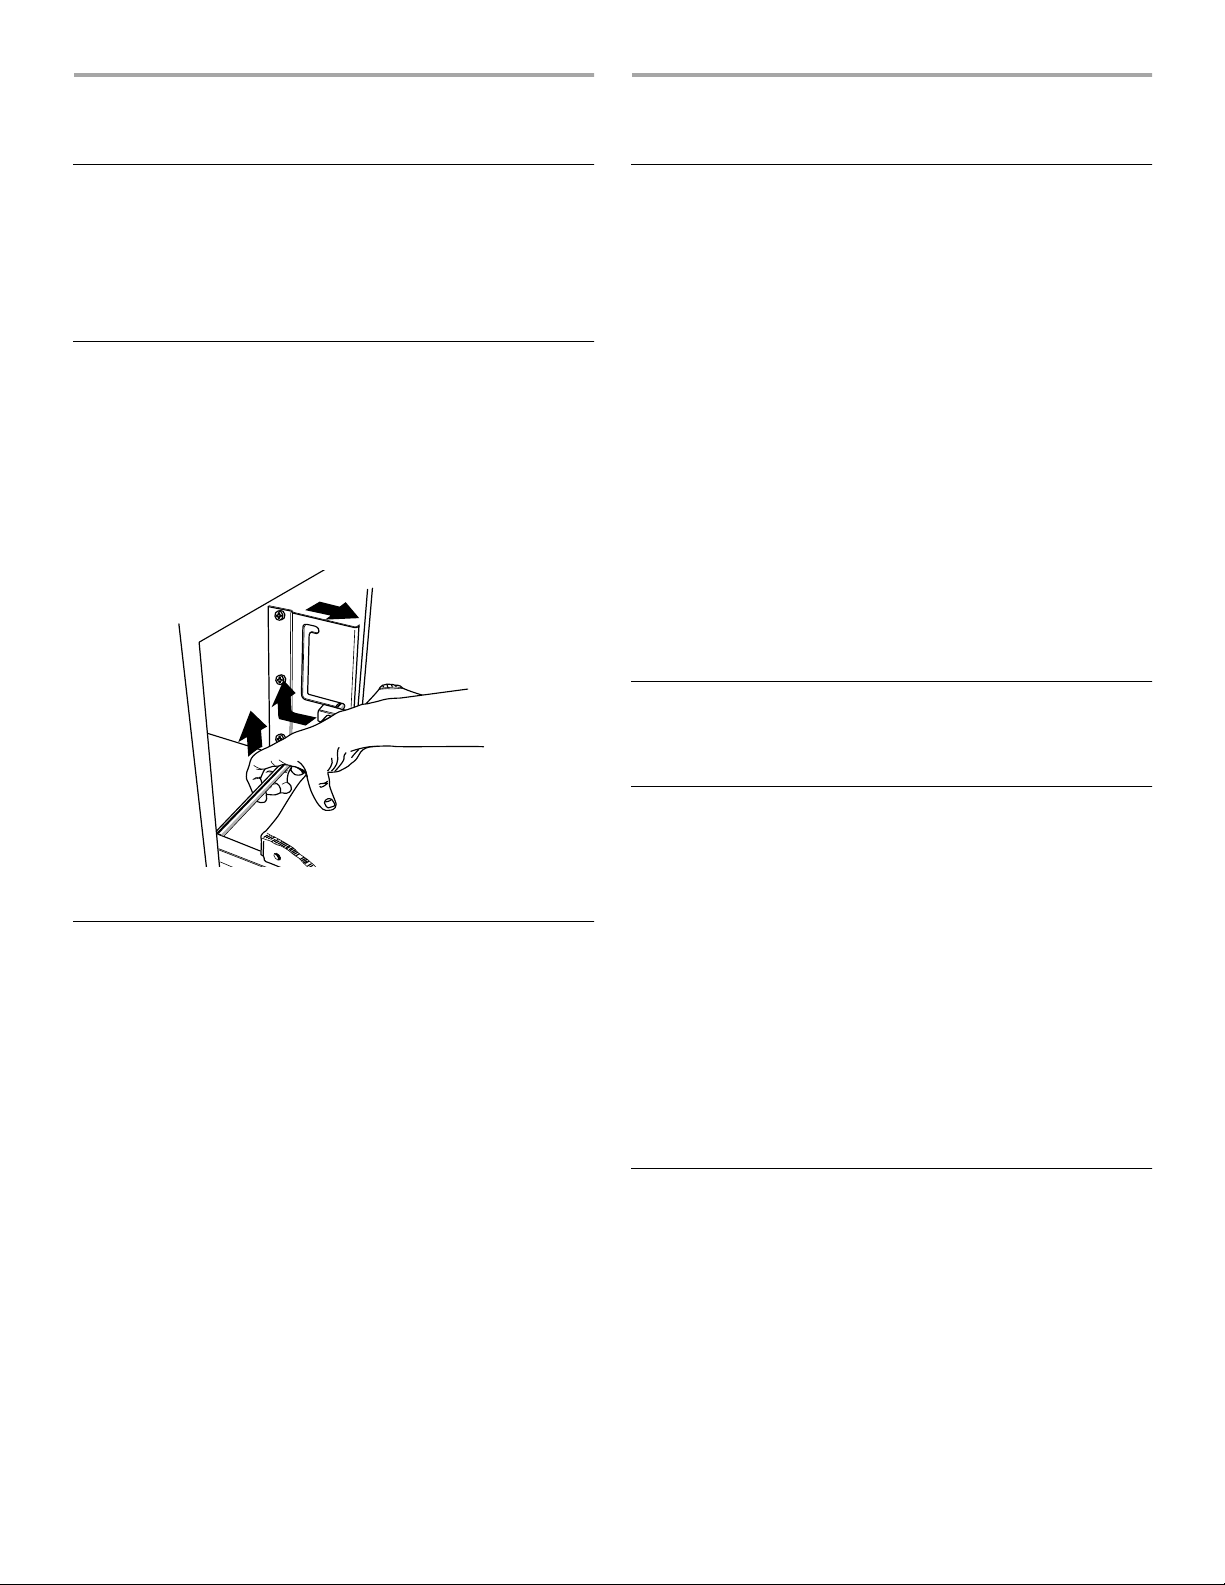
Adjusting Ironing Board Height
1. To adjust the height, put the board in a straight (horizontal)
position.
2. Hold the front of the board, and with your other hand, place
your thumb on the rear of the ironing board while grasping the
axle rod (A).
3. To raise the ironing board, lift the axle rod, slide it to the back
of the side bracket (B), lift to the upper level and lock into
position (C).
C
B
A
Replacing Cover and Pad
To replace the cover and pad, follow these instructions:
1. Lower the board to the ironing position.
2. Place the pad on the board, extending the edges of the pad
slightly over the tapered end of the ironing board.
3. Place the cover on the pad and extend the edges of the cover
approximately 1¹/₂ in. (3.8 cm) over the tapered end of the
board. Slightly tighten the drawstrings at the lower end of the
cover to partially secure the cover and pad.
4. Fold the excess cover and pad at the back of the board over
and around the end of the board
NOTE: A fold of approximately 6 in. (15.2 cm) is necessary to
align the first and second sets of eyelets for lacing.
5. Place one hand over the tapered end of the board to keep the
cover and pad in place and raise the board back into the
cabinet.
6. While firmly holding the tapered end of the board with one
hand, alternately tighten the drawstrings at the bottom until
the cover fits tightly.
7. Thread the ends of the drawstrings through the eyelets at the
lower end of the cover and tie securely.
Ordering Replacement Cover and Pad
To order a replacement ironing board cover and pad for your
ironing station, please call the Customer Interaction Center.
4. To lower the board, lift the nose end of the board and guide it
as the board returns to the lower position.
Begin Ironing
1. Plug iron cord into receptacle.
2. If desired, board can be swiveled. Tension can be adjusted by
turning knob on underside of board.
3. Turn on timer knob/on-off switch past the 5-minute mark to
activate power.
4. Begin ironing after allowing iron time to reach desired heat
setting.
5. When ironing is completed, turn off timer knob/on-off switch.
6. Place iron in iron storage compartment in upright position
with bottom of iron facing the insulated heat shield (back wall
of iron storage compartment).
7. Unplug iron from receptacle.
8. Return board to upright position.
9. In upright position, ironing board will depress upper electrical
cutoff switch, shutting off all electrical current to the unit.
NOTE: Electrical cutoff switch will stop electrical current to
the unit, but will not reset timer knob. This must be done
manually.
10. Close door securely.
Installing or Changing the Light Bulb
NOTE: Use a 40w candelabra-style light bulb (not included).
Bulbs are available at most stores but are not available through
Whirlpool Corporation.
1. Disconnect power.
2. Turn the timer knob on the unit to the off position.
3. Allow the light bulb and light shield to cool before handling.
Remove the light shield by unscrewing the two screws that
hold it in place on the side of the shield.
4. Remove the light bulb and replace with a 40w candelabra-
style bulb.
5. Replace the light shield by lining up the groove on the light
shield with the flange on the ironing station and replacing the
two screws on the side.
6. Reconnect power.
Cleaning
■ Use a clean sponge or soft cloth and a mild detergent in
warm water. Do not use abrasive or harsh cleaners.
■ Hand wash, rinse and dry all surfaces thoroughly.
4
 Loading...