

Whirlpool LE9800XM User Manual
use&care guide
AUTOMATIC
DRYERS
Electric
Model LE9800XM
and
Gas
Model LG9801XM
Solid State Mark II Series
Electronic Touch Control
3ve Ovens, Trash Compactors, Room Air Conditioners, Dehumidifiers, Automatic Washers, Clothes Dryers, Freezers, Refrigerator-Freezer
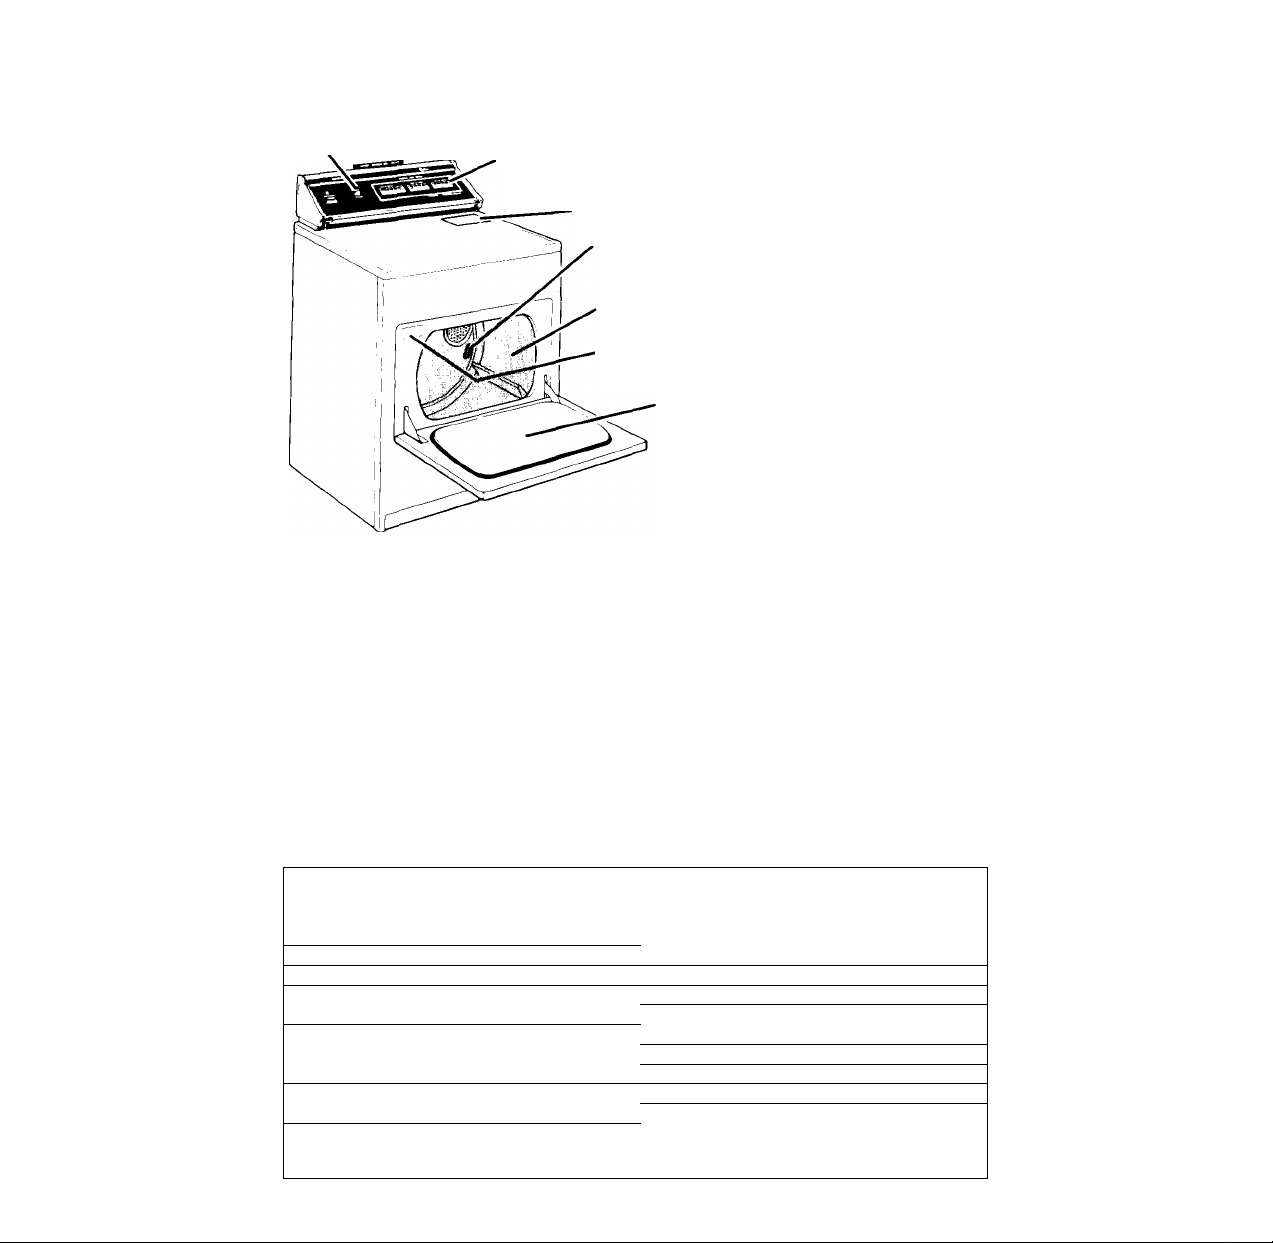
Parts and features
POWER LAUNDRY
ON/OFF INFORMATION CENTER
IFVFR /
Lcvci. / .SOLID STATE ELECTRONIC
TOUCH CONTROL
LINT SCREEN
ELECTRONIC
DRYNESS
SENSOR
DRYER DRUM
MODEL
AND SERIAL
NUMBER PLATE
LOADING
DOOR
Copy your Model and Serial Numbers here
When you need service or call with a
question, have this information ready:
1. Complete Model and Serial Numbers
(from the plate located as shown).
2. Purchase date from sales slip.
Copy this information in these spaces.
Keep this book, your warranty, sales slip
and "Dryer Guide" in the Laundry Infor
mation Center on the back of the dryer
console.
There is no warranty registration to return. Proof-of-purchase is al
that is required for in-warranty service.
Complete Model Number
Complete Serial Number
Purchase Date
Service Company and
Teiephone Number
Remove the Con
sumer Buy Guide la
bel before using
your dryer. It will be
easier to remove.
Wipe out the
dryer drum with a
damp cloth to re
move dust from stor
ing or shipping.
Contents
PARTS AND FEATURES ......... . . 2
YOUR RESPONSIBILITIES .... . . 3
SAFETY FIRST
STARTING YOUR DRYER AND
SELECTING A CYCLE
OPERATING INSTRUCTIONS 6
CUSTOM DRY Controls ..
TIMED DRY Controls
FINISH GUARD'Control ..
DRYING TIPS ............
FLUFF AIR Setting
.........................
______
............
................
c1984 Whirlpool Corporation
Page
. . 3 Mixed Loads
. . 4
. . 6
. . 6
. . 6 LINT REMOVAL
. . 7 CARING FOR YOUR DRYER . . . 10
, . 7
TUMBLE PRESS 'Setting .
Drying Times
Drying Rack
Changing the
Drum Light
End-of-Cycle Signal ...
LINT SCREEN
IF YOU NEED SERVICE OR
ASSISTANCE
.......................
........................
.........................
............................
........................
.....................
.........................
Page
. . . 7
. . . 7
. . . 7
. . . 8
. . . 8
. . . 8
. . . 9
. . . 9
. . . 11

Your
Responsibilities
Read this "Use and Care Guide"
and your "Dryer Guide" carefully for
important use and safety information.
You are personally responsible tor
making sure that your dryer...
• is installed by a qualified installer.
• is properly maintained.
• is installed in an area protected
trom the weather.
• is properly installed and leveled in
a well ventilated room* on a floor
that can support the weight.
Safety first
ALWAYS unplug the power sup
ply cord or turn off elecfrlcol
power before oftempting to
service the dryer. Shut off the
GAS VALVE if yours is a gas dryer.
ALWAYS shut off the gas valve
before leaving on vacation.
NEVER use flammable fluids
(dry-cleaning solvents, gasoline,
kerosene) in or near your dryer.
ALWAYS hand launder or air dry
fabrics treated with flammable
fluids before putting them into
your dryer.
NEVER dry items containing
wax or paint in the dryer. The
fumes can create a FIRE HAZARD.
FIRE HAZARD and DAMAGE to
some materials can result from:
• drying heat-sensitive mate
rials with heat (see page 5).
• operating the dryer with the
lint screen loose, damaged or
missing.
• allowing lint to build up inside
the dryer (see page 9).
NEVER allow children to oper
ate, play with, or crawl inside
the dryer.
• SAVE THESE INSTRUCTIONS
• is located in an area where thetemperature is above 45 F (7.2 C).
• is connected to the right kind of out
let, electric supply and grounding*
• is properly connected to fuel and
exhaust systems*
• is used only for jobs normally ex
pected of home clothes dryers.
• is not run where there may be explo
sive fumes.
• is not used by children or anyone
unable to operate it properly.
*See the "Installation Instructions” for
complete information.
NEVER operate the dryer if...
• it is not working right.
• it is damaged.
• parts are missing.
• all panels are not in place.
DO NOT let dust, lint, paper,
rags, chemicals, etc., pile up
around or under the dryer. DO
NOT install against drapes or
curtains.
• FOR YOUR SAFETY •
IF YOU SMELL GAS:
1. OPEN WINDOWS.
2. DON’T TOUCH ELECTRI
CAL SWITCHES.
3. EXTINGUISH ANY OPEN
FLAME.
4. IMMEDIATELY CALL
GAS SUPPLIER.
•FOR YOUR SAFETY*
DO NOT STORE OR USE
GASOLINE OR OTHER
FLAMMABLE VAPORS AND
LIQUIDS IN THE VICINITY
OF THIS OR ANY OTHER
APPLIANCE.
Starting your
dryer and
selecting a cycle
Before starting your dryer, be
sure laundry is sorted and loaded
properly (see your'’DryerGuide")
Be sure the door is tightly closed.
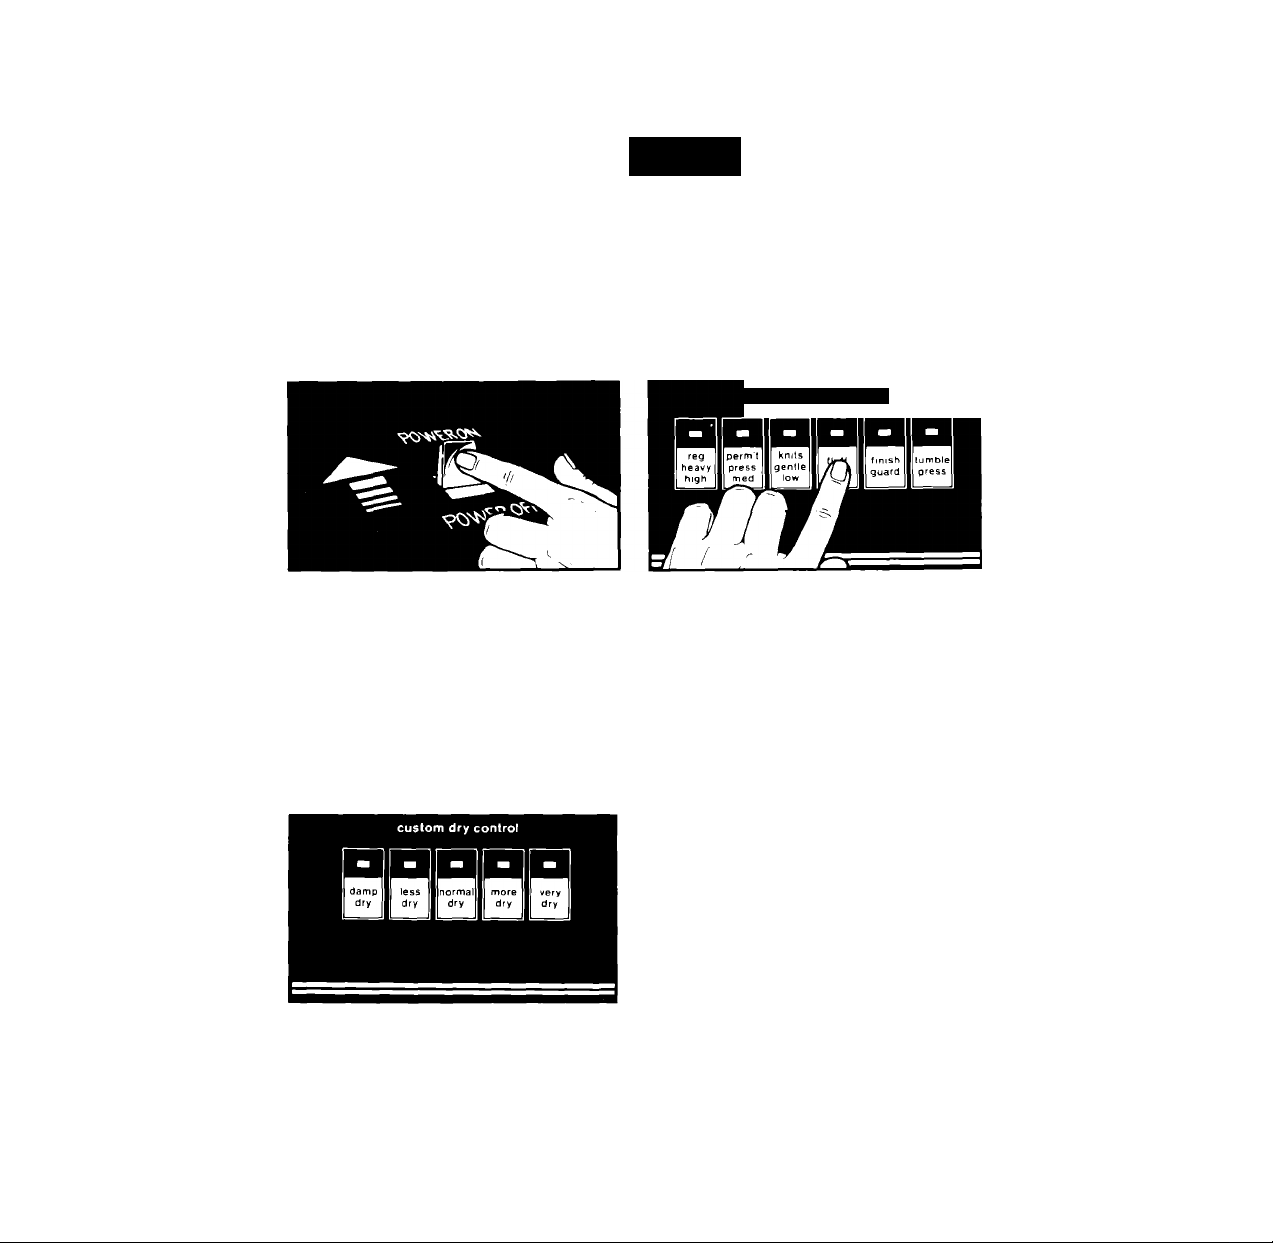
Turn
1.
power on
Move the POWER SWITCH up.
You will have 8 seconds to touch
a FABRIC-TEMP Selector.
Imrf cmpmcity
Dry-Miur Control
Cfwoy Eriicwnt Syalwn
/
i:
Touch FABRIC-TEMP
2. Selector
fabric-temp selector
Within 8 seconds, touch the lower
part of a FABRIC-TEMP Selector. The
dryer will not operate if you touch the
upper half of the selector.
You may change the dryer setting
at any time during any cycle by
touching the desired selector or
selectors.
Touch a CUSTOM DRY
3. or TIMED DRV Control
IMPORTANT: If you do not touch a
CUSTCM DRY or TIMED DRY Control,
the dryer will automatically select
NORMAL DRY.
If this is not the dryness you like,
you must touch one of the other
dryness Controls. See page 6 of this
book for more details.
4
• To stop the dryer
1. Cpenthedoor,or...
2. Move PCWER SWITCH to CFF.
• To check the load
1. Cpen door.
2. The dryer will remember where it
was in the cycle if you restart the
dryer within 2 minutes. Touch
selector with the blinking lightto
restart.
 Loading...