

Whirlpool LE444UXW, LG4441XW User Manual
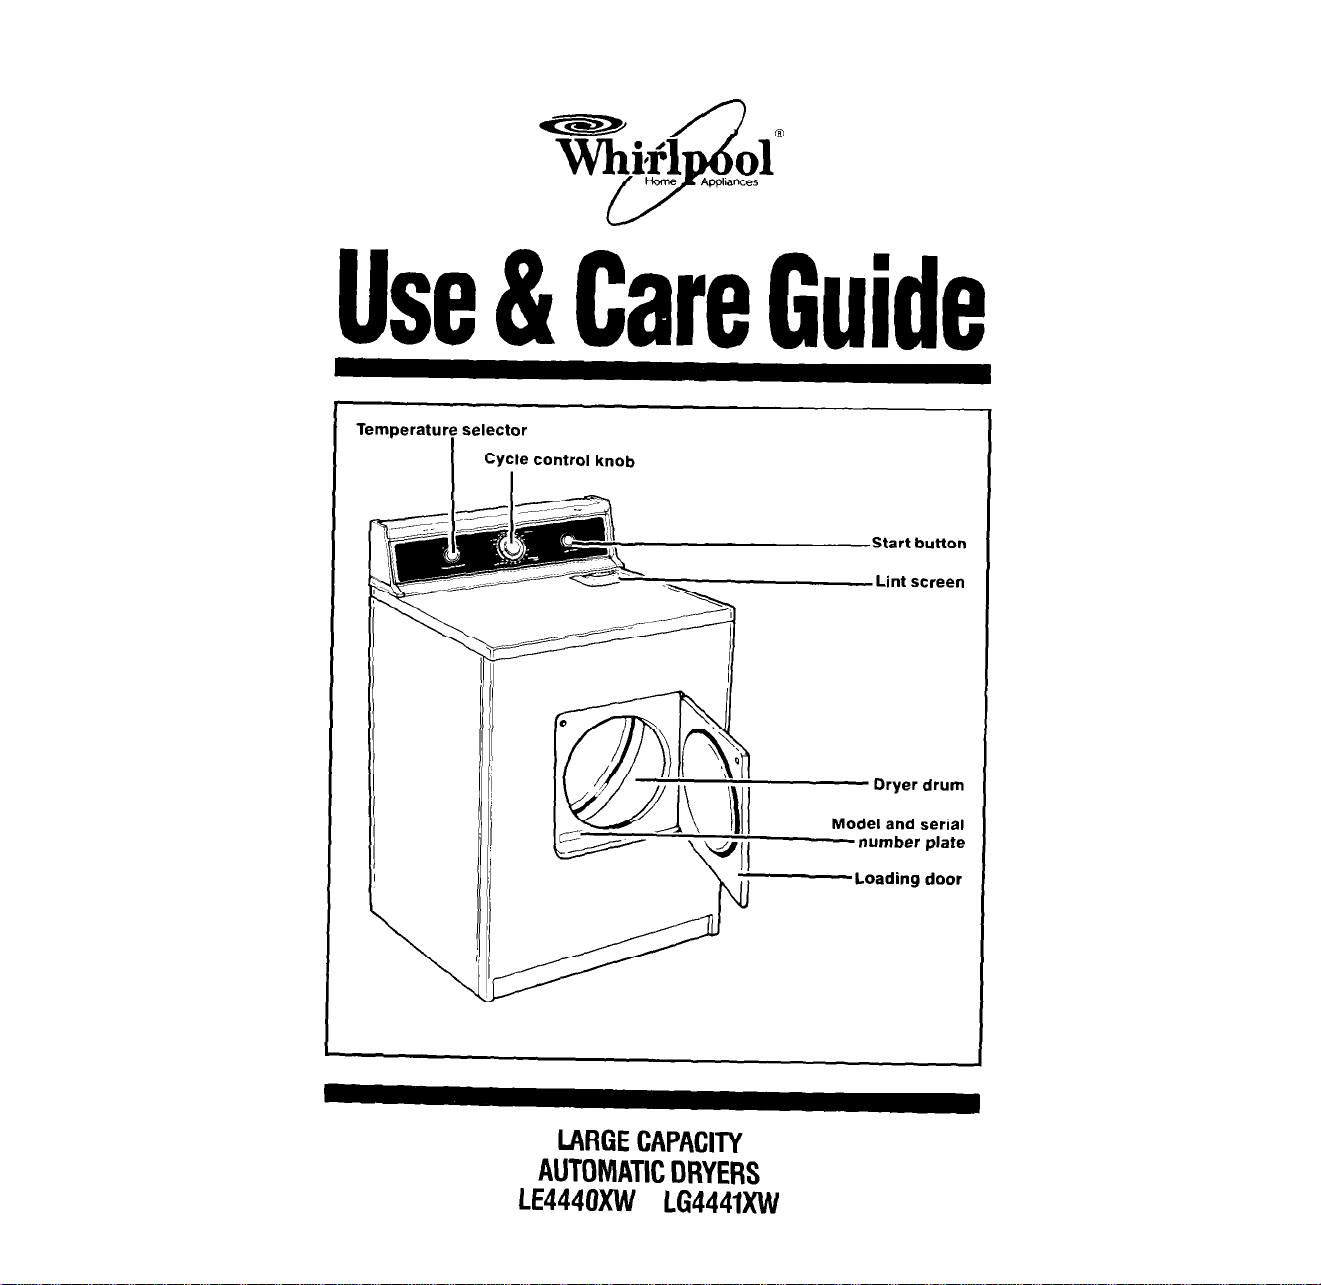
Temperature selector
Start button
Lint screen
Dryer drum
Model and serial
number plate
Loading door
LARGECAPACITY
AUTOlVlATlCDRYERS
LE444UXW LG4441XW
Contents
Page
Important Safety
Instructions..
Additional safety instructions
and your responsibilities
Operating Instructions
Starting your dryer
Dryer cycles and settings
Cool-down limes
Using air setting
Using TUMBLE PRESS@
Caring For Your Dryer
Cleaning the lint screen
Cleaning the dryer interior
Lint removal
If You Need Service Or
Assistance.
Whirlpool Automatic Dryer
Warranty.................... 12
01990 Whirlpool Corporation
4-5
10
Thank you for buying a WhIrlpool
appliance. Please complete and malt
3
the Owner Regstration Card provided
with thus product. Then complete the
3
form below. Have this rnformatron ready
If you need service or call with a
question.
6
l
Copy model and serial numbers
8
from plate (on the frame behind the
7
door) and purchase date from sales
7
skp.
8
l
Keep this book, the Dryer Guide and
8
the sales slip together in a handy
9
place.
Model Number
Serial Number
If your dryer has a Consumer Buy
Guide label, remove it. It will be easier
to remove before the dryer is used.
To remove any remaining glue:
l
Rub briskly with thumb to make a ball,
then remove.
or
l
Soak area with liquid hand dishwashing detergent before removing glue
as described above.
Do not use sharp Instruments,
rubbing alcohol, flammable fluids or
abrasive cleaners. These can damage
the finish. See “Important Safety
Instructions” on page 3.
NOTE: Do not remove any permanent
instruction labels inside the dryer.
You should wipe out the dryer drum
with a damp cloth before using to
remove dust from storing or shipping.
Purchase Date
Service Company Phone Number
FOR YOUR SAFETY
If you smell gas:
1. Open windows.
2. Don’t touch electrical
switches.
3. iitkeguish any open
.
4. Immediately call your
gas supplier.
FOR YOUR SAFETY
Do not store or use gasdine or other flammable
vapors and liquids in the
vicinity of this or any
other appliance. The
fumes can create a fire
hazard or explosion.
Important Safety Instructions
To reduce the risk of fire, electrical shock, or
injury to persons when using your dryer, follow
basic precautions, including the following:
l
l
Read all instructions before
using the dryer.
l
NEVER dry items cleaned,
washed, soaked in or spotted with
wax, paint, gasoline or flammable
fluids in the dryer. The fumes can
create a FIRE HAZARD or
EXPLOSION. ALWAYS hand
launder and air dry fabrics containing these materials.
l
NEVER allow children to operate,
play with or crawl inside the dryer.
Close supervision of children IS
necessary when the dryer is used
near children.
l
DO NOT reach into a dryer if the
drum is moving.
l
When discarding an old dryer,
ALWAYS remove the door to
prevent accidental entrapment.
l
DO NOT install or store dryer
where it will be exposed to the
weather.
l
DO NOT tamper with the controls.
- SAVE THESE INSTRUCTIONS -
You are responsible for
making sure that your dryer
is installed, repaired and parts
replaced by a qualified person.
l
Use only fabric softeners specifitally labeled as not being harmful
to the dryer.
l
FIRE HAZARD and DAMAGE
materials can result from:
-drying rubber, rubber-like and
heat sensitive materials with heat.
-
allowtng lint build-up inside the
dryer or exhaust system. Cleaning should be done periodically
by a qualified person.
l
Clean lint screen before or after
each load.
l
DO NOT let dust, lint, paper, rags,
chemicals, etc. pile up around or
under the dryer.
l
Dryer must be electrically
grounded. See the Installation
Instructions.
10
Additional safety instructions and your responsibilities
-
l
NEVER operate the dryer if:
- il is not working right (i.e. noisy, too hot).
-it is damaged.
-parts are missing (i.e. door latch).
-all panels are not in place.
-the lint screen is loose, damaged
or missing.
l
ALWAYS shut off the gas valve
before leaving on vacation if you have
a gas dryer.
l
ALWAYS unplug the power supply
cord or turn off electrical power before
attempting to service the dryer. Shut
off GAS VALVE if you have a gas dryer.
l
You are responsible for making
sure that your dryer;
- is properly maintained.
is properly installed and leveled
on a floor that can support the
weight in a well ventilated room.*
-
is located in an area where the
temperature is above 45°F (7.2%).
-
is connected to the proper outlet
and electrical supply.’
- is properly connected to fuel and
exhaust systems.*
-
is not installed against drapes or
curtains.’
- is used only for jobs normally
expected of home clothes dryers.
-
is not used by anyone unable to
operale it properly.
*See the Installation Instructions for
complete information.

Operating Instructions
Starting your dryer
Be sure to refer to the chart below and the Dryer Guide for proper sorting, loadtng
and control setting informatton before starting it.
TYPE OF LOAD
Cottons and linens
EXTRA HEAVY - Bedspreads, mattress
pads, quilts
HEAVYWEIGHT COTTONS -Towels,
jeans, corduroys, work clothes
MEDIUMWEIGHT COTTONS - Sheets,
pillowcases, cotton, underwear, diapers
LIGHTWEIGHT COTTONS - Batistes,
organdies, lingerie
Permanent press, synthetics and
blends
HEAVYWEIGHT FABRICS-Work clothes,
jackets, raincoats
MEDIUMWEIGHT FABRICS - Shorts, play
clothes, sheets, slacks
LIGHTWEIGHT FABRICS - Lingerie,
blouses, dresses
Knits
HEAVYWEIGHT-Cottons, rayons,
blends, T-shorts, slacks, shirts
LIGHTWEIGHT - Synthetic (polyester,
acrylrc, etc.) and blends, lingerre, blouses,
dresses
Delicate fabrics
Sheer curtarns (2 or 3 panels)
Gauze, lace, etc.
SUGGESTED
CYCLE
EX HEAVY
HEAVY
MEDIUM
LIGHT
PERMANENT
PRESS
40-50 MINS.
30-40 MINS.
20-30 MINS.
PERMANENT
PRESS
40-50 MINS.
30-40 MINS.
PERMANENT
PRESS
20-30 MINS
15-20 MINS.
SUGGESTED
TEMPERATURE
HIGH
HIGH
HIGH
LOW
Rubber, plastic, heat-sensitive
fabrics
FOAM RUBBER - Pillows, bras,
stuffed toys
PLASTIC - Shower curtarns, tablecloths
RUBBER-BACKED RUGS
OLEFIN, POLYPROPYLENE,
SHEER NYLON
DO NOT
some fabrics.
4
OVERDRY.
Overdrying can cause shrinkage, static cling, and damage
PERMANENT
PRESS
20-30 MINS.
20-30 MINS.
40-50 MINS.
15-20 MINS.
AIR
 Loading...