

Whirlpool LC4500XT User Manual
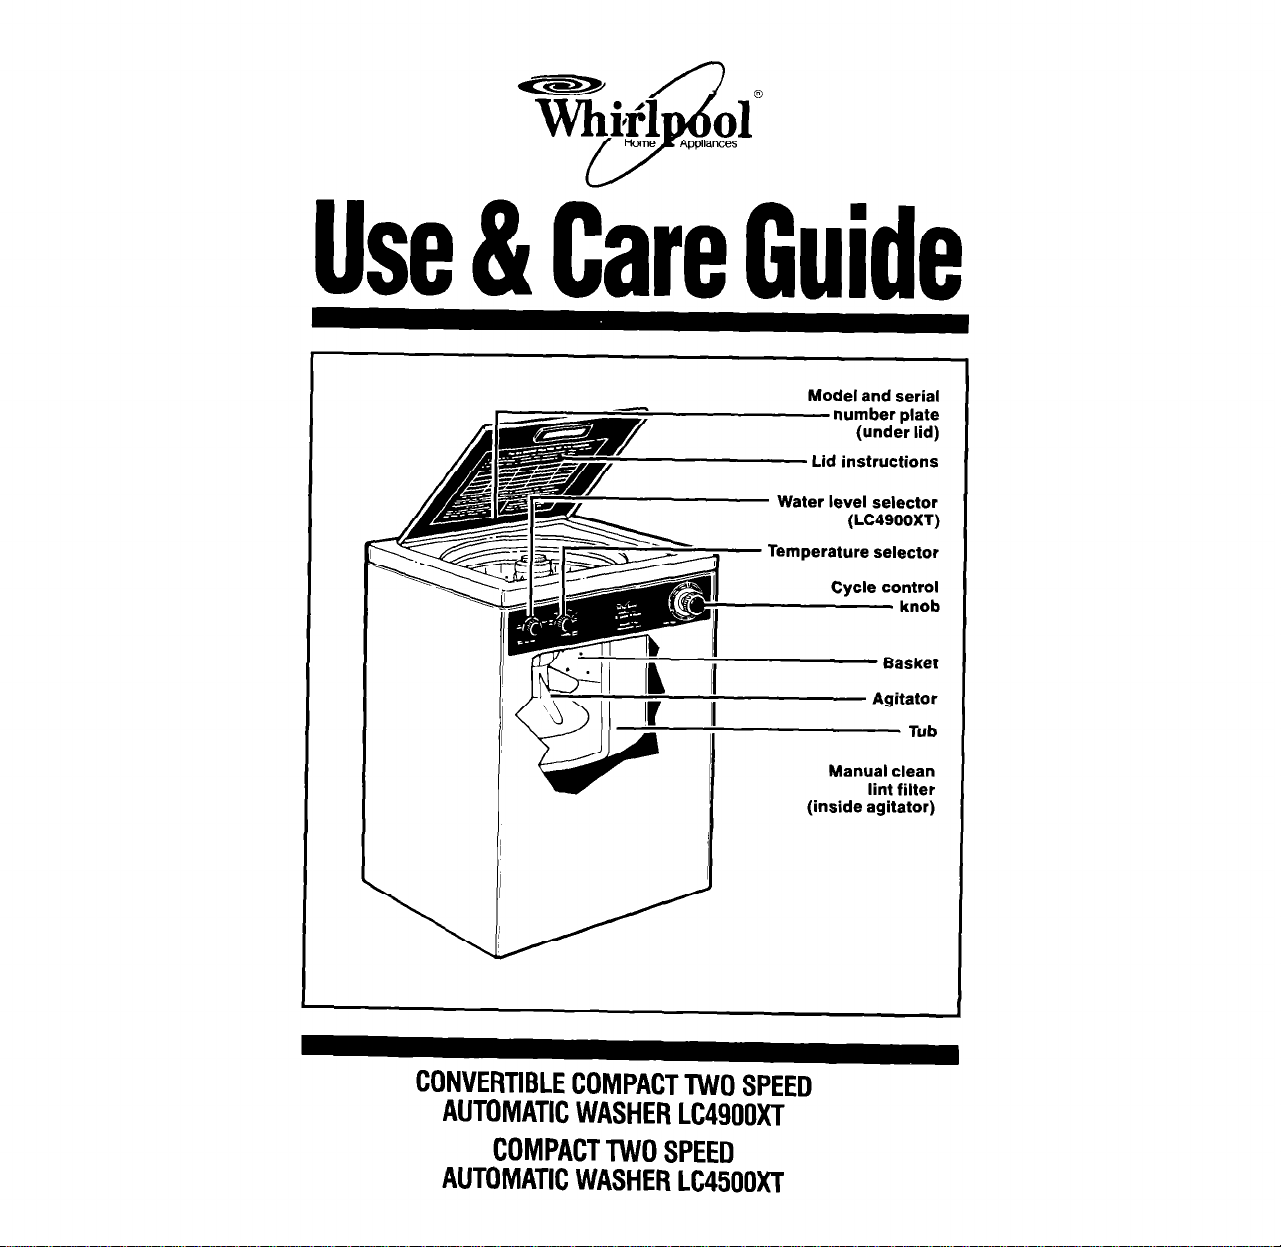
Model and serial
number plate
(under lid1
Lid instructions
-v -
Water level selector
(LC4900XT)
Temperature selector
Manual clean
lint filter
(inside agitator)
CONVERTIBLECOMPACTTWOSPEED
AUTOMATlCWASHERLC4900XT
COMPACTTWOSPEED
AUTOMATlCWASHERLC4500XT
Contents
Important Safety
Instructions.
Washer Connections
(Model LC4900XT)
Portable one faucet
connection
Portable two faucet
connections
Permanent installation
Operating Instructions
Starting your washer
What happens in each cycle
Other Operating Instructions
Rinse and spin
Drain and spin
Soak cycle
Pre-wash cycle
Cleaning the lint filter
If You Need Service Or
Assistance,
Whirlpool Automatic
Washer Warranty.
01990 Whirlpool Corporation
Page
6-7
7-10
11
11
11
12
12
13
16
Thank you for buying a Whirlpool
3
appliance. Please complete and mail
the Owner Registration Card provided
with this product. Then complete the
form below. Have this information ready
4
if you need service or call with a
question.
5
Copy model and serial numbers
5
from plate (under lid near hinge) and
the purchase date from the sales slip.
Keep this book, the Laundry Guide
and the sales slip together in a
handy place.
Model Number
Serial Number
Purchase Date
Service Company Phone Number
If your washer has a Consumer Buy
Guide label, remove it. It will be easier
to remove before the washer is used. To
remove any remaining glue:
l
Rub briskly with thumb to make a ball,
then remove.
or
l
Soak area with liquid hand dishwashing detergent before removing glue as
described above.
Do not use sharp instruments, rubbing
alcohol, flammable fluids or abrasive
cleaners. These can damage the finish.
See “Important Safety Instructions” on
page 3.
Important Safety Instructions
injury to persons when using your washer, follow basic precautions, including the following:
l
Read all instructions before
using the washer.
l
NEVER wash items cleaned,
washed, soaked in or spotted with
wax, paint, gasoline, or flammable
fluids in the washer. The fumes
can create a FIRE HAZARD or
EXPLOSION. ALWAYS hand
give off vapors that can create a
FIRE HAZARD or EXPLOSION.
l
If hot water has not been used
recently (usually 2 weeks or
longer), hydrogen gases may build
up in the water heater and the hot
water pipes. HYDROGEN GAS IS
EXPLOSIVE. To prevent injury or
launder and air dry fabrics contain- damage, before using your washer,
ing these materials.
l
NEVER allow children to operate,
play with, or crawl inside the
washer. Close supervision of
children is necessary when the
washer is used near children.
l
When discarding an old washer,
ALWAYS remove the lid to prevent
accidental entrapment.
l
NEVER put your hands into the
washer until all motion stops, If the
lid is opened while the basket is
spinning, the basket will automatitally stop in a few seconds.
l
DO NOT tamper with controls.
l
NEVER use or store flammable
fluids (dry-cleaning solvents,
kerosene) in or near your washer.
DO NOT add flammable fluids to the
wash water. These substances
turn on all hot water faucets and
allow water to run for several
minutes. This will allow gases to
escape. DO NOT smoke or use
any open flame near the faucet
while it is open.
l
You are responsible for mak-
ing sure that your washer:
-
is installed, repaired, and has
parts replaced by a qualified
person.
- is properly installed and leveled
on a floor that can support the
weight.’
-
is connected to the correct 3prong outlet, electric supply,
water supply and drain.*
- is properly grounded.*
- IS properly maintained.*
- is protected from the weather
and kept where the temperature
will not fall below freezrng.
‘See the Installation Instructions.
- SAVE THESE INSTRUCTIONS -
Additional safety instructions and your responsibilities
l ALWAYS
aids and other materials in a cool, dry
place where children can’t reach them
-in a locked cabinet if possible,
l
ALWAYS read and follow instructions
on packages of detergent and laundry
aids - especially warnings and
precautions.
l
HAZARDOUS FUMES can be
formed if chlorine bleach is used in
the same wash as ammonia or acids
such as vinegar or rust remover,
store detergent, laundry
l
ALWAYS unplug the power supply
cord before attempting to service
the washer.
l
DO NOT machine wash glass fiber
materials. Small particles can stick to
fabrics washed in following loads and
cause skin irritation.
l
You are responsible for making
sure that your washer:
-is used only for jobs normally ex-
petted of home automatic washers.
- is not run by children or anyone
unable to operate it properly.
3
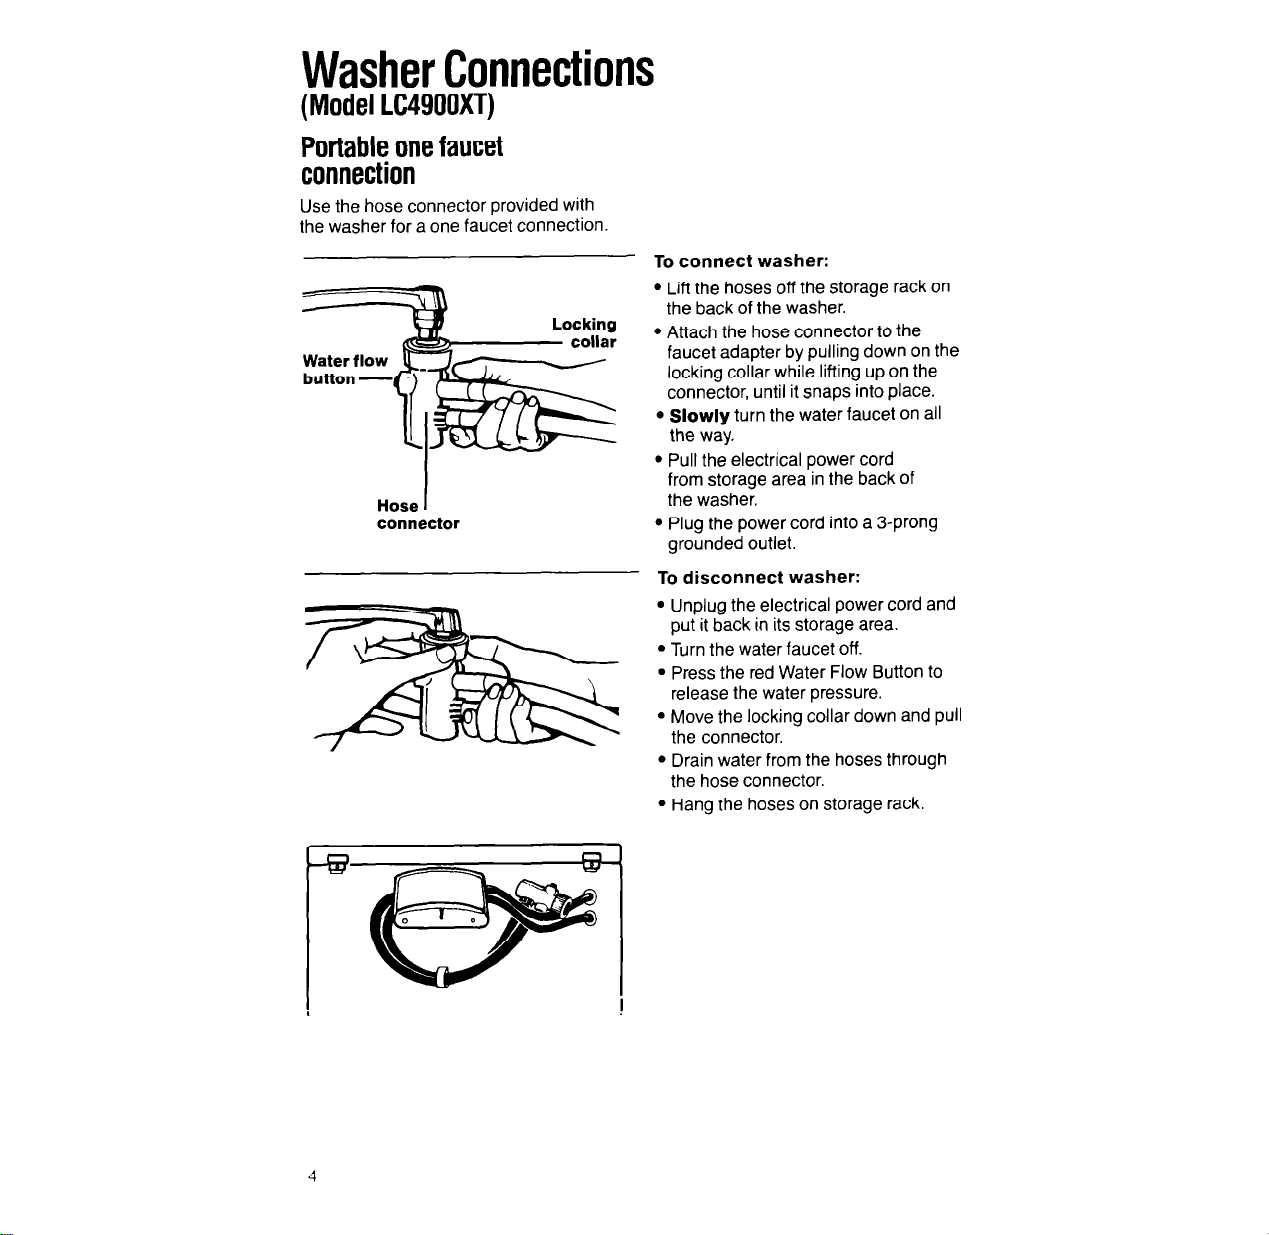
Washer Connections
(Model LC49OOXT)
Portable one faucet
connection
Use the hose connector provided with
the washer for a one faucet connection.
To connect washer:
l
Lift the hoses off the storage rack on
the back of the washer.
l
Attach the hose connector to the
faucet adapter by pulling down on the
locking collar while lifting up on the
connector, until it snaps into place.
l
Slowly turn the water faucet on all
the way.
l
Pull the electrical power cord
from storage area in the back of
the washer.
connector
l
Plug the power cord into a 3-prong
grounded outlet.
To disconnect washer:
l
Unplug the electrical power cord and
put it back in its storage area.
l
Turn the water faucet off.
. Press the red Water Flow Button to
release the water pressure.
. Move the locking collar down and pull
the connector.
l
Drain water from the hoses through
the hose connector.
l
Hang the hoses on storage rack.
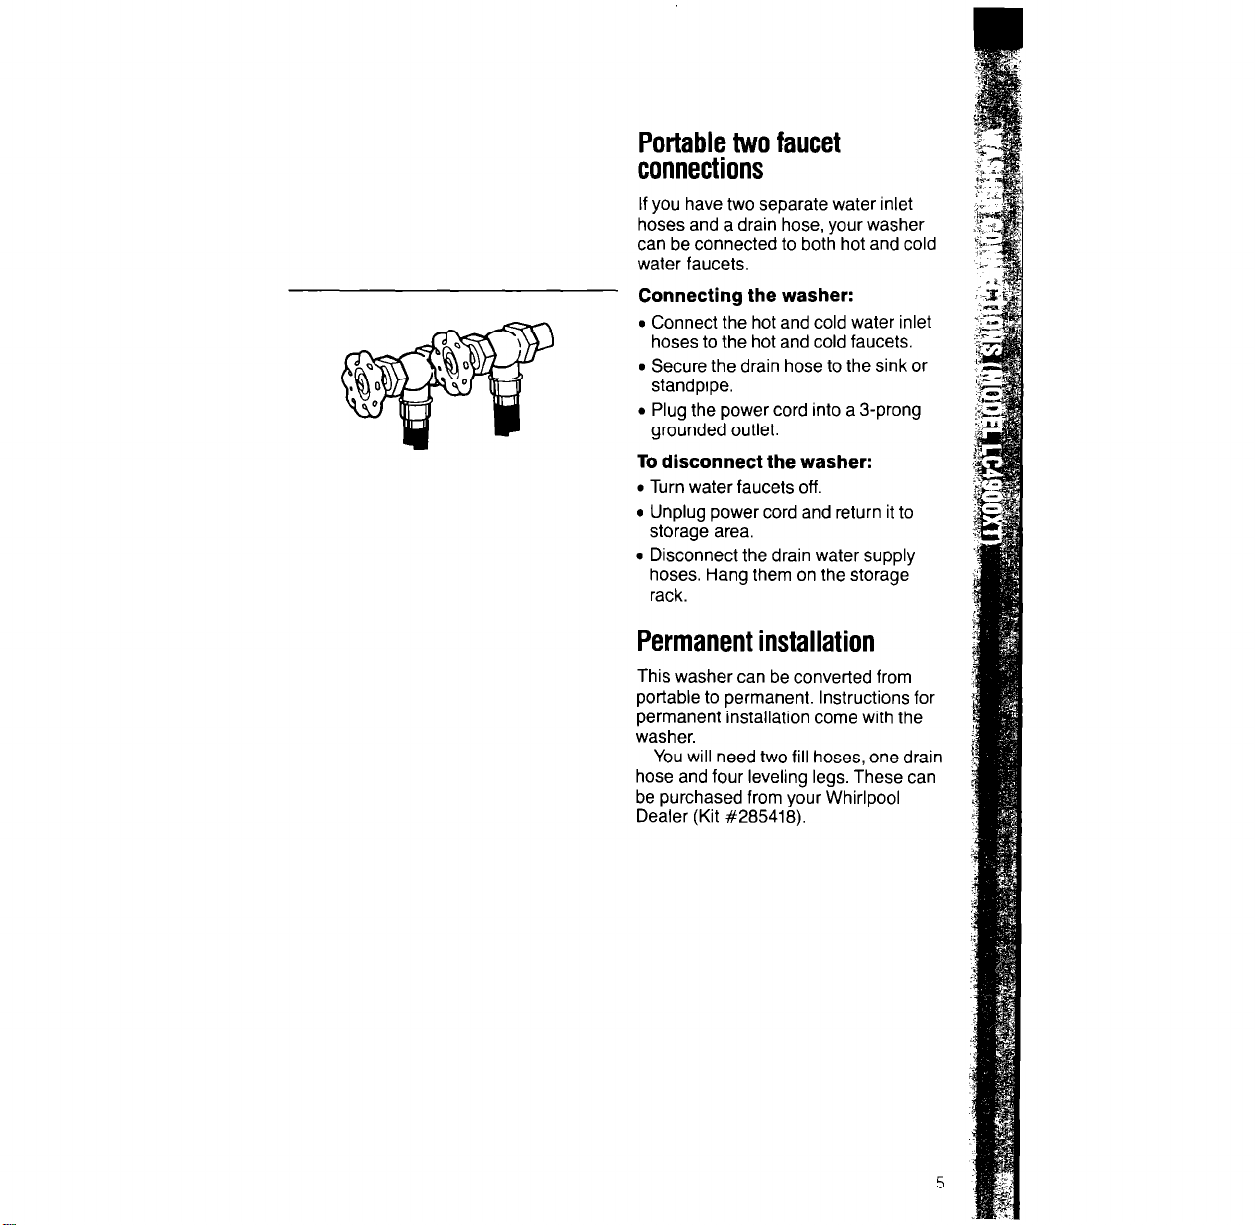
Portable two faucet
connections
If you have two separate water inlet
hoses and a drain hose, your washer
can be connected to both hot and cold
water faucets.
Connecting the washer:
l
Connect the hot and cold water inlet
hoses to the hot and cold faucets.
l
Secure the drain hose to the sink or
standpipe.
l
Plug the power cord into a 3-prong
grounded outlet.
To disconnect the washer:
l
Turn water faucets off.
l
Unplug power cord and return it to
storage area.
l
Disconnect the drain water supply
hoses. Hang them on the storage
rack.
Permanent installation
This washer can be converted from
portable to permanent. Instructions for
permanent installation come with the
washer.
You will need two fill hoses, one drain
hose and four leveling legs. These can
be purchased from your Whirlpool
Dealer (Kit #285418).
 Loading...