

Whirlpool LA5530XS Use & Care Manual

AUTOMATIC
WASHER
Large Capacity
Model
LA553oxs
. . ,/ _~
r. =- -*++wj‘.. i, i
L&l A.‘. .-‘-=, &
Microwave Ovens. Trash Compactors, Room Air Conditioners. Oehumldifiers. Automatic Washers. Clothes Dryers. Freezers, Refrigerator-F

Contents
PARTS AND FEATURES . . .
- 2
IMPORTANT SAFETY
INSTRUCTIONS. . . . . . .
3
OPERATING INSTRUCTIONS.. . .
4
Starting Your Washer .
4
What Happens in Each Cycle
6
OTHER OPERATING
INSTRUCTIONS. . .
12
For a Rinse and Spin . . . . .
12
Page
For a Drain and Spin
12
For a
Soak . . . . .
12
Liquid Bleach Dispenser .
13
MAGIC CLEAN@ Lint Filter . .
13
CARING FOR YOUR WASHER
14
Winterizing.. . .
15
IF YOU NEED SERVICE OR
ASSISTANCE
16
WASHER WARRANTY
20
01987 Whirlpool Corporation
Parts and features
LOAD LAUNDRY
CYCLE
SIZE
INFORMATION CONTROL
SEl.B$TOR
TEMPERATURE
SELECTOR
MODEL AND
SERIAL
NUMBER PLATE
MAGIC CLEAN@
LINT FILTER
(not shown)
Remove
the Consumer
Buy Guide label. It will be
easier to remove before the
washer is used.
You should wipe out the
basket with a damp cloth
before using to remove dust
from storing or shipping.
Copy your Model and Serial Numbers here
When you need service or call with a
question, have this information ready:
1. Complete
Model and Serial Numbers
Model Number
(from plate under the lid near the
hinge).
serio, Number
2.
Purchase date from sales slip.
Copy this information in these spaces.
Purchase Dcte
Keep this book, your”Laundry Guide” and
sales slip in the Laundry Information
Center.
Service Company
Phone Number
Please complete and mall the Owner Registration Card turnlshed with
this product.
2
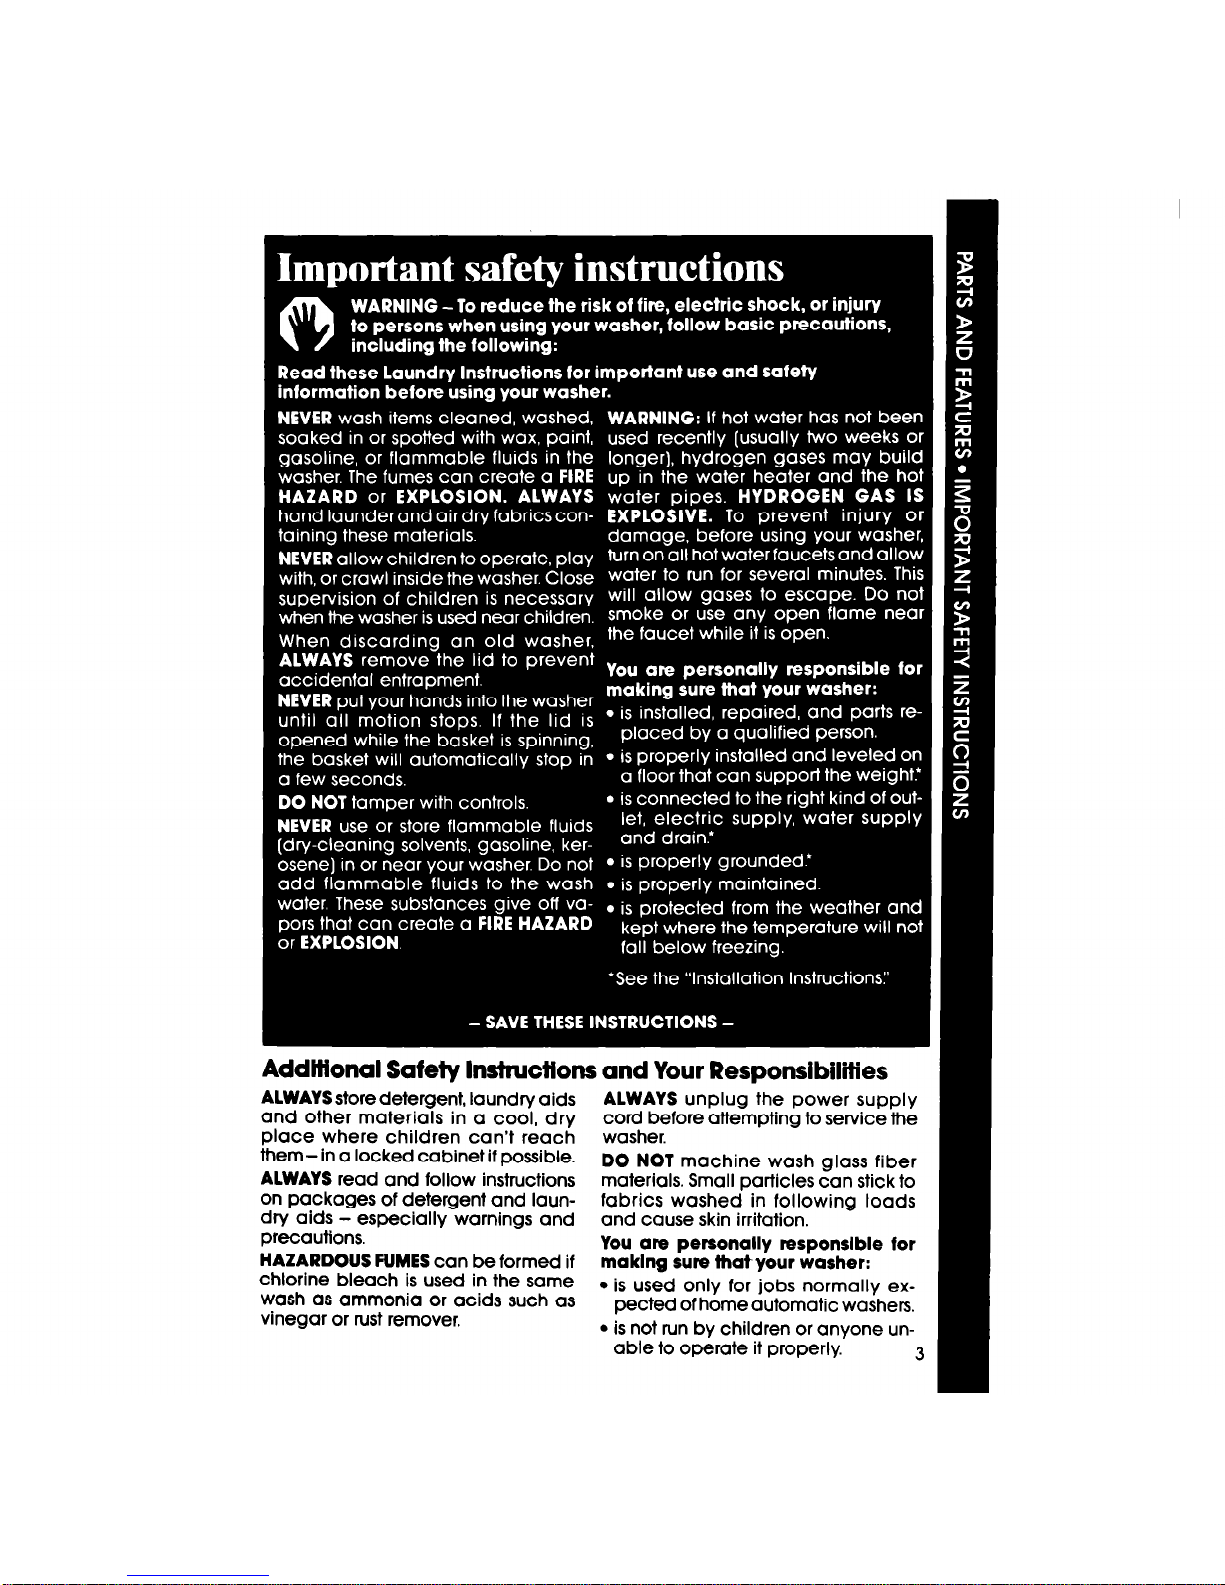
Addtfional Safety Inshucfions and Your Responsibilities
ALWAYS
store detergent, laundry aids
ALWAYS
unplug the power supply
and other materials in a cool, dry cord before attempting to service the
place where children can’t reach washer.
them- in a locked cabinet if possible.
-____-__-
DO NOT
machine wash glass fiber
.
ALWAYS
read
and
follow instructions
on packages of detergent and laundry aids -
especially warnings and
precauttons.
HAZARDOUS FUMES
can be formed if
chlorine bleach is used in the same
wash as ammonia or acids such as
vinegar or rust remover.
materials. Small particles can stick to
fabrics washed in following loads
and cause skin irritation.
You are personally responslble for
maklng sure thatyour washer:
l is used only for jobs normally ex-
pected of home automatic washers.
l is not run by children or anyone un-
able to operate it properly.
3
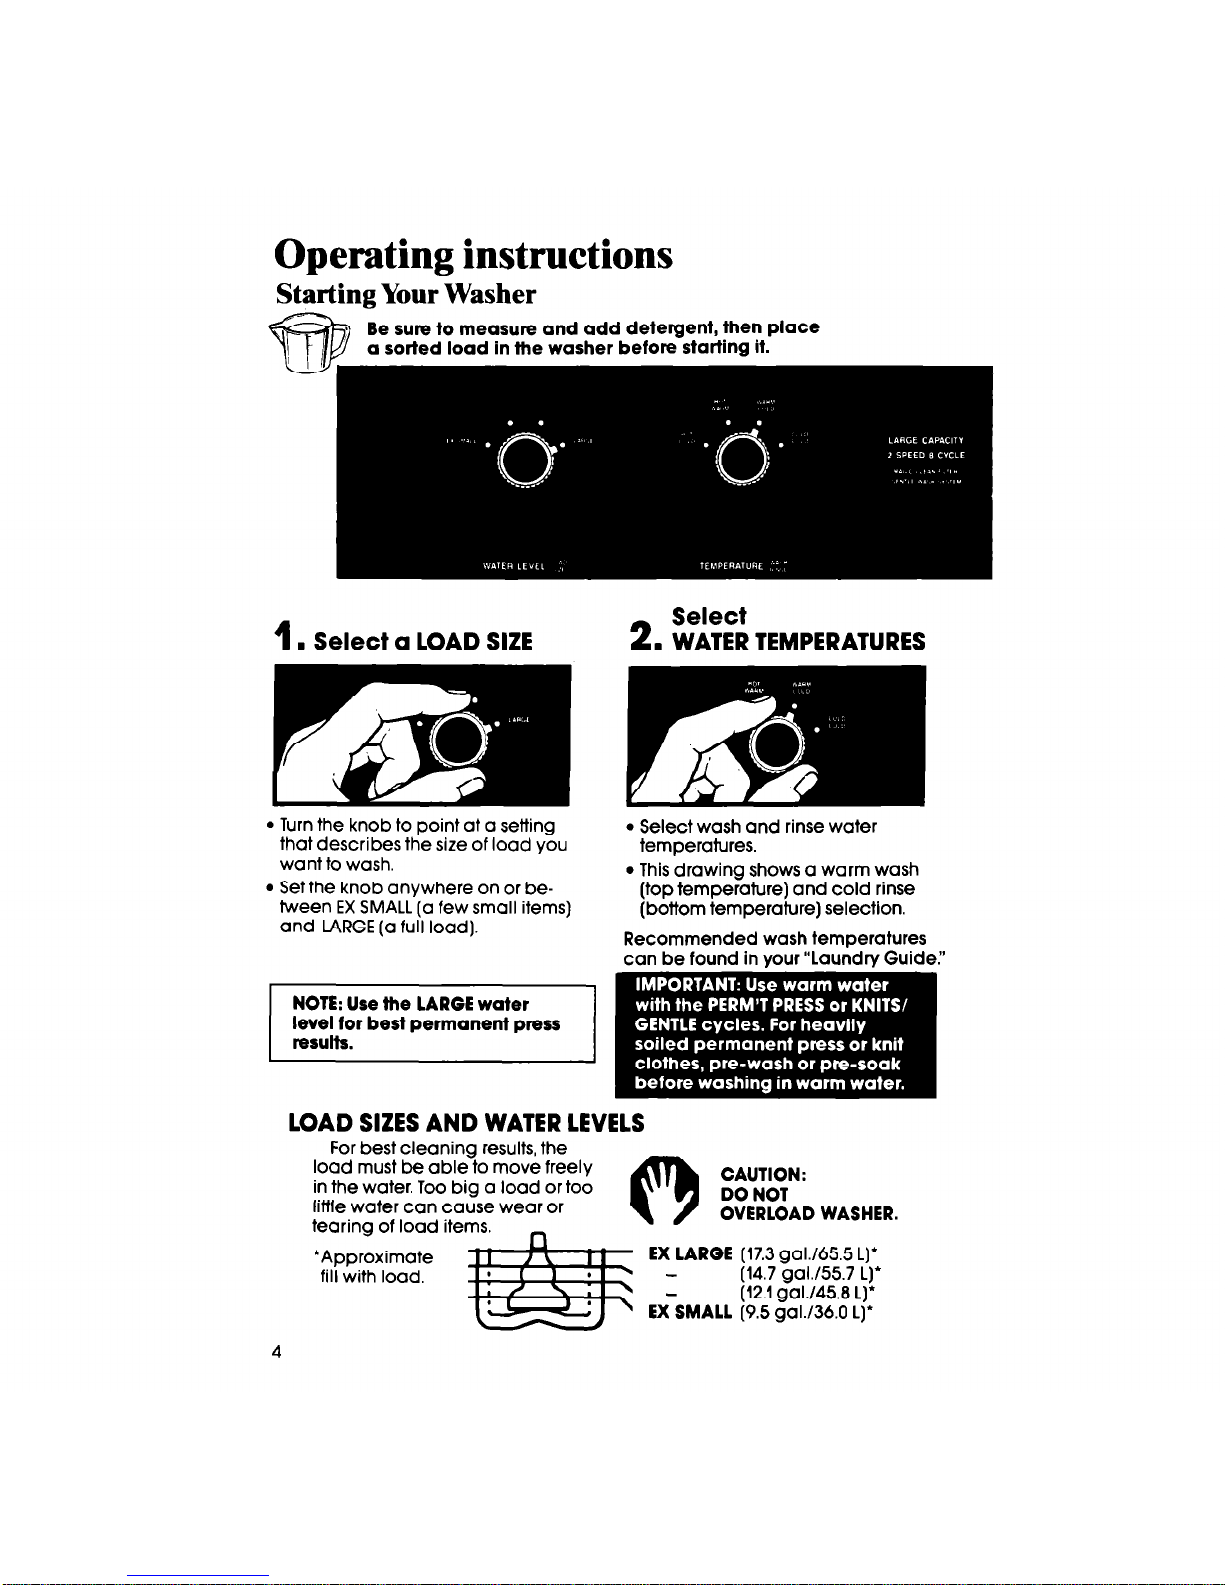
Operating instructions
Starting Your Washer
Be sure to measure and add detergent, then place
a sorted load in the washer before
starting
it.
1
. Select a LOAD SIZE
2
Select
. WATER TEMPERATURES
l Turn the knob to point at a setting
that describes the size of load you
want to wash.
l Set the knob anywhere on or be-
tween EX SMALL [a few small items)
and LARGE (a full load).
l Select wash and rinse water
temperatures.
l This drawing shows a warm wash
(top temperature) and cold rinse
(bottom temperature) selection.
Recommended wash temperatures
can be found in vour “Laundry Guide:’
NOTE: Use the LARGE water
level for best permanent press
results.
LOAD SIZES AND WATER LEVELS
For best cleaning results, the
load must be able to move freely
in the water. Too big a load or too
little water can cause wear or
tearing of load items.
0
CAUTION:
DO NOT
OVERLOAD WASHER.
‘Approximate
fill with load.
(17.3 gal./655 L)*
(14.7 gal./557 L)*
(12.1 gal./458 L)*
(9.5
gal./360 L)’

3.
Start the washer
A.
Push in the Control Knob and turn
it to the right. It must be pushed in
and turned only clockwise.
C.
Start the washer by pulling out
the Control Knob. The washer will
till to the level you set with wash
water of the selected temperature. After tilling, the washer will
agltate for the selected number
of minutes.
B.
Stop on a number in the cycle
you want. The numbers are minutes of wash time. The drawing
shows 10 minutes of agitation in
the REGULAR NORMAL Cycle.
D.
To stop the washer at any time,
push in the Control Knob. To
restart the washer, pull out the
Control Knob.
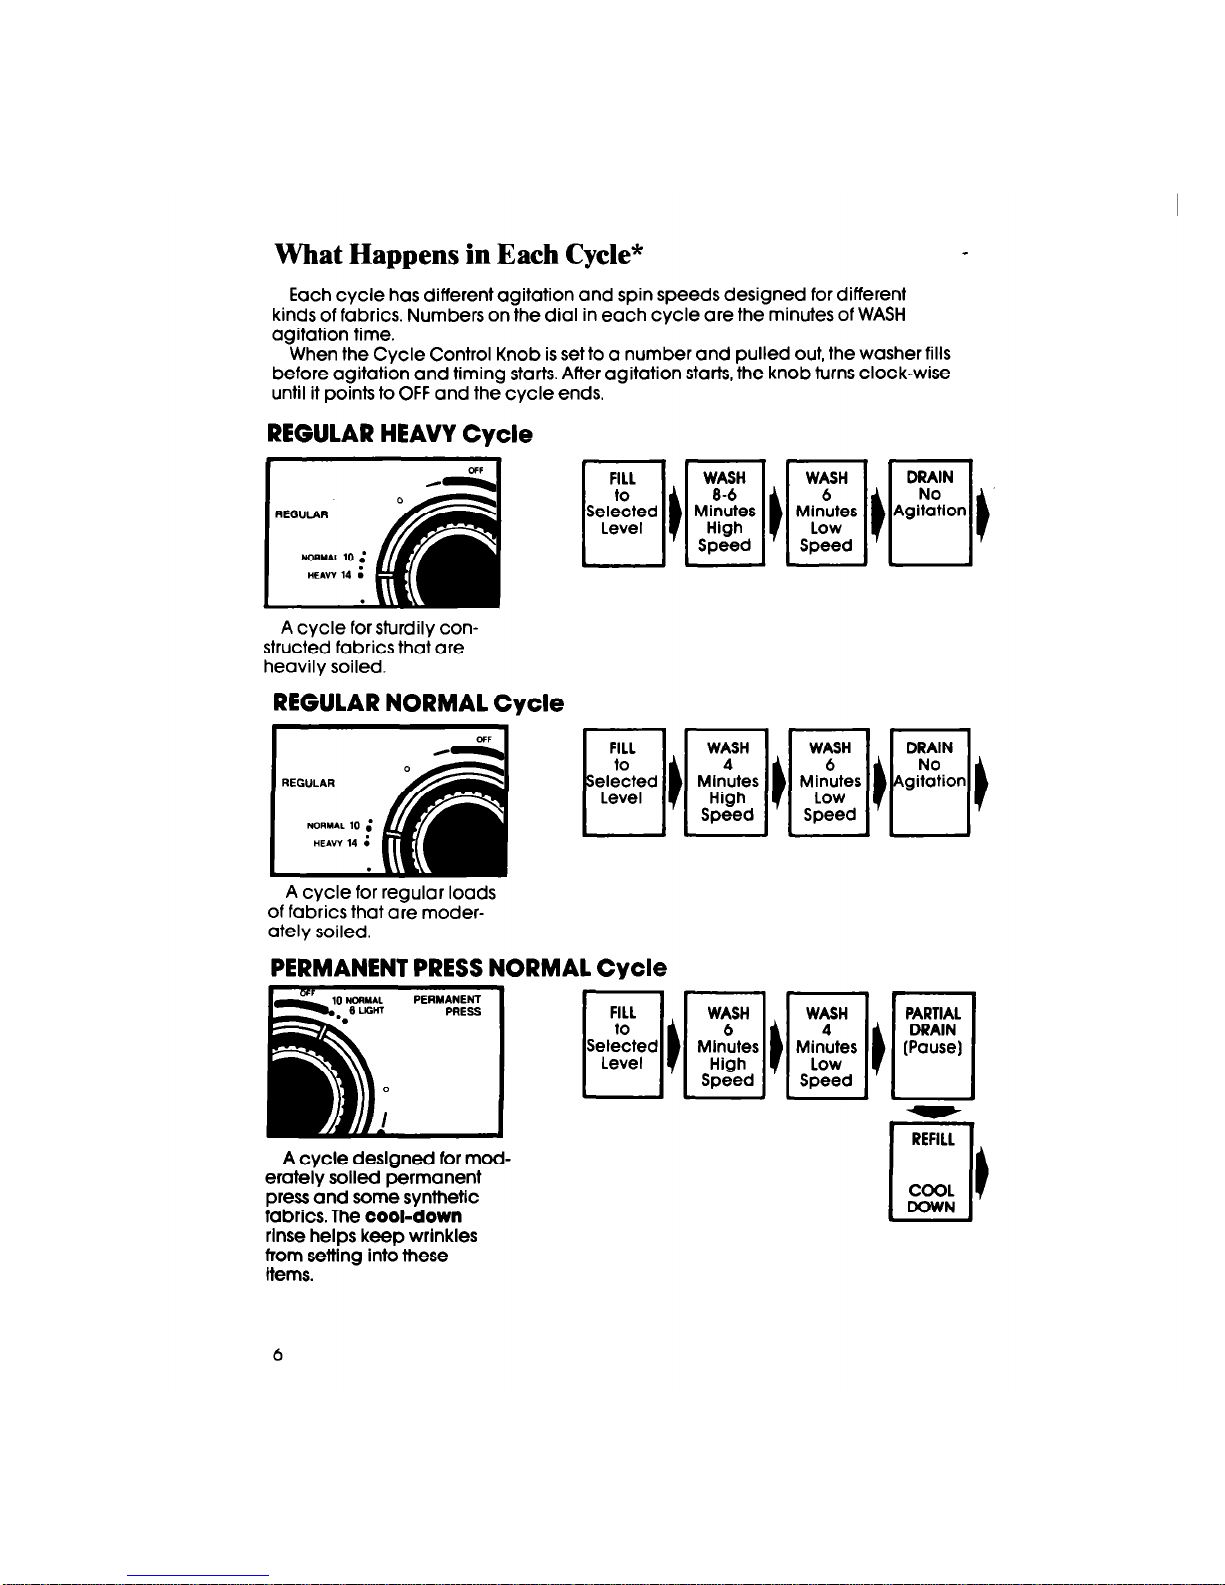
What Happens in Each Cycle*
Each cycle has different agitation and spin speeds designed for different
kinds of fabrics. Numbers on the dial in each cycle are the minutes of WASH
agitation time.
When the Cycle Control Knob is set to a number and pulled out, the washer fills
before aaitation and timina starts. After aaitation starts, the knob turns clock-wise
until it poynts to OFF and thecycle ends.
-
REGULAR HEAVY Cycle
rSH 1 1 WASH
Minutes
1’ p&y ’ @IT
A cycle for sturdily constructed fabrics that are
heavily soiled.
REGULAR NORMAL Cycle
A cycle for regular loads
of fabrics that are moder-
ately soiled.
PERMANENT PRESS NORMAL Cycle
A cycle deslgned for mod-
erately solled permanent
press and some synthetic
fabrics. The cool-down
rinse helps keep wrinkles
from setilng into these
Items.
WASH
6
Minutes
Low
Speed
WASH
4
Minutes
Low
Speed
REFILL
q
COOL
DOWN
6
 Loading...