

Whirlpool LA5380XP Use & Care Manual

AUTOMATIC
WASHER
Super
pP&ity
LA538OXP
Yave Ovens, Trash Compactors, Room Au Condllloners. Oehumldlflers. Aulomallc Washers. Clolhes Dryers. Freezers, Aelrlgerator-Freeze1

Parts and features
LAUNDRY
TEMPERATURE
‘59;.
SELECrOR
~F?‘w/ SELECTORCYCLE
IT FILTER
MODEL AND SERIAL
NUMBER PLATE
(not shown)
-AGITATOR
W BASKET
Remove the Consumer
Buy Guide label. It will be
easier to remove before
the washer is used.
f
You should wipe out the
basket with a damp cloth
before using to remove
dust from storing or
shipping.
Copy your Model and Serial Numbers here
When youneed service or call with a
question, have this information ready:
Model Number
1. Complete Model and Serial Numbers (from plate underthe lid nearthe
hinge).
Serial Number
2. Purchase date from sales slip
Copy this information in these spaces. Purchase Date
Keep this book in the Laundry Informa-
tion Center with your”Laundry Guide,”
Service Company/
sales slip and warranty
Phone Number
There is no warranty registration to return. Proof-of-purchase is all
that is required for in-warranty service.
2

re :sponsibilities
Read this “Use and Care Guide”
and your “Laundry Guide” carefully for important use and safety
information,
You are personally responsible
for making sure that your
washer...
l
is installed by a qualifiedinstaller.
l
is properly installed and
leveled on a floor that can
support the weight:
l
is connected to the right kind
of outlet, electric supply, water
supply and drain.*
l
is properly grounded.*
l
is used only for jobs normally
expected of home automatic
washers.
l
is properly maintained.
l
is protected from the weather
and kept where the tempera-
ture will not fall below freezing.
l
is not run by children or anyone
unable to operate it properly.
*See the “Installation Instructions”
for complete information.
Contents
Page
PARTS AND FEATURES. .
2
YOUR RESPONSIBILITIES. .
3
SAFETY FIRST . . . .
3
STARTING YOUR WASHER
4
WHAT HAPPENS IN EACH
CYCLE. .
6
OTHER OPERATING
INSTRUCTIONS
10
For a Rinse and Spin
10
For a Drain and Spin . .
10
Fora Soak
10
Cleaning the Lint Filter . .
10
CARING FOR YOUR WASHER
11
Winterizing . . . . .
12
IF YOU NEED SERVICE OR
ASSISTANCE. . .
13
1. Before Calling for
Assistance
13
2. If You Need Assistance
14
3.
IfYou Need Service
14
4. If You Have a Problem
14
01984 Whirlpool Corporation
-SAVE THESE
INSTRUCTIONS -
3

Starting your washer
Betore starting
1. Measure and add detergent.
your washer:
2. Place sorted load in washer.
3. Start washer.
Select a
1. LOAD SIZE
Select WATER
2.
TEMPERATURES
l
Turn the knob to point at a setting
. Match the wash water temperature
that describes the size of load you
to the type of fabrics and soils being
want to wash.
washed.
l
The water level can be set for
EX SMALL (a few items), MED or
LARGE (a full load).
*All rinses are cold.
Recommended wash temperatures
can be found in your “Laundry Guide!’
See your “Laundry Guide” for details
on load sizes.
I
LOAD SIZES AND WATER LEVELS
Far best cleaning results, the
load must be able to move freely
in the water. Too big a load or too
little water can cause wear or
tearing of load items.
DO NOT
OVERLOAD WASHER.
*Approximate
fill with load.
LARGE - (20.5 gals.177.6 L)’
MEDIUM - (14.2 galsI53.8 L)’
EX SMALL - (8.6 gals.132.9 L)*
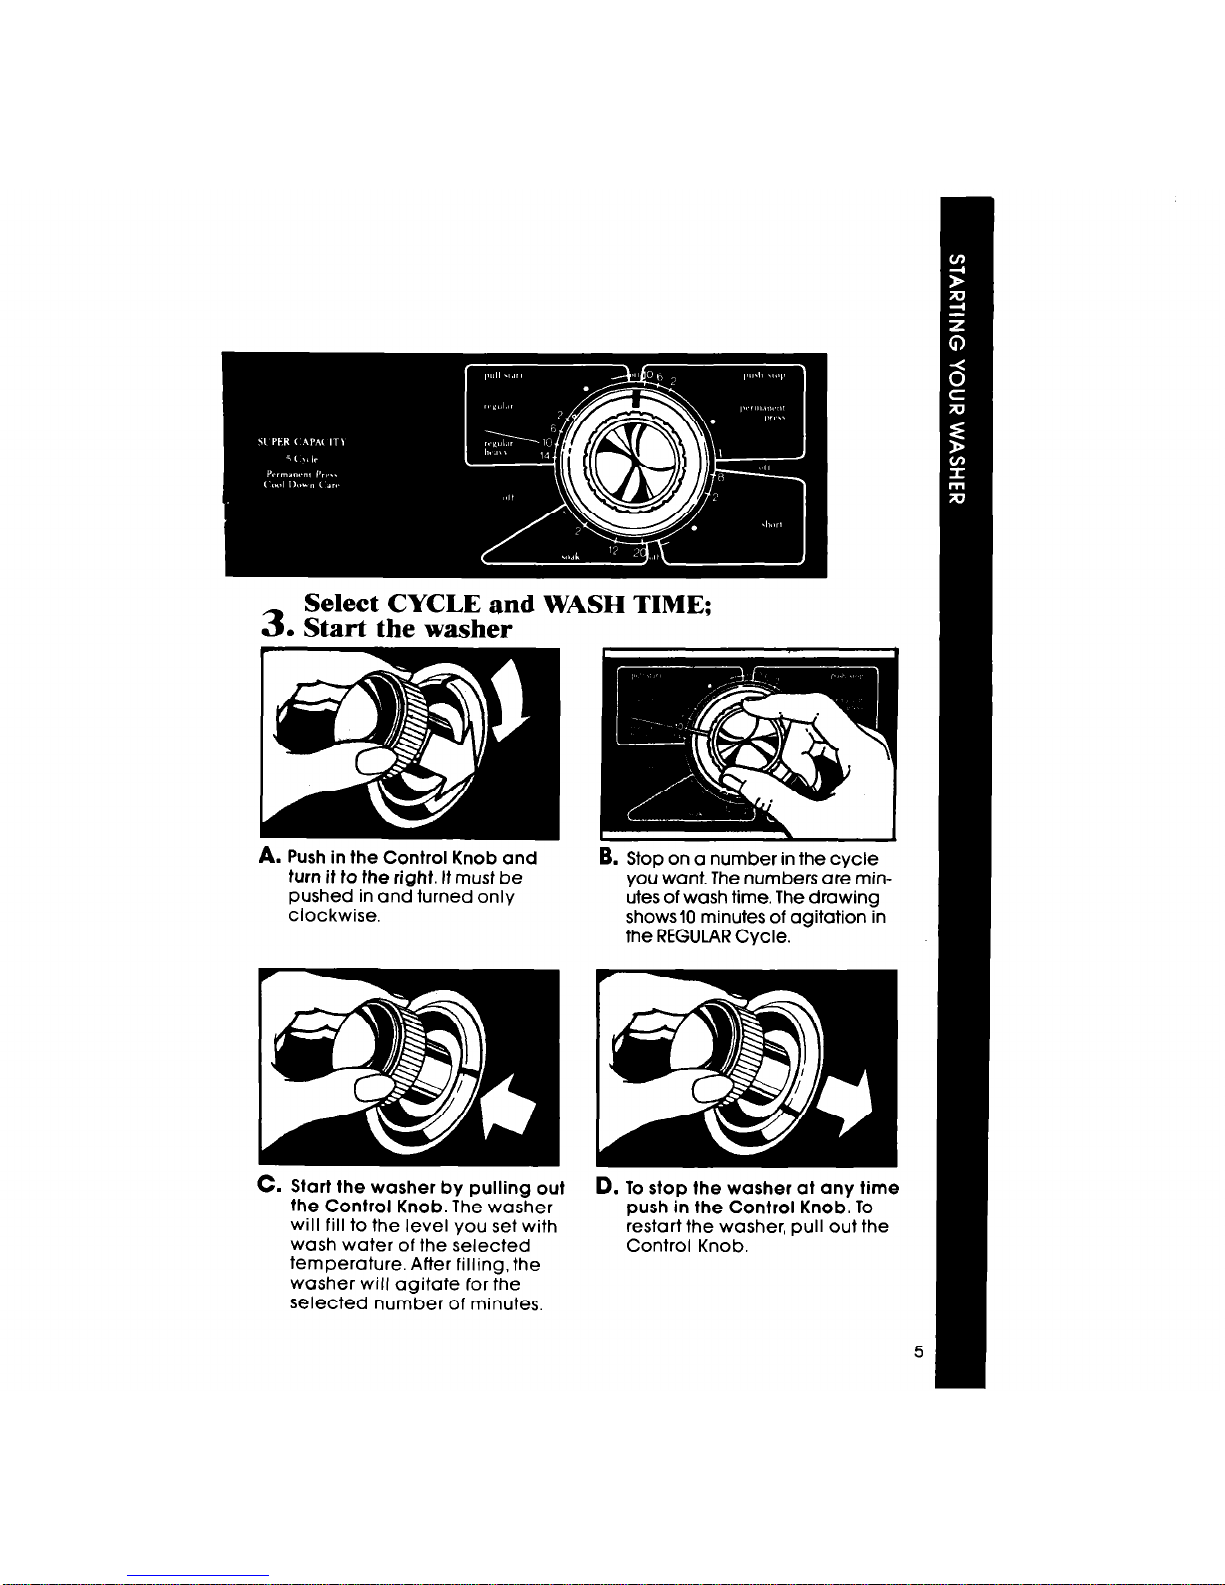
3. Start the wash&
A.
Push in the Control Knob and
turn it to the right. It must be
pushed in and turned only
clockwise.
B.
Stop on a number in the cycle
you want. The numbers are minutes of wash time. The drawing
shows10 minutes of agitation in
the REGULAR Cycle.
C. Start the washer by pulling out
the Control Knob. The washer
will fill to the level you set with
wash water of the selected
temperature. After filling, the
washer will agitate for the
selected number of minutes.
D.
To stop the washer at any time
push in the Control Knob. To
restart the washer, pull out the
Control Knob.
 Loading...