

Whirlpool KGEA 325 BIO PLUS IO, KGEA 325 BIO PLUS WS INSTRUCTION FOR USE
PRODUCT SHEET
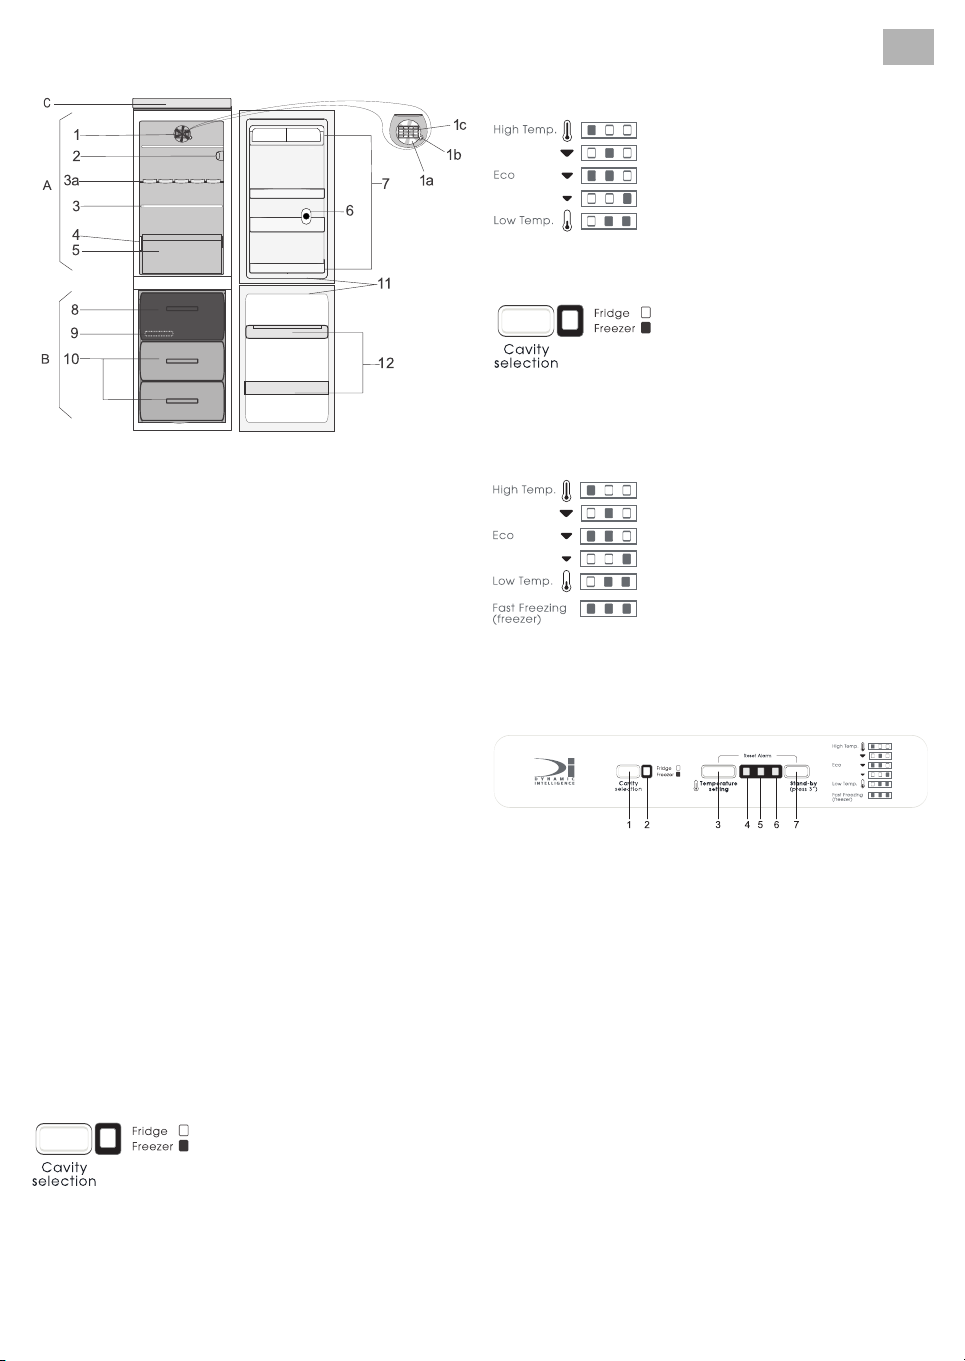
A. Refrigerator Compartment
2. Lighting
3. Shelves / Shelf area
3a. Plastic “dual shelf”
4. Rating plate
5. Crisper drawer/drawers
6. Separator (depending on the model)
7. Door trays
B. Freezer Compartment
8. Upper basket (freezing zone)
9. Ice tray and/or cold accumulator (depending on the model)
10. Storage basket for frozen food items
12. The freezer door trays for pizza or other frozen products with a short
storage time (depending on the model)
C. Control panel
Anti-bacterial protection (depending on the model):
1. Hygiene+ filter in fan
5. Hygiene crisper/s
11. Door seals
Note:
• The crisper and the door seals are manufactured from materials that
inhibit bacterial growth.
• In case of power failure the cold accumulator helps to keep optimal
storage temperature longer.
• The internal temperatures of the appliance depend on the ambient
temperature, frequency of opening the doors, as well as location of the
appliance. Temperature setting must consider these factors.
• The number and type of shelves, as well as configuration of accessories
may vary, depending on model. All shelves and door trays are removable.
• The appliance accessories are not suitable for washing in a dishwasher.
HOW TO START THE APPLIANCE
After plugging the appliance to the mains, the refrigerator compartment
starts operation automatically. Particular control elements are activated:
• The indicator lamps on the control panels light up for 2 seconds.
• The alarm becomes activated for 1 second.
Note:
• If food is placed in the refrigerator before the appliance has cooled
completely, it may deteriorate.
OPERATION DESCRIPTION
Temperature Adjustment between cabinets is made with the button Cavity
selection. When the lamp is OFF the user can select temperature in fridge.
The temperature in the refrigerator compartment may be set by the
Temperature setting pushbutton on the control panel.
- To set a lower temperature, press pushbutton to the MAX level 5.
- To set a higher temperature, press pushbutton to the MIN level 1.
Recommended thermostat is level 3 ECO. Below are described the 5 set points
for the fridge compartment.
To adjust the temperature in the freezer compartment, use the Cavity
selection button to control temperature in freezer cabinet. The green lamps
turn ON.
The temperature in the freezer compartment may be set by the
temperature setting pushbutton on the control panel.
- To set a lower temperature, press pushbutton to the MAX level 5.
- To set a higher temperature, press pushbutton to the MIN level 1.
Below are described the 5 set points for the freezer compartment and fast
freezing. Each consecutive pressing of the button sets a different temperature:
After “fast freezing” the freezer temperature sets on level 3 (Eco)
One of the green indicators, lights, as appropriate, lights up on the control
panel.
When the appliance is disconnected from the power supply and then reconnected, the freezer remembers the previously set temperature.
CONTROL PANEL DESCRIPTION
1. “Cavity selection” pushbutton.
2. Green indicator light ON informing of:
- freezer cabinet temp. setting
- fridge cabinet temp. setting
3. Temperature selection button “Temperature setting”.
4,5,6. Green lamps indicating temperature settings.
7. “Stand-by” pushbutton.
GB
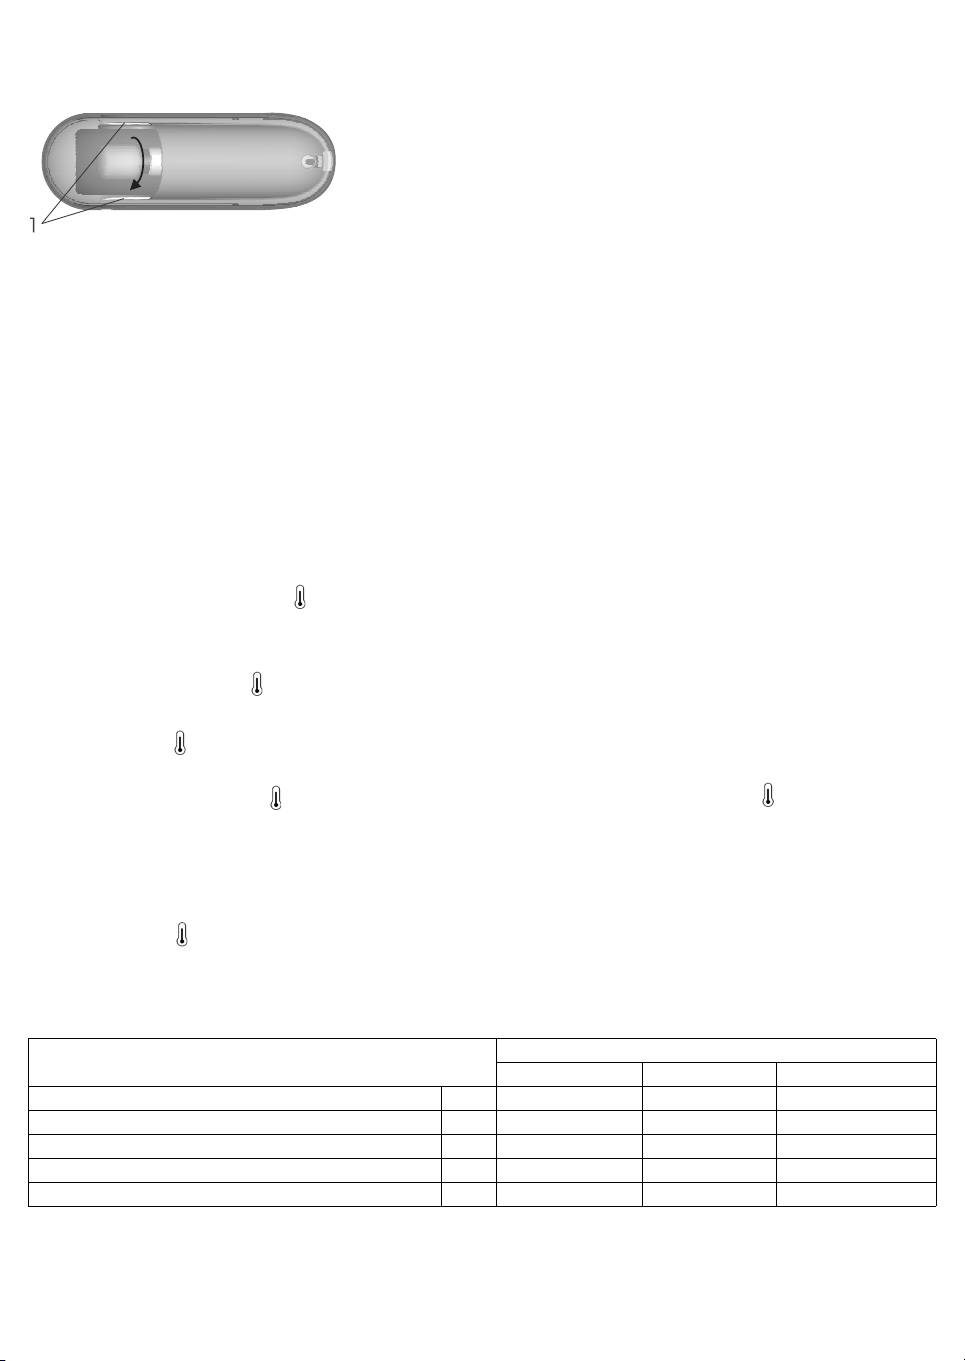
Fan with a button
The fan helps to achieve better temperature distribution inside the refrigerator
compartment, and optimizes food storage conditions
Press button (1b) to turn the fan on when the ambient temperature is above
27/ 28°C, when condensation occurs on the shelves, or in the instances of high
air humidity.
Note:
Do not obstruct the air intake area (1a) with food items.
The fan ONLY runs if the compressor is working.
Make sure to turn the fan off in lower ambient temperatures.
While the fan is ON, you have the option to fit in the Hygiene+ filter which
helps trap and kill airborne microorganisms caught within it.
Remove it from the box (found in the crisper drawer (item 5)) and insert into
the grille (item 1c). For any optimum performance of the Hygiene+ filter,
replace the filter every 6 months.
1. Remove the filter and dispose as a whole (grate box + insert).
2. Replace the filter with the new ones.
3. The replacement procedure is attached to the filter.
Our After-sales Service can supply this type of filter.
Replacing the light bulb
Always disconnect the refrigerator from the power supply before replacing any
light bulb. If the inside light is not working, it is necessary to:
1. Remove the light cover: put your fingers into the side ventilation holes (1),
stretch the cover gently and move it upwards.
2. Check the bulb. If necessary unscrew the broken bulb and replace it with
the new one (use maximum 15W bulb).
3. Assemble again the light cover pushing it into place. Do not leave
uncovered the bulb.
GUIDE TO SELECTING FUNCTIONS
Functions and settings
Alarm deactivation - the user has to press two pushbuttons: temperature
setting and vacation mode simultaneously.
Fast Freezing: For more efficient freezing activate this function 24 hours
before freezing fresh products.
- Press steps by the “Temperature setting” button to start the function -
3 green indication lamps will light up simultaneously. After 24 hours place the
food to be frozen in the upper basket of the freezer compartment.
This function is automatically disabled after 24 hours. To deactivate it earlier:
-Press the “Temperature setting” button again - the temperature
selection lights will return to the 1
Temperature selection - It is possible to select the fridge/freezer
temperature from among 5 levels (level 1, level 2, level 3, level 4, level 5) by
pressing the temperature selection button .
st
temperature level.
Stand-by Mode / Cooling Off Mode.
It allows the user to turn ON or stand-by the product.
This function is enabled even if any alarm or failure appears.
• ON state: when the product is in the Stand-by state to “turn ON” press &
keep “Stand-by” pushbutton for 3 s.
• The product is turned ON;
• All functions should be enabled.
• STAND-BY state: when the product is ON and the user presses the
“Stand-by” pushbutton and keeps it pressed for 3 s, the appliance goes OFF.
• The appliance goes to STAND-BY when the user press and keep pushbutton
“Stand-by” for 3s.
• The product is turned OFF, disabling all loads
• All function shall be disabled;
• All lamps should be turned OFF;
• Turn off light.
Notes:
When the user presses at once “Stand-by” an d “Te mperatur e setting” to check
indication of the alarms (displayed by lamp 1 & lamp 2 & lamp 3) “Stand-by”
function is locked.
“Black-out” Alarm (power supply failure) - in case of power failure, the
appliance automatically monitors the temperature changes in the freezer
compartment. After the power supply returns,- the “Black-out” alarm will
activate, if the temperature has risen above the admissible level. This is
indicated by:
- Flashing of the green indicator lamps (4, 5, 6).
- Activation of a beep.
When the “Black-out” alarm is active, it is recommended to proceed as
follows:
- If the food in the freezer is not frozen but is still cold, transfer it promptly to
the refrigerator compartment and consume within 24 hours.
- If the food in the freezer is frozen, it has re-frozen after thawing caused by
the power failure. The consumption of re-frozen food is not recommended
because it has lost its nutritive value and may be hazardous to your health.
Note: The “Black-out” alarm does not guarantee the food quality and its
safety in case of consumption. It only indicates the necessity to assess the
quality of food in the freezer and refrigerator compartments. To deactivate the
alarm, press and hold “Temperature setting” pushbutton & party mode
button and keep pressed until the indicator light goes off.
- The temperature will return to the normal operating cycle level and the
beep will stop.
Other abnormal appliance operations displayed by indicator lamps.
In case of abnormal appliance operation, all the temperature selection indicator lamps will flash and a beep will sound. After pressing and holding the
“Temperature setting” & “stand-by” mode (“reset alarm”) buttons, the beep will stop and the indicator lamps will light up, showing the alarm code (possible
alarm codes are explained in the table below).
After the (“reset alarm”)button is released, the indicator lamps will flash until the fault is eliminated. If any alarm shown in the table occurs, the fridge/freezer
functions such as temperature adjustment and party mode are not available until the fault is eliminated.
When several alarms occur simultaneously, the alarm with the highest priority is displayed (with code 01 being the highest priority)
Alarm priority
Codification to be displayed by the Temperature Range Lamps
Lamp 1 Lamp 2 Lamp 3
FC Evaporator Temperature Sensor Alarm 01 OFF OFF ON
RC Evaporator Temperature Sensor Alarm 02 OFF ON OFF
RC Ambient Temperature Sensor Alarm 03 ON OFF OFF
Door Alarm 04 OFF OFF OFF
B.O.A 05 -- -
After determining the alarm code (between 01 and 05)
• The user can eliminate the reason for the code 04 alarm by closing the door completely.
• Code 05 alarm - The alarm deactivates when the minimum required temperature is reached.
• The other alarms (code 01, 02, 03) - Contact the After-Sales Service and provide the alarm code.
5019 437 01011
 Loading...