

Page 1
Use and Care Guide
Table of Contents
(complete) .................. 2
A Note to You................ 3
Oven Safety................ 4-5
Getting to Know
Your Oven ..................... 6
Using Your Oven .......... 7
Using EASY
CONVECT*
Conversion............... 29
Caring for Your
Oven............................. 44
Using the
Self-Cleaning Cycle .... 47
Troubleshooting ......... 52
Requesting Assistance or
Service in the U.S.A. .. 54
Requesting Assistance
or Service in Canada... 55
Index ............................ 58
Warranty ...................... 60
In the U.S.A. for assistance or service,
call the Consumer Assistance Center:
1-800-422-1230
In Canada for assistance
or service, see page 3.
KITCHENAID*
Electric Built-In
THERMAL-CONVECTION* Ovens
4450571 Rev. A
Models: KEBS278D KEBS207D KEBS277D KEBS247D
KEBS208D KEBS107D KEBS177D KEBS147D
Page 2

T
able of Contents
A Note to You .......................................... 3
Oven Safety .......................................... 4-5
Getting to Know Your Oven ................... 6
Using Your Oven ..................................... 7
Using the electronic oven control ......... 7
Oven settings ..................................... 12
Setting the clock ................................ 14
Using the timer ................................... 15
Baking or convection baking .............. 16
Convection roasting ........................... 18
Cooking tips ....................................... 20
Adjusting oven temperature ............... 22
Using the temperature probe ............. 23
Using convect full meal ...................... 26
Using EASY CONVECT*
Conversion ......................................... 29
Broiling ............................................... 31
Convection broiling ............................ 34
Timed cooking ................................... 36
Dehydrating ....................................... 41
Raising bread ..................................... 42
The oven vent(s) ................................ 43
Caring for Your Oven ............................ 44
Cleaning your oven and controls ....... 44
Removing the oven door..................... 45
Using and replacing the oven lights ... 46
Using the Self-Cleaning Cycle ............. 47
Before you start ................................. 47
Before setting the controls ................. 48
Setting the controls ............................ 48
For best cleaning results .................... 51
How the cycle works .......................... 51
Troubleshooting .................................... 52
Requesting Assistance or Service
in the U.S.A............................................. 54
Requesting Assistance or Service
in Canada ................................................ 55
Index ....................................................... 58
Warranty ................................................. 60
2
Page 3

A
Note to You
Thank you for buying a KITCHENAID
KITCHENAID designs the best tools for the most important room in your house. To
ensure that you enjoy many years of trouble-free operation, we developed this Use
and Care Guide. It contains valuable information concerning how to operate and
maintain your new appliance properly and safely. Please read it carefully.
Also, please complete and mail the enclosed Product Registration Card (U.S.A. or
Canadian, whichever applies to you).
In the U.S.A.
For assistance or service
Call the Consumer Assistance Center toll-free ......................................... 1-800-422-1230
Throughout Canada for assistance
Call the Consumer Assistance Center toll-free ......................................... 1-800-461-5681
Throughout Canada for service
Call toll-free............................................................................................... 1-800-807-6777
* appliance!
8:30 a.m. – 6 p.m. (EST)
8 a.m. – 6 p.m. (EST)
If you need assistance or service, first see the “Troubleshooting” section of this book.
After checking “Troubleshooting,” additional help can be found be checking the
“Requesting Assistance or Service” sections, or by calling one of the telephone numbers
above.
When calling, you will need to know your appliance’s complete model number and serial
number. You can find this information on the model and serial number plate (see
diagram on page 6).
Keep this book and the sales slip together in a safe place for future reference. You must
provide proof of purchase or installation date for in-warranty service.
Model Number ________________________
Serial Number ________________________
Date Installed _________________________
Builder/Dealer Name ___________________
Address _____________________________
Phone _______________________________
3
Page 4
O
ven Safety
Your safety is important to us.
This guide contains safety statements
under warning symbols. Please pay special
attention to these symbols and follow any
instructions given. Here is a brief explanation
of the use of the symbol.
IMPORTANT SAFETY INSTRUCTIONS
wWARNING
General
• Read all instructions before using
the oven.
• Install or locate the oven only in
accordance with the provided
Installation Instructions. The oven
must be installed by a qualified
installer. The oven must be
properly connected to electrical
supply and grounded.
• CAUTION: Do not store things
children might want above the
oven. Children could be burned
or injured while climbing on it.
• Do not leave children alone or
unattended in area where the
oven is in use. They should never
be allowed to sit or stand on any
part of the oven. They could be
burned or injured.
• Do not operate the oven if it is
damaged or not working properly.
• Do not use the oven for warming
or heating the room. Persons
could be burned or injured, or a
fire could start.
• Use the oven only for its intended
use as described in this manual.
To reduce the risk of fire, electrical
shock, injury to persons, or damage
when using the oven, follow basic
precautions, including the following:
• Do not touch heating elements or
interior surfaces of oven. Heating
elements may be hot even though
they are dark in color. Interior
surfaces of an oven become hot
enough to cause burns. During
and after use, do not touch, or let
clothing or other flammable materials contact heating elements or
interior surfaces of oven until they
have had sufficient time to cool.
Other surfaces of the oven, such
as the oven vent opening, the
surface near the vent opening,
and the oven door and window,
could also become hot enough to
cause burns.
• Do not wear loose or hanging
garments when using the oven.
They could ignite if they touch a
hot heating element and you
could be burned.
• Use only dry pot holders. Moist
or damp pot holders on hot surfaces could result in burns from
steam. Do not let pot holder touch
hot heating elements. Do not use
a towel or bulky cloth for a pot
holder. It could catch on fire.
• Keep oven vents unobstructed.
This symbol alerts you to
hazards such as fire, electrical
shock, or other injuries.
4
Page 5
Oven Safety
• Do not heat unopened contain-
ers. They could explode. The
hot contents could cause burns
and container particles could
cause injury.
• Use only cookware approved
for oven use. Follow cookware
manufacturer’s instructions,
especially when using glass
or plastic cookware.
• Do not store flammable materials
on or near the oven. The fumes
could create an explosion and/or
fire hazard.
• Do not repair or replace any part
of the oven unless specifically
recommended in this manual. All
other servicing should be referred
to a qualified technician.
• Disconnect the electrical supply
before servicing the oven.
When using the oven
• Do not use water on grease fires.
Never pick up a flaming pan.
Smother flaming pan by covering
with a well-fitting lid, cookie sheet,
or flat tray. Flaming grease outside of pan can be extinguished
with baking soda or, if available,
a multipurpose dry chemical or
foam-type extinguisher.
• Always position oven rack(s) in
desired location while oven is
cool. If a rack must be removed
while oven is hot, do not let pot
holder contact hot heating
elements in oven.
• Use care when opening oven
door. Let hot air or steam
escape before removing or
replacing food.
– SAVE THESE INSTRUCTIONS –
Care and cleaning
• Small amounts of formaldehyde
and carbon monoxide are given
off in the Self-Cleaning cycle
from fiberglass insulation and
food decomposition. Significant
exposure to these substances
can cause cancer or reproductive
harm. Exposure can be minimized by venting with a hood or
open window and wiping out
excess food spills prior to selfcleaning.
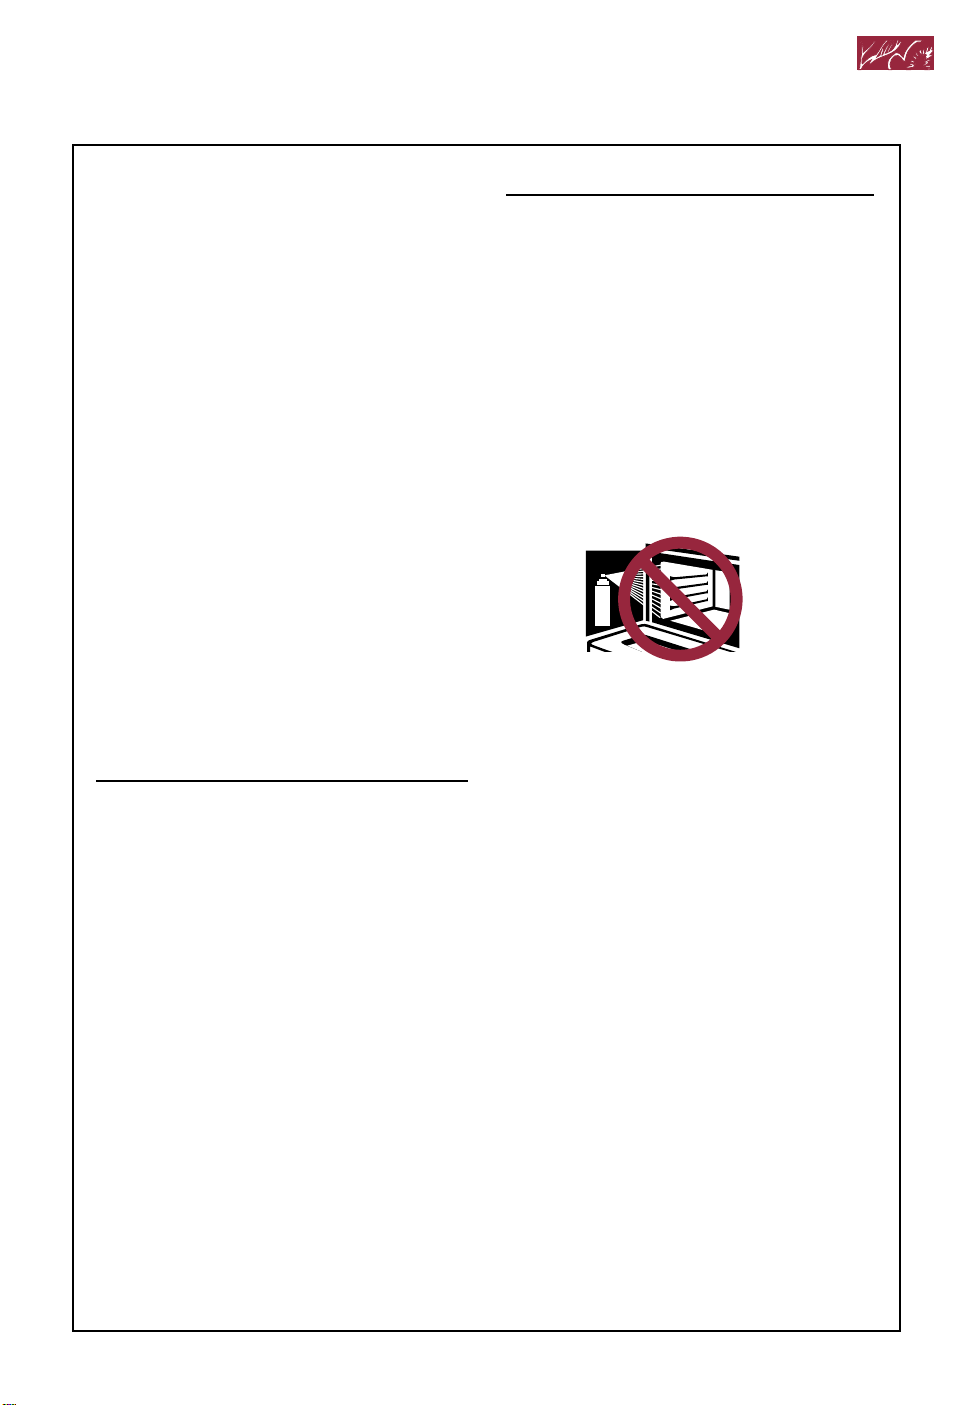
• Do not use oven cleaners. No
commercial oven cleaner or oven
liner protective coating of any
kind should be used in or around
any part of the oven.
• Before self-cleaning the oven,
remove broiler pan, broiler grid,
oven racks, and other cookware.
Do not use your oven to clean
miscellaneous parts unless you
are instructed to do so in this Use
and Care Guide.
• Do not clean door gasket. It is
essential for a good seal. Care
should be taken not to rub, damage, or move the gasket. Clean
only parts recommended in this
Use and Care Guide.
5
Page 6
G
etting to Know Your Oven
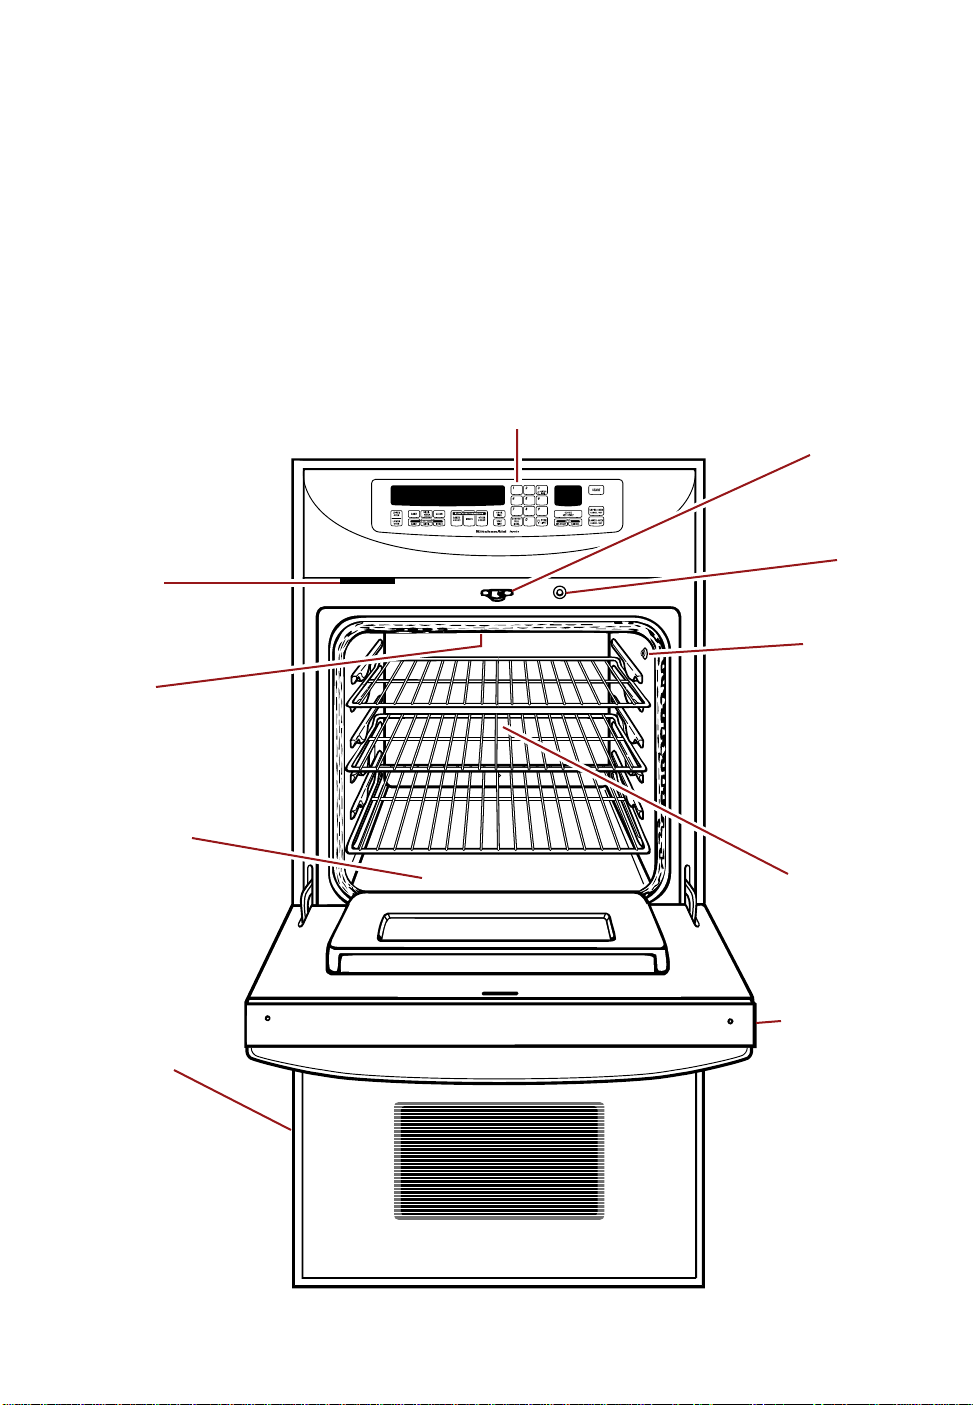
This section tells you what features your oven has and where they are located.
Please review this information before using your oven. To help you find information
on specific parts or features quickly, page references are included.
Feature locations
(Models KEBS208D and KEBS278D shown)
Electronic
oven control
(p. 7)
Oven vent
(above oven door)
(p. 43)
Dual broil
elements
(p. 12)
DELAYDELAY
SETSETPROBEPROBE TEMPTEMP
RAISING
F
BREAD
DEHYDRATE
CONVECTION
STANDARDENTER
ON
COOKTEMP CLEANTIME
EASYCONVECTEASYCONVECT
DELAYDELAY
STARTRT
TIMETIME
STOP
CHECKCHECK
TITIME
FOODFOODATAT
CONTROLCONTROL
CLOSECLOSE
LOCKLOCK
COOK
TIME
ON
LOCKEDLOCKED
DOORDOOR
STARTSTART
?
EASYCONVECTEASYCONVECT
Oven
lock latch
F
HRMIN MIN SEC
CLOSE
DOOR
LOCKED
(pp. 49, 50)
Automatic
oven light
switch
(p. 46)
Temperature
probe jack
(upper/single
oven only)
(p. 24)
Oven light
(on left oven wall)
(p. 46)
Bake element
(hidden under
oven cavity floor)
(p. 12)
Lower oven
(double ovens
only)
Oven light
(on right
oven wall)
(p. 46)
Convection fan
and element
(not shown)
(p. 12)
Model
and serial
number plate
(on side of door)
6
Page 7
U
sing Your Oven
This section tells you, step by step, how to operate all oven functions controlled by the
electronic control. Carefully follow these instructions, along with the cooking tips, for
successful use of your oven.
NOTE: Displays and command pads shown are from double upper ovens. In some
cases, lower oven and single oven displays and command pads may look different than
those shown.
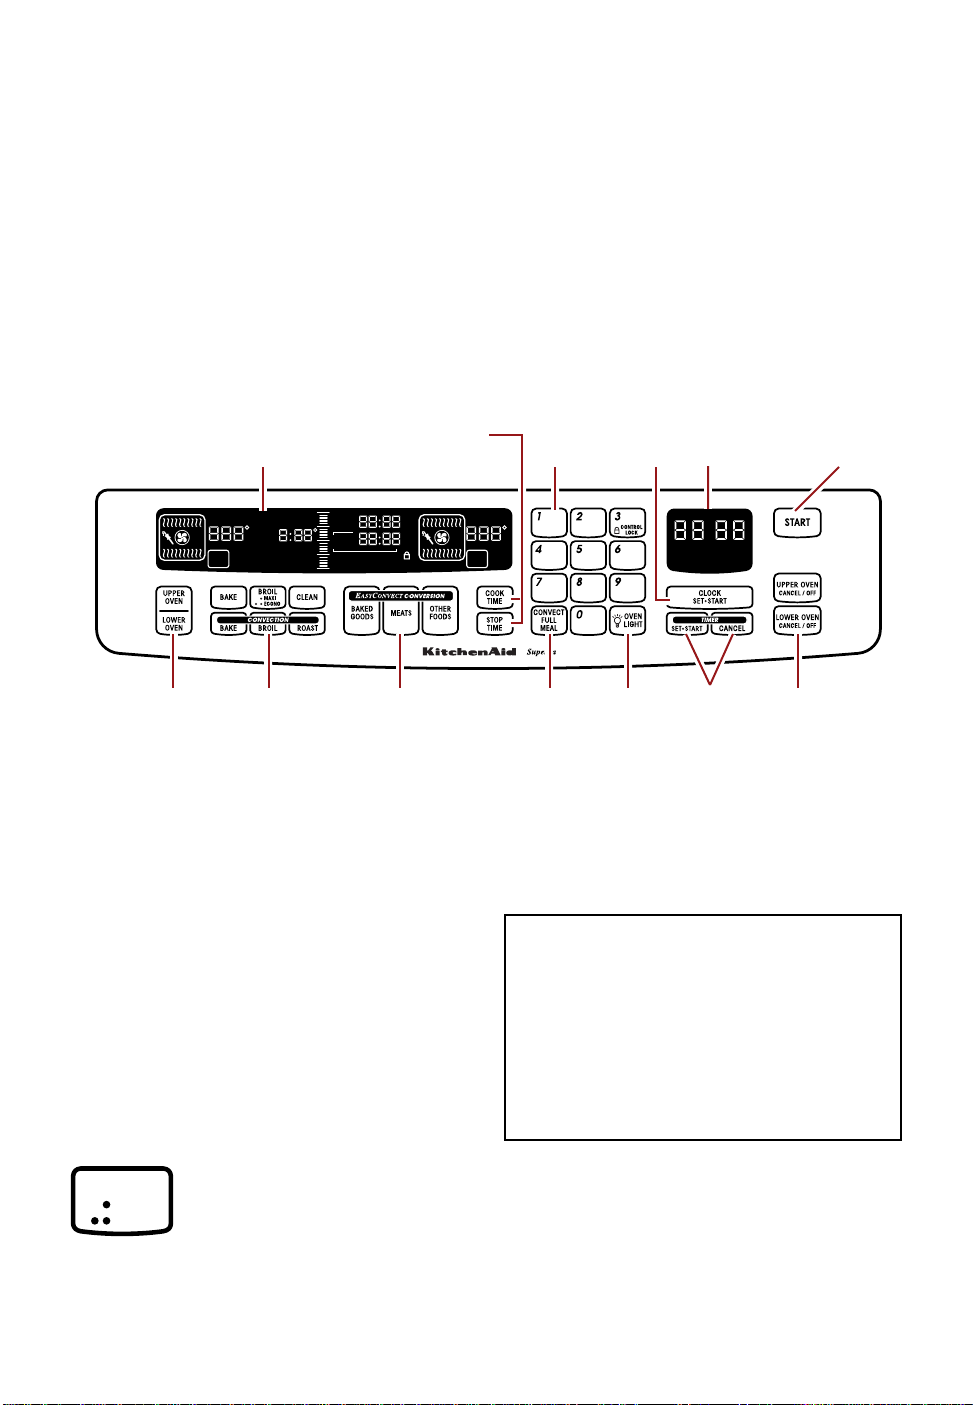
Using the electronic oven control
(double thermal–convection oven shown)
Timed and delayed
Oven display
(see below)
cooking pads
(pp. 36-40)
Number
pads
Clock
set/start
pad
(p. 14)
Time of day/
timer display
(pp. 14
and 15)
Start
pad
(p. 8)
ON
EASYCONVECT
Oven selector pads
(double ovens only)
(p. 8)
DELAY
SET PROBE TEMP
RAISING
F
BREAD
DEHYDRATE
CONVECTION
COOK
STANDARDENTER
COOK TEMP CLEAN TIME
Oven
setting
pads
(pp. 12-13)
CHECK
FOODAT
CLOSE
TIME
DOOR
START
TIME
STOP
TIME
CONTROL
LOCK
LOCKED
START
?
EASYCONVECT
EASY
CONVECT*
conversion
pads
(p. 29)
Display/clock
• When you first plug in the oven, a tone
will sound, the display will be fully lit for a
few seconds, and the display will show the
last time set and “PF” (power failure). If,
after you set the clock (page 14), the
display again shows “PF”, your electricity
was off for a while. Reset the clock.
• The display will show “Err” and three
short tones will sound if a time or temperature is incorrectly entered.
To set your oven to cook in Celsius
instead of Fahrenheit:
PRESS and hold for 5 seconds
DELAY
ON
F
CLOSE
DOOR
LOCKED
Convect
full meal
pad
Oven
light pad
(p. 46)
HR MIN MIN SEC
Timer
pads
(p. 15)
Cancel/off
pads
(p. 8)
(p. 26)
If you need to convert temperatures from
Celsius to Fahrenheit or vice versa, you
can refer to this chart:
Temperature replacement values
38°C-100°F
60°C-140°F
66°C-150°F
77°C-170°F
93°C-200°F
121°C-250°F
135°C-275°F
149°C-300°F
163°C-325°F
177°C-350°F
191°C-375°F
204°C-400°F
218°C-425°F
232°C-450°F
246°C-475°F
260°C-500°F
BROIL
MAXI
ECONO
You will know you are in Celsius when “F”
disappears. To switch back to Fahrenheit,
press and hold BROIL again for 5 seconds.
(“F” will reappear.)
7
Page 8
Using Your Oven
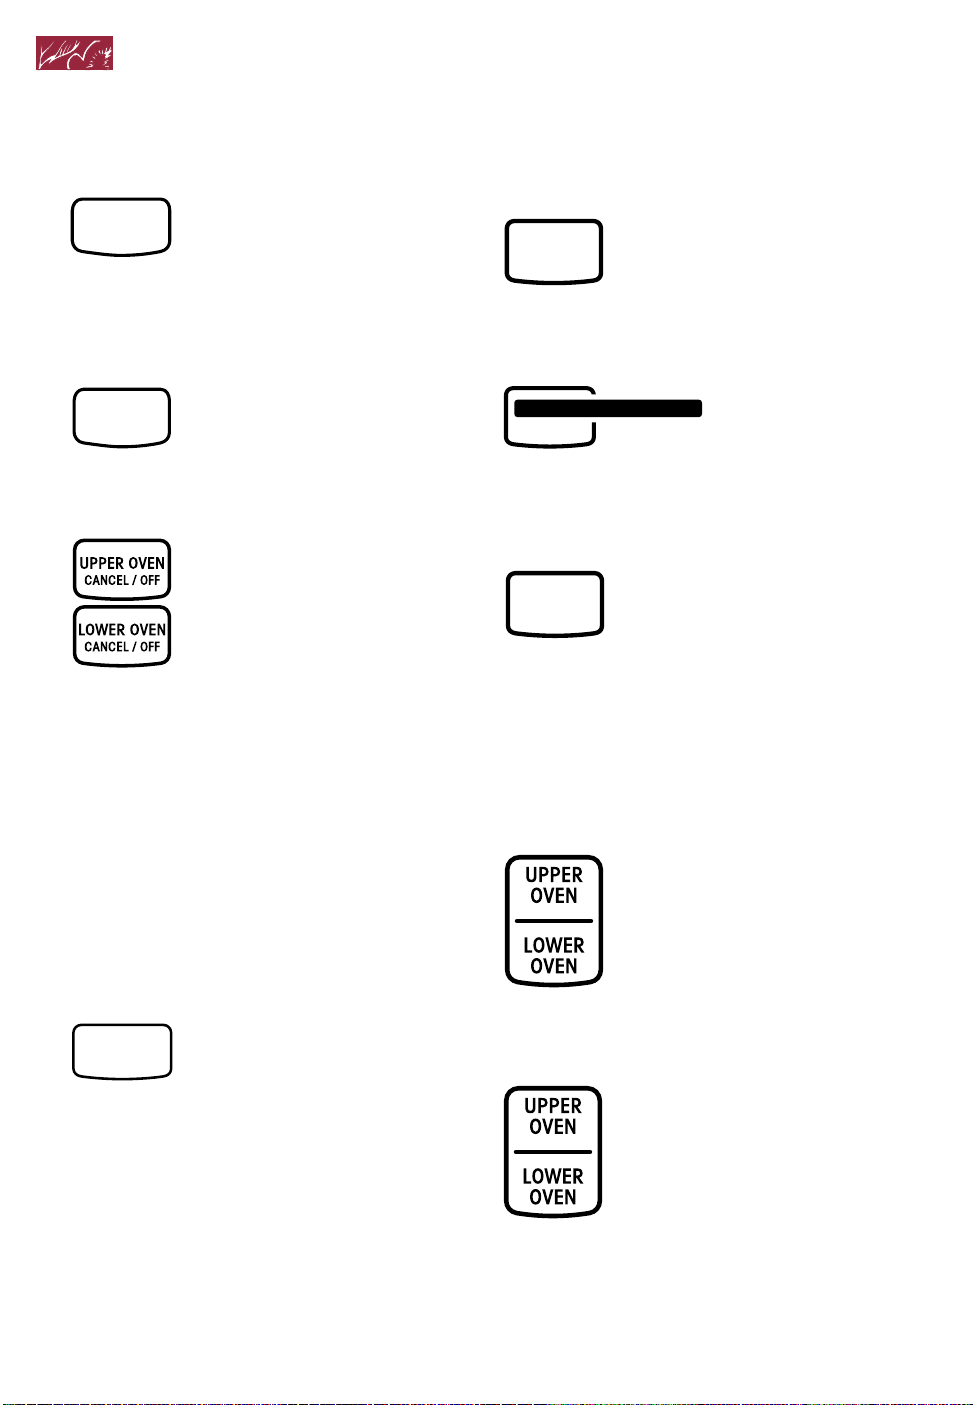
Starting an operation
After programming a function, you must
press the Start pad to start
START
5 seconds of programming, “START?”
will show on the display as a reminder.
the function. If you do not
press the Start pad within
Canceling an operation
The Cancel/Off pad will cancel any function,
CANCEL
OFF
(single
ovens)
OR
(double
ovens)
NOTE: You may hear a fan blowing in the
oven even after you press the Cancel/Off
pad. This is the cooling fan. It will turn
off when the oven cools.
except for the Clock and Timer
functions. When you press the
Cancel/Off pad, the small
display will show the time of
day, or if Timer is also being
used, the time remaining.
NOTE: To cancel the timer
see page 16.
Changing audible signals
Audible signals tell you if a function is
entered correctly or not. They also tell
you when a cycle is completed.
To turn on and off end-of-cycle tones and
reminder tones (single or double ovens):
PRESS and hold for 5 seconds
COOK
TIME
To turn on and off all reminder tones
(single or double ovens):
PRESS and hold for 5 seconds
TIMER
SET START
•
To turn on and off all tones (double
ovens)/to turn on and off key pad entry
tones (single ovens):
PRESS and hold for 5 seconds
STOP
TIME
A short tone will sound and “Snd” and “On”
or “OFF” will appear on the display to tell
you the signals have been changed. Repeat
the step above to turn the signals back on.
Selecting an oven
(double ovens)
To choose the oven you want to use, press the
Upper Oven or Lower Oven pad.
To change pitch and loudness of
key tone:
PRESS and hold for 5 seconds
7
A short tone will sound and “Snd” and “Hi” or
“Lo” will appear on the display. Repeat the
step above to change to the other setting.
8
Finding out which oven is in use
(on double ovens)
Press the Upper Oven or Lower Oven pad.
Upper oven or lower oven
information will be displayed
and the outer oven cavity
symbol for the oven being
programmed will flash.
Page 9
U sing Your Oven
Using the control lock
The control lock prevents unwanted use of
the oven by disabling the control panel
command pads.
NOTES:
• On double ovens, control lock is only
available when oven is not active or set.
On single ovens, control lock is available
when oven is active, but it is not available
only during the Self-Cleaning cycle or the
Sabbath mode.
• On single ovens, the Cancel/Off pad will
still work during control lock, but you will
need to press it for 1 second.
• On both single and double ovens, the
control lock will not disable the Timer. On
double ovens, the light, timer, and clock
are still available during control lock.
• Set control lock when cleaning the control
panel to prevent oven from accidentally
turning on.
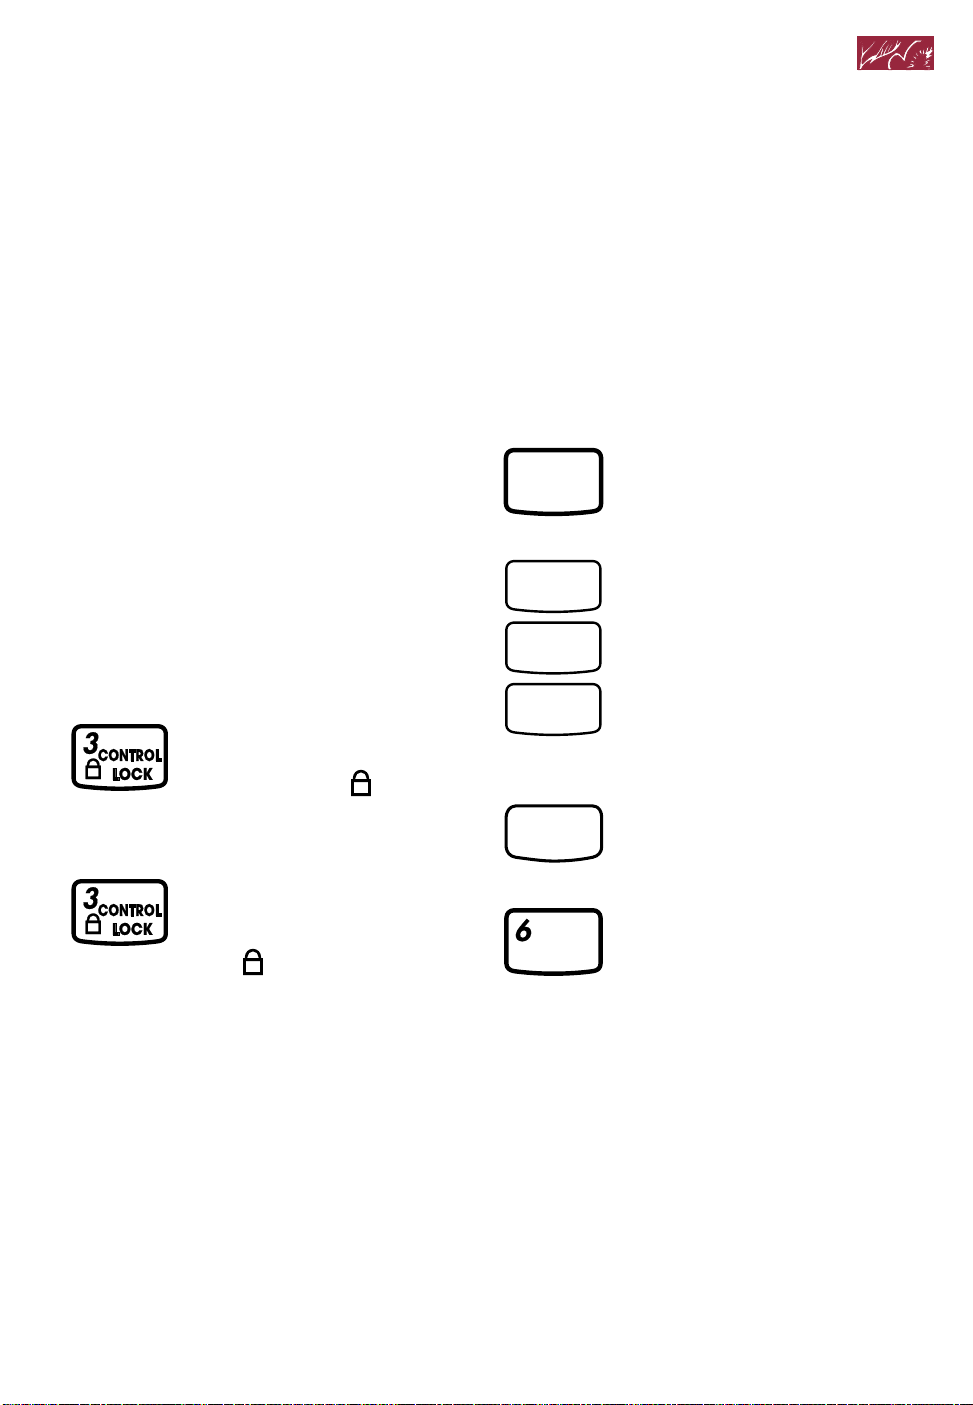
To lock the control panel:
Press and hold the Control Lock pad
(Number Pad 3) for 5 seconds.
A single tone will sound and
“CONTROL LOCK ” will
appear on the display.
To unlock the control panel:
Press and hold the Control Lock pad
(Number Pad 3) for 5 seconds.
A single tone will sound
after 5 seconds and
“CONTROL LOCK ” will disappear from
the display.
Prompt for start
If “START?” is lit, this means that the Start
pad has not been pressed. If you do not
press the Start pad, the programmed
function will automatically be canceled in
5 minutes.
Setting your single oven for the
Sabbath
If you want to set your oven to meet “no
work” requirements for the Sabbath, follow
these steps:
1. Turn the oven light on or off, as desired,
by pressing the Oven Light pad. The oven
light will stay turned on or off, whichever
you chose, while in the Sabbath mode.
Opening the door will not switch the oven
light throughout the Sabbath mode.
2. Press BAKE.
BAKE
3. Press Number Pads to set the tempera-
†
ture you want.
3
2
5
(example for 325°F)
4. Press START.
START
5. Press and hold Number Pad 6 for
5 seconds to go into the
Sabbath mode.
NOTE: The Sabbath mode is only available
with the Bake function. Before going into the
Sabbath mode make sure the timer is off.
Also, make sure you are in an untimed Bake
mode with no cook time or stop time
specified.
†
Star K certification pending. Full certification by Star K is expected near the end of
1996 or early 1997. Information is accurate
as of 5/96.
9
Page 10
U sing Your Oven
What your oven will do while in the
Sabbath mode:
• The oven will not shut off automatically.
• The temperature displays of the active
ovens will show “Sab”.
• To prevent accidental key pad presses,
only the 0-9, Start, Upper Oven, and Lower
Oven key pads will work. (The Cancel/Off
pad will also work, but it must be pressed
1 second longer.)
• No tones will sound.
• No prompts, error messages, or tempera-
ture changes will be displayed.
• The ON Indicator Light will light up when
the oven is heating and will go off when
the oven stops heating.
NOTE: If you open the oven door when the
elements are off, the elements will not turn
on. Elements will not turn on immediately
after the door is closed. If you open the
oven door when the elements are on, the
elements will turn off after a delay. Again,
elements will not turn on immediately after
the door is closed.
2. Press START and hold for 2 seconds.
START
To end the Sabbath mode:
• Press and hold Number Pad 6 for
If a power failure occurs during the
Sabbath mode:
The oven will automatically return to the
Sabbath mode at the desired temperature
when power returns.
NOTE: It may take the oven up
to one half hour to reach the
desired temperature.
5 seconds.
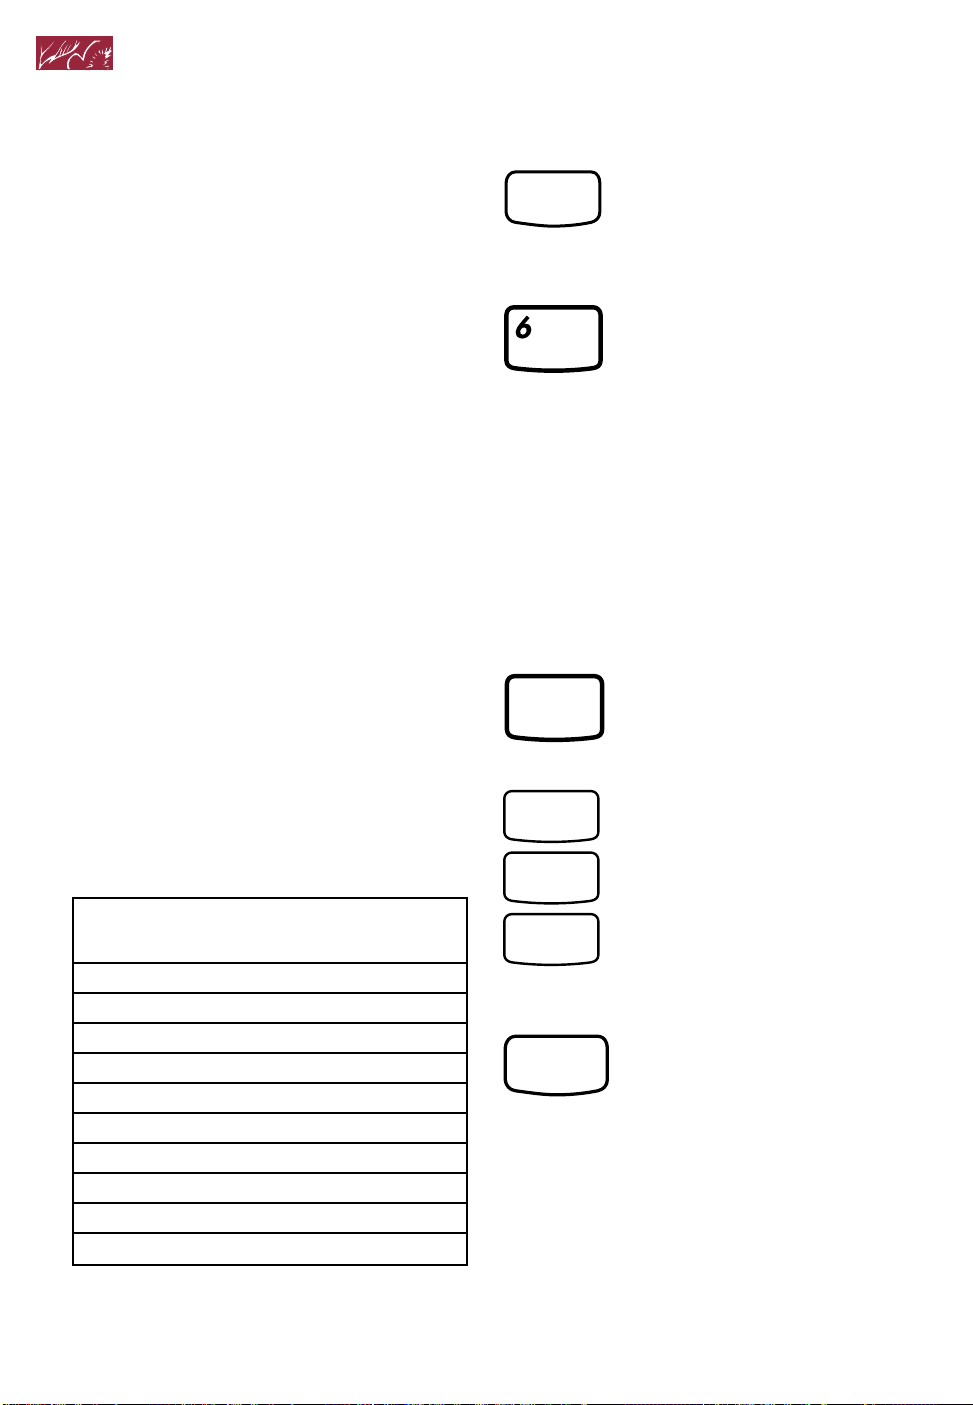
Setting your double oven for the
Sabbath
If you want to set your oven to meet “no
work” requirements for the Sabbath, follow
these steps:
1. Press BAKE.
BAKE
†
To change the temperature during the
Sabbath mode for holidays:
1. Press a Number Pad and hold for 2
seconds for the desired temperature.
Each Number Pad is programmed for a
specific set temperature:
NUMBER
PAD
1
2
3
4
5
6
7
8
9
0
SET
TEMPERATURE
170°F (77°C)
200°F (93°C)
250°F (121°C)
275°F (135°C)
300°F (149°C)
325°F (163°C)
350°F (177°C)
375°F (191°C)
400°F (204°C)
450°F (232°C)
2. Press Number Pads to set the tempera-
ture you want.
3
2
5
(example for 325°F)
3. Press START.
START
†
Star K certification pending. Full certification by Star K is expected near the end of
1996 or early 1997. Information is accurate
as of 5/96.
10
Page 11
Using Your Oven
4. Press and hold Number Pad 6 for
5 seconds to go into the
Sabbath mode.
NOTES:
• The Sabbath mode is only available with
the Bake function.
• The Timer will be canceled in the
Sabbath mode.
• To use both ovens in the Sabbath
mode, both ovens must be in BAKE mode
before going into the Sabbath mode. If
only one oven is on before entering the
Sabbath mode, then the other oven cannot
be turned on while in the Sabbath mode.
What your oven will do while in the
Sabbath mode:
• The oven will not shut off automatically.
• The temperature displays of the active
ovens will show “Sab”.
• To prevent accidental key pad presses,
only the 1-9, Start, Upper Oven, and Lower
Oven key pads will work.
• Oven lights will stay off. Lights will not turn
on when door is opened.
• The indicator will flash for a few seconds
to tell you when the elements are about to
turn on or off.
• No tones will sound.
• No prompts, error messages, start times,
or temperature changes will be displayed.
• The Element Indicator light will light up
when the oven is heating and will go off
when the oven stops heating.
To change the temperature during the
Sabbath mode for holidays:
1. Press upper/lower oven pad.
2. Press a Number Pad for the desired
temperature. Each Number Pad is
programmed for a specific set
temperature:
NUMBER
PAD
1
2
3
4
5
6
7
8
9
3. Press START.
SET
TEMPERATURE
170°F (77°C)
200°F (93°C)
250°F (121°C)
300°F (149°C)
325°F (163°C)
350°F (177°C)
375°F (191°C)
400°F (204°C)
475°F (246°C)
START
NOTE: It may take the oven up to one half
hour to reach the desired temperature.
To end the Sabbath mode and turn off
oven:
• Press and hold Number Pad 6 for
5 seconds. (You only need
to do this step once for both
ovens.)
NOTE: If you open the oven door when the
elements are off, the elements will not turn
on. Elements will not turn on immediately
after the door is closed. If you open the
oven door when the elements are on, the
elements will turn off after a delay. Again,
elements will not turn on immediately after
the door is closed.
If a power failure occurs during the
Sabbath mode:
The oven will automatically return to the
Sabbath mode at the desired temperature
when power returns.
11
Page 12
Using Your Oven
Oven settings
This chart tells you when to use each setting. It also explains which elements heat up for
each setting.
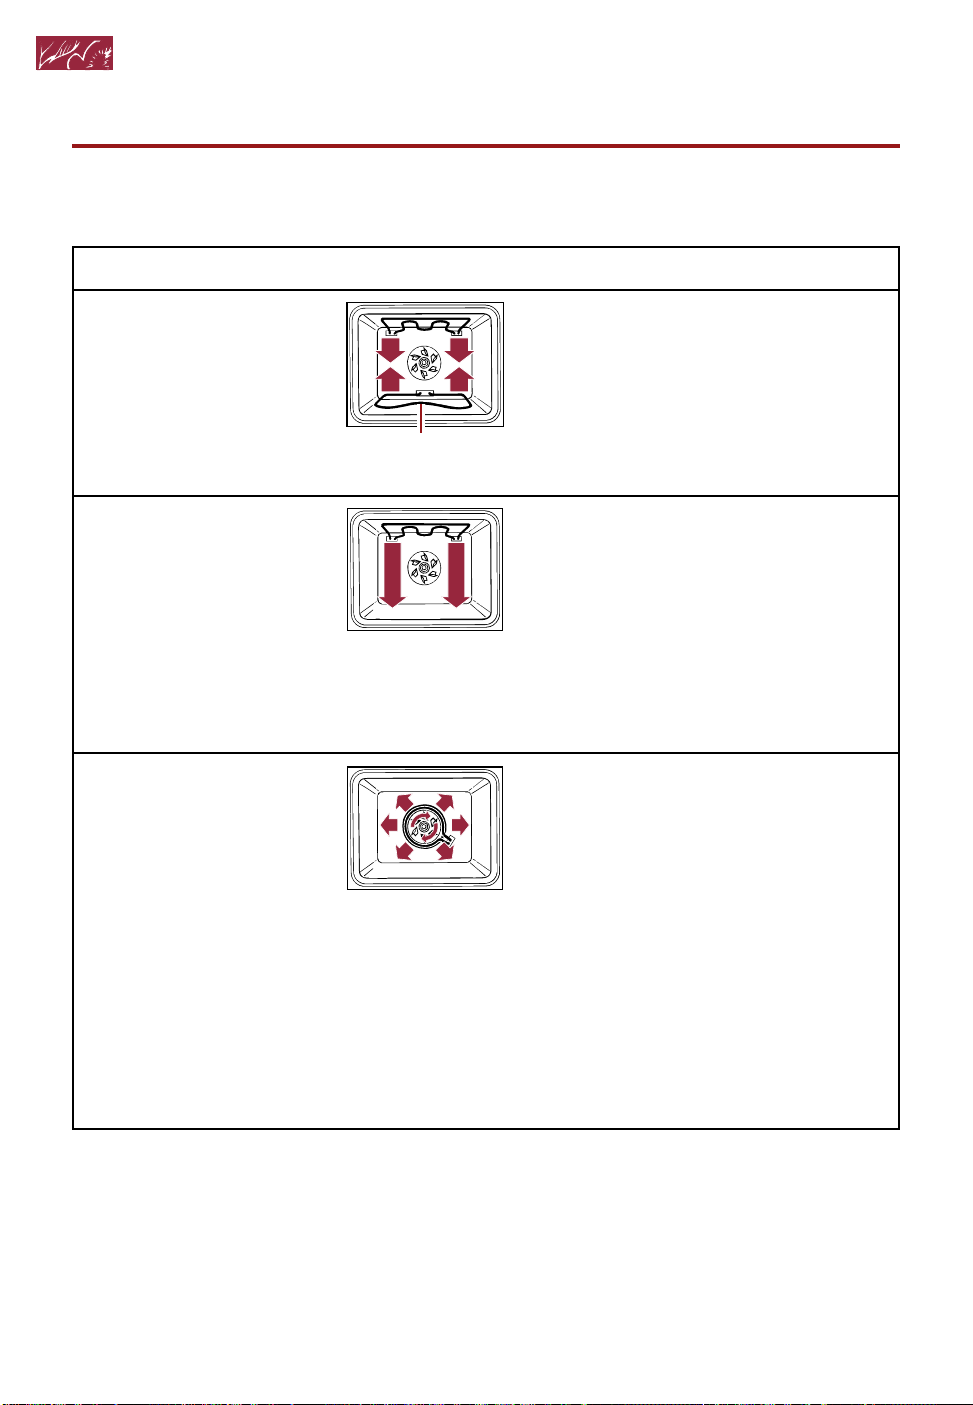
SETTING
BAKE
Use this setting for
standard baking and
roasting.
BROIL (MAXI/ECONO)
Use this setting for
broiling regular-sized
and smaller cuts of
meat, poultry, and fish.
CONVECTION BAKE
Use this setting for
delicate foods and for
baking breads and
cakes. Use also when
baking large quantities
of food on more than
one oven rack.
DIAGRAM
Bake element
(not visible)
SETTING INFORMATION
• The bottom element and both top
elements heat up.
• The elements will turn on and off to
maintain the oven temperature.
• Opening the door during Bake will
cause the broil elements to turn off
immediately and the bake element
to turn off after 2 minutes.
• Both top elements heat during
Maxi Broil. (Maximum browning
coverage.)
• Only the inner element heats up
during Econo Broil. (Browning
coverage in center only.)
• The elements will turn on and off to
maintain the oven temperature.
• Opening the door during Broil will cause
the broil elements to turn off immediately.
• For faster preheating, the bottom
element and both top elements heat up
until oven reaches desired temperature.
After preheat, only the rear element
heats up (and in some models the
bottom element heats up).
• For even heating, the fan at the back of
the oven circulates air in the oven cavity.
• The elements will turn on and off to
maintain the oven temperature.
• Opening the door during Convection
Bake will cause the broil elements,
convection fan, and rear element to turn
off immediately. The bake element will
turn off after 2 minutes.
12
Page 13
U sing Your Oven
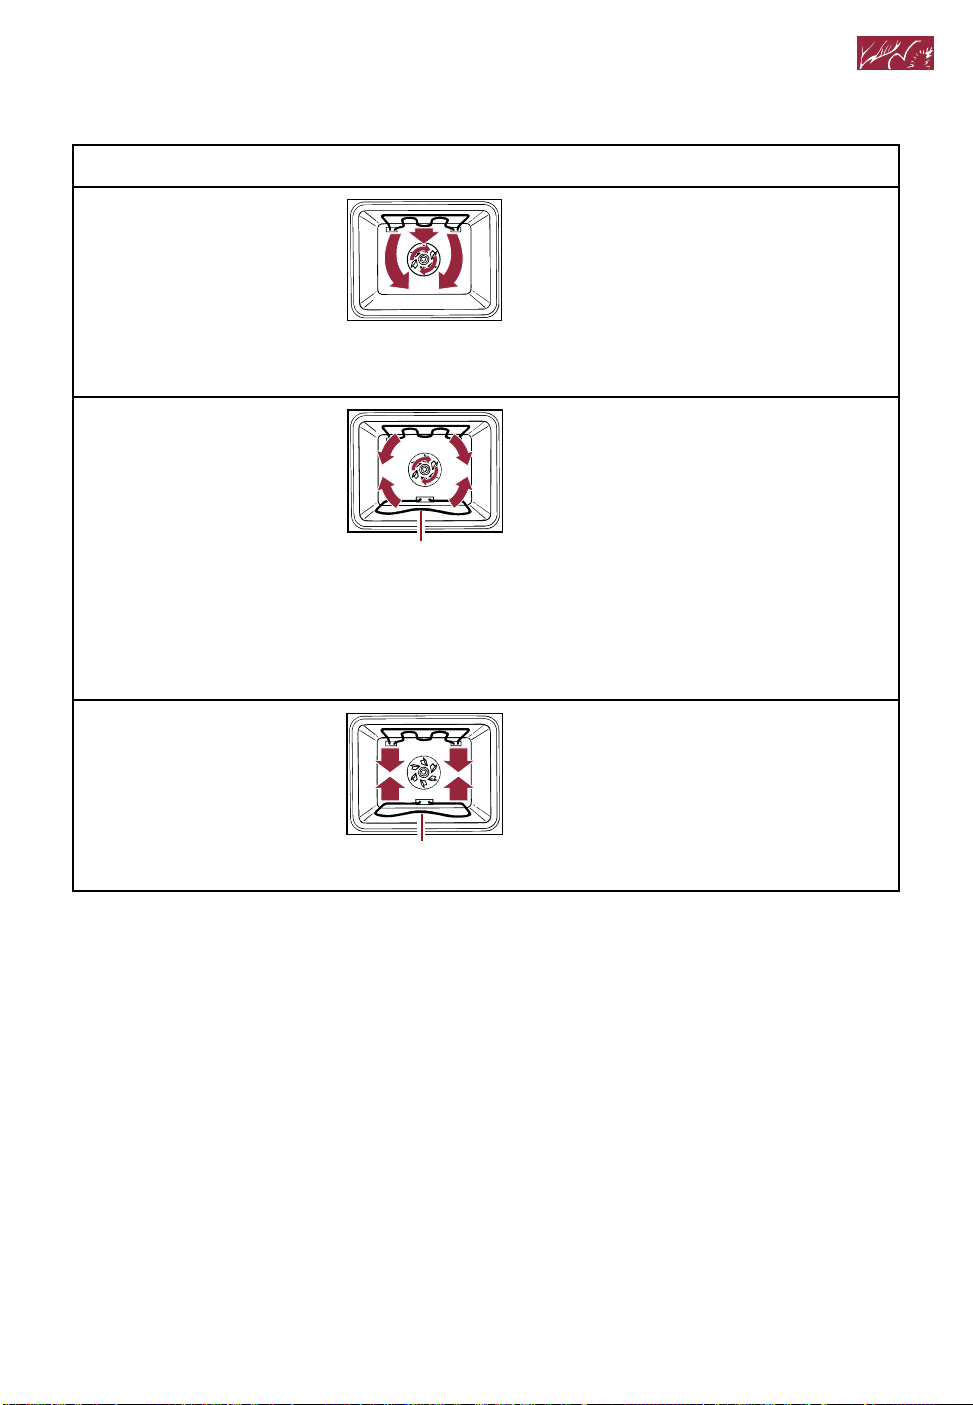
SETTING
CONVECTION BROIL
Use this setting for
broiling thick cuts
of meat.
CONVECTION ROAST
Use this setting for
roasting and baking
on one rack.
CLEAN
Use this setting for
self-cleaning only.
DIAGRAM
Bake element
(not visible)
SETTING INFORMATION
• Both top elements heat up.
• For even heating, the fan at the back of
the oven circulates air in the oven cavity.
• The elements will turn on and off to
maintain the oven temperature.
• Opening the door during Convection
Broil will cause the broil elements and
convection fan to turn off immediately.
• The bottom element and both top
elements heat up.
• For even heating and faster cooking,
the fan at the back of the oven circulates
air in the oven cavity.
• The elements will turn on and off to
maintain the oven temperature.
• Opening the door during Convection
Roast will cause the broil elements and
convection fan to turn off immediately.
The bake element will turn off after
2 minutes.
• The bottom element and both top
elements heat up.
Bake element
(not visible)
13
Page 14
HR MIN MIN SEC
MIN SEC
MIN SEC
U sing Your Oven
Setting the clock
NOTE: These examples are for double
upper ovens only. Other ovens may look
slightly different.
NOTE: If a timed oven function is active or
programmed, you cannot change the clock.
If an untimed oven function is active or
programmed, you can change the clock,
however the start time will disappear.
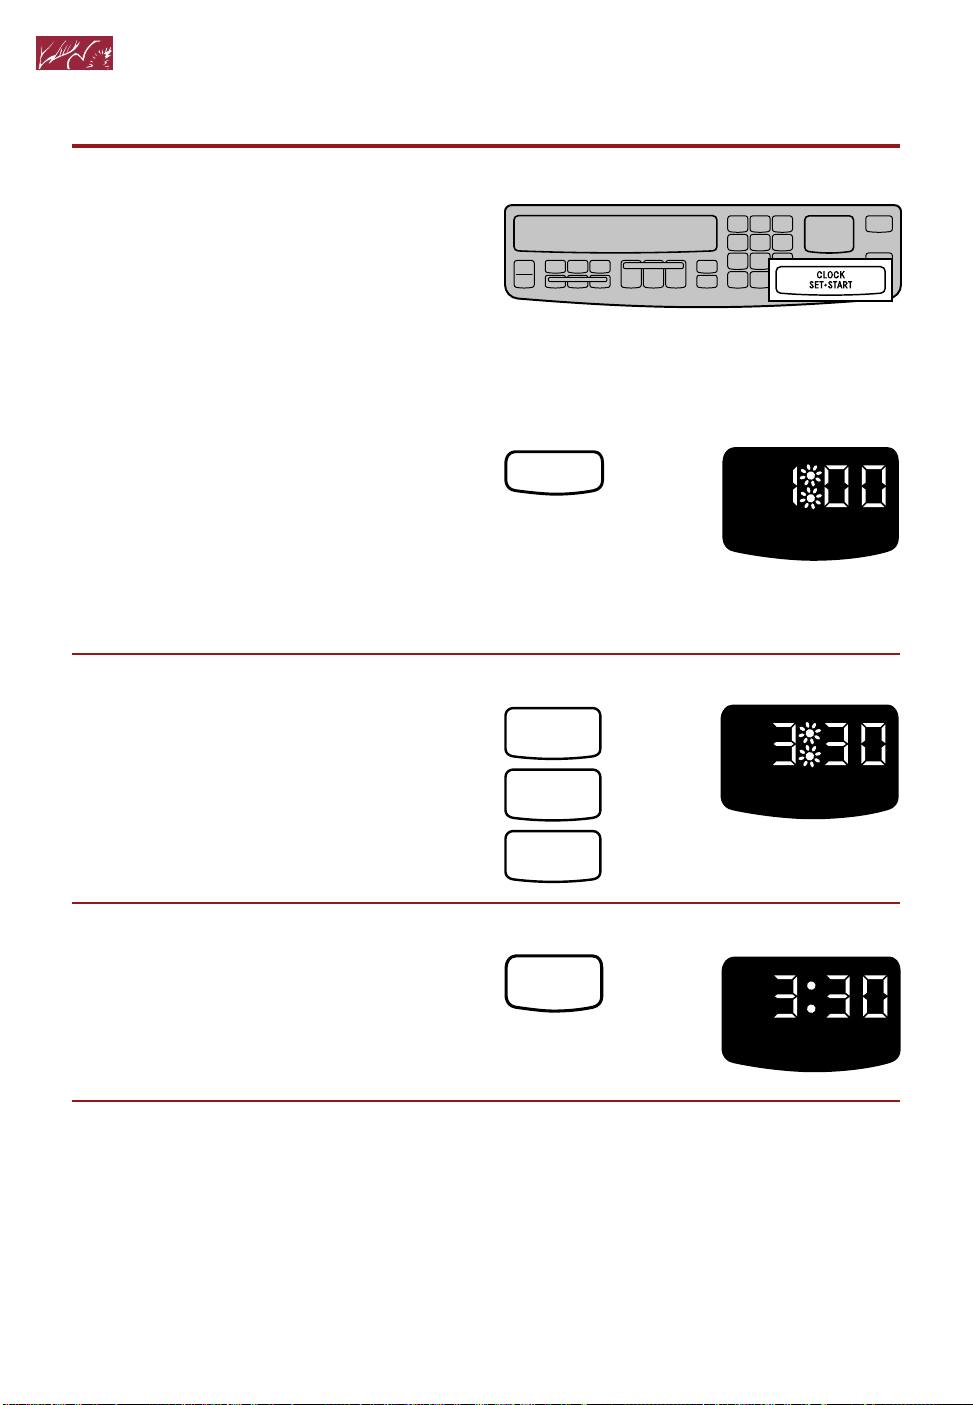
1. Press Clock Set/Start pad.
2. Set time.
3. Start clock.
If time has not been entered correctly,
three short tones will sound and “Err” will
be displayed. The display will show the
last valid time to appear on the display.
Repeat Steps 2 and 3 to re-enter the
time of day.
PRESS YOU SEE
CLOCK
SET START
•
(last time of day on
display) (colon is
flashing)
PRESS YOU SEE
3
3
0
PRESS YOU SEE
START
To disable the display clock:
You can clear the time of day from the
display by pressing and holding CLOCK
SET/START for 5 seconds. Repeat to see
time of day on display again.
14
Page 15
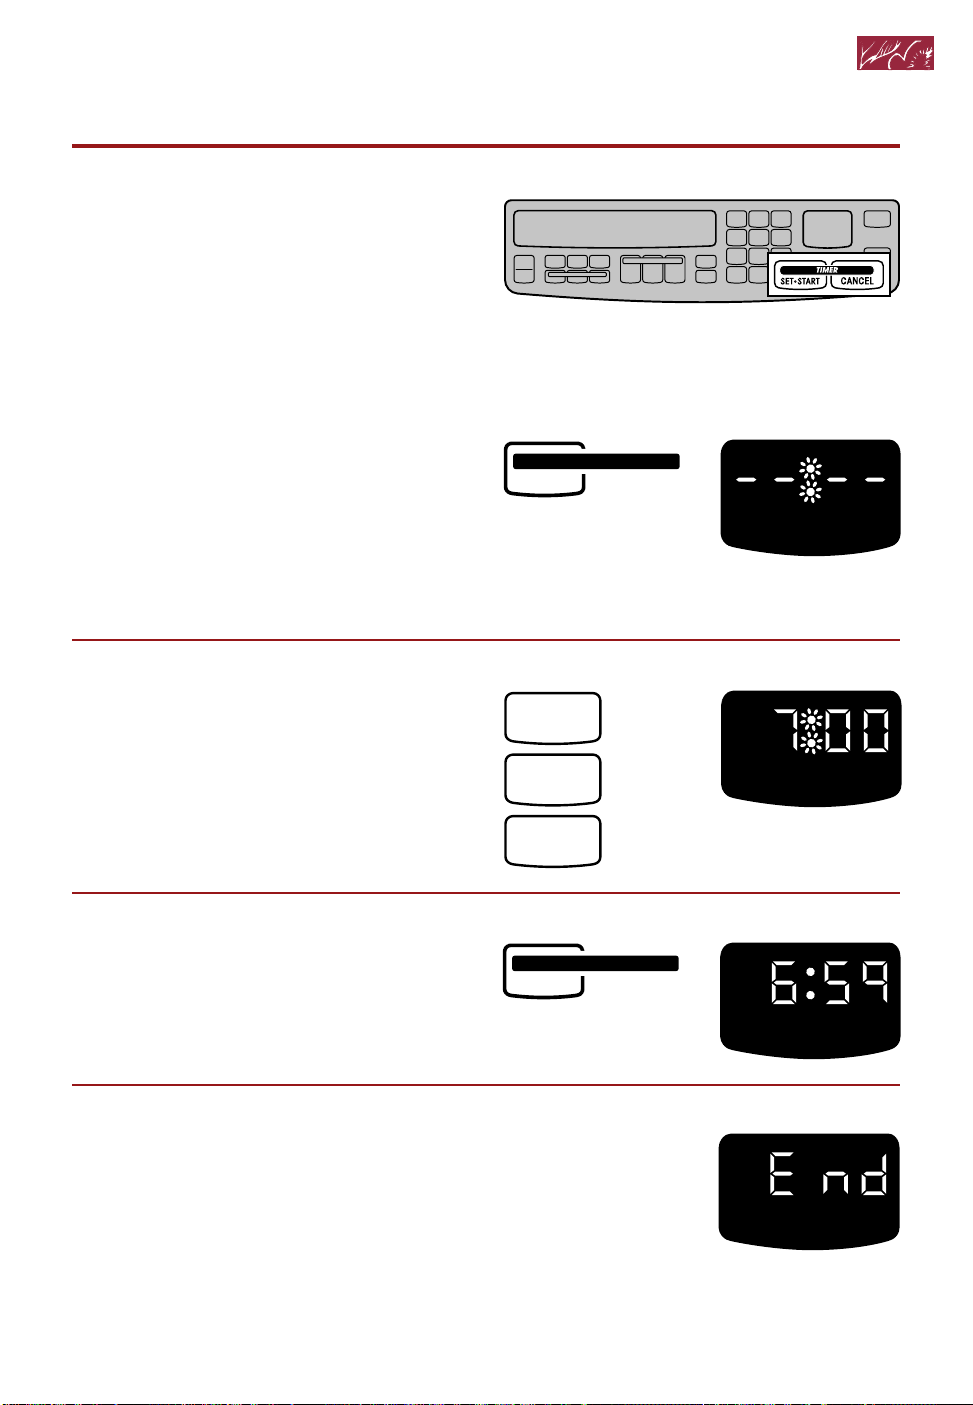
Using the timer
HR MIN
HR MIN
The Timer does not start or stop the oven.
It works like a regular kitchen timer. It can
be set in hours and minutes up to 99 hours,
59 minutes, or in minutes and seconds up to
99 minutes, 99 seconds.
NOTE: These examples are for double
upper ovens only. Other ovens may look
slightly different.
Using Your Oven
1. Press Timer Set/Start pad.
• Once to set hours and minutes
• Twice to set minutes and seconds
2. Set time.
3. Start Timer.
The Timer will begin counting down
immediately after you press the Timer
Set/Start pad.
PRESS YOU SEE
TIMER
SET START
•
HR MIN
(example shows
hours and minutes
timer setting 1)
PRESS YOU SEE
7
0
0
PRESS YOU SEE
TIMER
SET START
•
(example shows a
7-hour timer setting)
4. When time is up, turn off Timer.
When time is up, you will hear four tones
unless end-of-cycle tone is disabled.
(See page 8.) Press the Timer Cancel
pad to clear the display. Also, four tones
will sound every minute as an audible
reminder unless they are disabled.
(See page 8.)
YOU SEE
15
Page 16
U sing Your Oven
To change the timer during
its operation:
1. Press Timer Set/Start pad.
2. Enter new desired time.
3. Press Timer Set/Start pad.
To cancel the timer during
its operation:
You can cancel the Timer any time during
its operation. Press the Timer Cancel pad.
PRESS
TIMER
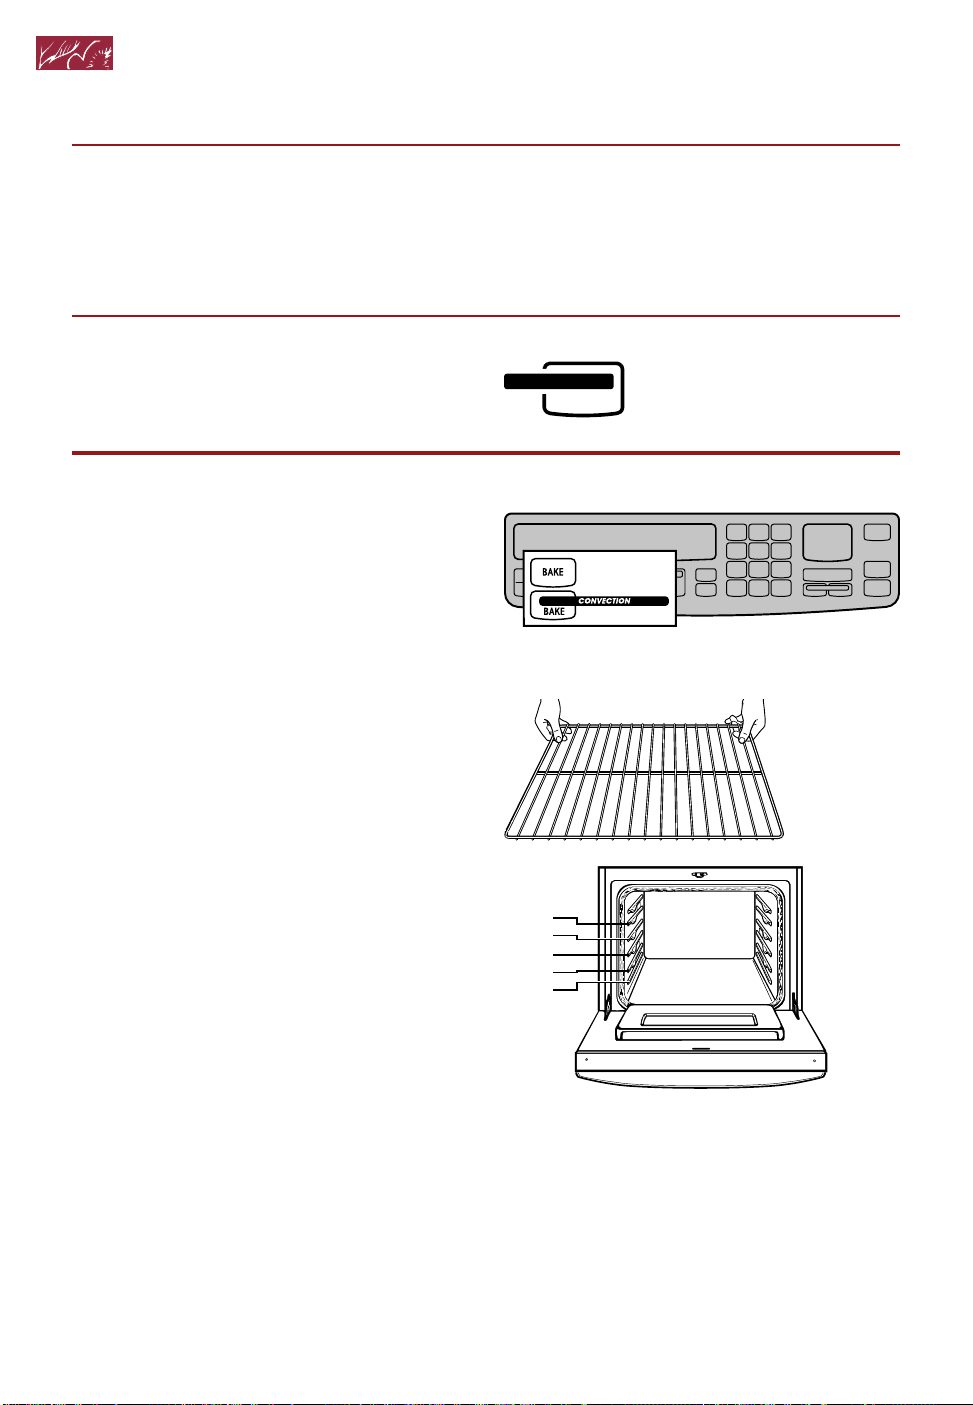
Baking or convection baking
NOTES:
• These examples are for double upper
ovens only. Other ovens may look slightly
different.
• If you need to convert temperatures from
Celsius to Fahrenheit or vice versa,
see page 7.
1. Position racks.
For correct rack placement, see
“Rack placement” chart on page 20.
Your upper/single oven has 3 flat racks
and 5 rack positions. Your lower oven
has either 2 or 3 racks (depending on
model) and 5 rack positions. Rack
position 5 is the highest position, or
farthest from the bottom of the oven.
Rack position 1 is the lowest position, or
closest to the bottom of the oven.
No. 5
No. 4
No. 3
No. 2
No. 1
CANCEL
NOTES:
• Before turning oven on, place oven racks
where you need them.
• Be sure the rack(s) is level.
• Use pot holders or oven mitts to protect
your hands, if rack(s) must be moved while
oven is hot.
• Do not let pot holder or oven mitt touch
oven bottom.
• See pages 20 and 21 for additional baking
and convection baking tips.
16
Page 17
Using Your Oven
O
F
O
F
O
F
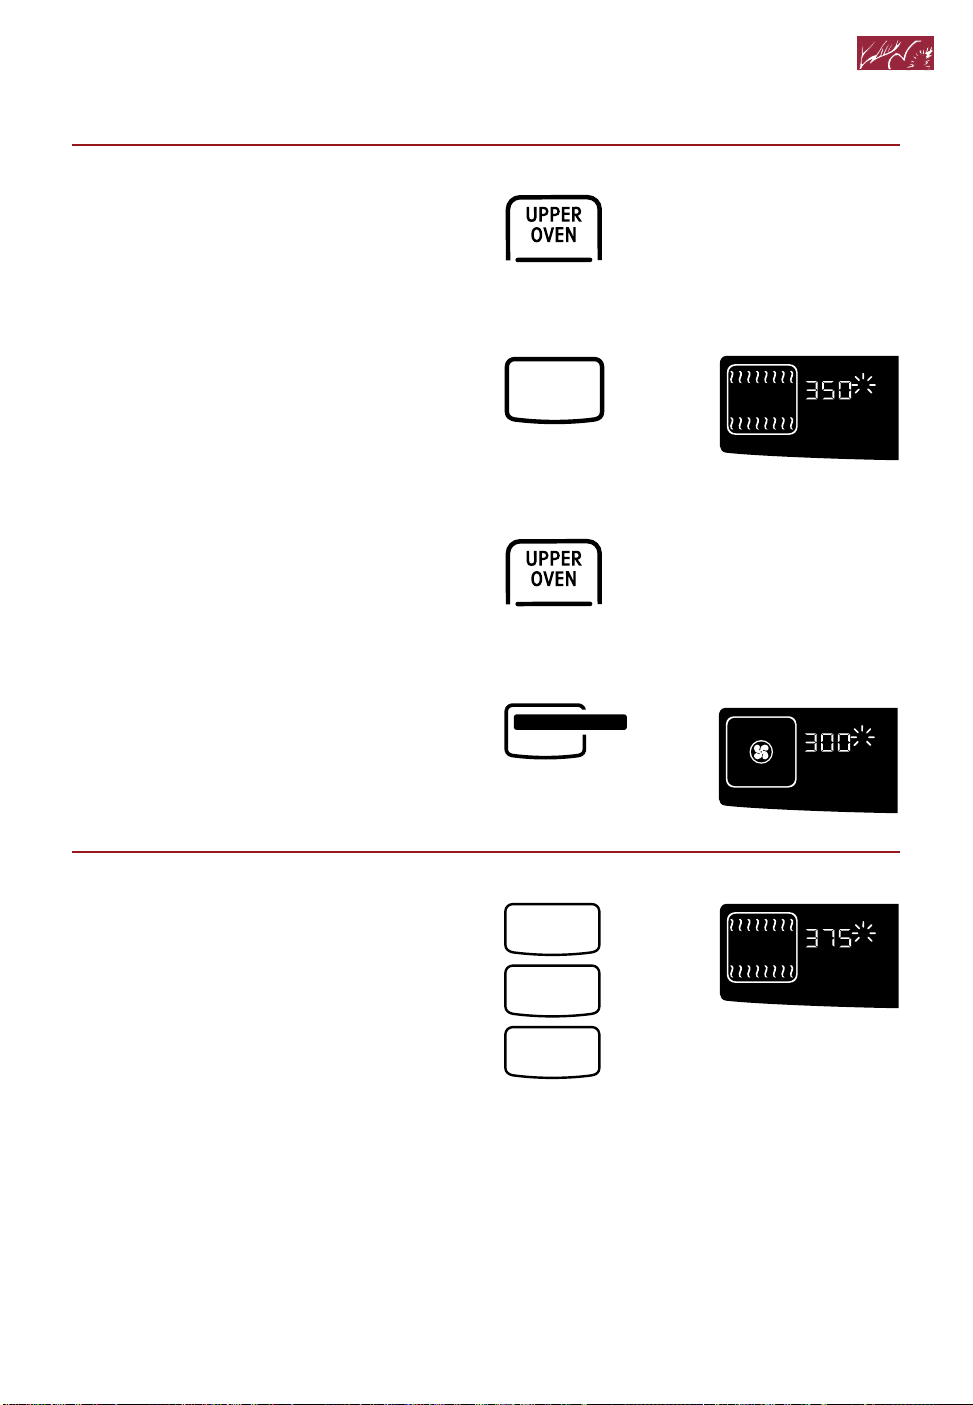
2. Choose baking setting.
NOTE: On double ovens, the cavity
symbol flashes to tell you which oven
you are setting.
PRESS
to select oven
(for double ovens)
PRESS YOU SEE
BAKE
OR
(or 177°C)
PRESS
to select oven
(for double ovens)
PRESS YOU SEE
CONVECTION
BAKE
3. Set temperature (optional).
Do this step if you want to set a temperature other than 350°F for Bake or
300°F for Convection Bake.
NOTE: See a reliable cookbook or your
convection oven cookbook for temperature recommendations.
(or 149°C)
PRESS YOU SEE
3
7
(example for Bake
5
at 375°F)
continued on next page
17
Page 18
Using Your Oven
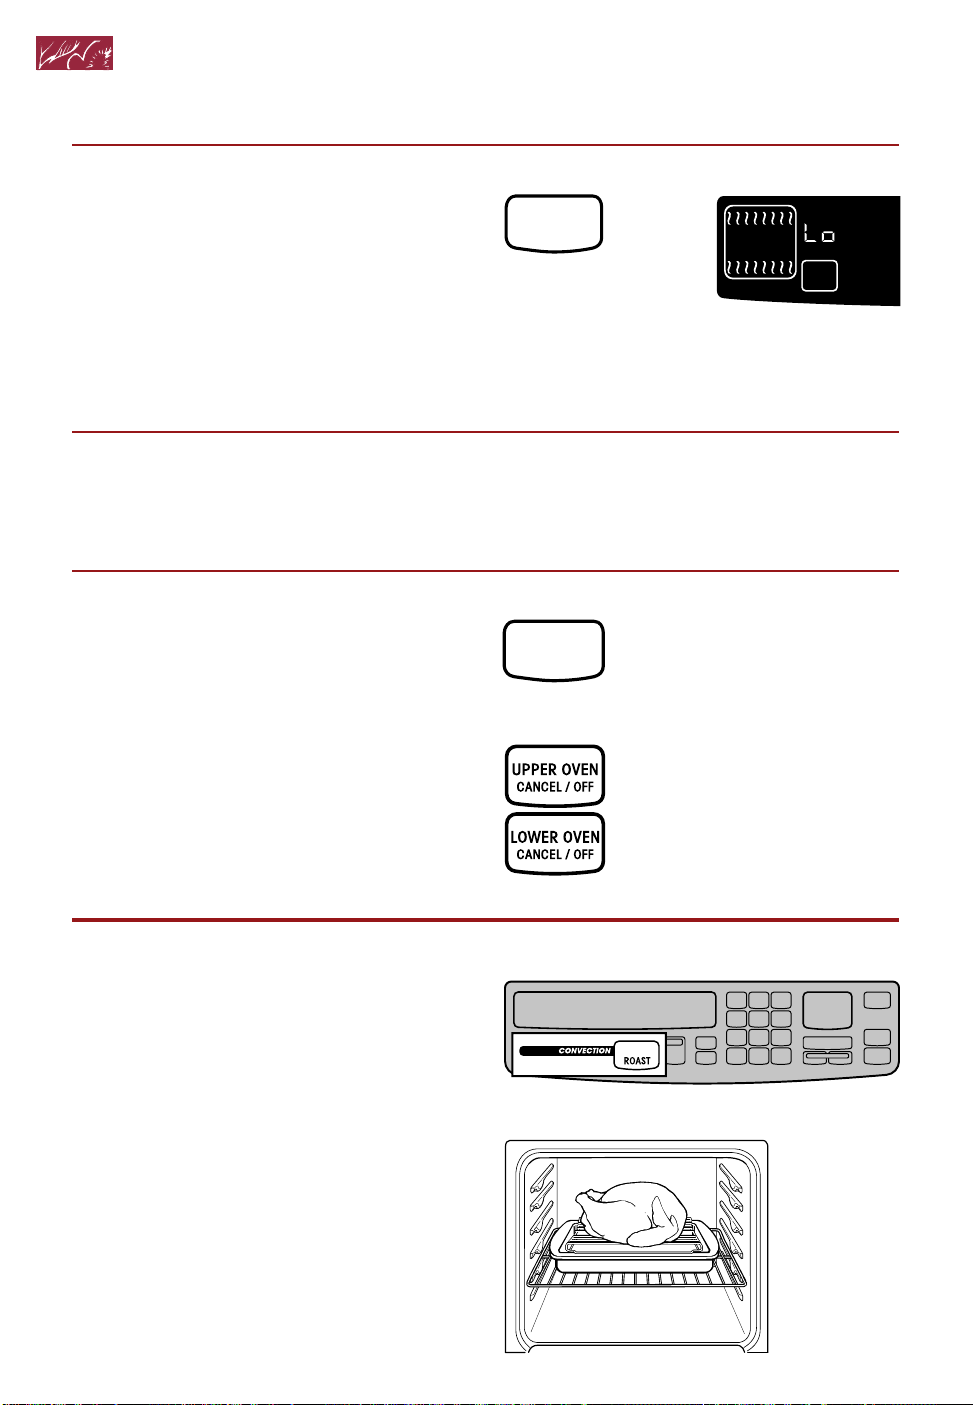
4. Preheat oven.
After the temperature reaches 170°F, the
temperature display will show the actual
oven temperature at each 5°F (3°C)
increase. It will then stop at the set
temperature. One long tone will sound
when oven is preheated.
5. Put food in oven.
NOTE: If you want to change the
baking temperature after baking has
begun, repeat Steps 2, 3, and 4.
6. After cooking, turn off oven.
PRESS YOU SEE
START
(example for Bake)
(“Lo” is displayed
after 5 seconds if
oven temperature is
below 170°F)
PRESS YOU SEE
CANCEL
OFF
(single ovens)
OR
(display will go blank)
ON
Convection roasting
NOTE: These examples are for double
upper ovens only. Other ovens may look
slightly different.
1. Prepare oven.
Position the rack properly. For correct
rack placement, see “Baking or convection baking” on page 16. Place food in
the oven. For large roasts and turkeys,
place rack in position 1 or 2. (Preheating
is not necessary when roasting.)
18
(double ovens)
Page 19

U sing Your Oven
O
F
O
F
ON
2. Choose setting.
NOTE: On double ovens, the cavity
symbol flashes to tell you which oven
you are setting.
3. Set temperature (optional).
Do this step if you want to set a
temperature other than 300°F.
NOTE: See your convection oven
cookbook for temperature
recommendations.
4. Start oven.
NOTES:
• After the temperature reaches
170°F, the temperature display will
show the actual oven temperature at
each 5°F (3°C) increase. It will then
stop at the set temperature.
• If you want to change the roasting
temperature after roasting has
begun, repeat Steps 2, 3, and 4.
PRESS YOU SEE
to select oven (for
double ovens)
(or 149°C)
PRESS
CONVECTION
ROAST
PRESS YOU SEE
3
2
(example shows 325°F
5
PRESS YOU SEE
START
temperature setting)
(“Lo” is displayed
after 5 seconds if
oven temperature
is below 170°F)
ON
O
F
5. After cooking, turn off oven.
PRESS YOU SEE
(display will go blank)
CANCEL
OFF
(single ovens)
OR
(double ovens)
19
Page 20

Using Your Oven
Cooking tips
Baking/convection baking tips
The hot air must circulate around the pans in
the oven for even heat to reach all parts of
the oven. This results in better baking.
For best air circulation:
• Place the pans so that one is not directly
over the other.
Rack placement for specific foods:
RACK
FOOD
Frozen pies
Angel food and bundt cakes,
most quick breads, yeast
breads, casseroles, meats
Cookies, biscuits, muffins,
cakes, nonfrozen pies
POSITION
2
1 or 2
2 or 3
• For best results, allow 11⁄2 to 2 inches of
space around each pan and between pans
and oven walls.
• When baking with one pan, place pan in
the center of the oven rack.
• When baking with two pans, place pans
in opposite corners of the oven rack.
NOTE: “Oven peeking” may cause heat
loss, longer cooking times, and unsatisfactory baking or roasting results. Rely on
your timer.
Baking tips
(Bake pad)
For proper cooking, follow these
guidelines:
• When using one rack, place the rack
so the top of the food will be centered in
the oven.
• When using more than one rack, use the
Convection Bake setting.
• Use only one cookie sheet in the oven at
a time when using the Bake setting.
NOTE: See “Baking or convection baking”
on page 16 for additional baking tips.
Bakeware tips
• When baking with insulated cookie
sheets or baking pans, place them in the
bottom third of the oven. You may need to
increase the recommended baking times,
so test for doneness before removing from
the oven.
• When using ovenproof glassware or dark
bakeware, reduce the oven temperature
by 25°F, but use the same baking time.
Because these pans absorb heat, producing darker bottom browning and crispier
crusts, place the rack in the center of
the oven. When baking pies and bread,
you can use the temperature called for
in the recipe.
Using aluminum foil in the oven
(for thermal baking)
Use aluminum foil to catch spillovers from
pies or casseroles.
20
• Place the foil on the oven rack below the
rack with the food. Turn foil edges up and
make sure foil is about 1 inch (3 cm) larger
all around than the dish holding the food.
Page 21

U sing Your Oven
• Do not cover the entire rack with alumi-
num foil. It will reduce air circulation and
cause poor cooking results.
NOTE: Do not line oven bottom with foil or
other liners. It could affect the quality of
your baking.
Convection baking tips
(Convection Bake pad)
• Do not use aluminum foil when convection
baking. Aluminum foil may block airflow.
• Reduce recommended recipe oven
temperature by approximately 25°F.
Use EASY CONVECT* Conversion
(see page 29).
• For some recipes, you can reduce
convection baking time compared to
standard baking times. Use EASY
CONVECT Conversion (see page 29).
NOTE: Cooking time may be longer when
you use more than one rack.
• When baking on two or three racks, use
the Convection Bake setting for more even
results. (You can, however, use only one
rack when convection baking.)
Roasting tips
• Spatter can be reduced by lining the
bottom of the roasting pan with lightly
crushed aluminum foil.
• Use an accurate meat thermometer or
temperature probe (see page 23) to
determine when meat has reached desired
degree of doneness. Insert the thermometer or probe into the center of the thickest
portion of the meat or inner thigh or breast
of poultry. For an accurate reading, the tip
of the thermometer or probe should not
touch fat, bone, or gristle.
• After reading the thermometer once,
push it further into the meat 1⁄2 inch or
more and read again. If the temperature
drops, return the meat to the oven for more
cooking.
• Check pork and poultry with a thermo-
meter in 2-3 places to ensure adequate
doneness.
• Poultry and roasts will be easier to
carve if loosely covered with foil and
allowed to stand 10-15 minutes after
removal from the oven.
• You can reduce roasting times and
temperatures for most standard recipes
when using the Convection Roast setting.
See convection roasting chart in your
convection oven cookbook for recommended roasting times and temperatures,
or use EASY CONVECT Conversion
(see page 29).
• To use three racks during convection
baking, place one rack in position 5 (the
highest position), another rack in position
1 (the closest to the oven bottom), and the
third rack in position 3. This allows all three
racks to be an equal distance apart for
better baking.
• Stagger cake pans or other utensils in
opposite directions on each rack when
three racks are used. This will make sure
pans are not directly over each other.
NOTE: See “Baking or convection baking”
on page 16 for additional convection
baking tips.
• Use the convection roasting rack on the
broiler pan and grid (all included with your
oven). (The convection roasting rack rests
on the broiler pan and grid.) The long side
of the rack should be parallel with the oven
door for best heat distribution and airflow.
21
Page 22

Using Your Oven
T
Adjusting oven temperature
Although your new oven is properly adjusted
to provide accurate temperatures, it may
cook faster or slower than your old oven.
If, after using the oven for a period of time,
you are not satisfied with the baking/roasting
results, you can change the offset temperature by following the steps below. The
control will “remember” the selected offset
even after the power has been interrupted
or lost.
NOTES:
• On double ovens, upper and lower oven
temperature may be adjusted independently. Press the Upper or Lower Oven pads.
• DO NOT measure oven temperature
with a thermometer. Opening the oven
door will affect the oven temperature and
give you an inaccurate reading. Also, the
thermometer temperature reading will
change as your oven cycles.
• These examples are for double upper
ovens only. Other ovens may look slightly
different.
1. Press and hold Bake pad for
5 seconds.
Release the pad when a number and
CAL appear on the temperature display
and you hear a tone.
2. Set new offset temperature.
You can set the offset temperature
adjustment as low as -35°F (-21°C) or as
high as +35°F (+21°C). Each time you
press the Bake pad, the displayed temperature will increase by 5°F (3°C). Each
time you press the Broil pad, the displayed
temperature will decrease by 5°F (3°C).
(To determine the amount of adjustment
needed, see the chart on page 23.)
PRESS YOU SEE
to select oven (for
double ovens)
(factory setting of “0”)
PRESS
BAKE
Hold for
5 seconds
PRESS YOU SEE
NIGHT LIGHT
BAKE
OR
ON
EASYCONVECT
(example when making
oven 10°F [or 5°C] hotter)
BROIL
MAXI
ECONO
O
F
COOK TEMP
DELAY
PROBE TEMP
SET
O
RAISING
F
BREAD
DEHYDRATE
CONVECTION
COOK
STANDARDENTER
COOK TEMP CLEAN TIME
CHECK
FOOD A
TIME
CLOSE
DOOR
NOTE: If there is no “F” after the tem-
perature, you are in the Celsius mode.
22
Page 23

U sing Your Oven
3. Enter the adjustment.
NOTE: If you press the Cancel/Off pad
instead of the Start pad, the offset
temperature will stay the same.
How to determine the amount of
adjustment needed
The following chart tells you how much to
adjust the offset temperature to get the
desired cooking results. You can determine
cooking results by amount of browning,
moistness, and rising times for baked foods.
PRESS YOU SEE
START
TO COOK
FOOD …
A little more
Moderately
more
Much more
A little less
Moderately
less
Much less
(display will go blank)
ADJUST BY THIS
NUMBER OF DEGREES
+5°F to +10°F/
+3°C to +6°C
+15°F to +20°F/
+8°C to +12°C
+25°F to +35°F/
+16°C to +21°C
-5°F to -10°F/
-3°C to -6°C
-15°F to -20°F/
-8°C to -12°C
-25°F to -35°F/
-16°C to -21°C
Using the temperature probe
(upper/single oven only)
The Temperature Probe can be used when
baking/roasting any type of meat or poultry,
or cooking casseroles with liquid.
NOTES: These examples are for double
upper ovens only. Other ovens may look
slightly different.
NOTES:
• Do not use the Temperature Probe when
broiling, convection broiling, dehydrating,
or raising bread.
• Unplug the Temperature Probe before
self-cleaning the oven.
1. Insert probe into food.
Insert at least 2⁄3 of the probe into the
center of the thickest portion of meat or
into the inner thigh or breast of poultry,
away from fat or bone.
continued on next page
23
Page 24

NIGHT LIGHT
DELAY
SET
RAISING
BREAD
O
F
ON
COOK
DEHYDRATE
TIME
COOK TEMP CLEAN TIME
STANDARDENTER
CONVECTION
PROBE TEMP
FOOD AT
CHECK
DOOR
CLOSE
EASYCONVECT
Using Your Oven
BAKE
2. Put food in oven.
Place meat on the convection roasting
rack, place rack on broiler pan and grid,
and place pan in the center of the oven.
3. Connect probe to oven.
Insert the plug into the jack located on
the right oven wall. (Keep the top of the
probe as far as possible from the heat
source.)
4. Close oven door.
5. Set temperature (optional).
Do this step if you want to set an
internal food temperature (from
130°F-190°F) other than 160°F.
NOTE: See a reliable cookbook or your
convection oven cookbook for internal
food temperature recommendations.
PRESS YOU SEE
to select
oven (for
double
ovens)
EASYCONVECT
(example shows 185°F internal
temperature setting)
PRESS
1
YOU SEE
(or 71°C) (on double
ovens, the upper oven
cavity symbol flashes to
tell you which oven you
are setting)
DELAY
NIGHT LIGHT
DEHYDRATE
ON
COOK TEMP CLEAN TIME
PROBE TEMP
SET
O
RAISING
F
BREAD
CONVECTION
COOK
STANDARDENTER
TIME
CHECK
FOOD AT
CLOSE
DOOR
6. Choose cook setting.
• BAKE,
• CONVECTION BAKE, or
• CONVECTION ROAST
NOTE: If you press Clean, Cook Time,
Stop Time, or Broil pads the display will
show “pull prb out”.
24
8
5
PRESS YOU SEE
(example
for Bake)
EASYCONVECT
NIGHT LIGHT
O
F
DEHYDRATE
STANDARDENTER
ON
COOK TEMP CLEAN TIME
DELAY
SET
RAISING
BREAD
PROBE TEMP
CONVECTION
COOK
TIME
CHECK
FOOD AT
CLOSE
DOOR
Page 25

START
U sing Your Oven
7. Set temperature (optional).
Do this step if you want to set an oven
temperature other than the one displayed.
NOTE: See a reliable cookbook or your
convection oven cookbook for oven
temperature recommendations.
8. Start oven.
NOTES:
• If you do not choose a cook setting
and press START, the oven will default
to bake at 350°F and start. If you want
to cook with another setting or at
another temperature, do Steps 6 and 7
and press START.
• The oven temperature display will
show the set oven temperature
throughout temperature probe cooking.
• After the food temperature reaches
130°F, the probe display will show the
actual food temperature at each 5°F
increase and stop at the set temperature. Four tones will sound (if tones are
not disabled, see page 8) and “End”
will show when food reaches the set
temperature. The oven then shuts off.
• If you want to change the probe
temperature after cooking has begun:
– Unplug the probe, then plug it back
in. You will be prompted for a new
probe temperature. Next, repeat
Steps 5 and 8 in that order. You may
also change the oven temperature at
this point by pressing the desired
cook setting pad again.
OR
– Press Start pad and repeat steps
5-8, in that order. You may also
change the oven temperature at this
point by pressing the desired cook
setting pad again.
PRESS YOU SEE
3
7
EASYCONVECT
(example shows 375°F
temperature setting)
5
PRESS YOU SEE
EASYCONVECT
(example for Bake)
NIGHT LIGHT
O
F
DEHYDRATE
ON
COOK TEMP CLEAN TIME
NIGHT LIGHT
O
DEHYDRATE
ON
COOK TEMP CLEAN TIME
DELAY
RAISING
BREAD
STANDARDENTER
DELAY
RAISING
BREAD
STANDARDENTER
SET
CONVECTION
SET
CONVECTION
PROBE TEMP
COOK
PROBE TEMP
COOK
TIME
TIME
CHECK
FOOD AT
CLOSE
DOOR
CHECK
FOOD AT
CLOSE
DOOR
continued on next page
25
Page 26

U sing Your Oven
wWARNING
Burn Hazard
Use an oven mitt or pot holder to
remove temperature probe.
Do not touch broil element.
Failure to follow these instructions
can result in burns.
9. After cooking, unplug probe.
The probe symbol will remain lit until
you unplug the Temperature Probe.
10. Remove food from oven.
(This prevents overcooking.)
11. Clean probe.
Wash with a soapy sponge and dry
thoroughly. Use a plastic scouring pad
to remove cooked-on foods. You can
also clean the probe in a dishwasher.
Using convect full meal
(upper oven/single oven/both ovens on Models KEBS208D
and KEBS278D)
Convect Full Meal lets you choose from
among ten preset oven convection cooking
cycles, all using the convection fan. These
cycles store commonly used cooking times,
cooking temperatures, and probe temperature settings. Convect Full Meal saves you
time by limiting the number of pads you
have to press when cooking a favorite cycle.
Convect Full Meal also lets you set your own
favorite cycle (either convection or nonconvection). On double ovens, you can set two
favorite cycles, one for each oven.
NOTE: These examples are for double
upper ovens only. Other ovens may look
slightly different.
26
Page 27

1. Place food in cold oven.
T
HR MIN MIN SEC
NIGHT LIGHT
DELAY
SET
RAISING
BREAD
O
F
COOK
DEHYDRATE
TIME
COOK TEMP CLEAN TIME
STANDARDENTER
CONVECTION
PROBE TEMP
FOOD AT
CHECK
DOOR
CLOSE
EASYCONVECT
ON
If you need the Temperature Probe for
your cycle (settings 6 thru 0 in chart on
page 28), insert probe into food. Place
food in oven and plug probe into jack.
Using Your Oven
2. Press Convect Full Meal pad.
3. Press desired Number pad.
Use the “Convect full meal chart” on page
28 as your guide for selecting a cycle.
NOTES:
• On double ovens, the cavity symbol
flashes to tell you which oven you
are setting.
• You can change the Convect Full Meal
cycle any time before pressing the Start
pad by repeating Step 3.
• You can program your own setting,
for each oven in double ovens, which
you can then select in the future by
pressing just upper/lower oven Convect
Full Meal and START. (See page 28 for
more information.)
PRESS YOU SEE
to select oven
(for double ovens)
PRESS
CONVECT
FULL
MEAL
(“C” stands for “cycle,”
“F” stands for “favorite”)
PRESS YOU SEE
1
HR MIN MIN SEC
(example for cycle 1)
NIGHT LIGHT
ON
EASYCONVECT
DELAY
PROBE TEMP
SET
O
RAISING
F
BREAD
DEHYDRATE
CONVECTION
COOK
STANDARDENTER
COOK TEMP CLEAN TIME
CHECK
FOOD A
TIME
CLOSE
DOOR
4. Start oven.
5. When the Convect Full Meal
cycle is done:
Four tones will sound, followed by 4
reminder tones (unless they have been
disabled), every minute until you open
the door, remove the probe, or press the
Cancel/Off pad.
PRESS YOU SEE
START
YOU SEE
COOK TIME
(double oven display)
27
Page 28

U sing Your Oven
Convect full meal chart
CYCLE
NUMBER
1
2
3
4
5
6
7
8
9
0
CONVECTION
CYCLE
Conv. Bake
Conv. Roast
Conv. Roast
Conv. Bake
Conv. Bake
Conv. Roast
Conv. Roast
Conv. Roast
Conv. Roast
Conv. Bake
OVEN
TEMP
325°F
325°F
350°F
375°F
425°F
325°F
325°F
325°F
300°F
325°F
TIME OR
PROBE TEMP
1 hr
11⁄2 hrs
40 min
45 min
20 min
140°F
155°F
165°F
135°F
160°F
FOOD OR MEAL
Meal#1: Spinach and
ricotta stuffed meat loaf,
Baked potatoes, Fall
apple cake
Meal#2: Pesto stuffed
turkey breast, Caramelsweet potato casserole,
Rhubarb-pineapple
crisp
Meal#3: Pork chops
with currant-nut stuffing,
Cherry cobbler
Meal#4: Herb and
pecan fried chicken,
Crispy potato wedges,
Applesauce rhubarb
muffins
Meal#5: Spicy red
snapper, Gruyere pecan
biscuits
Beef, rare
Beef, medium
Pork
Beef, well done
Ham, fully cooked
Casseroles
To program your own cycle:
1. Press Upper/Lower Oven pad.
2. Press Convect Full Meal.
3. Press the Command Pad to the cook
cycle you want (for example, BAKE).
4. Enter the temperature and cook time you
want. (The default is Bake at 170°F for
2 hours.) Entering a cook time of 0
minutes lets you do untimed cooking.
5. To save only, press Convect Full Meal.
To cook with this cycle immediately
and save it, press START.
28
NOTE: You can also program a Tempera-
ture Probe setting rather than a cook time
in upper/single ovens. In double ovens you
can program two separate favorite cycles,
one for each oven.
When programming your own cycle:
1. Start with meat or main dish items (times
are more critical with these items).
2. Choose baked goods with bake tempera-
tures similar to those of meat or main dish
items. Convection baking time of +/-10 to
15 minutes and temperatures of +/-25 to
50 degrees are acceptable.
3. Choose vegetables and fruits last.
Page 29

Using Your Oven
T
Using EASY CONVECT* Conversion
(upper oven/single oven/both ovens on Models KEBS208D
and KEBS278D)
EASY CONVECT Conversion lets you
convection cook without entering convection
cook temperatures and times. Simply enter
the standard cook temperature and time for
the food to be cooked. The oven will reduce
the temperature, or the temperature and
time, for convection cooking. (Convection
temperatures and times are not as long
because the heated air is circulated in the
oven cavity for quicker cooking.)
NOTE: These examples are for double
upper ovens only. Other ovens may look
slightly different.
1. Place food in oven.
NOTE: For Baked Goods and Other
Foods, place food in the oven after the
oven has been preheated.
NOTE: The converted temperatures and
times are not precise because the food
categories you choose from are general.
(See “EASY CONVECT Conversion setting
chart” on page 31 for which foods you can
cook in each setting.) To ensure proper
cooking, the oven will prompt you to check
food at the end of cook time. If food needs
more cooking, the oven will continue to
cook. If food does not need more cooking,
press Cancel/Off pad.
2. Press one of three EASY
CONVECT Conversion Pads.
Example for Meats:
NOTE: On double ovens, the cavity
symbol flashes to tell you which oven
you are setting.
3. Enter standard cook
temperature.
PRESS YOU SEE
to select
oven (for
double ovens)
EASYCONVECT
PRESS
MEATS
PRESS YOU SEE
3
2
5
EASYCONVECT
(example showing 325°F –
cooking without temperature
probe)
continued on next page
NIGHT LIGHT
O
F
DEHYDRATE
ON
COOK TEMP CLEAN TIME
NIGHT LIGHT
O
F
DEHYDRATE
ON
RAISING
BREAD
STANDARDENTER
DELAY
RAISING
BREAD
STANDARDENTER
DELAY
SET
SET
PROBE TEMP
CONVECTION
COOK
PROBE TEMP
CONVECTION
COOK
CLEAN TIME
TIME
TIME
CHECK
FOOD A
CLOSE
DOOR
CHECK
FOOD AT
CLOSE
DOOR
29
Page 30

NIGHT LIGHT
O
F
DEHYDRATE
COOK TEMP
ENTER
EASYCONVECT
ON
T
START
U sing Your Oven
4. Enter standard cook time.
NOTES:
• This step is not needed when using
the temperature probe.
• To delay convection cooking, after
Step 4, press the Stop Time pad and
enter the desired stop time. Cooking will
start at the time equal to the stop time
less the cook time. (Example: A cook
time of 1 hour and a stop time of 4:00
would give you a start time of 3:00.)
5. Start oven.
NOTES:
• The actual temperature reduction and
time savings are different for each food
category and oven type.
• For Baked Goods and Other Foods,
place food in the oven after the oven
has been preheated.
6. At end of cook time
(nondelayed cooking):
PRESS YOU SEE
1
0
EASYCONVECT
(example showing 1 hour)
0
PRESS YOU SEE
NIGHT LIGHT
ON
EASYCONVECT
(display shows temperature
reduced by 25°F – nondelayed
cooking)
YOU SEE
EASYCONVECT
NIGHT LIGHT
ON
NIGHT LIGHT
O
RAISING
F
BREAD
DEHYDRATE
STANDARDENTER
ON
DELAY
PROBE TEMP
SET
O
RAISING
F
BREAD
DEHYDRATE
CONVECTION
COOK
STANDARDENTER
COOK TEMP CLEAN TIME
DELAY
PROBE TEMP
SET
O
RAISING
F
BREAD
DEHYDRATE
STANDARDENTER
COOK TEMP CLEAN TIME
DELAY
SET
TIME
PROBE TEMP
CONVECTION
COOK
CLEAN TIME
CHECK
FOOD AT
CLOSE
DOOR
CHECK
FOOD AT
CLOSE
DOOR
TIME
CONTROL
CONTROL
CHECK
FOOD A
CLOSE
DOOR
START
TIME
LOCK
START
START
TIME
LOCK
START
?LOCKED
?LOCKED
7. Open door and check food
(nondelayed cooking).
If you want to continue cooking, close
door and the oven will continue cooking.
If you do not want to continue cooking,
press the Cancel/Off pad.
8. When stop time is reached
(delayed cooking only):
Four tones will sound, followed by four
reminder tones (unless they have been
disabled), every minute until you open
the door, remove the probe, or press the
Cancel/Off pad.
30
YOU SEE
YOU SEE
COOK TIME
(double oven display)
Page 31

EASY CONVECT * Conversion setting chart
Using Your Oven
EASY CONVECT SETTING
Baked Goods
Meats
Other Foods
FOODS YOU CAN COOK WITH THIS SETTING
Cakes: layer, angel food
Breads: quick and yeast
Biscuits and cookies
Casseroles, including frozen entrees and soufflés, Fish
Chicken: whole and pieces
Roasts: pork, beef, and ham
Meat loaf, Baked potatoes
NOTE: Turkey or large poultry are not included because
their cooking times vary.
Convenience foods: french fries, nuggets, fish sticks, pizza
Pies: fruit and custard
Broiling
NOTE: These examples are for double
upper ovens only. Other ovens may look
slightly different.
NOTE: Preheating is not necessary
when broiling.
1. Position rack.
See “Broiling rack positions” on page 35
for recommended rack positions.
NOTES:
• Before turning oven on, place oven racks
where you need them.
• Be sure the rack(s) is level.
• Use pot holders or oven mitts to protect
your hands, if rack(s) must be moved while
oven is hot.
• Do not let pot holder or oven mitt touch
hot broil elements.
• See “Broiling tips” on page 35 for
additional broiling tips.
continued on next page
31
Page 32

Using Your Oven
ON
NIGHT LIGHT
O
F
DEHYDRATE
COOK TEMP
ENTER
2. Put food in oven.
Place food on grid in broiler pan and
place in center of the oven rack.
NOTES:
• Place food about 3" or more from the
broil elements.
• To ensure adequate grease drainage,
do not use cookie sheets or similar
pans for broiling.
• If foil is used to cover broiler grid,
cut slits in foil to allow grease to
drain away.
3. Close door.
NOTE: Do not keep the door open as on
other electric ovens. Unlike other electric
ovens, the broil elements will only stay
on with the door closed. This gives you
the high heat you need for broiling.
However, if you leave the door open, the
broil elements will go off.
Broiler panBroiler grid
4. Press Broil pad.
Once for Maxi Broil
OR
Twice for Econo Broil
NOTE: On double ovens, the cavity
symbol flashes to tell you which oven
you are setting.
32
PRESS YOU SEE
to select oven (for
double ovens)
PRESS
(or 260°C) (example for
Maxi Broil)
BROIL
MAXI
ECONO
PRESS
to select oven (for
double ovens)
PRESS
YOU SEE
(or 260°C) (example for
Econo Broil)
BROIL
MAXI
ECONO
BROIL
MAXI
ECONO
NIGHT LIGHT
ON
O
F
DEHYDRATE
ENTER
COOK TEMP
Page 33

START
Using Your Oven
5. Set temperature (optional).
Do this step if you want to use variable
temperature broiling (see below).
6. Start oven.
NOTE: If you want to change the broiling
temperature after broiling has begun,
repeat Steps 4, 5, and 6.
7. When broiling is done,
turn off oven.
PRESS YOU SEE
3
2
5
PRESS YOU SEE
PRESS YOU SEE
CANCEL
OFF
(single ovens)
OR
(example shows 325°F
broiling temperature
for Maxi Broil)
(example for Maxi
Broil)
(display will go blank)
NIGHT LIGHT
ON
NIGHT LIGHT
ON
O
F
DEHYDRATE
ENTER
COOK TEMP
O
F
DEHYDRATE
ENTER
COOK TEMP
Variable temperature broiling
• If food is cooking too fast or you want
the food to broil slower from the start, set
the broil temperature between 170°F and
325°F. These temperature settings allow
the broil heating elements to cycle more
frequently and to slow cooking. The lower
the temperature, the slower the cooking.
• Fish and chicken are some foods that
may cook better if you use lower broiling
temperatures.
(double ovens)
33
Page 34

U sing Your Oven
Convection broiling
(upper oven/single oven/both ovens on Models KEBS208D
and KEBS278D)
Use this setting when broiling thick cuts
of meat.
NOTE: These examples are for double
upper ovens only. Other ovens may look
slightly different.
1. Position rack.
See “Broiling rack positions” on page 35
for recommended rack positions.
2. Close door.
NOTE: Do not try to convection broil with
the door open. The fan and elements will
not operate.
3. Choose Convection
Broil setting.
NOTE: On double ovens, the cavity
symbol flashes to tell you which oven
you are setting.
4. Set temperature (optional).
Do this step if you want to set a temperature (up to 500°F) other than 450°F.
NOTE: See your convection
oven cookbook for temperature
recommendations.
PRESS YOU SEE
to select oven (for
double ovens)
PRESS
CONVECTION
BROIL
(or 232˚C)
PRESS YOU SEE
4
0
0
(example shows 400°F
temperature setting)
NIGHT LIGHT
DEHYDRATE
ENTER
ON
COOK TEMP
NIGHT LIGHT
DEHYDRATE
ENTER
ON
COOK TEMP
O
F
O
F
34
Page 35

START
U sing Your Oven
5. For best results, preheat oven
for 5 minutes.
NOTE: If you want to change the convec-
tion broiling temperature after broiling
has begun, repeat Steps 3, 4, and 5.
6. Put food in oven.
Place food on grid in broiler pan and
place in center of the oven rack. Turn the
pan so the long side is parallel to the
oven door for the most even heat and the
best airflow.
NOTE: If you want to change the convec-
tion broiling temperature after broiling
has begun, repeat Steps 3, 4, and 5.
7. When broiling is over, turn
off oven.
PRESS YOU SEE
PRESS YOU SEE
(display will go blank)
CANCEL
OFF
(single ovens)
OR
ON
O
F
Broiling tips
• Always start broiling with a cold broiler
pan for better results.
• To retain more natural juice, do not
pierce meat with a fork.
• Trim the outer layer of fat from steaks
and chops.
• Slit fatty edges to prevent meat from
curling during broiling.
• Use a nonstick cooking spray or veg-
etable oil on the broiler pan and grid when
broiling fish to prevent sticking.
NOTE: See “Broiling” on page 31 for
additional broiling tips.
(double ovens)
Broiling rack positions
5
4
3
2
1
35
Page 36

Using Your Oven
Timed cooking
The electronic clock/oven control will turn
the oven on and off at times you set, even
when you are not around.
Delayed time cooking is ideal for foods
which do not require a preheated oven, such
as meats and casseroles. Do not use
delayed time cooking for cakes, cookies,
etc. – they will not rise properly. Before
using timed cooking, make sure the
clock is set to the correct time of day.
(See “Setting the clock” on page 14.)
wWARNING
Food Poisoning Hazard
Do not let food sit in oven more than
one hour before or after cooking.
Doing so can result in death, food
poisoning, or sickness.
NOTE: These examples are for double
upper ovens only. Other ovens may look
slightly different.
To start now and stop automatically:
1. Prepare oven.
Position the oven rack(s) properly and
place the food in the oven. For correct
rack placement, see “Baking or convection baking” on page 16 and “Rack
placement” chart on page 20.
2. Choose setting.
• BAKE,
• CONVECTION BAKE, or
• CONVECTION ROAST
NOTE: On double ovens, the cavity
symbol flashes to tell you which oven
you are setting.
PRESS YOU SEE
to select
oven (for
double
ovens)
PRESS
CONVECTION
ROAST
(example for Convection Roast)
O
F
36
Page 37

U sing Your Oven
3. Set temperature (optional).
Do this step if you want to set a temperature other than the one displayed.
NOTE: See a reliable cookbook or your
convection oven cookbook for temperature recommendations.
4. Press Cook Time pad.
5. Set cook time.
PRESS YOU SEE
3
2
(example shows 325°F
5
temperature setting in
Convection Roast)
PRESS YOU SEE
NIGHT LIGHT
COOK
TIME
ON
(start time display will light up,
showing time of day)
PRESS YOU SEE
NIGHT LIGHT
2
ON
0
(example shows 2-hour cook
time with stop time now 2 hours
later than time of day)
0
O
F
ON
DELAY
PROBE TEMP TIME
SET
O
RAISING
F
BREAD
DEHYDRATE
CONVECTION
STANDARDENTER
COOK
COOK TEMP CLEAN TIME
DELAY
PROBE TEMP TIME
SET
O
RAISING
F
BREAD
DEHYDRATE
CONVECTION
STANDARDENTER
COOK
COOK TEMP CLEAN TIME
START
AT
TIME
TIME
LOCK
CONTROL
START
?LOCKED
START
STOP
TIME
AT
LOCK
CONTROL
START
?LOCKED
6. Start oven.
Vertical bar on display will get shorter as
cook time counts down.
7. When baking/roasting is done:
“End” will show on the display. Four
tones will sound, followed by 4 reminder
tones (unless they have been disabled),
every minute until you open the door, or
press the Cancel/Off pad.
PRESS YOU SEE
NIGHT LIGHT
START
ON
(cook time is displayed)
YOU SEE
(double oven display)
DELAY
PROBE TEMP
SET
RAISING
BREAD
DEHYDRATE
CONVECTION
COOK
STANDARDENTER
COOK TEMP CLEAN TIME
COOK TIME
START
TIME
STOP
TIME
AT
TIME
CONTROL
LOCK
START
?LOCKED
37
Page 38

U sing Your Oven
ON
O
F
To delay start and stop automatically:
1. Prepare oven.
Position the oven rack(s) properly and
place the food in the oven. For correct
rack placement, see “Baking or convection baking” on page 16 and “Rack
placement” chart on page 20.
2. Choose setting.
• BAKE,
• CONVECTION BAKE, or
• CONVECTION ROAST
NOTE: On double ovens, the cavity
symbol flashes to tell you which oven
you are setting.
3. Set temperature (optional).
Do this step if you want to set a temperature other than the one displayed.
NOTE: See a reliable cookbook or your
convection oven cookbook for temperature recommendations.
4. Press Cook Time pad.
PRESS YOU SEE
to select oven
(for double
ovens)
(example for Convection Roast)
PRESS
CONVECTION
ROAST
PRESS YOU SEE
3
2
(example shows 325°F
5
PRESS YOU SEE
COOK
TIME
temperature setting in
Convection Roast)
NIGHT LIGHT
ON
(start time display will light up,
showing time of day)
DELAY
PROBE TEMP
SET
O
RAISING
F
BREAD
DEHYDRATE
CONVECTION
STANDARDENTER
COOK
COOK TEMP CLEAN TIME
O
F
START
TIME
AT
TIME
CONTROL
LOCK
START
?LOCKED
38
Page 39

U sing Your Oven
STOP
TIME
START
5. Set cook time.
6. Press Stop Time pad.
7. Set stop time.
PRESS YOU SEE
NIGHT LIGHT
2
ON
0
(example shows 2-hour cook
time with stop time now 2 hours
later than time of day)
0
PRESS YOU SEE
NIGHT LIGHT
ON
PRESS YOU SEE
NIGHT LIGHT
3
ON
0
0
(stop time display shows 3:00
and start time display shows
1:00 – stop time minus 2-hour
cook time)
DELAY
PROBE TEMP
SET
O
RAISING
F
BREAD
DEHYDRATE
CONVECTION
STANDARDENTER
COOK
COOK TEMP CLEAN TIME
DELAY
PROBE TEMP
SET
O
RAISING
F
BREAD
DEHYDRATE
CONVECTION
STANDARDENTER
COOK
COOK TEMP CLEAN TIME
DELAY
PROBE TEMP
SET
O
RAISING
F
BREAD
DEHYDRATE
CONVECTION
STANDARDENTER
COOK
COOK TEMP CLEAN TIME
START
TIME
STOP
TIME
AT
TIME
TIME
TIME
AT
AT
CONTROL
CONTROL
CONTROL
LOCK
START
LOCK
START
LOCK
START
START
TIME
STOP
TIME
START
TIME
STOP
TIME
?LOCKED
?LOCKED
?LOCKED
8. Press Start pad.
When start time is reached:
Vertical bar on display will get shorter as
cook time counts down.
PRESS YOU SEE
NIGHT LIGHT
ON
YOU SEE
NIGHT LIGHT
ON
continued on next page
DELAY
PROBE TEMP
SET
O
RAISING
F
BREAD
DEHYDRATE
CONVECTION
STANDARDENTER
COOK TEMP CLEAN TIME
PROBE TEMP
SET
O
RAISING
F
BREAD
DEHYDRATE
CONVECTION
STANDARDENTER
COOK
COOK TEMP CLEAN TIME
START
TIME
STOP
TIME
AT
LOCK
CONTROL
START
?LOCKED
START
TIME
STOP
TIME
AT
TIME
CONTROL
LOCK
START
?LOCKED
39
Page 40

Using Your Oven
9. When baking/roasting is done:
“End” will show on the display. Four
tones will sound, followed by 4 reminder
tones (unless they have been disabled),
every minute until you open the door, or
press the Cancel/Off pad.
To cancel timed cooking settings:
Press Cancel/Off pad.
YOU SEE
(double oven display)
PRESS YOU SEE
CANCEL
OFF
(single ovens)
OR
(double ovens)
(display will go blank)
COOK TIME
40
Page 41

U sing Your Oven
ON
NIGHT LIGHT
O
F
DEHYDRATE
COOK TEMP
ENTER
Dehydrating
(upper oven/single oven/both ovens on Models KEBS208D
and KEBS278D)
You can use your THERMAL-CONVECTION*
oven to dehydrate fruits and vegetables.
NOTE: These examples are for double
upper ovens only. Other ovens may look
slightly different.
NOTE: If you do not turn off oven after
dehydrating, the oven will keep running
until you press CANCEL/OFF.
1. Prepare food.
Prepare foods as recommended
in recipe.
2. Arrange food on drying racks.
Racks are not included with oven.
Contact a local store handling specialty
cooking utensils.
3. Close door.
NOTE: Do not try to dehydrate with the
door open. The fan and elements will not
operate.
4. Press and hold Convection
Bake pad for 5 seconds.
NOTE: On double ovens, the cavity
symbol flashes to tell you which oven
you are setting.
PRESS YOU SEE
to select oven
(for double ovens)
(or 60°C)
PRESS
CONVECTION
BAKE
Hold for
5 seconds
continued on next page
41
Page 42

Using Your Oven
5. Set temperature (optional).
Do this step if you want to set a
temperature (from 100°F to 200°F)
other than 140°F.
6. Start oven.
NOTE: If you want to change the dehy-
drating temperature after dehydrating has
begun, repeat Steps 4, 5, and 6.
7. When dehydrating is done,
turn off oven.
PRESS YOU SEE
1
2
(example shows
5
PRESS YOU SEE
START
PRESS YOU SEE
CANCEL
OFF
(single ovens)
OR
125°F dehydrating
temperature)
(display shows
“Lo” until oven
reaches 100°F)
(display will go blank)
NIGHT LIGHT
ON
NIGHT LIGHT
ON
O
F
DEHYDRATE
ENTER
COOK TEMP
DEHYDRATE
ENTER
COOK TEMP
(double ovens)
Raising (proofing) bread
(upper oven/single oven/both ovens on Models KEBS208D
and KEBS278D)
You can use your THERMAL-CONVECTION*
oven to proof bread. For more information
see your convection oven cookbook, provided with your oven.
NOTE: These examples are for double
upper ovens only. Other ovens may look
slightly different.
42
NOTE: If you do not turn off oven after
proofing bread, the oven will keep running
until you press Cancel/Off pad.
Page 43

1. Put dough in oven.
NOTE: Be sure to close the door.
U sing Your Oven
2. Press and hold Baked Goods
pad for 5 seconds.
NOTE: On double ovens, the cavity
symbol flashes to tell you which oven
you are setting.
3. Start oven.
One long tone will sound when oven is
preheated.
4. When proofing is done, turn
off oven.
PRESS YOU SEE
NIGHT LIGHT
ON
to select oven (for
(or 38˚C)
double ovens)
PRESS
BAKED
GOODS
Hold for 5 seconds
PRESS YOU SEE
NIGHT LIGHT
START
ON
(display shows “Lo”
until oven reaches
100°F)
PRESS YOU SEE
CANCEL
(display will go blank)
OFF
O
F
DEHYDRATE
ENTER
ENTER
RAISING
BREAD
RAISING
BREAD
DELAY
DELAY
SET
SET
The oven vent(s)
Hot air and moisture escape from the
oven(s) through vent(s). The vent for the
oven is above the oven door. This vent is
needed for air circulation. Do not block the
vent(s). Poor baking/roasting can result.
(single ovens)
OR
(double ovens)
ON
EASYCONVECT
Oven vent
DELAY
SETSETPROBEPROBE TEMPTEMP
RAISING
F
BREAD
DEHYDRATE
STANDARDENTER
COOKTEMP CLEANTIME
DELAY
START
TIME
STOP
F
CHECK
TIME
FOODAT
CONVECTION
LOCK
CONTROL
CLOSE
COOK
TIME
ON
START
LOCKED
DOOR
?
EASYCONVECT
HRMIN MIN SEC
CLOSE
DOOR
LOCKED
43
Page 44

C
aring for Your Oven
Cleaning your oven and controls
Make sure all controls are off and the oven is cool before cleaning. Your oven is designed for
easy care. You can do most cleaning with items found around your home. Cleaning your
oven whenever spills or soiling occurs will help to keep it looking and operating like new.
Do not use commercial oven cleaners in your oven.
PART
Control panel
Exterior surfaces
(other than control
panel)
Broiler pan and
grid (clean after
each use)
Oven racks
Oven door glass
WHAT TO USE
Sponge and warm,
soapy water
OR
Paper towel and
spray glass cleaner
Sponge and warm,
soapy water
Steel-wool pad and
warm, soapy water
Steel-wool pad and
warm, soapy water
OR
The Self-Cleaning cycle
Paper towel and spray
glass cleaner
OR
Warm, soapy water and
a nonabrasive, plastic
scrubbing pad
HOW TO CLEAN
• Wash, wipe with clean water, and dry
thoroughly.
• Do not use steel wool or abrasive
cleansers. They may damage the finish.
• Do not spray cleaner directly on panel.
Apply cleaner to paper towel.
NOTE: Set the Control Lock to prevent the
oven from accidentally turning on when you
are cleaning the panel. (See “Using the
control lock” on page 9.)
• Wash, wipe with clean water, and dry
thoroughly.
• Use nonabrasive, plastic scrubbing pad on
heavily soiled areas.
• Do not use abrasive or harsh cleansers.
They may damage the finish.
• Wash, rinse, and dry thoroughly.
• Do not clean the pan and grid in the
Self-Cleaning cycle.
• Wash, rinse, and dry thoroughly.
OR
• Leave in oven during Self-Cleaning cycle.
NOTE: Racks will permanently discolor and
become harder to slide if left in oven during
the Self-Cleaning cycle. Apply a small
amount of vegetable oil to the side rungs
to aid sliding.
• Make sure oven is cool.
• Follow directions provided with the
cleaner.
• Wash, wipe with clean water, and dry
thoroughly.
Oven cavity
44
Self-Cleaning cycle
• See “Using the Self-Cleaning Cycle” on
pages 47-51.
Page 45

Removing the oven door
For normal use of your oven, you do not
need to remove the door. However, you can
remove the door by following the instructions
in this section.
The oven door is heavy. Use both hands
to remove and replace the door. Do not lift
and carry the door by the handle. To remove
and replace the door you may need help.
Caring for Your Oven
To remove:
1. Open door all the way.
NOTE: Two 5⁄32" Allen wrenches or two nails
of similar diameter may be used if factory
furnished door removal pins have been
misplaced. Be careful not to damage
porcelain finish.
Insert small end
of pin here
2. Insert small end of a door removal pin
into each door hinge.
To replace:
1. Fit hinge arms into slots in frame. Push in
at lower corners to insure that hinge arms
are fully engaged.
2. Open the door all the way.
3. Remove the door removal pins from
each hole.
4. Close the door.
3. Grasp under handle and gently close
door as far as it will shut. Pull door out
at bottom to remove.
4. Set door aside on protected surface.
NOTE: If the door does not operate freely,
you have not installed it properly. Repeat
Steps 1-4.
45
Page 46

Caring for Your Oven
Using and replacing the oven lights
The oven lights will come on when you open
the oven door. To turn the lights on when the
oven door is closed, press the Oven Light
OVEN
LIGHT
pad on the control panel. Press the
OVEN
pad again to turn off the lights.
LIGHT
Replacing the oven light:
1. Disconnect appliance at the main
power supply. Make sure the oven is cool
before replacing the light bulb.
2. Remove glass light cover by grasping the
front edge of the cover and pulling it away
from the side wall of the oven.
3. Remove the light bulb from its socket.
Replace the bulb with another halogen
bulb (12 volt, 5 watt maximum, available
at most hardware stores).
4. Replace the light cover by snapping it
back into wall. The light cover must be in
place when using the oven. The cover
protects the bulb from breaking and from
high oven temperatures.
5. Reconnect appliance at the main power
supply.
NOTE: On both single and double ovens,
the oven lights will not work during the SelfCleaning cycle.
46
Page 47

U
sing the Self-Cleaning
Cycle
The Self-Cleaning cycle saves you from the toil and mess that often come with handcleaning the oven interior. Like the other functions of your oven, you operate the
Self-Cleaning cycle with the easy-to-use electronic control. To use this cycle properly,
follow the step-by-step instructions in this section.
wWARNING
Burn Hazard
Do not touch the oven during the Self-Cleaning cycle.
Keep children away from oven during Self-Cleaning cycle.
Do not use commercial oven cleaners in your oven.
Failure to follow the above can result in burns, or illness from
inhaling dangerous fumes.
Before you start
• Remove the broiler pan and grid and
anything else being stored in the oven.
DO NOT
hand-clean
gasket
Hand-clean frame
Hand-clean door
around edge
Before you start the Self-Cleaning cycle,
make sure you:
• Hand-clean the areas shown. They do
not get hot enough during the Self-Cleaning cycle for soil to burn away. Use hot
water and detergent or a soapy, steel-wool
pad for cleaning.
NOTES:
• DO NOT clean, move, or bend the
gasket. Poor cleaning, baking, and
roasting may result.
• DO NOT let water, cleaner, etc., enter
slots on door and frame.
• Wipe out any loose soil or grease. This
will help reduce smoke during the SelfCleaning cycle.
• Remove the oven racks from the oven if
you want them to remain shiny. You can
clean the oven racks in the Self-Cleaning
cycle, but they will become harder to
slide. (See page 44.) If you clean racks in
the Self-Cleaning cycle, place them on
the 2nd and 4th rack guides. (Guides are
counted from bottom to top.)
• Heat and odors are normal during the
Self-Cleaning cycle. Keep the kitchen
well ventilated by opening a window or
by turning on a vent hood or other kitchen
vent during the cycle.
NOTES:
• Do not block the oven vent during the
Self-Cleaning cycle. Air must move freely
for best cleaning results.
• Do not leave any foil in oven during the
Self-Cleaning cycle. Foil could burn or
melt and damage the oven surface.
• The oven light will not work during the
Self-Cleaning cycle.
47
Page 48

Using the Self-Cleaning Cycle
Before setting the controls
• Make sure clock is set to
correct time of day. The clock
cannot be set during the SelfCleaning cycle.
Setting the controls
NOTE: These examples are for double
upper ovens only. Other ovens may look
slightly different.
To start cleaning immediately:
• Make sure the oven door is
completely closed.
1. Press Clean pad.
A 31⁄2-hour Self-Cleaning cycle will be
set. (The first 3 hours are for cleaning,
the last 30 minutes are for cooling.)
NOTE: On double ovens, the cavity
symbol flashes to tell you which oven you
are setting. The electronic control will
not let both ovens be active while one
oven is cleaning.
2. Set cleaning time (optional).
If you want a Self-Cleaning cycle other
than 31⁄2 hours, press the desired
Number pads for the new time from
21⁄2 to 41⁄2 hours.
• Use 21⁄2 hours for light soil.
• Use 31⁄2-41⁄2 hours for moderate
to heavy soil.
PRESS YOU SEE
NIGHT LIGHT
ON
to select
oven (for
double
(stop time display shows time
1
⁄2 hours later than time of day –
3
shown in start time display)
ovens)
PRESS
CLEAN
PRESS YOU SEE
NIGHT LIGHT
4
ON
0
(example shows 4-hour cleaning
cycle with stop time now 4 hours
later than time of day)
0
DELAY
PROBE TEMP
SET
RAISING
BREAD
DEHYDRATE
STANDARDENTER
COOK TEMP CLEAN TIME
DELAY
PROBE TEMP
SET
RAISING
BREAD
DEHYDRATE
STANDARDENTER
COOK TEMP CLEAN TIME
START
TIME
STOP
TIME
AT
LOCK
CONTROL
START
AT
CONTROL
START
?LOCKED
START
TIME
STOP
TIME
LOCK
?LOCKED
DOOR
DOOR
48
Page 49

U sing the Self-Cleaning Cycle
3. Start oven.
NOTE: The door will lock right after you
press START.
4. After the Self-Cleaning
cycle ends:
To delay cleaning start time:
1. Press Clean pad.
A 31⁄2-hour Self-Cleaning cycle will be
set. (The first 3 hours are for cleaning,
the last 30 minutes are for cooling.)
NOTE: On double ovens, the cavity
symbol flashes to tell you which oven you
are setting. The electronic control will not
let both ovens be active while one oven
is cleaning.
PRESS YOU SEE
NIGHT LIGHT
START
ON
YOU SEE
(double oven display)
PRESS YOU SEE
NIGHT LIGHT
ON
to select
oven (for
double
(stop time display shows time
1
⁄2 hours later than time of day –
3
shown in start time display)
ovens)
PRESS
DELAY
PROBE TEMP
SET
RAISING
BREAD
DEHYDRATE
STANDARDENTER
COOK TEMP CLEAN TIME
CLEAN
DELAY
PROBE TEMP
SET
RAISING
BREAD
DEHYDRATE
STANDARDENTER
COOK TEMP CLEAN TIME
START
TIME
STOP
TIME
AT
LOCK
CONTROL
START
CONTROL
LOCK
START
START
TIME
STOP
TIME
?LOCKED
?LOCKED
DOOR
AT
DOOR
2. Set cleaning time (optional).
If you want a Self-Cleaning cycle
other than 31⁄2 hours, press the
desired Number pads for the new
time from 21⁄2 to 41⁄2 hours.
• Use 21⁄2 hours for light soil.
• Use 31⁄2-41⁄2 hours for moderate
to heavy soil.
3. Press Stop Time pad.
CLEAN
PRESS YOU SEE
NIGHT LIGHT
4
ON
0
(example shows 4-hour cleaning
cycle with stop time now 4 hours
later than time of day)
0
PRESS YOU SEE
NIGHT LIGHT
STOP
TIME
ON
continued on next page
DELAY
PROBE TEMP
SET
RAISING
BREAD
DEHYDRATE
STANDARDENTER
COOK TEMP CLEAN TIME
DELAY
PROBE TEMP
SET
RAISING
BREAD
DEHYDRATE
STANDARDENTER
COOK TEMP CLEAN TIME
START
TIME
STOP
TIME
AT
LOCK
CONTROL
START
DOOR
DOOR
?LOCKED
START
TIME
STOP
TIME
AT
LOCK
CONTROL
START
?LOCKED
49
Page 50

U sing the Self-Cleaning Cycle
4. Set stop time.
Example for 7:00:
5. Complete entry.
NOTES:
• The door will lock right after you press
START.
• Lights will stay on until start time is
reached.
When the start time is reached:
6. After the Self-Cleaning
cycle ends:
PRESS YOU SEE
NIGHT LIGHT
7
ON
0
(display shows stop time of
7:00 and start time of 3:00 –
stop time minus cleaning time)
0
PRESS YOU SEE
NIGHT LIGHT
START
YOU SEE
YOU SEE
ON
NIGHT LIGHT
ON
DELAY
PROBE TEMP
SET
RAISING
BREAD
DEHYDRATE
STANDARDENTER
COOK TEMP CLEAN TIME
DELAY
PROBE TEMP
SET
RAISING
BREAD
DEHYDRATE
STANDARDENTER
COOK TEMP CLEAN TIME
PROBE TEMP
SET
RAISING
BREAD
DEHYDRATE
STANDARDENTER
COOK TEMP CLEAN TIME
START
TIME
STOP
TIME
AT
LOCK
CONTROL
START
DOOR
DOOR
DOOR
?LOCKED
START
TIME
STOP
TIME
AT
LOCK
CONTROL
START
?LOCKED
START
TIME
STOP
TIME
AT
LOCK
CONTROL
START
?LOCKED
To stop the Self-Cleaning cycle at
any time:
50
(double oven display)
PRESS YOU SEE
CANCEL
OFF
(single ovens)
OR
(double ovens)
(double oven display)
(“cln”, “cooling”, and “DOOR
LOCKED” will appear if oven
has not cooled down and you
try to program another
cooking function)
CLEAN
CLEAN
Page 51

Using the Self-Cleaning Cycle
For best cleaning results
• After the oven is cool, wipe up any resi-
due or ash with a damp cloth or sponge.
If any spots remain, clean with a mild
abrasive cleanser or cleaning sponge.
• Clean the oven before it gets heavily
soiled. Cleaning a very soiled oven takes
longer and results in more smoke than usual.
How the cycle works
The Self-Cleaning cycle uses very high heat
to burn away soil and grease. During the
cycle, the oven gets much hotter than it does
for normal baking or broiling. This high heat
breaks up the soil or grease and burns
it away.
Your oven is preset for a 31⁄2-hour SelfCleaning cycle. However, you can adjust the
cycle time to the amount of soil in your oven.
You can set the cycle anywhere between 21⁄2
and 41⁄2 hours. (See “Setting the controls” on
page 48.)
The graph at the right is representative of
a normal, 31⁄2-hour Self-Cleaning cycle. Note
that the heating stops after 3 hours, but
it takes longer for the oven to cool enough
to unlock.
• If the Self-Cleaning cycle does not get
the oven as clean as you expected, the
cycle may not have been set long enough
or you may not have prepared the oven
properly. Set the Self-Cleaning cycle
longer the next time and hand-clean
areas noted on page 47.
CLEANING CYCLE
OVEN SHUTS OFF
( normal broiling temperature )
DOOR UNLOCKS
Temperature
DOOR LOCKS
START 1 2 3 STOP
Time In Hours
( fan stays on )
51
Page 52

T
If nothing operates, check the following:
roubleshooting
Most cooking problems often are caused by little things you can find and fix without
tools of any kind. Check the lists below and on the next page before calling for
assistance or service. If you still need help, see “Requesting Assistance or Service”
on pages 54 and 55.
Is the oven wired into a live circuit with the proper voltage?
(See Installation Instructions.)
▼
Have you blown a household fuse or tripped a circuit breaker?
Other possible problems and their causes:
PROBLEM
The oven will not
operate
The Self-Cleaning
cycle will not
operate
Display is blank
CAUSE
• You have not set the electronic control correctly. Refer to
the section in this manual describing the function you are
operating.
• You have programmed a delayed start time. Wait for the
start time to be reached or cancel and reset the controls.
• You have programmed a delayed start time. Wait for the
start time to be reached or cancel and reset the controls.
• You have programmed another function in the other oven on
a double oven. Cancel and reprogram oven.
• You have set the display not to show the clock time. To see
the clock time again, press and hold the Clock Set/Start pad
for 5 seconds.
52
Page 53

Troubleshooting
PROBLEM
Cooking results are not
what you expected
The display is
showing “PF”
A letter followed by a
number shows on the
display (for example
“E3”, “F1”)
The key pads do not
operate
CAUSE
• The oven is not level. (See Installation Instructions.)
• The oven temperature seems too low or too high. See
“Adjusting oven temperature” on page 22 to adjust oven
temperature.
• You did not preheat the oven before baking (if called for
in recipe).
• The recipe you are using may need to be altered to
improve the taste or appearance of the food.
• You are using a pan that is not the correct type or size.
Refer to a reliable cookbook or recipe for recommended
pan type and size.
• There is not enough air space around pan when baking.
Allow 11⁄2 to 2 inches (4-5 cm) of air space on all sides of
pan. There must be a minimum space of 1 inch.
• There has been a power failure. Reset the clock.
(See page 14.)
• Press Cancel/Off pad. If the code reappears, note the
code and call for service. (See Step 2 on pages 54 and 55.)
• The Control Lock has been set. (See “Using the control
lock” on page 9.) Turn off the Control Lock by pressing
and holding the Control Lock pad (Number Pad 3) for
5 seconds.
• The Sabbath mode has been set (“Sab” appears on the
display). Turn off the Sabbath mode by pressing and
holding Number Pad 6 for 5 seconds.
If none of these items was causing your problem, see “Requesting Assistance or Service”
on pages 54 and 55.
53
Page 54

R
equesting Assistance
or Service in the U.S.A.
1. If the problem is not due to one
of the items listed in “Troubleshooting” on pages 52-53†:
• Call KitchenAid Consumer Assistance
Center:
1-800-422-1230
One of our trained consultants
can instruct you in how to
obtain satisfactory operation from your
appliance or, if service is necessary,
recommend a qualified service company
in your area.
• If you prefer, write to:
KitchenAid Brand Home Appliances
Consumer Assistance Center
c
⁄o Correspondence Dept.
2000 North M-63
Benton Harbor, MI 49022-2692
Please include a daytime phone number in
your correspondence.
2. If you need service†:
• Call your dealer or the repair service he
recommends.
• All service should be handled
locally by the dealer from whom
you purchased the unit or an
authorized KitchenAid
• If you are unable to obtain the name of a
local authorized KitchenAid servicer, call
our Consumer Assistance Center telephone
number (see Step 1).
servicer.
3. If you are not satisfied with the
action taken:
• Contact the Major Appliance Consumer
Action Program (MACAP). MACAP is a
group of independent consumer experts
that voices consumer views at the highest
levels of the major appliance industry.
• Contact MACAP only when the dealer,
authorized servicer, and KitchenAid have
failed to resolve your problem.
Major Appliance Consumer Action Program
20 North Wacker Drive
Chicago, IL 60606
• MACAP will in turn inform us of your action.
†
When asking for help or service:
Please provide a detailed description of
the problem (including any information
that appears on the electronic control
display), your appliance’s complete
model and serial numbers, and the
purchase date. (See page 3.) This
information will help us respond properly
to your request.
Don’t forget, KitchenAid offers a full line of quality home appliances.
Built-In Refrigerators Trash Compactors Ranges & Cooktops
Freestanding Refrigerators Hot Water Dispensers Microwave Ovens
50-Pound Ice Makers Food Waste Disposers Washers & Dryers
Dishwashers Built-In Ovens Mixers & Blenders
For more information on these appliances, or the one you have purchased, call our toll-
free Consumer Assistance Center telephone number, 1-800-422-1230 (in U.S.A.) or
contact your authorized Inglis Limited** Appliance Service company (in Canada).
54
Page 55

R
equesting Assistance or
Service in Canada
Before calling for assistance or service, please check “Troubleshooting” on pages 52
and 53. If you still need help, follow the instructions below. When calling, please know
the purchase date and the complete model and serial number of your appliance (see
page 3). This information will help us to better respond to your request.
1. For Assistance:
Call the Consumer Assistance Centre
1-800-461-5681
• Use and maintenance
procedures
• Referrals to local dealers
• Specifications on all our
appliances
Authorized Service Centres
For service of Inglis, Whirlpool, KitchenAid, Roper, Estate,
& Admiral Appliances
Direct Service Branches:
BRITISH COLUMBIA
ALBERTA
ONTARIO
MANITOBA
QUEBEC
NOVA SCOTIA
SASKATCHEWAN
For service in areas other than those listed, contact the Consumer Service Centre,
your local appliance dealer, or consult your telephone directory yellow pages.
Vancouver
Victoria
Edmonton
Calgary
Toronto
(Mississauga)
Toronto
(Markham)
Ottawa
Winnipeg
Montreal
(Laval)
Brossard
Quebec City
Sherbrooke
(Rock Forest)
Dartmouth
Regina
Saskatoon
2. For Service:
Call the Consumer Service Centre
1-800-807-6777
• Maintenance and repair
service
• Accessory and repair part
sales
Inglis Home Appliance Service
3627 E. 4th Avenue
Inglis Home Appliance Service
Inglis Home Appliance Service
11653 163rd Street
Inglis Home Appliance Service
Inglis Home Appliance Service
5945 Ambler Drive
Inglis Home Appliance Service
110 Torbay Road, Unit 1
Inglis Home Appliance Service
28 Capital Drive
Inglis Home Appliance Service
1683 Church Avenue
Inglis Home Appliance Service
2750 Francis-Hughes
Inglis Home Appliance Service
9605 Ignace Street, Unit F
Inglis Home Appliance Service
5275 Wilfrid-Hamel Blvd., Suite 140
Inglis Home Appliance Service
3475 Industriel Blvd.
Inglis Home Appliance Service
900 Windmill Road, Unit 109
Inglis Home Appliance Service
Inglis Home Appliance Service
604-291-6426
1-800-665-6788
1-800-665-6788
403-453-3900
1-800-661-6291
403-253-9267
905-821-3900
1-800-807-6777
905-475-9511
1-800-807-6777
613-225-0510
1-800-267-3456
204-694-5308
1-800-665-1683
514-382-8110
1-800-361-3032
514-397-1840
1-800-361-0950
418-871-5251
1-800-463-1523
819-564-6565
1-800-567-6966
902-468-6634
1-800-565-1598
1-800-665-1683
1-800-665-1683
55
Page 56

ndex
I
This index is alphabetical. It contains all the topics included in this manual, along with
the page(s) on which you can find each topic.
TOPIC PAGE
ASSISTANCE ................................... 54, 55
BAKING
Aluminum foil ........................................ 20
Pans...................................................... 20
Setting cycle ......................................... 17
Tips ....................................................... 20
BROILING
Grid ....................................................... 32
Pan ....................................................... 32
Setting cycle ......................................... 32
Tips ....................................................... 35
CLEANING
Broiler pan and grid .............................. 44
Control panel......................................... 44
Exterior surfaces................................... 44
Oven cavity ........................................... 44
Oven door glass.................................... 44
Oven racks............................................ 44
Removing oven door............................. 45
Self-cleaning cycle ................................ 47
CONTROL PANEL
Canceling................................................ 8
Celsius cooking....................................... 7
Celsius/Fahrenheit conversion................ 7
Changing audible signals........................ 8
Clock..................................................... 14
Command pads....................................... 7
Control lock ............................................. 9
Disabling clock display.......................... 14
Display .................................................... 7
Finding out oven in use........................... 8
Number pads .......................................... 7
Sabbath feature (double oven) ............. 10
Sabbath feature (single oven)................. 9
Selecting an oven ................................... 8
Settings............................................ 12-13
Signals .................................................... 8
Starting.................................................... 8
Start? ...................................................... 8
Timer..................................................... 15
Tones ...................................................... 8
TOPIC PAGE
CONVECT FULL MEAL .......................... 26
CONVECTION BAKING
Pans...................................................... 20
Setting................................................... 17
Tips ....................................................... 21
CONVECTION BROILING ...................... 34
DEHYDRATING ...................................... 41
EASY CONVECT* Conversion ............... 29
FEATURES ............................................... 6
LIGHT ...................................................... 46
LOCK
Control .................................................... 9
Self-cleaning cycle .......................... 49, 50
MODEL AND SERIAL NUMBER .............. 3
OVEN DOOR ........................................... 45
OVEN TEMPERATURE
Adjusting ............................................... 22
Setting... 17, 19, 24, 29, 33, 34, 37, 38, 42
OVEN VENT(S)........................................ 43
PARTS ...................................................... 6
RACKS
Convection roasting rack ...................... 21
Placement ............................................. 20
Positions ............................................... 16
RAISING BREAD .................................... 42
ROASTING
Rack...................................................... 21
Setting cycle ......................................... 19
Tips ....................................................... 21
SAFETY ................................................. 4-5
58
Page 57

TOPIC PAGE
SELF-CLEANING
Delay cleaning ...................................... 49
How cycle works ................................... 51
Preparing oven ..................................... 47
Setting controls ................................ 48-50
Starting immediately ............................. 48
Stopping cycle....................................... 50
Tips ....................................................... 51
SERVICE .......................................... 54, 55
TEMPERATURE PROBE
Cleaning................................................ 26
Connecting to oven ............................... 24
Inserting in food .................................... 23
Setting cycle ......................................... 24
TIMED COOKING
Canceling.............................................. 40
Cook time........................................ 37, 38
Stop time............................................... 39
TROUBLESHOOTING ............................ 52
WARRANTY............................................. 60
I
ndex
59
Page 58

Electric Built-In Oven
Warranty
LENGTH OF
WARRANTY:
ONE-YEAR FULL
WARRANTY
FROM DATE OF
PURCHASE
SECONDTHROUGH FIFTHYEAR LIMITED
WARRANTY
FROM DATE OF
PURCHASE
SECONDTHROUGH
TENTH-YEAR
LIMITED
WARRANTY
FROM DATE OF
PURCHASE
KITCHENAID
WILL PAY FOR:
Replacement parts
and repair labor costs
to correct defects in
materials or workmanship. Service must be
provided by an authorized KitchenAid
servicing outlet.
Replacement parts
for any electric
element to correct
defects in materials
or workmanship.
Replacement parts for
solid state touch control
system to correct
defects in materials or
workmanship.
Replacement parts for
the porcelain oven
cavity/inner door if the
part rusts through due
to defects in materials
or workmanship.
KITCHENAID
WILL NOT PAY FOR:
A. Service calls to:
1. Correct the installation of the oven.
2. Instruct you how to use the oven.
3. Replace house fuses or correct
house wiring.
B. Repairs when oven is used in other
than normal home use.
C. Damage resulting from accident,
alteration, misuse, abuse, improper
installation, or installation not in
accordance with local electrical
codes.
D. Any labor costs during the limited
warranties.
E. Replacement parts or repair labor
costs for units operated outside the
United States and Canada.
F. Pickup and delivery. This product
is designed to be repaired in the
home.
G.Repairs to parts or systems caused
by unauthorized modifications made
to the appliance.
3/96
KITCHENAID DOES NOT ASSUME ANY RESPONSIBILITY FOR INCIDENTAL OR CONSEQUENTIAL DAMAGES. Some states or provinces do not allow the exclusion or limitation
of incidental or consequential damages, so this exclusion or limitation may not apply to you.
This warranty gives you specific legal rights and you may also have other rights which may
vary from state to state or province to province.
Outside the United States and Canada, a different warranty may apply. For details,
please contact your authorized KitchenAid dealer.
If you need service, first see the “Troubleshooting” section of this book. After checking
“Troubleshooting,” additional help can be found by checking the “Requesting Assistance or
Service” sections or by calling our Consumer Assistance Center telephone number,
1-800-422-1230, from anywhere in the U.S.A. In Canada, call KitchenAid Canada at one of
the telephone numbers listed on page 3.
KitchenAid
Benton Harbor, Michigan, U.S.A. 49022-2692
4450571 Rev. A
KitchenAid Canada, Licensee in Canada/
Registered Trademark/Trademark of KitchenAid, U.S.A.;
*
Registered Trademark of Inglis Limited.
**
Printed in U.S.A.© 1996 KitchenAid
5 /96
 Loading...