

Page 1
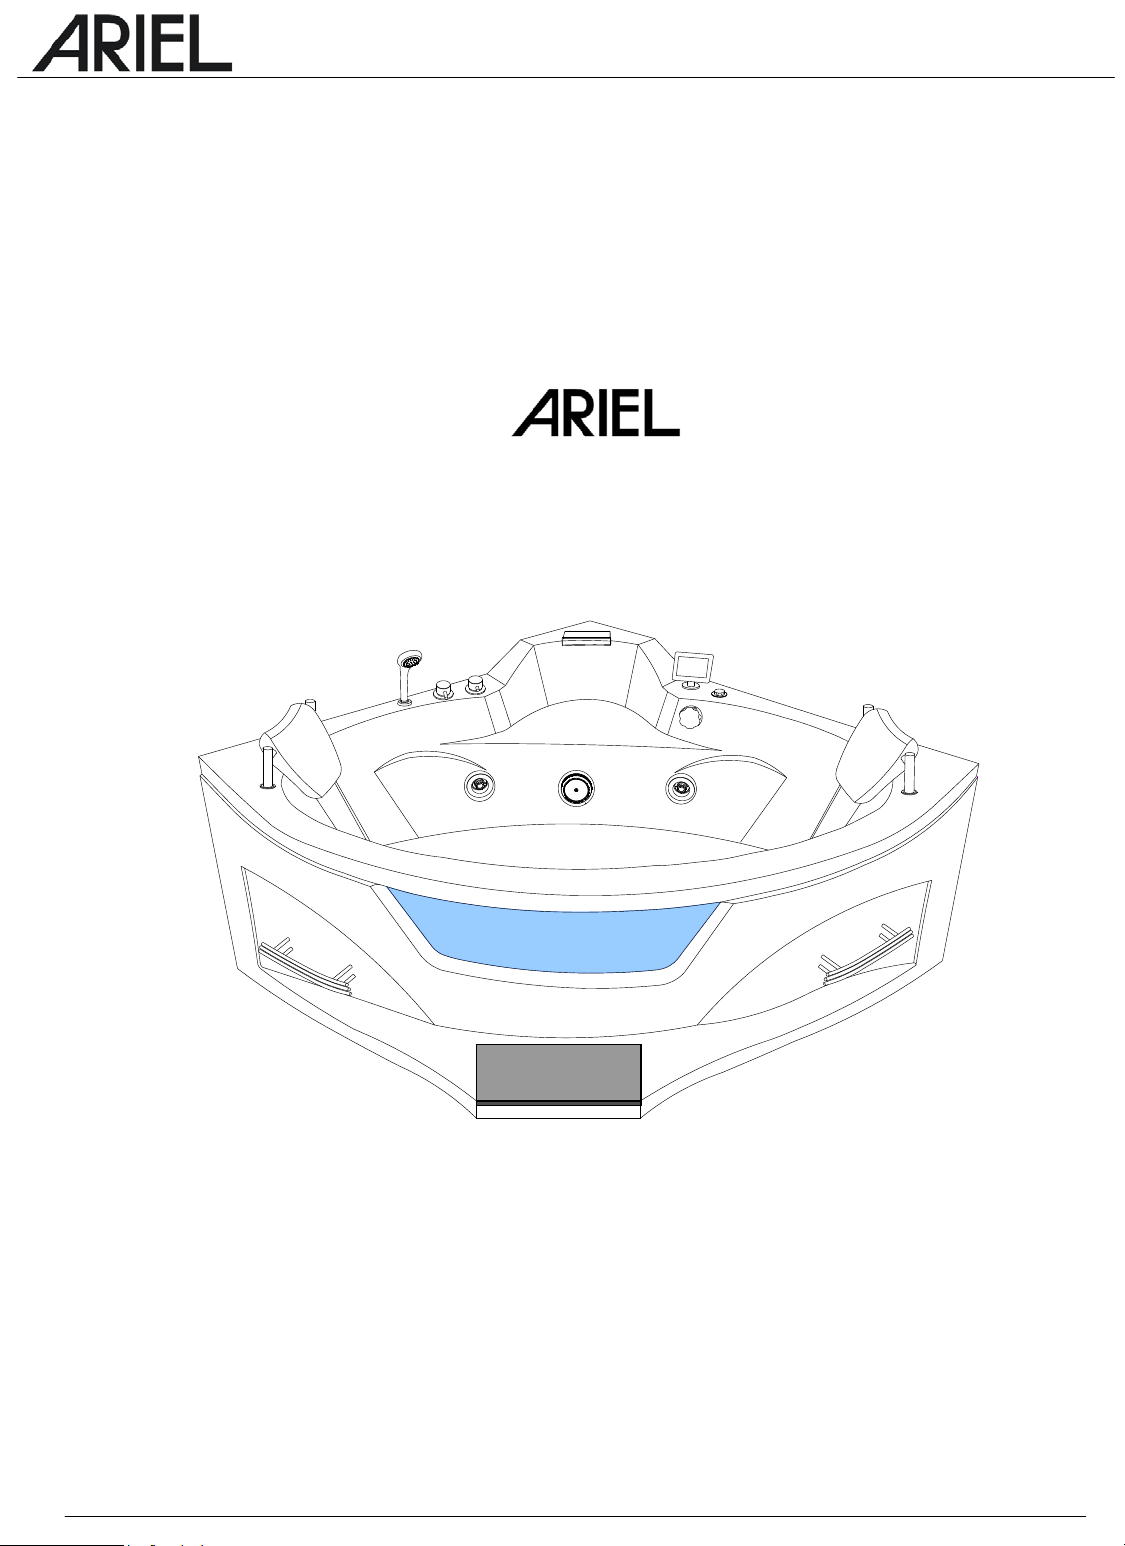
Whirlpool
User Manual
HW 123
Serial Number:
Page 2

D-Series Whirlpool User Manual with Bluetooth
Foreword:
This manual is for use with all BT-series Whirlpool Bathtubs. This user manual describes general safety procedures, operating instructions, and
basic maintenance. Please take your time to read this manual in its entirety before installation and before using this product.
manual for future reference.
Important Note to Installer/Customer:
Please check the labeling on each package to ensure it matches the item description you have ordered. Also visually inspect each package upon
delivery to ensure there are no damages. Upon delivery, if there are any damages to the packaging, it is required to immediately and thoroughly
inspect the contents of that package. All damages must be noted on delivery receipt before accepting and signing for any shipment. Any damages
should be photographed and must be reported directly to your place of purchase.
Precautions:
1. Do not allow children use the whirlpool without the supervision of an adult. This appliance is not intended for use by any persons (including
2. Exposure to extreme temperatures could potentially cause pregnancy complications. Consult your doctor before use.
3. Avoid the use of drowsy medication, alcohol or drugs with the use of this product; such usage may lead to possible unconscio
4. Persons using any medication should consult a doctor before using this product, as some medications can cause drowsiness, affect heart
5
. Persons with a medical history of heart problems, blood circulation, high or low blood pressure, obesity, diabetes or simila
6. Excessive use of this product can lead to heatstroke. Heatstroke occurs when the body loses its ability to regulate a normal temperature
Please save this
children) with reduced physical, sensory or mental capabilities, or lack of experience and knowledge, unless they have been given
supervision or adequate instruction concerning use of this appliance by a person responsible for their safety, and at their dis
ware of the possibility that children can drown and always have supervisi
Be a
ware of the possibility that long hair can be sucked into the water suction port. This could lead to injuries.
Be a
stroke, drowning or increased risk of fatality.
rate, blood pressure or blood circulation.
should consult your doctor b
range. Elevated body temperatures can cause such symptoms as dizziness, drowsiness, unconsciousness and heatstroke. Heatstroke can
cause you to 1
the ability
) lose awareness to possible dangers, 2) no longer feel heat/warmth, 3) not perceive a need to stop using this product, 4)
to stand, balance, walk or exit this product, 5) if pregnant, fetal damage, 6) unconsciousness that may lead to drown
using this product.
efore
on.
cretion.
usness, heat
r health concerns
lose
ing.
7
. An electrical protective device for an overload of power, short-circuit or incorrect voltage must be used in conjunction with this product, and
functioning.
properly
8
. Do not use any other electrical devices in or near this product. Very low voltage items may be considered. Consult your lice
. If any wires, cords or plumbing are damaged, it must be repaired by a qualified professional to avoid
9
10. Measurements, specifications, and local building codes should be reviewed by a licensed professional before purchase.
General:
Warnings!
Never lift the whirlpool tub by, or apply heavy pressure to, the critical parts such as the jet plumbing, jets, electrical
cables, hoses, and drain hose or similar components.
It is recommended to install this product in such a way that the critical components are easily accessible. This will
ensure any potential repair cost will be kept at a minimum.
risk.
nsed electrician.
Page 2 / 9
Page 3

D-Series Whirlpool User Manual with Bluetooth
Before Installation:
1. Ensure electrical connections, water supply lines and waste connections are both compatible with this product and their installation
completed the be
components the
contact
your place of purchase. The (optional) drain hose size is 40mm (1.5-inches); the water inlet connections with (optional
hoses are ½-inch
2
. Before connecting the water supply lines, briefly flush the water lines to free any loose particles that may have built up t
the years, or may have fallen in during new construction.
3. Ensure the water supply lines for this product has its own dedicated water shutoff valves installed in an accessible location.
. Ensure there is enough space to connect, adjust or fasten the various supply lines, waste line and other components.
4
5. After extracting the product and parts from the packaging, check that all parts are complete and that there are no visible errors
missing parts, or damages. Any damages are required to be reported within 72-hours of delivery.
6. Bathtubs are already leak tested from the factory, but should always be leak
7
. Computerized systems and electrical components are already function tested from the factory, but should always be tested aga
before installation.
fore installation of this product. Reference the technical specifications listed on the product and the individ
mselves, also review the specifications within the documentation supplied. If there are any further q
National Pipe Thread (NPT/FIP/M
IP).
tested again after shipping.
uestions
ual
)
hroughout
,
in
ews, wi
res, etc.
h analysis of any specia
allation and testing.
l circumstances.
and used in
or its distributors.
in accordance to local
Installation Instructions:
1. Be sure to check each installation step with this manual to ensure the product is installed correctly. The product must be
installed with all the feet or supportive legs touching the floor before any use. Leveling the product is an important procedure
and must be completed on-site, on the final installation surface and position.
. Only a professional electrician is recommended to work on the electrical portions of inst
2
3. Electrical service must meet the requirements listed on the components of the product, listed within this manual, or otherwise
advised based on a thoroug
. An electrical protection device for short-circuits, power overloads or incorrect voltage must be installed
4
conjunction with this product.
5
. Do not cut or extend electrical wires or power-cord of the product without the approval of a professional electrician and
warranty service representative.
6. Do not disassemble the control panel or computer controller as it is not designed for disassembly. Defects, damages or shock
caused by such removal cannot be the responsibility of the supplier
7. Local standards and codes must be followed and cannot be the responsibility of the supplier or its distributors.
8
. The motor must be grounded with wire not less than 1.63mm-diameter (14awg) or otherwise required
codes.
9
. Appliances or components with ground or “earth” connections must be installed and used in conjunction with the produc
connected in accordance to local codes.
10. Other electrical components, except the remote control device (optional), should be kept, located or affixed away from the
product, so they cannot fall into the bath, while in use.
11. This product or any appliance used near this product must be used in conjunction with a Ground Fault Circuit Interrupter
(“G.F.C.I.” or “G.F.I.”) or Residual Current Device (“R.C.D.”) with a trip current of not greater than 30mA or otherwise required
in accordance to local codes.
2. Always double-check all connections to ensure for proper installation, tension, and connection, including parts, plugs, hos
1
nuts, scr
3. Check local and national requirements before installing or purchasing this product.
1
t, and
es,
14. “H” hot (red) and “C” cold (blue) water supply connections are critical to proper f
5. Ensure the (optional) “H” hot (red) and “C” cold (blue) water hoses will not touch the floor when this product is fully ins
1
as it may cause rusting and possibly weakening of those hoses.
6. Harsh chemicals such as acetone, ammonia or gasoline can possibly dissolve or damage portions of this product – do not
1
use such chemicals for cleaning or installing this pr
1
7. Do not stack anything on top of this product, use it for support, or apply any extreme pressure to critical areas that may
misalignment or damage; take sp
1
8. Maintain good ventilation in the space this product is installed into, as excess standing moisture or vapor may cause damag
to that space.
ecial care when
oduct.
moving this product.
unction of this product.
talled,
cause
e
Page 3 / 9
Page 4
D-Series Whirlpool User Manual with Bluetooth
After Installation:
1. Before suppl
ter installation and before starting the product for the first time, you should inspection all the connections to ensure they are properl
2. Af
connected; inclu
3.
After you have fully installed the unit and made all the inspections to ensure the unit can function safely, fully clean the unit inside and out to
ensure the unit is ready for usage, and also to check for any potential lose debris that may have fallen into any of the plumbing. After a thorough
visual inspection, close the drain and fill the tub up to the overflow drain, submerging all the jets underwater. If any debris floats out, remove it, or if
it’s very small, paddle it towards the drain plug, and then drain the tub until the debris is removed. The whirlpool system will not run unless the water-
level sensor is fully submerged underwater. The water-level sensor is placed above the water line of the water jets.
4. Turn
sit for a minimum of 10-minutes. N
any adjustments made, restart this test and review all the connections again.
5. You must ensure the product works as it normally would: immediately test all functions of the product to possibly find any errors. After testing,
place the tub against the wall(s) and seal the wall joints with an acid-free caulking agent and then allow it to cure sufficiently before any further use.
Important Note:
It is not generally recommended to use bath oils in whirlpool bathtubs, as the oil residue can stick to the side walls of the tub and plumbing.
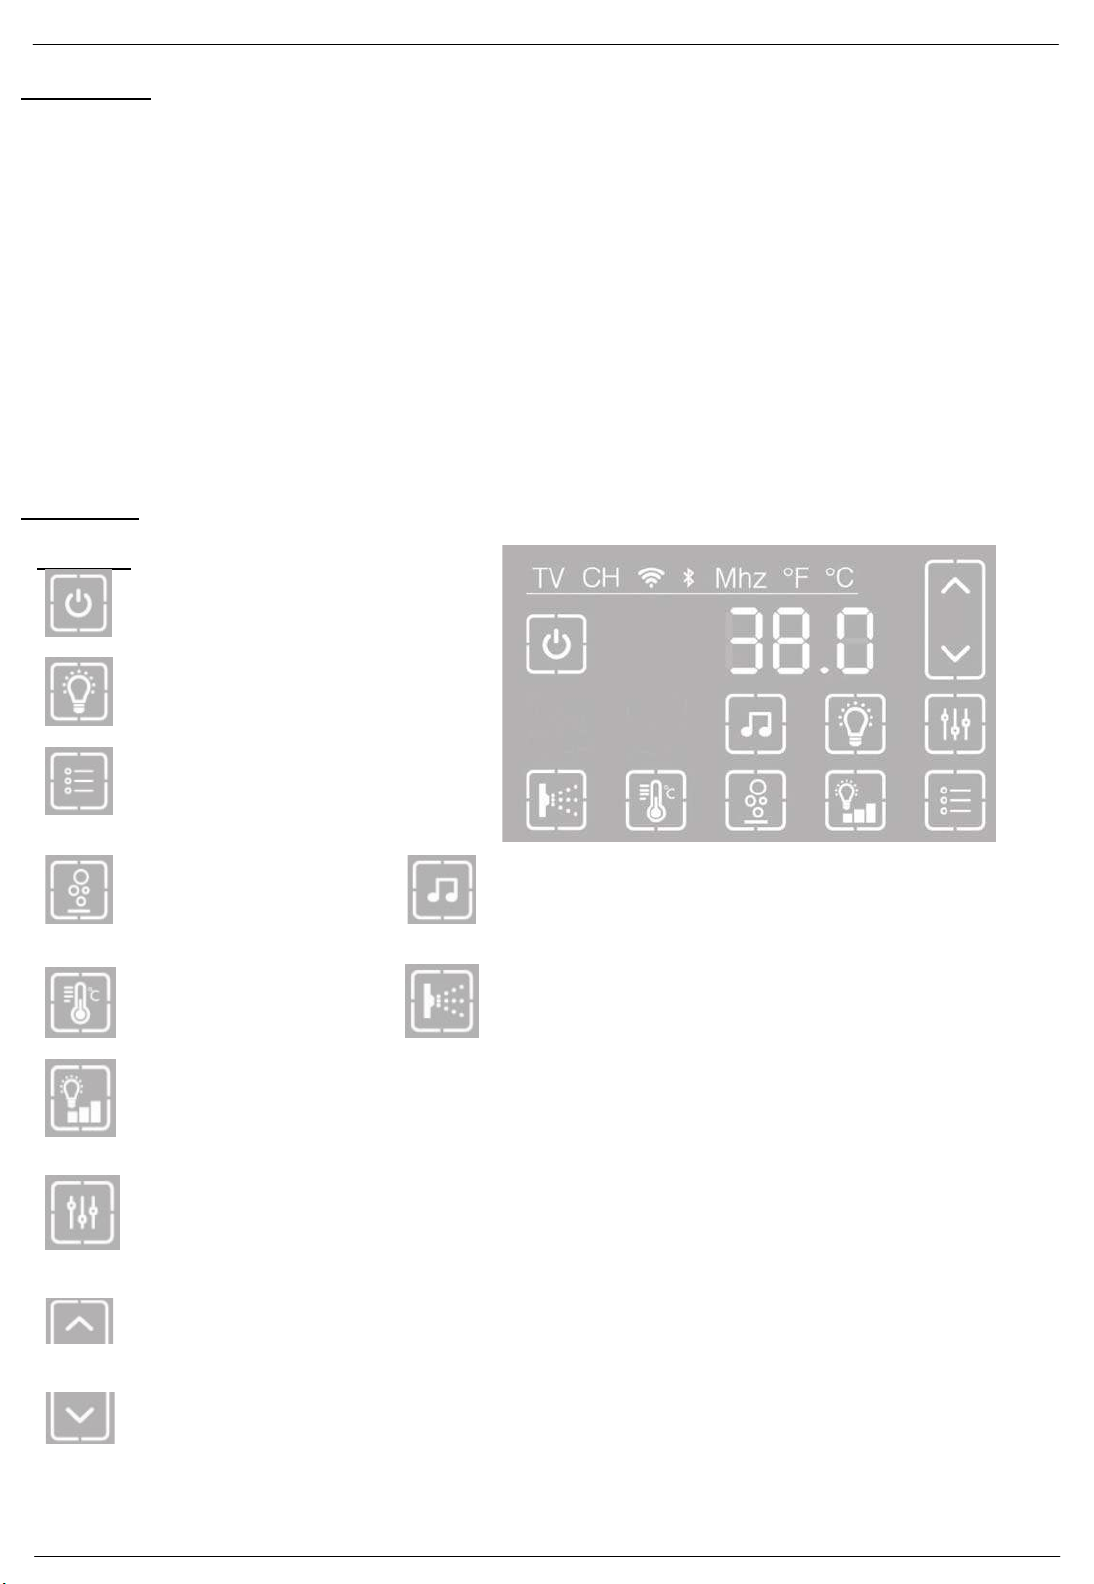
The Display:
Used to turn on/off the computerized system.
ying any power to the product, you should inspect the power cables to ensure the power leads are properly connected.
ding parts, plugs, hoses, nuts, screws, wire
-on the whirlpool system and operate it for a minimum of 10-minutes. Then turn-off the whirlpool system and without draining it, allow
ow check all the plumbing, pipe works, hoses, joints, threads and any other connections for any leaks. If there are
Power Standby Button
s, etc.
it to
y
Used to turn on the tub light and change the brightness.
Used to change the user-preset channels on the radio feature.
Used to turn on/off the Air Bubble feature.
Used to turn on/off the Heat Pump feature. Used to turn on/off the water jet feature.
Used to change the intensity or brightness of the tub light feature.
Used to change the function of a feature; used in conjunction with Volume/Parameter “UP” & “DOWN” buttons
Color Changing Lights Button
Channel Memory Button
Air Bubble Button Music Button
Used to turn on/off the radio feature, and also cycle between the Radio & Bluetooth functions.
Heat Pump Button Water Jet Button
Light Brightness Button
Parameter Setting Button
To turn up the volume or change the value of a parameter upward; used in conjunction with the “Parameter Setting” button.
Volume/Parameter “UP” Button
Volume/Parameter “DOWN” Button
To turn down the volume or change the value of a parameter downward; used in conjunction with the “Parameter Setting” button.
Page 4 / 9
Page 5

D-Series Whirlpool User Manual with Bluetooth
Turn on/off the Display:
This system remains on “standby” when power is supplied to the whirlpool system.
1. If the system is in “standby” mode, the 'Power Standby' on/off icon will be partially visible on the dark screen. On standby, if any
portion of the screen is touched the backlight will display at 50% strength. To activate the system, on the display, press and
'Power Standby' button for 3-seconds. When the unit is first activated the current temperature (°C) will display on the screen. The
temperature sensor is located below the overflow drain knob.
2. There is a 2-hour timer programmed into this system, all functions will automatically turn off and the system will go into “standby”
mode, 2-hours from system activation.
3
. To turn off all functions of the system, placing the unit in standby, press the 'Power Standby' button on the display
hold the
Water Jet Feature
The water pump and features directly related to the whirlpool system only work when the water level inside the tub is above the
water-level sensor. The water-level sensor is hidden behind the tub wall. This system has two sensors; the other sensor is the
temperature sensor. The temperature sensor is visible from inside the tub, usually underneath the overflow drain knob (depending
on model).
Press the 'Water Jet' button to activate the water pump and aslo unlock the other [optional] whirlpool features. If the water level
inside the tub is not above the water-level sensor, the 'Water Jet' icon will flash and the other [optional] whirlpool features will
remain locked. If the water jet feature is turned on but the water is not yet at a safe level, the whirlpool feature will automatically
turn on when the water reaches an appropriate level. The default operating time for the water jets is set for 20-minutes. If the water
jet feature and air bubble feature are both activated, but at different times, both features will still automatically turn off at 20-minutes.
To stop the 'Water Jet' feature, press the 'Water Jet' icon for 2-seconds. You will see “OFF” flash on the display.
Underwater Color Light
The underwater tub light has color and intensity adjustments. Press the ‘Color Changing Lights’ button to turn on the underwater
lights. The light color is white, first (C=1); to change the intensity of the light, press the ‘Color Changing Lights’ button again to the
next brightness setting; press again to the next brightness setting; press again to turn off; there are 3 color brightness settings and
an “OFF” setting; a cycle of 4-positions in total.
:
: C = Color Color: 1 ~ 7
To change the color of the light, while the light function is on, press the ‘Parameter Setting’ button, and then press the 'Parameter UP'
or ‘DOWN’ buttons; the light function will cycle through 7 settings: “C=1” to “C=7”.
Brightness Underwater Light
Another way to adjust the tub light intensity, while the light function is on, press the ‘Light Brightness’ button, and then press the
‘Parameter UP’ or ‘DOWN’ buttons: “B=1” to “B=3”.
: B = Brightness Brightness: 1 ~ 3
Page 5 / 9
Page 6
D-Series Whirlpool User Manual with Bluetooth
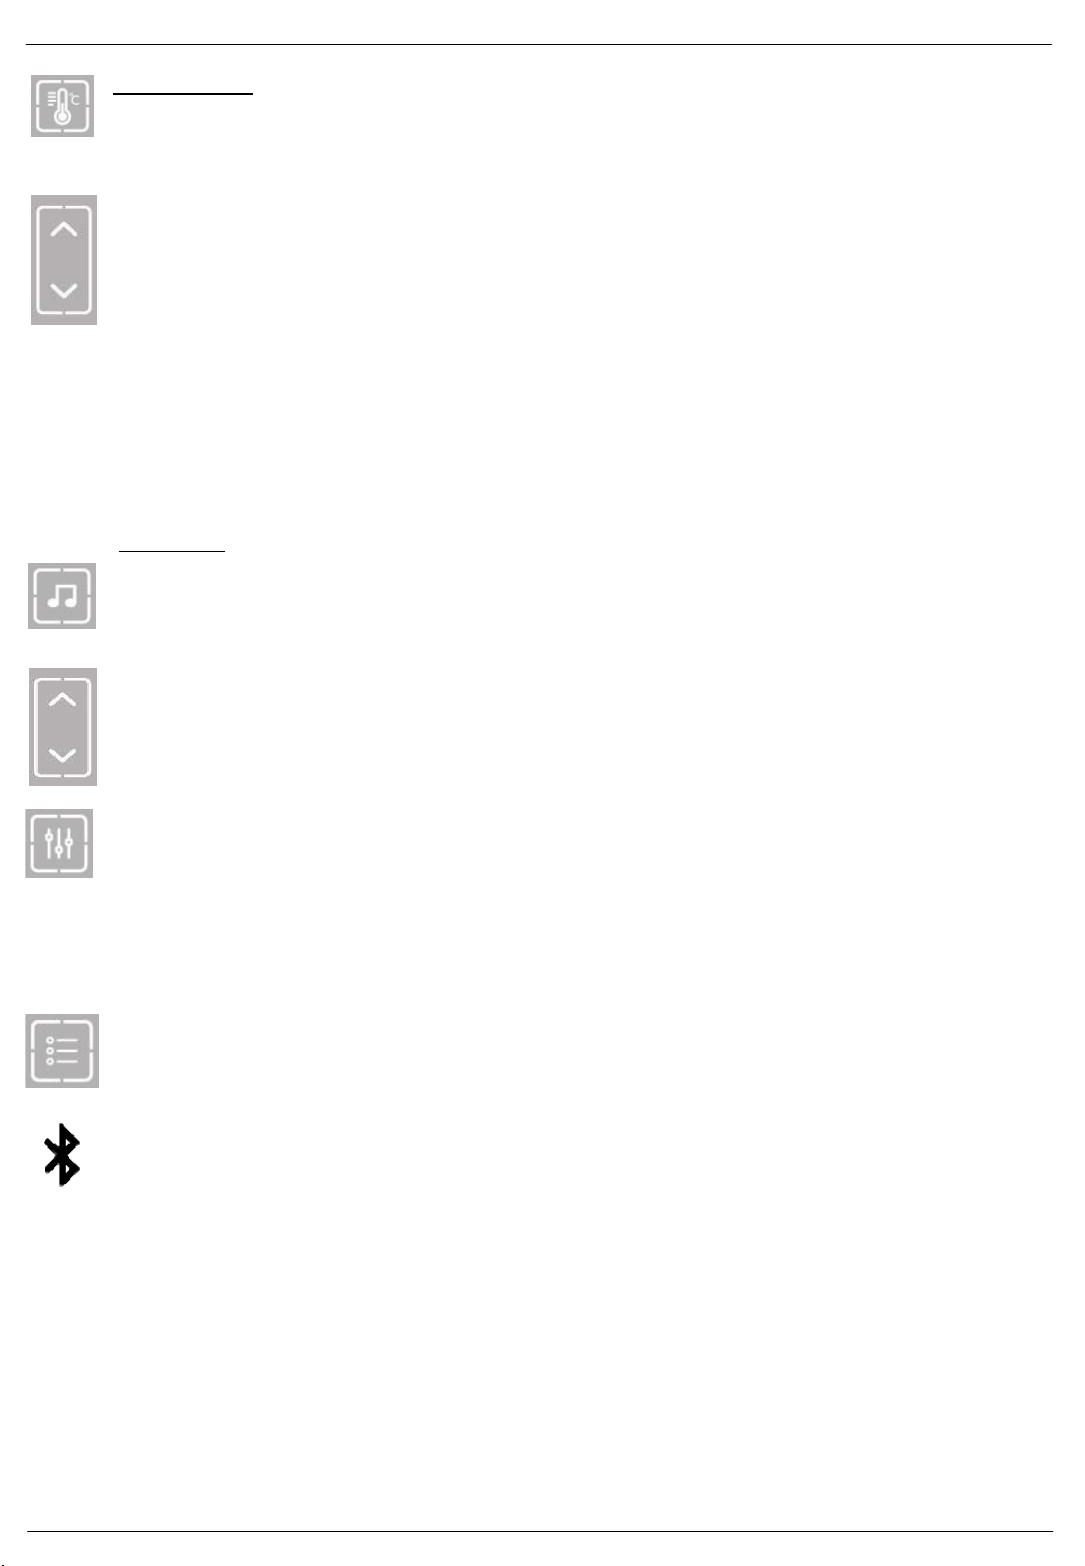
Heatpump Feature: Temperature: 35 ~ 43°C (95°F ~ 109.4°F)
The heatpump function will remain locked-out until both the water jet feature is turned on and the water-level sensor is activated. The
waterlevel sensor is activated when the tub is filled and the water level inside the tub surpasses the height of the water-level sensor. If
the waterlevel sensor does not sense water at a safe water level both the heatpump and water pump will turn off. The heatpump
function also has a thermostat feature in which you can set a desired temperature also which the heatpump will activate. The default
temperature of the thermostat is set at 38°C (100.4°F). You can change the thermostat setting between 35°C (95°F) to 43°C (109.4°F).
If the temperature of the tub water is above this set temperature of the thermostat, the heatpump feature will not activate. Because this
system is a “tub” designed to use fresh water for each use, this system uses a “heatpump” system; as it is not a “pool” in which is
designed to continuously use chemically treated water which uses a water “heater” system. “Heatpump” systems are designed to
produce just enough heat to prolong the warmth of a tub of water, but not specifically designed to heat a pool of water to a normal “spa”
operating temperatures. This is designed to be safer and more efficient for household use.
To adjust the thermostat setting for the heatpump function, ensure there is adequate water level; press the heatpump button so that
the heatpump feature is on, and then press the Parameter Setting button Up or Down until the desired setting is selected. To turn off
the heatpump feature, simply press the heatpump button until the icon is unlighted or off. If the whirlpool system is shut off with the
heatpump running, the system will delay the shutdown process for a few short seconds until the heatpump slightly cools.
Music Feature: Radio / Bluetooth
While the computer system is on, press the Music button to activate either the FM radio or Bluetooth functions. When the radio
function is selected, a “3 dB” will first show on the display panel, indicating a volume adjustment; to adjust the volume, press the
Volume/Parameter “UP” or “DOWN” buttons until desired volume is achieved. The volume adjustments span from “0” to “10” “dB” (“3
dB” being default). After 5-seconds the display will change to a frequency reading, indicating a frequency adjustment; to adjust the
frequency, press the Volume/Parameter “UP” or “DOWN” buttons until desired frequency is found. The system will automatically use
the last frequency selected when the radio function us used again.
To search for a new radio channel, while the radio function is in the frequency mode, press and hold either the Volume/Parameter
“UP” or “DOWN” button for 2-seconds, and it will automatically search for the next radio station with a strong/steady signal.To program
a frequency into the channel memory, press the Channel Memory button; “CH=1” will display on the screen; use the
Volume/Parameter “UP” or “DOWN” buttons to select different channel numbers (1-10); press the Channel Memory button again to
save the frequency to the channel number of your selection. To select between the preset memory channels, while the radio is
functioning, press the Memory button, then press the Set button, and then use the Volume/Parameter “UP” or “DOWN” buttons.
To select the Bluetooth function, press the Music button again, cycling past Radio feature. The Bluetooth symbol will appear on the
upper portion of the display, and “bt” near the center of the display. When first turned on, the Bluetooth feature will scan for an audio
source Bluetooth device; use your audio source Bluetooth device to scan and “pair” the connection.
The Bluetooth system is named “Whirlpool”; the password is “1234”. When the Bluetooth systems “pair”, the Bluetooth feature will
chime, indicating they have successfully connected.
The Bluetooth feature will only play audio output, and will not accept vocal input. If there is an incoming or outgoing call during music
streaming, the music will automatically stop playing, and will automatically continue when the call is ended. To deactivate the
Bluetooth feature, press the Music button to cycle the radio feature into the ‘off’ position.
Page 6 / 9
Page 7

D-Series Whirlpool User Manual with Bluetooth
Once a Bluetooth device has been “paired” the system will automatically connect when both Bluetooth devices are activated. If there is
more than one device “paired” to the system, the system will randomly choose one of the devices. If the system automatically connects
to an undesired “paired” device, deactivate the Bluetooth function by pressing the Music button, then press and hold the Music button
for 3-seconds, and then the Bluetooth symbol will start to flash and the system will be placed in scan mode.
Turn off and on the Bluetooth function or open Bluetooth function on the device for connection and pairing with the “Whirlpool”.
Sound volume can adjust using the parameter setting buttons set into 9 different volume levels.
Air Bubble Feature:
To activate the Air Bubble feature, turn on the Display and then press the Air Bubble button. To deactivate the Air Bubble feature,
press the Air Bubble button again, or turn off the Display.
The Air Bubble feature will turn on independent of the water-level sensor, and is designed to automatically turn off after 20-minutes of
continuous use. However, if the water-level sensor changes condition from sensing-water to not-sensing-water, the air bubble feature will
shut off automatically. After which, the Air Bubble icon will start to flash. If the Air Bubble feature is still desired, press the Air Bubble button
to turn on the Air Bubble feature. If the water jet feature and the air bubble features are started at different times, both features will
automatically shut off at the same time, and the 20-minute timer is reset to the last inputted update.
The Air Bubble feature is designed to run for 1-minute to flush and dry the air jets, 20-minutes after the water-level sensor no longer
detects water, but will only do so in the following scenarios:
1. Water is no longer detected by the water-level sensor while the system is still turned on
2. Water is no longer detected by the water-level sensor and then the system is turned off
3. The system is turned off and then the water-level sensor no longer detects water.
Page 7 / 9
Page 8
D-Series Whirlpool User Manual with Bluetooth
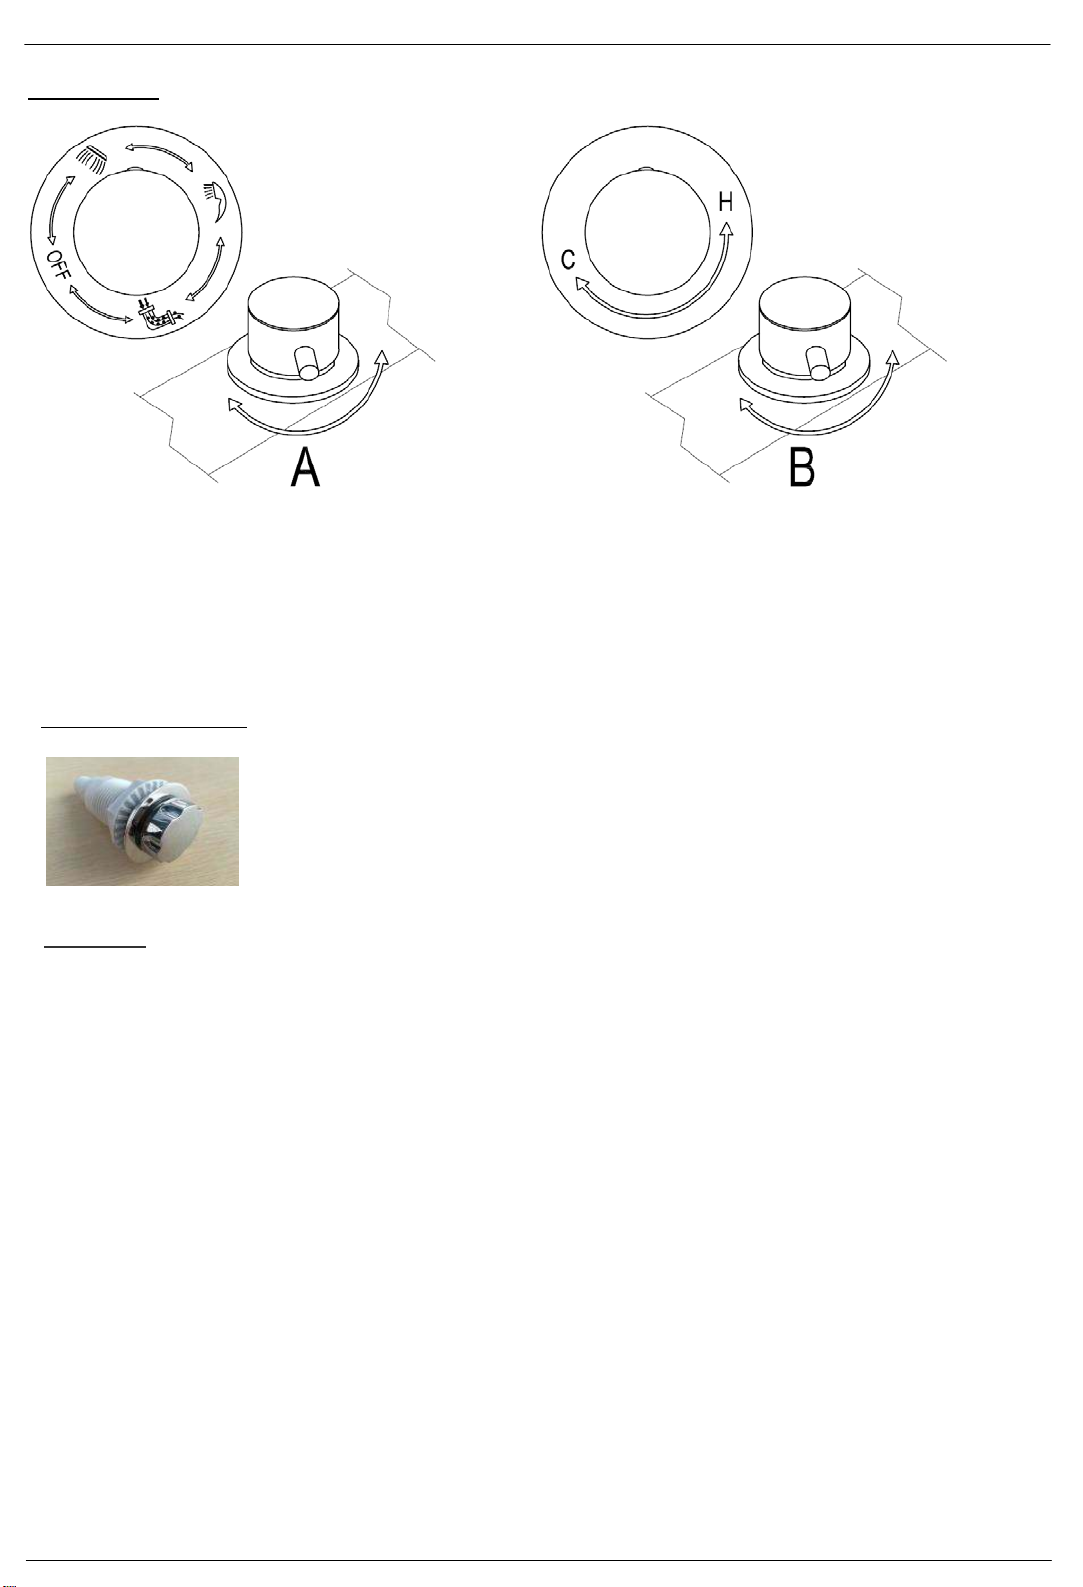
Faucet Operation:
A: Selector Valve (clock-wise)
OFF-position
Waterfall faucet
B: Temperature Valve
H = Hotter. Rotate in the direction of the arrow.
C = Colder. Rotate in the direction of the arrow.
Handheld shower wand
Jet-plumbing
Air Bubble Regulator Valve:
This valve is used to control the amount of air bubbles in the Water Jet feature.
Maintenance:
The drain can be clogged by hair or soap scum and should be cleaned regularly.
Poor maintenance, infrequent, or irregular cleaning can cause damage to the faucets or jets.
When cleaning the chrome parts, do not use cleaning compounds or instruments with abrasives or harsh chemicals. Do not try to remove
stains with hard objects, such as blades or screwdrivers.
When cleaning the acrylic surfaces of the bathtub, use a soft sponge and a detergent without ammonia, acetone or other harsh chemicals,
to prevent surfaces from getting dulled or damaged.
Dulled surfaces can be refinished with an acrylic polishing compound (follow instructions of polishing compound); first test on a non-visible
surface area.
Consider cleaning the whirlpool features monthly with a whirlpool cleaning solution from your local hardware store. Follow the instructions
of the whirlpool cleaning solution. If not cleaned regularly you may notice black flakes in the bath – if this happens you should clean the
whirlpool system. Consider cleaning the whirlpool system with whirlpool cleaning solution repeatedly until the black flakes disappear. Soap
scum, hair, dead skin, skin care products, oil, grease and/or bacteria can contaminate your whirlpool system, it is important to clean
regularly.
Consider cleaning the whirlpool system using a cup of chlorine bleach (sodium hypochlorite) and the minimum amount of warm or hot water
to activate the (water-level sensor) whirlpool system, in between regular cleanings with whirlpool cleaning solution. Thoroughly flush and
rinse the bathtub and whirlpool system before use. (This is not meant as a substitute for whirlpool cleaning solution)
Warning: the use of cleaning materials other than those recommended by the manufacturer can result in damage to the bathtub, whirlpool
apparatus, or other hardware.
Warning: Any service, adjustment or repair is only recommended by an experienced professional. Only consider a licensed professional for all
installation, servicing or repair work.
Page 8 / 9
Page 9
D-Series Whirlpool User Manual with Bluetooth
Technical Parameters:
Rated voltage AC220V~240 Rated frequency 60HZ
Rated current 11.8A Rated power 2600W
Insulating resistance
Type of Load Rated Load Voltage Rated Load Frequency Rated Load Power
Water pump AC220V~240 60HZ 900W
Heater water pump AC220V~240 60HZ 1500W
Air pump AC220V~240 60HZ 200W
Lighting AC12V
Speaker
Test Standard:
Electrical Operational Parameters
>20M
Component Parameters
Waterproof level IPX5
7W
8Ω/10W
1. The requirements for this appliance to be connected to water and electrical are:
The maximum inlet water pressure is 0.5 mPa (5 bars / 72.5 psi)
The minimum inlet water pressure is 0.1 mPa (1 bar / 14.5 psi), if this is necessary for the correct operation of the appliance.
2. This appliance must be connected using a Residual Current Device (RDC) or Ground-Fault Circuit Interrupter (GFCI/GFI).
Maximum hot water temperature: 80°C (176°F).
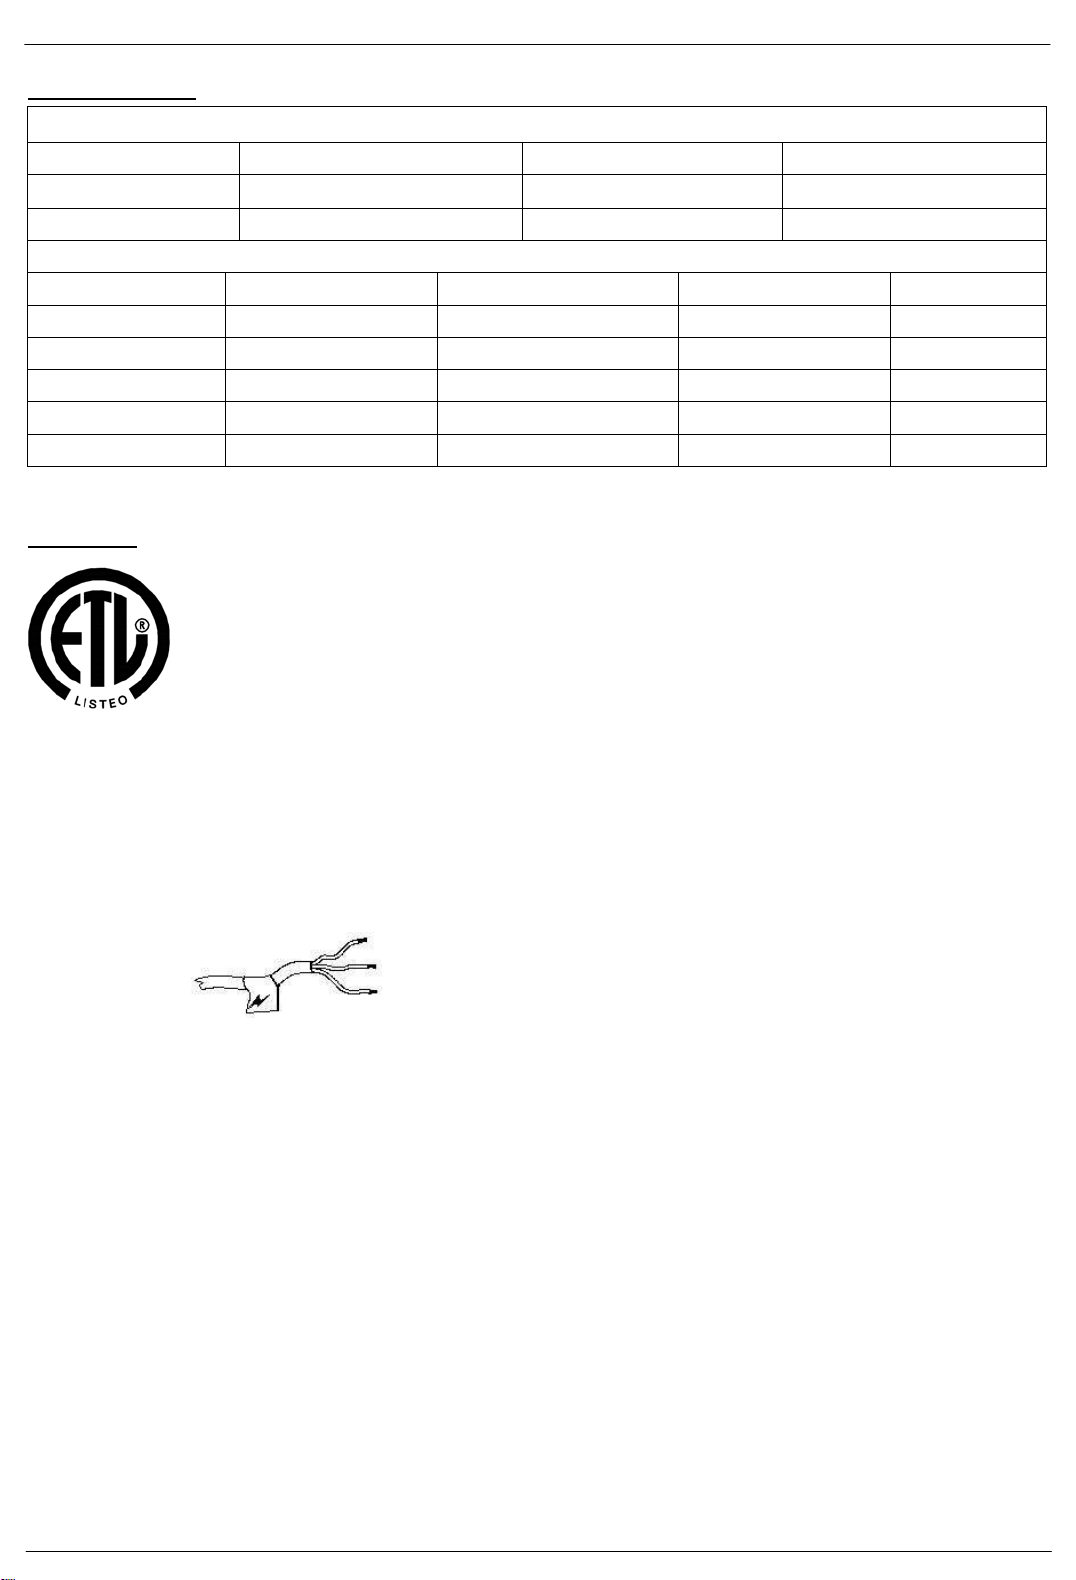
← L = Brown color (Live-1)
← N = Blue color (Live-2)
← G = Yellow-green color (Earth-Ground)
Page 9 / 9
Page 10

Do not trash. Keep these instructions for future reference.
Some features explained within this user guide maybe optional and/or may not be applicable for your specific model.
 Loading...