

Page 1
HOO 902
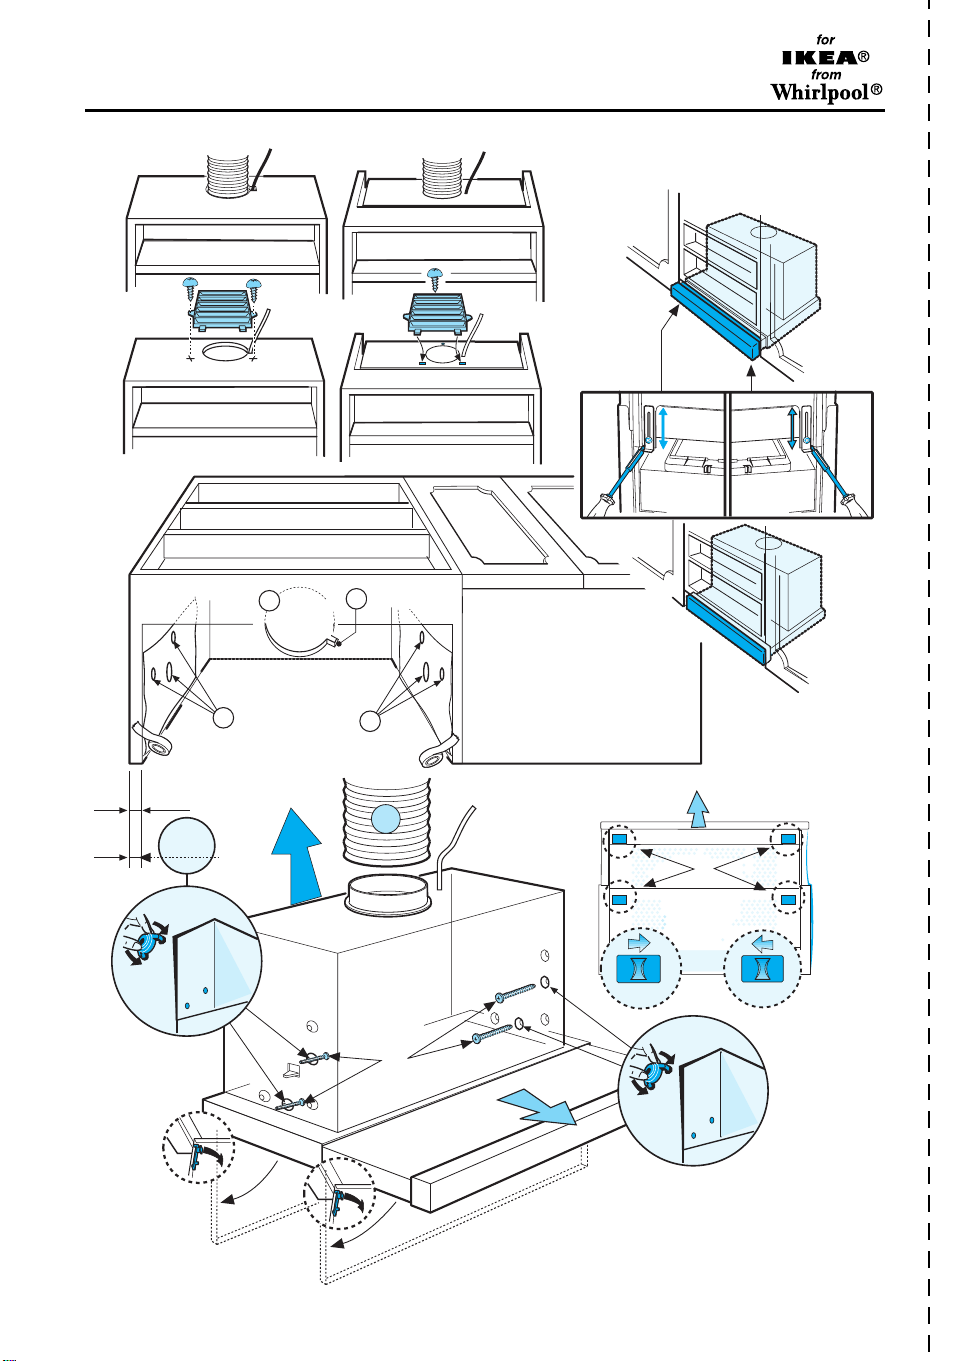
POPIS INSTALACE
CZ
Minimální vzdálenost od sporáků:
43 cm (elektrické sporáky), 65 cm (sporáky na plyn, naftu nebo uhlí).
Při montáži sledujte číslování (1Ö2Ö3Ö.....).
Spotřebič připojte k elektrické síti až po úplném dokončení instalace.
SK
INŠTALAČNÁ SCHÉMA
Minimálna vzdialenost' od sporáka:
43 cm (elektrické sporáky), 65 cm (plynové sporáky, sporáky na naftu alebo uhlie).
Pri montáži postupujte podľa číslic (
Spotrebič nezapájajte do siete, kým nie je inštalácia úplne ukončená.
PL
KARTA INSTALACYJNA
Minimalna odległość od palników:
43 cm (od palników elektrycznych), 65 cm (od palników gazowych, olejowych lub
węglowych).
Podczas montażu należy przestrzegać kolejność numeracji (
Nie podłączać urządzenia do zasilania zanim nie zostanie zakończony całkowicie jego
montaż.
ÜZEMBE HELYEZÉSI ÚTMUTATÓ
H
A tűzhelytől való minimális távolság:
43 cm (elektromos tűzhely), 65 cm (gáz-, olaj- vagy széntüzelésű tűzhely).
A felszereléshez kövesse a számozást (
Ne helyezze feszültség alá a készüléket addig, amíg nem történt meg maradéktalanul az
üzembe helyezés.
1Ö2Ö3Ö.....
1Ö2Ö3Ö.....
).
1Ö2Ö3Ö.....
).
).
СХЕМА УСТАНОВКИ
RUS
Минимальное расстояние от конфорок:
43 см (электрические конфорки), 65 см (газовые, керосиновые или
угольные).
Последовательность действий при монтаже должна соответствовать
нумерации (
Не подключайте прибор к сети до тех пор, пока установка не будет полностью
закончена.
BG
КАРТА ЗА ИНСТАЛИРАНЕ
Минимално разстояние от печки:
43 см (електрически печки), 65 см (печки с газ, нафта или въглища).
За монтаж следвайте номерацията (
Не включвайте уреда към мрежата, докато инсталирането не е завършено
докрай.
FIȘA PENTRU INSTALARE
RO
Distanţa minimă de la focuri:
43cm (arzătoare electrice), 65cm (arzătoare pe bază de gaze, motorină sau cărbune).
Pentru montaj urmaţi numerotarea (
Nu branșaţi aparatul la curent până când nu terminaţi definitiv operaţia de instalare.
INSTALLATION SHEET
GB
Minimum height above cooker:
43 cm (electric cookers), 65 cm (gas, gas oil or coal cookers).
To install follow the numbers (1Ö2Ö3Ö.....).
Do not connect the appliance to the electrical power supply until installation is
completed.
1Ö2Ö3Ö.....
).
1Ö2Ö3Ö.....
1Ö2Ö3Ö.....
).
).
5019 100 75133
Page 2
HOO 902
AA
FF
OK!OK!
5
135mm
A
F
Ø
10x10mm
6
OK!
1
20mm
16mm
13
2
8
12
13
4
12
3
7
14
15
CLOSED
11 11
10
9
11
OPEN
CLOSED
OPEN
5019 100 75133
Page 3
HOO 902
a
b
PRODUCT DESCRIPTION SHEET
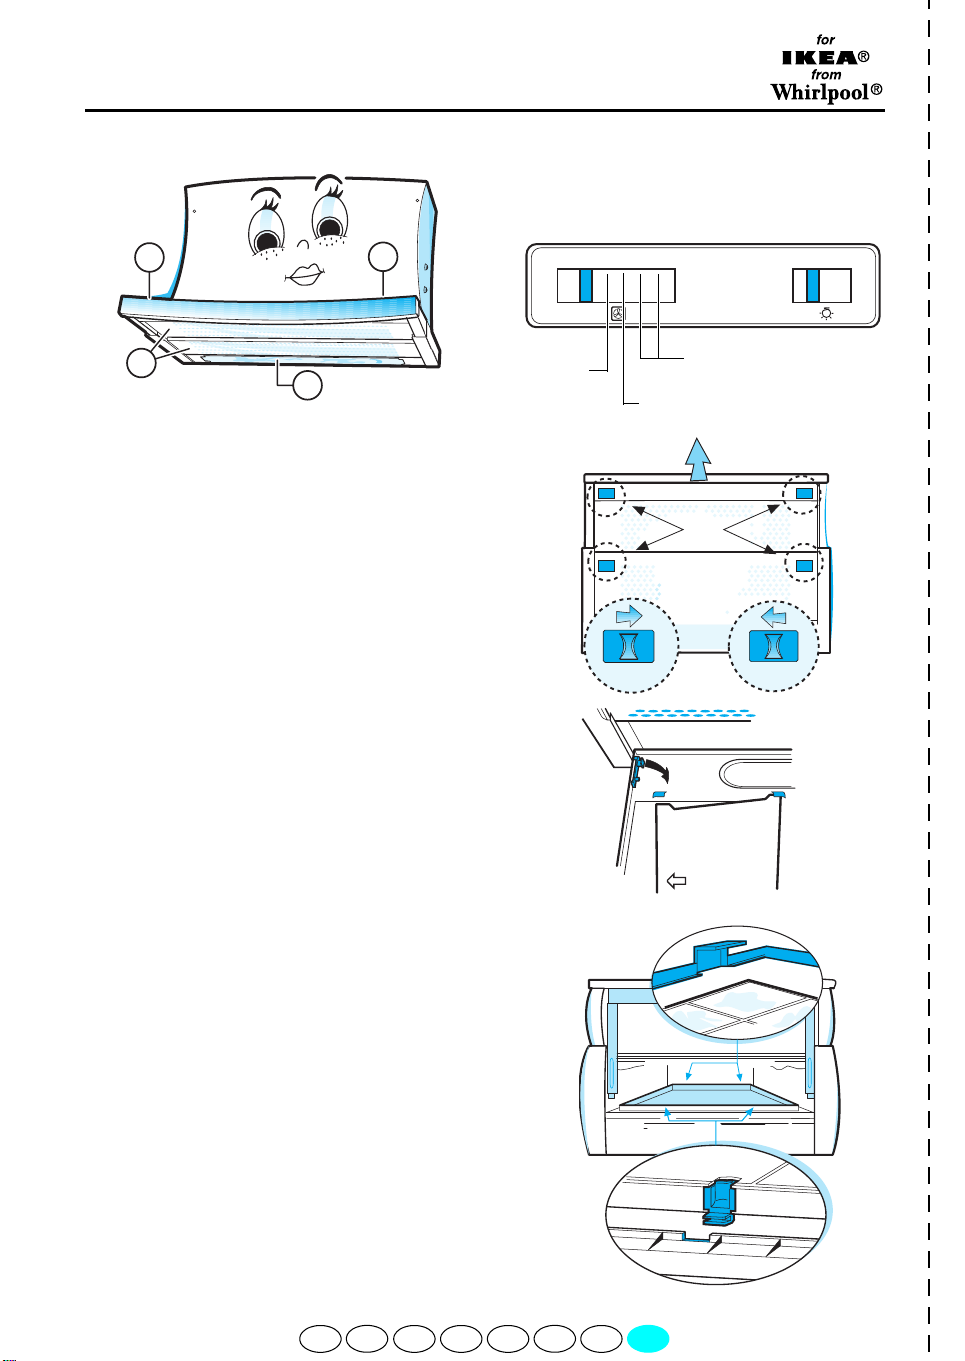
CONTROL PANEL
A.
Speed selector switch.
B.
Light switch.
4
1
2
3
1.
Control panel
2.
Grease filters (behind the extractor grille)
3.
Lighting unit
4.
Pull-out steam deflector
Removing and renewing or washing the
grease filter Fig. 1-2:
1.
Unplug the appliance or disconnect the mains
power supply.
2.
Pull out the steam deflector.
3.
Remove the extractor grilles (
4.
Remove the device securing the grease filter
Fig. 2
(
).
5.
Remove the dirty grease filter.
6.
After the grease filter has been renewed or
cleaned (depending on model), remount in
reverse order, making sure the entire
extraction surface is covered.
Fitting or renewing the carbon filter Fig. 3:
1.
Unplug the appliance or disconnect the mains
power supply.
2.
Pull out the steam deflector.
3.
Remove the extractor grilles.
4.
If the carbon filter is already fitted and needs
renewing, press the release buttons (b) and
pull the filter out downwards.
5.
If the filters are not fitted.
a
. Locate the carbon filter under the top clips.
b
. Secure in place with the bottom clips.
6.
Refit the extractor grille.
Fig. 1
).
O123
small amount
of steam
and fumes
Fig.1
Fig.2
4
A
large amount of steam
and fumes
medium amount of steam
and fumes
CLOSED
OPEN
B
OPEN
a
OI
CLOSED
Replacing bulbs
1.
Unplug the appliance or disconnect the mains
power supply.
2.
Pull out the steam deflector.
3.
Open the back extractor grille.
4.
Remove the burnt-out bulb.
Replace using 40W max (E14) bulbs only.
5.
Refit the extractor grille.
5019 100 75133
CZ PL H
RUS
Fig.3
BGSK
RO
GB
b
 Loading...