

Whirlpool GU940SCGB1, GU940SCGQ1, GU940SCGZ1 Owner’s Manual

®
Appliances
III II ......iiiiiii!,!,!,!!!iiiii
A Note to You .......................... 2
Dishwasher Safety .................. 3
Parts and Features .................. 4
Starting Your Dishwasher ...... 6
Loading Your Dishwasher ...... 8
Using the Dispensers ............ 12
Setting the Controls .............. 14
Selecting a wash cycle ...... 14
Using Cancel/Drain ............ 16
Selecting cycle options ...... 16
Changing a cycle or
option setting ...................... 17
Adding items
during a cycle .................... 17
Using Delay Hours ............ 18
Understanding the
status indicators .................. 19
Washing Special Items .......... 20
Caring for Your
Dishwasher ............................ 21
Saving Energy ........................ 23
Solving Common
Dishwashing Problems ........ 24
Troubleshooting .................... 27
Requesting Assistance
or Service .............................. 28
Warranty ................................ 32
8051225
www.whJr|poo|.com

A Note to You
.....H!iJiiii_ii!!!ii_ii_i_ii_iii:_ _i:i:i_!!!_:,_:ii_!il_¸¸'i_!:ii_i;!!!i!i_iiiii!llii!!!iilF_ii!;_!iizi_i_!iilliiiiii_iiiiliiii::iiiiiiiiiJii!_'OO!iiiiJ¸¸¸¸¸_¸'_;_!_:ili_i:_i;;_i_ii:;;;_!_....
The Whirlpool Brand is committed to designing quality products that consistently perform for
you to make your life easier. To ensure you enjoy years of trouble-free operation, we devel-
oped this Use and Care Guide. It contains valuable information about how to operate and
maintain your appliance properly and safely. Please read it carefully.
Also, please complete and mail the Ownership Registration Card provided with your
appliance. This card helps us notify you about any new information on your appliance.
Whenever you call to request service for Model Number
your appliance, you need to know your Serial Number
complete model number and serial number.
You can find this information on the model Purchase Date
and serial number label (see the "Parts and Dealer Name
Features" section). Dealer Address
Please also record the purchase date of
your appliance and your dealer's name, Dealer Phone
address, and telephone number.
Keep this book and the sales slip together in a safe place for future reference.
Center number is toll free. 1-800-253-1301
I Our Consumer Assistance I
j in Canada, for assista,n, ce or service, see the "'Requesting j
Assistance or Service section.
To find detailed product information, the location of the nearest Whirlpool dealer or authorized
servicer, to purchase an accessory item, or register your appliance on-line, please visit our
Web site at www.whirlpool.com
In Canada visit our Web site at www.whirlpool.com/canada
Please:
• Have your dishwasher installed by a
qualified installer.
• Install where dishwasher is protected from
the elements.
• Install and level dishwasher on a floor that
will hold the weight, and in an area suitable
for its size and use.
• Properly connect dishwasher to electricity,
water, and drain.*
* See Installation Instructions for complete
information.
• Remove all shipping plugs from hoses and
connectors (such as the cap on the drain
outlet) before installing.*
• Remove all hang tags and temporary
labels.
• Make sure dishwasher is not used by
anyone unable to operate it properly.
• Properly maintain dishwasher. See the
"Caring for Your Dishwasher" section.

ishwas
Your safety and the safety of others is very important.
We have provided many important safety messages in this manual and on your
appliance. Always read and obey all safety messages.
This is the safety alert symbol.
This symbol alerts you to hazards that can kill or hurt you and others.
All safety messages will be preceded by the safety alert symbol and the
word "DANGER" or "WARNING." These words mean:
All safety messages will identify the hazard, tell you how to reduce the chance of injury,
and tell you what can happen if the instructions are not followed.
er Safety
You will be killed or seriously injured
if you don't follow instructions.
You can be killed or seriously injured
if you don't follow instructions,
IMPORTANT SAFETY INSTRUCTIONS
WARNING = When using the
dishwasher, follow basic precautions,
including the following:
• Read all instructions before using the
dishwasher.
• Use the dishwasher only for its
intended function.
• Use only detergents or rinse agents
recommended for use in a dishwasher
and keep them out of the reach of
children.
• When loading items to be washed:
1) Locate sharp items so that they
are not likely to damage the door
seal; and
2) Load sharp knives with the handles
up to reduce the risk of cut-type
injuries.
o Do not wash plastic items unless they
are marked "dishwasher safe" or the
equivalent. For plastic items not so
marked, check the manufacturer's
recommendations.
o Do not touch the heating element
during or immediately after use.
- SAVE THESE INSTRUCTIONS -
• Do not operate the dishwasher unless
all enclosure panels are properly in
place.
• Do not tamper with controls.
• Do not abuse, sit on, or stand on the
door or dish racks of the dishwasher.
o To reduce the risk of injury, do not
allow children to play in or on the
dishwasher.
o Under certain conditions, hydrogen gas
may be produced in a hot water system
that has not been used for two weeks
or more. HYDROGEN GAS IS EXPLO-
SIVE. If the hot water system has not
been used for such a period, before
using the dishwasher turn on all hot
water faucets and let the water flow
from each for several minutes. This will
release any accumulated hydrogen gas.
As the gas is flammable, do not smoke
or use an open flame during this time.
• Remove the door to the washing
compartment when removing an old
dishwasher from service or discarding it.
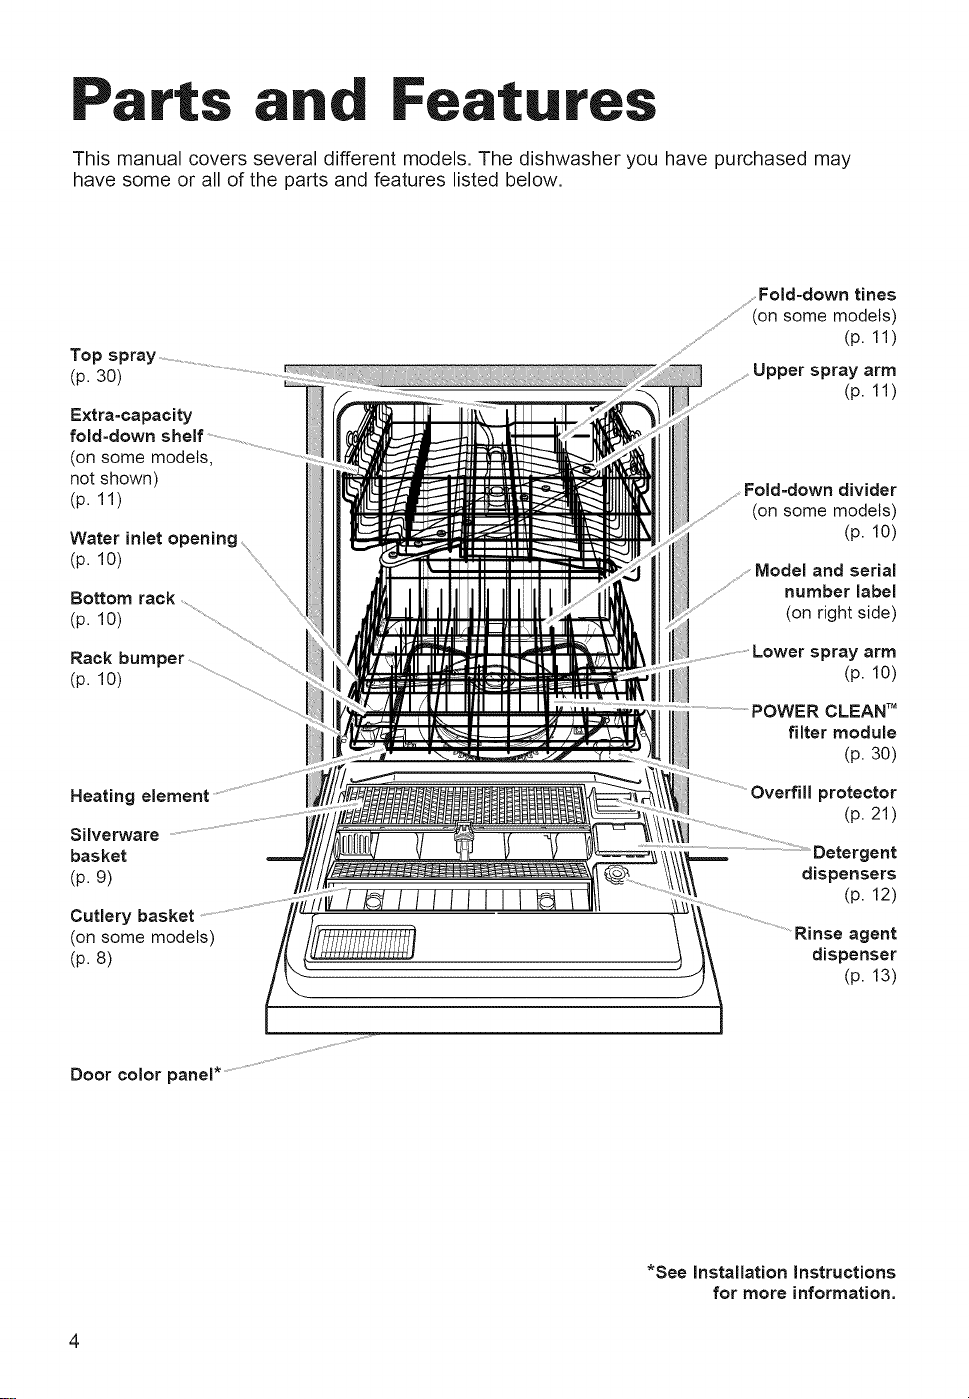
a an ures
This manual covers several different models. The dishwasher you have purchased may
have some or all of the parts and features listed below.
Fold=down tines
.......................(on some models)
Top
(p. 30)
Extra-capacity
fold=down shelf
(on some models,
not shown)
(p. 11)
Water inlet opening
(p. 10) ........
Bottom rack ................................
(p. 10)
Rack bumper
(p. 10) ..................................................................................
Upper spray arm
Fold=down divider
(on some models)
and serial
number label
(on right side)
Lower spray arm
CLEAN TM
filter module
(p. 11)
(p. 11)
(p. 10)
(p. 10)
(p. 30)
Heating element
Silverware
basket
(p. 9)
Cutlery basket
(on some models)
(p. 8)
Door color panel* ............
protector
(p. 21)
Detergent
dispensers
(p. 12)
Rinse agent
dispenser
(p. 13)
*See Installation Instructions
for more information.

Series 925 model
Cycle selector pads Option selector pads Cycle status indicators
Series 940 model
Cycle selector pads Option selector pads
Cycle status indicators
Series 980 model
Cycle selector pads Option selector pads Cycle status indicators

Startin Your
ishwasher
Tip Over Hazard
Do not use dishwasher until
completely installed.
Do not push down on open door.
Doing so can result in serious injury
or cuts.
GROUNDING iNSTRUCTiONS
• For a grounded, cord connected
dishwasher:
The dishwasher must be grounded. In
the event of a malfunction or breakdown,
grounding will reduce the risk of electric
shock by providing a path of least
resistance for electric current. The
dishwasher is equipped with a cord
having an equipment-grounding conduc-
tor and a grounding plug. The plug must
be plugged into an appropriate outlet that
is installed and grounded in accordance
with all local codes and ordinances.
WARNING = Improper connection of
the equipment-grounding conductor can
result in a risk of electric shock.
Electrical Shock Hazard
Electrically ground dishwasher.
Connect ground wire to green ground
connector in terminal box.
Do not use an extension cord.
Failure to follow these instructions
can result in death, fire, or
electrical shock.
Check with a qualified electrician or
service representative if you are in
doubt whether the dishwasher is
properly grounded. Do not modify the
plug provided with the dishwasher; if it
will not fit the outlet, have a proper
outlet installed by a qualified electrician.
For a permanently connected
dishwasher:
The dishwasher must be connected to
a grounded metal, permanent wiring
system, or an equipment-grounding
conductor must be run with the circuit
conductors and connected to the
equipment-grounding terminal or lead
on the dishwasher.
- SAVE THESE INSTRUCTIONS -

ii! ! !i!! i: i"'ii_i"'i!!!"'!!!!":_!!_lllilll'_l_!ll!!!iii!!"!!_'?'_'_!iiiiil_'_!!!i"_"iii!!!!_!!''"!!"'"ff!i!J!iiiiill!!_!i'!!_l"i'!!!'"'!'"!!!!!iii!!i""!i!!E!ii
_"iiiiiii::_:_:i_!_i_"_i_i_"i_ii_,!iiiii__i:ii!i!!__,,"i_,_i_Sii"i_i_i__Jiiiiiii_SOl_,¸
1. Load the dishwasher. See the "Loading
Your Dishwasher" section.
6. Run hot water at the sink nearest the
dishwasher until water is hot.
Turn off water.
2. Spin the spray arms. They should turn
freely.
3. Add detergent. See the "Using the
Dispensers" section.
4. Add rinse agent, if needed.
5. Close door firmly until it latches.
7. Press a Cycle pad. If desired, press one
or more Option pads. The
dishwasher starts filling once
you press a Cycle pad unless
you select the delay wash
cycle. You may press Option
pads as the machine is filling.
The pad indicator glows red
when a cycle or an option is
selected.
You can stop your dishwasher anytime
during a cycle. All you have to do is:
• Open the door slightly. Wait for any filling
or spraying action to stop before opening
the door all the way. Close the door to
continue the cycle.
OR
• Press Cancel/Drain. Once pressed, a
2-minute drain starts.
Loa Your ishwasher
• To save water and energy, do not rinse
dishes before putting them into the
dishwasher.
• Remove large pieces of food, bones, and
other hard items. The POWER CLEAN T''
filter module removes food particles from
the water. The module contains a chopping
device which reduces the size of food
items.
NOTE: }f hard items such as fruit seeds,
nuts, and egg shells enter the
POWER CLEAN filter module, you might
hear chopping, grinding, crunching, or
buzzing sounds. Those sounds are normal
when hard items enter the module. Do not
let metallic items (such as pot handle
screws) get into the POWER CLEAN filter
module. Damage can occur.
• Foods like eggs, rice, pasta, and cooked
cereals may be hard to remove if left to
dry over a period of time. Run a Rinse
Only cycle to keep dishes moist if you do
not plan to wash them soon.
• Load dishes so soiled surfaces face the
rotating spray arm.
• Load dishes so they are not stacked or
overlapping. It is important for the water
spray to reach all soiled surfaces for best
washing. For best drying, water must be
able to drain from all surfaces.
Loading for quiet operation
• Secure lightweight load items in the racks.
• Pot lids and handles, pizza pans, cookie
sheets, etc. should not touch interior walls
or interfere with the spray arm's rotation.
• Load dishes so they do not touch one
another.
NOTE: Keep sink drain plugs inserted
during dishwasher operation to prevent
noise transfer through drains.
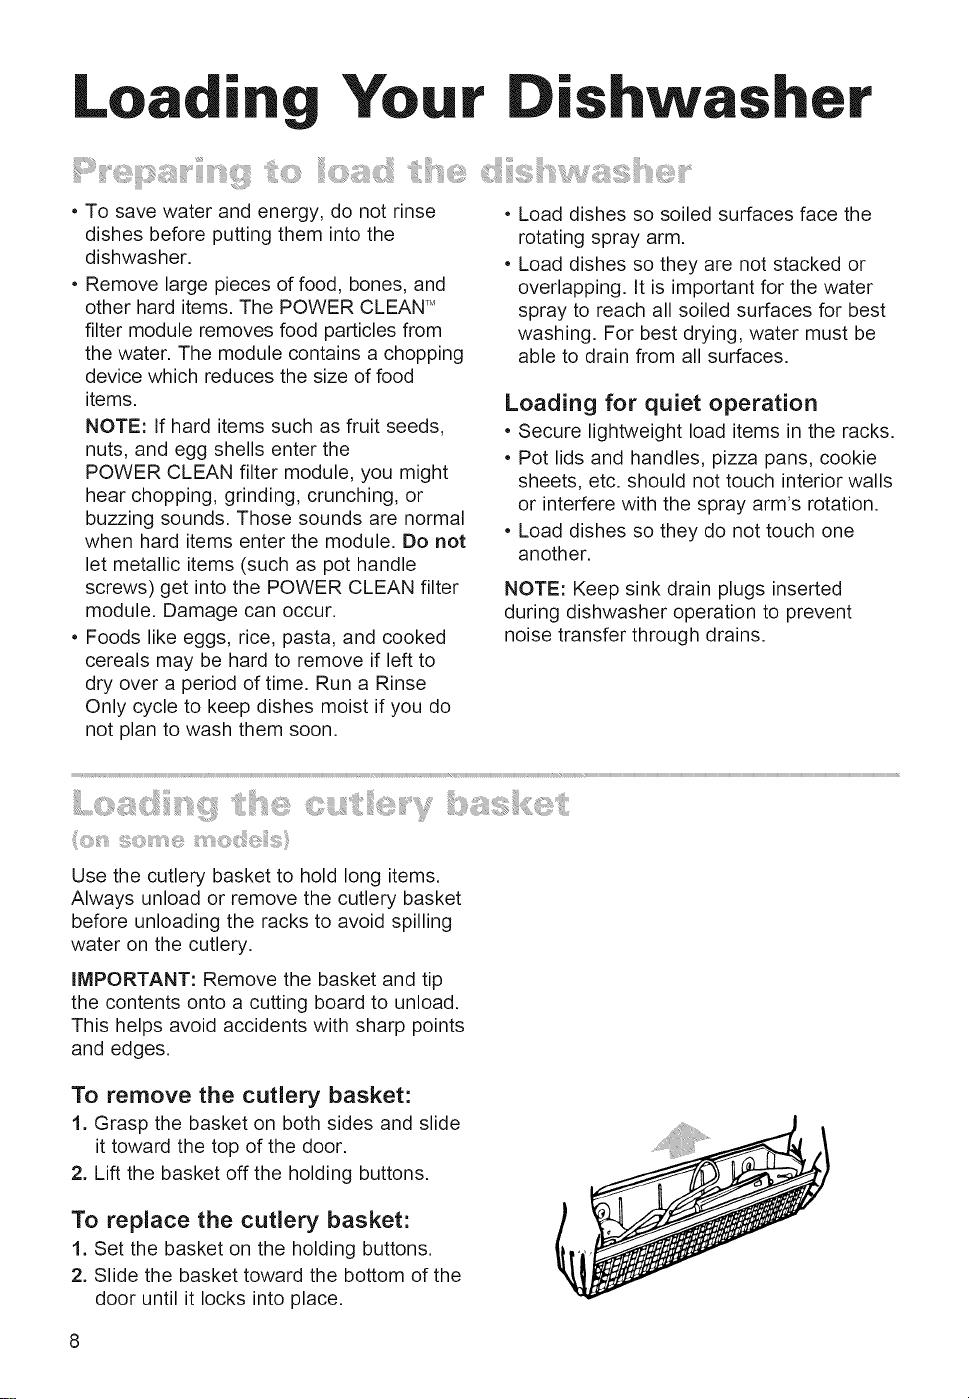
Use the cutlery basket to hold long items.
Always unload or remove the cutlery basket
before unloading the racks to avoid spilling
water on the cutlery.
IMPORTANT: Remove the basket and tip
the contents onto a cutting board to unload.
This helps avoid accidents with sharp points
and edges.
To remove the cutlery basket:
1. Grasp the basket on both sides and slide
it toward the top of the door.
2. Lift the basket off the holding buttons.
To replace the cutlery basket:
1. Set the basket on the holding buttons.
2. Slide the basket toward the bottom of the
door until it locks into place.

• Loadthesilverwarebasketwhileitisin
thedoorortakethebasketoutforloading
ona counterortable.
• Mixitemsineachsectionofthebasket
withsomepointingupandsomedownto
avoidnesting.Spraycannotreachnested
items.Loadspoonswithbakedonfood
pointingup.
IMPORTANT:Alwaysloadsharpitems
(knives,skewers,forks,etc.)pointing
down.
• Putsmallitems(babybottlecaps,jarlids,
etc.)inthesectionwiththelid.
• Youcanalsoremovethebasketforeasy
unloading.Alwaysunloadorremovethe
basketbeforeunloadingtherackstoavoid
spillingwateronthesilverware.
NOTE:Thebasketmaybehungonthe
doororonthebottomrack.Itcanalsobe
placedinsidethebottomrack.
orlll
To remove the basket:
1. Grab the basket by the handle and slide
it toward the top of the door.
2. Lift the basket off the holding buttons.
To replace the basket:
1. Set the basket on the holding buttons.
2. Slide the basket towards the bottom of
the door until it locks in place.
To open the basket:
• Unhook the latch as shown.
NOTE: Be sure the cover is completely
latched before pulling out the bottom rack
and before closing the dishwasher door.

,
Load items with cooked-on or dried-on food 12 place setting load
in the bottom rack, with soiled surfaces
facing inward to the spray.
Mixed load
* Load plates, soup bowls, etc., between
prongs and facing inward to the spray.
* Make sure pot handles and other items do
not stop rotation of the spray arm. Spray
arm must move freely.
* Load heavily soiled cookware face down
in rack.
* Do not stack or overlap dishes. Water
spray must reach all soiled surfaces for
best results.
Utensil load
• Load cookie sheets, cake pans, and other
large items at sides and back. Loading
such items in front may keep water spray
from reaching detergent dispenser and
silverware basket.
NOTES:
* Do not load glasses, cups, or plastic items
in the bottom rack.
* Do not load items between the bottom rack
and the dishwasher tub. This can block
the water inlet opening.
* If you have removed the bottom rack for
unloading or cleaning, replace it with
bumpers in front.
Mixed load
Utensil load
/
Bumpers must face
dishwasher door
Fold-down dividers
(on some models)
Fold=down dividers at the back of the rack
can be lowered to make room for deep
bowls, roasters, and other large items.
10

, iiiii:, :iii i :::iii ,
The top rack is designed for cups, glasses, 12 place setting
and smaller items.
Cup and glass load
• Load so open ends face down for
cleaning and draining.
• Load glasses in top rack only - bottom
rack is not designed for glasses. Damage
can occur.
• Place items in the rows between prongs.
Placing them over the prongs can lead
to breakage.
• Secure lightweight items.
• China, crystal, and other delicate items
must not touch each other during dish-
washer operation. Damage can occur.
Mixed load
• Small bowls, pans, and other utensils can
be placed in the top rack.
• Load plastic items in the top rack only.
Plastic items can melt in the bottom rack.
• Wash only plastic items marked
"dishwasher safe."
• Load plastic items so the force of the
spray does not move them during the
cycle.
Cup and glass load
Mixed load
Fold=down tines
(on some models)
Fold down tines in the top rack to
accommodate larger items.
Extra=capacity fold=down
shelves
(on some models)
Fold down the extra shelves on the top rack
to hold items such as cups, juice glasses
and cereal bowls.
11
=!
spensers
• Use automatic dishwashing detergent
only. Other detergents are too mild and
much too sudsy.
• Add detergent just before starting cycle.
• Store tightly closed detergent in a cool, dry
place. Fresh automatic dishwasher
detergent results in better cleaning.
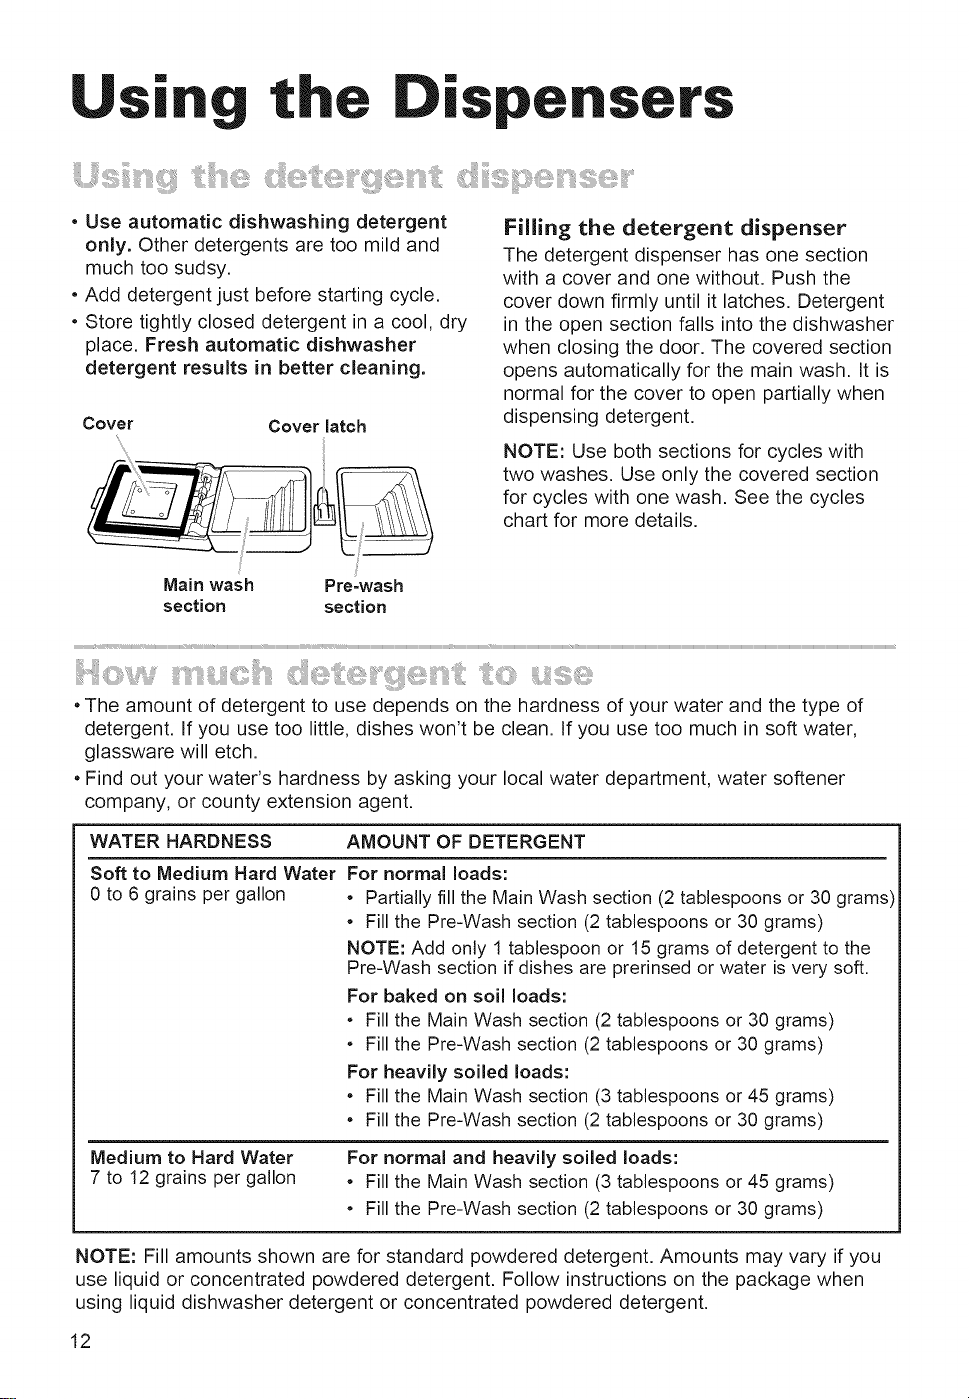
Cover
Main wash Pre=wash
section section
• The amount of detergent to use depends on the hardness of your water and the type of
detergent, if you use too little, dishes won't be clean, if you use too much in soft water,
glassware will etch.
• Find out your water's hardness by asking your local water department, water softener
company, or county extension agent.
Cover latch
Filing the detergent dispenser
The detergent dispenser has one section
with a cover and one without. Push the
cover down firmly until it latches. Detergent
in the open section falls into the dishwasher
when closing the door. The covered section
opens automatically for the main wash. it is
normal for the cover to open partially when
dispensing detergent.
NOTE: Use both sections for cycles with
two washes. Use only the covered section
for cycles with one wash. See the cycles
chart for more details.
WATER HARDNESS AMOUNT OF DETERGENT
Soft to Medium Hard Water For normal loads:
0 to 6 grains per gallon • Partially fill the Main Wash section (2 tablespoons or 30 grams)
• Fill the Pre-Wash section (2 tablespoons or 30 grams)
NOTE: Add only 1 tablespoon or 15 grams of detergent to the
Pre-Wash section if dishes are prerinsed or water is very soft.
For baked on soil loads:
• Fill the Main Wash section (2 tablespoons or 30 grams)
• Fill the Pre-Wash section (2 tablespoons or 30 grams)
For heavily soiled loads:
• Fill the Main Wash section (3 tablespoons or 45 grams)
• Fill the Pre-Wash section (2 tablespoons or 30 grams)
Medium to Hard Water
7 to 12 grains per gallon
NOTE: Fill amounts shown are for standard powdered detergent. Amounts may vary if you
use liquid or concentrated powdered detergent. Follow instructions on the package when
using liquid dishwasher detergent or concentrated powdered detergent.
12
For normal and heavily soiled loads:
• Fill the Main Wash section (3 tablespoons or 45 grams)
• Fill the Pre-Wash section (2 tablespoons or 30 grams)

Keeptherinseagentdispenserfilledwitha
liquidrinseagent.A rinseagentgreatly
improvesdish dryingbyhelpingwater
flowoff duringthelastrinse.A rinse
agentalsokeepswaterfromforming
dropletsanddryingasspotsorstreaks.
Asmallamountofrinseagentautomatically
releasesintotherinsewaterduringthefinal
rinseofeachcycle.Forbestdrying
results,checkdispenserperiodicallyto
seeif it needsfilling.
To check dispenser:
• Check center of Fill Indicator Cap. Clear
means it needs filling.
OR
• Remove Fill Indicator Cap. An "E" is visible
when dispenser is empty.
To fill dispenser:
The rinse agent dispenser holds 6 ounces
(175 mL). Under normal conditions, this
lasts about 3 months.
1. Open dishwasher door completely.
2. Remove Fill Indicator Cap.
3. Add rinse agent. Fill to smallest opening
in lower part of dispenser only. Overfilling
may cause rinse agent to leak out. This
will not harm the dishwasher, but could
cause oversudsing.
4. Clean up any spilled rinse agent with
a damp cloth.
5. Replace Fill Indicator Cap. Keep it
closed tightly.
NOTE: You do not have to wait until the
dispenser is empty before refilling, but do
not overfill it. Your dishwasher is designed
to use a liquid rinse agent. You do not need
to use a solid or bar-type rinse agent.
Cap center clear
when empty
Do not fill past
smallest opening
Keep dispenser filled for best drying results
13

the Controls
i :
Press a Cycle pad. The dishwasher starts
filling once you press a Cycle pad, unless
you select the delay wash. You can press
Option pads as the machine is filling.
NOTE: Your model may have some or all of
the cycles shown.
For Series 980 models:
Your electronic dishwasher senses the soil
level on your dishes. Soil level determines
the length of some cycles, the amount of
heat added to a wash or rinse, and the
cycle needed for a load.
Cycle time depends upon the soil on the
dishes, and water usage may be higher for
large amounts of soil.
A "+" shows what each cycle includes
MAIN FINAL USE TIME
CYCLE
RINSE ONLY
IFlllFO +sn°a+w
• Do not use detergent.
• Water is not heated during
Rinse Only.
• Air Dry is automatically
selected.
QUICK WASH
i!| Asn°ewash+
to 140°F (60°C) in the final
rinse.
CHINA
IN Light wash and a
items to be
I washed one or
more days later.
quick cleaning.
• The water heats
gentle dry for china
and crystal.
WASH RINSE WASH RINSE RINSE DRY (gallons', (Minutes)
+ + 4.3 19
+ + + 4.8 70*
WATER CYCLE
LOW ENERGY
prerinsed or
Ill/sn°ewash+
to 140°F (60°C) in the final
rinse.
Cycle time includes dry time and may be longer depending on the temperature of water entering the dishwasher and
soil level on the dishes. The cooler the water, the longer the cycle time. If the water is already hot enough, the cycle
times will be as shown.
14
lightly soiled loads.
• The water heats

A "." shows what each cycle includes
MAIN FINAL USE TIME
CYCLE
WASH RINSE WASH RINSE RINSE DRY (gallons) (Minutes)
LOWENERGY/CHINA
Singlewashfor
prerinsed,lightly
soiled,chinaor
+ + + + + 6.9 67*
srystalloads.
Thewaterheatsto 140°F
(60°C)inthefinalrinse.
NORMAL
normal, everyday
lllJl°ou+wash+
abel is based on this cycle.)
If you have used the Pots-N-
Pans or the Heavy cycle,
3ress Rinse Only before
selecting Normal.
The water heats to 140°F
(60°C) in the final rinse.
HEAVY
soiled loads. (The
Energy Guide
+ + + + 6.9 70*
+
WATER CYCLE
cleaning heavily
III ouble wash for
to 140°F (60°C)in both
washes and the final rinse.
POTS-N-PANS
dishes, pots and pans.
The water heats to 140°F
(60°C) in both washes and
the final rinse.
* Cycle time includes dry time and may be longer depending on the temperature of water entering the dishwasher
and soil level on the dishes. The cooler the water, the longer the cycle time. if the water is already hot enough, the
cycle times will be as shown.
soiled loads.
• The water heats
An extended
double wash for
maximum
cleaning of
heavily-soiled
+' " +' +' +' " 10.8 84*
" " " +' +' +' 10.8 89*
15

PressCancel/Draintocancelacycleor
! !
clearoptionselections.
•YoucanpressCancel/Drainagaintostop
thedrainimmediately.Remembertodrain
thedishwasheragainbeforestartinga
newcycle.
To cancel a cycle:
• Press Cancel/Drain while the dishwasher
is running to start a 2-minute drain. It will
take a few seconds for the drain to start. If
desired, select a new cycle. (See the
"Changing a cycle or an option setting"
section.)
You can press an Option pad after the
dishwasher starts as long as the cycle is
not past the point that the option is used.
For example, you can press Air Dry any
time before the Drying indicator glows.
After a wash cycle, the dishwasher remem-
bers the options used and uses the same
options in the next wash cycle unless new
options are selected or the Cancel/Drain
pad is pressed.
POWER SCOUR TM feature
(on some models)
When POWER SCOUR is selected the dish-
washer heats the water during
several portions of the Normal,
Heavy, and Pots-N-Pans cycles.
Heating the water helps improve
washing results. The Pots-N-
Pans cycle, with POWER SCOUR is
recommended for baked-on soil.
High Ternp Wash
(on some models)
When High Temp Wash is selected, the
dishwasher heats the water to
140°F (60°C) during the main
wash of the Low Energy,
China, Normal and Heavy
cycles. Heating the water helps improve
washing results. The Pots-N=Pans cycle
automatically uses High Temp washes.
NOTE: A small amount of water remaining
in the dishwasher is normal.
To clear the cycle indicators:
Press Cancel/Drain before starting the
dishwasher.
SAN| R|NSE TM option
(on some models)
Selecting the SANI RINSE option raises the
water temperature in the final
rinse to 150°F (65°C). SANI
RINSE is an option with the
Pots-N-Pans, Heavy, Normal,
Low Energy and China cycles. Depending
on the incoming temperature of your water,
cycle times might be longer when you select
SANI RINSE.
NOTE: SANI RINSE raises the temperature
of the final rinse to 150°F (65°C), and main-
tains that temperature 9 minutes. This high
temperature rinse sanitizes your dishes and
glassware.
Air Dry
When Air Dry is selected, the air in the
dishwasher is not heated during
the "dry" portion of a cycle. Using
Air Dry helps save energy, but
dishes take longer to dry and
some spotting can occur. Some items (such
as plastics) may need towel drying. For best
drying, use a liquid rinse agent.
NOTE: The dishwasher automatically heats
the air in the dishwasher during the "dry"
portion of the cycle unless you select Air Dry.
16

During the first minute of a cycle
1. Press new Cycle and/or Option pads.
2. Check the detergent dispensers. They
must be filled properly for the new cycle.
After the first minute of a cycle
1. Press Cancel/Drain. A 2-minute drain
cycle starts. Wait for drain cycle to finish.
2. Press a new Cycle pad.
3. If desired, press one or more Option pad(s).
4. Check the detergent dispensers. They
must be filled properly for the new cycle.
1. Lift up the door latch to stop the cycle.
Wait for spraying action to stop before
opening the door.
2. Open the door and add the item.
3. Close the door, but do not latch it. Wait
30 seconds for the air in the dishwasher
to warm up. Doing so reduces the
amount of moisture in the vent when
restarting a cycle.
4. Close the door firmly until it latches. The
dishwasher resumes the cycle.
For series 925 and 940 models:
You can add an additional item to the dish-
washer anytime before the main portion of a
cycle. See the "Selecting a wash cycle"
chart.
For series 980 model:
You can add items to the dishwasher load
anytime the Add-A-Dish indi-
cator is on.
17
ii! ilIIIIlliliIiIIilIi!i!i!i¸2 IiIii ! !i
i_,_!!_ii_I_S;_,,i_j_,__,,,_O,_iiiii_;!_iiiii,"S
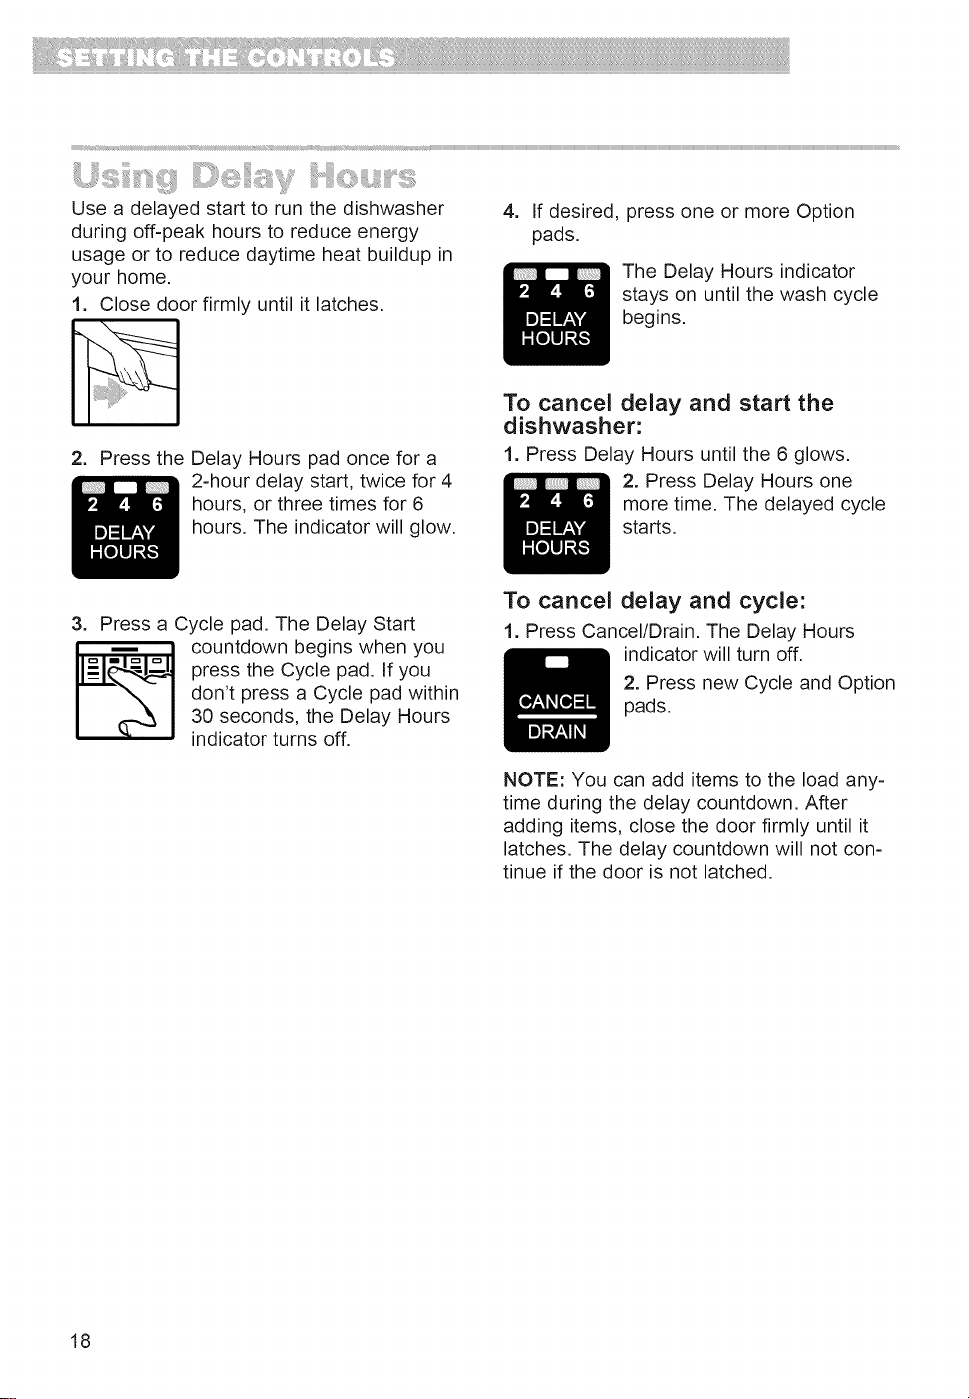
Use a delayed start to run the dishwasher
during off-peak hours to reduce energy
usage or to reduce daytime heat buildup in
your home.
1. Close door firmly until it latches.
2.
Press the Delay Hours pad once for a
2-hour delay start, twice for 4
hours, or three times for 6
hours. The indicator will glow.
3. Press a Cycle pad. The Delay Start
press the Cycle pad. If you
_L_ ountdown begins when you
don't press a Cycle pad within
30 seconds, the Delay Hours
indicator turns off.
4_
If desired, press one or more Option
pads.
The Delay Hours indicator
stays on until the wash cycle
begins.
To cancel delay and start the
dishwasher:
1. Press Delay Hours until the 6 glows.
2. Press Delay Hours one
more time. The delayed cycle
starts.
To cancel delay and cycle:
1. Press Cancel/Drain. The Delay Hours
indicator will turn off.
2. Press new Cycle and Option
pads.
18
NOTE: You can add items to the load any-
time during the delay countdown. After
adding items, close the door firmly until it
latches. The delay countdown will not con-
tinue if the door is not latched.

Washing
The Washing indicator glows at the start of
the first fill of any cycle
(except Rinse Only) and
remains on until the end
of the main wash.
Add-A=Dish
(on some models)
The Add-A-Dish indicator glows as soon as
the dishwasher starts and
keeps glowing until the main
wash portion of the cycle
begins. You can add an
additional item while the indicator is on.
Water Heating
The Water Heating indicator glows when-
ever water is heated
during a cycle.
Rinsing
The Rinsing indicator glows during the last
two rinses of all cycles.
Drying
The Drying indicator glows during the
drying portion of each
cycle - even if you select
Air Dry. It turns off at
the end of the cycle. If
dishes are not as dry as you expected when
using Air Dry, either allow longer drying
times (overnight) or do not use Air Dry.
Clean
The Clean indicator glows at the end of a
cycle to show that the
load is clean. All other
indicators turn off. The
Clean indicator glows until
you open the door or press Cancel/Drain or
any other control pad.
Controls Locked
The Controls Locked feature lets you lock
the control pads. When
the controls are locked,
you cannot start the
dishwasher.
To lock controls:
* Press and hold Air Dry (about 5
seconds) until the Controls Locked
indicator glows.
To unlock controls:
• Press and hold Air Dry (about 5 seconds)
until the Controls Locked indicator turns
off.
19

ashing Special items
MATERIAL DISHWASHER SAFE? EXCEPTIONS/SPECIAL INFORMATION
Aluminum Yes High water temperature and detergents can pit
finish of anodized aluminum.
Bottles No Wash bottles and cans by hand. Labels attached
and Cans with glue can loosen in your dishwasher. Loose
labels and glue can clog spray arm or the pump
and will reduce washing performance.
Cast Iron No Seasoning will be removed and iron will rust.
China/ Yes Always check manufacturer's recommendations
Stoneware before washing. Antique, hand-painted, or over-
the-glaze patterns may fade. Gold leaf can
discolor or fade.
Crystal Yes Always check manufacturer's recommendations
before washing. Some types of leaded crystal can
etch with repeated washings.
Gold No Gold-colored flatware will discolor.
Glass Yes Milk glass will yellow with repeated dishwasher
washing.
Hollow- No Handles of some knives are attached to the blade
Handle with adhesives which may loosen if washed in the
Knives dishwasher.
Pewter No High water temperatures and detergent can
discolor or pit finish.
Disposable No Cannot withstand high water temperatures
Plastics and detergents.
Plastics Yes Always check manufacturer's recommendations
before washing. Plastics vary in their capacity to
withstand high water temperatures and deter-
gents. Load plastics in top rack only.
Stainless Yes Run the Rinse Only cycle if not washing immedi=
Steel ately. Prolonged contact with food containing salt,
vinegar, milk products, or fruit juice can damage
finish.
Sterling Yes Run the Rinse Only cycle if not washing immedi=
Silver or ately. Prolonged contact with food containing salt,
Silver Plate acid, or sulfide (eggs, mayonnaise, and seafood)
can damage finish.
Tin No Can rust.
Wooden No Always check manufacturer's recommendations
Ware before washing. Untreated wood can warp,
crack, or lose its finish.
2O

Caring for Your
_iiil,',i,i,iiiiiiil;i;;i!iili,_i_!i_,,,,,_i_ii!!!_il;ii_iii,i_,'!i_i_,_i;iii_i_i;i"_!!!i;iiiiil:::iii_l"iiic_,,_l!:!i!_,¸,_i!i_i_,;::_ili_,,il:;iiiiii:::,,_iiii!!:;!i!_,_iiii"iiiiii,_i:i:ii_,_ii_.....
In most cases, regular use of a soft, damp
cloth or sponge and a mild detergent is all
that is necessary to keep the outside of your
dishwasher nice looking and clean.
Hard water minerals may cause a white film
to build up on the inside surfaces, especially
just beneath the door area.
To clean interior:
• Apply powdered dishwasher detergent to a
damp sponge to make a paste.
OR
• Use liquid automatic dishwasher detergent
and clean with damp sponge.
Do not clean the dishwasher interior until it
has cooled.
Wear rubber gloves. Do not use any type of
cleanser other than dishwasher detergent
because it can cause foaming or sudsing.
ishwasher
NOTE: See "Removing spots and film" in
the "Solving Common Dishwashing Prob-
lems" section to clean your dishwasher with
white vinegar. Remember, this procedure is
intended for occasional use only. Vinegar
is an acid. Excessive use can damage your
dishwasher.
O"!_,_!_ii_i_"'i_:_ii_
The overfill protector (in the front right
corner of the dishwasher tub) keeps the
dishwasher from overfilling. It must be in
place for the dishwasher to operate.
Check under the float for objects that may
keep the protector from moving up or down.
....
21
 Loading...