

Whirlpool GTE 275 STOPF A2, GTE 405 STOPF A2, GTE 335 STOPF A2 INSTRUCTION FOR USE
GB
INSTRUCTIONS FOR USE
APPLIANCE DIAGRAM (Fig. 1)
A. Handle.
B. Safety closure (if provided).
C. Seal.
D. Separator (if provided).
E. Defrost water drain plug.
F. Control panel.
G. Side motor ventilation grille.
CONTROL PANEL DIAGRAM (Fig. 2)
1. Red light: when blinking, it indicates an alarm
condition (see the section "TROUBLESHOOTING
GUIDE").
2. Blue light: when on, it indicates that the STOP FROST
function is activated (see the section "STOP FROST
FUNCTION")
3. Green lights: they indicate that the product is
working, the set temperature and possible activation of
the quick freeze function ("Shopping").
4. Setting button: for updating the set temperature,
activation/deactivation of the quick freeze function
("Shopping") and activation/deactivation of the "STOP
FROST" function.
BEFORE USING THE APPLIANCE
Your new appliance is designed to be used in the
household and similar applications such as:
- kitchen areas in shops, offices and other working
environments
- farm houses
- by clients in hotels, motels, residences, bed &
breakfasts.
The product must only be used to store frozen food, to
freeze fresh food and to make ice.
Regulations require the appliance to be earthed.
The manufacturer declines all liability for injury to
persons or animals and for damage to property
resulting from failure to observe the above
procedures and reminders.
1. After unpacking, make sure that the appliance is
undamaged and that the door closes perfectly, with the
gasket remaining intact. Any damage must be reported
to your retailer within 24 hours after delivery of the
appliance.
2. Wait at least two hours before switching the appliance
on in order to ensure the refrigerant circuit is fully
efficient.
3. Installation and electrical connection must be carried
out by a qualified technician, according to the
manufacturer's instructions and local safety regulations.
4. Clean the inside of the appliance before using it.
• Before connecting the appliance to the mains supply,
ensure that the voltage corresponds to that given on
the rating plate located on the rear of the appliance.
• Electrical connections must be made in
accordance with local regulations.
INSTALLATION
• Unpack the product.
• Remove the 4 spacers inserted between the lid
and the product. (Fig 3)
• Make sure the defrost water drain plug (if provided) is
correctly positioned (E).
• For optimum operation and to avoid damage when the
lid is opened, maintain a distance of at least 7 cm from
the front wall and 7 cm at the sides. (Fig 4)
• Insert the accessories (if provided).
STARTING THE PRODUCT
• Connect the product to the power supply.
• The green light ("Min") comes on.
• The red light (1) blinks, since the temperature inside
the product is not yet low enough for loading food.
This light normally goes off within six hours after
startup.
• Place food inside only when the red light has gone off.
Note: If the STOP FROST function is deactivated, the lid
cannot be immediately reopened after closing it, because
the seal is tight. It is necessary to wait a few minutes
before reopening the lid.
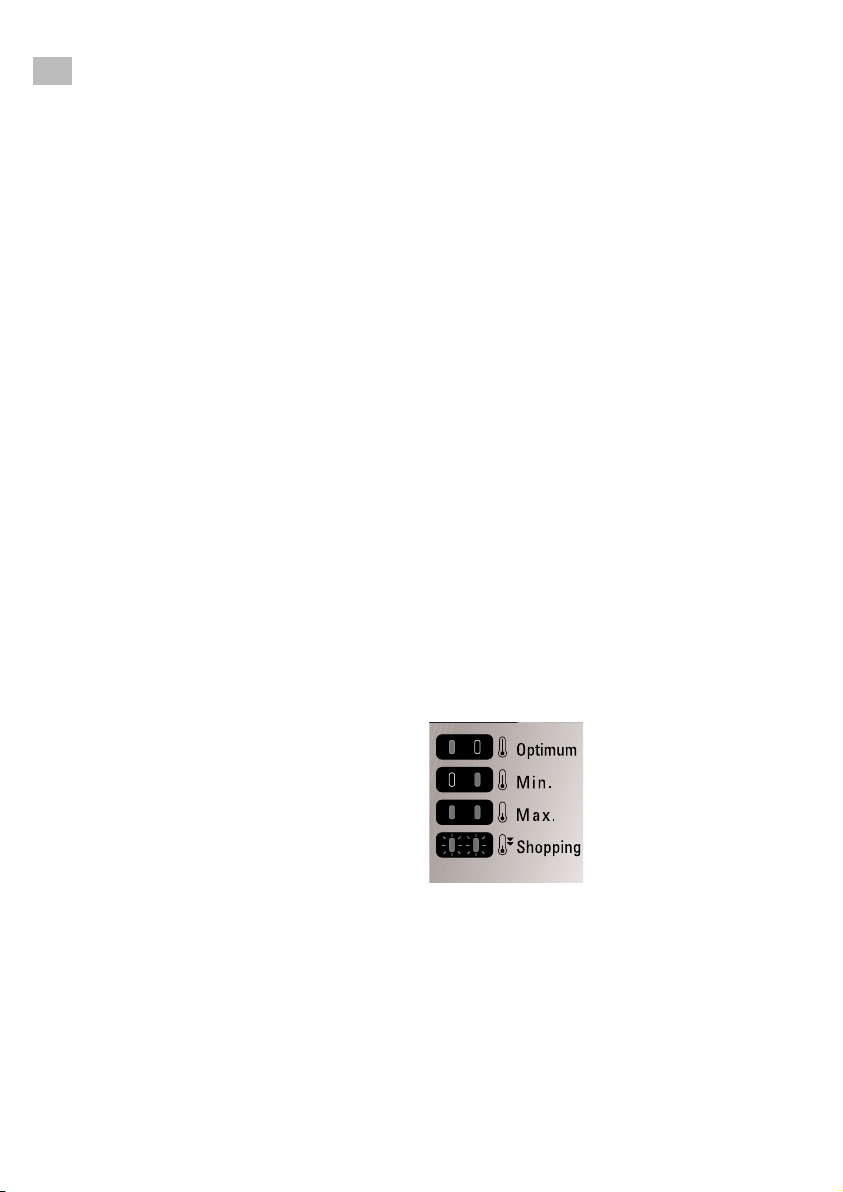
TEMPERATURE ADJUSTMENT
Use the button (4) to select the required temperature.
To adjust the product temperature, proceed as follows:
• Press the button (4). With each press of the button,
the set temperature will be changed cyclically between
the values "Optimum", "Min", "Max" and "Shopping".
• Select "Max" for a colder storage temperature.
• In case of a partial load, it is advisable to select
"Optimum" to optimise energy consumption.
The green lights (3) indicate the selected setting as
follows:
Optimum: less cold
temperature (left light on).
Min: middle temperature (right
light on).
Max: very cold temperature
(both lights on).
Shopping: Quick Freeze (both
lights on).
See the section "Freezing fresh
food".
Note: In case of a power failure, the settings (except for
the "STOP FROST" function) remain stored. The time
required for the temperature inside the freezer to reach
approximately the set value may vary depending on the
climatic conditions and the setting selected.
STOP FROST FUNCTION
The STOP FROST function significantly reduces the
amount of frost that can form inside the product,
collecting it in the special easy to remove and clean "ICE
BOX" (M) container. STOP FROST technology also allows
easy reopening of the lid at any time whenever deemed
necessary, even repeatedly, always with the same effort.

The STOP FROST function is already activated when the
product is switched on the first time (blue light on). It can
be deactivated/reactivated by keeping the button (4)
pressed for at least 3 seconds.
Thanks to STOP FROST technology, the ambient humidity
is largely conveyed inside the ICE BOX (M), where it
turns into ice.
Make sure to periodically remove the inside the ICE
BOX (M) following the cleaning procedure described
below. The frequency of cleaning operations required to
ensure proper functioning of the system depends on the
climatic conditions in the place of installation (more
frequent cleaning is advisable in places with high
humidity). The lack of or inadequate cleaning of the
device can temporarily compromise its operation.
Therefore, during normal use it is advisable to check the
level of ice accumulated in the Ice Box (M), also by means
of the special inspection window (I).
STOP FROST DEVICE CLEANING PROCEDURE
• Open the lid of the product.
• Grip the ICE BOX (M) with two hands and turn it
anticlockwise (fig. S1), bringing the top indicator (H)
from the closed padlock to the open padlock position
(fig. S2), then pull out the ICE BOX (fig. S3).
• Remove any ice present inside the cone (L) on the lid
(free the middle hole of any obstructions), being careful
not to damage the surfaces.
• Dry the surfaces of the cone (L) on the lid with a soft
cloth.
• Close the lid.
• Remove the ice contained in the ICE BOX (M), washing
it with cold or lukewarm (not hot) water.
• Dry the inside and outside of the ICE BOX (M) with a
soft cloth.
• Refit the ICE BOX (M), positioning the top indicator
(H) at the open padlock then turn clockwise until
aligning the top indicator (H) with the closed padlock
(reverse order to that followed for removing the ICE
BOX).
• Close the lid.
IF THE ICE BOX (H) IS BLOCKED OR HARD TO
REMOVE
If the ICE BOX (M) is blocked, do not persist in trying to
remove it, but proceed as follows:
• Close the lid and check if the STOP FROST function is
on or off.
- If the function is on (blue light on):
press the button (4) for 3 seconds to deactivate the
function (blue light off), then press the button (4)
again for 3 seconds; the STOP FROST function is
reactivated (blue light on).
- If the function is off (blue light off):
press the button (4) for 3 seconds: the STOP FROST
function is activated (blue light on).
• Wait about 25 minutes for completion of automatic
defrost, then try removing the ICE BOX (M) again by
following the "STOP FROST DEVICE CLEANING
PROCEDURE".
FREEZING FOOD
Preparing fresh food for freezing
• Wrap and seal fresh food in: aluminium foil, cling film,
air and water-tight plastic bags, polyethylene containers
with lids, provided they are suitable for freezing foods.
• Food must be fresh, mature and prime quality.
• Fresh vegetables and fruit should preferably be frozen
as soon as they are picked to maintain the full original
nutritional value, consistency, colour and flavour.
• Always leave hot food to cool before placing in the
appliance.
Freezing fresh food
• Place foods to be frozen in direct contact with the walls
of the appliance:
A) - food to be frozen,
B) - food already frozen.
• Avoid placing foods to be frozen in direct contact with
food already frozen.
• For better and faster freezing, foods should be split into
small portions; this will also be useful when the frozen
items are to be used.
1. At least 24 hours before storing fresh food in the
appliance, activate fast freezing ("Shopping") by
repeatedly pressing button (4) until both green
indicator lights (3) flash.
2. Place the food to be frozen inside the appliance and
keep the lid closed for 24 hours. Food will be fully
frozen after this period of time.
The fast freezing function ("Shopping") can be deactivated
by pressing button (4) and selecting a different
temperature setting.
If the function is not deactivated manually, the appliance
automatically deactivates the function after 50 hours,
restoring the last setting selected (which was active for at
least 1 minute) before the "Shopping" setting was selected.
FOOD STORAGE
Refer to the table on the appliance.
Classification of frozen foods
Load and classify the frozen foods; it is advisable to
indicate the storage date on the packs, to ensure
 Loading...