

Whirlpool GT386MIR Quick reference guide
GB
T
HIS FUNCTIO N IS USED
for quick reheating of food with a
high water content such as clear soups, co ee or tea.
q
PRESS THE JE T START BUTTO N.
THIS FUNCTION AU TOMATICAL-
LY STARTS with maximum mi-
crowave power level and the cooking time set to 30
seconds. Each additional press increases the time with
30 seconds. You may also alter the time by turning the
adjust knob to increase or decrease the time af ter the
function has started.
GT 386
THE
CLOCK IS SET
and in operation.
D
URING YOUR SETTIN G
, if you press the Stop button it will
exit the setting and enter standby mode with only colon
shown.
N
OTE
: If current clock setting is not completed till clock
set mode time out (1 minute), it will enter Standby mode
with only colon shown.
q
TURN THE ADJUST KN OB to set the hour when the left-
hand digit (hours) blinking.
w
PRESS START BUTTO N to set the hours.
e
TURN THE ADJUST KN OB to set the minute when the
two right hand digit (minutes) blinking.
r
PRESS START BUTTO N to set the minutes.
SUPPLY VOLTAGE 230 V/50 HZ
RATED POWER IN PUT 1900 W
FUSE 10 A (UK 13 A)
MW OUTPUT POW ER 700 W
GRILL 900 W
OUTER DI MENSIONS (HXWXD) 299 X 521 X 391
INNER DI MENSIONS (HXWXD) 200 X 326 X 320
USE THIS FUNC TION TO quickly give a pleasant brown
surface to the food.
q
PRESS THE GR ILL BUTTON.
w
TURN THE ADJUST KNOB to set the cooking time.
e
PRESS THE JE T START BUTTON.
D
URING COOK ING TIME, It is possible to adjust the cook
time by turning the adjust knob.
ENSURE THAT THE UT ENSILS used are heat resistant
and ovenproof before grilling with them.
D
O NOT USE PLAST IC utensils when grilling. They
will melt. Items of wood or paper are not suitable either.
GRILL
FUNC
TIO
N I
S U
SED
r q
uic
k r
ehe
ati
ng
of
foo
d w
ith
a
JET START
CLOCK
1/7
MICROWAVES ONLY
POWER SUGGESTED USE :
JET
(700 W)
REHEATING O F BEVERAGES, water, clear soups,
co ee, tea or other food with a high water
content. If the food contains egg or cream
choose a lower power.
500 W
MORE CAR EFUL COOKING e.g. high protein
sauces, cheese and egg dishes and to nish
cooking casseroles.
350 W SIMMER ING STEWS, melting butter.
160 W DEFROST ING. Softening butter, cheeses.
90 W SOFTEN ING Ice cream.
QUICK REFERENCE GUIDE
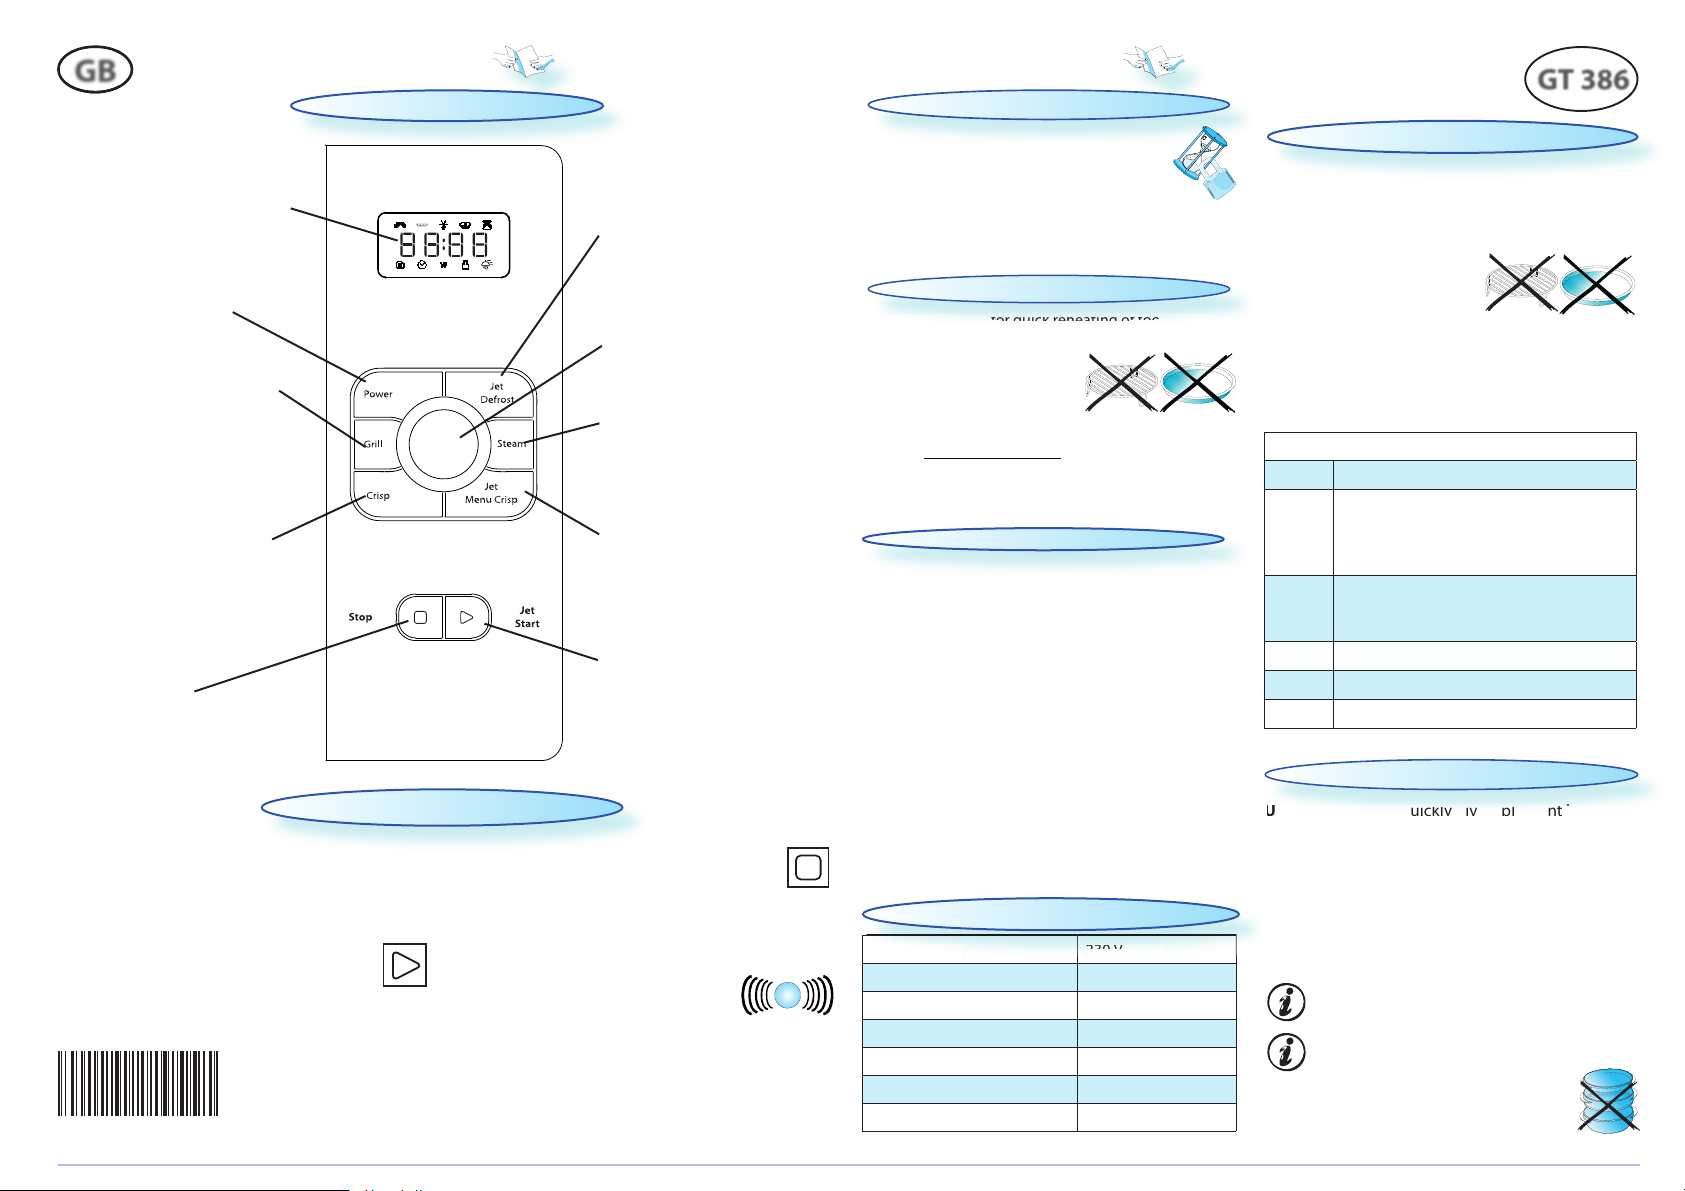
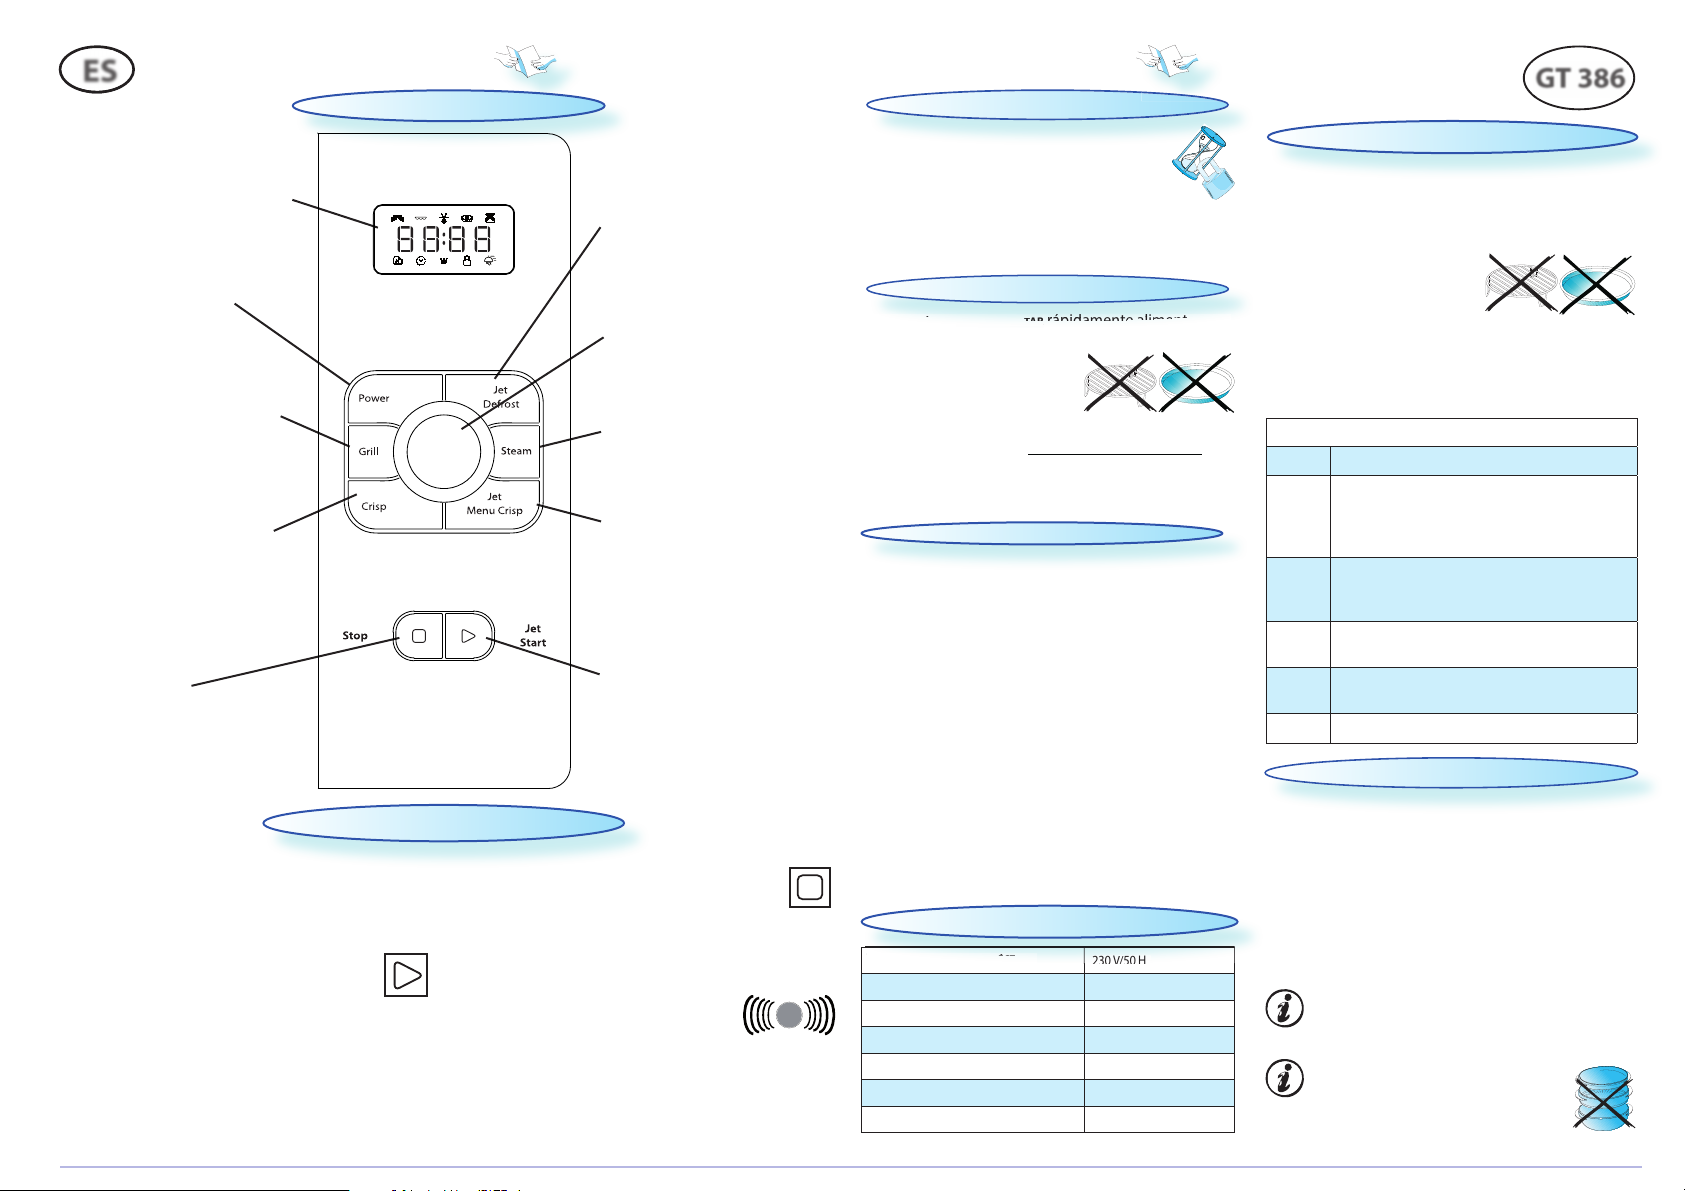
CONTROL PANEL
PAUSE OR STOP COOKING
T
O PAUSE COOKING:
THE COOKING CAN BE PAUSED to check, turn or stir the
food by opening the door. The setting will be maintained for 10 minutes.
T
O CONTINUE COO KING:
CLOSE THE DOO R and press the Jet Start button
ONCE. The cooking is resumed from where it
was paused.
PRESSING TH E START BUTTON TWICE will increase the
time by 30 seconds.
I
F YOU DON’T WANT TO CONTIN UE COOKING:
REMOVE THE FO OD, close the door and press the
STOP button.
NOTE: After cooking ends, the fan, turntable and
cavity lamp is on before pressing STOP button, it’s
normal.
A
BEEP WILL SI GNAL once a minute for 10 minutes when
the cooking is nished. Press the STOP
button or open the door to cancel the
signal.
NOTE: The oven will only hold the settings for 60
seconds if the door is opened and then closed after
the cooking is nished.
COOK & REHEAT WITH MICROWAVES
USE THIS FUN CTION for normal cooking and reheating,
such as vegetables, sh, potatoes and meat.
ONCE THE COO KING PROCESS HAS B EEN STARTED:
The time can easily be increased in 30-second steps by
pressing the Start button. Each press increases the time
with 30 seconds. You may also alter the time by turning
the adjust knob to increase or decrease the time.
q
P
RESS THE POWER BUTTON
repeatedly to set the power.
w
TURN THE ADJUST KN OB to set
the cooking time.
e
PRESS THE JE T START BUTTO N.
CHILD LOCK
THIS AUTOMATIC SAFETY FU NCTION IS ACTI VATED 1
MINUTES A FTER the oven has returned to “stand
bymode“. In this mode the door will be
locked.
THE DOOR MUST BE OP ENED AND CLOSED e.g. putting food into
it, before the safety lock is released. Else the display will
show “DOO R“.
W
HEN THE APPLIANCE IS FIRST PLUGGED IN
or after a power
failure, it will enter clock setting mode automatically.
POWER BUTTON
Use to set the desired
microwave power level.
STOP BUTTON
Press to stop or reset any of
the oven functions.
JET DEFROS T BUTTON
Use to select Jet Defrost function and select type of food to
be defrosted.
ADJUST KNOB
Use to set the cooking time or
weight.
STEAM BUTTON
Use to select Steam function
and select food class.
GRILL BUT TON
Use to select Grill function.
JET START BUTTON
Use to start the cooking
process or invoke the Jet
Start function.
DIGITAL DISPLAY
The display includes a 24-hour
clock and indicator symbols.
CRISP BUTTO N
Use to select Crisp function.
JET MENU CR ISP BUTTON
Use to select Jet Menu Crisp
function and select food
class.
SUPPLY VOLTAGE
230
TECHNICAL SPECIFICATION
W10685281
GB
GT 386
FOOD CLASS AMOUNT HINTS
q
MEAT 100G - 2KG
Minced meat, cutlets,
steaks or roasts.
w
POULTRY 100G - 2.5KG
Chicken whole, pieces
or llets.
e
FISH 100G - 1.5KG Whole, steaks or llets.
r
VEGETABLES 100G - 1.5KG
Mixed vegetables,
peas, broccoli etc.
t
BREAD 100G - 1KG Loaf, buns or rolls.
FOR
FOOD NOT LISTED IN THIS TABLE
and if the weight is lesser
or greater than recommended weight, you should follow
the procedure for “Cook and reheat with microwaves”
and choose 160 W when defrosting.
JET MENU CRISP
USE THIS FUN CTION TO cook various types of frozen foods.
THE OVEN WIL L automatically select cooking method, time
and power needed.
q
PRESS THE JET MENU CRISP BUTTON repeatedly to select
the food class. (see table)
w
TURN THE ADJUST KNOB TO set the weight of the food.
e
PRESS THE START BUTTON.
SOME FOOD C LASSES REQUIR E the food to be added, turned
or stirred during cooking (varies between models).
In these cases the oven will stop and prompt you to
perform the needed action.
Open the door.
Add, Stir or turn the food.
Close the door and restart by pressing the Start
button.
NOTE: In ”add food” status, if the door isn’t opened at
this time (within 2 minutes) the oven will stop and go
to “standby mode” . In “turn food“/”stir food” status, it
will continue to cook if the door isn’t opened within 2
minutes.
FOOD CLASS
RECOMMENDED
AMOUNT
ACCESSORIES TO USE DURING
COOKING
q
RICE 300G - 650G INSERT THE EMPTY CRISP PLATE. ADD FOOD WHEN
“ADD FOOD” IS DISPLAYED
STIR FOOD
w
PASTA 250G - 550G INSERT THE EMPTY CRISP PLATE. ADD FOOD WHEN
“ADD FOOD” IS DISPLAYED
STIR FOOD
e
BUFFALO WINGS / CHICKEN NUGGETS 250G - 500G USE CRISP PLATE TURN FOOD
r
FRENCH FRIES 250G - 500G USE CRISP PLATE STIR FOOD
t
PIZZA 250G - 750G USE CRISP PLATE
y
QUICHE 250G - 600G USE CRISP PLATE
u
BREADED FISH / FISH STICKS 250G - 500G INSERT THE EMPTY CRISP PLATE. ADD FOOD WHEN
“ADD FOOD” IS DISPLAYED
TURN FOOD
i
CORDON BLEU/ CHICKEN CUTLETS 1 - 4 PCS (100-
125G A PCS)
INSERT THE EMPTY CRISP PLATE. ADD FOOD WHEN
“ADD FOOD” IS DISPLAYED
TURN FOOD
FOR FOOD NOT LI STED IN THIS TABLE and if the weight is lesser or greater than recommended weight, you should follow
the procedure for “Cook and reheat with microwaves”.
NOTE: Small amounts of oil or butter can be placed on the Crisp Plate during preheating.
USE THIS FUNCTION TO reheat and cook pizzas and other dough based food. It is also good for frying bacon and eggs, sau-
sages, hamburgers etc.
ENSURE that the Crisp-plate is correctly placed in the
middle of the Glass turntable.
USE OVEN MIT TENS
or the special Crisp handle supplied
when removing the hot Crisp -plate.
BE CAREFU L, NOT TO TOUCH the ceiling beneath the Grill
element.
DO NOT PLACE TH E HOT CRISP-PL ATE on any surface susceptible to heat.
THE OVEN AND THE CRI SP-PLATE become very hot when
using this function.
q
PRESS THE CRIS P BUTTON.
w
TURN TH E ADJUST KNOB to set the cooking time.
e
PR ESS THE START BUTTON.
IT IS NOT POSSIBLE TO CHANGE OR SWITCH the Power level or Grill
on/o , when using the Crisp function.
ONLY USE the supplied Crisp plate with this
function. Other available Crisp plates on
the market will not give the correct result
when using this function.
THE OVEN AUTOMATICALLY use Microwaves and Grill in order
to heat the Crisp-plate. This way the Crisp-plate will
rapidly reach its working temperature and begin to
brown and crisp the food.
k p
as
and
sed
sed
so
goo
d f
or
fry
CRISP
q
POTATOES / ROOT VEGETABLES 150G - 500G
USE EVEN SIZES.
Cut the vegetables into even pieces.
Allow to stand for 1 - 2 minutes, after cooking.
w
VEGETABLES
(Cauli ower and Broccoli)
150G - 500G
e
FROZEN VEGETABLES 150G - 500G ALLOW TO STAND for 1 - 2 minutes.
r
FISH FILETS 150G - 500G
DISTRIBUTE FILLETS EVENLY on the steam grid. Interlace thin parts. Allow to
stand for 1 - 2 minutes, after cooking.
t
CHICKEN FILETS 150G - 500G
USE EVENLY SIZED FILLETS and distribute them evenly on the steam grid. If
you use frozen fillets, make sure the fillets are well defrosted before
steaming.
Allow to stand for 3 - 5 minutes, after cooking.
y
FRUIT 150G - 500G
CUT THE FRUIT IN EVENLY SIZED PIECES.
If the fruit is very ripe, to avoid overcooking, program a lower weight
than the actual.
Allow to stand for 2 - 3 minutes after cooking.
USE THIS FUN CTION FOR such food as vegetables and sh.
ALWAYS USE THE SUPPLIED STEA MER when using this function.
q
PR ESS THE FITNESS BUT TON repeatedly to select food
class. (See table)
w
TURN TH E ADJUST KNOB to set the weight of the food.
e
PR ESS THE START BUTTON.
ADD 100 ml (1 dl) water in the bottom part of
the steamer.
PLACE the food on the steam grid.
Ê
Ð
Ð
COVER with the lid.
tab
d
d
.
.
CE
ood
e s
tea
STEAM
THE STEAMER IS designed to be used with microwaves only!
NEVER USE I T with any other function at all.
USING THE ST EAMER in any other function may cause damage.
ALWAYS ENSURE THAT the turntable is able to turn freely before starting the oven.
ALWAYS PLACE the steamer on the Glass Turntable.
FROZEN FOODS:
IF THE WEI GHT IS LESSER OR GR EATER THAN RECOMMEN DED WEIGHT:
Follow the procedure for “Cook & Reheat with microwaves” and choose 160 W when defrosting.
IF THE FOOD I S WARMER than deep-freeze temperature (-18°C), choose lower weight of the food.
IF THE FOOD I S COLDER than deep-freeze temperature (-18°C), choose higher weight of the food.
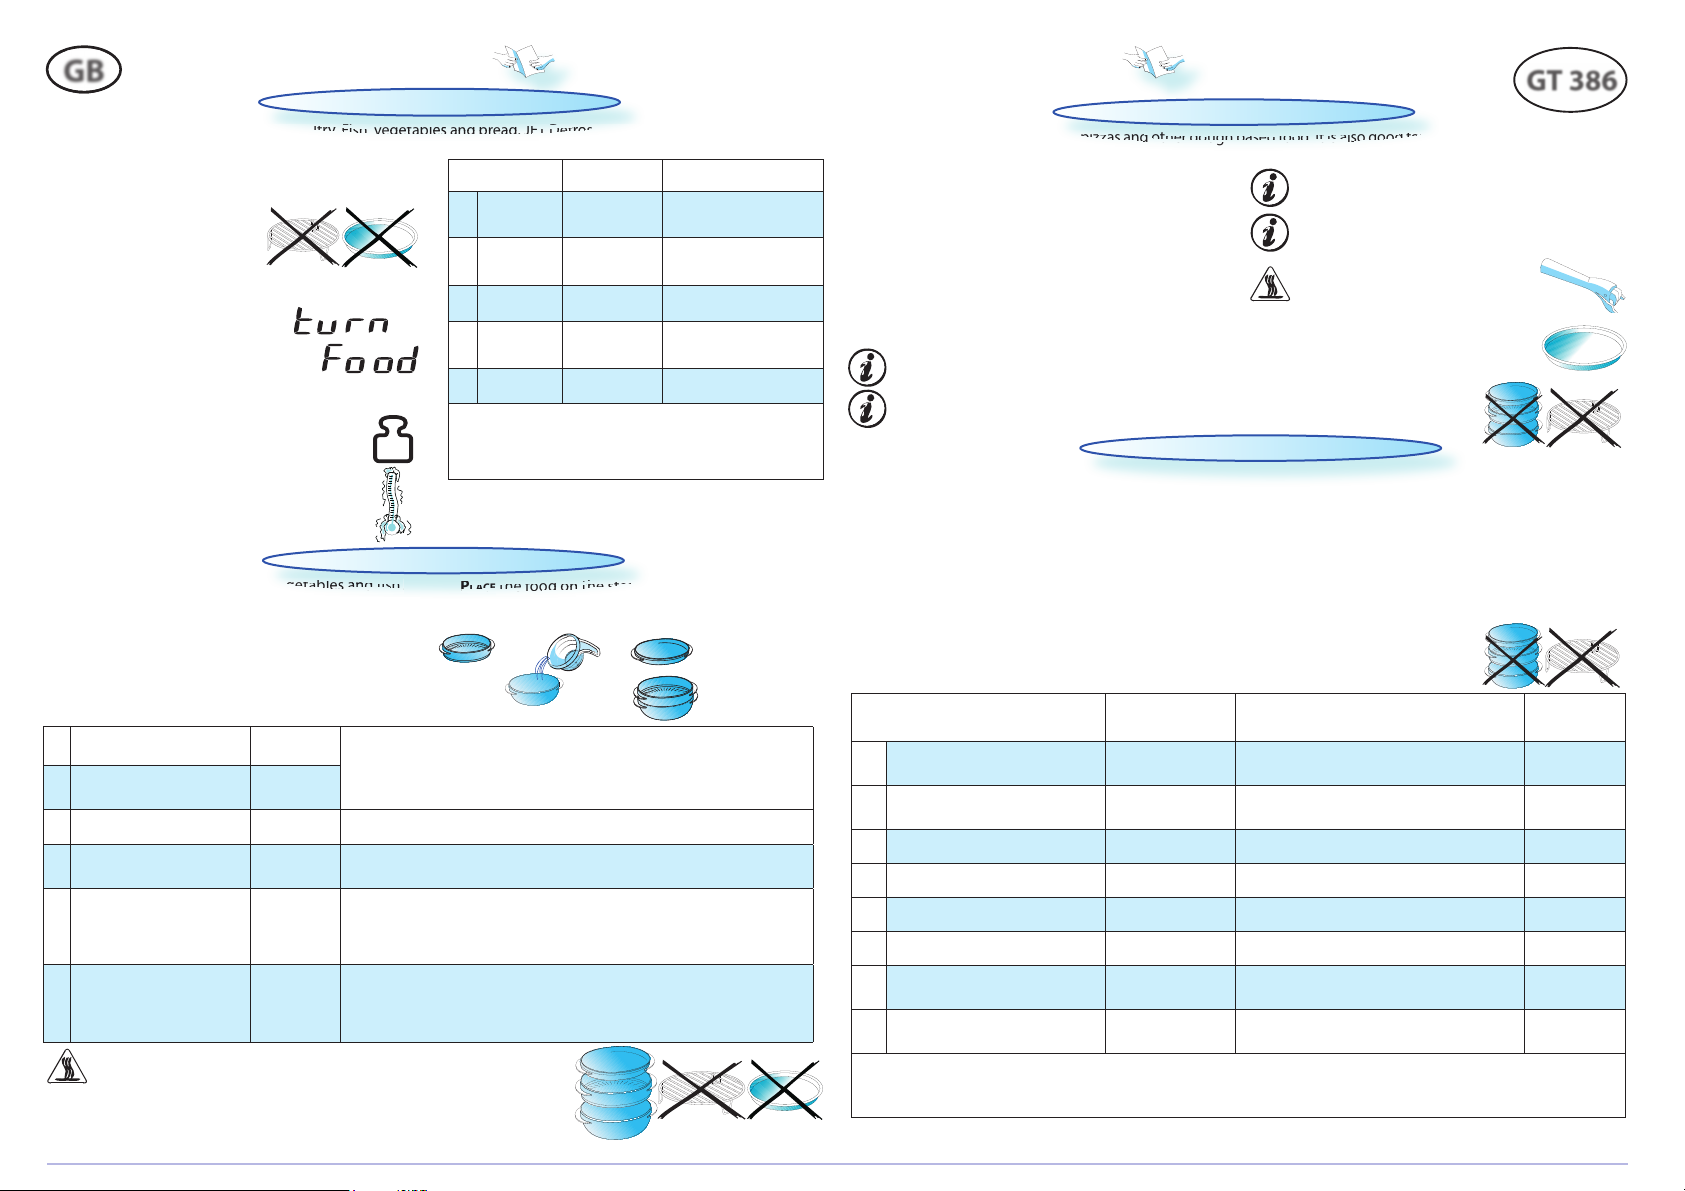
USE THIS FUNCTION for defrosting Meat, Poultry, Fish, vegetables and bread. JET Defrost should only be used if the net
weight is between 100 g- 2.5 kg.
ALWAYS PLACE THE FOOD on the glass turntable.
q
PRESS THE JET DEFROST BUT TON repeatedly to select
food class.
w
TURN THE ADJUST KNOB to set
the weight of the food.
e
PRESS THE JET START BUT TON.
MIDWAY THROUG H THE DEFROSTING PR OCESS the oven stops
and prompts you to TURN FOOD.
Open the door.
Turn the food.
Close the door and restart by press-
ing the Start button.
NOTE: The oven continues automatically after 2 min. if
the food hasn’t been turned. The defrosting time will
be longer in this case.
at,
ult
ry,
sh,
abl
es
and
ead
ET
ros
t s
ld
JET DEFROST
1/7
QUICK REFERENCE GUIDE
FR
UTILISEZ L A FONCTION JE T S
TART
POUR réchau er rapidement des ali-
ments à forte teneur en eau, tels que les potages, le café ou le thé.
q
APPUYEZ SU R LA TOUCHE JET
START (DÉMARRAGE R APIDE).
CETTE FON CTION DÉMAR RE AUTOMATIQUE-
MENT à pleine puissance avec un temps de cuisson réglé sur
30 secondes. Chaque nouvelle pression augmente le temps de
cuisson de 30 secondes. Vous pouvez également modi er la
durée en utilisant le bouton de réglage pour augmenter ou
diminuer le temps de cuisson une fois celle-ci commencée.
GT 386
q
TOURNEZ LE BOUTO N DE RÉGLAGE pour régler l’heure lorsque
le chiffre gauche (heures) se met à clignoter.
w
APPUYEZ SU R LE BOUTON START (DÉMARRER) pour confirmer.
e
TOURNEZ LE BOUTO N DE RÉGLAGE pour régler les minutes
lorsque le chiffre droit (minutes) se met à clignoter.
r
APPUYEZ SU R LE BOUTON START (DÉMARRER) pour confirmer.
L'
HORLOG E EST MAINTEN ANT RÉGLÉE
et fonctionne.
L
ORS DU RÉGLAGE
, une pression sur le bouton Stop vous
fera quitter le mode réglage pour basculer en mode
veille ou seuls deux points sont a chés.
R
EMARQUE
: Si le réglage de l’horloge n’est pas terminé
dans le délai imparti (1 minute), l’appareil bascule automatiquement en mode veille où seuls deux points sont
affichés.
TENSION D’ALIMENTATION 230 V/50 HZ
PUISSANC E NOMINALE 1900 W
F
USIBLE 10 A (UK 13 A)
P
UISSANCE MO 700 W
G
RIL 900 W
DIMEN SIONS EXTE RNES (HXLXP) 299 X 521 X 391
DIMEN SIONS INTER NES (HXLXP) 200 X 326 X 320
UTILISEZ CE TTE FONCTION pour dorer rapidement la
surface des aliments.
q
APPUYEZ SUR L A TOUCHE GRIL.
w
TOURNEZ LE BOUTON DE R ÉGLAGE pour sé-
lectionner le temps de cuisson.
e
APPUYE Z SUR LA TOUCHE J ET START.
P
ENDANT LA CUI SSON, il est possible d’ajuster le temps
de cuisson en tournant le bouton de réglage.
V
EILLEZ À CE QU E LES USTENSILES que vous utilisez
soient à la fois résistants à la chaleur et au four
avant de les utiliser pour griller.
N'UTIL ISEZ PAS D'USTENSILES E N PLASTIQUE pour la fonction Gril. Ils fonderaient. Les articles en bois et en
papier doivent également être évités.
ETTEONCTN
r
rapidemea
GRIL
LA
FON
CTI
ON
JET
UR
e
r r
dem
ent
li-
DÉMARRAGE RAPIDE
HORLOGE
FONCTION MICROONDES UNIQUEMENT
ALIMENTATION SUGGESTIO N D’UTILISATION:
JET (rapide)
(700 W)
RÉCHAUFFAGE DE BOISSON S, eau, potages, café,
thé ou autres aliments à haute teneur en eau.
Si l'aliment contient de l’œuf ou de la crème,
choisir une puissance inférieure.
500 W
CUISSON ATTENTIVE , par ex. pour les plats préparés
avec de la sauce riche en protéines, le fromage
et les œufs, et la n de cuisson des ragoûts.
350 W
CUISSON LENTE DE RAGO ÛTS, ramollissement de
beurre.
160 W
DÉCONGÉL ATION. Ramollissement du beurre, des
fromages.
90 W RAMOLL ISSEMENT de la glace.
GUIDE DE RÉFÉRENCE RAPIDE
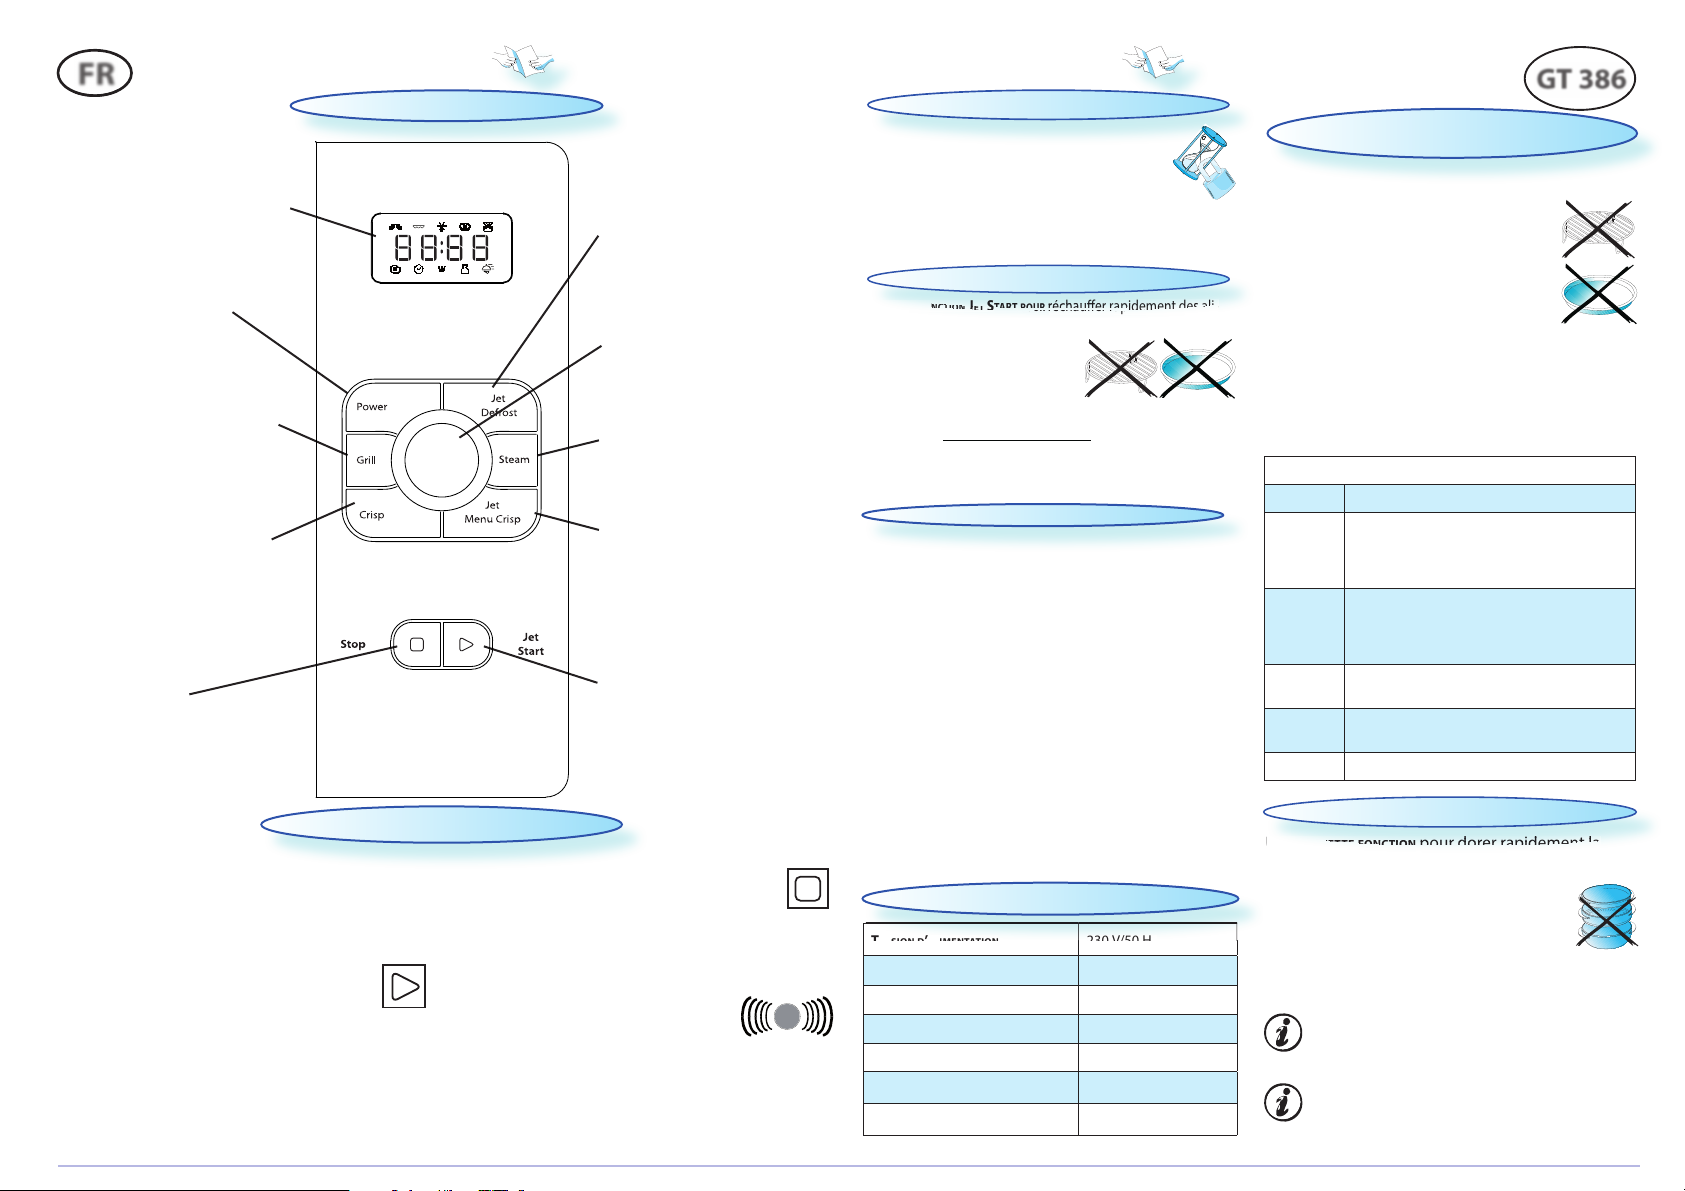
PANNEAU DE COMMANDE
INTERRUPTION OU ARRÊT DE LA CUISSON
POUR INTER ROMPRE LA CUISSON :
VOUS POUVEZ SUSPE NDRE LA CUISSON pour véri er, re-
tourner ou mélanger les aliments en ouvrant simplement la porte. Les réglages seront conservés
pendant 10 minutes.
P
OUR POURS UIVRE LA CUISSON :
FERMEZ LA P ORTE et appuyez UNE FOIS sur la
touche Jet Start. La cuisson reprend là où elle
a été interrompue.
SI VOUS APPUYEZ DEUX FOIS sur la touche Start, le
temps de cuisson est augmenté de 30 secondes.
SI VOUS NE SOU HAITEZ PAS CONTINUE R LA CUISSON :
SORTEZ LE S ALIMENTS, fermez la porte et appuyez
sur la touche STOP.
REMARQU E : Une fois la cuisson terminée, le ventilateur, la plaque tournante et l’éclairage du four restent
allumés avant que vous n’appuyiez sur le bouton STOP
– ceci est normal.
UN SIGNAL S ONORE RETENT IT toutes les
minutes pendant 10 minutes une fois
la cuisson terminée. Pour désactiver le
signal, appuyez sur la touche STOP ou
ouvrez la porte.
REMARQU E : Le four ne conserve les paramètres que
pendant 60 secondes si la porte est ouverte puis refer-
mée une fois la cuisson terminée.
CUISSON ET RÉCHAUFFAGE AVEC LA
FONCTION MICROONDES
UTILISEZ C ETTE FONCTI ON pour la cuisson normale ou le réchauffage d'aliments tels que les légumes, le poisson, les pommes
de terre et la viande.
q
APPUYEZ PLUS IEURS FOIS SUR LA T OUCHE POWER
pour sélectionner la puissance.
w
TOURNEZ LE BOUTO N DE RÉGLAGE pour sélectionner le temps de cuisson.
e
A
PPUYEZ SU R LA TOUCHE JE T START.
LORSQU E LA CUISSON A DÉMA RRÉ :
Le temps de cuisson peut facilement être augmenté par
paliers de 30 secondes en appuyant sur la touche Start (démarrer). Chaque pression augmente le temps de cuisson de 30
secondes. Vous pouvez également modi er la durée en utilisant le bouton de réglage pour augmenter ou diminuer le
temps de cuisson.
VERROUILLAGE ENFANTS
CETTE FON CTION DE SÉCUR ITÉ AUTOMATIQUE EST ACT IVÉE 1
MINUTE après le retour du four en "mode veille".
Sous ce mode, la porte sera verrouillée.
LA PORTE D OIT ÊTRE OUVER TE PUIS REFERM ÉE par ex. en y
plaçant de la nourriture, avant que la sécurité automatique ne soit désactivée. Faute de quoi, l’a chage indi-
quera “D OO R “.
LORSQU E L’APPAREIL EST B RANCHÉ POUR LA T OUTE PREMIÈR E FOIS ou
après une panne de courant, il bascule automatiquement en
mode de réglage de l’horloge.
TOUCHE D’ALIMENTATION
Permet de dé nir le
niveau de puissance micro-ondes souhaité.
TOUCHE STOP
Appuyez pour arrêter
ou réinitialiser n’importe
quelle fonction du four.
TOUCHE JET DEFROST (DÉCONG ÉLA-
TION RAPID E)
S’utilise pour sélectionner la
fonction Jet Defrost (décongélation rapide) et choisir la catégorie d’aliments à décongeler.
BOUTON DE RÉG LAGE
Utilisez ce bouton pour régler
la durée de cuisson ou le
poids.
TOUCHE VAPEUR
Sert à sélectionner la fonction Vapeur et la catégorie
d’aliments.
TOUCHE GRIL
Utilisez cette touche pour
choisir le mode gril.
TOUCHE JET START (DÉMARRAGE
RAPIDE)
Utilisez cette touche pour
démarrer le processus de
cuisson ou appeler la fonction démarrage rapide.
AFFICHAGE NUMÉ RIQUE
L'a chage comprend une
horloge au format 24 heures et
des symboles d'indication.
TOUCHE CRISP
Utilisez cette touche pour
choisir le mode Crisp (croustillant).
TOUCHE JET MENU CRIS P (MENU
RAPIDE CROUSTILLANT)
Utilisez cette touche pour
choisir le mode Menu rapide
croustillant et sélectionner la
catégorie d'aliments.
SPÉCIFICATIONS TECHNIQUES
2/7
FR
GT 386
CATÉGORIE
D’ALIMENTS
QUANTITÉ CONSEIL S
q
VIANDE 100G - 2KG
Viande hachée, côtelettes,
steaks ou rôtis.
w
VOLAILLE 100G - 2.5KG
Poulet entier, lets ou morceaux.
e
POISSON 100G - 1.5KG
Poisson entier, darnes ou
lets.
r
LÉGUMES 100G - 1.5KG
Mélange de légumes, petits
pois, brocoli etc.
t
PAIN 100G - 1KG Pain, petits pains.
POUR TOUS LES AL IMENTS NON LIST ÉS DANS CE TABLEAU et si le poids
est supérieur ou inférieur au poids recommandé, il est
conseillé d’appliquer la procédure décrite dans ‘Cuisson et
réchau age avec la fonction micro-ondes’ et de sélectionner la puissance de 160 W pour la décongélation.
JET MENU CROUSTILLANT
SÉLECTIONNEZ CETTE FONCTION POUR cuire di érents types d’aliments congelés.
LE FOUR sélectionnera ensuite automatiquement la méthode de cuisson, la durée et la puissance adaptée.
q
APPUYEZ PLUSIEURS FOIS SUR LA TOUCHE JET MENU CRISP
pour sélectionner la catégorie d’aliments. (voir le
tableau)
w
TOURNEZ LE BOUTON DE RÉGLAGE pour sélectionner le
poids des aliments.
e
APPUYEZ SUR LA TOUCHE JET START.
CERTAINES CATÉGORIES D’ALIMENTS REQUIÈRENT un ajout ou un
mélange en cours de cuisson (varie en fonction des
modèles). Lorsque tel est le cas, le four s’arrête automatiquement et vous demande d’exécuter l’action nécessaire.
Ouvrez la porte.
Ajoutez, retournez ou mélangez les aliments.
Fermez la porte et redémarrez le four en appuyant
sur la touche Start (démarrer).
R
EMARQUE
: Sous le mode ”ajouter des ali-
ments”, si la porte n’est pas ouverte dans le
délai imparti (2 minutes) le four s’arrête et
passe automatiquement en “mode veille”. En
mode ‘tourner les aliments’ / ‘mélanger les
aliments’, la cuisson se poursuivra même si la
porte n’est pas ouverte dans les 2 minutes.
CATÉGO RIE D’ALIMENT S
QUANT ITÉ RECOM
MAND ÉE
ACCESSO IRES À UTILI SER
DURA NT LA
CUISSO N
q
RIZ 300G - 650G
PLACEZ L’ASS IETTE CRISP VIDE DANS LE FOUR. LORSQUE LE
MESSAGE «ADD FOOD» S’AFFICHE , AJOUTEZ LES ALIMENTS.
MÉLANGEZ LES
ALIMENTS
w
PÂTES 250G - 550G
PLACEZ L’ASS IETTE CRISP VIDE DANS LE FOUR. LORSQUE LE
MESSAGE «ADD FOOD» S’AFFICHE , AJOUTEZ LES ALIMENTS.
MÉLANGEZ LES
ALIMENTS
e
AILES DE POULET / NUGGETS
DE POULET
250G - 500G UTILISEZ L’ASSIETTE CRISP.
R
ETOURNEZ LES
ALIMENTS.
r
FRITES 250G - 500G UTILISEZ L’ASSIETTE CRISP.
M
ÉLANGEZ LES
ALIMENTS
t
PIZZA 250G - 750G UTILISEZ L’ASSIETTE CRISP.
y
QUICHE 250G - 600G UTILISEZ L’ASSIETTE CRISP.
u
POISSON PANÉ / FISH STICKS 250G - 500G
PLACEZ L’ASS IETTE CRISP VIDE DANS LE FOUR. LORSQUE LE
MESSAGE «ADD FOOD» S’AFFICHE , AJOUTEZ LES ALIMENTS.
RETOURNEZ LES
ALIMENTS.
i
CORDON BLEU/ CROQUETTES
DE POULET
1 - 4 MORCEAUX (100125G PAR PIÈCE)
PLACEZ L’ASS IETTE CRISP VIDE DANS LE FOUR. LORSQUE LE
MESSAGE «ADD FOOD» S’AFFICHE , AJOUTEZ LES ALIMENTS.
RETOURNEZ LES
ALIMENTS.
POUR TOUS LES ALIMENTS NON LISTÉS DANS CE TABLEAU et si le poids est supérieur ou inférieur au poids recommandé, il est conseillé d’ap-
pliquer la procédure décrite dans ‘Cuisson et réchau age avec la fonction micro-ondes’.
REMARQUE : Une petite quantité d’huile ou de beurre peut être placée sur l’assiette Crisp durant le préchau age.
UTILISEZ C ETTE FONCTI ON POUR CUIRE OU FAIR E RÉCHAUFFER DES QU ICHES, des pizzas ou autres aliments à base de pâte. Cette
fonction est également adaptée à la cuisson du bacon et des œufs, des saucisses, des hamburgers etc.
UTILISEZ D ES GANTS DE CUISI NE
ou la poignée Crisp spéciale
fournie pour sor tir l’assiette Crisp chaude.
FAITES TRÈS ATTE NTION À NE JAMAI S TOUCHER la voûte du
four sous le gril.
NE POSEZ JAM AIS L’A SSIETTE CRI SP CHAUDE sur une surface
sensible à la chaleur.
q
APPUYEZ SUR LA T OUCHE CRISP.
w
TOURNEZ LE BOUTON D E RÉGLAGE pour sélectionner le
temps de cuisson.
e
APPUYEZ SU R LA TOUCHE JET S TART.
IL N'EST PAS POSS IBLE DE MODIFIE R le niveau de puissance ou
d'activer/désactiver le gril pendant l'utilisation de la
fonction Crisp.
LE FOUR ASSO CIE AUTOMATIQUEMEN T les micro-ondes et le
gril pour chau er l’assiette Crisp. Ainsi, l’assiette Crisp
atteint très rapidement sa température optimale et
commence à dorer vos plats et à les rendre crous-
tillants.
ASSUREZ-VOUS que l’assiette Crisp est bien placée
au milieu du plateau tournant en verre.
LE FOUR ET L’ASSIET TE CRISP deviennent très chauds
lors de l’utilisation de cette fonction.
UTILISEZ E XCLUSIVEMENT l’assiette Crisp fournie avec
cette fonction. Les autres assiettes Crisp
disponibles sur le marché ne donneront
pas de résultats comparables avec cette
fonction.
U F
AIR
E R
ÉCH
ÉCH
AUF
AUF
FER
S Q
UIC
HES
,
izz
as
ou
ou
res
ime
CRISP
q
POMMES DE TERRE / CAROTTES 150 G - 500 G
COUPEZ EN MORCEAUX DE MÊME TAILLE.
Coupez les légumes en morceaux de même taille.
Laissez reposer 1 à 2 minutes après la cuisson.
w
LÉGUMES
(Choux- eurs et brocolis)
150 G - 500 G
e
LÉGUMES SURGELÉS 150 G - 500 G LAISSEZ REPOSER 1 à 2 minutes.
r
FILETS DE POISSON 150 G - 500 G
RÉPARTISSEZ LES FILETS UNIFORMÉMENT dans le panier-vapeur.
Superposez les tranches nes. Laissez reposer 1 à 2 minutes après la cuisson.
t
FILETS DE POULET 150 G - 500 G
COUPEZ EN FILETS DE MÊME TAILLE et répartissez-les uniformément dans le panier-va-
peur. Si vous utilisez des filets surgelés, veillez à ce que les filets soient bien
décongelés avant la cuisson vapeur.
Laissez reposer 3 à 5 minutes après la cuisson.
y
FRUITS 150 G - 500 G
COUPEZ LES FRUITS EN MORCEAUX DE MÊME TAILLE.
Si le fruit est très mûr, pour éviter qu'il soit trop cuit,
programmez un poids inférieur au poids réel.
Laissez reposer 2 à 3 minutes après la cuisson.
UTILISEZ CE TTE FONCTIO N POUR la cuisson d'aliments tels que légumes et poisson.
UTILISEZ TOUJO URS LE CUIT-VAPEUR fourni, avec cette fonction.
q
APPUYEZ SUR LA TOUCHE VAPEUR (forme-santé) à
plusieurs reprises pour sélectionner la classe
d'aliments. (voir le tableau)
w
TOURNEZ LE BO UTON DE RÉGLAGE pour régler le poids de
l'aliment.
e
APPUYEZ SUR LA TOUCHE START (DÉMAR RAGE).
AJOUTEZ 100 ml (1 dl) d'eau au fond du cuit-vapeur.
PLACEZ les aliments dans le panier vapeur.
COUVREZ avec le
couvercle.
LE CUIT-VAPEUR EST conçu pour être utilisé avec les micro- ondes seulement !
NE L'UTILISEZ JAM AIS pour une autre fonction.
VOUS RISQUERI EZ de l'endommager.
ASSUREZ-VOU S TOUJOURS QU E le plateau tournant peut tourner librement avant de
mettre l'appareil en marche.
PLACEZ TOUJ OURS le cuit-vapeur sur le plateau tournant en verre.
Ê
Ð
Ð
ALIMENTS SURGELÉS :
SI LE
POIDS DES ALIMENT S EST INFÉRI EUR OU SUPÉRIE UR AU POIDS CONSEILLÉ
: Appliquez la procédure décrite sous “Cuisson et ré-
chau age avec la fonction micro-ondes” et sélectionnez la puissance de 160 W pour la décongélation.
POUR LES ALIM ENTS PLUS CHAUDS que la température
de surgélation (-18 °C), choisissez un poids d'aliment inférieur.
P
OUR LES ALIMENT S PLUS FROIDS
que la température de
surgélation (-18 °C), choisissez un poids supérieur.
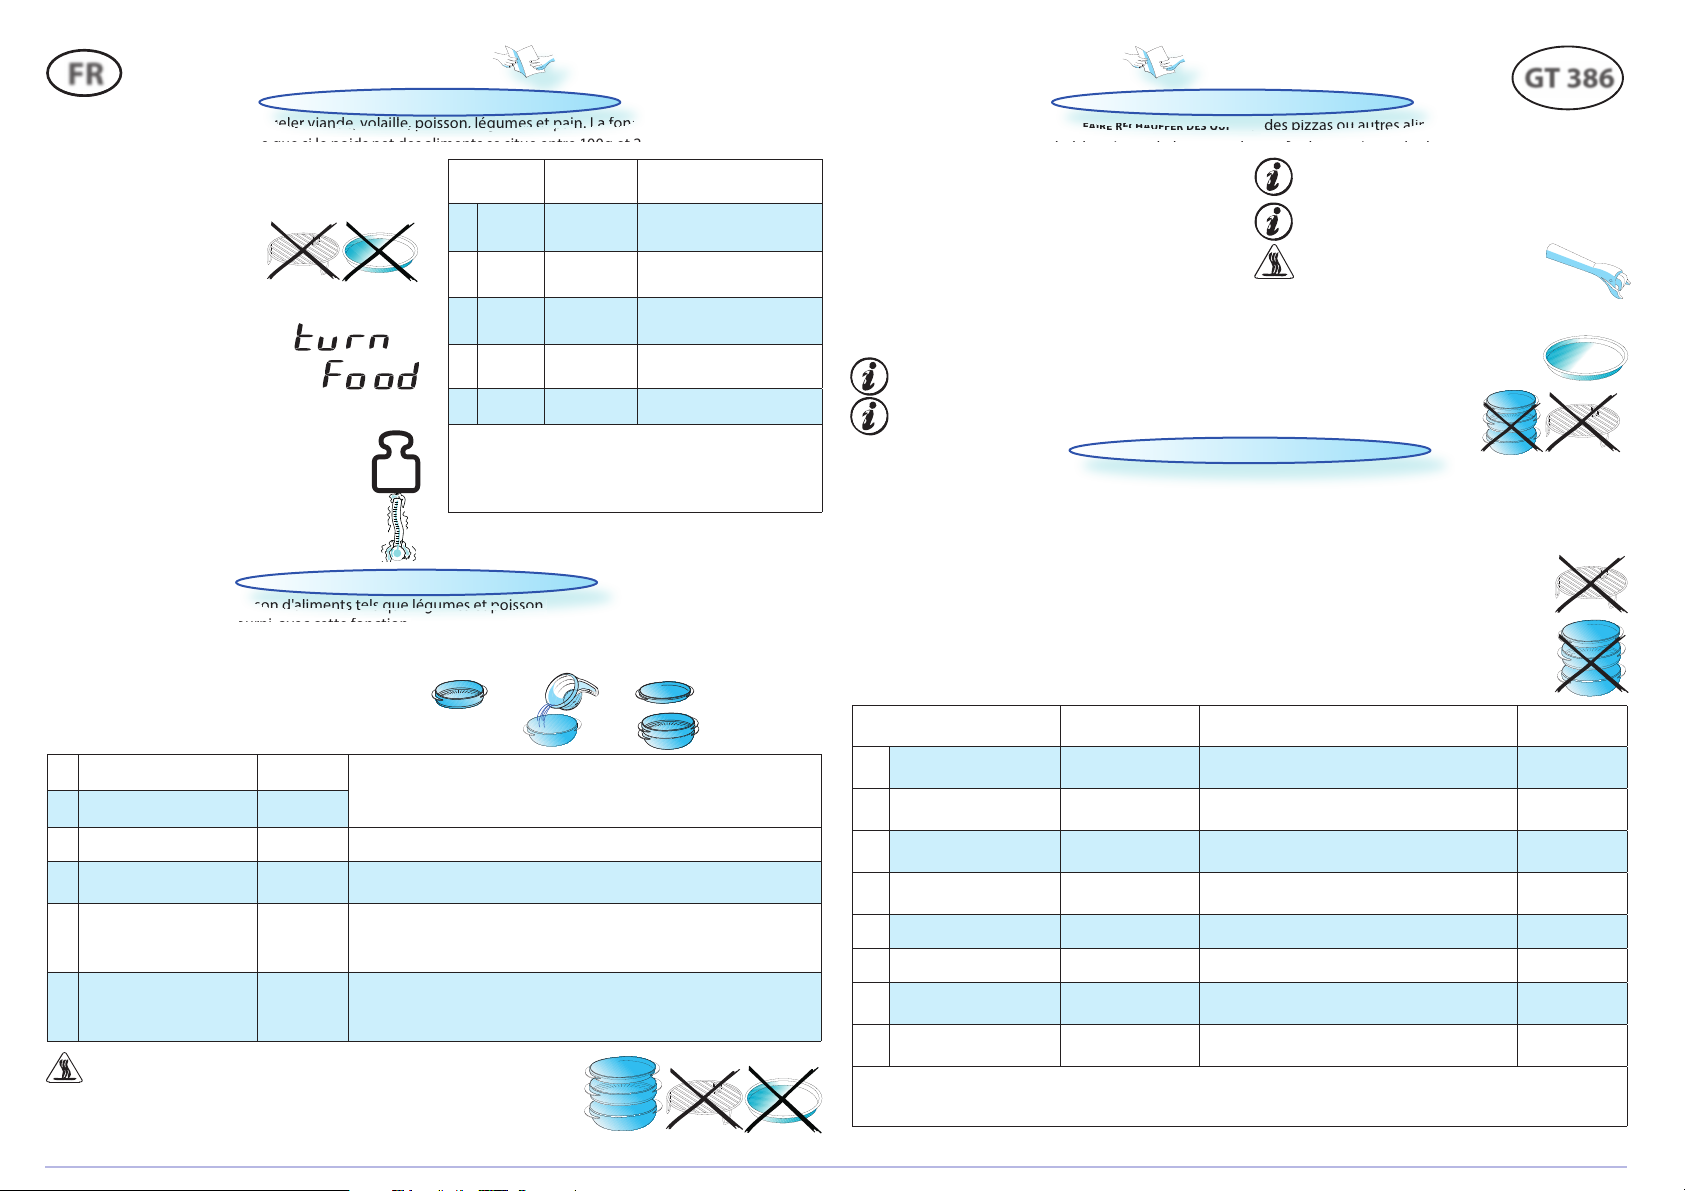
UTILISEZ C ETTE FONCTI ON pour décongeler viande, volaille, poisson, légumes et pain. La fonction Jet Defrost (décongélation rapide) ne doit être utilisée que si le poids net des aliments se situe entre 100g et 2,5kg.
PLACEZ TOUJ OURS LES ALIMENT S sur le plateau tournant en verre.
q
A
PPUYEZ PLUSIEURS FOIS SUR LA TOUCHE
JET D
EFROST (DÉCONGÉ
-
LATION RAPIDE
) pour sélectionner une catégorie d’aliments.
w
TOURNEZ LE BOUTON D E RÉGLAGE pour sélectionner le
poids des aliments.
e
A
PPUYEZ SUR LA TOUCHE JET
START.
À LA MOITI É DU TEMPS DE DÉCONG ÉLA-
TION SPÉCI FIÉ le four s’arrête et a che un message vous
invitant à retourner les aliments TURN FOOD.
Ouvrez la porte.
Retournez les aliments.
Fermez la porte et redémarrez le four en
appuyant sur la touche Start (démarrer).
R
EMARQUE : Le four continue automatiquement la décongéla-
tion après 2 minutes si vous n'avez pas retourné les aliments.
Dans ce cas, la durée de décongélation est allongée.
and
and
vol
vol
ail
ail
le,
le,
on,
on,
gum
gum
es
es
et
et
n.
fon
DÉCONGÉLATION RAPIDE
GUIDE DE RÉFÉRENCE RAPIDE
iss
on
d'a
lim
lim
ent
ent
els
e l
égu
égu
égu
mes
mes
iss
VAPEUR
2/7
ES
GUÍA DE REFERENCIA RÁPIDA
PANEL DE CONTROL
PAUSA O INTERRUPCIÓN DE LA COCCIÓN
PARA EFECTUAR UN A PAUSA DURANTE LA COCCIÓN :
SI DESEA COM PROBAR, dar la vuelta o remover el alimento,
puede efectuar una pausa durante la cocción abriendo
la puerta. El ajuste programado se conservará durante
10 minutos.
PARA REANUDAR L A COCCIÓN:
CIERRE L A PUERTA y pulse el botón Jet Start (Inicio
rápido) UNA VEZ. El proceso de cocción continuará desde donde se interrumpió.
SI PULSA EL BO TÓN START (INICIO) DOS VECES, el tiempo aumentará en 30 segundos.
SI NO
DESEA CONTINUAR CON LA COCCIÓN
:
R
ETIRE EL ALIMENTO
, cierre la puerta y pulse el
botón Stop (Parada).
N
OTA
: Al finalizar la cocción, es normal que el
ventilador, el plato giratorio y la luz del interior del
horno permanezcan en funcionamiento hasta pulsar el
botón Stop (Parada).
EL HORN O EMITIRÁ UNA SE ÑAL una vez por minuto durante
10 minutos cuando nalice la cocción.
Pulse el botón Stop (Parada) o abra la
puerta para detener la señal.
NOTA: Si la puerta se abre y se cierra una vez nalizada
la cocción, el horno sólo conservará los ajustes durante
60 segundos.
BOTÓN POWER (POTENCIA)
Permite establecer la
potencia de la función
de microondas al nivel
deseado.
BOTÓN STOP (PARADA)
Permite detener o restablecer cualquiera de las funciones del horno.
BOTÓN JET DE FROST (DESCONGEL-
ACIÓN RÁPIDA)
Permite seleccionar la función
Jet Defrost (Descongelación
rápida); seleccione el tipo de
alimento que desee descongelar a continuación.
MANDO DE A JUSTE
Permite establecer el periodo
de cocción o el peso.
BOTTON STEAM(VAPOR)
Pulse este botón para seleccionar
la función Steam (Vapor). A continuación, seleccione el tipo de al-
imento.
BOTÓN GRIL L (PAR RILLA)
Permite seleccionar la
función Grill (Parrilla).
BOTÓN JET START (INICIO R ÁPIDO)
Permite iniciar el proceso de
cocción o activar la función
Jet Start (Inicio rápido).
PANTALLA DIGITAL
La pantalla digital muestra la
hora en el formato de 24 horas,
así como los indicadores de las
funciones.
BOTÓN CRISP (FRITU RA AL HORNO)
Permite seleccionar la función
Crisp (Fritura al horno).
BOTÓN JET ME NU CRISP (MENÚ
RÁPIDO DE FR ITURA AL HORNO)
Permite seleccionar la
función Jet Menu Crisp (Menú
rápido de fritura al horno) y
elegir un tipo de alimento.
E
STA FUNCIÓN PERMITE CALENTAR
rápidamente alimentos con
alto contenido de agua, como sopas acuosas, café o té.
q
PULSE EL BOT ÓN JET START.
ESTA FUNCIÓN P ONE EN MARCHA el horno
automáticamente con el nivel
máximo de potencia de microondas y el tiempo de cocción
establecido a 30 segundos. Cada vez que pulse este botón, el
tiempo aumentará en 30 segundos. También puede modi car el tiempo girando el mando de ajuste para aumentarlo o
reducirlo una vez puesta en marcha la función.
q
GIRE EL M ANDO DE AJUSTE para establecer la hora cuando los dígitos de la izquierda (correspondientes a las
horas) comiencen a parpadear.
w
PULSE EL BOT ÓN START (INICI O) para establecer las horas.
e
GIRE EL M ANDO DE AJUSTE para establecer los minutos cuando los dígitos de la derecha (correspondientes a los
minutos) comiencen a parpadear.
r
PULSE EL BOT ÓN START (INICI O) para establecer los minutos.
AL HACERLO, E L RELOJ QUEDA RÁ ESTABLECID O y en funcionamiento.
SI PULSA EL B OTÓN STOP (PARADA) durante el ajuste de la hora, el horno
abandonará la operación y activará el modo de espera; en tal caso, la
pantalla mostrará sólo dos puntos.
NOTA: Si el ajuste de la hora no se lleva a cabo antes de que finalice el
tiempo de espera del modo de ajuste de hora (1 minuto), el horno activará el modo de espera y la pantalla mostrará sólo dos puntos.
TENSIÓN DE SUM INISTRO E LÉCTRICO
230 V/50 HZ
ENTRAD A DE POTENCIA N OMINAL
1900 W
FUSIBLE
10 A (REINO UNIDO: 13 A)
POTENCIA D E SALIDA DE MICR OONDAS
700 W
PARRILLA
900 W
DIMEN SIONES EX TERIORES (AL X AN X PR)
299 X 521 X 391
DIMENSIONES INTERIORES (AL X AN X PR)
200 X 326 X 320
FUNC
PE
RMI
TE
CAL
ENT
AR
pid
ame
ime
s c
on
INICIO RÁPIDO
RELOJ
BLOQUEO INFANTIL
ESTA FUNCIÓN D E SEGURIDAD SE ACTIVA AUTO MÁTICAMENTE 1
MINUTO DE SPUÉS de que el horno haya vuelto al “modo
de espera”. La puerta permanecerá cerrada en
este modo.
A
NTES DE POD ER ABRIR Y CERR AR LA PUERTA DEL HOR NO (por
ejemplo, para introducir alimentos en él), es preciso desactivar el bloqueo de seguridad. De lo contrario, la pantalla
mostrará el mensaje “D OOR”.
EL HORN O ACTIVARÁ AUTOMÁTICAM ENTE EL modo de con guración
de reloj al enchufarlo por primera vez o después de una interrupción del suministro eléctrico.
ÉCT
RICO
CARACTERÍSTICAS TÉCNICAS
SÓLO MICROONDAS
POTENCIA USO RECOMENDADO:
JET
(RÁPIDO)
(700 W)
CALENTAMIENTO DE BEBIDAS, agua, sopas acuosas,
café, té y otros alimentos con un alto contenido de agua. Si el alimento contiene huevo o
nata, elija una potencia inferior.
500 W
COCCIÓN MÁS D ELICADA ; apta para salsas de alto
valor proteico, queso y platos con huevo, así
como para terminar de cocinar guisos.
350 W
COCCIÓN LENTA de guisos; apta también para
fundir mantequilla.
160 W
DESCONG ELACIÓN; apta también para ablandar
mantequilla y queso.
90W
ABLANDAMIENTO HE LADOS.
COCCIÓN Y CALENTAMIENTO CON MICROONDAS
ESTA FUNCIÓN PE RMITE cocinar y calentar con normalidad,
por ejemplo, verduras, pescado, patatas y carne.
q
PULSE EL BOT ÓN POWER (POTENCIA) VARIAS V ECES para establecer la potencia.
w
GIRE EL M ANDO DE AJUSTE para establecer el tiempo de
cocción que desee.
e
PULSE EL BOT ÓN JET START (INI-
CIO RÁPID O).
UNA VEZ IN ICIADO EL PROCESO D E COCCIÓN:
Basta con pulsar el botón Start (Inicio) para aumentar en
30 segundos el tiempo de cocción. Cada vez que pulse este
botón, el tiempo aumentará en 30 segundos. También puede
modi car el tiempo girando el mando de ajuste para aumentarlo o reducirlo.
GT 386
PARRILLA
E
STA FUNCIÓN PERM ITE dorar rápidamente la super cie
de un alimento.
q
PULSE EL BOTÓ N GRILL (PARRILLA).
w
GIRE EL MAN DO DE AJUSTE para establecer el
tiempo de cocción que desee.
e
PULSE EL BOTÓ N JET START (INICI O RÁPIDO).
D
URANTE EL PE RIODO DE COCCIÓN, es posible establecer el
tiempo de cocción girando el mando de ajuste.
ASEGÚRESE DE Q UE LOS UTENSILIOS empleados son re-
sistentes al calor y aptos para horno antes de
utilizarlos con la parrilla.
NO EMPLEE UTEN SILIOS de plástico durante
el uso de la función Grill (Parrilla); se
derretirían. Los artículos de madera o
cartón tampoco son adecuados.
3/7
 Loading...