

Whirlpool GSU 4873 T SW, GSU 4873 T WS INSTRUCTION FOR USE
GB
E
GSU 4873
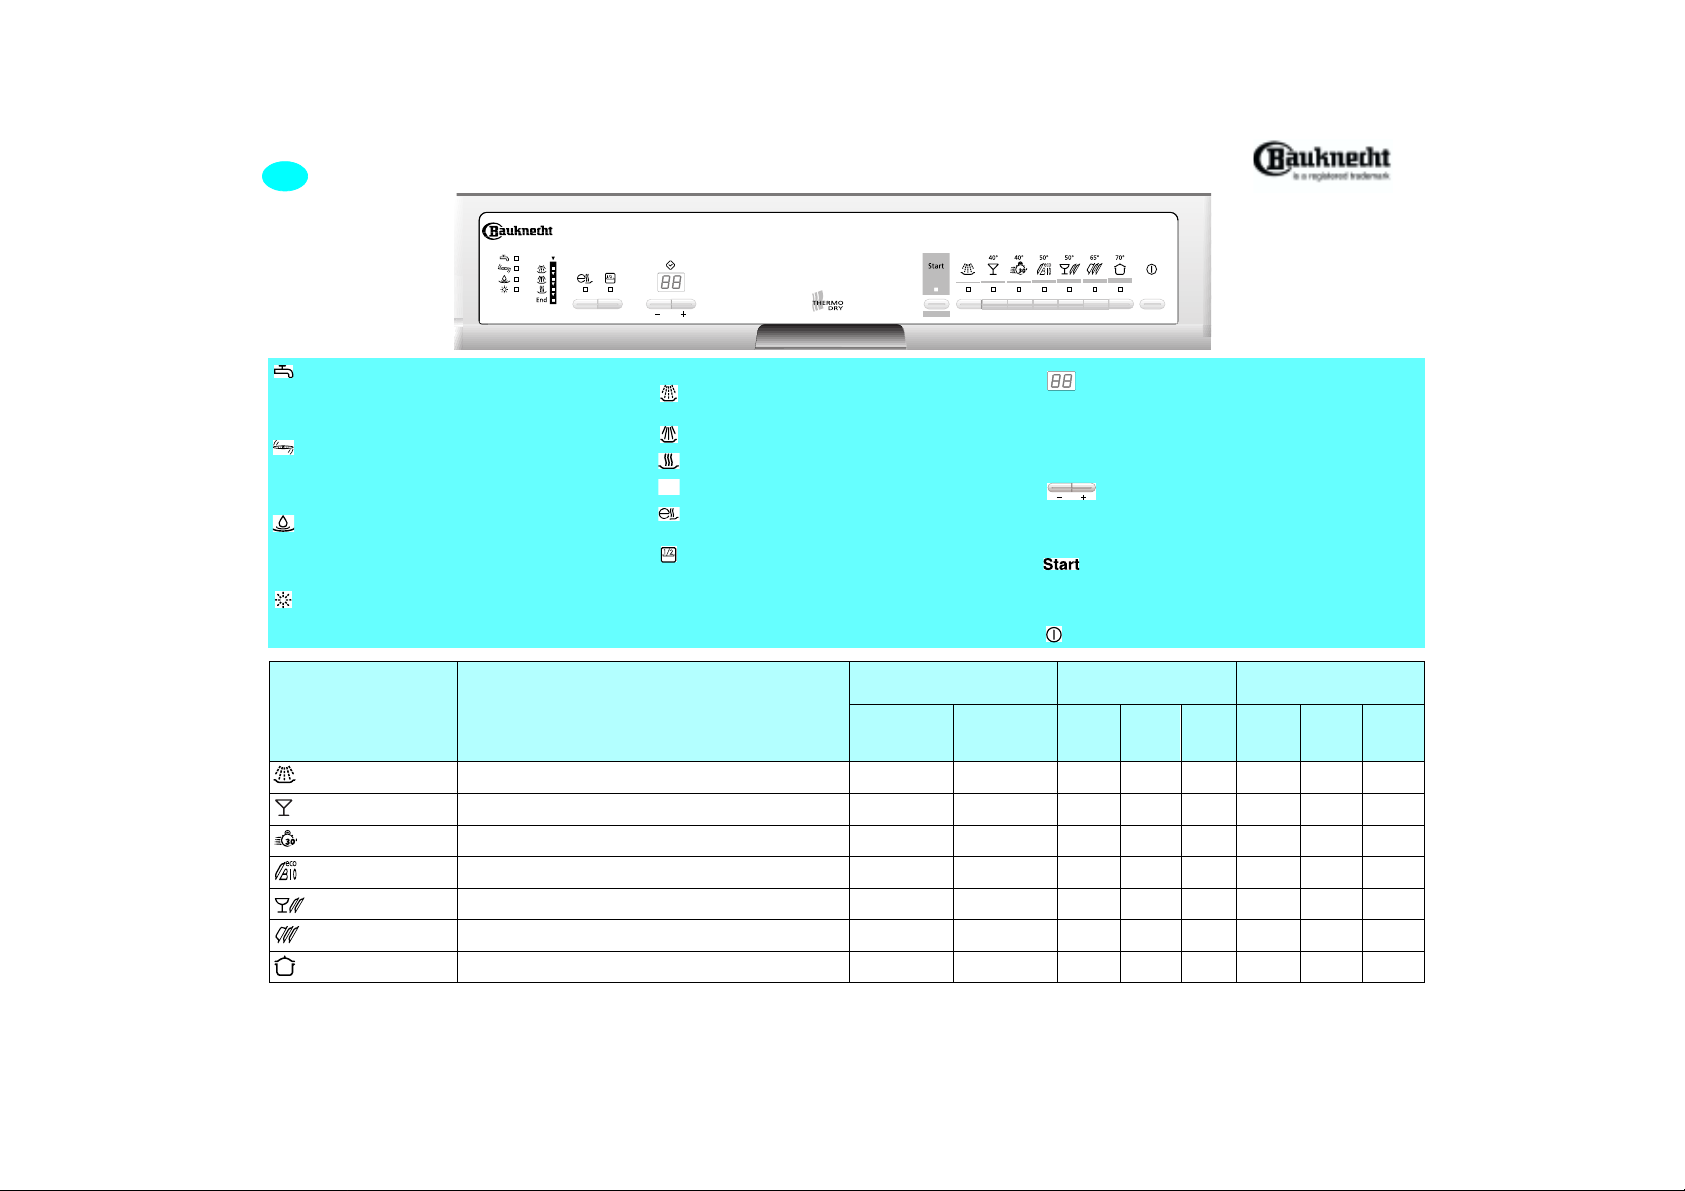
Water tap indicator
The machine water supply is restricted. Check that the
water supply tap is turned fully on and that there is
adequate water pressure available.
Blocked spray arm indicator
Something is preventing the spray arms from rotating
freely. Check dishes and cutlery to find and clear the
obstruction.
Water detection indicator
These is water leaking into the overflow pan located
underneath the machine. Turn off the water supply and
determine the source of the leak.
Rinse aid level indicator
Rinse aid reservoir is empty. Add rinse aid.
WASH CYCLE CHART
Wash cycle progress indicators
Pre-wash
Only lights with those cycles that include a pre-wash.
Rinsing / Washing
Drying
nd
End of cycle
Eco-Dry button
Dishes will air dry without the use of the drying fan.
Half Load button
Load the upper
This function can be used with any cycle.
lower rack only.
or
Cycle time and failure display
Shows the time delay hours remaining before the
start of the cycle. Switches off once the cycle has
started. Near the end of a cycle, the d isplay wi ll show
minutes remaining to cycle completion.
“
F1”... “F9
technician.
Delay start buttons
Used to set the time delay hours. The maximum
delay that can be set is 24 hours.
Start button indicator lamp
Switches on when the dishwasher is operating.
Flashes when a fault occurs.
Switches off at the end of the cycle.
” are fault indicators for use by a service
On/Off button
Cycle symbol
and
wash temperature
Rinse only
Delicate 40° C
Rapid 40° C
Bio-Eco 50° C
Normal 50° C
Heavy 65° C
Intensive 70° C
*) Values for normal conditions. Values may vary in relation to usage, e.g.: different loads, water temperatures, water hardness and power supply voltage.
1) Cycle recommended for use with the new generation “enzyme” based detergents.
2) Cycle recommended for use with tradit i onal no n-e nzyme base d de terg ent s.
Dishes to be washed later.
Lightly soiled glasses and cups.
Lightly soiled dishes with no dried-on food.
Normally soiled dishes.
2)
Normally soiled dishes.
1)
Normally or heavily soiled dishes.
Heavily soiled pots and pans.
Description of
dish load
Detergent required
Pre-wash
(open
compartment)
No No 5.9 0.03 9 4.1 0.02 6
No Yes 12.7 0.88 80 10.7 0.81 75
No Yes 12.7 0.61 46 10.7 0.56 43
Yes Yes 12.7 1.65 124 10.7 1.52 119
Yes Yes 17.7 1.71 137 14.8 1.60 131
Yes Yes 17.7 1.96 145 14.8 1.79 138
Yes Yes 21.8 2.34 163 18.5 2.15 155
Main-wash
(sealed
compartment)
Consumption *
normal load
Water
Energy
(Liter)
(We reserve the right to make technical modifications)
(kWh)
Time
(Min.)
Consumption *
half load
Water
(Liter)
Energy
(kWh)
Time
(Min.)
5019 100 90118

Quick Reference Guide
GB
Daily check list
1. Arrange dishes so that items do not
touch each other.
2. Load cups at a slight angle to
facilitate water circulation.
3. In general, place cutlery in the
basket with the handles facing
downwards, but ensure that sharp
knives and forks that might cause
injury are placed in the basket with
the handles positioned upwards.
4. Make sure the water je t can reach
all loaded items and that the spray
arms rotate freely.
5. Ensure that the water supply is
turned on before starting the
dishwasher.
Important:
• Do not switch off the dishwasher
until the “START” indicator lamp
has switched off. If you switch off
the dishwasher during a wash
cycle, when it is switched on again,
the dishwasher will continue that
cycle from where it was interrupted.
• If a fault occurs or if you wish to
change or cancel the current cycle,
press the “START” button fo r about
5 seconds until the Start indicator
lamp switches off! You can now
turn off the machine or select a
different cycle.
• Please refer to the troubleshooting
guide in the user instruction book
to familiarize yourself with other
operating situations which you may
encounter while using this
appliance.
Cup holders:
Upper Rack
• Down: to hold cups and glasses.
• Up: to help support and separate
the edges of plates placed in the
upper rack.
Long utensil holder:
• Down: to make room for cups and
glasses.
• Up: to support long knives and
utensils.
• Place knives with the blades
facing downwards.
Stemware holder:
• The stemware holder can be
moved sideways to achieve an
optimum position for supporting
your long stem glasses.
• The stemware holder can be
easily removed altogether to make
room for larger items in the upper
rack. Simply pull the metal end out
of the plastic support clip.
Half load:
If you are using the upper rack for a
half load, you may remove the cutlery
basket from the lower rack and locate
it in the upper rack.
Height adjustment:
(The dishwasher is delivered with the
upper rack in the top position).
The rack height can be changed at
any time.
• To lower: pull out the two side
handles and gently lower the rack.
• To raise: pull up the two side
handles until the rack clicks into
place in the upper position.
• The rack must be level on both
sides.
Lower Rack
Half load:
When doing a half load, the lower rack
is preferred since this location will
provide greater washing power
especially for plates and saucepans.
Cutlery basket:
The cutlery basket can be moved or
removed entirely to make more space
available for other dishware.
Plate holder:
• The plate holders can be removed to
make room for large pots and pans.
• To remove: pull up on the handle.
• To reposition: reinstall in the
desired position by first locating
the feet under the rack frame and
then pushing down on the handle
till it snaps into place. The plate
holders can be installed in the
normal or in a crosswise
orientation for maximum flexibility.
 Loading...