

Whirlpool GSL9365EQ0 User Manual

MAGCORP_CD
Three speed
automatic washers
A Note to You............ 2
Washer Safety .......... 3
Parts and Features ... 4
Operating Your
Washer...................... 5
Caring for Your
Washer.................... 11
Troubleshooting ...... 12
Requesting
Assistance or
Service ....................16
Index .......................19
Warranty ................. 20
In the U.S.A. for assistance or service,
call the Consumer Assistance Center:
1-800-253-1301
In Canada for assistance or service,
see page 17.
3950309
*
Home Appliances

A NOTE TO YOU
Thank you for buying a WHIRLPOOL* appliance.
The Whirlpool Brand is committed to designing quality products that consistently perform for you to make
your life easier. To ensure that you enjoy years of trouble-free operation, we developed this Use and Care
Guide. It is full of valuable information about how to operate and maintain your appliance properly and safely.
Please read it carefully.
Also, complete and mail the Ownership Registration Card provided with your appliance. The card helps us
notify you about any new information on your appliance.
Please record your model’s information.
Whenever you call to request service for your appliance, you need to know your complete model number
and serial number. You can find this information on the
model and serial number label (see the diagram on the
“Parts and Features” page for the location of the label).
Also, record the other information shown in the next
column.
Keep this book and the sales slip together in a safe place for future reference.
Model Number __________________________________
Serial Number ___________________________________
Purchase Date __________________________________
Dealer Name ____________________________________
Dealer Address __________________________________
Dealer Phone ___________________________________
Our Consumer Assistance Center number is toll free.
To find detailed product information, the location of the nearest Whirlpool dealer or authorized servicer, to
purchase an accessory item, or register your appliance on-line, please visit our Web site at
www.whirlpool.com
1-800-253-1301
In Canada, for assistance or service, see the “Requesting Assistance or Service” section.
In Canada, visit our Web site at www.whirlpool.com/canada
2
WASHER SAFETY
Your safety and the safety of others is very important.
We have provided many important safety messages in this manual and on your appliance. Always read and
obey all safety messages.
This is the safety alert symbol.
This symbol alerts you to hazards that can kill or hurt you and others.
All safety messages will be preceded by the safety alert symbol and the word “DANGER” or
“WARNING.” These words mean:
You will be killed or seriously injured if you don’t
wDANGER
wWARNING
All safety messages will identify the hazard, tell you how to reduce the chance of injury, and tell you what can
happen if the instructions are not followed.
IMPORTANT SAFETY INSTRUCTIONS
WARNING
basic precautions, including the following:
Read all instructions before using the washer.
•
Do not wash articles that have been previously
•
cleaned in, washed in, soaked in, or spotted with
gasoline, dry-cleaning solvents, other flammable,
or explosive substances as they give off vapors
that could ignite or explode.
Do not add gasoline, dry-cleaning solvents, or
•
other flammable, or explosive substances to the
wash water. These substances give off vapors
that could ignite or explode.
Under certain conditions, hydrogen gas may be
•
produced in a hot water system that has not been
used for 2 weeks or more. HYDROGEN GAS IS
EXPLOSIVE. If the hot water system has not been
used for such a period, before using the washing
machine, turn on all hot water faucets and let the
water flow from each for several minutes. This will
release any accumulated hydrogen gas. As the
gas is flammable, do not smoke or use an open
flame during this time.
– To reduce the risk of fire, electric shock, or injury to persons when using the washer, follow
follow instructions.
You can be killed or seriously injured if you don’t
follow instructions.
Do not allow children to play on or in the washer.
•
Close supervision of children is necessary when the
washer is used near children.
Before the washer is removed from service or
•
discarded, remove the door.
Do not reach into the washer if the tub or agitator is
•
moving.
Do not install or store the washer where it will be
•
exposed to the weather.
Do not tamper with controls.
•
Do not repair or replace any part of the washer or
•
attempt any servicing unless specifically recommended in this Use and Care Guide or in published
user-repair instructions that you understand and
have the skills to carry out.
See Installation Instructions for grounding
•
requirements.
– SAVE THESE INSTRUCTIONS –
3
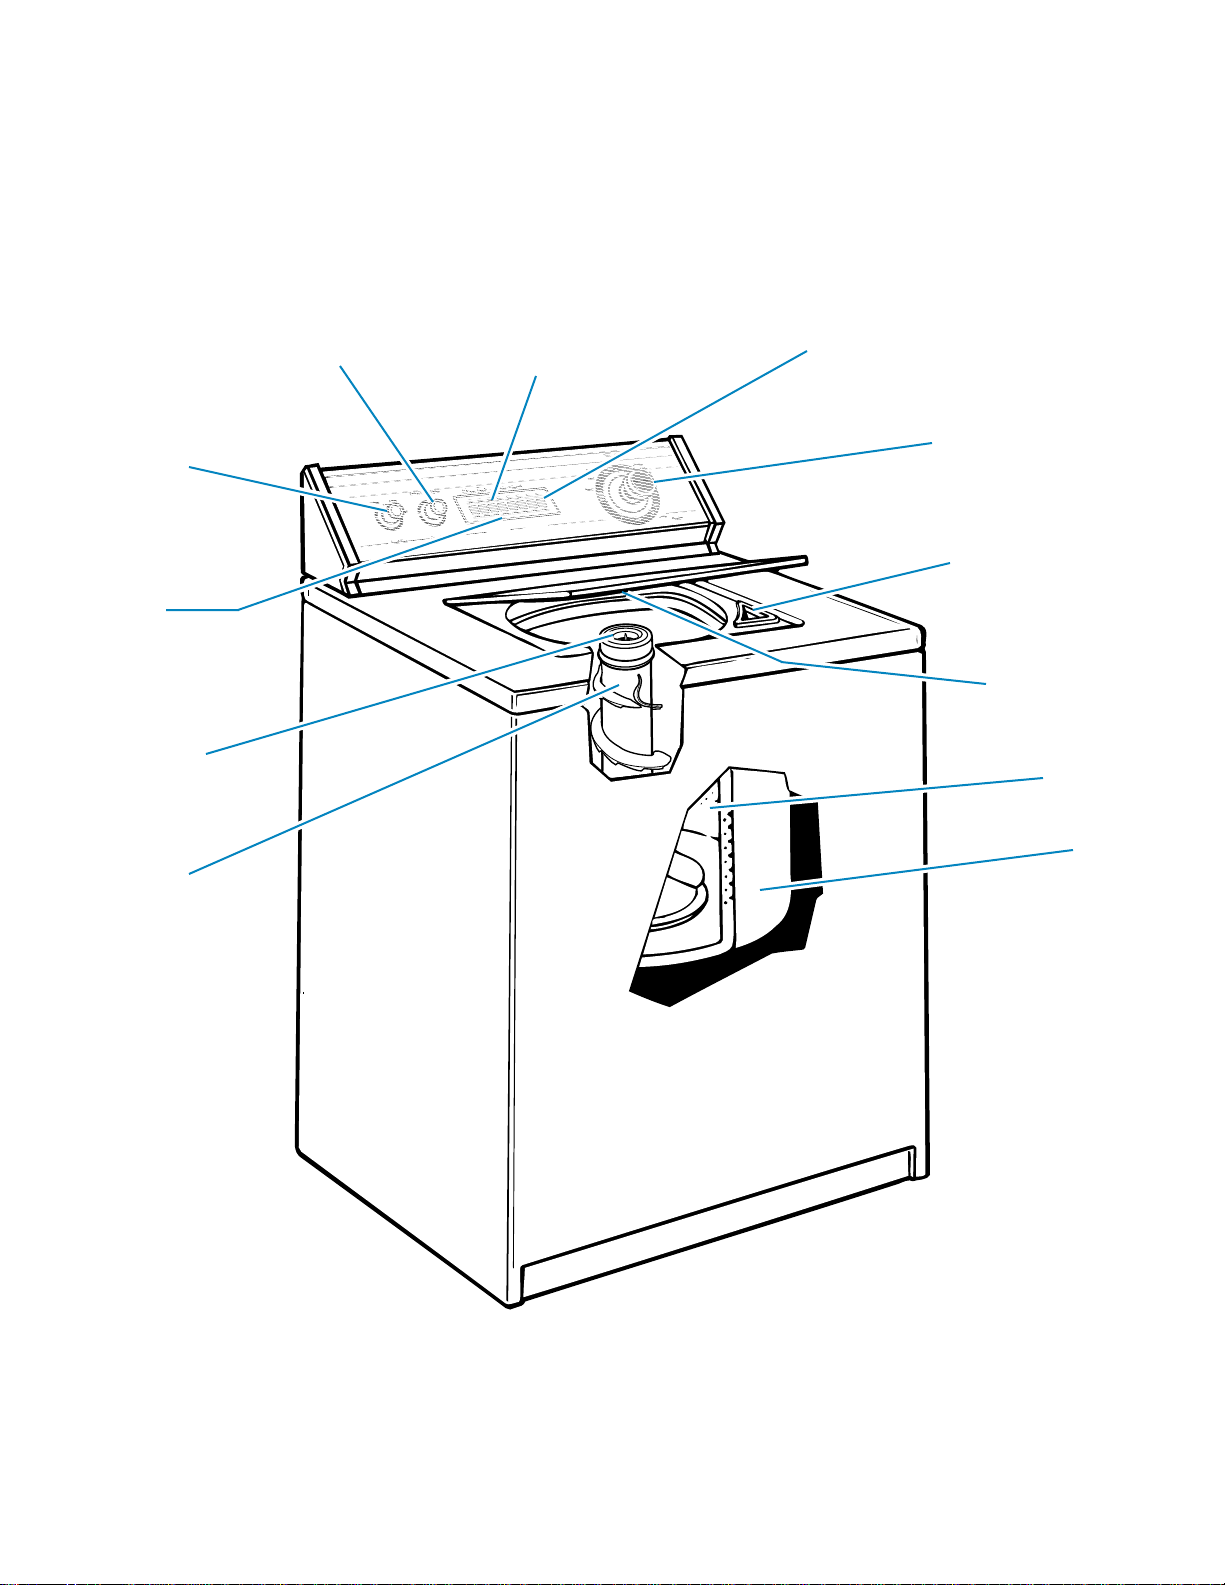
PARTS AND FEATURES
The parts and features of your washer are illustrated on this page. Become familiar with all parts
and features before using your washer. Page references are included next to some features. Refer
to those pages for more information about the features.
NOTE: The drawings in this book may vary from your washer model. They are designed to show
the different features of all models covered by this book. Your model may not include all features.
Load size
selector
(p. 6)
CLEAN TOUCH*
panel
Liquid fabric
softener
dispenser
(pp. 6, 11)
Agitator
Cycle signal selector
(p. 6)
Heavy Duty • Large Capacity Heavy Duty • Large Capacity
End of Cycle SignalEnd of Cycle Signal
Off
On
Large
Medium
Off
Extra
Off
Large
Small
Load SizeLoad Size
On
Off
Speed SelectSpeed Select
Water temperature
selector
Extra rinse selector
(p. 6)
(p. 6)
Cycle control knob
Normal
Extra
RinseRinse
SpinSpin
Light
SpinSpin
Off
Off
Normal
9
6
Rinse
3
Permanent
Pause
Press
Regular
Heavy
6
9
12
15
Pause
18
Off
SpinSpin
Hand WashablesHand Washables
Cool
Down
Rinse
Spin
Off
Extra
RinseRinse
SpinSpin
Rinse
Pull StartPull Start
Push StopPush Stop
Off
6
3
Normal
6
Off
Delicates
Rinse
SpinSpin
Light
X-RinseRinse
Off
Liquid chlorine
Low High
Agitate
Speed SelectSpeed Select
Soft Wash
Super WashSuper Wash
Spin
8 Cycle - 2 Speed 8 Cycle - 2 Speed
High Low
Hot WarmWarm WarmWarm ColdCold
On
On
Cold WarmWarm Cold Warm
Wash
Rinse
Temperature
High High Low Low
(pp. 7-9)
bleach dispenser
(p. 5)
Model and serial
number label
(under lid)
Basket
Tub
MAGIC CLEAN*
lint filter
(bottom of
washer basket)
(p. 9)
4

OPERATING YOUR WASHER
To get the best washing results possible, you must use your washer correctly. This section tells
you how to use your washer properly and efficiently.
USING YOUR WASHER
wWARNING
Explosion Hazard
Never place items in the washer that are
dampened with gasoline or other
flammable fluids.
No washer can completely remove oil.
Do not dry anything that has ever had any
type of oil on it (including cooking oils).
Doing so can result in death, explosion,
or fire.
1. Measure detergent and pour it into the washer.
If desired, you may
•
also add powder or
liquid color-safe
bleach.
Add extra detergent
•
for the Super Wash
cycle.
2. Drop a sorted load of clothes loosely into your
washer, filling to the
top row of holes.
Load evenly to main-
•
tain washer balance.
Mix large and small
items.
Items should move
•
easily through the wash
water. Overloading can
cause poor cleaning.
To reduce wrinkling
of permanent press clothes and some synthetic
knits, use a large load size to provide more space
(see step 6).
•
wWARNING
Electrical Shock Hazard
Plug into a grounded 3 prong outlet.
Do not remove ground prong.
Do not use an adapter.
Do not use an extension cord.
Failure to follow these instructions can
result in death, fire, or electrical shock.
3. (OPTIONAL STEP) Pour measured liquid chlorine
bleach into the liquid
chlorine bleach dispenser. Bleach will
be diluted automatically
during the wash part of
the cycle.
Never use more than
•
1 cup (250 mL) for a full
load. Use less with a
smaller load size.
Follow the manufac-
turer’s directions for safe use.
To avoid spilling, use a cup with a pouring spout.
•
Do not let bleach splash, drip, or run down into the
washer basket.
Make sure you use only liquid chlorine bleach in
•
this dispenser.
•
continued on next page
5

OPERATING YOUR WASHER
USING YOUR WASHER (CONT.)
4. (OPTIONAL STEP) Pour measured liquid fabric
softener into the fabric
softener dispenser.
Do not spill or drip
•
any fabric softener on
the clothes.
Make sure you use
•
only liquid fabric
softener in this
dispenser.
Dilute liquid fabric softener by filling the dis-
•
penser with warm
water until liquid
reaches the
crossbar in the
opening.
Softener is added
•
automatically during
the rinse portion of
the cycle.
5. Close the washer lid.
6. Turn the Load Size selector to the correct setting
for your wash load and
the type of fabric being
washed.
Your washer has five
•
load size settings.
Choose a load size
•
that allows the load to
move freely for best
fabric care. See
“Loading” later in this
section.
Change the setting after the washer has
•
started filling by turning the selector to a
different setting.
7. Set the Water Temperature selector to the correct
setting for the type of
fabric and soils being
washed.
Your washer uses the
•
Accuwash automatic
temperature control.
Accuwash maintains a
uniform water temperature by regulating
incoming hot and cold
water. This helps eliminate undissolved detergent and ensures consistent cleaning results. The cold wash is maintained
at approximately 75°F (24°C). The warm wash is
maintained at approximately 100°F (38°C).
NOTE: Make sure that both hot and cold water
faucets are turned on, or the Accuwash feature
will not work properly.
Use the warmest water safe for fabric.
•
Follow garment label instructions.
•
HOT: 130°F (54°C) or above.
– Whites and pastels.
– Heavy and greasy soils.
WARM: 90° to 110°F (32° to 44°C).
– Bright colors.
– Moderate to light soils.
COLD: 70° to 90°F (21° to 32°C).
– Colors that bleed or fade.
– Light soils.
8. (OPTIONAL STEP) Your washer has an Extra
Rinse selector. For an additional rinse and spin
at the end of a wash cycle, set the Extra Rinse
selector to On.
9. (OPTIONAL STEP) Set the Cycle Signal selector
to On if you want your washer to sound a signal
when the wash cycle is finished. This signal is
helpful when you are washing items that should
be removed from the washer as soon as the
cycle ends.
6
 Loading...