

Page 1
GB
DYNAMIC SENSE: Energy savings and optimum wash results
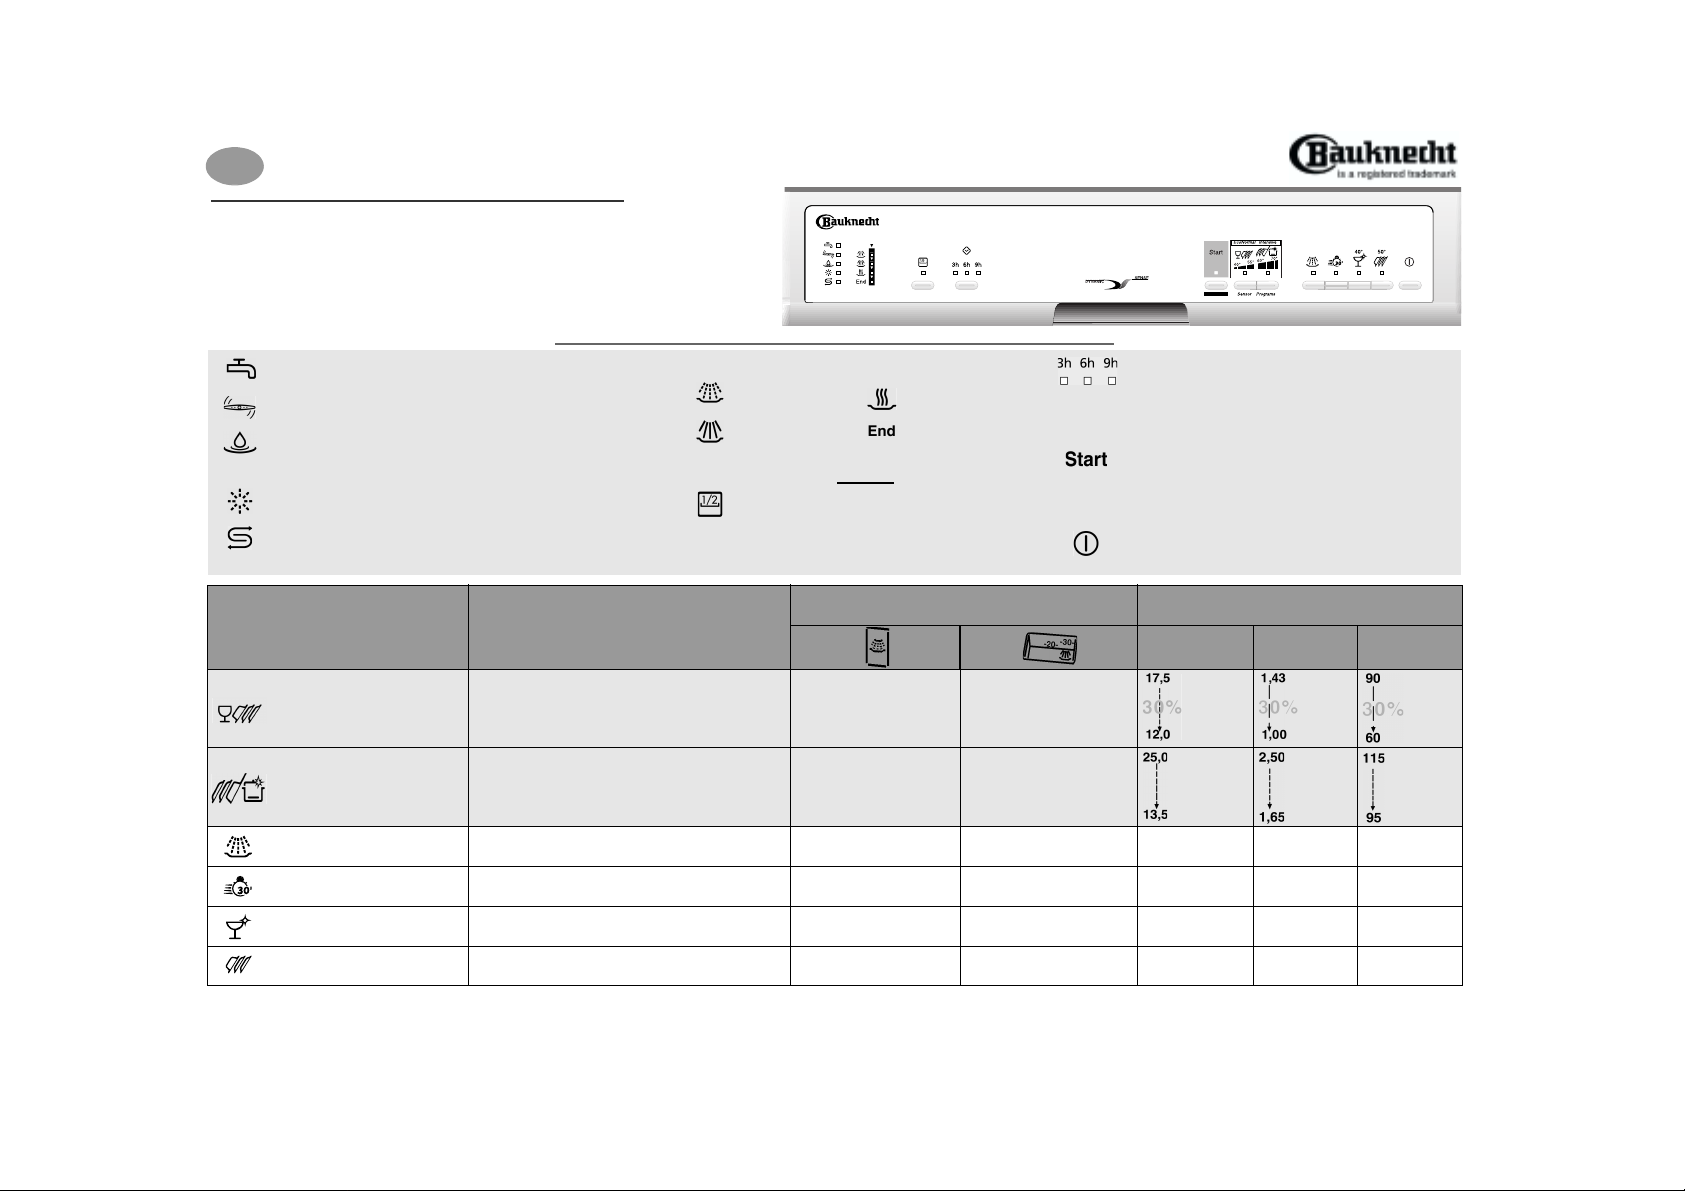
The two sensor-controlled “DYNAMIC SENSE” wash options are
recommended for routine washes. They use double-sensor
technology. Separate sensors gauge turbidity and particles in
order to determine the degree of soiling of the wash water. In
accordance with values measured, a microprocessor establishes
optimum water, energy and time consumption. Optimum wash
results are thus achieved using only those resources strictl y
required.
GSF 7396
Further indications are given in the pages to follow and in the user instructions.
Water supply indicator
Check the appliance fills with water.
Lower spray arm block indicator.
Release the spray arm.
“Water stop” device indicator
“Water stop” device not working.
Switch off the dishwasher and
shut off the water tap.
Rinse aid level indicator
Add rinse aid.
Salt level indicator
Add regeneration salt; only add regeneration salt
immediately before starting a wash programme.
Programme Symbol
and Temperature
Eco Normal 40 - 55° C
Intensive 60 - 70° C
Pre-wash
Rapid 40° C
Programme selection and
recommended load type
Recommended programme
, for crockery with little or no dried-on
washes
food.
Recommended programme
crockery
suitable for pans and saucepans.
Crockery to be washed later.
Lightly soiled crockery with no dried-on food.
, with dried-on food. Especially
Quick Reference Guide
Programme progress indicator
Pre-rinse /
Pre-wash
Washing
Half Load button
This function can be used with any
programme. The indicator lamp switches on:
the wash cycle is activated for the
lower
for routine
for heavily soiled
Options
rack only.
small compartment large compartment
Drying
Programme end
Place the detergent in the:
X X
X X
- - 5.0 (4.2) 0.02 (0.02) 9(9)
- X 13.0 (13.0) 0.85 (0.75) 30 (30)
upper
or
Delayed start button
Set the desired delay: 3, 6 or 9 hours.
Press the Start button.
The dishwasher will start at the set time.
Start button
Indicator lamp lit while the dishwasher is
operating. Flashes when a fault occurs.
Switches off at the end of the programme.
On / Off Button
Consumption 1)
Normal load / (Half load)
Water
(Litres)
(13.5)
(11.5)
(19.5)
(11.5)
Energy
(kWh)
Time
(Min.)
(1.3)
(0.9)
(1.7)
(1.3)
(80)
(60)
(98)
(90)
Glasses 40° C
Standard 50° C
1) Values may vary in relation to usage, e.g.: different loads, water temperatures - above or below 15° C - as well as
water hardness and power supply voltage.
2) Reference programme for Test Institute and energy-label.
2)
Light soiling, especially glasses and cups.
Normally or heavily soiled crockery with dried-
on food.
- X 12.0 (10.0) 0.82 (0.78) 60 (59)
X X 16.0 (14.5) 1.24 (1.10) 91 (88)
5019 100 90267
(We reserve the right to make technical modifications)
Page 2
B
A
C
C
How to use the dishwasher
1. After loading the dishwasher, cl ose the
door properly and open the water
supply tap.
2. Press the On/Off button to switch the
dishwasher on.
indicator lamps will switch on.
3. Select the desired programme by
pressing the corresponding button.
The corresponding indicator lamp
lights up.
(if supplied).
4. Press the Start button to start the
selected programme.
indicator lamp will light up.
the programmed data cannot be
altered by pressing the programme
selector buttons.
Once the Start button has been
Note:
pressed, the dishwasher memorises the
last programme selected. This
information remains in the memory even
during interruption of the power supply.
To change the selected
programme, press the Start button
for about 5 seconds,
Start indicator lamp switches
off.
using the programme selector
knob and press the Start button.
If the dishwasher is switched off
Note:
during a wash programme, when
switched on again it will resume the wash
cycle from where it was interrupted.
Only open the dishwasher door if
strictly necessary during a wash
cycle and exercise maximum
caution. Danger of scalding from
steam.
5. To indicate the end of the programme,
the Start indicator lamp switches off
and
the End indicator lamp (if fitted)
lights up
One of the programme
If required, select options
The Start
Once set,
until the
Select a new programme
(for about 30 min.)
.
6. Once the Start indicator lamp has
switched off press the On/Off bu tton to
switch the dishwasher off.
indicator lamps switch off.
7. Open the door (warning: beware of hot
steam). Unload the lower rack before
the upper one. Close the water tap.
All the
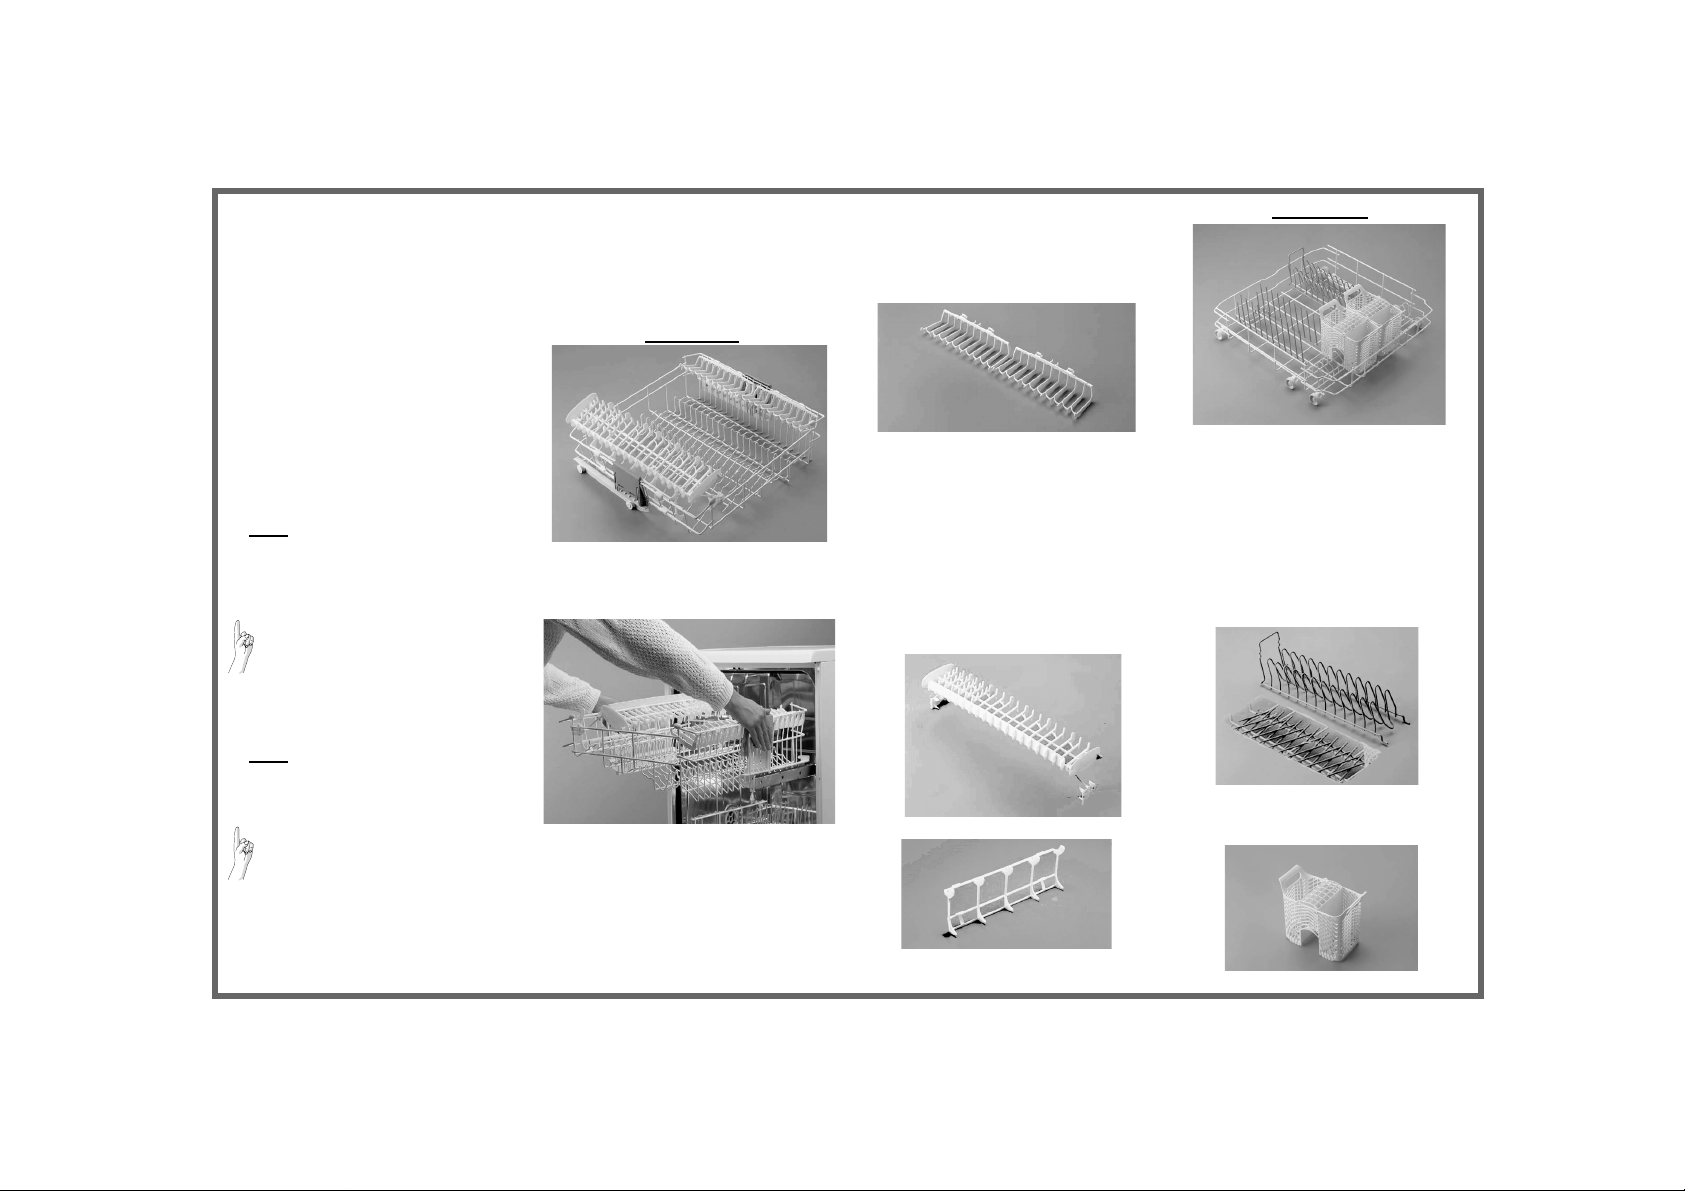
Upper rack
Half Load:
If the upper rack
the cutlery basket from the lower rack and
place it in the upper one.
is to be loaded, remove
only
Rack height adjustment:
(The dishwasher is delivered with the upper
rack in the top position).
The rack height can also be changed
when loaded.
• To lower: pull out the
handles and gently lower the rack.
• To raise: pull up the
until the rack clicks into place.
two
side handles
two
side
Upper and lower rack
• The rack must be level on both
sides.
Crockery holders:
• Down:
cups and long-stemmed glasses.
•
Up: plates.
“Vario Organizer” multi-purpose
support:
• To be used, for example, for longhandled utensils (
with the blade facing downwards),
cups and glasses.
• May be used in three different
positions (see also “Dishwasher
loading instructions” on Page 4).
1. Upon the left-hand side of the rack.
2. Upside-down, towards the centre of
the rack.
3. Upside-down, towards the left side.
Glass holder:
arrange knives
Lower rack
Half Load:
Loading the lower rack
greater washing power, especially for
plates and saucepans.
only
gives
Plate holders:
• May be lowered to increase
available space (A).
• May be removed to increase available
space (B). To remove: pull the handle
up.
B
A
Cutlery basket:
The cutlery basket can be removed to
increase (C) available space.
Please read the user instructions carefully.
Page 3
• Arrange crockery so that items do not
Tips and advice
touch each other. Arrange large
crockery in the lower rack and smaller
crockery in the upper rack.
• Load cups at an angle to facilitate
water drainage.
• Generally speaking, place cutlery in the
basket with the handles positioned
downwards, but ensure that any sharp
knives and forks that might cause
injury are placed in the basket with the
handles positioned upwards.
• Make sure the water jet can reach all
loaded items and that the spray arms
turn freely.
Important
• Fill the detergent dispenser and check
the salt and rinse aid level.
• Do not use the appliance for items not
suitable for washing in a dishwasher,
for example: wooden items, aluminium,
plastic utensils, tin, hand-decorated
crockery (unglazed), silver cutlery.
• Do not put liquid fat in the dishwasher
(e.g. oil used for frying) or candle wax.
• If a fault occurs or you wish to change
the current programme, press
the “START” button for about 5
seconds until the Start indicator lamp
switches off.
• If regeneration salt is to be added,
immediately start a wash programme in
order to eliminate any residual salt
(rinsing alone is not sufficient).
• Sometimes even though the
regeneration salt container has been
filled, the corresponding indicator lamp
(if fitted) will light up during the first
wash cycle after filling with salt.
• Before starting a wash programme,
make sure that the spray arms can turn
freely and are not impeded by crockery
or cutlery.
• Only switch off the dishwasher once the
“Start” indicator lamp has switched off.
If the dishwasher is switched off during a
wash cycle, when switched on again it
will resume the cycle from where it was
interrupted without having to start it
again.
If a fault occurs, before contacting our
After-Sales Service, make the following
checks to try and remedy the problem:
The dishwasher is not working:
• Is the plug properl y inserted in the wall
socket?
• Is there a power failure?
• Is the dishwasher switched on?
• Has the Start button been pressed?
• Has the delayed start timer been set
(if fitted)?
• Is the water suppl y tap on?
• Is the flow of water obstructed by
impurities? If so, close the water supply tap,
detach the water hose and clean the filter.
Then re-connect the water hose to the tap
and open the water tap once again.
• Are the filters clogged? (See “Care and
maintenance” chapter in the user
instructions).
• Is the door closed properly?
• Is a fault indica ted?
(The Start indicator lamp flashes).
Start the programme again from the
beginning: press the Start button for
about 5 seconds, until the Start indicator
lamp switches off.
Select a new programme and press the
Start button.
Troubleshooting Guide
Crockery still dirty after washing:
• Was the crockery loaded pr operly?
• Crockery must be loaded facing
downwards; this is important, especially
for large items of crockery.
• The water jets must sp ray the entire
surface of all items.
• Make sure that crockery and cutlery are
arranged properly.
• Have you selected the correct
programme?
• Did you use too much or too little
detergent? (The use of poor quality
detergents may result in less effective
washing).
• Are the filters clogged or incorrectly
assembled? (See “Care and
Maintenance” chapter in the user
instructions).
• Are the spray arms blocked or the nozzles
clogged? (See “Care and Maintenance”
chapter in the user instructions).
• Is the lower spray arm correctly fitted?
• Is the salt container cap (water softening
system) screwed down?
Marked crockery:
• Is the water hardness level selector not
properly adjusted? See (“Filling the salt
container” in the user instructions).
• Is the salt container empty? (See “Filling
the salt container” in the user
instructions).
• Was insufficient detergent used? (See
“Filling the detergent dispenser” in the
user instructions).
Marked glasses and cutlery:
• Was too much rinse aid used? (See
“Filling the rinse aid dispenser” in the user
instructions).
Note:
with some models, when the Start button
is pressed a pre-wash cycle precedes the
actual wash programme; this regenerates the
water softening system.
AFTER-SALES
SERVICE
If after carrying out the above checks the
malfunction persists or appears again,
turn the appliance off and turn off the
water supply tap, then call our After-Sales
Service (see guarantee). Please specify:
• The nature of the fault.
• The appliance type and model.
• The service code (the number after the
word Service on the adhesive rating plate)
inside the door on the right-hand side.
Your full address and telephone number.
•
Please read the user instructions carefully.
Page 4
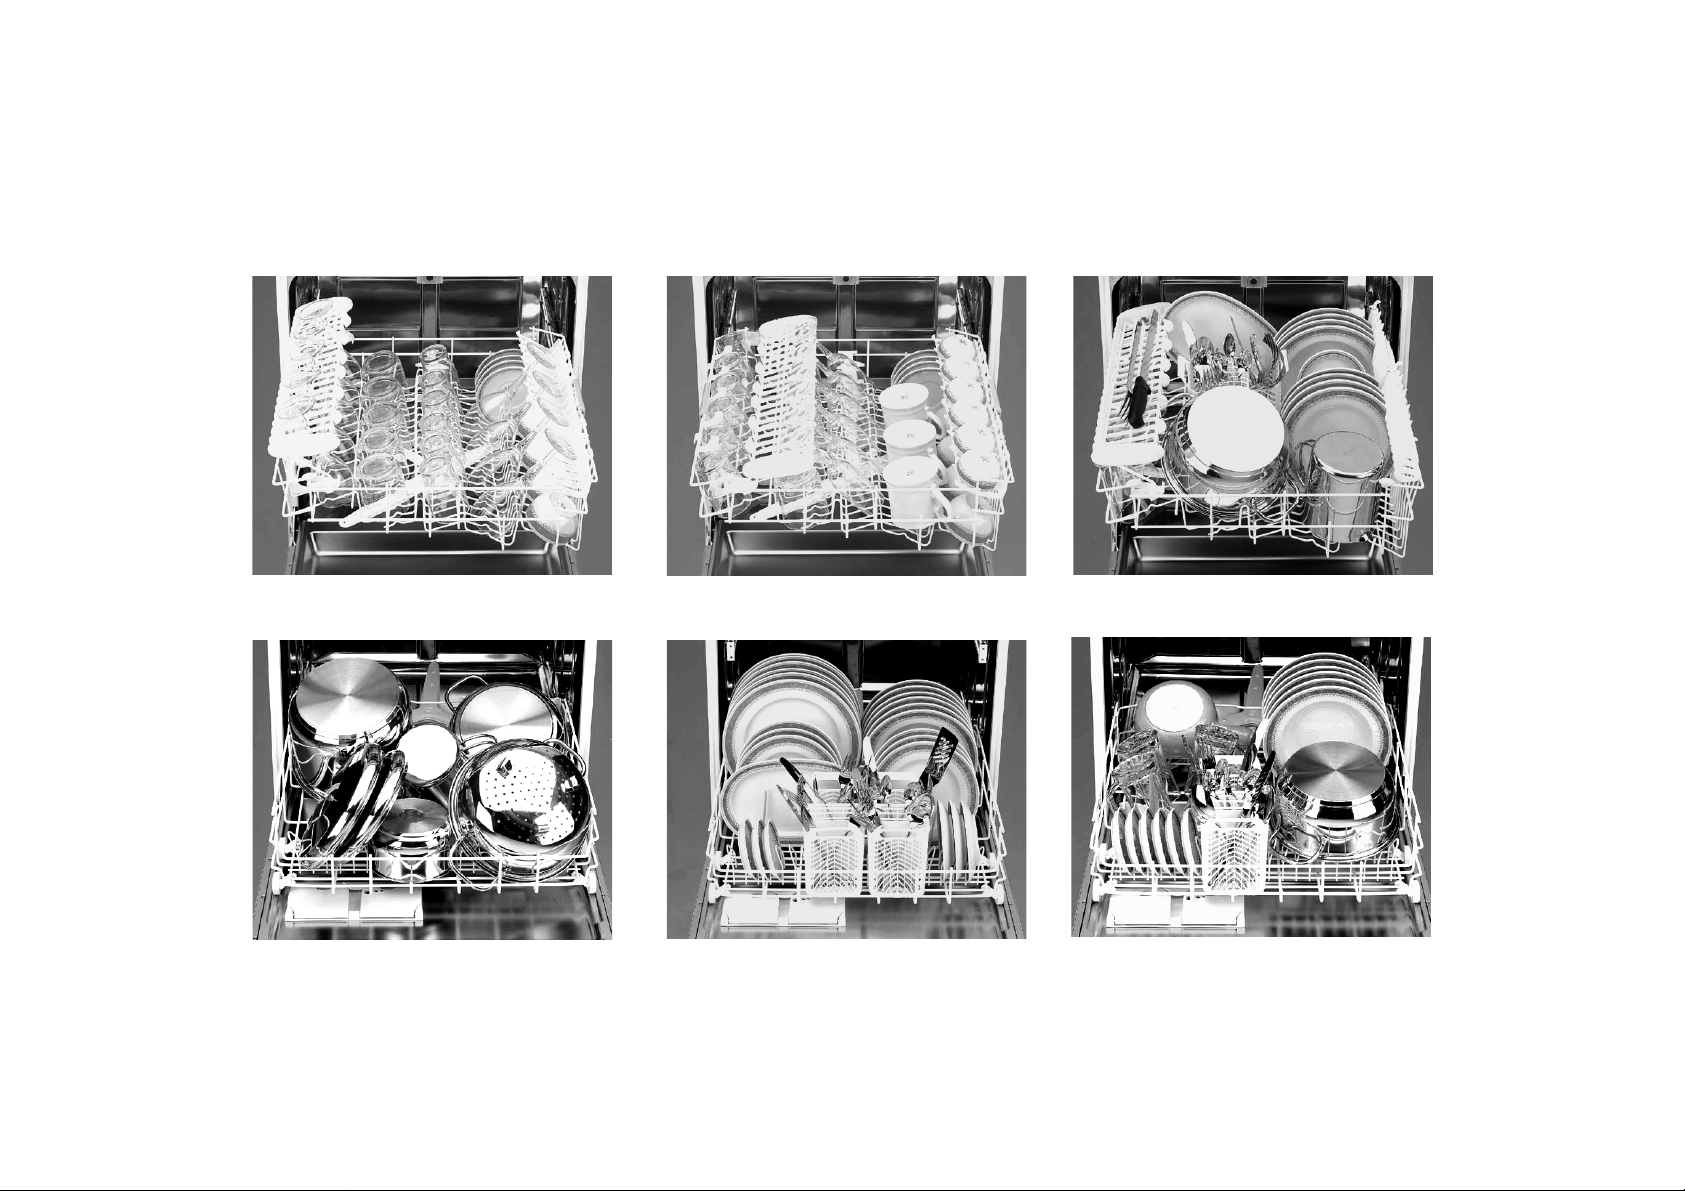
Dishwasher loading instructions
UPPER RACK
LOWER RACK
Depending on the model, rack features may vary (see “Upper and lower rack” description).
Half Load
 Loading...