

Whirlpool GS2SHEXMS00, ED5SHAXMQ00, GD5SHAXMT00, GD5SHAXMQ00, GD5SHAXMB00 Owner’s Manual
...
TABLEOFCONTENTS
TABLEDESMATIERES
REFRIGERATOR SAFETY ............................................................. 3
Proper Disposal of Your Old Refrigerator .................................... 3
INSTALLATION INSTRUCTIONS .................................................. 4
Unpacking .................................................................................... 4
Location Requirements ................................................................ 4
Electrical Requirements ............................................................... 5
Water Supply Requirements ........................................................ 5
Base Grille .................................................................................... 5
Door Removal ............................................................................... 6
Door Closing ................................................................................. 8
Water Supply Connection ............................................................ 8
Water System Preparation ......................................................... 10
Normal Sounds .......................................................................... 10
REFRIGERATOR USE .................................................................. 10
Ensuring Proper Air Circulation .................................................. 10
Using the Controls ..................................................................... 11
Water and Ice Dispensers .......................................................... 11
Water Filter Status Light............................................................. 13
Water Filtration System .............................................................. 14
Ice Maker and Storage Bin ........................................................ 15
REFRIGERATOR FEATURES ...................................................... 16
Refrigerator Shelves ................................................................... 16
Flip-up Shelf ............................................................................... 16
Adjustable Flip-up Shelf ............................................................. 17
Drop-down shelf ......................................................................... 17
Dell Drawer ................................................................................. 17
Convertible Vegetable/Meat Drawer, Crisper and Covers ........17
Convertible Vegetable/Meat Drawer Temperature Control .......18
Crisper Humidity Control ........................................................... 18
Wine or Can/Bottle Rack ........................................................... 18
Utility Bin .................................................................................... 18
FREEZER FEATURES .................................................................. 19
Freezer Shelf .............................................................................. 19
Freezer Basket or Bin ................................................................. 19
DOOR FEATURES ........................................................................ 19
Tilt-out Freezer Door Bin............................................................ 19
Chilled Door Bin ......................................................................... 19
Door Rails ................................................................................... 20
Door Bins.................................................................................... 20
REFRIGERATOR CARE ............................................................... 20
Cleaning ...................................................................................... 20
Changing the Light Bulbs ........................................................... 21
Power Interruptions .................................................................... 22
Vacation and Moving Care ......................................................... 22
TROUBLESHOOTING .................................................................. 23
ASSISTANCE OR SERVICE ......................................................... 25
In the U.S.A ................................................................................ 25
In Canada ................................................................................... 26
Accessories ................................................................................ 26
WATER FILTER CERTIFICATIONS ............................................. 26
PRODUCT DATA SHEETS ........................................................... 27
WHIRLPOOL ................................................................................. 29
S¢:CURITI_ DU RC:FRIGI_RATEUR .............................................. 30
Mise au rebut de votre vieux r_frig6rateur ................................. 30
INSTRUCTIONS D'INSTALLATION ............................................. 31
Deballage .................................................................................... 31
Emplacement d'installation ........................................................ 31
Specifications electriques .......................................................... 32
Specifications de I'alimentation en eau ..................................... 32
Grille de la base .......................................................................... 32
Enlevement des portes ............................................................... 33
Fermeture des portes ................................................................. 35
Raccordement de la canalisation d'eau .................................... 35
Pr6paration du systeme d'eau ................................................... 37
Sons normaux ............................................................................ 38
UTILISATION DU RCFRIGI_RATEUR .......................................... 38
Pour s'assurer d'une circulation d'air appropriee ...................... 38
Utilisation des commandes ........................................................ 39
Distributeurs d'eau et de glagons .............................................. 39
Le temoin lumineux de I'etat du filtre a eau ............................... 41
Syst_me de filtration d'eau ........................................................ 42
Machine a glagons et bac d'entreposage ................................. 43
CARACTI_RISTIQUES DU RCFRIGCRATEUR ........................... 44
Tablettes du refrigerateur ........................................................... 44
Tablette relevable ....................................................................... 44
Tablette relevable ajustable ....................................................... 45
Ctag_re inclinable ....................................................................... 45
Tiroir pour specialit6s alimentaires ............................................ 45
Tiroir a legumes/viande convertible,
bac a legumes et couvercles ..................................................... 45
Reglage de la temperature du tiroir
legumes/viande convertible ....................................................... 46
Reglage de I'humidite dans le bac a legumes ........................... 46
Casier a vin ou porte-cannettes/bouteilles ................................ 46
Casier utilitaire ............................................................................ 46
CARACTI_RISTIQUES DU CONGI_LATEUR ............................... 47
Tablette de congelateur ............................................................. 47
Panier ou bac de cong_lateur .................................................... 47
CARACTI_RISTIQUES DE LA PORTE ......................................... 47
Compartiment inclinable de la porte du congealateur .............. 47
Compartiment frafcheur ............................................................. 48
Tringles dans la porte ................................................................. 48
Balconnets dans la porte ........................................................... 48
ENTRETIEN DU RCFRIGI_RATEUR ............................................ 49
Nettoyage ................................................................................... 49
Remplacement des ampoules d'eclairage ................................ 50
Pannes de courant ..................................................................... 51
Entretien avant les vacances ou Iors d'un dem6nagement .......51
DI_PANNAGE ................................................................................. 52
ASSISTANCE OU SERVICE ......................................................... 56
Accessoires ................................................................................ 56
FEUlLLES DE DONNI_ES SUP LE PRODUlT ............................. 57
GARANTIE ..................................................................................... 59
REFRIGERATORSAFETY
Your safety and the safety of others are very important.
We have provided many important safety messages in this manual and on your appliance, Always read and obey all
safety messages.
This symbol alerts you to potential hazards that can kill or hurt you and others,
All safety messages will follow the safety alert symbol and either the word "DANGER" or
This is the safety alert symbol,
"WARNING," These words mean:
You can be killed or seriously injured if you don't
immediately follow instructions.
You can be killed or seriously injured if you don't
follow instructions.
All safety messages will tell you what the potential hazard is, tell you how to reduce the chance of injury, and tell you
what can happen if the instructions are not followed,
IMPORTANT SAFETY INSTRUCTIONS
WARNING: To reduce the risk of fire, electric shock, or injury when using your refrigerator, follow these basic
precautions:
• Plug into a grounded 3 prong outlet.
• Do not remove ground prong.
• Do not use an adapter.
• Do not use an extension cord.
• Disconnect power before servicing.
• Replace all panels before operating.
• Remove doors from your old refrigerator.
• Use nonflammable cleaner.
• Keep flammable materials and vapors, such as
gasoline, away from refrigerator.
• Use two or more people to move and install
refrigerator.
• Disconnect power before installing ice maker (on
ice maker kit ready models only).
• Use a sturdy glass when dispensing ice or water
(on some models).
SAVE THESE INSTRUCTIONS
ProperDisposalofYourOldRefrigerator
Suffocation Hazard
Remove doors from your old refrigerator.
Failure to do so can resuJt in death or
brain damage.
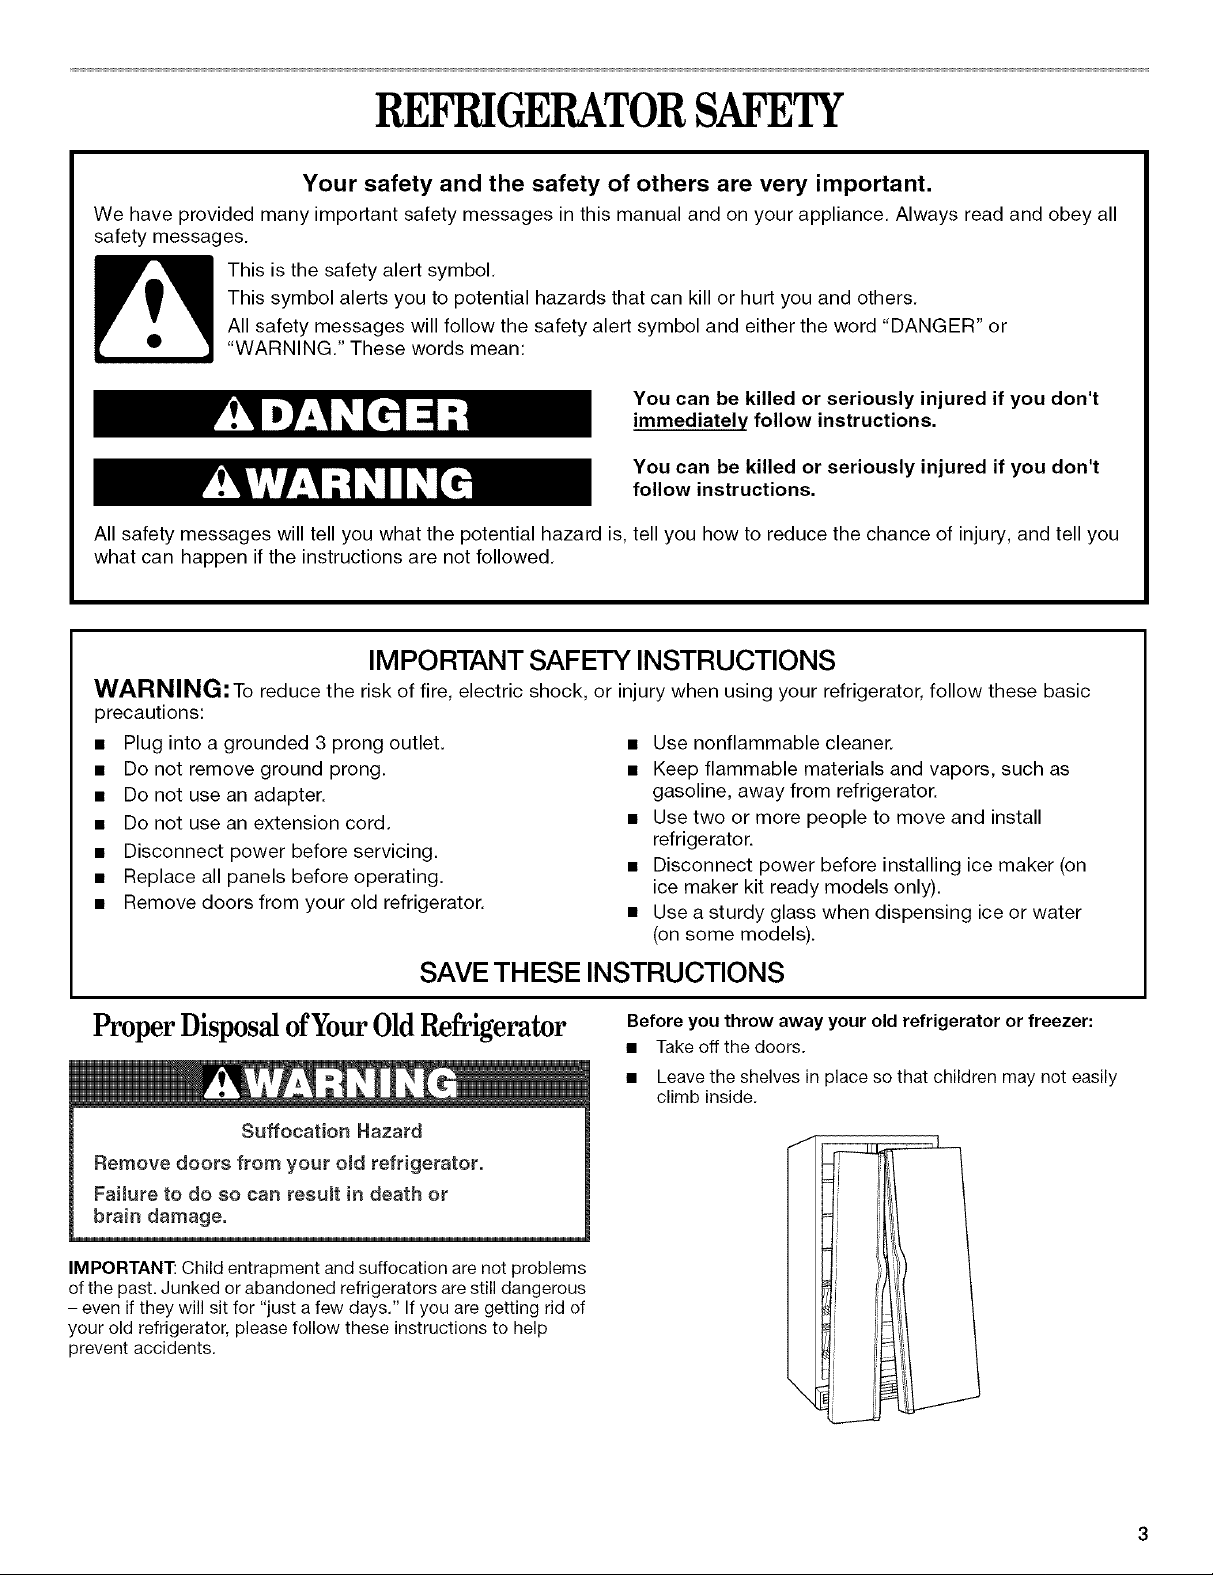
IMPORTANT: Child entrapment and suffocation are not problems
of the past. Junked or abandoned refrigerators are still dangerous
- even if they will sit for "just a few days." If you are getting rid of
your old refrigerator, please follow these instructions to help
prevent accidents.
Before you throw away your old refrigerator or freezer:
• Take off the doors.
• Leave the shelves in place so that children may not easily
climb inside.

INSTALLATIONINSTRUCTIONS
Excessive Weight Hazard
Use two or more people to move and install
refrigerator.
Failure to do so can result in back or other injury.
Removing packaging materials
• Remove tape and glue residue from surfaces before turning
on the refrigerator. Rub a small amount of liquid dish soap
over the adhesive with your fingers. Wipe with warm water
and dry.
Do not use sharp instruments, rubbing alcohol, flammable
fluids, or abrasive cleaners to remove tape or glue. These
products can damage the surface of your refrigerator. For
more information, see the "Refrigerator Safety" section.
When t"vloving Your Refrigerator:
Your refrigerator is heavy. When moving the refrigerator
for cleaning or service, be sure to protect the floor=
Always pulI the refrigerator straight out when moving it.
Do not wiggle or "walk" the refrigerator when trying to move
it, as floor damage could occur.
Cleaning before use
After you remove all of the packaging materials, clean the inside
of your refrigerator before using it. See the cleaning instructions
in the "Refrigerator Care" section.
important information to know about glass shelves
and covers:
Do not clean glass shelves or covers with warm water when
they are cold. Shelves and covers may break if exposed to
sudden temperature changes or impact, such as bumping.
For your protection, tempered glass is designed to shatter
into many smal!, pebble-size pieces. This is normal. Glass
shelves and covers are heavy. Use special care when re-
moving them to avoid impact from dropping.
E×ploeion Hazard
Keep flammable materials and vapors, such as
gasoline, away from refrigerator.
FaiJure to do so can result in death, explosion,
or fire.
To ensure proper ventilation for your refrigerator, allow for 1/2in.
(1.25 cm) space on each side and at the top. When installing your
refrigerator next to a fixed wall, leave 2 in. (5.08 cm) minimum on
each side (depending on your model) to allow for the door to
swing open. If your refrigerator has an ice maker, allow extra
space at the back for the water line connections.
NOTE: Do not install the refrigerator near an oven, radiator, or
other heat source, nor in a location where the temperature will fall
below 55°F (13°C).
2'
1/2" (1.25 crn)i
II -- I'!
/
2" (5°08era)
ElectricaJShockHazard
Plugintoagrounded3 prong outJet.
Do not remove ground prong.
Do not use an adapter.
Do not use an extension cord.
Failure to follow these instructions can result in
death, fire, or eJectrical shock.
Before you move your refrigerator into its final location, it is
important to make sure you have the proper electrical
connection.
Recommended grounding method
A 115 Volt, 60 Hz., AC only 15 or 20 ampere fused, grounded
electrical supply is required. It is recommended that a separate
circuit serving only your refrigerator be provided. Use an outlet
that cannot be turned off by a switch. Do not use an
extension cord.
NOTE: Before performing any type of installation, cleaning, or
removing a light bulb, turn the control (Thermostat, Refrigerator
or Freezer Control depending on the model) to OFF and then
disconnect the refrigerator from the electrical source. When you
are finished, reconnect the refrigerator to the electrical source
and reset the control (Thermostat, Refrigerator or Freezer Control
depending on the model) to the desired setting.
Read all directions carefully before you begin.
IMPORTANT:
• If you turn the refrigerator on before the water line is
connected, turn the ice maker OFR
• All installations must meet local plumbing code requirements.
• Use copper tubing and check for leaks. Install copper tubing
only in areas where the household temperatures will remain
above freezing.
Tools Required: Flat-blade screwdriver, 7_6in. and 1/2in. open-
end wrenches or two adjustable wrenches, 1/4in. nut driver and
drill bit, hand drill or electric drill (properly grounded).
NOTE: Your refrigerator dealer has a kit available with a 1/4in.
(6.35 ram) saddle-type shutoff valve, a union, and copper tubing.
Before purchasing, make sure a saddle-type valve complies with
your local plumbing codes. Do not use a piercing-type or 3/1_in.
(4.76 mm) saddle valve which reduces water flow and clogs more
easily.
Water Pressure
A cold water supply with water pressure of between 30 and 120
psi (207-827 kPa) is required to operate the water dispenser and
ice maker. Ifyou have questions about your water pressure, see
"Troubleshooting" or call a licensed, qualified plumber.
Reverse Osmosis Water Supply
If a reverse osmosis water filtration system is connected to your
cold water supply, the water pressure to the system needs to be
a minimum of 40 to 60 psi (276 - 414 kPa).
If the water pressure to the reverse osmosis system is less than
40 to 60 psi (276 - 414 kPa) a booster pump can be inserted into
the small tubing that goes from the cold water line to the reverse
osmosis system.
If the water dispenser is still not dispensing water properly:
• Check to see whether the sediment filter in the reverse
osmosis system is blocked. Replace the filter if necessary.
Allow the storage tank on the reverse osmosis system to refill
after heavy usage.
If your refrigerator has a water filter cartridge, it may further
reduce the water pressure when used in conjunction with a
reverse osmosis system. Remove the water filter cartridge.
See "Water Filtration System."
If you have questions about your water pressure, refer to
"Troubleshooting" or call a licensed, qualified plumber.
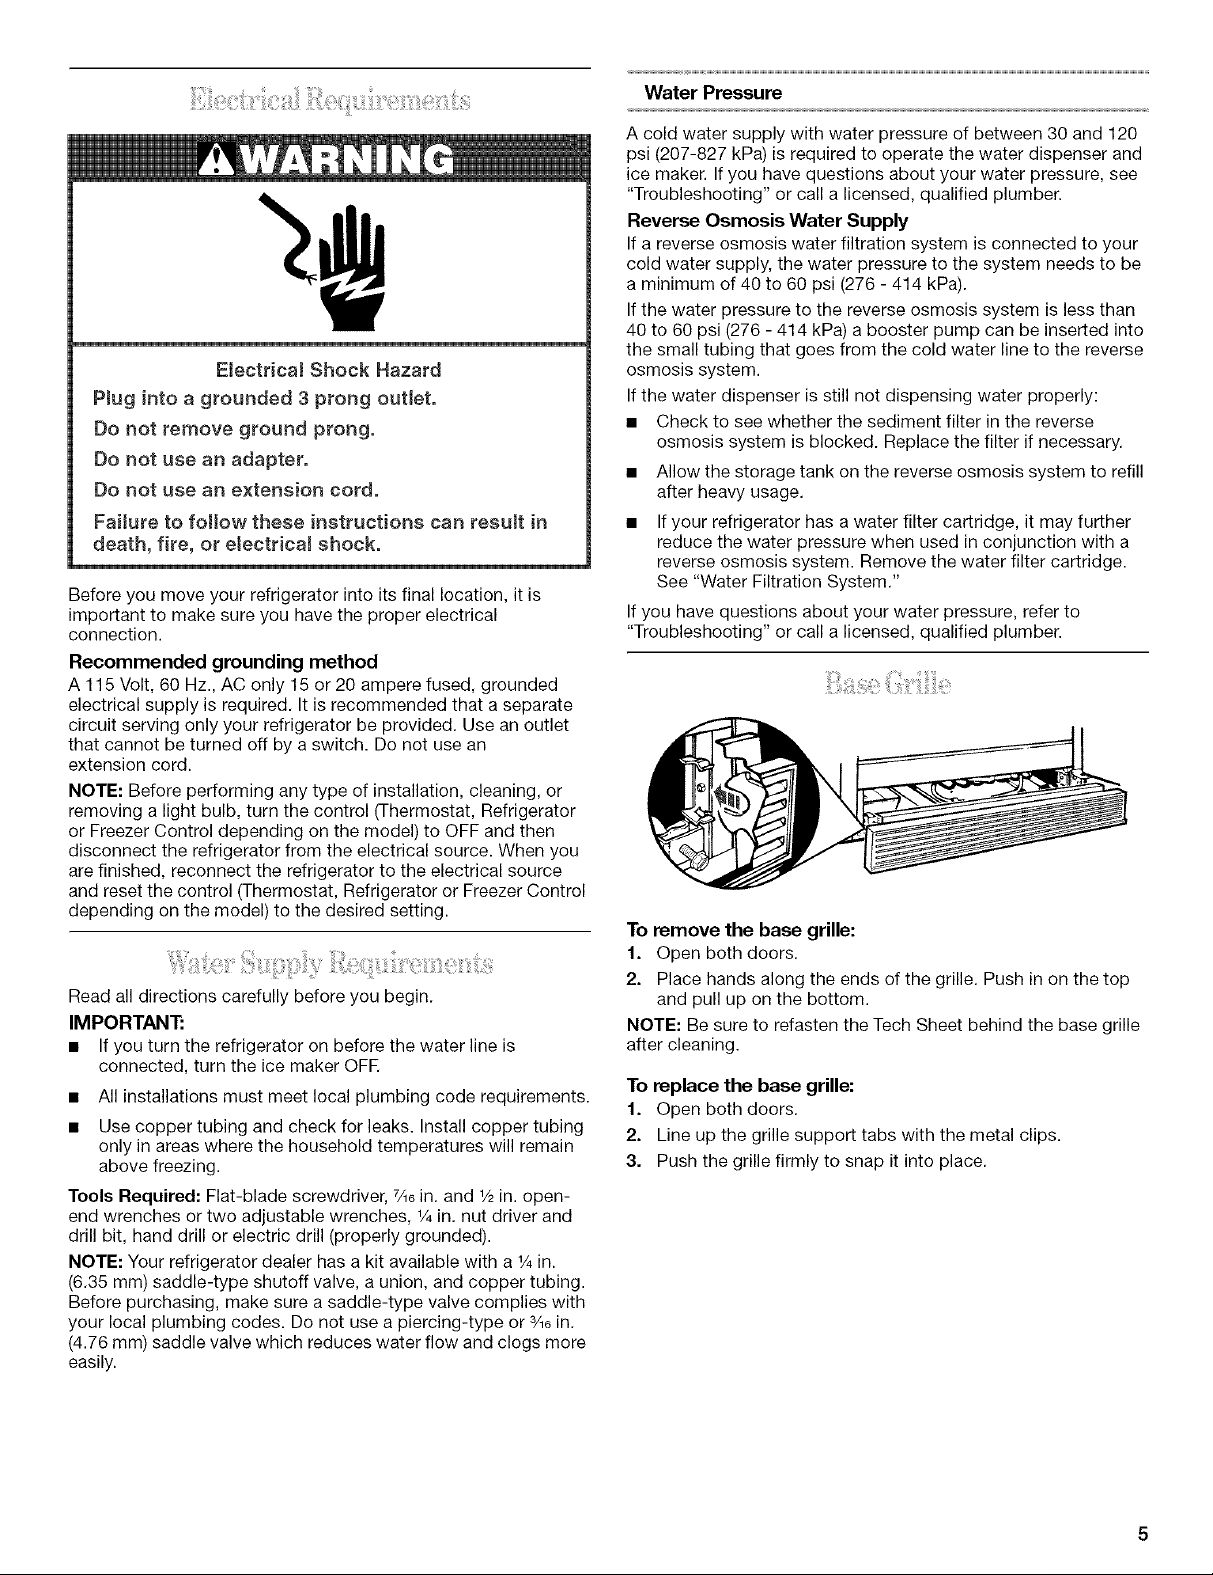
To remove the base grille:
1. Open both doors.
2. Place hands along the ends of the grille. Push in on the top
and pull up on the bottom.
NOTE: Be sure to refasten the Tech Sheet behind the base grille
after cleaning.
To replace the base grille:
1. Open both doors.
2. Line up the grille support tabs with the metal clips.
3. Push the grille firmly to snap it into place.
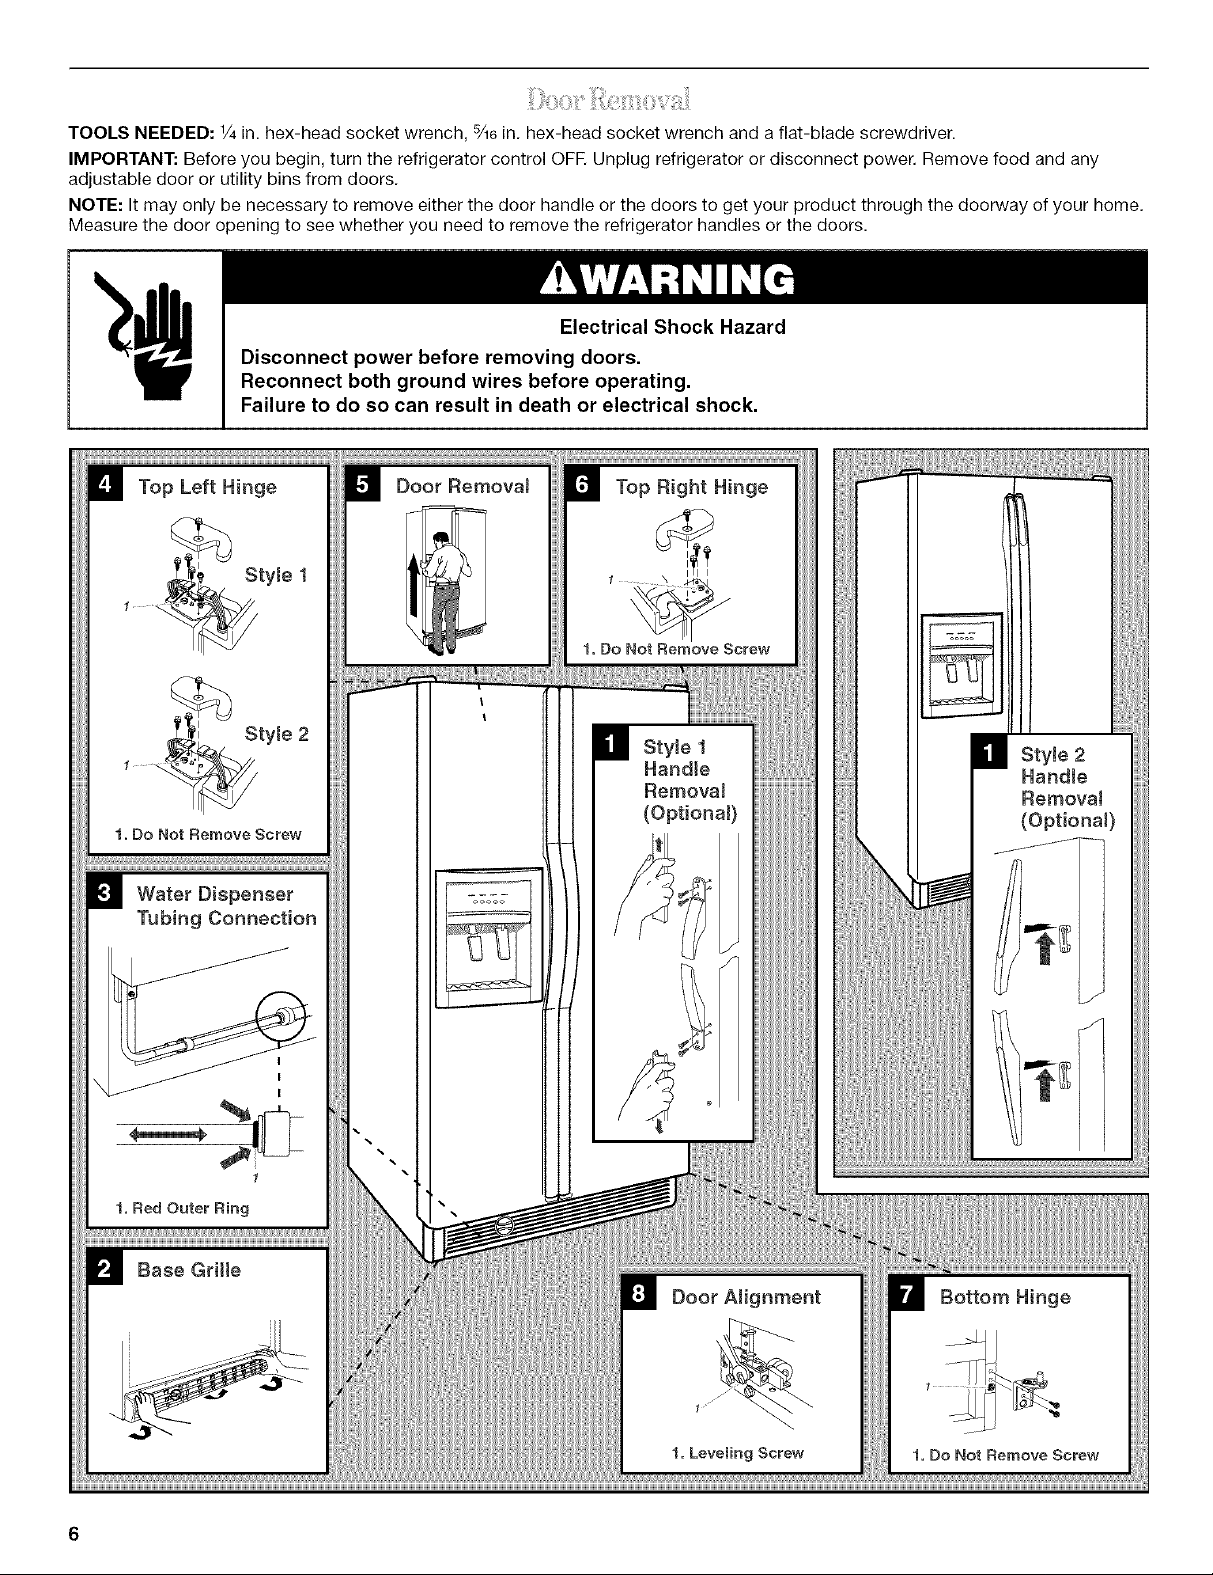
TOOLSNEEDED:1/4in.hex-headsocketwrench,%6in.hex-headsocketwrenchandaflat-bladescrewdriver.
IMPORTANT:Beforeyoubegin,turntherefrigeratorcontrolOFEUnplugrefrigeratorordisconnectpower.Removefoodandany
adjustabledoororutilitybinsfromdoors.
NOTE:Itmayonlybenecessarytoremoveeitherthedoorhandleorthedoorstogetyourproductthroughthedoorwayofyourhome.
Measurethedooropeningtoseewhetheryouneedtoremovetherefrigeratorhandlesorthedoors.
Electrical Shock Hazard
Disconnect power before removing doors.
Reconnect both ground wires before operating.
Failure to do so can result in death or electrical shock.
Top Left Hinge
_tyle 1
Style 2
1. Do Not Remove Screw
Door RemovaJ
1. Do Not Remove Screw
_'Style 1
Handle
RemovaJ
(OptionaJ)
I
1
Bottom Hinge
1, Do Not Remove Screw
Handle Removal (optional)
Style 1
1. Apply firm pressure with your hand on the face of trim. Slide
top trim up and bottom trim down away from handle. Lift trim
pieces off shoulder screws (see Graphic 1).
NOTE: Some models include accent pieces between the handle
and the handle trim. If your model includes the accents, you will
need to carefully remove them with a flat-blade screwdriver
before removing the handle screws. The accent pieces are
optional and can be reinstalled or left off the handle assembly.
2. Remove handle screws and handles. (See Graphic 1).
3. Move refrigerator into place. Replace handles as shown (see
Graphic 1).
Style 2
1. Apply firm pressure on the handle to slide it up and off of the
shoulder screws (see Graphic 1).
2. Move refrigerator into place. Replace handles as shown (see
Graphic 1).
Door Removal
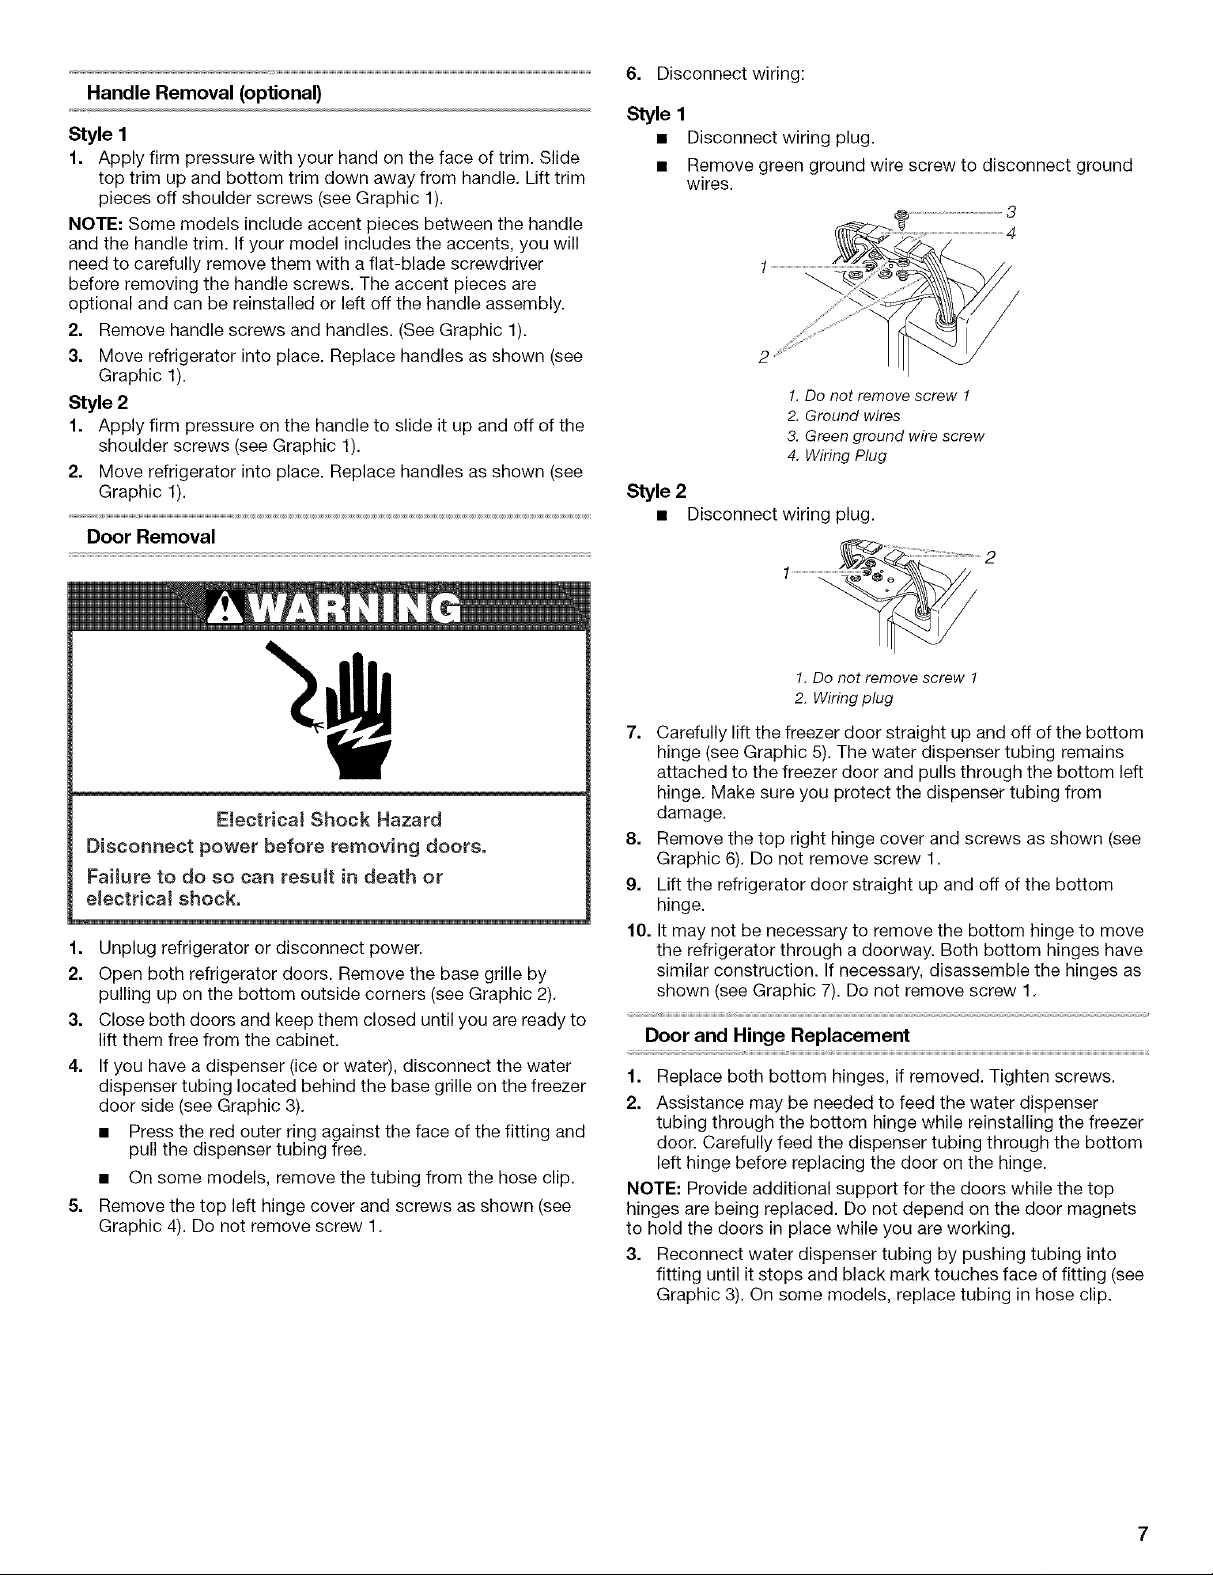
6. Disconnect wiring:
Style 1
• Disconnect wiring plug.
• Remove green ground wire screw to disconnect ground
wires.
1
1. Do not remove screw 1
2. Ground wires
3. Green ground wire screw
4. Wiring Plug
Style 2
• Disconnect wiring plug.
1 _ 2
E_ectricai Shock Hazard
Disconnect power before removing doors.
Failure to do so can result in death or
etectrica_ shock.
1. Unplug refrigerator or disconnect power.
2. Open both refrigerator doors. Remove the base grille by
pulling up on the bottom outside corners (see Graphic 2).
3. Close both doors and keep them closed until you are ready to
lift them free from the cabinet.
4. If you have a dispenser (ice or water), disconnect the water
dispenser tubing located behind the base grille on the freezer
door side (see Graphic 3).
• Press the red outer ring against the face of the fitting and
pull the dispenser tubing free.
• On some models, remove the tubing from the hose clip.
5. Remove the top left hinge cover and screws as shown (see
Graphic 4). Do not remove screw 1.
1. Do not remove screw 1
2. Wiring plug
7. Carefully lift the freezer door straight up and off of the bottom
hinge (see Graphic 5). The water dispenser tubing remains
attached to the freezer door and pulls through the bottom left
hinge. Make sure you protect the dispenser tubing from
damage.
8. Remove the top right hinge cover and screws as shown (see
Graphic 6). Do not remove screw 1.
9. Lift the refrigerator door straight up and off of the bottom
hinge.
10. It may not be necessary to remove the bottom hinge to move
the refrigerator through a doorway. Both bottom hinges have
similar construction. If necessary, disassemble the hinges as
shown (see Graphic 7). Do not remove screw 1.
Door and Hinge Replacement
1. Replace both bottom hinges, if removed. Tighten screws.
2. Assistance may be needed to feed the water dispenser
tubing through the bottom hinge while reinstalling the freezer
door. Carefully feed the dispenser tubing through the bottom
left hinge before replacing the door on the hinge.
NOTE: Provide additional support for the doors while the top
hinges are being replaced. Do not depend on the door magnets
to hold the doors in place while you are working.
3. Reconnect water dispenser tubing by pushing tubing into
fitting until it stops and black mark touches face of fitting (see
Graphic 3). On some models, replace tubing in hose clip.
4. Alignandreplacethetoplefthingeasshown(seeGraphic4).
Tightenscrews.
ElectricaJShockHazard
Reconnectbothgroundwires.
Failuretodosocanresultindeathor
etectricaJshock.
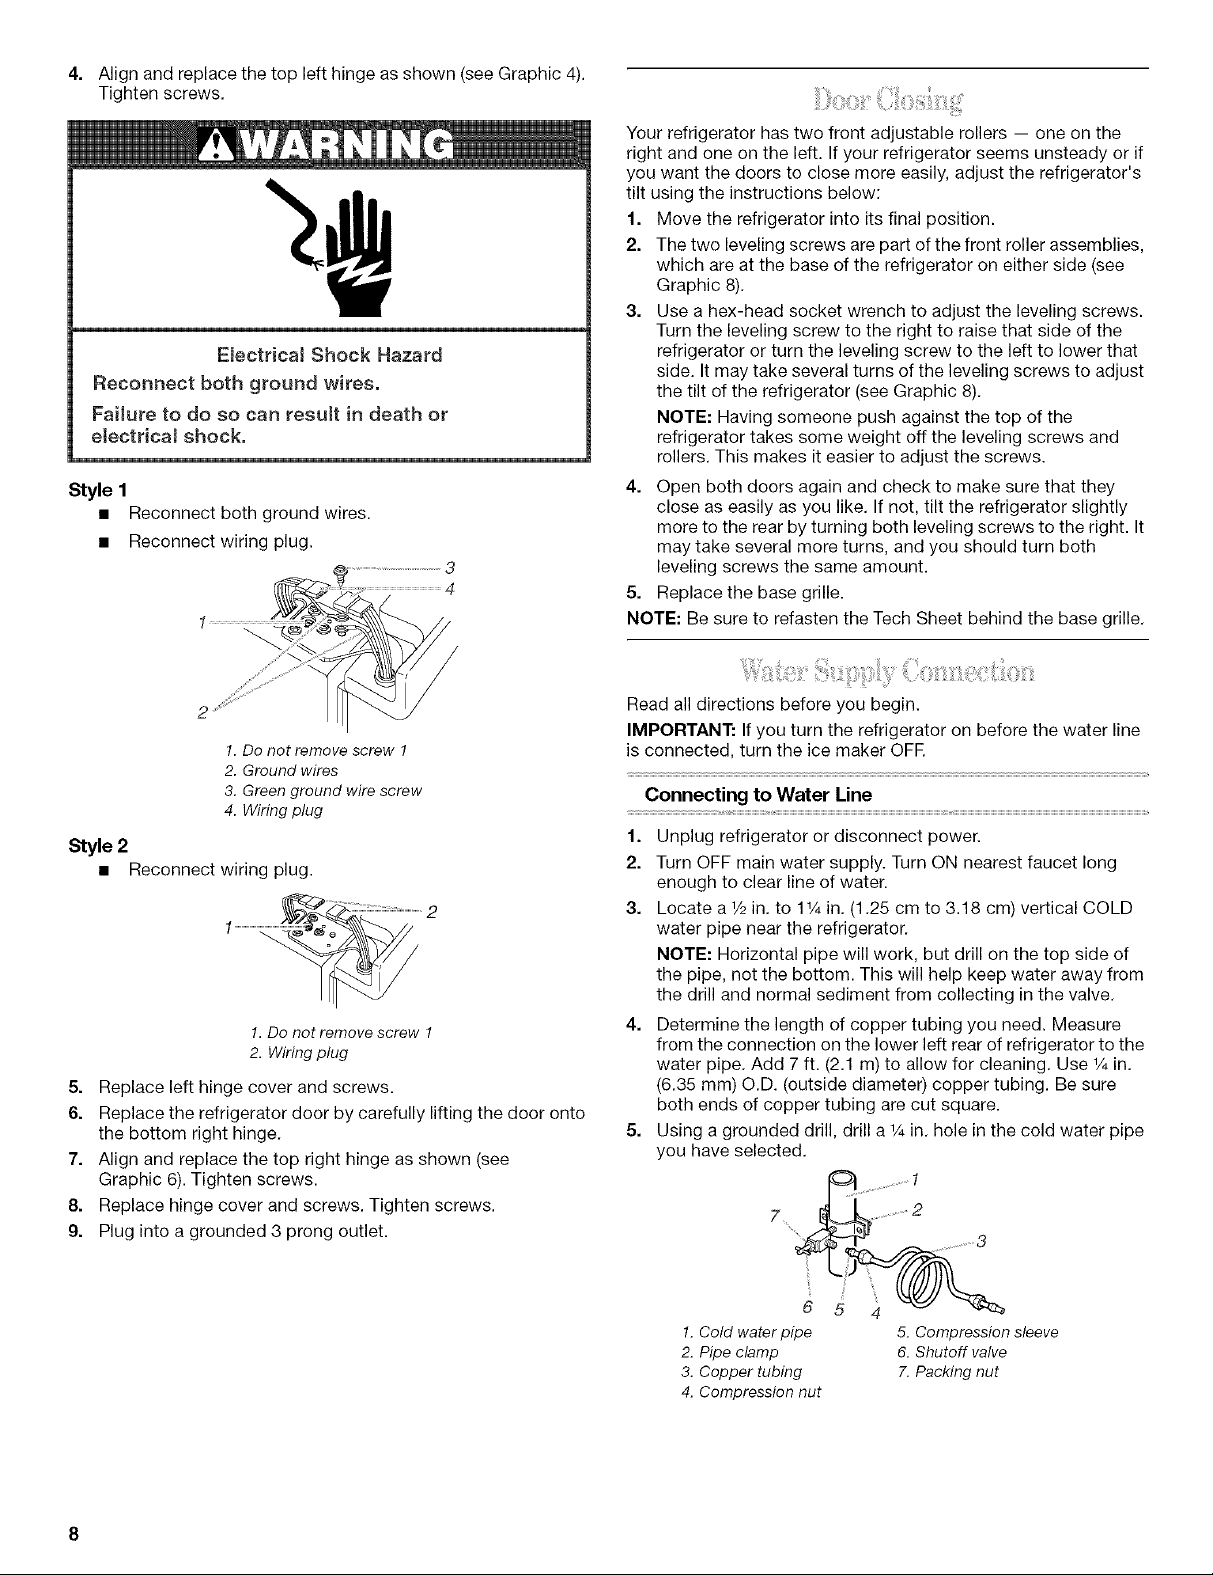
Style1
• Reconnectbothgroundwires.
• Reconnectwiringplug.
Yourrefrigeratorhastwofrontadjustablerollers-- oneonthe
rightandoneontheleft.Ifyourrefrigeratorseemsunsteadyorif
youwantthedoorstoclosemoreeasily,adjusttherefrigerator's
tiltusingtheinstructionsbelow:
1. Movetherefrigeratorintoitsfinalposition.
2. Thetwolevelingscrewsarepartofthefrontrollerassemblies,
whichareatthebaseoftherefrigeratoroneitherside(see
Graphic8).
3. Useahex-headsocketwrenchtoadjustthelevelingscrews.
Turnthelevelingscrewtotherighttoraisethatsideofthe
refrigeratororturnthelevelingscrewtothelefttolowerthat
side.Itmaytakeseveralturnsofthelevelingscrewstoadjust
thetiltoftherefrigerator(seeGraphic8).
NOTE:Havingsomeonepushagainstthetopofthe
refrigeratortakessomeweightoffthelevelingscrewsand
rollers.Thismakesiteasiertoadjustthescrews.
4. Openbothdoorsagainandchecktomakesurethatthey
closeaseasilyasyoulike.Ifnot,tilttherefrigeratorslightly
moretotherearbyturningbothlevelingscrewstotheright.It
maytakeseveralmoreturns,andyoushouldturnboth
levelingscrewsthesameamount.
5. Replacethebasegrille.
NOTE:BesuretorefastentheTechSheetbehindthebasegrille.
!, Do not remove screw 1
2. Ground wires
3. Green ground wire screw
4. Wiring plug
Style 2
• Reconnect wiring plug.
1 _ 2 3.
1.Do notremove screw 1 4.
2. Wiringplug
5.
Replace left hinge cover and screws.
6.
Replace the refrigerator door by carefully lifting the door onto
the bottom right hinge. 5.
7.
Align and replace the top right hinge as shown (see
Graphic 6). Tighten screws.
8.
Replace hinge cover and screws. Tighten screws.
9.
Plug into a grounded 3 prong outlet.
Read all directions before you begin.
IMPORTANT: If you turn the refrigerator on before the water line
is connected, turn the ice maker OFE
Connecting to Water Line
1.
Unplug refrigerator or disconnect power.
2.
Turn OFF main water supply. Turn ON nearest faucet long
enough to clear line of water.
Locate a 1/2in. to 11/4in. (1.25 cm to 3.18 cm) vertical COLD
water pipe near the refrigerator.
NOTE: Horizontal pipe will work, but drill on the top side of
the pipe, not the bottom. This will help keep water away from
the drill and normal sediment from collecting in the valve.
Determine the length of copper tubing you need. Measure
from the connection on the lower left rear of refrigerator to the
water pipe. Add 7 ft. (2.1 m) to allow for cleaning. Use 1/4in.
(6.35 mm) O.D. (outside diameter) copper tubing. Be sure
both ends of copper tubing are cut square.
Using a grounded drill, drill a 1/4in. hole in the cold water pipe
you have selected.
................ 1
7 ...................2
1.Cold waterpipe 5. Compression sleeve
2. Pipe clamp 6. Shutoff valve
3. Copper tubing 7.Packing nut
4. Compression nut
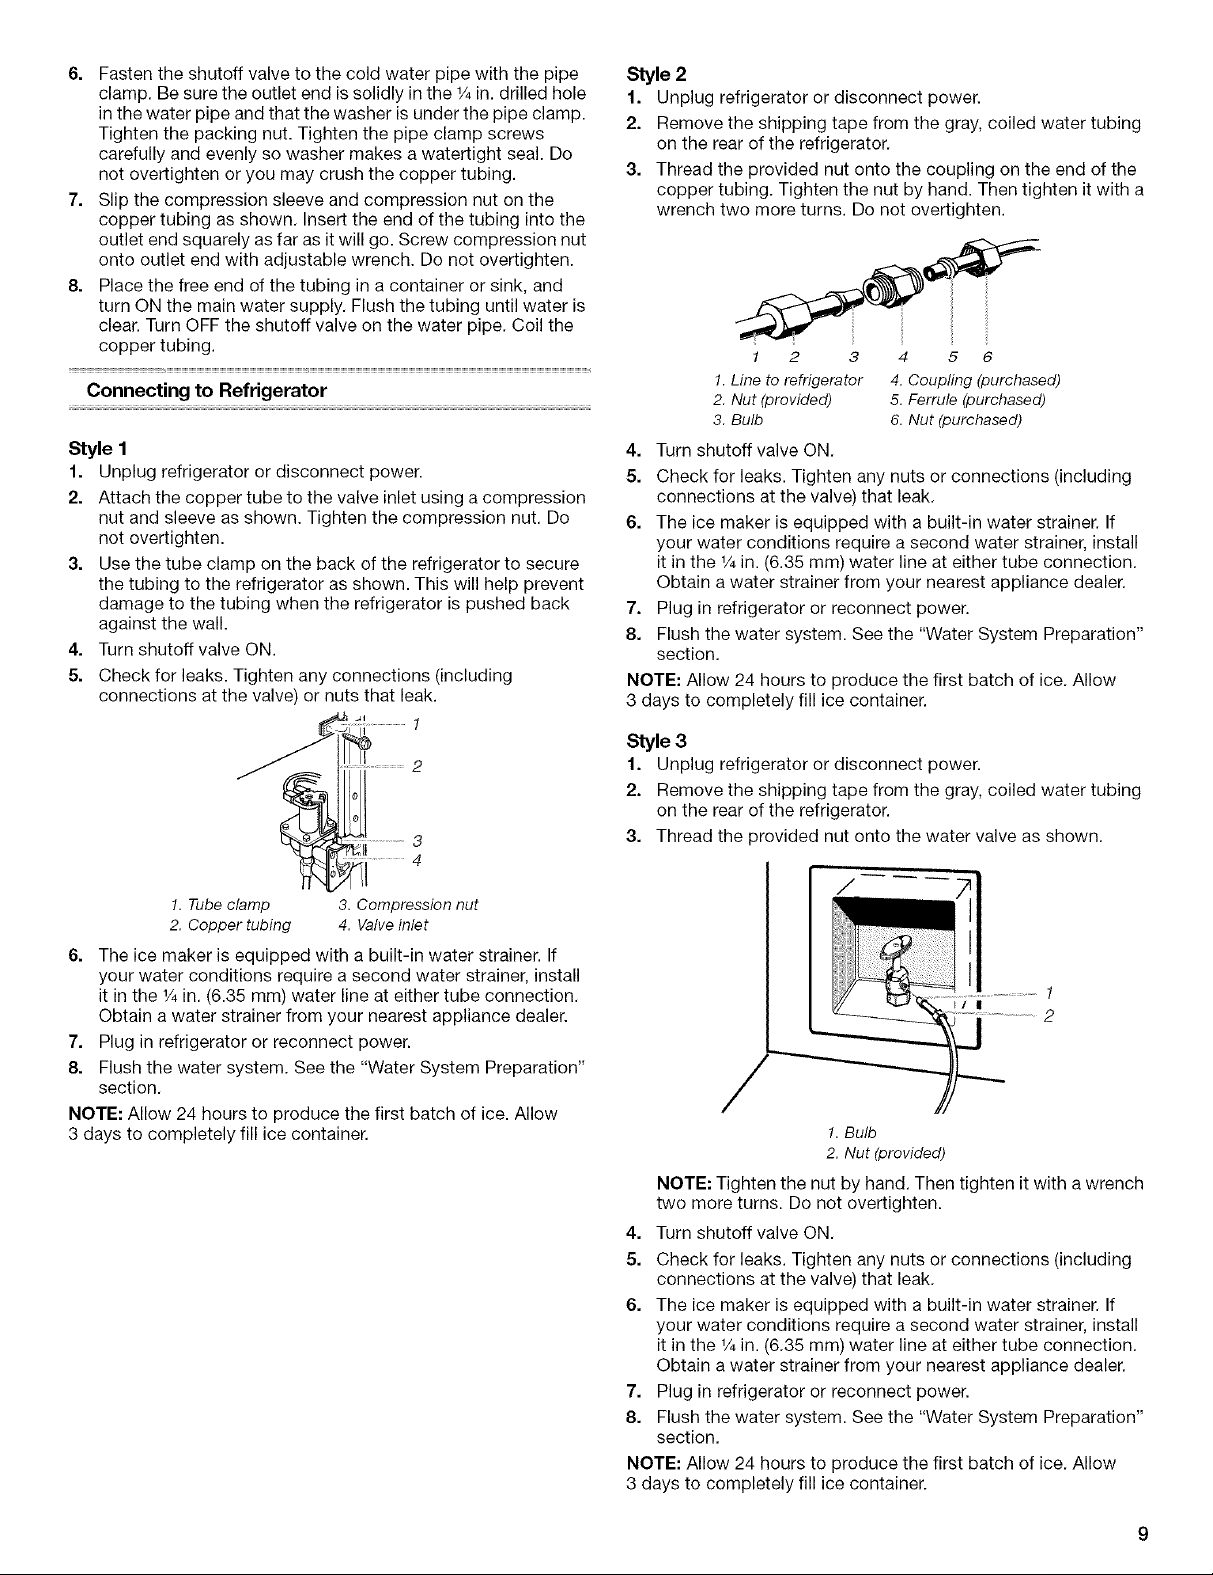
6. Fasten the shutoff valve to the cold water pipe with the pipe
clamp. Be sure the outlet end is solidly in the 1/4in. drilled hole
in the water pipe and that the washer is under the pipe clamp.
Tighten the packing nut. Tighten the pipe clamp screws
carefully and evenly so washer makes a watertight seal. Do
not overtighten or you may crush the copper tubing.
7. Slip the compression sleeve and compression nut on the
copper tubing as shown. Insert the end of the tubing into the
outlet end squarely as far as it will go. Screw compression nut
onto outlet end with adjustable wrench. Do not overtighten.
8. Place the free end of the tubing in a container or sink, and
turn ON the main water supply. Flush the tubing until water is
clear. Turn OFF the shutoff valve on the water pipe. Coil the
copper tubing.
Connecting to Refrigerator
Style 1
1. Unplug refrigerator or disconnect power.
2. Attach the copper tube to the valve inlet using a compression
nut and sleeve as shown. Tighten the compression nut. Do
not overtighten.
3. Use the tube clamp on the back of the refrigerator to secure
the tubing to the refrigerator as shown. This will help prevent
damage to the tubing when the refrigerator is pushed back
against the wall.
4. Turn shutoff valve ON.
5. Check for leaks. Tighten any connections (including
connections at the valve) or nuts that leak.
1
Style 2
1. Unplug refrigerator or disconnect power.
2. Remove the shipping tape from the gray, coiled water tubing
on the rear of the refrigerator.
3. Thread the provided nut onto the coupling on the end of the
copper tubing. Tighten the nut by hand. Then tighten it with a
wrench two more turns. Do not overtighten.
i 2 3 4 5
1.Line torefrigerator 4. Coupling (purchased)
2. Nut (provided) 5. Ferrule (purchased)
3. Bulb 6. Nut (purchased)
4. Turn shutoff valve ON.
5. Check for leaks. Tighten any nuts or connections (including
connections at the valve) that leak.
6. The ice maker is equipped with a built-in water strainer. If
your water conditions require a second water strainer, install
it in the 1/4in. (6.35 mm) water line at either tube connection.
Obtain a water strainer from your nearest appliance dealer.
7. Plug in refrigerator or reconnect power.
8. Flush the water system. See the "Water System Preparation"
section.
NOTE: Allow 24 hours to produce the first batch of ice. Allow
3 days to completely fill ice container.
Style 3
1. Unplug refrigerator or disconnect power.
2. Remove the shipping tape from the gray, coiled water tubing
on the rear of the refrigerator.
3. Thread the provided nut onto the water valve as shown.
1. Tube clamp
2. Copper tubing
3. Compression nut
4. Valve inlet
6. The ice maker is equipped with a built-in water strainer. If
your water conditions require a second water strainer, install
it in the 1/4in. (6.35 mm) water line at either tube connection.
Obtain a water strainer from your nearest appliance dealer.
7. Plug in refrigerator or reconnect power.
8. Flush the water system. See the "Water System Preparation"
section.
NOTE: Allow 24 hours to produce the first batch of ice. Allow
3 days to completely fill ice container.
1
2
1. Bulb
2. Nut (provided)
NOTE: Tighten the nut by hand. Then tighten it with a wrench
two more turns. Do not overtighten.
4. Turn shutoff valve ON.
5. Check for leaks. Tighten any nuts or connections (including
connections at the valve) that leak.
6. The ice maker is equipped with a built-in water strainer. If
your water conditions require a second water strainer, install
it in the 1/4in. (6.35 mm) water line at either tube connection.
Obtain a water strainer from your nearest appliance dealer.
7. Plug in refrigerator or reconnect power.
8. Flush the water system. See the "Water System Preparation"
section.
NOTE: Allow 24 hours to produce the first batch of ice. Allow
3 days to completely fill ice container.
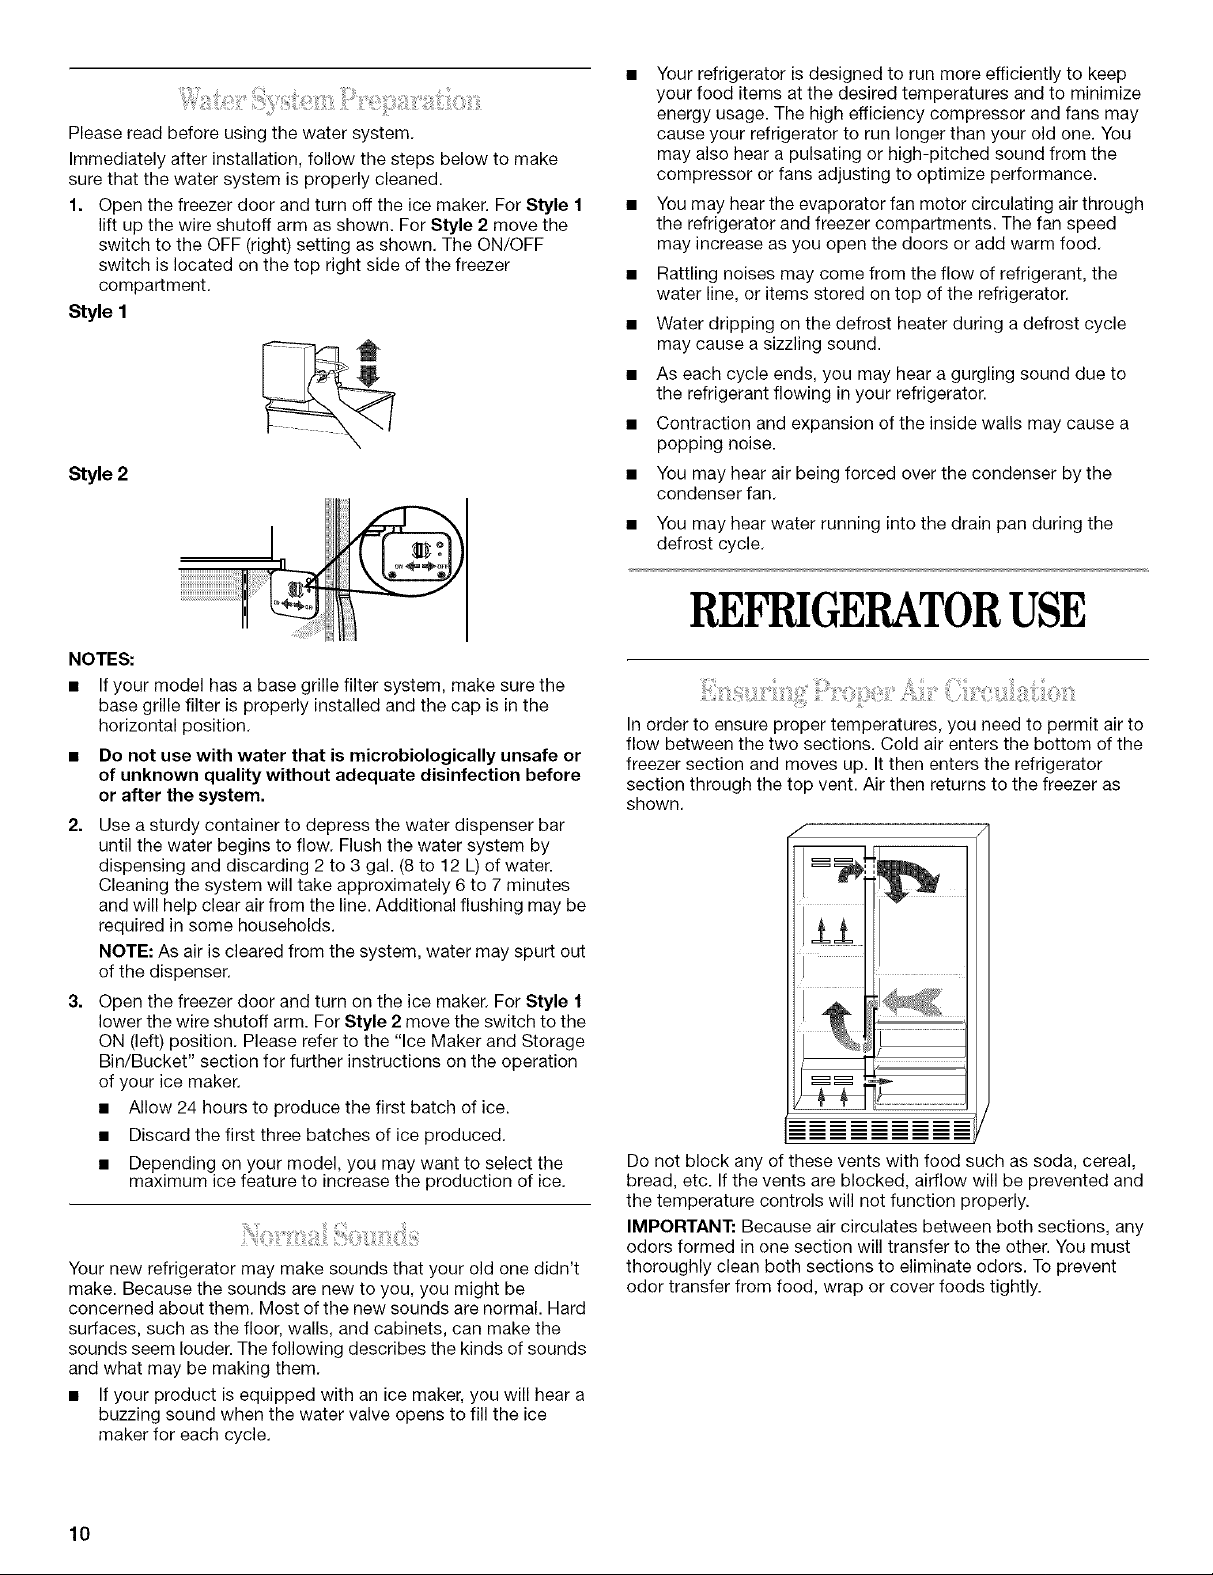
Pleasereadbeforeusingthewatersystem.
Immediatelyafterinstallation,followthestepsbelowtomake
surethatthewatersystemisproperlycleaned.
1. Openthefreezerdoorandturnofftheicemaker.ForStyle1
liftupthewireshutoffarmasshown.ForStyle2movethe
switchtotheOFF(right)settingasshown.TheON/OFF
switchislocatedonthetoprightsideofthefreezer
compartment.
Style I
Style 2
Your refrigerator is designed to run more efficiently to keep
your food items at the desired temperatures and to minimize
energy usage. The high efficiency compressor and fans may
cause your refrigerator to run longer than your old one. You
may also hear a pulsating or high-pitched sound from the
compressor or fans adjusting to optimize performance.
• You may hear the evaporator fan motor circulating air through
the refrigerator and freezer compartments. The fan speed
may increase as you open the doors or add warm food.
• Rattling noises may come from the flow of refrigerant, the
water line, or items stored on top of the refrigerator.
• Water dripping on the defrost heater during a defrost cycle
may cause a sizzling sound.
• As each cycle ends, you may hear a gurgling sound due to
the refrigerant flowing in your refrigerator.
• Contraction and expansion of the inside walls may cause a
popping noise.
• You may hear air being forced over the condenser by the
condenser fan.
• You may hear water running into the drain pan during the
defrost cycle.
REFRIGERATORUSE
NOTES:
• If your model has a base grille filter system, make sure the
base grille filter is properly installed and the cap is in the
horizontal position.
• Do not use with water that is microbiologically unsafe or
of unknown quality without adequate disinfection before
or after the system.
2.
Use a sturdy container to depress the water dispenser bar
until the water begins to flow. Flush the water system by
dispensing and discarding 2 to 3 gal. (8 to 12 L) of water.
Cleaning the system will take approximately 6 to 7 minutes
and will help clear air from the line. Additional flushing may be
required in some households.
NOTE: As air is cleared from the system, water may spurt out
of the dispenser.
3.
Open the freezer door and turn on the ice maker. For Style 1
lower the wire shutoff arm. For Style 2 move the switch to the
ON (left) position. Please refer to the "Ice Maker and Storage
Bin/Bucket" section for further instructions on the operation
of your ice maker.
• Allow 24 hours to produce the first batch of ice.
• Discard the first three batches of ice produced.
• Depending on your model, you may want to select the
maximum ice feature to increase the production of ice.
Your new refrigerator may make sounds that your old one didn't
make. Because the sounds are new to you, you might be
concerned about them. Most of the new sounds are normal. Hard
surfaces, such as the floor, walls, and cabinets, can make the
sounds seem louder. The following describes the kinds of sounds
and what may be making them.
• If your product is equipped with an ice maker, you will hear a
buzzing sound when the water valve opens to fill the ice
maker for each cycle.
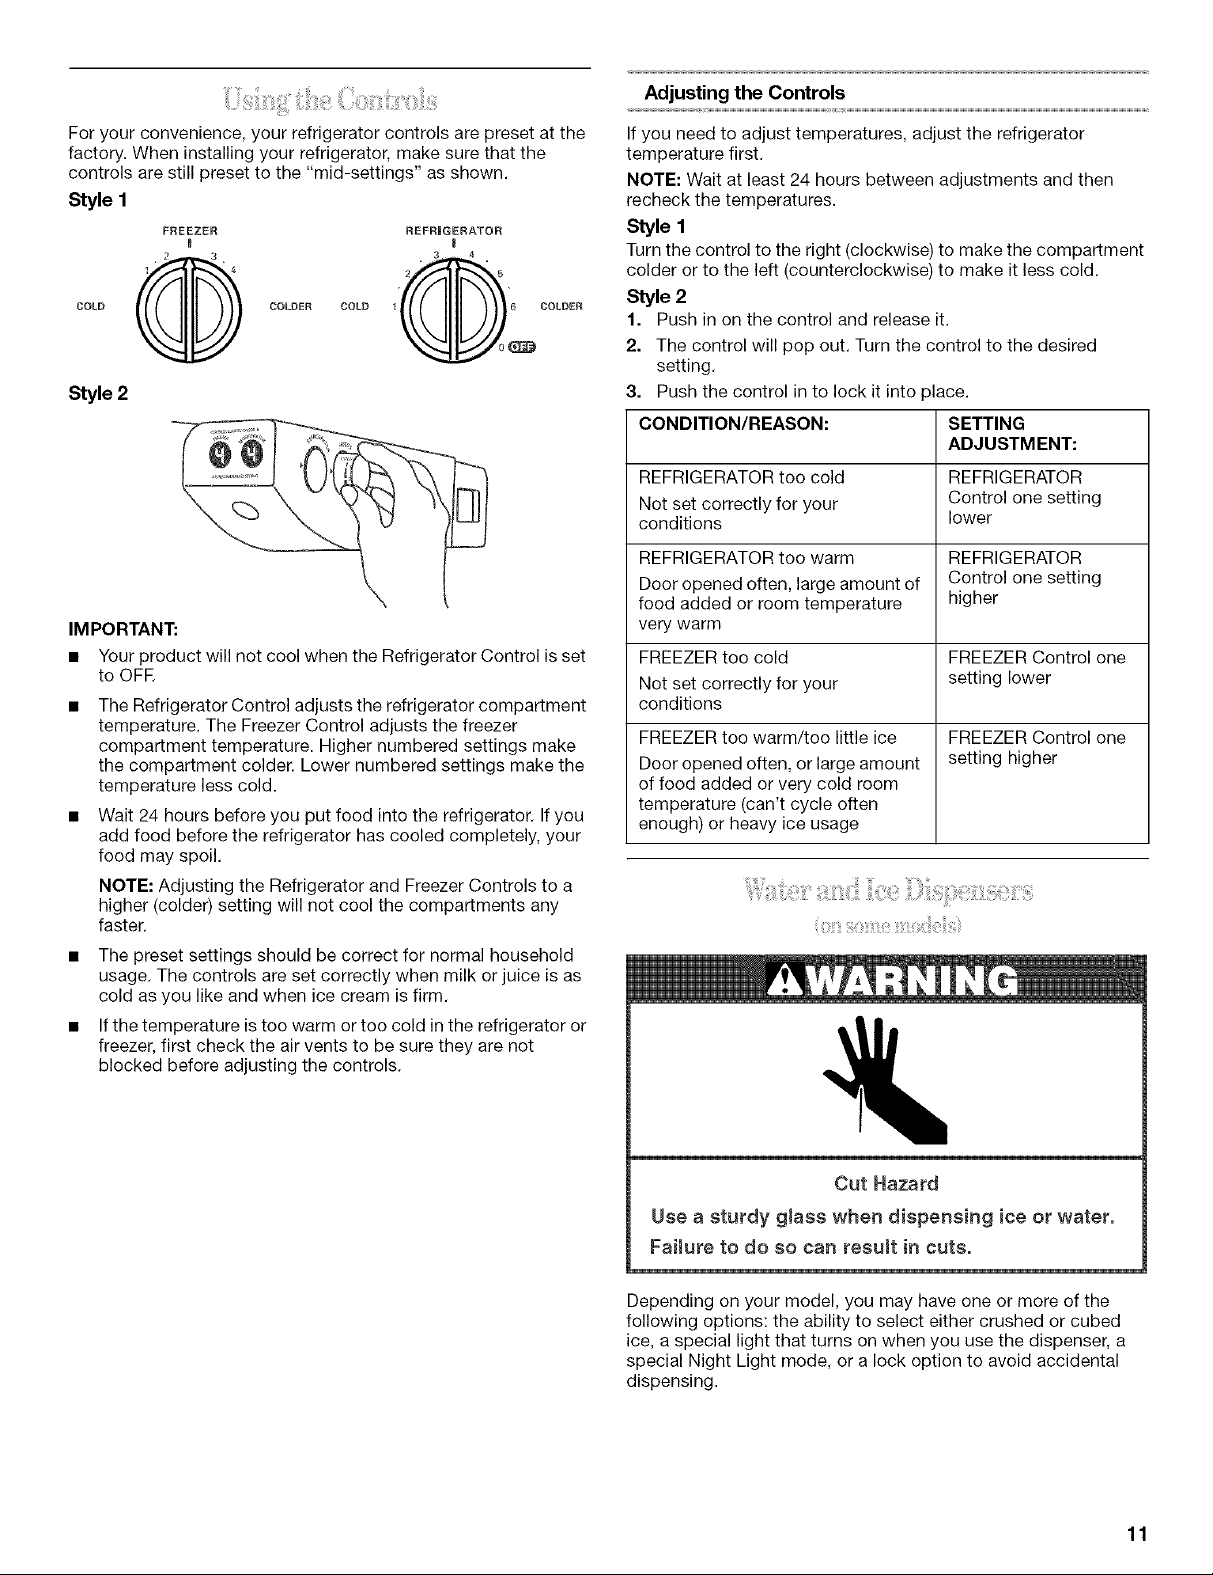
In order to ensure proper temperatures, you need to permit air to
flow between the two sections. Cold air enters the bottom of the
freezer section and moves up. It then enters the refrigerator
section through the top vent. Air then returns to the freezer as
shown.
Do not block any of these vents with food such as soda, cereal,
bread, etc. If the vents are blocked, airflow will be prevented and
the temperature controls will not function properly.
IMPORTANT: Because air circulates between both sections, any
odors formed in one section will transfer to the other. You must
thoroughly clean both sections to eliminate odors. To prevent
odor transfer from food, wrap or cover foods tightly.
10
/iiY ii: i: ii!i!il¸t Coi:ii;
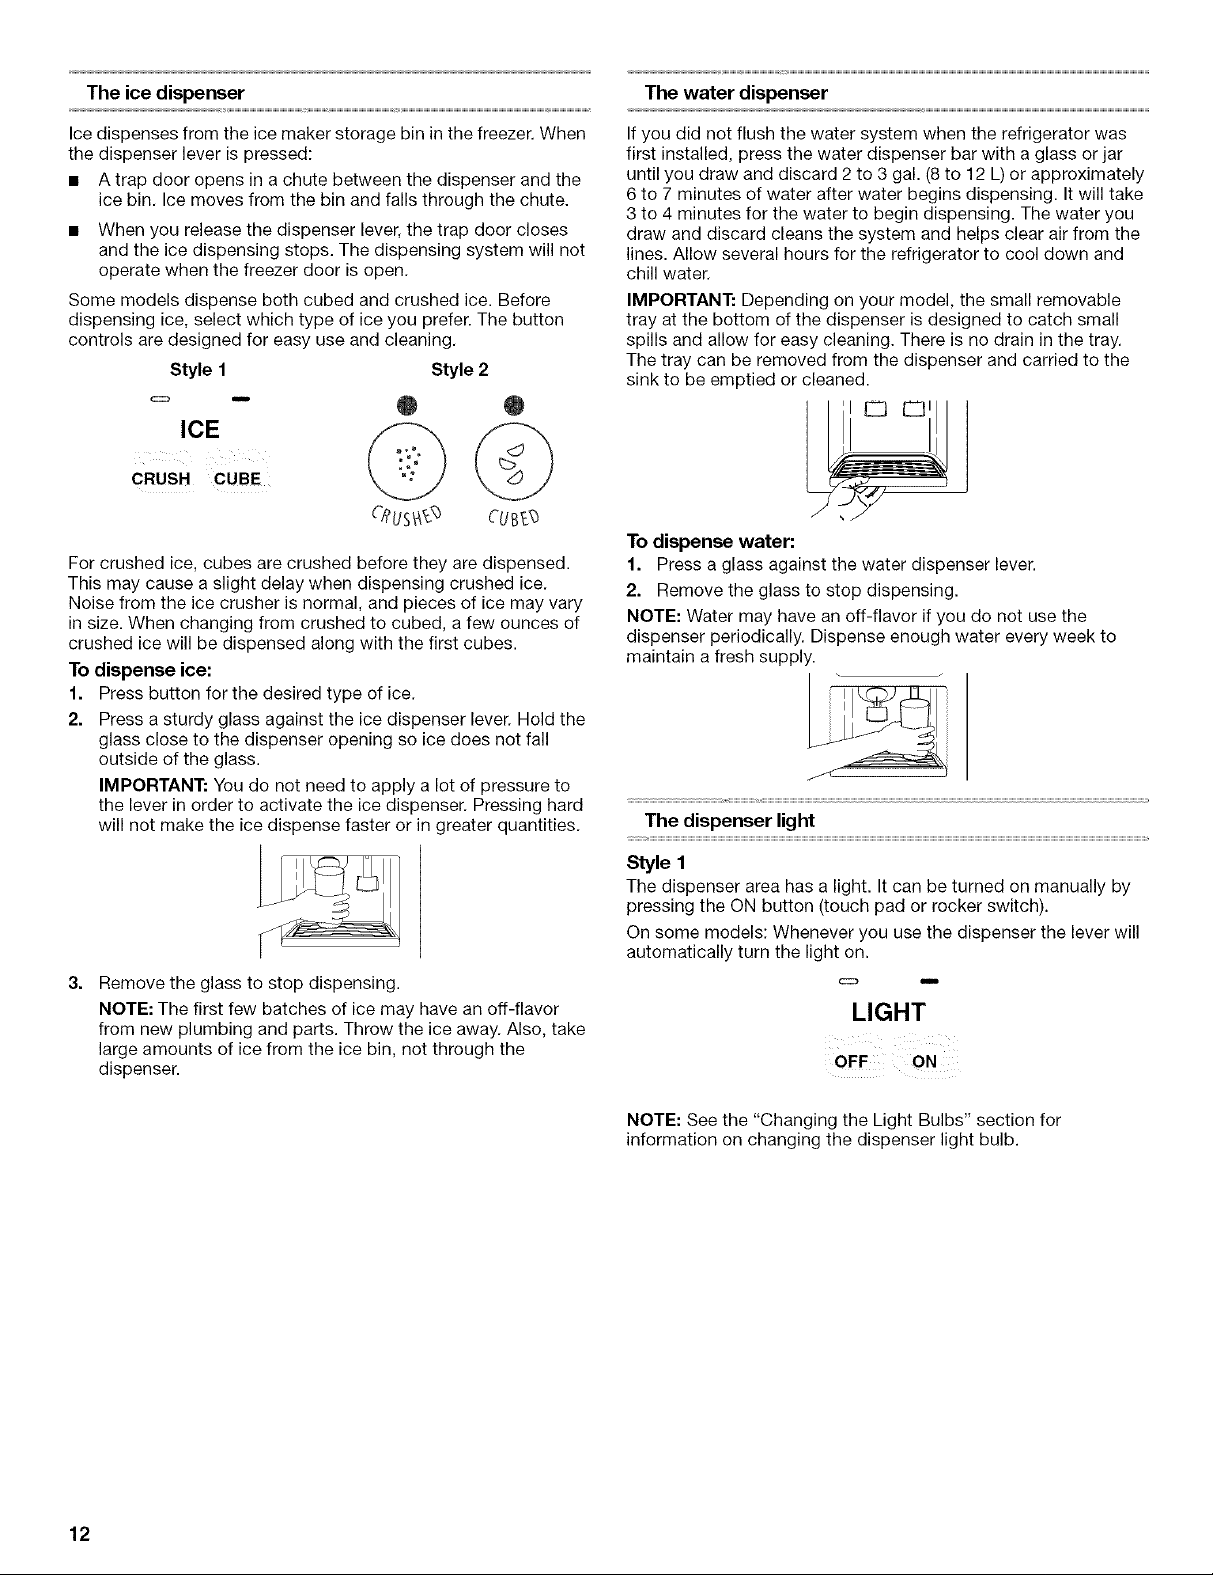
For your convenience, your refrigerator controls are preset at the
factory. When installing your refrigerator, make sure that the
controls are still preset to the "mid-settings" as shown.
Style I
FREEZER
COLD
COLDER COLD
Style 2
IMPORTANT:
• Your product will not cool when the Refrigerator Control is set
to OFR
The Refrigerator Control adjusts the refrigerator compartment
temperature. The Freezer Control adjusts the freezer
compartment temperature. Higher numbered settings make
the compartment colder. Lower numbered settings make the
temperature less cold.
• Wait 24 hours before you put food into the refrigerator. If you
add food before the refrigerator has cooled completely, your
food may spoil.
NOTE: Adjusting the Refrigerator and Freezer Controls to a
higher (colder) setting will not cool the compartments any
faster.
• The preset settings should be correct for normal household
usage. The controls are set correctly when milk or juice is as
cold as you like and when ice cream is firm.
• If the temperature is too warm or too cold in the refrigerator or
freezer, first check the air vents to be sure they are not
blocked before adjusting the controls.
REFR|GERATOR
. 3 4 .
1 6 COLDER
Adjusting the Controls
If you need to adjust temperatures, adjust the refrigerator
temperature first.
NOTE: Wait at least 24 hours between adjustments and then
recheck the temperatures.
Style 1
Turn the control to the right (clockwise) to make the compartment
colder or to the left (counterclockwise) to make it less cold.
Style 2
1. Push in on the control and release it.
2. The control will pop out. Turn the control to the desired
setting.
3. Push the control in to lock it into place.
CONDITION/REASON: SETTING
ADJUSTMENT:
REFRIGERATOR too cold REFRIGERATOR
Not set correctly for your
Control one setting
conditions lower
REFRIGERATOR too warm REFRIGERATOR
Door opened often, large amount of Control one setting
food added or room temperature higher
very warm
FREEZER too cold FREEZER Control one
Not set correctly for your setting lower
conditions
FREEZER too warm/too little ice FREEZER Control one
Door opened often, or large amount setting higher
of food added or very cold room
temperature (can't cycle often
enough) or heavy ice usage
Cut Hazard
Use a sturdy g_ass when dispensing ice or water.
Faiture to do so can result in cuts.
Depending on your model, you may have one or more of the
following options: the ability to select either crushed or cubed
ice, a special light that turns on when you use the dispenser, a
special Night Light mode, or a lock option to avoid accidental
dispensing.
11
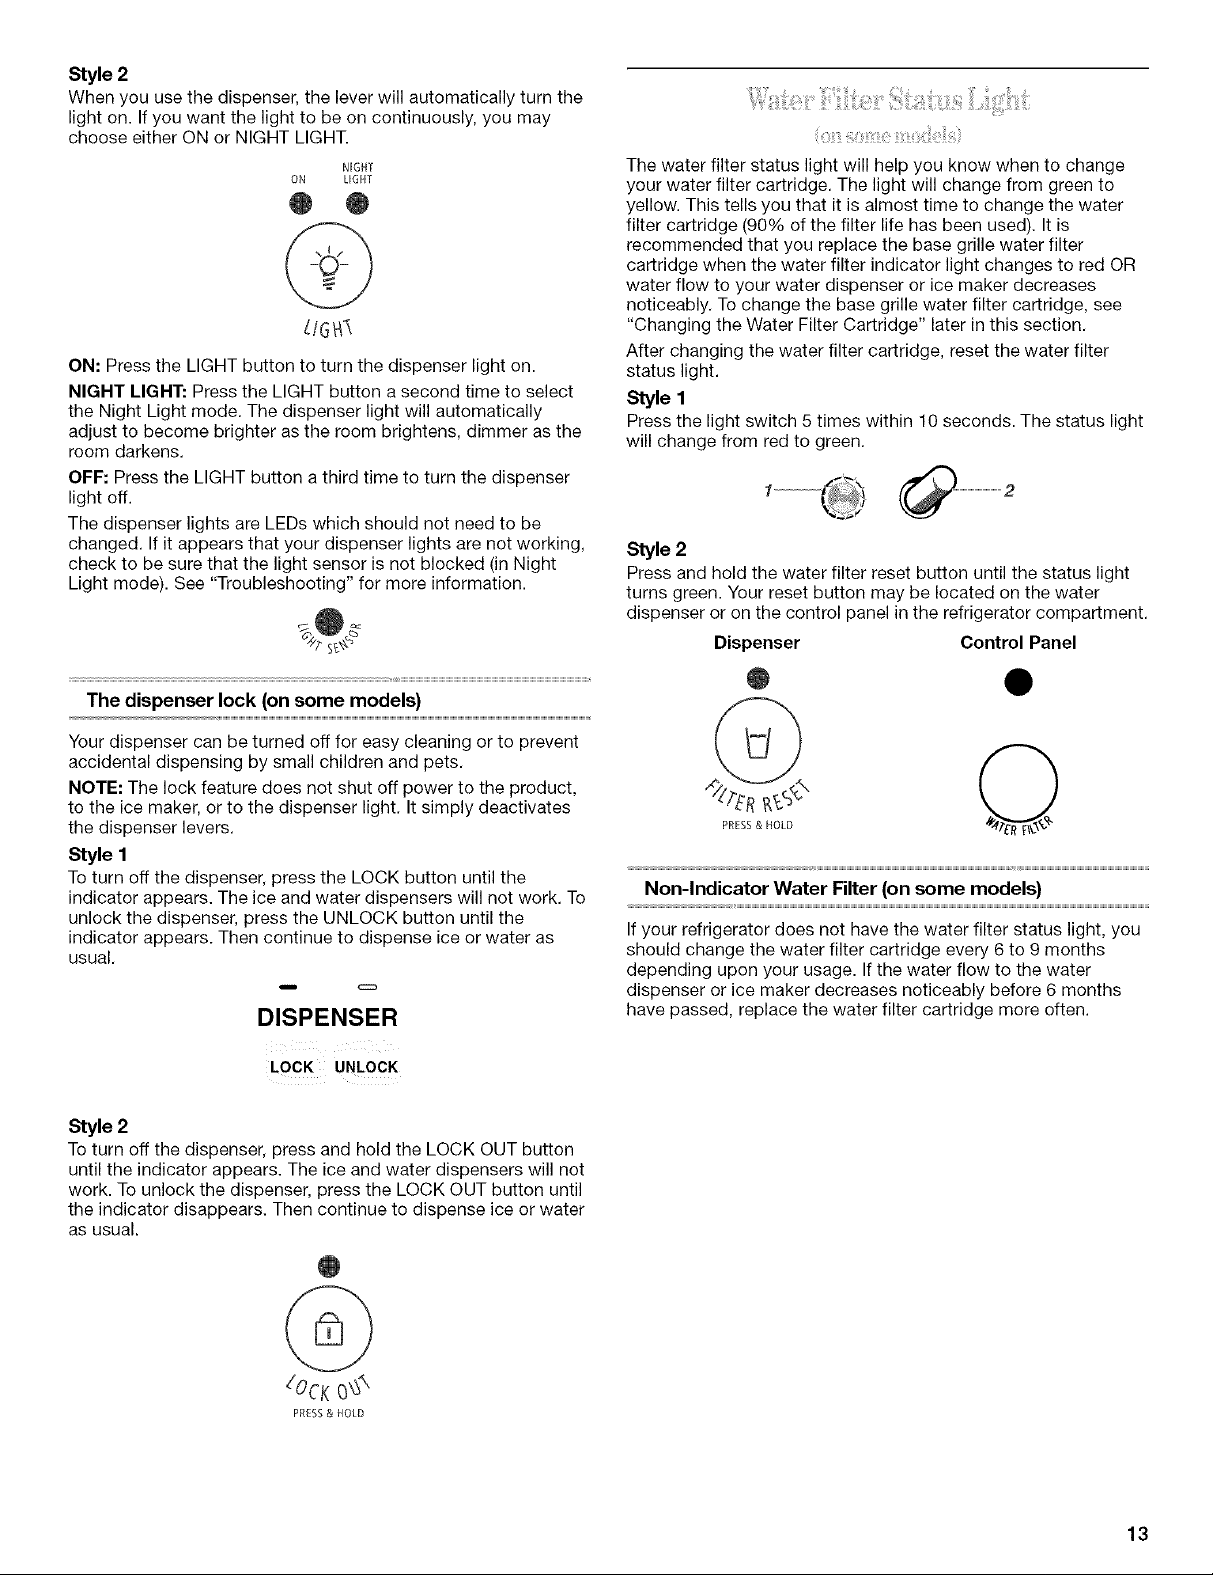
The ice dispenser
The water dispenser
Ice dispenses from the ice maker storage bin in the freezer. When
the dispenser lever is pressed:
• A trap door opens in a chute between the dispenser and the
ice bin. Ice moves from the bin and falls through the chute.
• When you release the dispenser lever, the trap door closes
and the ice dispensing stops. The dispensing system will not
operate when the freezer door is open.
Some models dispense both cubed and crushed ice. Before
dispensing ice, select which type of ice you prefer. The button
controls are designed for easy use and cleaning.
Style 1 Style 2
O •
ICE
CRUSH CUBE
('_tUSSttb CUB£I)
For crushed ice, cubes are crushed before they are dispensed.
This may cause a slight delay when dispensing crushed ice.
Noise from the ice crusher is normal, and pieces of ice may vary
in size. When changing from crushed to cubed, afew ounces of
crushed ice will be dispensed along with the first cubes.
To dispense ice:
1. Press button for the desired type of ice.
2. Press a sturdy glass against the ice dispenser lever. Hold the
glass close to the dispenser opening so ice does not fall
outside of the glass.
IMPORTANT: You do not need to apply a lot of pressure to
the lever in order to activate the ice dispenser. Pressing hard
will not make the ice dispense faster or in greater quantities.
If you did not flush the water system when the refrigerator was
first installed, press the water dispenser bar with a glass or jar
until you draw and discard 2 to 3 gal. (8 to 12 L) or approximately
6 to 7 minutes of water after water begins dispensing. It will take
3 to 4 minutes for the water to begin dispensing. The water you
draw and discard cleans the system and helps clear air from the
lines. Allow several hours for the refrigerator to cool down and
chill water.
IMPORTANT: Depending on your model, the small removable
tray at the bottom of the dispenser is designed to catch small
spills and allow for easy cleaning. There is no drain in the tray.
The tray can be removed from the dispenser and carried to the
sink to be emptied or cleaned.
To dispense water:
1. Press a glass against the water dispenser lever.
2. Remove the glass to stop dispensing.
NOTE: Water may have an off-flavor if you do not use the
dispenser periodically. Dispense enough water every week to
maintain a fresh supply.
The dispenser light
3.
Remove the glass to stop dispensing.
NOTE: The first few batches of ice may have an off-flavor
from new plumbing and parts. Throw the ice away. Also, take
large amounts of ice from the ice bin, not through the
dispenser.
Style 1
The dispenser area has a light. It can be turned on manually by
pressing the ON button (touch pad or rocker switch).
On some models: Whenever you use the dispenser the lever will
automatically turn the light on.
LIGHT
OFF ON
NOTE: See the "Changing the Light Bulbs" section for
information on changing the dispenser light bulb.
12
Style 2
When you use the dispenser, the lever will automatically turn the
light on. If you want the light to be on continuously, you may
choose either ON or NIGHT LIGHT.
NIGHT
ON LIGHT
@ 0
ON: Press the LIGHT button to turn the dispenser light on.
NIGHT LIGHT." Press the LIGHT button a second time to select
the Night Light mode. The dispenser light will automatically
adjust to become brighter as the room brightens, dimmer as the
room darkens.
OFF: Press the LIGHT button athird time to turn the dispenser
light off.
The dispenser lights are LEDs which should not need to be
changed. If it appears that your dispenser lights are not working,
check to be sure that the light sensor is not blocked (in Night
Light mode). See "Troubleshooting" for more information.
The water filter status light will help you know when to change
your water filter cartridge. The light will change from green to
yellow. This tells you that it is almost time to change the water
filter cartridge (90% of the filter life has been used). It is
recommended that you replace the base grille water filter
cartridge when the water filter indicator light changes to red OR
water flow to your water dispenser or ice maker decreases
noticeably. To change the base grille water filter cartridge, see
"Changing the Water Filter Cartridge" later in this section.
After changing the water filter cartridge, reset the water filter
status light.
Style 1
Press the light switch 5 times within 10 seconds. The status light
will change from red to green.
Style 2
Press and hold the water filter reset button until the status light
turns green. Your reset button may be located on the water
dispenser or on the control panel in the refrigerator compartment.
Dispenser Control Panel
The dispenser lock (on some models)
Your dispenser can be turned off for easy cleaning or to prevent
accidental dispensing by small children and pets.
NOTE: The lock feature does not shut off power to the product,
to the ice maker, or to the dispenser light. It simply deactivates
the dispenser levers.
Style 1
To turn off the dispenser, press the LOCK button until the
indicator appears. The ice and water dispensers will not work. To
unlock the dispenser, press the UNLOCK button until the
indicator appears. Then continue to dispense ice or water as
usual.
DISPENSER
LOCK UNLOCK
Style 2
To turn off the dispenser, press and hold the LOCK OUT button
until the indicator appears. The ice and water dispensers will not
work. To unlock the dispenser, press the LOCK OUT button until
the indicator disappears. Then continue to dispense ice or water
as usual.
z,"ER
PRESS& HOLD
Non-Indicator Water Filter (on some models)
If your refrigerator does not have the water filter status light, you
should change the water filter cartridge every 6 to 9 months
depending upon your usage. If the water flow to the water
dispenser or ice maker decreases noticeably before 6 months
have passed, replace the water filter cartridge more often.
PRESS& HOLD
13
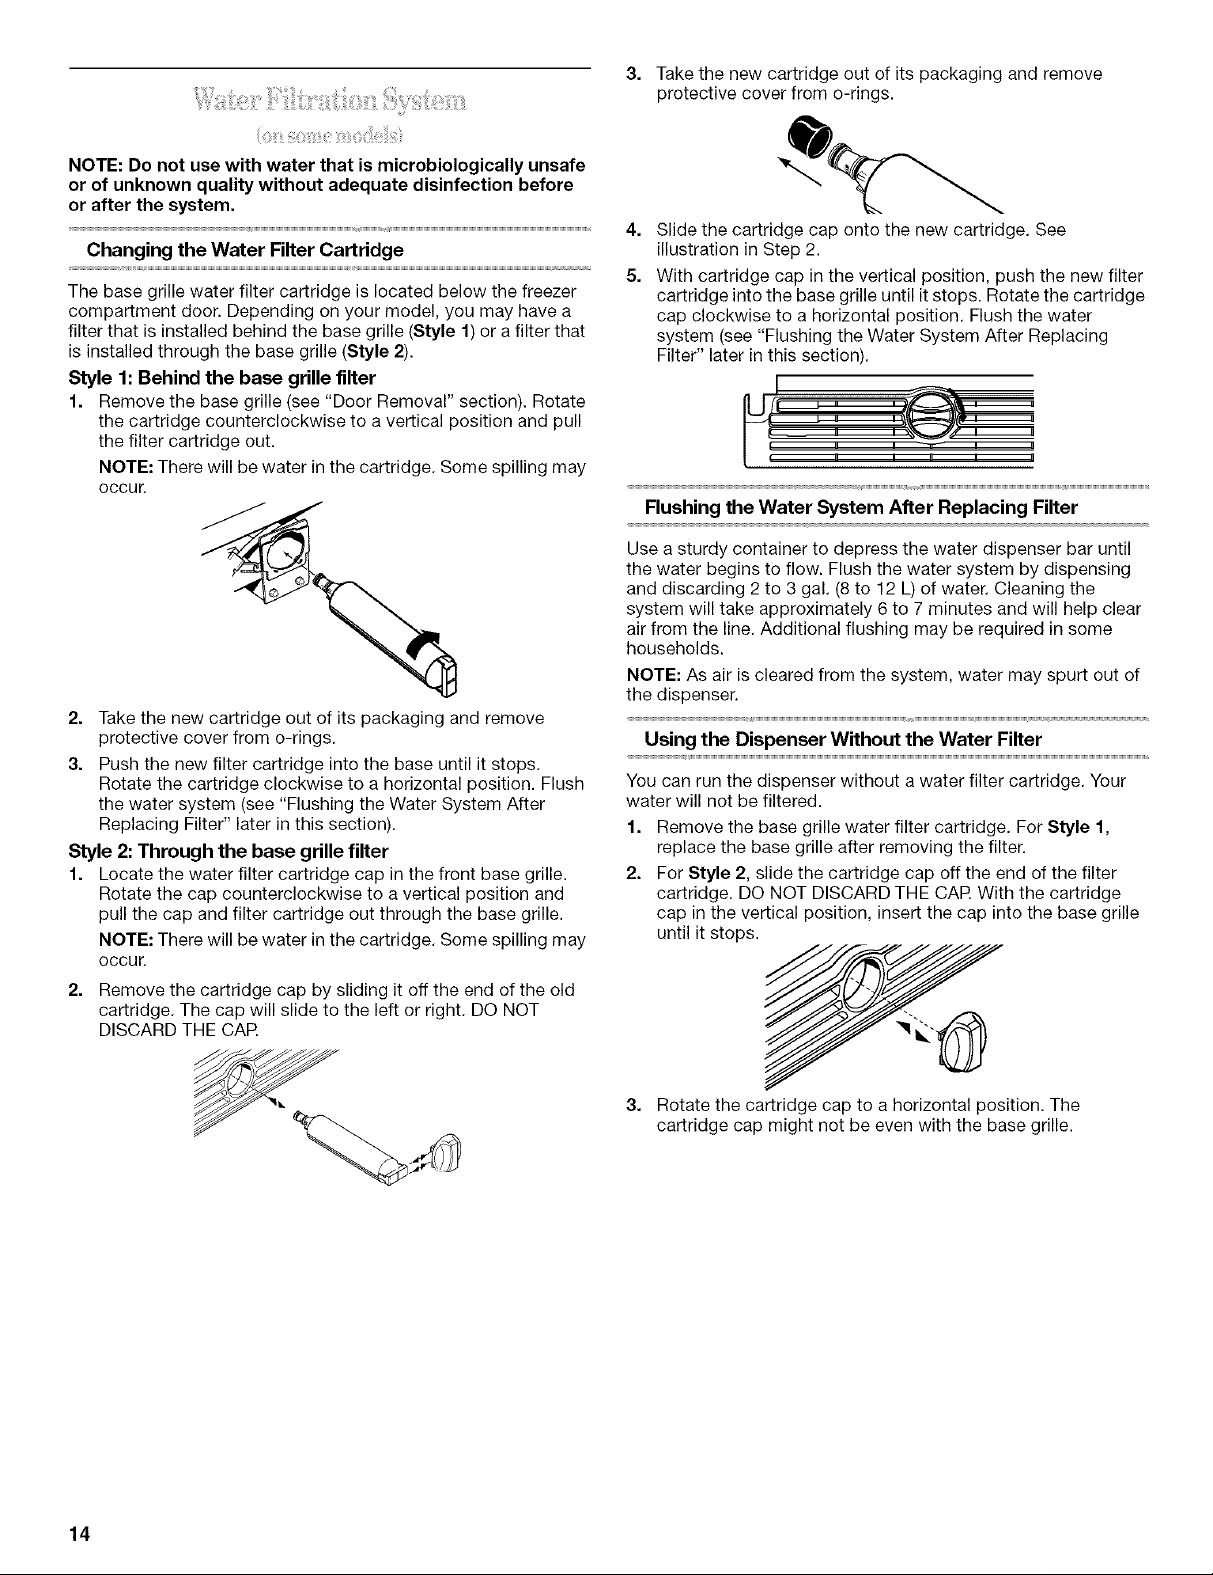
_ protective cover from o-rings.
NOTE: Do not use with water that is microbiologically unsafe
or of unknown quality without adequate disinfection before
or after the system.
Changing the Water Filter Cartridge
The base grille water filter cartridge is located below the freezer
compartment door. Depending on your model, you may have a
filter that isinstalled behind the base grille (Style 1)or a filter that
is installed through the base grille (Style 2).
Style 1: Behind the base grille filter
1. Remove the base grille (see "Door Removal" section). Rotate
the cartridge counterclockwise to a vertical position and pull
the filter cartridge out.
NOTE: There will be water in the cartridge. Some spilling may
occur.
2. Take the new cartridge out of its packaging and remove
protective cover from o-rings.
3. Push the new filter cartridge into the base until it stops.
Rotate the cartridge clockwise to a horizontal position. Flush
the water system (see "Flushing the Water System After
Replacing Filter" later in this section).
Style 2: Through the base grille filter
1. Locate the water filter cartridge cap in the front base grille.
Rotate the cap counterclockwise to a vertical position and
pull the cap and filter cartridge out through the base grille.
NOTE: There will be water in the cartridge. Some spilling may
occur.
2. Remove the cartridge cap by sliding it off the end of the old
cartridge. The cap will slide to the left or right. DO NOT
DISCARD THE CAR
3. Take the new cartridge out of its packaging and remove
4=
Slide the cartridge cap onto the new cartridge. See
illustration in Step 2.
5=
With cartridge cap in the vertical position, push the new filter
cartridge into the base grille until it stops. Rotate the cartridge
cap clockwise to a horizontal position. Flush the water
system (see "Flushing the Water System After Replacing
Filter" later in this section).
Flushing the Water System After Replacing Filter
Use a sturdy container to depress the water dispenser bar until
the water begins to flow. Flush the water system by dispensing
and discarding 2 to 3 gal. (8 to 12 L) of water. Cleaning the
system will take approximately 6 to 7 minutes and will help clear
air from the line. Additional flushing may be required in some
households.
NOTE: As air is cleared from the system, water may spurt out of
the dispenser.
Using the Dispenser Without the Water Filter
You can run the dispenser without a water filter cartridge. Your
water will not be filtered.
1. Remove the base grille water filter cartridge. For Style 1,
replace the base grille after removing the filter.
2. For Style 2, slide the cartridge cap off the end of the filter
cartridge. DO NOT DISCARD THE CAR With the cartridge
cap in the vertical position, insert the cap into the base grille
until it stops.
14
3.
Rotate the cartridge cap to a horizontal position. The
cartridge cap might not be even with the base grille.
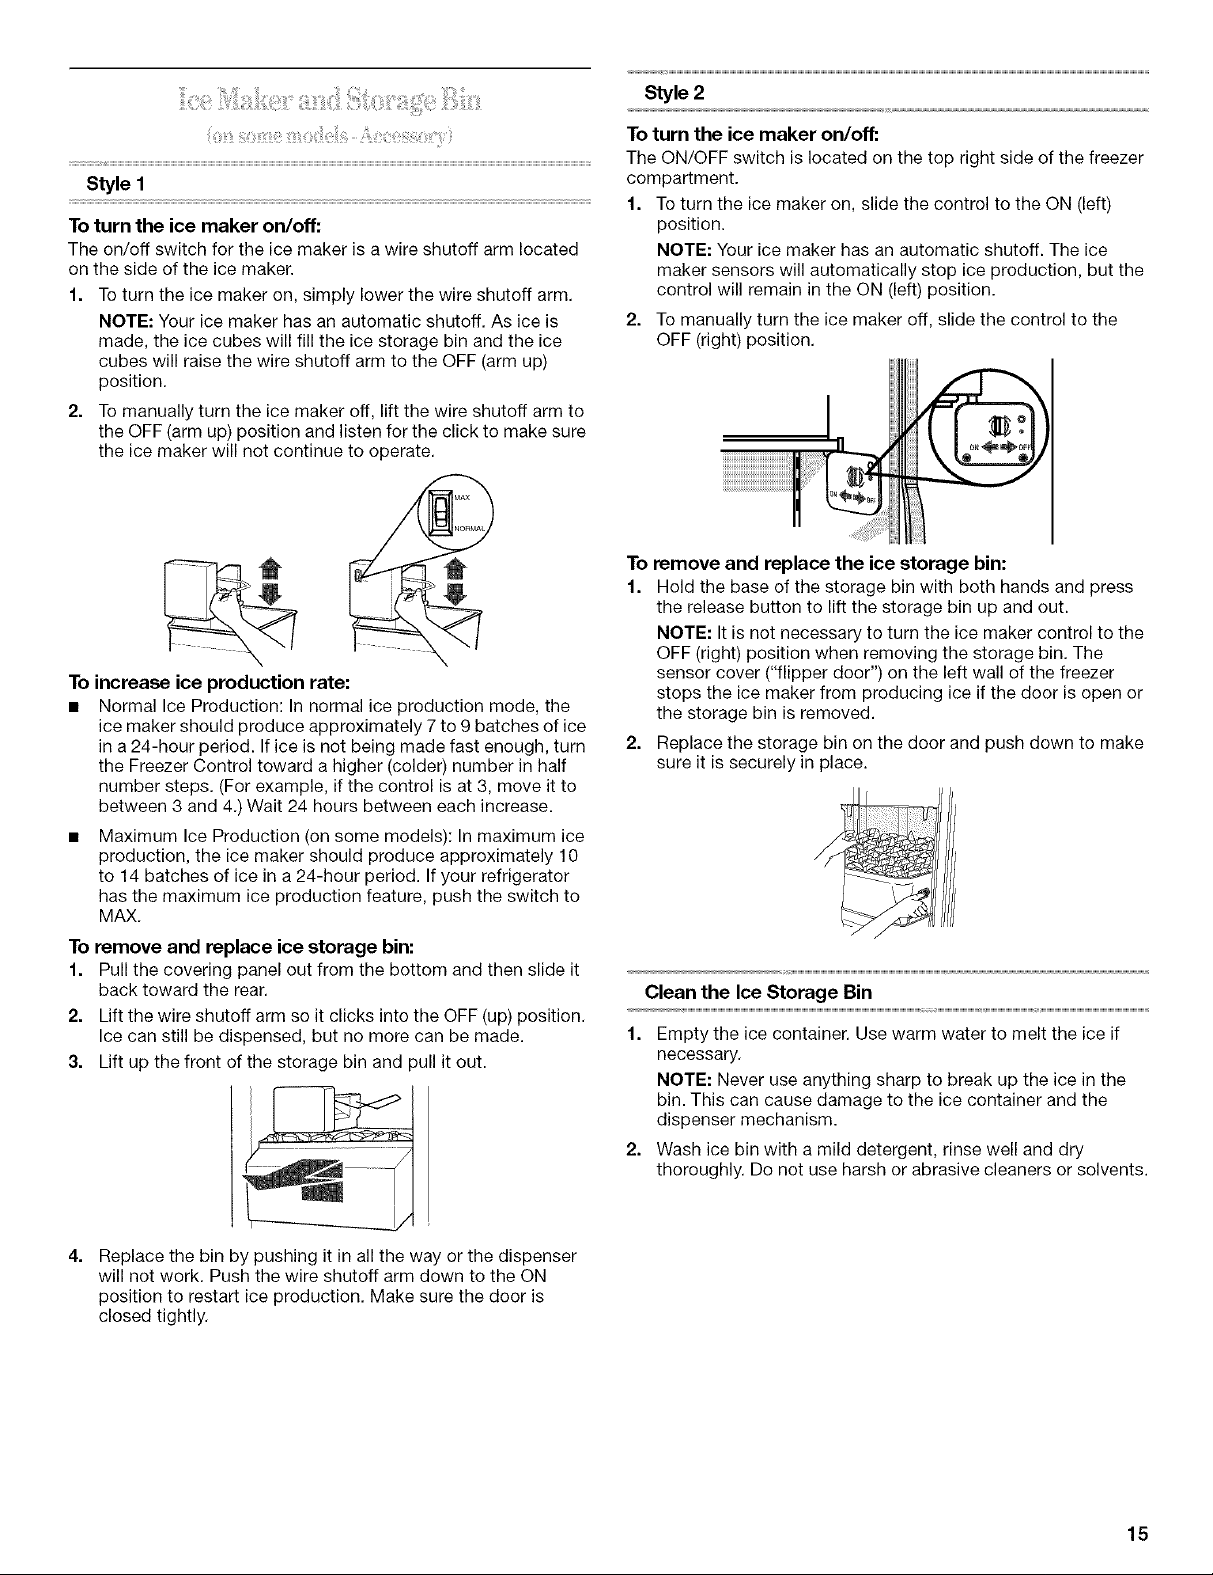
To turn the ice maker on/off:
The on/off switch for the ice maker is a wire shutoff arm located
on the side of the ice maker.
1. To turn the ice maker on, simply lower the wire shutoff arm.
NOTE: Your ice maker has an automatic shutoff. As ice is
made, the ice cubes will fill the ice storage bin and the ice
cubes will raise the wire shutoff arm to the OFF (arm up)
position.
2.
To manually turn the ice maker off, lift the wire shutoff arm to
the OFF (arm up) position and listen for the click to make sure
the ice maker will not continue to operate.
\
To increase ice production rate:
Normal Ice Production: In normal ice production mode, the
ice maker should produce approximately 7 to 9 batches of ice
in a 24-hour period. If ice is not being made fast enough, turn
the Freezer Control toward a higher (colder) number in half
number steps. (For example, if the control is at 3, move it to
between 3 and 4.) Wait 24 hours between each increase.
Maximum Ice Production (on some models): In maximum ice
production, the ice maker should produce approximately 10
to 14 batches of ice in a 24-hour period. If your refrigerator
has the maximum ice production feature, push the switch to
MAX.
To remove and replace ice storage bin:
1. Pull the covering panel out from the bottom and then slide it
back toward the rear.
2. Lift the wire shutoff arm so it clicks into the OFF (up) position.
Ice can still be dispensed, but no more can be made.
3. Lift up the front of the storage bin and pull it out.
Style 2
To turn the ice maker on/off:
The ON/OFF switch is located on the top right side of the freezer
compartment.
1. To turn the ice maker on, slide the control to the ON (left)
position.
NOTE: Your ice maker has an automatic shutoff. The ice
maker sensors will automatically stop ice production, but the
control will remain in the ON (left) position.
2. To manually turn the ice maker off, slide the control to the
OFF (right) position.
To remove and replace the ice storage bin:
1. Hold the base of the storage bin with both hands and press
the release button to lift the storage bin up and out.
NOTE: It isnot necessary to turn the ice maker control to the
OFF (right) position when removing the storage bin. The
sensor cover ("flipper door") on the left wall of the freezer
stops the ice maker from producing ice if the door is open or
the storage bin is removed.
2. Replace the storage bin on the door and push down to make
sure it is securely in place.
Clean the Ice Storage Bin
Empty the ice container. Use warm water to melt the ice if
necessary.
NOTE: Never use anything sharp to break up the ice in the
bin. This can cause damage to the ice container and the
dispenser mechanism.
2. Wash ice bin with a mild detergent, rinse well and dry
thoroughly. Do not use harsh or abrasive cleaners or solvents.
4.
Replace the bin by pushing it in all the way or the dispenser
will not work. Push the wire shutoff arm down to the ON
position to restart ice production. Make sure the door is
closed tightly.
15
REMEMBER
• Allow 24 hours to produce the first batch of ice. Allow 3 days
to completely fill ice container.
• Discard the first three batches of ice produced to avoid
impurities that may be flushed out of the system.
• The quality of your ice will be only as good as the quality of
the water supplied to your ice maker.
Avoid connecting the ice maker to a softened water supply.
Water softener chemicals (such as salt) can damage parts of
the ice maker and lead to poor quality ice. If a softened water
supply cannot be avoided, make sure the water softener is
operating properly and is well maintained.
• It is normal for the ice cubes to be attached at the corners.
They will break apart easily.
• For Style 1 ice maker, do not force the wire shutoff arm up or
down.
• Do not store anything on top of the ice maker or in the ice
storage bin.
REFRIGERATOR
FFATURES
Your model may have some or all of these features. Features that
can be purchased separately as product accessories are labeled
with the word "Accessory." Not all accessories will fit all models.
If you are interested in purchasing one of the accessories, please
call the toll-free number on the cover or in the "Accessories"
section.
Your model may have glass or wire shelves. Store similar foods
together and adjust the shelves to fit different heights. This
reduces the time the refrigerator door is open and saves energy.
Slide-out Shelves (on some models)
To remove and replace a shelf in a metal frame:
1. Pull the shelf forward to the stop. Tilt the front of the shelf up
and lift it slightly as you pull the shelf from the frame.
2. Replace the shelf by guiding it back into the slots on the
frame and pushing the shelf in past the stop.
Shelves and Shelf Frames
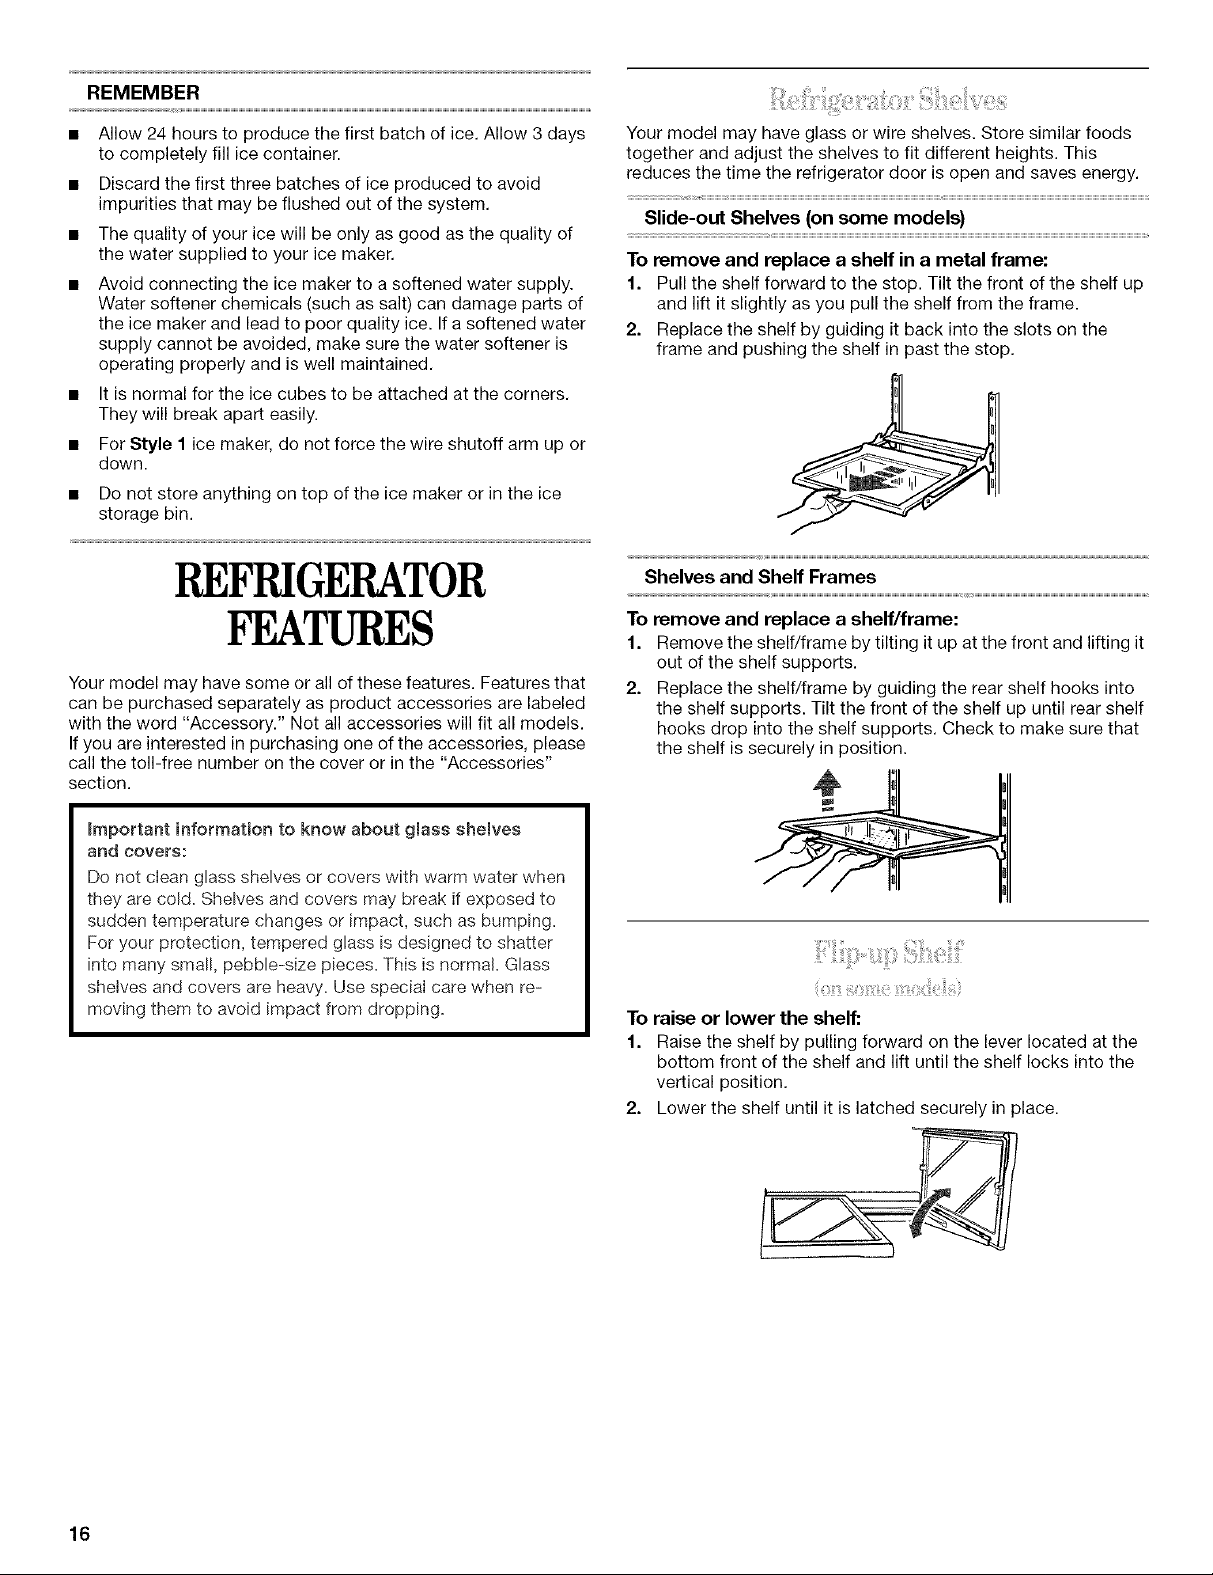
To remove and replace a shelf/frame:
1. Remove the shelf/frame by tilting it up at the front and lifting it
out of the shelf supports.
2. Replace the shelf/frame by guiding the rear shelf hooks into
the shelf supports. Tilt the front of the shelf up until rear shelf
hooks drop into the shelf supports. Check to make sure that
the shelf is securely in position.
important information to know about glass shelves
aRd covers:
Do not clean glass shelves or covers with warm water when
they are cold= Shelves and covers may break if exposed to
sudden temperature changes or impact, such as bumping.
For your protection, tempered glass is designed to shatter
into many small, pebble-size pieces. This is normal= Glass
shelves and covers are heavy= Use special care when re=
moving them to avoid impact from dropping=
To raise or lower the shelf:
1. Raise the shelf by pulling forward on the lever located at the
bottom front of the shelf and lift until the shelf locks into the
vertical position.
2. Lower the shelf until it is latched securely in place.
16
To raise or lower the shelf:
1. Raise the shelf by first sliding it back and down to make it
half-width, (You can use the shelf in this position to allow
taller items to be stored on the shelf below,)
2. Lift the front of the shelf until it fits securely in place against
the back wall, Lower the shelf securely back into position.
3. Pull the front of the shelf forward until it fits into place.
To remove and replace the drop-down shelf:
1. Remove the drop-down shelf by sliding it up and back. Pull
forward slightly to release the rear pegs from the track as
shown.
The dell drawer stores raisins, nuts, spreads, and other small
items at normal refrigerator temperatures.
To remove and replace the dell drawer:
1. Remove the dell drawer by sliding it straight out to the stop.
Lift the front and slide the drawer out the rest of the way.
2. Replace the dell drawer by sliding it back past the stop.
Crisper and Convertible Vegetable Meat Drawers
To remove and replace drawers:
1. Slide crisper or meat drawer straight out to the stop. Lift the
front of drawer with one hand while supporting the bottom of
drawer with other hand and slide the drawer out the rest of
the way.
2. Replace the crisper or meat drawer by sliding it back in fully
past the drawer stop.
2=
With the rear pegs released, pull the shelf down and forward.
3.
Replace the shelf by sliding the front pegs into the track.
Push the shelf up and back until the rear pegs drop into the
track. Pull down and forward to be sure the shelf is securely
in place.
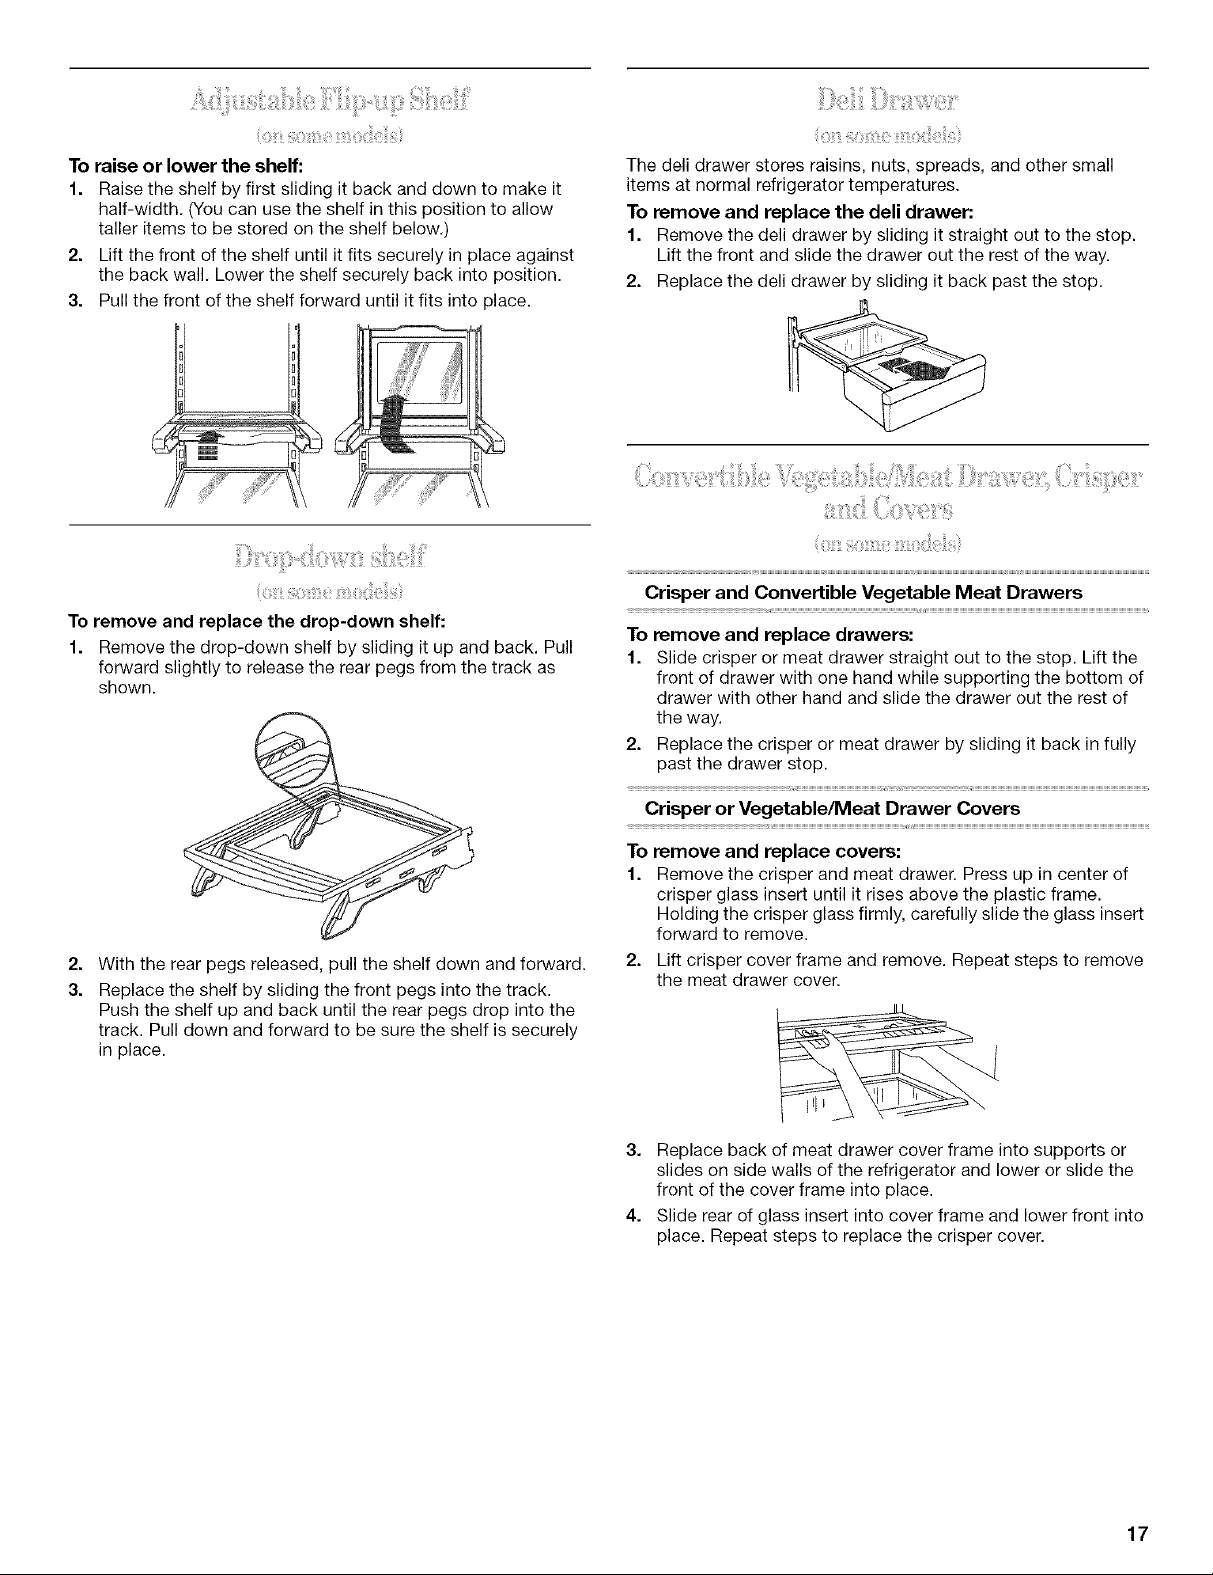
Crisper or Vegetable/Meat Drawer Covers
To remove and replace covers:
1. Remove the crisper and meat drawer. Press up in center of
crisper glass insert until it rises above the plastic frame.
Holding the crisper glass firmly, carefully slide the glass insert
forward to remove.
2. Lift crisper cover frame and remove. Repeat steps to remove
the meat drawer cover.
3. Replace back of meat drawer cover frame into supports or
slides on side walls of the refrigerator and lower or slide the
front of the cover frame into place.
4. Slide rear of glass insert into cover frame and lower front into
place. Repeat steps to replace the crisper cover.
17
The convertible vegetable/meat drawer can be adjusted to
properly chill meats or vegetables. The air inside the pan is
cooled to prevent "spot" freezing and can be set to keep meats
at the National Livestock and Meat Board recommended storage
temperatures of 28°- 32°F (-2°- 0°C).
IMPORTANT: To extend freshness, wrap meats in airtight,
moisture-proof materials before storing. Always store meat as
recommended.
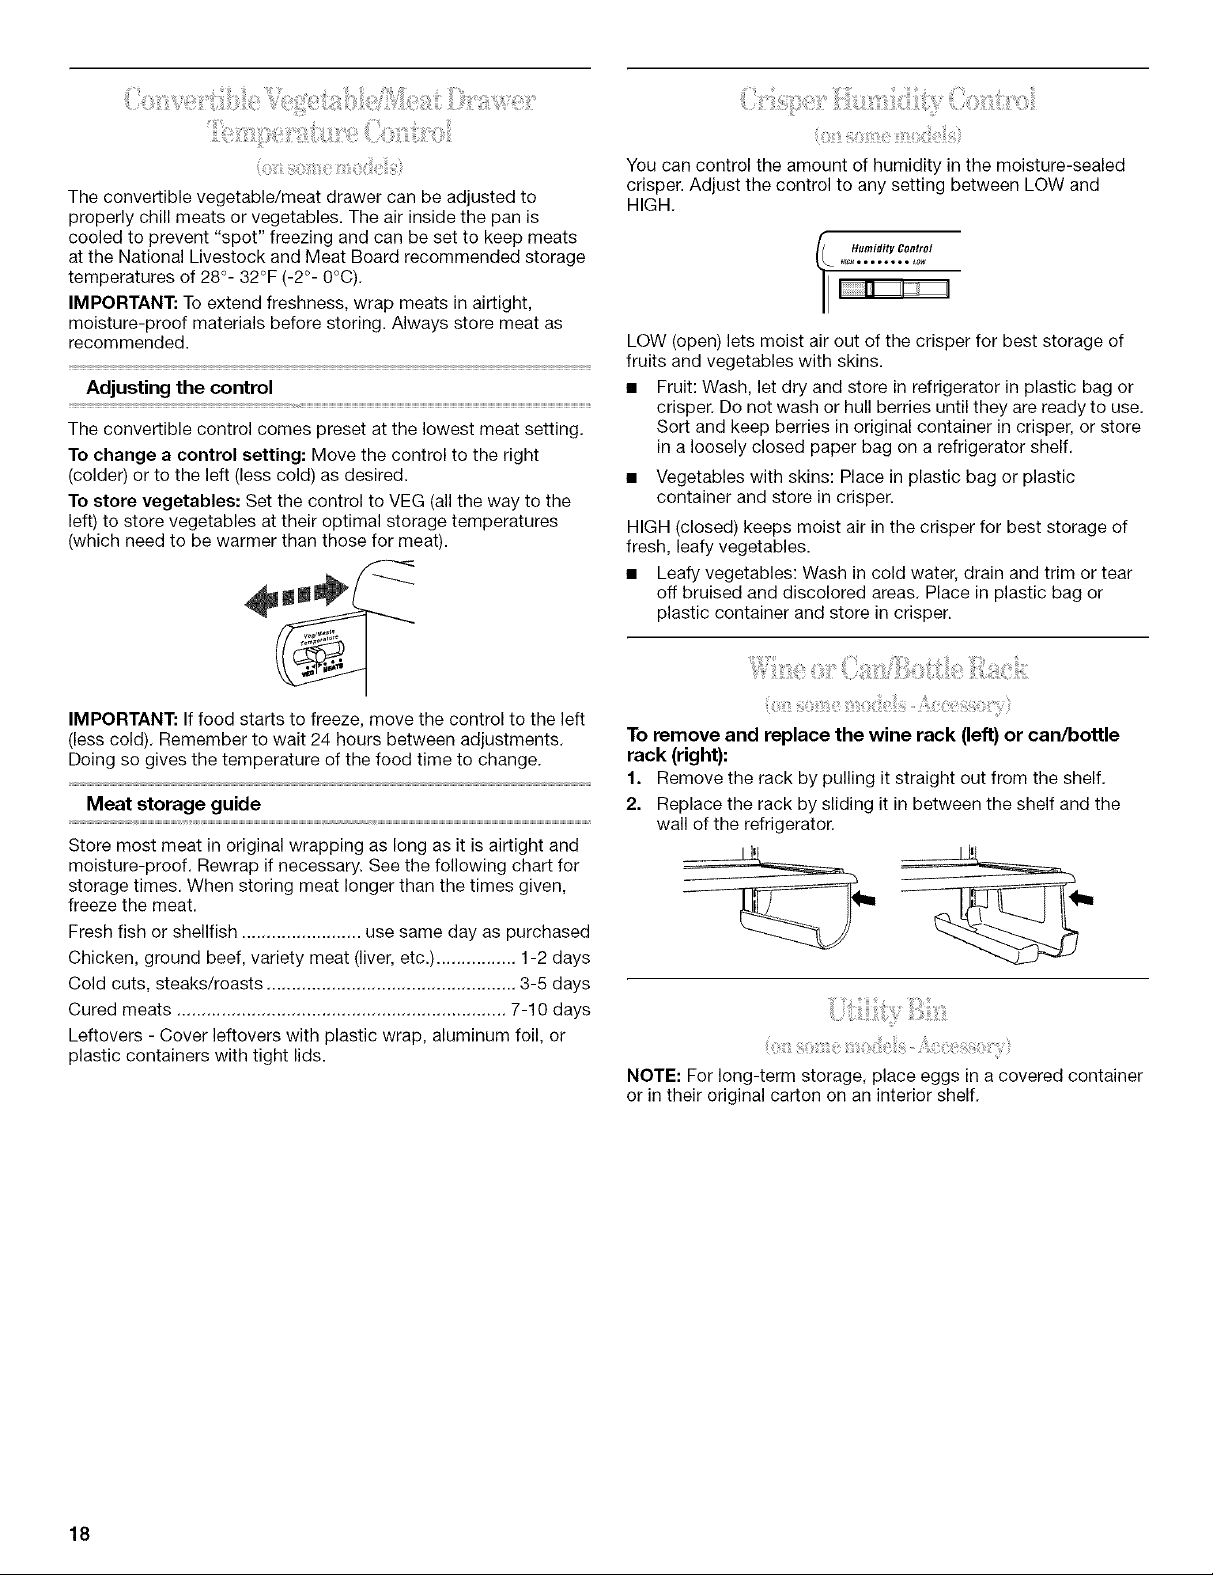
Adjusting the control
The convertible control comes preset at the lowest meat setting.
To change a control setting: Move the control to the right
(colder) or to the left (less cold) as desired.
To store vegetables: Set the control to VEG (all the way to the
left) to store vegetables at their optimal storage temperatures
(which need to be warmer than those for meat).
You can control the amount of humidity in the moisture-sealed
crisper. Adjust the control to any setting between LOW and
HIGH.
LOW (open) lets moist air out of the crisper for best storage of
fruits and vegetables with skins.
• Fruit: Wash, let dry and store in refrigerator in plastic bag or
crisper. Do not wash or hull berries until they are ready to use.
Sort and keep berries in original container in crisper, or store
in a loosely closed paper bag on a refrigerator shelf.
• Vegetables with skins: Place in plastic bag or plastic
container and store in crisper.
HIGH (closed) keeps moist air in the crisper for best storage of
fresh, leafy vegetables.
• Leafy vegetables: Wash in cold water, drain and trim or tear
off bruised and discolored areas. Place in plastic bag or
plastic container and store in crisper.
IMPORTANT: If food starts to freeze, move the control to the left
(less cold). Remember to wait 24 hours between adjustments.
Doing so gives the temperature of the food time to change.
Meat storage guide
Store most meat in original wrapping as long as it is airtight and
moisture-proof. Rewrap if necessary. See the following chart for
storage times. When storing meat longer than the times given,
freeze the meat.
Fresh fish or shellfish ........................ use same day as purchased
Chicken, ground beef, variety meat (liver, etc.) ................ 1-2 days
Cold cuts, steaks/roasts .................................................. 3-5 days
Cured meats .................................................................. 7-10 days
Leftovers - Cover leftovers with plastic wrap, aluminum foil, or
plastic containers with tight lids.
To remove and replace the wine rack (left) or can/bottle
rack (right):
1. Remove the rack by pulling it straight out from the shelf.
2. Replace the rack by sliding it in between the shelf and the
wall of the refrigerator.
NOTE: For long-term storage, place eggs in a covered container
or in their original carton on an interior shelf.
18
 Loading...