

Whirlpool GM8155XJB2, GM8155XJQ2, GM8155XJT2, KCMC155JWH0, KCMC155JBL0 Installation Guide
...
BUILT-IN TRIM KIT INSTALLATION INSTRUCTION
(KEEP FOR FURTHER REFERENCE)
FOR WHIRLPOOL TRIM-KIT MODELS' MK1157XJ, MK1150XJ
° FOR USE WITH WHIRLPOOL AND KITCHEN AID MICROWAVE OVEN MODELS :
GM8155XJ, KCMC155J, YKCMC155.1
• UL AND CSA LISTED- FOR USE OVER ELECTRIC HEAT SOURCE
(INCLUDING MODELS-27": (Y)RBS275PD, (Y)GBS277PD, (Y)KEBI171D, (Y)KEBS177D
-30" : (Y)RBS305PD, (Y)GBS307PD, (Y)KEBI101D, (Y)KEBS107D
PARTS LIST
Trim Kit
Upper Duct (1)
i
1• Screws
(4 Req'd 2 Extra)
1/2" Screws
(16 Req'd 2 Extra)
Anti-Tip
Bracket (1)
CUTOUT DIMENSIONS
27" 30"
Height
Width
Depth
(min.)
21 lr2"with flush mount receptacle.
(23 3/4"ifnon-flushreceptacleisused.)
25 I_,, 281/2"
Rear Duct (1)
BottomDuct (1)
17 1/4"
Bottom
Bracket (1)
Template (1)
r__ Depth
I
I
I
I
Width ;'#:
_ I Height
P/NO.: 3828W5U0078/8172219
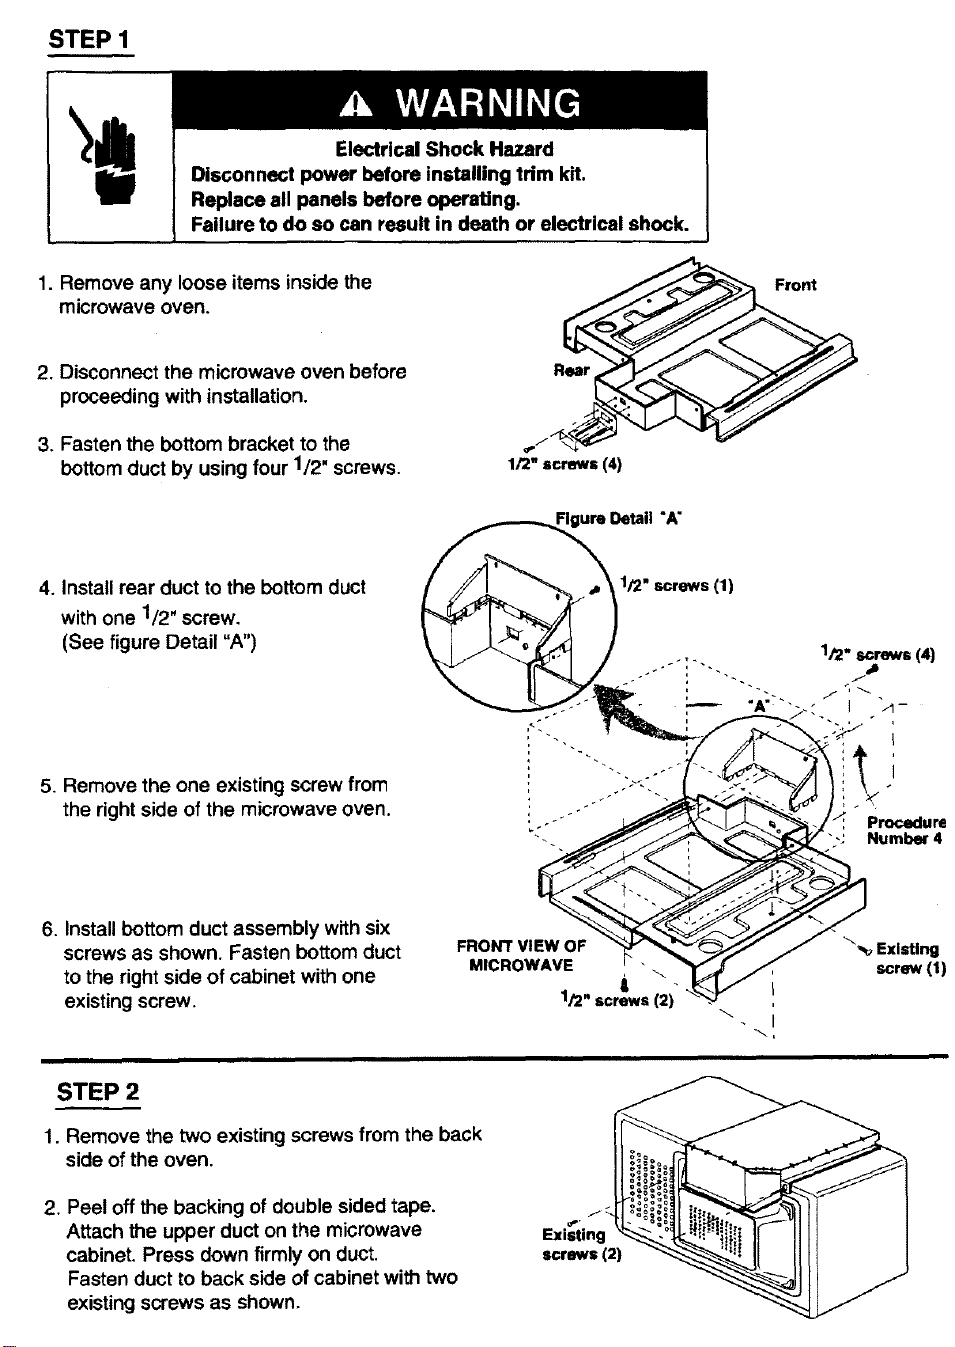
STEP1
Electrical Shock Hazard
Disoonnect power before installing trim kit.
Replace all panels before operating.
Failure to do so can result in death or electrical shock.
1. Remove any loose items inside the
microwave oven.
2. Disconnect the microwave oven before
proceeding with installation.
3. Fasten the bottom bracket to the
bottom duct by using four 1/2" screws.
4. Install rear duct to the bottom duct
with one 1/2" screw.
(See figure Detail "A")
5. Remove the one existing screw from
the right side of the microwave oven.
Front
Rear
1/2" screws (4)
1/2" screws (1)
1/2-screws(4)
" ] /1-
6. Install bottom duct assembly with six
screws as shown. Fasten bottom duct
FRONT VIEW OF
to the right side of cabinet with one
existing screw.
STEP 2
1. Remove the two existing screws from the back
side of the oven.
2. Peel off the backing of double sided tape.
Attach the upper duct on the microwave
cabinet. Press down firmly on duct.
Fasten duct to back side of cabinet with two
existing screws as shown.
MICROWAVE
1/2" screws (2)
J
Existing
screws(2)
i \
\_ Existing
screw(t)
 Loading...