

Page 1
6gb33057.fm Page 15 Friday, June 11, 2004 5:31 PM
INSTRUCTIONS FOR USE
BEFORE USING THE FREEZER
SAFEGUARDING THE ENVIRONMENT
PRECAUTIONS AND GENERAL
RECOMMENDATIONS
HOW TO USE THE FREEZER
HOW TO DEFROST AND CLEAN THE
FREEZER
CARE AND MAINTENANCE
TROUBLESHOOTING GUIDE
AFTER-SALES SERVICE
INSTALLATION
ELECTRICAL CONNECTION
15
Page 2
6gb33057.fm Page 16 Friday, June 11, 2004 5:31 PM
BEFORE USING THE FREEZER
•
Your new appliance is a freezer designed
exclusively for domestic use.
To get the most out of your freezer, please
read the instructions carefully. These contain
a description of your appliance as well as
useful tips for storing food.
Keep this handbook for future consultation.
1.
After unpacking the appliance, check for
damage and make sure that the door shuts
properly. Any damage must be reported to
your retailer within 24 hours after delivery of
the appliance.
2.
Wait at least three hours before switching the
appliance on in order to ensure the refrigerant
circuit is fully efficient.
3.
Installation of the appliance and electrical
connections must be carried out by a qualified
electrician, in accordance with the
manufacturer's instructions and local
regulations.
SAFEGUARDING THE ENVIRONMENT
1. Packing
The packaging material is entirely recyclable, and
marked with the recycling symbol. Follow local
regulations for scrapping.
Keep the packaging materials (plastic bags,
polystyrene parts, etc.) out of reach of children, as
they are potentially dangerous.
2. Scrapping
The freezer is made of recyclable material. Disposal
must be carried out in accordance with local
environmental regulations for waste disposal.
Make the appliance unusable by cutting off the
power cord. The appliance must be delivered to an
authorised collection centre for the recovery of
refrigerant gas.
Declaration of conformity
•
This appliance is designed to store food and is
manufactured in conformity with European
directive No. 89/109/EEC, 90/128/CEE,
02/72/CE.
•
This appliance is designed, manufactured, and
retailed in compliance with:
- the safety objectives of the Low Voltage
Directive 73/23/EEC
- the protection requirements of the “EMC”
89/336/CEE amended by Directive 93/68/CEE
- The electrical safety of the appliance can only
be guaranteed if the product is connected to an
approved earth connection.
Information:
This appliance does not contain CFCs (replaced
with R134a) or HFCs (replaced with R600a Isobutane).
Appliances with Isobutane (R600a):
Isobutane is a natural gas with low environmental
impact. Caution is required, however, since
isobutane is flammable.
Therefore, it is essential to ensure that refrigerant
pipelines are not damaged.
16
Page 3
6gb33057.fm Page 17 Friday, June 11, 2004 5:31 PM
PRECAUTIONS AND GENERAL
RECOMMENDATIONS
•
Only use the freezer for storing frozen food,
freezing fresh food and making ice cubes.
•
Do not cover or obstruct the air vents of the
appliance.
•
Do not store liquids in glass containers in the
freezer: risk of bursting.
•
Do not eat ice cubes immediately after taking
them out of the freezer since they may cause
cold burns.
•
Do not allow children to play or hide inside the
freezer: risk of becoming trapped inside and
suffocating.
•
Do not swallow the contents (non-toxic) of the
ice packs (if provided).
•
Do not use mechanical devices or any means
other than those recommended and/or supplied
by the manufacturer to speed up the defrosting
process.
•
Do not damage the refrigerant circuit.
•
Do not use electrical appliances inside the
freezer.
•
After installation, make sure that the freezer is
not standing on the power supply cable.
•
Make sure that your freezer is not near a heat
source.
•
Do not store or use gasoline or other flammable
vapours and liquids in the vicinity of the freezer.
The fumes can create a fire hazard or explosion.
•
Before servicing or cleaning the appliance, unplug
it from the mains or disconnect the electrical
power supply.
•
The power cable may only be replaced by an
authorised person.
•
Do not place hot containers (hotter than
50 - 60 °C) on top of the appliance.
17
Page 4
6gb33057.fm Page 18 Friday, June 11, 2004 5:31 PM
HOW TO USE THE FREEZER
The freezer can be used for storing already frozen food and
for freezing fresh food.
Switching on the freezer for the first time
•
There is no need to set the freezer temperature on the
thermostat because the appliance is already factory set.
•
Plug in the appliance.
•
The alarm signal, if present, activates, indicating that the freezer
has not yet reached a sufficiently cold temperature for storage
of foodstuffs.
•
Only place food in the freezer 2 hours after switching on.
Adjusting the temperature
•
Position 0: the appliance is switched off
Positions 1 to 3: make the internal temperature colder
•
Thermostat setting:
1 - for storing food for short periods;
2 - for storing food for long periods;
3 - for storing food for long periods and freezing fresh food.
Note:
Ambient air temperature, the frequency of door opening and the
position of the appliance can affect the freezer internal
temperature.
These factors must be taken into account when setting the
thermostat.
Freezing
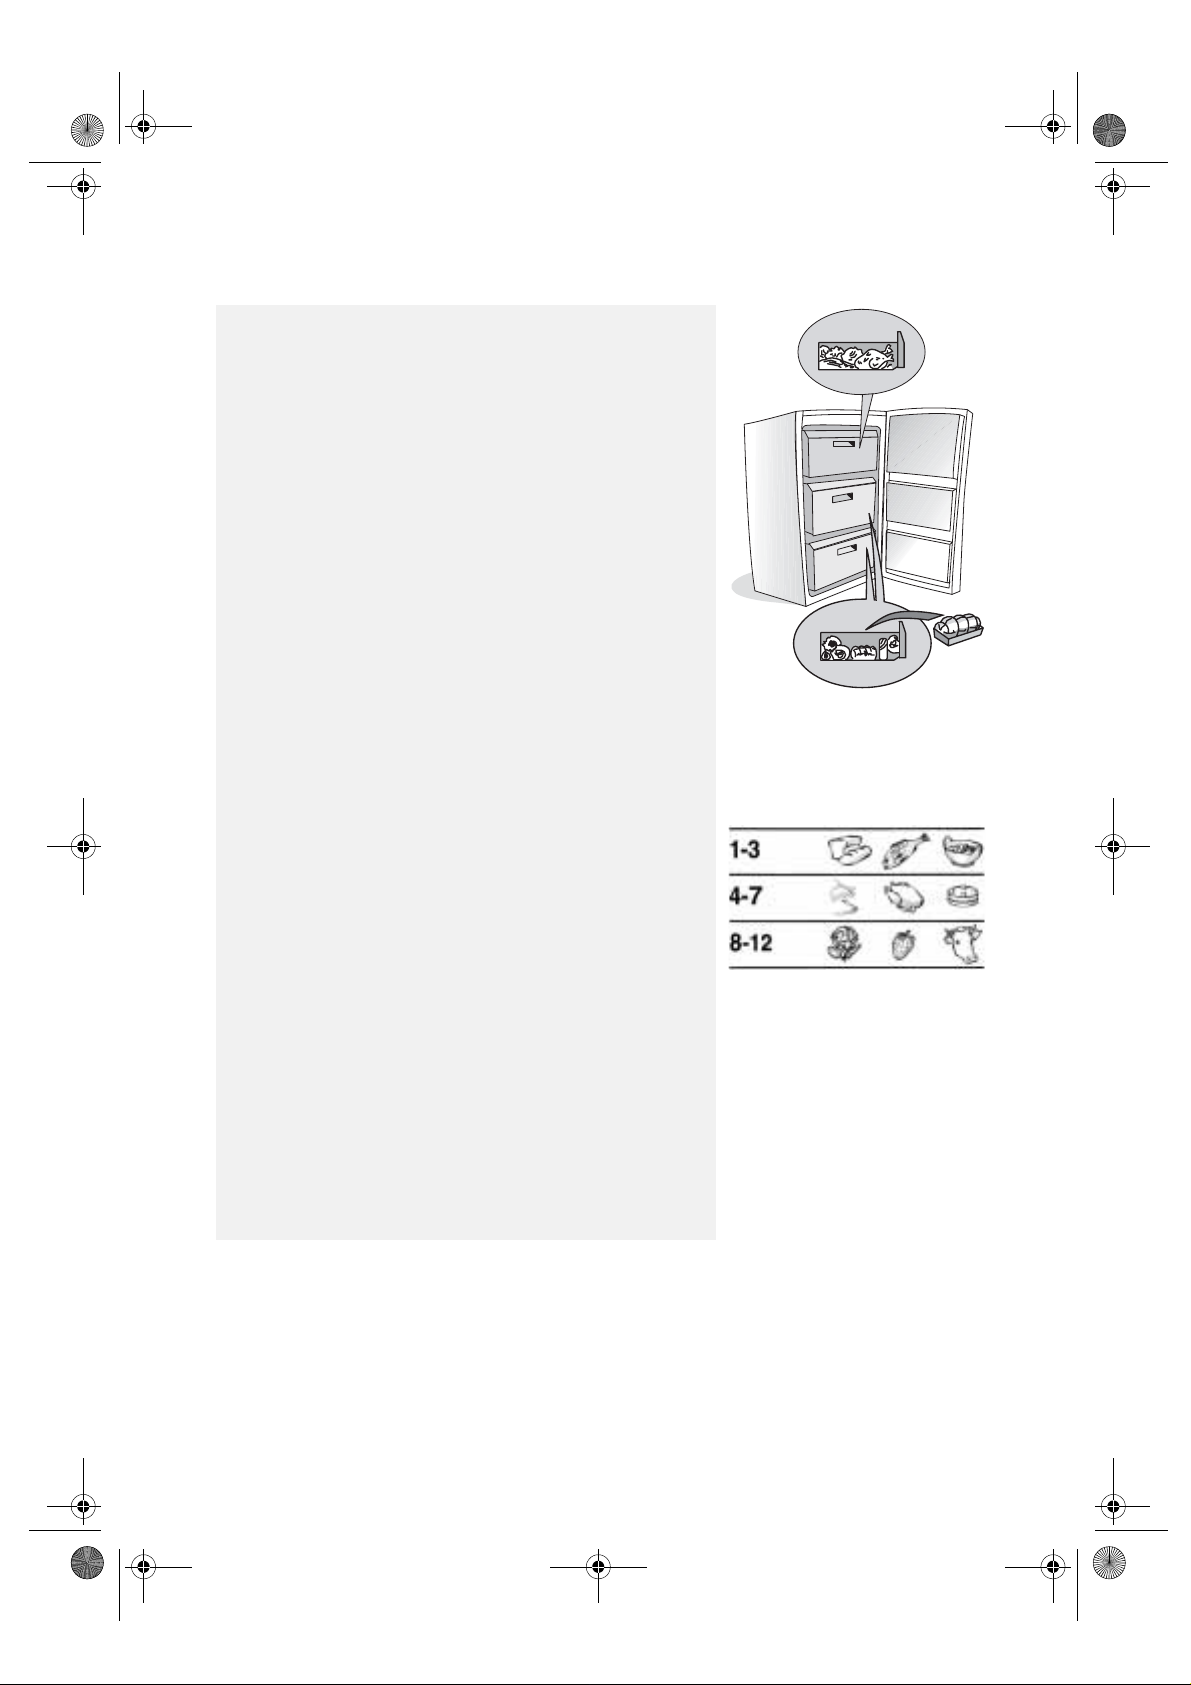
Place the amount of fresh food indicated on the rating plate
in the middle compartment. Take care not to place the food
directly in contact with food already frozen.
For optimum appliance performance, turn the thermostat knob to
position 3, then place the food in the freezer and after 24 hours
turn the knob back to position 2.
After placing fresh food in the freezer, 24 hours on fast freeze
function is generally sufficient; after 24 hours, deactivate the fast
freeze function (if provided).
Important:
When freezing only small amounts of food, the food can be placed
in any compartment, with the exception of the bottom drawer.
Furthermore, in order to save energy, when freezing small
amounts of food the fast freeze function (if provided) need not
necessarily be activated.
18
Page 5
6gb33057.fm Page 19 Friday, June 11, 2004 5:31 PM
Tips for freezing and storing fresh food.
•
Before freezing, wrap and seal fresh food in:
aluminium foil, cling film, air and water-tight plastic bags,
polythene containers with lids or freezer containers suitable for
freezing fresh food.
•
Food must be fresh, mature and of prime quality in order to
obtain high quality frozen food.
•
Fresh vegetables and fruit should preferably be frozen as soon
as they are picked to maintain the full original nutritional value,
consistency, colour and flavour.
Some meat, especially game, should be hung before it is frozen.
Note:
•
Always leave hot food to cool before placing in the freezer.
•
Eat fully or partially defrosted foods immediately. Do not
refreeze unless the food is cooked after it has thawed. Once
cooked, the thawed food can be refrozen.
Important:
The table alongside shows the recommended maximum
storage time for frozen fresh foods.
Classification of frozen foods
Put the frozen products into the freezer and classify them.
The storage date should be indicated on the packs, to allow use
within expiry dates.
Advice for storing frozen food
When purchasing frozen food products:
•
Ensure that the packaging is not damaged (frozen food in
damaged packaging may have deteriorated). If the package is
swollen or has damp patches, it may not have been stored under
optimal conditions and defrosting may have already begun.
•
When shopping, leave frozen food purchases until last and
transport the products in a thermally insulated cool bag.
•
Once at home, place the frozen foods immediately in the
freezer.
•
If food has defrosted even partially, do not re-freeze it.
Consume within 24 hours.
•
Avoid, or reduce temperature variations to the minimum.
Respect the best-before date on the package.
•
Always observe the storage information on the package.
MONTHS FOOD
19
Page 6
6gb33057.fm Page 20 Friday, June 11, 2004 5:31 PM
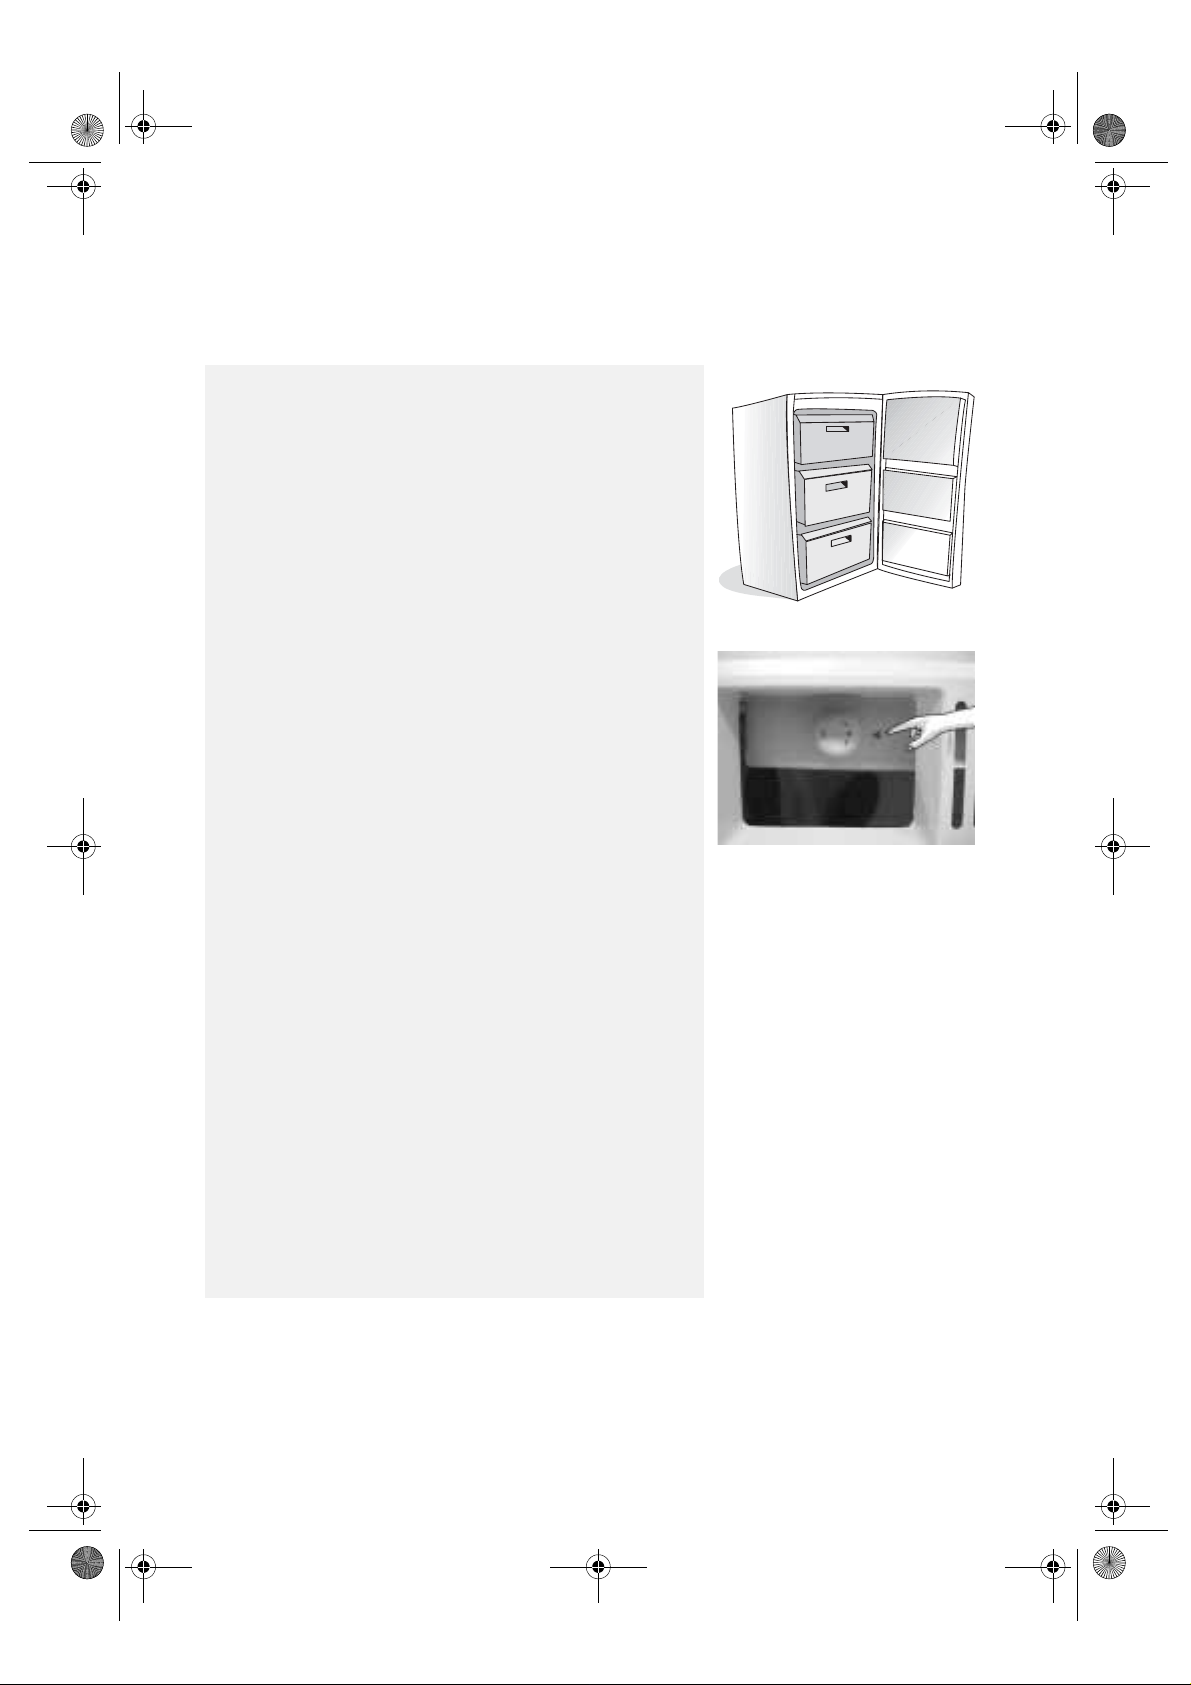
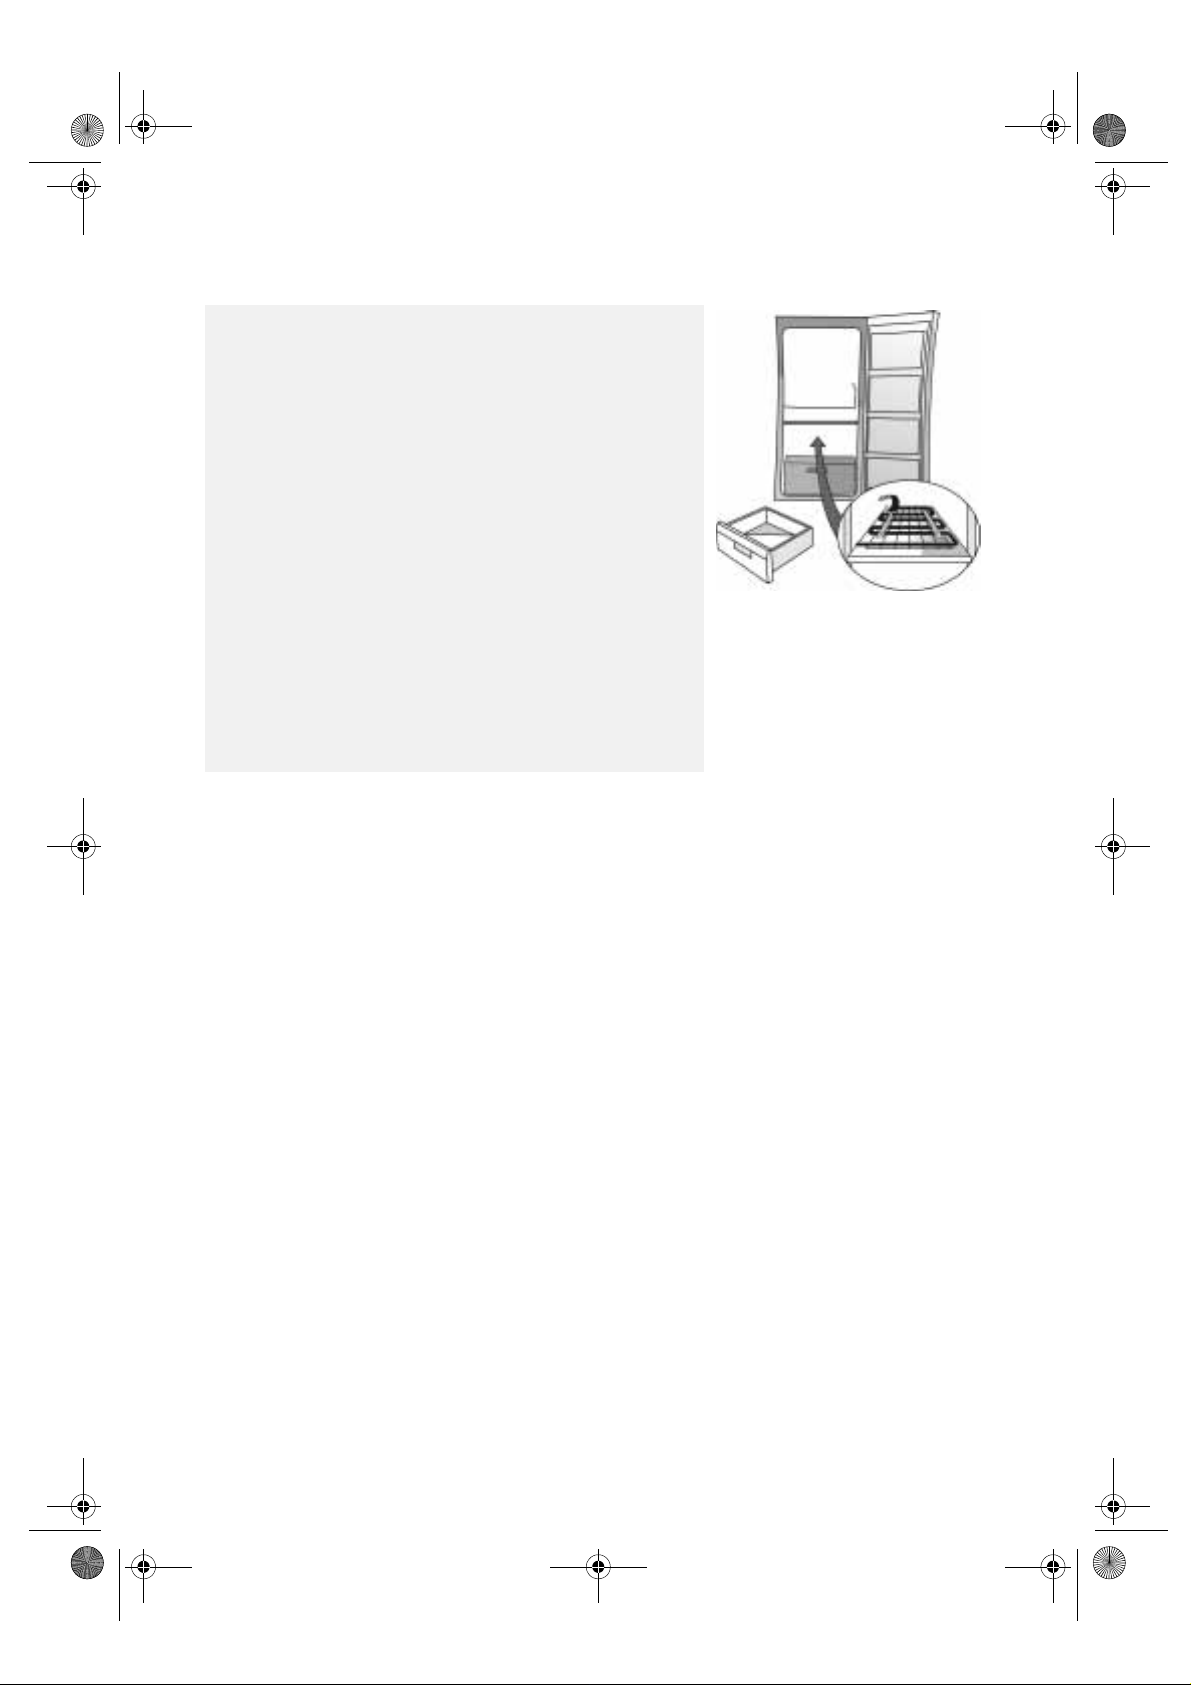
Removing the baskets
•
Pull the baskets out fully, then lift them up slightly in order to
remove.
Note:
Drawers and runners may be removed in order to obtain
increased storage space (if provided)
Ensure that the load does not exceed the limit (if present)
indicated on the side walls of the appliance.
(Fig. 1)
.
Making ice cubes
•
Fill the ice cube tray 2/3 full and place it in the special freezer
compartment.
•
Do not use sharp or pointed instruments to detach the tray if it
is stuck to the bottom of the freezer.
•
Bend the ice tray slightly to remove the cubes.
Note:
The freezer door will not re-open easily immediately after closing.
Wait a few minutes before opening again in order to allow for
compensation of the vacuum created.
Fig. 1
20
Page 7
6gb33057.fm Page 21 Friday, June 11, 2004 5:31 PM
HOW TO DEFROST AND CLEAN THE FREEZER
Before any cleaning or maintenance operation, unplug
the appliance from the mains or disconnect the
electrical power supply.
For electronic models, turn the knob to OFF/●.
Defrost the freezer once or twice a year, or when the
formation of ice on the refrigeration grilles is excessive.
It is perfectly normal for ice to form on the grilles.
The amount of ice which forms and the rate at which it
accumulates will depends on room temperature and
humidity, and on the frequency with which the door is
opened.
If possible, defrost the freezer when it is nearly empty.
•
Remove the food from the freezer, wrap in a newspaper
and group together in a cool place or in a portable cooler.
•
Leave the freezer door open to allow the frost to melt.
•
Pull out the defrost water drain and place a container under
the drain.
•
Clean the interior of the freezer with a sponge and warm
water and/or neutral detergent. Do not use abrasive
substances.
•
Rinse the interior and dry thoroughly.
•
Put the food back into the freezer.
•
Close the freezer door.
•
Plug in the appliance once again.
•
Switch on the freezer.
Note: for electronic models, first insert the power plug
into the mains socket, then turn the thermostat knob
to the chosen position, and lastly switch on the
appliance.
21
Page 8
6gb33057.fm Page 22 Friday, June 11, 2004 5:31 PM
CARE AND MAINTENANCE
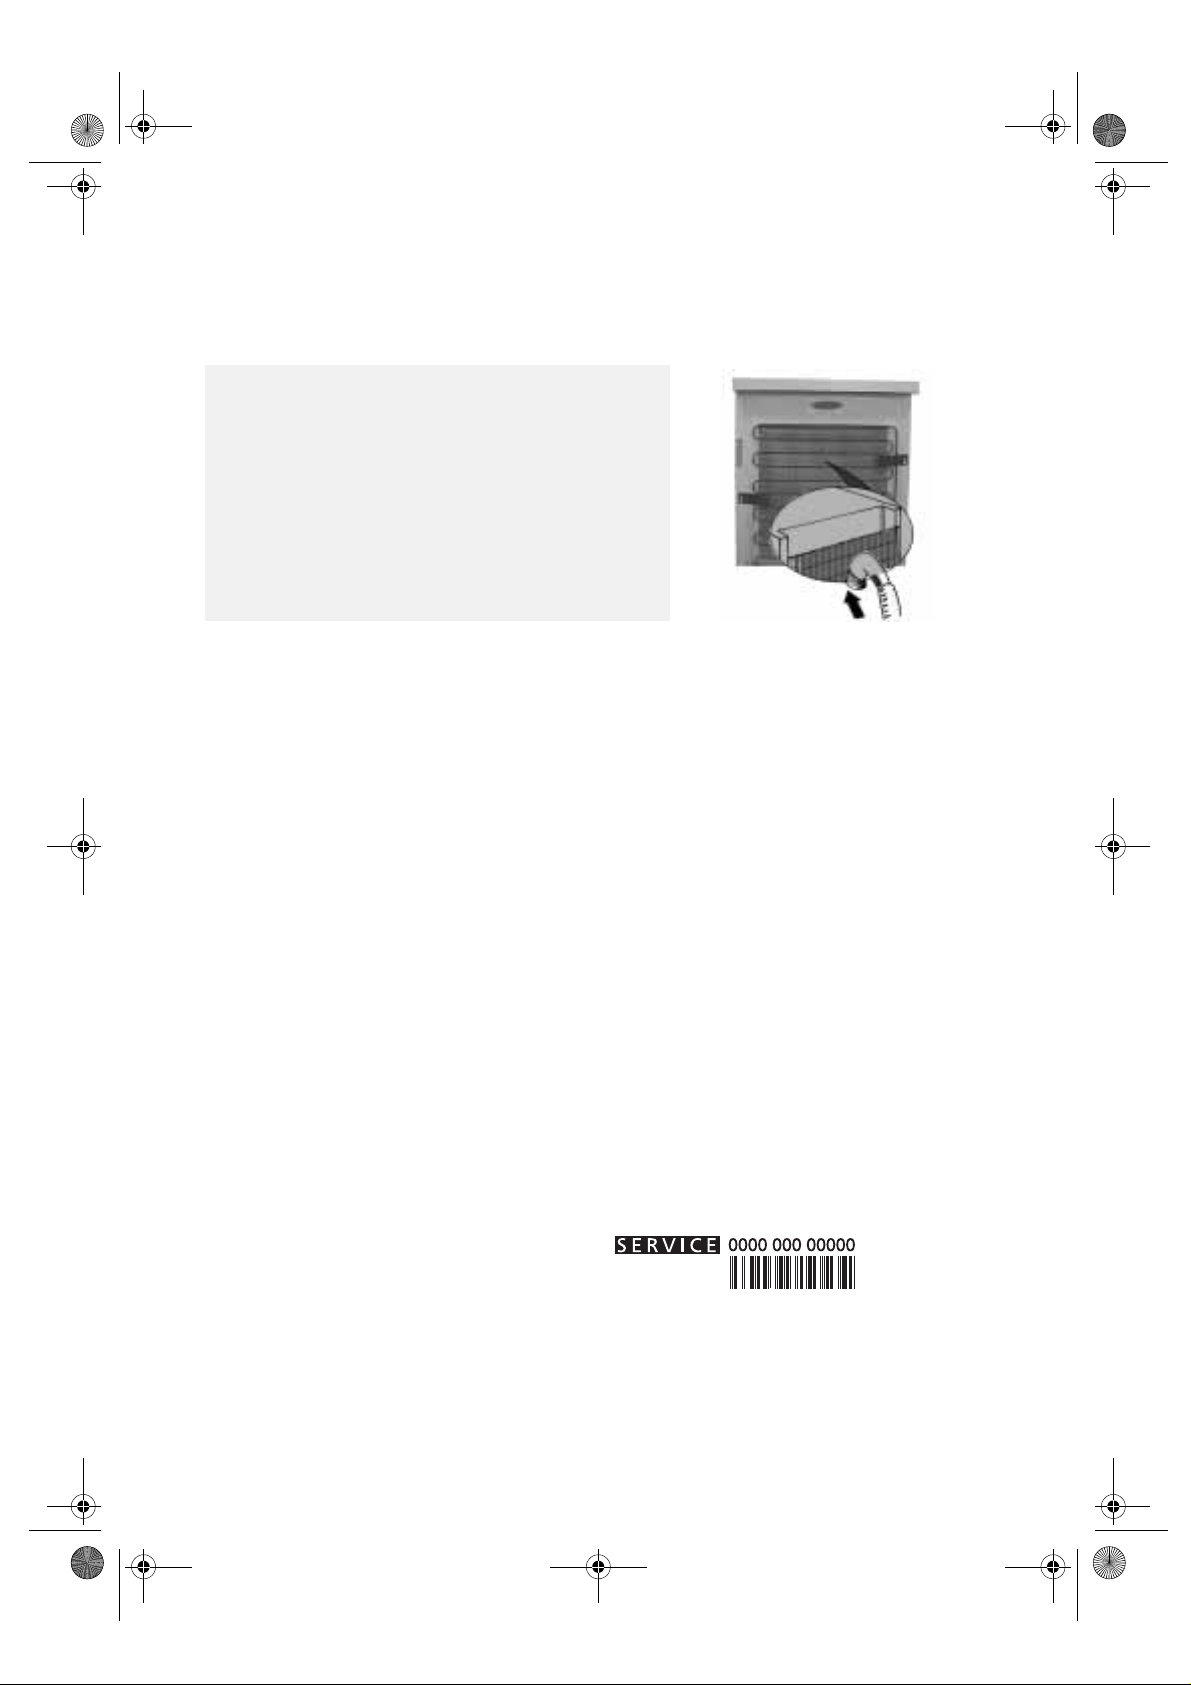
Periodically clean the condenser at the rear of the appliance
with a vacuum cleaner or brush.
Prolonged disuse
•
Empty the freezer.
•
Disconnect the freezer from the mains power supply.
•
Defrost and clean.
• Leave the door open to prevent formation of
unpleasant odours and to eliminate any dampness.
TROUBLESHOOTING GUIDE
1. The appliance is not working.
•
Is there a power failure?
•
Is the main power switch on?
•
Has the fuse blown?
•
Is the thermostat setting correct?
•
Was the appliance switched on correctly?
2. Excessive frost build-up.
•
Has the defrost water drain been positioned
correctly?
•
Is the door shut properly?
AFTER-SALES SERVICE
Before contacting After-Sales Service:
1.
See if you can solve the problem yourself with
the help of the “Troubleshooting guide”).
2.
Switch the appliance on again to see if the
problem has been solved. If it has not,
disconnect the appliance from the power
supply and wait for about an hour before
switching on again.
3.
If the problem persists after this course of
action, contact After-sales Service.
3. The yellow, red and green leds
(if provided) do not light up. Perform
the checks for point 1, and then:
•
Contact After-sales Service.
Notes:
• The front edge of the appliance may be hot.
This prevents the formation of condensation
and is not a defect.
• Gurgling and hissing nois es du e to
expansion in the refrigerant circuit are
normal.
Specify:
•
the nature of the problem,
•
the model,
•
the Service number (the number after the
word SERVICE on the rating plate on the
inside of the appliance),
•
your full address,
•
your telephone number and area code.
22
Note:
The direction of door opening can be changed.
If this operation is performed by After-sales
Service it is not covered by the warranty.
Page 9
6gb33057.fm Page 23 Friday, June 11, 2004 5:31 PM
INSTALLATION
•
Install the freezer away from heat sources. Installation in a
hot environment, direct exposure to the sun or installation
near heat sources (heaters, radiators, cookers) will increase
power consumption and should therefore be avoided.
•
If this is not possible, the following minimum distances mus t
be respected:
•
30 cm from coal or paraffin stoves;
•
3 cm from electric and/or gas stoves.
•
Install the appliance in a dry, well-ventilated place.
•
Clean the interior (see ”How to defrost and clean the
freezer”).
•
Fit the accessories.
•
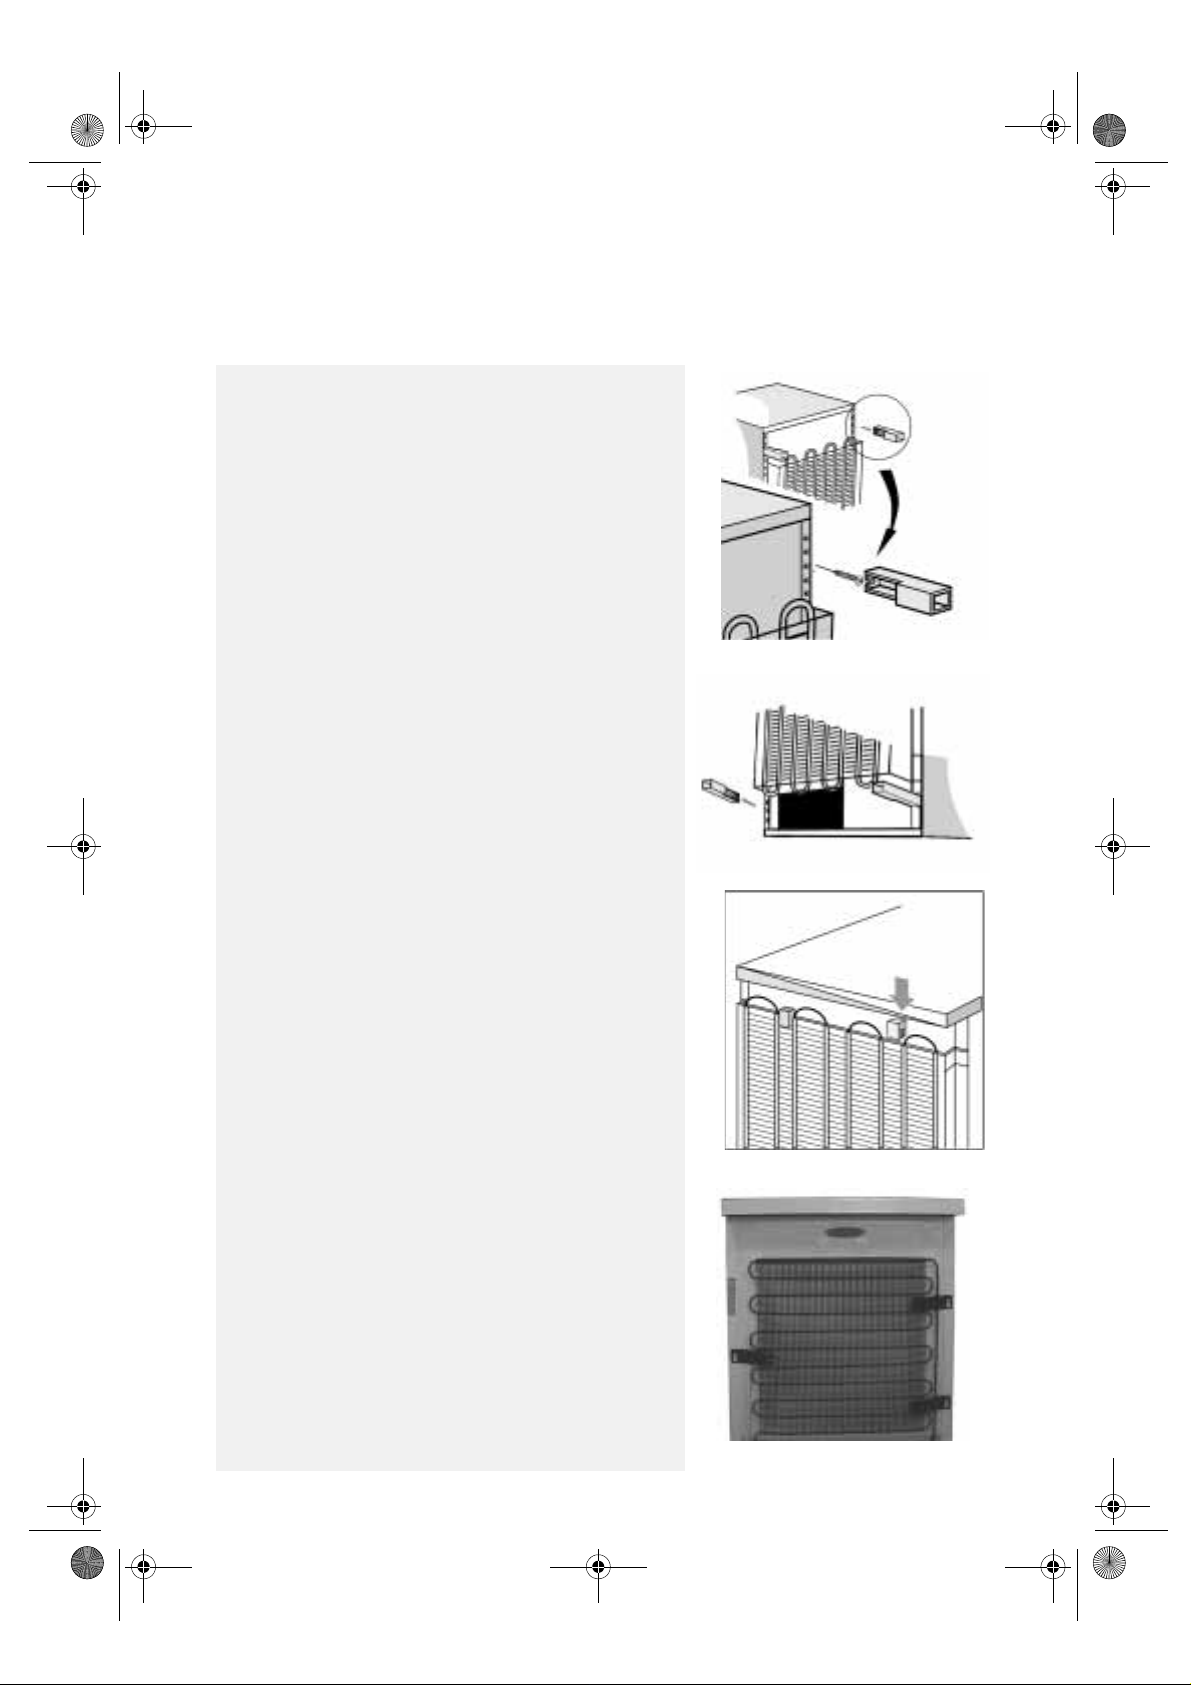
Fit the spacers (Fig. 1, 2, or 3, depending on the model)
Electrical Connection
• Electrical connections must be made in accordance
with local regulations.
•
Voltage and power consumption are indicated on the rating
plate inside the appliance.
•
Regulations require that the
The Manufacturer declines all liabilities for injury to
persons or animals or damage to property resulting
from failure to observe these regulations.
•
If the plug and socket are not of the same type, have the
socket replaced by a qualified electrician.
•
Do not use extension leads or adapters.
Disconnecting the appliance
Electrical disconnection must be possible either by unplugging
the appliance or by means of a double-pole switch located
upline from the socket.
appliance is earthed.
Fig. 1
Fig. 2
Fig. 3
Fig. 4
23
Page 10
6gb33057.fm Page 24 Friday, June 11, 2004 5:31 PM
Door reversibility
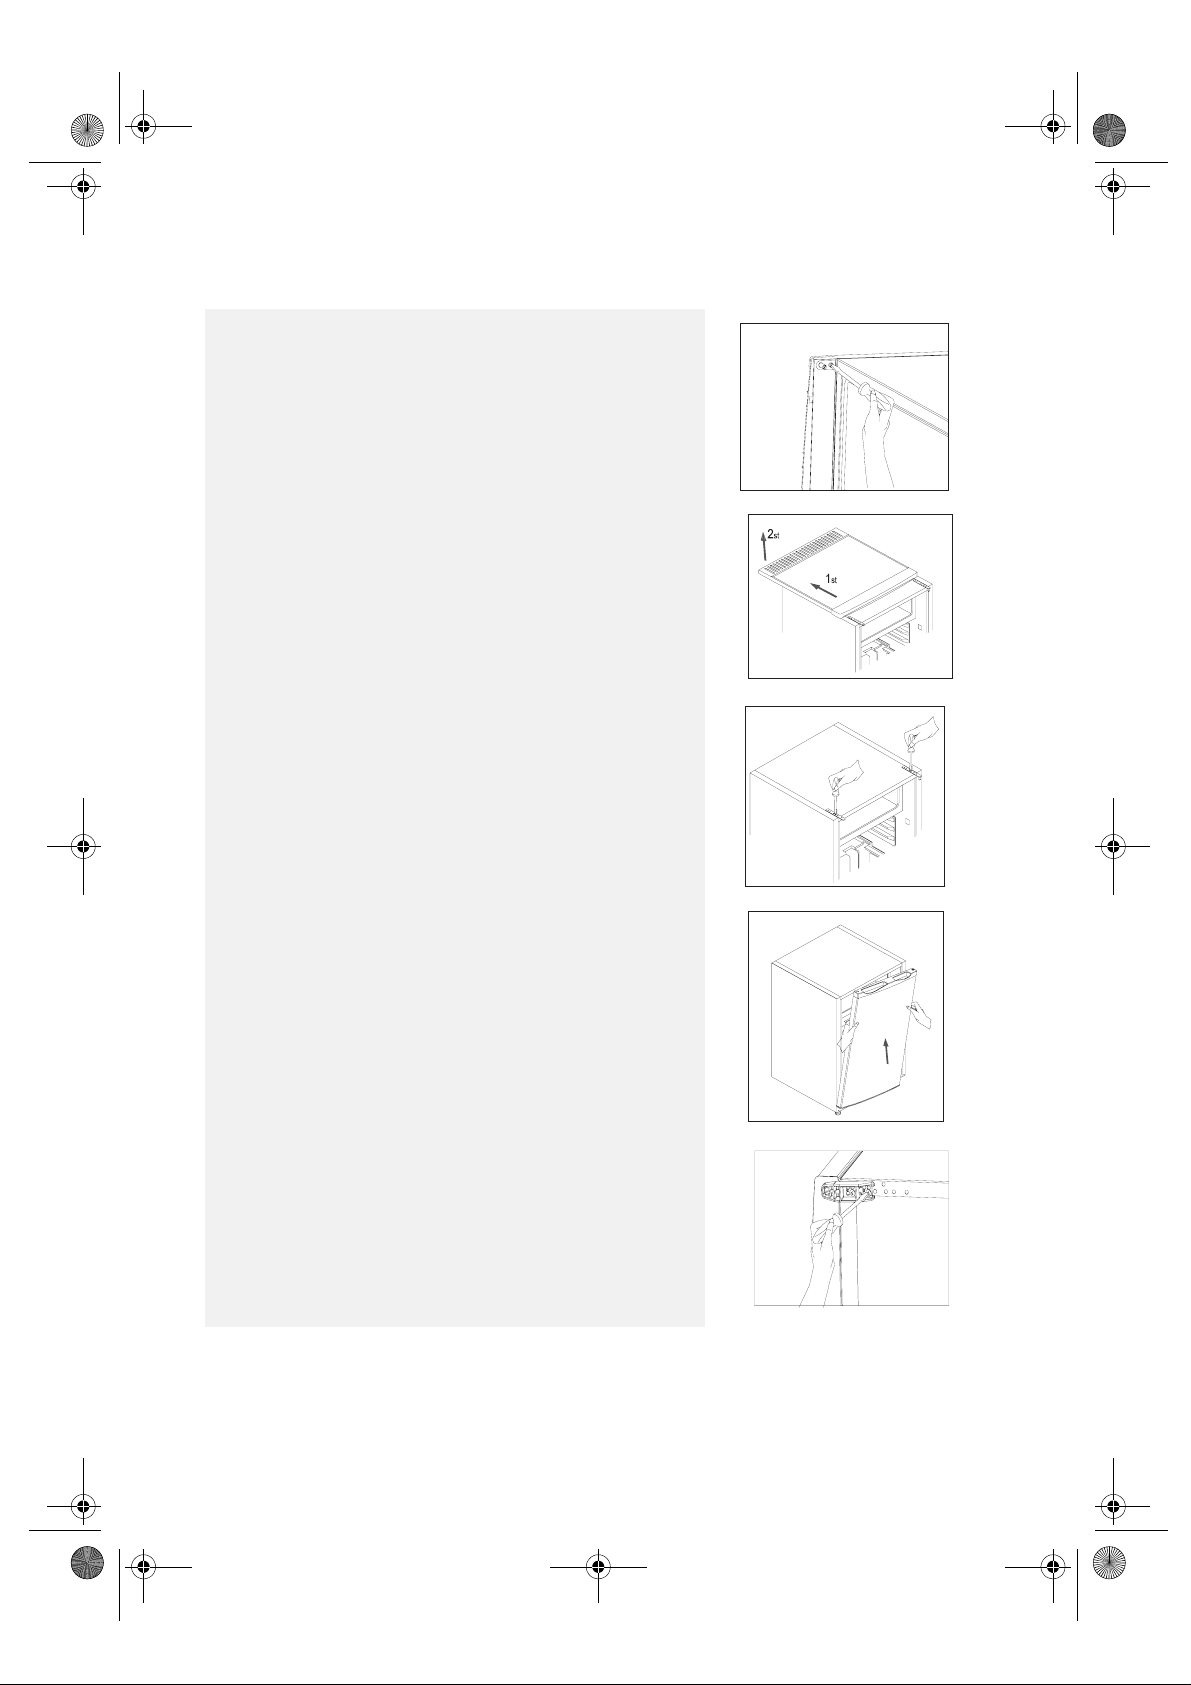
1.
Unscrew the fixing screws on the right and left of the top
panel. (Fig. 1)
2.
To remove the top panel, slide it back and then lift it off.
(Fig. 2)
3.
Unscrew the fixing screws of the right and left hinges and
remove them. (Fig. 3)
Fig. 1
Fig. 2
4.
Lift the door up to release it from the bottom hinge.
(Fig. 4)
5.
Lay the appliance on its left side and unscrew the 2 fixing
screws of the bottom hinge. (Fig. 5)
Fig. 3
Fig. 4
Fig. 5
24
Page 11
6gb33057.fm Page 25 Friday, June 11, 2004 5:31 PM
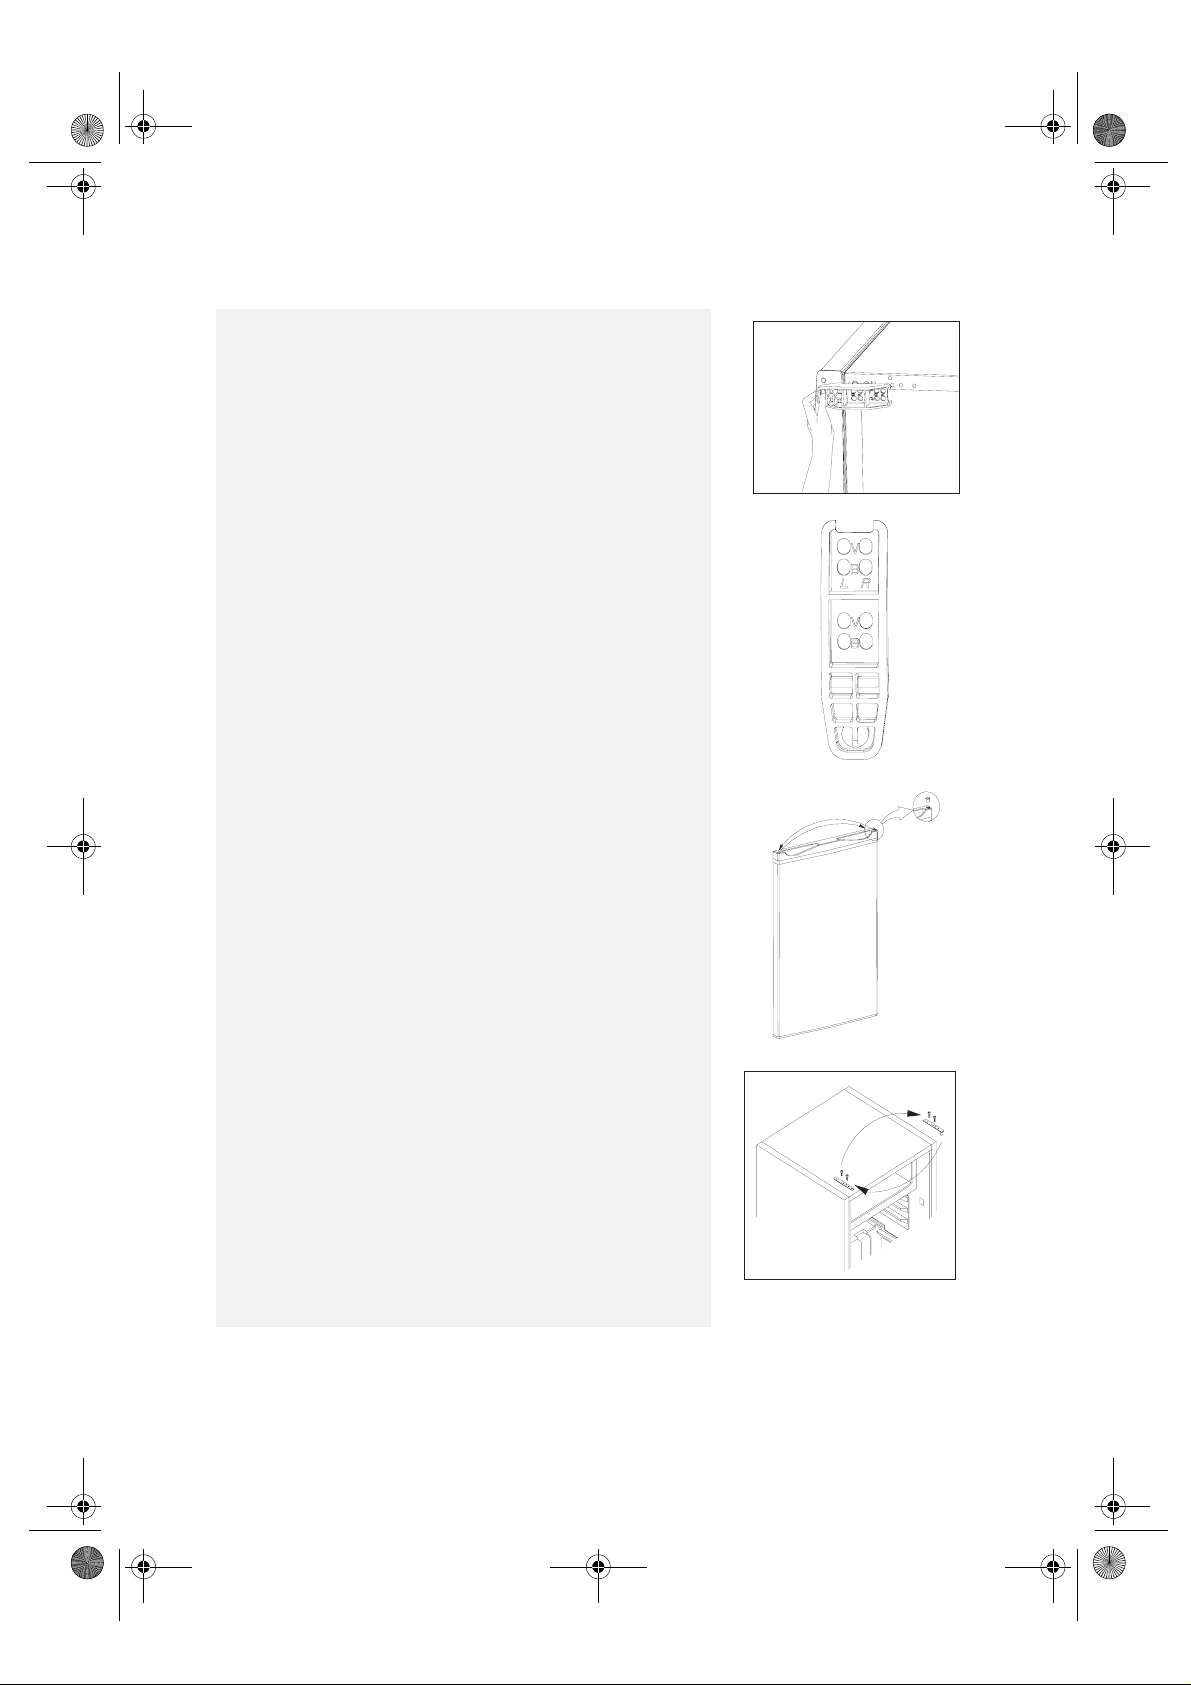
6.
Remove the bottom hinge and unscrew the left levelling foot.
(Fig. 6)
7.
Screw the bottom hinge back on the left side. Use the predrilled holes marked L (Fig. 7). Next screw the levelling foot
back on the right side. Stand the appliance back up again.
Fig. 6
8.
Position the bushings and top covers from the right hand side
on the left (Fig. 8). Remove the bottom right bushing and fit it
on the left. (Fig. 8)
9.
Refit the door, following the same steps as at point 4.
Screw down the left and right hinges (Fig. 9). Refit the top
panel as described at points 2 and 1.
Fig. 7
Fig. 8
Fig. 9
25
Page 12
6gb33057.fm Page 26 Friday, June 11, 2004 5:31 PM
ELECTRICAL CONNECTION
1) For Great Britain only
Warning - this appliance must be earthed
Fuse replacement
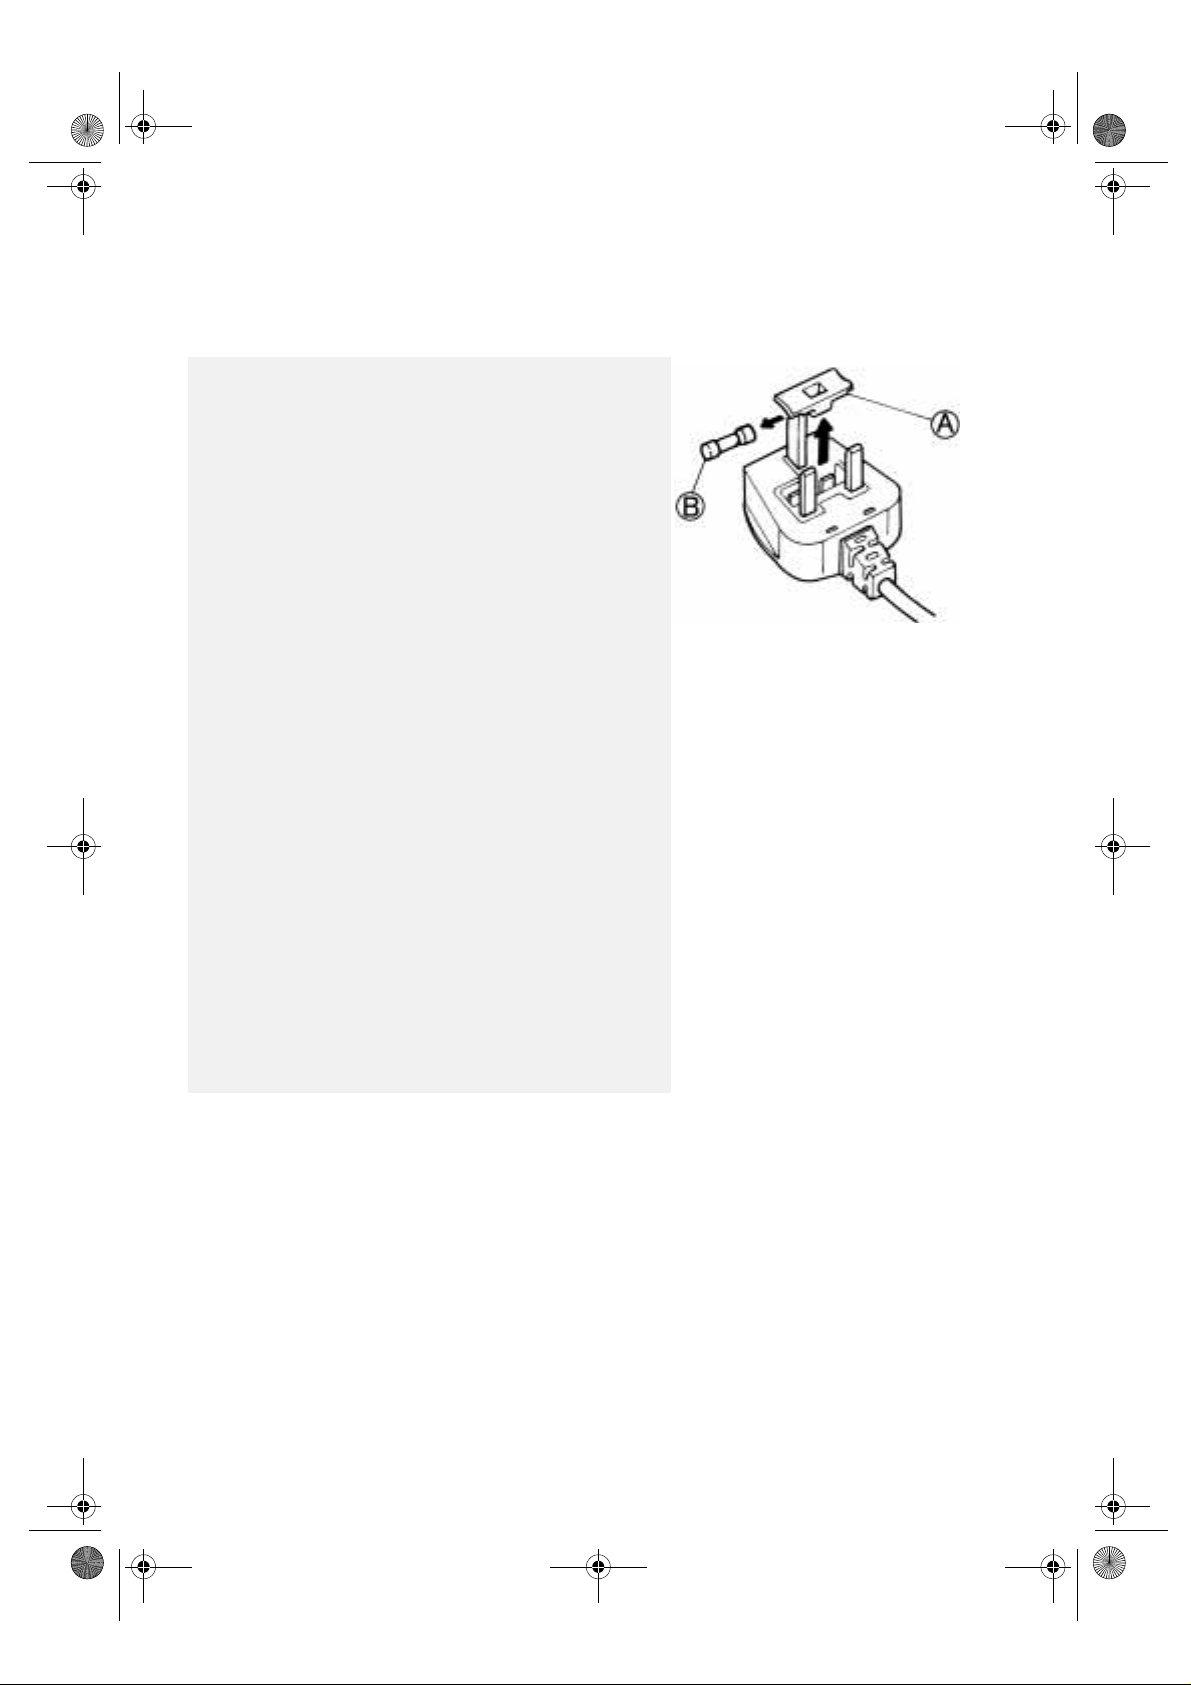
If the mains lead of this appliance is fitted with a BS 1363A
13amp fused plug, to change a fuse in this type of plug use an
A.S.T.A. approved fuse to BS 1362 type and proceed as follows:
1.
Remove the fuse cover (A) and fuse (B).
2.
Fit replacement 13A fuse into fuse cover.
3.
Refit both into plug.
Important:
The fuse cover must be refitted when changing a fuse and if the
fuse cover is lost the plug must not be used until a correct
replacement is fitted.
Correct replacement are identified by the colour insert or the
colour embossed in words on the base of the plug.
Replacement fuse covers are available from your local electrical
store.
2) For the Republic of Ireland only
The information given in respect of Great Britain will frequently
apply, but a third type of plug and socket is also used, the
2-pin, side earth type.
3) Socket outlet / plug (valid for both countries)
If the fitted plug is not suitable for your socket outlet, please
contact Whirlpool Service for further instruction. Please do no t
attempt to change plug yourself. This procedure needs to be
carried out by a qualified Whirlpool technician in compliance
with the manufactures instructions and current standard safety
regulations.
26
 Loading...