

Page 1
G2P 62F/01 PRODUCT DESCRIPTION SHEET
GB IE
Highest
level
First
level
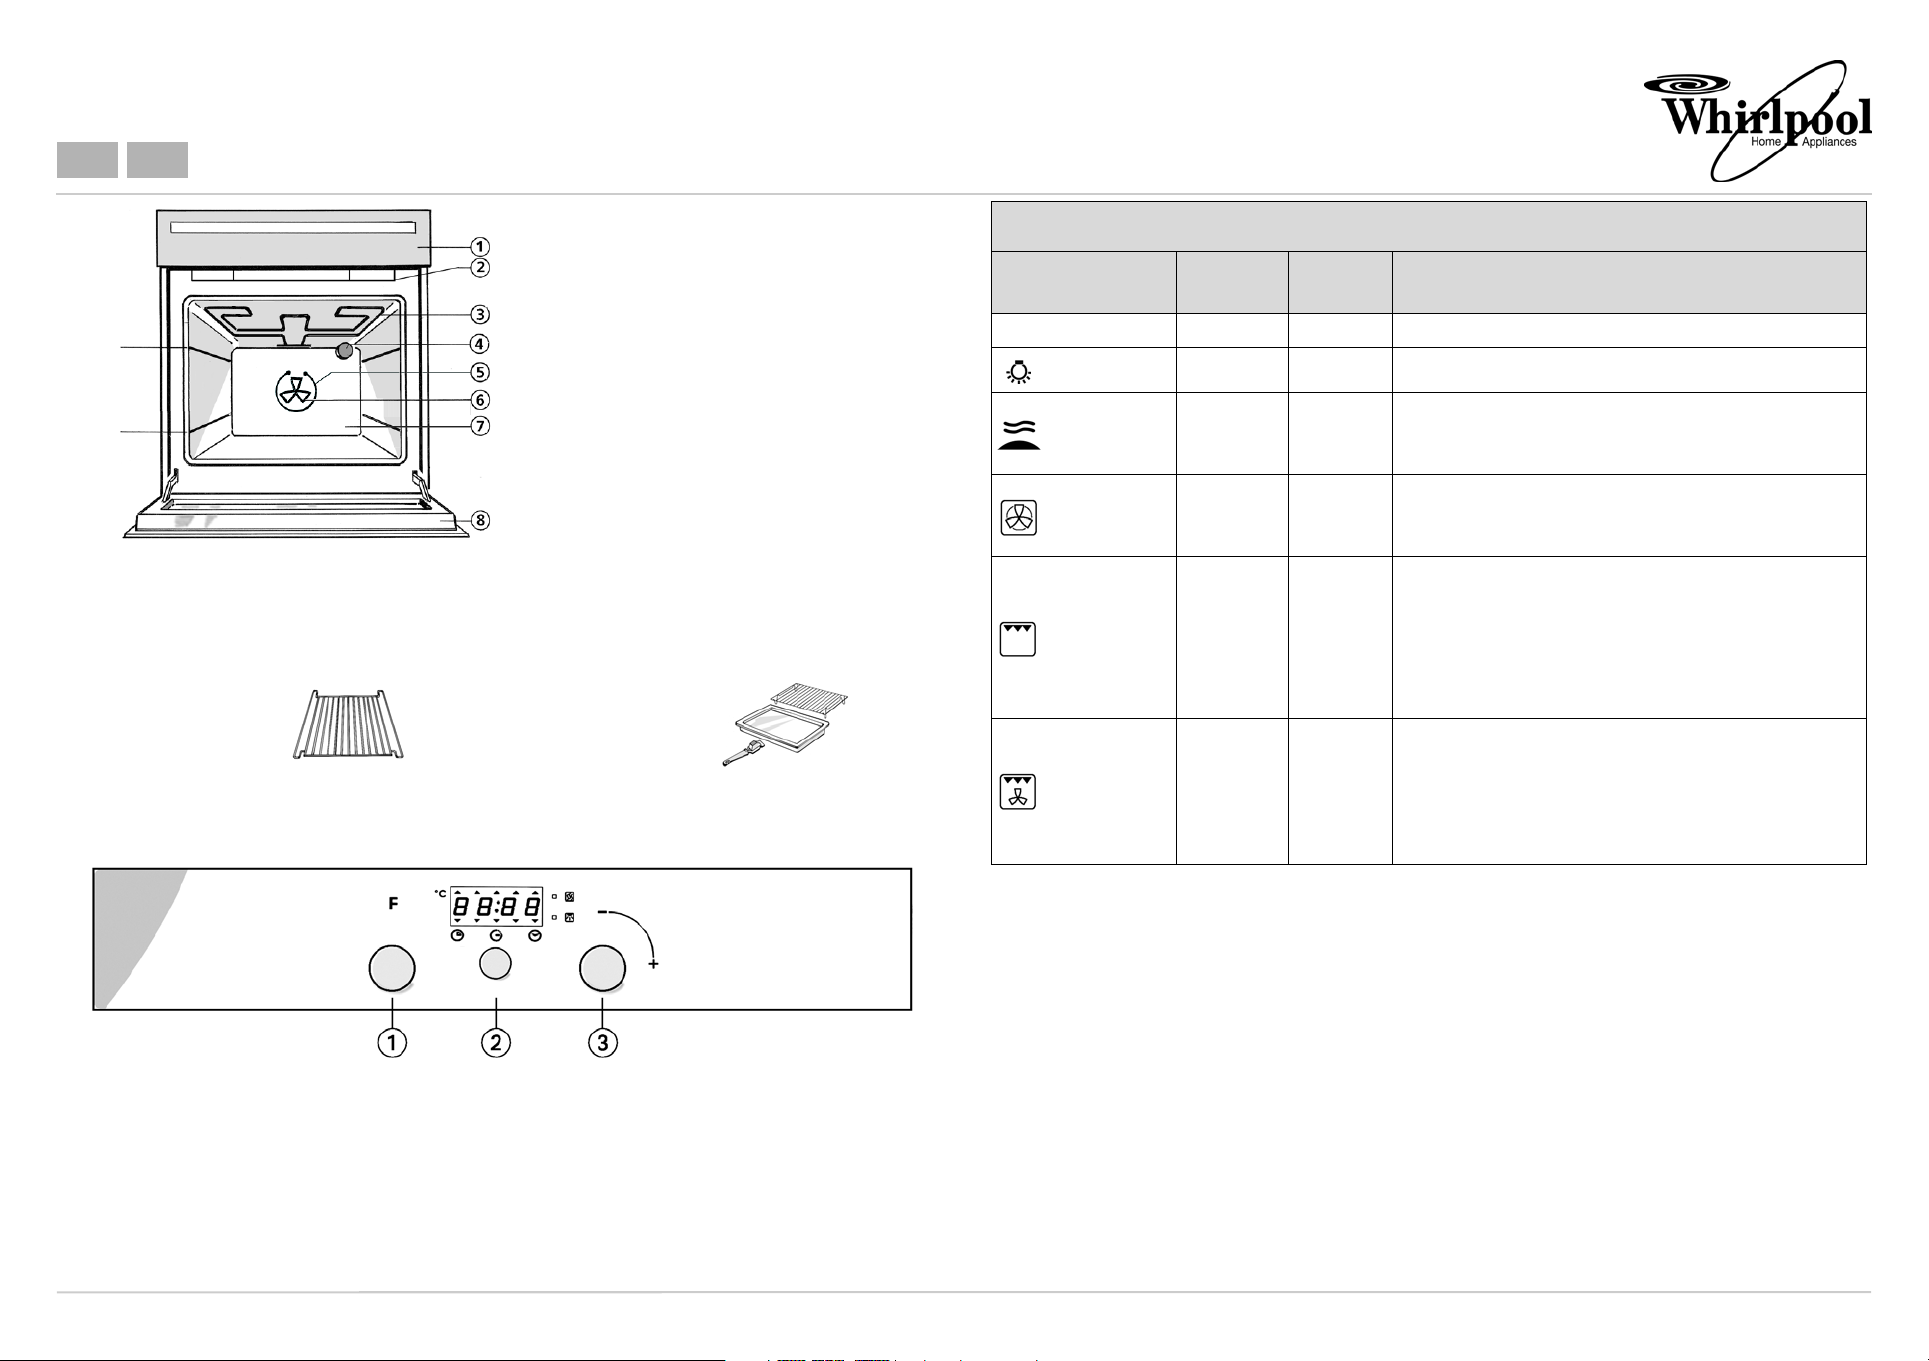
1. Control panel
2. Cooling fan (not visible)
Fan operation switches on only when the oven has
reached a certain temperature, and may continue
even after the appliance has been turned off, for
a few minutes.
3. Top heating element
4. Rear oven lamp
5. Circular heating element (not visible)
6. Fan
7. Catalytic rear wall
8. Oven door*
*Important: An optional kit consisting of a glass
panel for the oven door with related assembly
components is available upon request from the AfterSales Service. Using this kit reduces the oven door
external temperature; it is advisable for children's
safety. Code no. 4819 310 39186.
ACCESSORIES
Wire Shelf: Grill pan set:
CONTROL PANEL
Oven functions table
Function
Preset
temperature
Adjustable
temperature
- Oven OFF - - -
LAMP
MLTF (Heat
Maintenance)
FAN/THERMOVENTILATED
GRILL 3 -
TURBOGRILL 3 -
- - To switch on the oven light.
35°C - 60°C -
160°C 50°C - 250°C
Description of function
• To keep the temperature steady inside the oven.
• 35°C: to raise dough for bread and pizza.
• 60°C: to keep food warm once it is cooked.
• It is advisable to use the first level.
• To cook (without preheating) foods that require the same cooking
temperature on one or more levels
(e.g.: fish, vegetables, sweets), without transferring odours from
one foodstuff to the other.
• Use the grill function to cook sirloin steaks, kebabs, sausages,
vegetables au gratin and for making toast.
• The function allows various settings (1 min. - 5 max.).
• The default position is (3).
• Pre-heat the oven for 5 min. with the door closed.
• For best results, leave the oven door open when grilling. Arrange
food on the wire shelf. When cooking meat, to avoid spatters of fat
and smoke, pour a little water into the drip tray.
• It is advisable to turn the food during cooking.
• This function is ideal for cooking large pieces of meat (roast beef,
roast joints).
• The function allows various settings (1 min. - 5 max.).
• Preheat the oven for 3/5 min.
• During cooking the door must remain closed.
• When cooking meat, to avoid spatters of fat and smoke, pour a little
water into the drip tray.
• It is advisable to turn the food while it is cooked.
1. ON/OFF - Function Selector Knob.
2. Confirm and programme selection button
3. Pre-set values changing knob (temperature, time,
levels)
5019 310 56272
Retractable knobs
• To use this type of knob, press it in the middle.
• The knob comes out.
• Turn it to the required position.
Once cooking is over, turn the knob to 0 and press it
again to restore it to its original position.
Page 2
COOKING TABLES
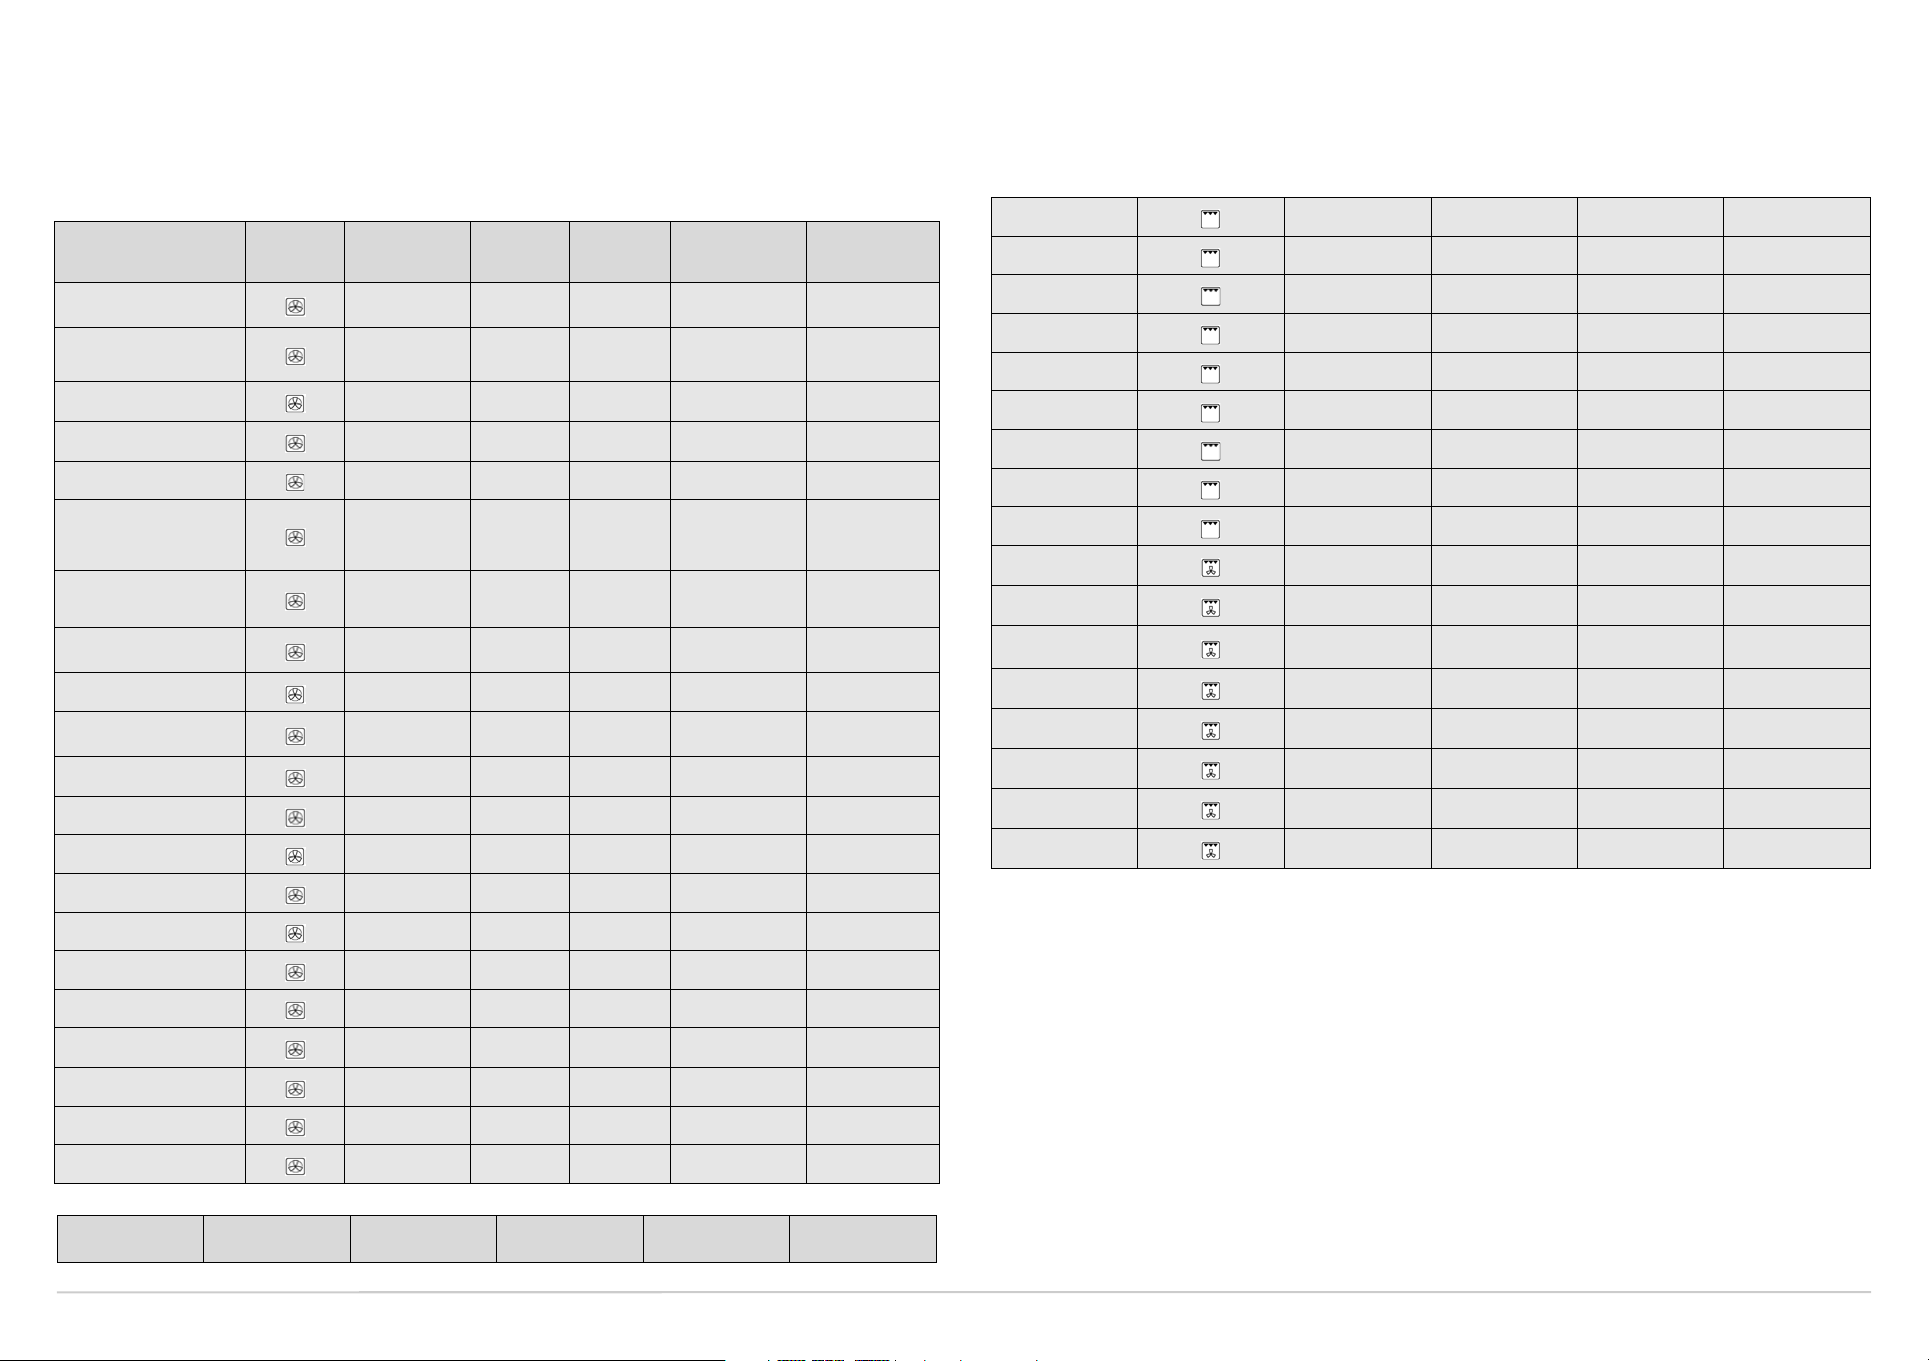
FOOD Function Preheating
MEAT
Lamb, Kid, Mutton
Roast
(Veal, Pork, Beef)
(kg. 1)
Chicken, Rabbit,
Duck
Turkey
(kg. 4-6) + browning level: 3
Goose (2 Kg)
FISH (WHOLE)
(1-2 kg)
Gilt-head, Bass, Tuna,
Salmon, Cod
FISH (CUTLETS)
(1 kg.)
Sword Fish, Tuna
VEGETABLES
Stuffed peppers and tomatoes
Baked potatoes
Level
(from the
bottom)
X 3 2 200 100 - 110
X 3 3 200 100 - 110
X 2 3 190 80 - 90
X 1 3 200 160 - 180
X 1 3 200 100 - 130
X 3 1 190 45 - 55
X 3 2 190 40 - 50
X 2 - 200 50 - 60
X 2 3 200 50 - 60
Browning
level
Tempe ra tu re
(°C)
Cooking time
(minutes)
Sirloin steak X 4 5 35 - 45
Cutlets X 4 5 30 - 40
Sausages X 3 - 4 5 30 - 40
Pork chops X 4 5 35 - 45
Fish (cutlets) X 3 - 4 5 35 - 45
Chicken legs X 3 - 4 5 40 - 50
Kebabs X 3 - 4 5 40 - 50
Spare ribs X 3 - 4 5 35 - 45
Chicken halves X 3 5 45 - 55
Chicken halves X 3 5 45 - 55
Whole chicken X 3 5 60 - 70
Roast
(pork, beef)
Duck X 2 5 70 - 80
X 2 5 60 - 70
SWEETS, PASTRIES, ETC.
Raising cakes
Filled pies
(with cheese)
Tar ts
Applestrudel
Biscuits
Choux buns
Savoury pies
Lasagna
Filled fruit pies
e.g. Pineapple, Peach
Meringues
Vol-au-vents
Soufflés
X 1 - 180 40 - 50
X 2 - 180 70 - 80
X 2 - 180 40 - 50
X 1 - 3 - 200 50 - 55
X 1 - 3 - 200 20 - 30
X 1 - 3 - 180 35 - 45
X 2 - 190 40 - 50
X 2 1 200 45 - 60
X 2 - 190 40 - 50
- 1 - 3 - 120 120 - 150
X 1 - 3 - 190 35 - 45
X 2 - 190 45 - 55
COOKING TABLE FOR GRILL FUNCTION
FOOD Function Preheating
Level
(from the bottom)
Power
level
Cooking time
(minutes)
Leg of lamb X 3 5 70 - 80
Roast beef X 3 5 50 - 60
Baked potatoes X 3 5 50 - 60
Fish (Gilt-head, Trout) X 3 5 50 - 60
N.B.: When cooking meat in Fan and Static functions, it is advisable to use the Browning function (level 1 to 3).
Cooking times and temperatures are approximate only.
Page 3
GB
Sel
S
t
3
4
T
T
T
a
A
O
t
o
T
INSTRUCTIONS FOR USING THE ELECTRONIC PROGRAMMER
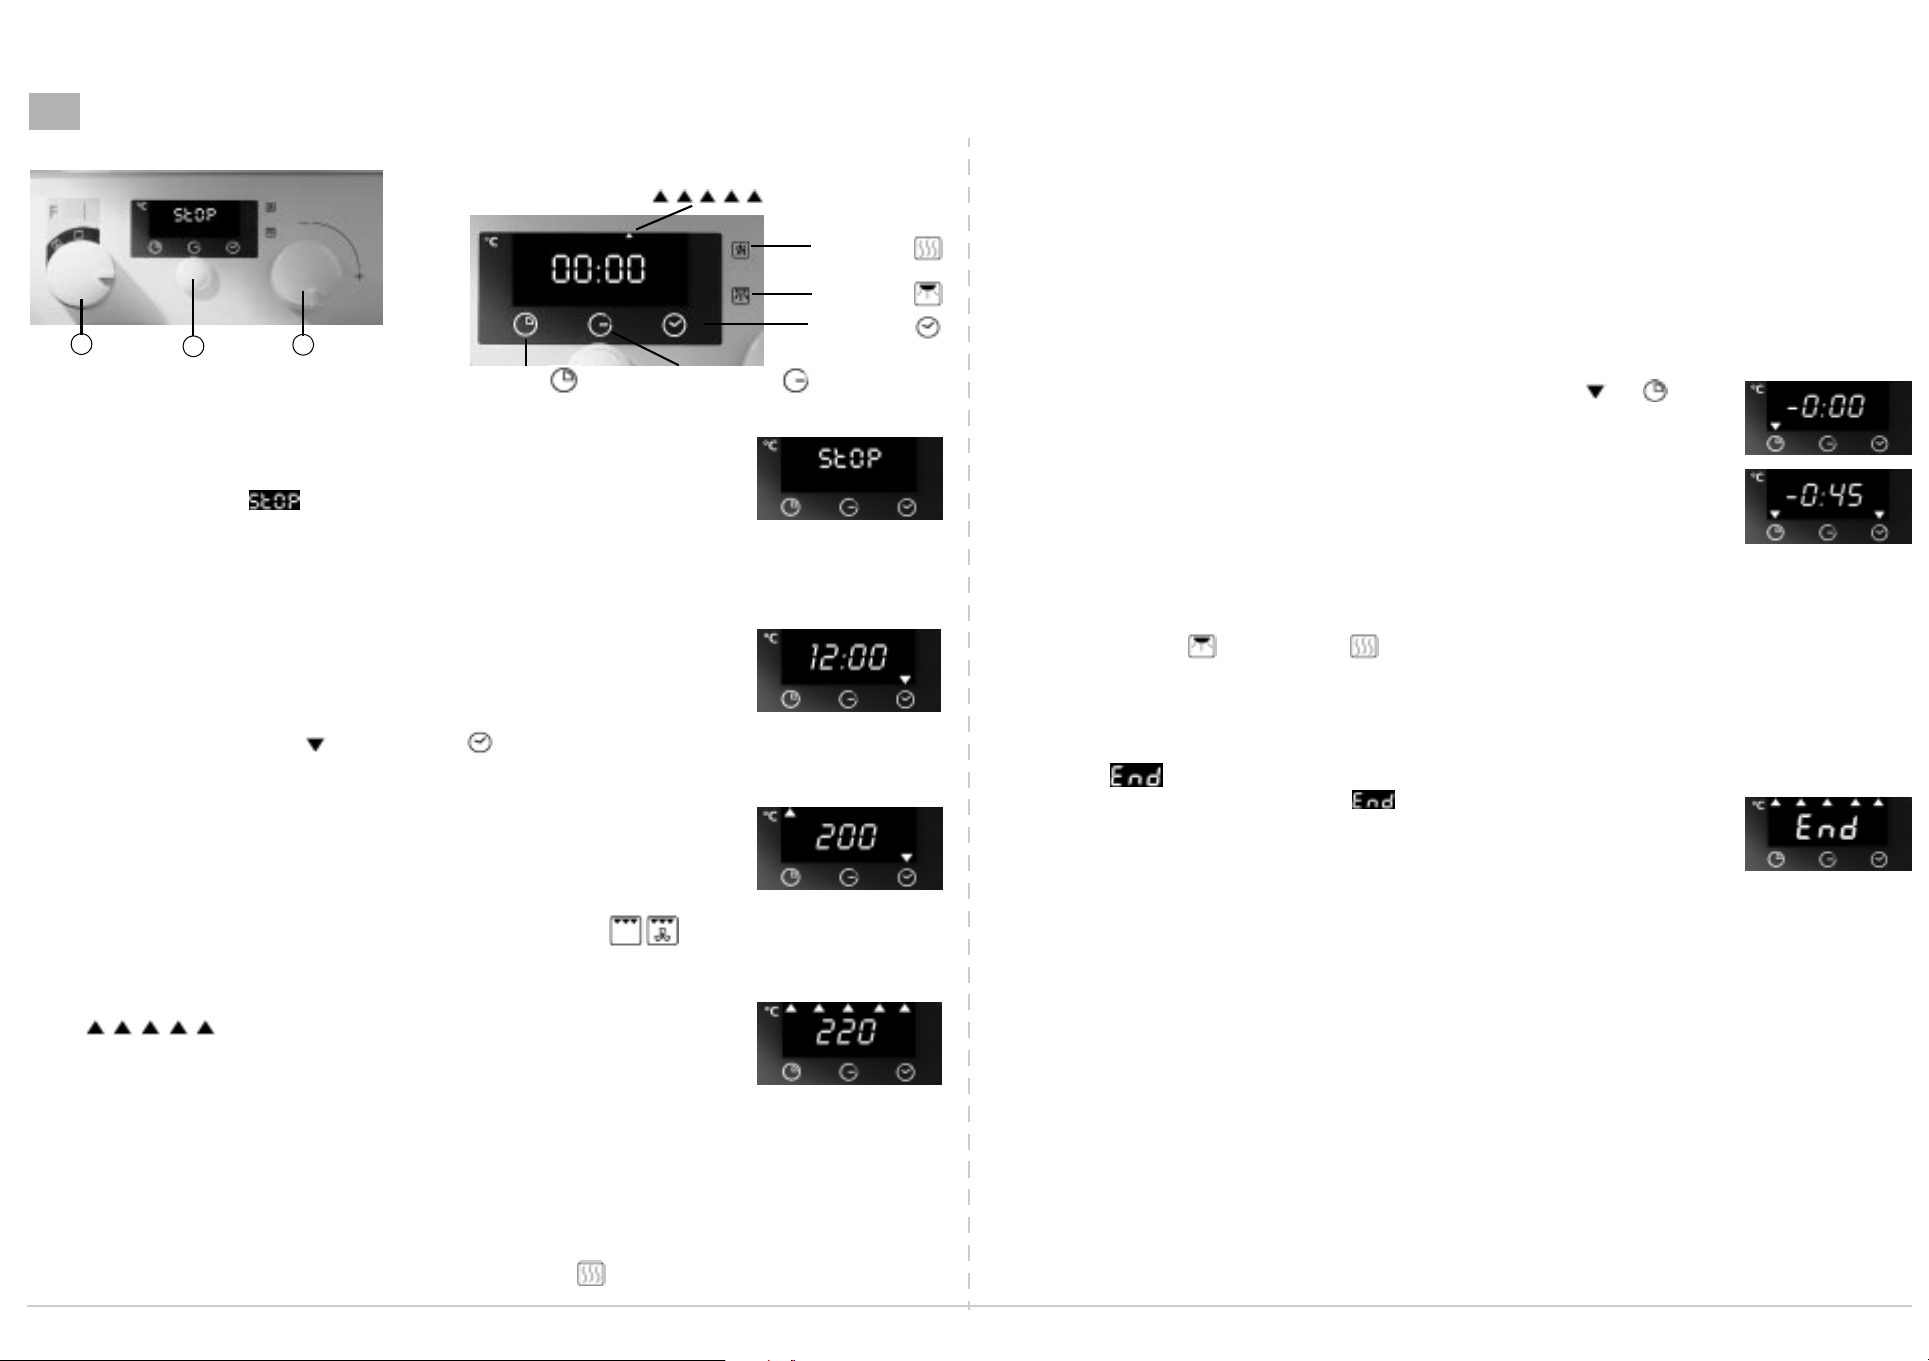
Electronic programmer Display
Display
1
1
Turn ON/OFF knob - Function selector switch
2
Confirm and programme selection button
3
Pre-set values changing knob (temperature, time, levels)
2
3
Set values Temperature increase indicators
00:00
Cooking time End of cooking time
Food warmer
Extra browning
Clock
Using the oven with the electronic programmer
ecting the cooking time:
elect the cooking time (available with any function) to turn the oven on for a specified period of
ime. At the end of the specified time the oven will switch off automatically. The maximum
programmed cooking time is 3 hours and 59 minutes.
1. Set the function and temperature or grill level (see chapter: “Fast starting the oven” and
“Selecting the cooking function).
2. Press button
“- 0:00”
2
until the indicator on the display blinks next to the symbol and
appears.
Fast starting the oven
When the oven is connected to the power supply for the first time, or re-connected after a power
failure, the display indicates “ ”.
To start the oven:
“0”.
1. Turn knob
2. Press button
Selecting and changing the clock time:
1. Press button
2. Turn the knob
day blinking.
3. Press button
To modify the time:
Press button
described above.
Selecting the cooking function:
1. Turn knob
level blinking.
2. If the displayed value is correct, press button
setting accepted automatically.
To change the pre-set temperature or grill level:
1. Turn knob
will blink on the display.
2. Press button
The oven will turn on 5 seconds after confirmation: the temperature increase indicators on the
display will turn on in sequence
N.B.:
The values set can also be changed during cooking.
At the end of cooking:
Switch the oven off by turning knob
Important notes:
To cancel any selection, turn knob
Keeping button
The audio signal is en abled again by pr essing button
automatically after 4'30" of continuous operation (except for the Light an d ).
1
to
1
1
“--:--”.
to
“0”.
to
2
to confirm or wait 10 seconds to have the
°C-----
showing the temperature increase.
“0”
. The time of day appears again on the display.
2
for 5 seconds. For safety r easons, the oven switches off
2
. The display shows
2
three times.
3
within 10 seconds to set the time of day. The display will show the time of
2
or wait 10 seconds to have the setting accepted automatically.
2
twice (the indicator above the symbol will blink). Repeat the steps
1
to the chosen function: the display will show the selected temperature or grill
3
: The temperature setting (or grill level when knob 1 is set to )
2
to confirm or wait 10 seconds to have the setting accepted automatically.
2
down for 5 seconds deactivates th e au di o si gn al associ ated with th e m anipulati on o f kn obs an d button s .
. Turn knob 3 clockwise: the display will show the selected time blinking.
selected value indicates that the time will count down to
. 20 seconds after it is set to automatic function, the oven will being cooking and the display will
show the remaining cooking time.
N.B.:
to display or modify the previous temperature setting turn knob
the display of the remaining time wait 20 seconds, or press button
o use the Extra browning and Food warmer special functions, consult the chapter “Special
Functions”.
o change the pre-set temperature or grill level:
urn knob 3 and confirm by pressing button 2 or wait 10 seconds to have the setting accepted
utomatically.
ppearance of on the display:
nce the set time has elapsed (end of cooking), an acoustic signal is heard and appears on
he display for 15 minutes at intervals . Th e oven switches o ff autom ati cally and th e oven li ght stays
n for 25 min.
2
1. Press button
2. Turn knob
he time of day appears again on the display.
to deactivate the acoustic signal.
“0”
1
to
. The oven light turns off.
“0”
.
”-”
in front of the
3
one click. To return to
2
.
Page 4
Selecting the end of cooking time
Using this function it is possible to preset the end of cooking time. The maximum programmed
cooking time is 3 hours and 59 minutes.
1. Set the function an d temperature or grill level. See chapter: “Fast startin g the oven”, para graph:
“Selecting the cooking function”.
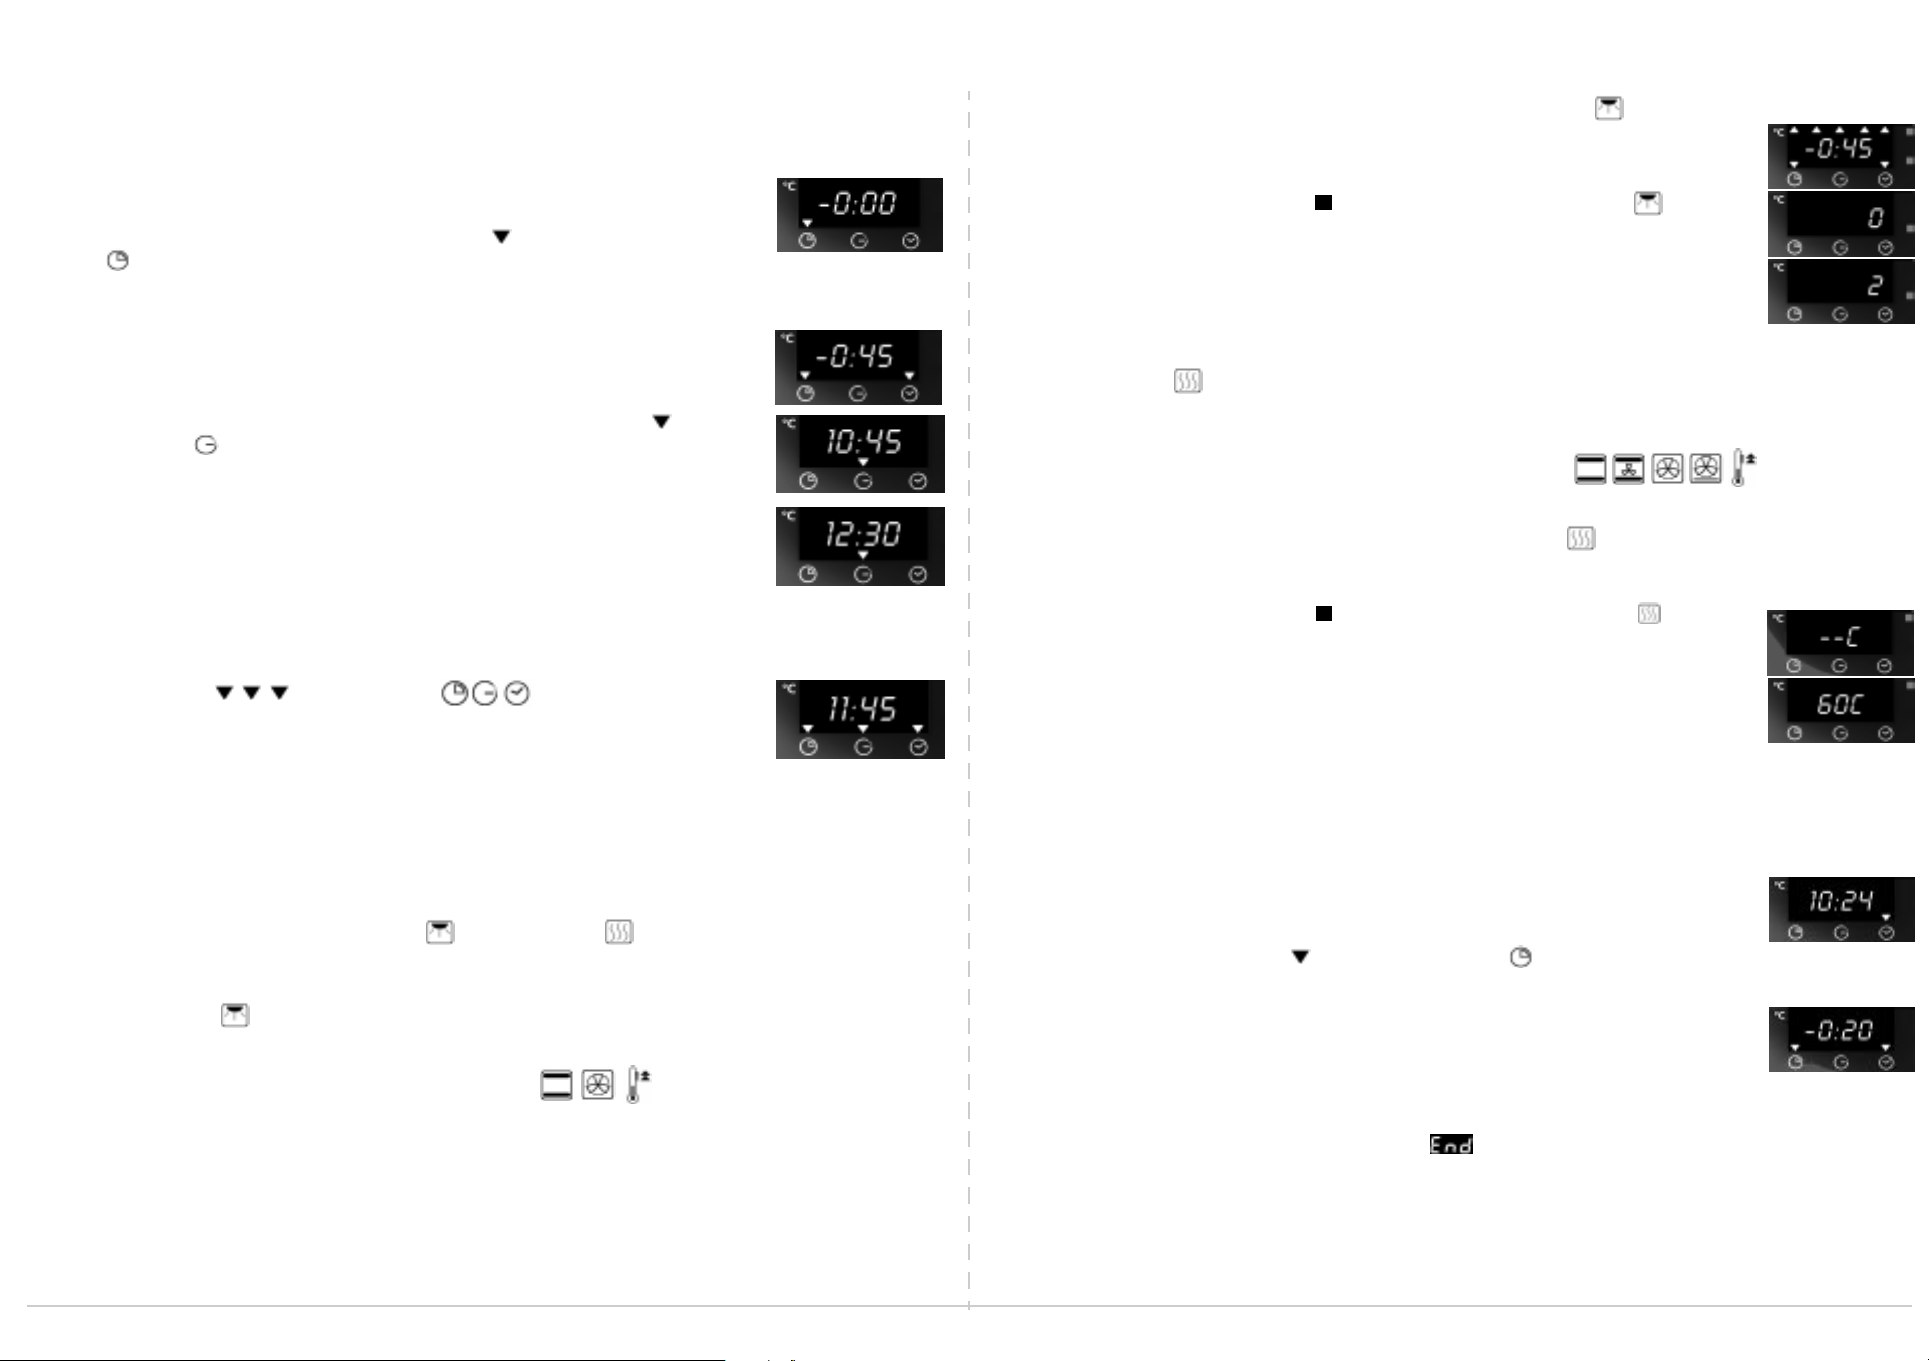
2. Example: it is 10:00 AM: press button
symbol and
“- 0:00”
appears.
until the indicator on the display blinks next to the
2
Selecting the Extra browning special function
1. Set the cooking and end of cooking times. See “Fast starting the oven” and “Selecting the cooking
function”.
2. Press button
3. Turn the knob
until the red indicator on the display blinks next to the symbol
2
to choose the food browning level:
3
1, 2 or 3
.
:
appears.
“0”
3. Set the oven cooking time (e.g. 45 minutes) by turning the knob
the display.
4. Press button
next to the symbol and the display will show the time of day and the cooking time
(e.g.: 9:00 + 45 minutes = 9:45).
5. Select the time at which the oven should switch off by turning knob
6. Press button
setting accepted automatically.
The oven will turn on automatically at the end of cooking time less cooking time (e.g. 12:30): the
indicators on the display above the symbols will light up.
To verify the chosen temperature or grill level, turn knob
To verify or modify both th e cookin g tim e (e.g.: 45 min.) and the end o f cooking time (e.g.: 12:30)
press button
to confirm the setting selected (e.g. 45 minutes): The indicator will blink
2
until the time of day appears again (10:00), or wait 20 seconds to have the
2
by one click.
3
.
2
: the time set will blink on
3
(e.g.: 12:30).
3
4. Press button
twice or wait 30 seconds to have the setting accepted automatically.
2
Food warmer
This function keeps th e temper ature in the oven at 60° C at the en d o f the cookin g cycle wh en th e oven is
on automatic function.
The “Food warmer” functi on can only be selected in combinati on with fu ncti ons .
Selecting the Food warmer special function :
1. Set the cooking and en d o f cookin g times . See chapter: “Fast startin g th e oven” and “Selectin g the
cooking function”
2. Press button
appears.
3. Turn knob
4. Press button
until the red indicator on the display blinks next to the symbol and
2
3
to
2
.
“60C”
or wait 20 seconds to have the setting accepted automatically.
“-- C”
Timer
The timer can only be set when th e oven is not in use and allows a maximum settin g of 3 hours and 59
minutes.
To set the timer:
on
1. Leave knob
1
. The display shows the time of the day.
“0”
Special functions:
These functions are only available when selecting the cooking or end of cooking times.
The two special functions can be selected together or separately
(Extra browning e Food warmer )
Extra browning
This function enables brownin g of f ood (e.g. a roast) while cooking. Choose on e of th e levels ,
for minimum browning and number 3 for maximum.
This function can only be selected in combination with the functions .
, where number 1 stands
1-2-3
2. Press button
3. Turn knob
indicates that the time will count down to
4. Press the button
Once the set time has elapsed:
An acoustic signal will be heard and the display will show .
Press button
until the indicator blinks next to the symbol .
2
clockwise: The time set will blink on the display
3
.
“0”
or wait 20 seconds to have the setting accepted automatically.
2
: The acoustic signal stops. The time of day appears again on the display.
2
in front of the selected value
”-”
 Loading...