

Page 1
GB CONTENTS
BEFORE USING THE DISHWASHER
PROTECTING THE ENVIRONMENT
PRECAUTIONS AND GENERAL RECOMMENDATIONS
CONNECTIONS
ELECTRICAL CONNECTION
HOW TO FILL THE SALT CONTAINER
HOW TO FILL THE RINSE AID DISPENSER
HOW TO FILL THE DETERGENT DISPENSER
PAGE
PAGE
PAGE
PAGE
PAGE
PAGE
PAGE
PAGE
11
11
11
12
13
14
15
16
CARE AND MAINTENANCE
PAGE
17
To make the most of your new dishwasher, please read these user
instructions and the quick reference guide carefully.
10
Page 2
BEFORE USING THE DISHWASHER
1. Removing the packaging and check
After unpacking, make sure that the
dishwasher is undamaged and that the door
closes correctly. If in doubt, contact a
qualified technician or your local retailer.
• Keep the packaging materials (plastic bags,
etc.) out of children's reach, as they are
potentially dangerous.
PROTECTING THE ENVIRONMENT
1. Packaging
The packing box may be fully recycled as
confirmed by the recycling symbol .
2. Energy and water saving tips
• Do not rinse crockery under running water.
• Always fully load the dishwasher before
switching on or set the wash programme to
half load (if available) if one rack only has
been filled.
2. Water and electrical connections
• All water and electrical connections must be
carried out by a qualified technician in
compliance with the manufacturer’s instructions
(refer to the enclosed assembly instructions)
and current local safety regulations.
The appliance must only be used in the
household for the prescribed uses.
• If ecological energy sources are available,
such as solar panel heating, heat pumps or
centralised heating systems, the appliance
may be connected to the hot water mains up
to a maximum temperature of 60° C. Make
sure the water inlet hose is of the correct
type. Refer to the “Connections” chapter in
these user instructions.
3. Disposal of the packaging material and
old machine.
The appliance is built from reusable
materials. If you decide to scrap the
dishwasher, it must be disposed of in
compliance with local waste disposal laws.
In any case, before scrapping, cut off
the power cable so that the appliance
cannot be connected to the mains.
PRECAUTIONS AND GENERAL RECOMMENDATIONS
1. Child safety:
Children must not be allowed to play with the
dishwasher.
Store the detergent, rinse aid and salt in a
dry place out of the reach of children.
2. General recommendations:
The open dishwasher door can only support
the weight of the loaded rack when pulled out.
Do not rest objects on the open door or sit or
stand on it: the appliance may topple over!
Do not use solvents inside the dishwasher:
risk of explosion!
Only use detergents, rinse aids and
regeneration salts specially recommended
for use in domestic dishwashers.
• Before cleaning or carrying out any
maintenance, switch off the appliance,
disconnect the mains plug and turn off the
water tap.
• If a fault occurs, switch off the appliance and
turn off the water tap.
• If necessary, the power cable may be
replaced with an identical one.
The power cable must only be replaced by a
qualified technician.
• On completion of the programme, switch off
the dishwasher and turn off the water tap.
3. For appliances with water stop system:
The water inlet hose and plastic casing
contain electrical components. Do not
therefore cut the hose or immerse the plastic
casing in water. If the hose is damaged,
switch off the appliance immediately.
EC Declaration of conformity
This appliance has been designed, constructed
and distributed in compliance with the safety
requirements of EC Directives:
• 73/23/EC
• 89/336/EC
• 93/68/EC
• IEC 436/DIN 44990
• EN 50242
Load capacity: 12 place settings
.
11
Page 3
CONNECTIONS
Do not use the dishwasher if it has been
damaged in transit. Consult our After-Sales
Service or your local retailer.
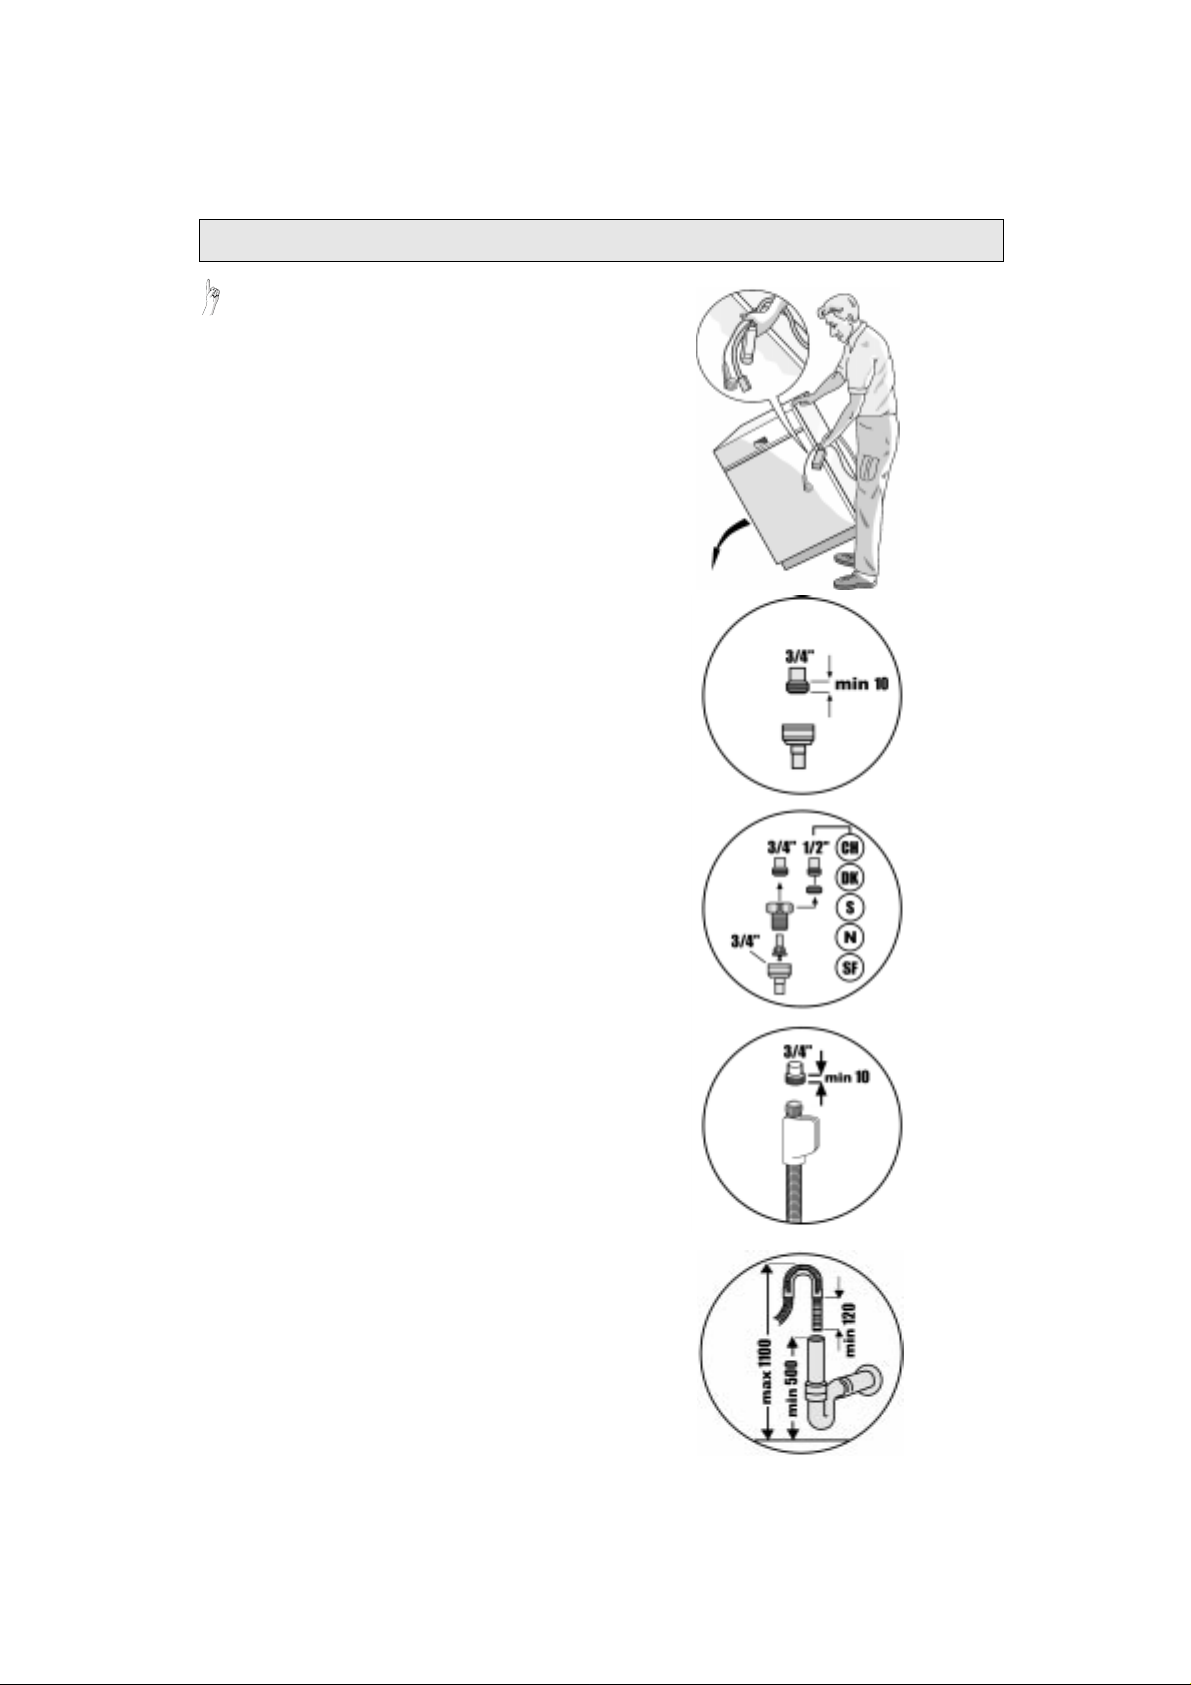
(Refer to the separate assembly instructions
booklet)
Water inlet and drain:
•
Observe any special regulations issued by
your local Water Board.
•
Make sure the inlet and drain hoses are kinkfree and are not crushed.
•
If the hose length is not sufficient, please
contact your local dealer or our After-Sales
Service.
•
The inlet hose must be securely clamped to
the water tap to prevent leaks.
•
The water inlet pressure should not be less
than 0.3 bars.
•
If the water inlet pressure is higher than
10 bars, a pressure reducing valve should be
fitted between the appliance inlet and the
water source.
•
The inlet water temperature varies according
to the model installed: inlet hose marked “25° C
Max”: maximum temperature 25° C.
All other models: maximum temperature 60° C.
•
When installing the appliance, make sure the
drain water discharges correctly (if
necessary, remove the wire gauze from
the sink siphon).
•
Fix the drain hose to the siphon with a clamp
to prevent it from coming off during operation.
•
For appliances with water-stop system only:
If the water connections are made correctly
according to the instructions, the water-stop
system safeguards your home against
damage caused by flooding.
Electrical connection:
•
Observe the current regulations issued by
your local electricity supplier.
•
Voltage information is shown on the rating
plate mounted inside the door on the right
hand side.
•
The appliance must be earthed as prescribed
by law.
•
Do not use extension leads or multiple
adapters.
•
Before carrying out maintenance, disconnect
the mains plug.
•
The power cable must only be replaced by a
qualified technician.
•
The manufacturer cannot be held
responsible for damage caused by incorrect
earthing of the appliance.
• For Austria:
connected to a fault current switch, this must
be sensitive to the pulsating current.
if the appliance is series
12
Page 4
ELECTRICAL CONNECTION
For Great Britain Only
Warning
- this appliance must be
earthed
Fuse replacement
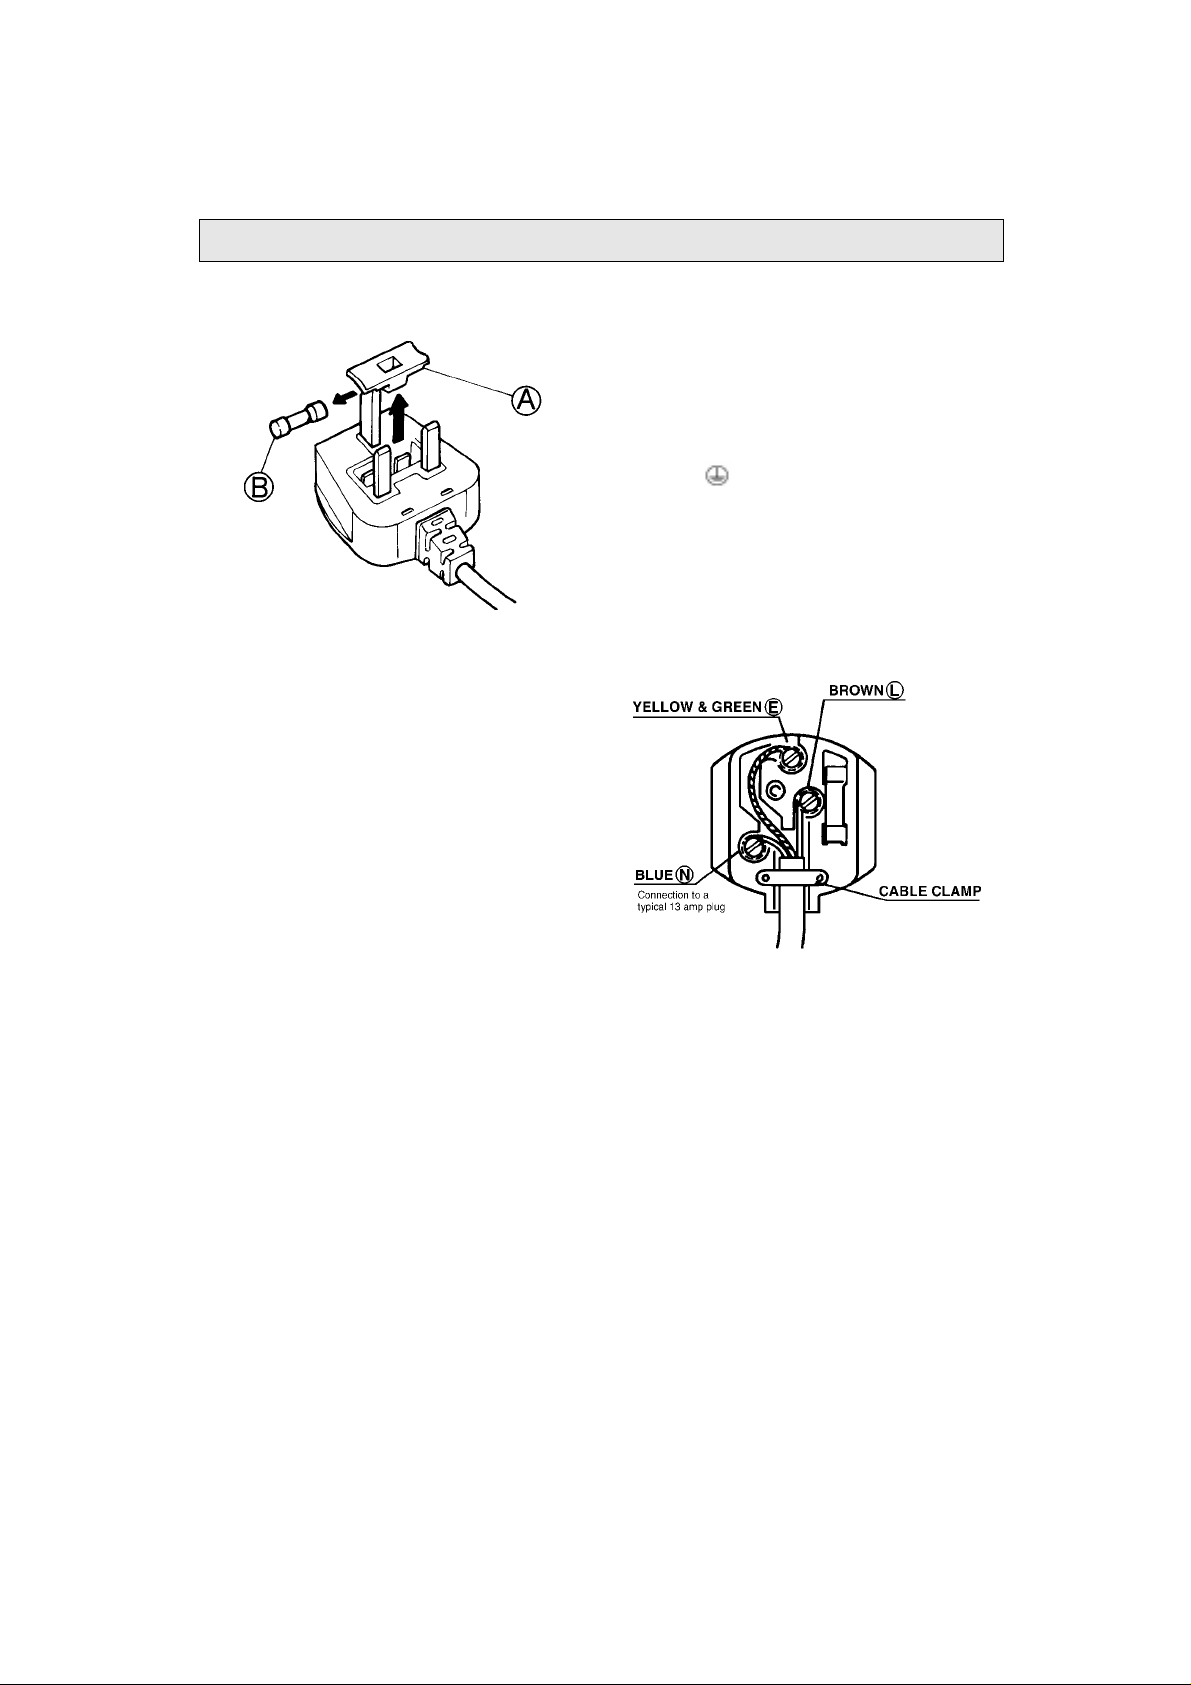
If the mains lead of this appliance is fitted with a
BS 1363A 13amp fused plug, to change a fuse in
this type of plug use an A.S.T.A. approved fuse
to BS 1362 type and proceed as follows:
1. Remove the fuse cover (A) and fuse (B).
2. Fit replacement 13A fuse into fuse cover.
3. Refit both into plug.
The wires in the mains lead are coloured in
accordance with the following code:
BLUE - “NEUTRAL” (“N”)
BROWN- “LIVE” (“L”)
GREEN AND YELLOW - “EARTH” (“E”)
1. The GREEN AND YELLOW wire must be
connected to the terminal in the plug which is
marked with the letter “E” or by the Earth
symbol or coloured green or green and
yellow.
2. The BLUE wire must be connected to the
terminal which is marked with the letter “N” or
coloured black.
3. The BROWN wire must be connected to the
terminal which is marked with the letter “L” or
coloured red.
Important:
The fuse cover must be refitted when changing a
fuse and if the fuse cover is lost the plug must not
be used until a correct replacement is fitted.
Correct replacement are identified by the colour
insert or the colour embossed in words on the
base of the plug.
Replacement fuse covers are available from
your local electrical store.
Connection to a rewirable plug
If the fitted plug is not suitable for your socket
outlet, then it should be cut off and disposed of in
order to avoid a possible shock hazard should it
be inserted into a 13A socket elsewhere.
A suitable alternative plug should then be fitted
to the cable.
For the Republic of Ireland only
The information given in respect of Great Britain
will frequently apply, but a third type of plug and
socket is also used, the 2-pin, side earth type. In
this case, the wire which is coloured GREEN
AND YELLOW must be connected to the EARTH
contact, and the two wires to the two pins,
irrespective of colour. The supply to the socket
must be fitted with a 16 amp fuse.
13
Page 5
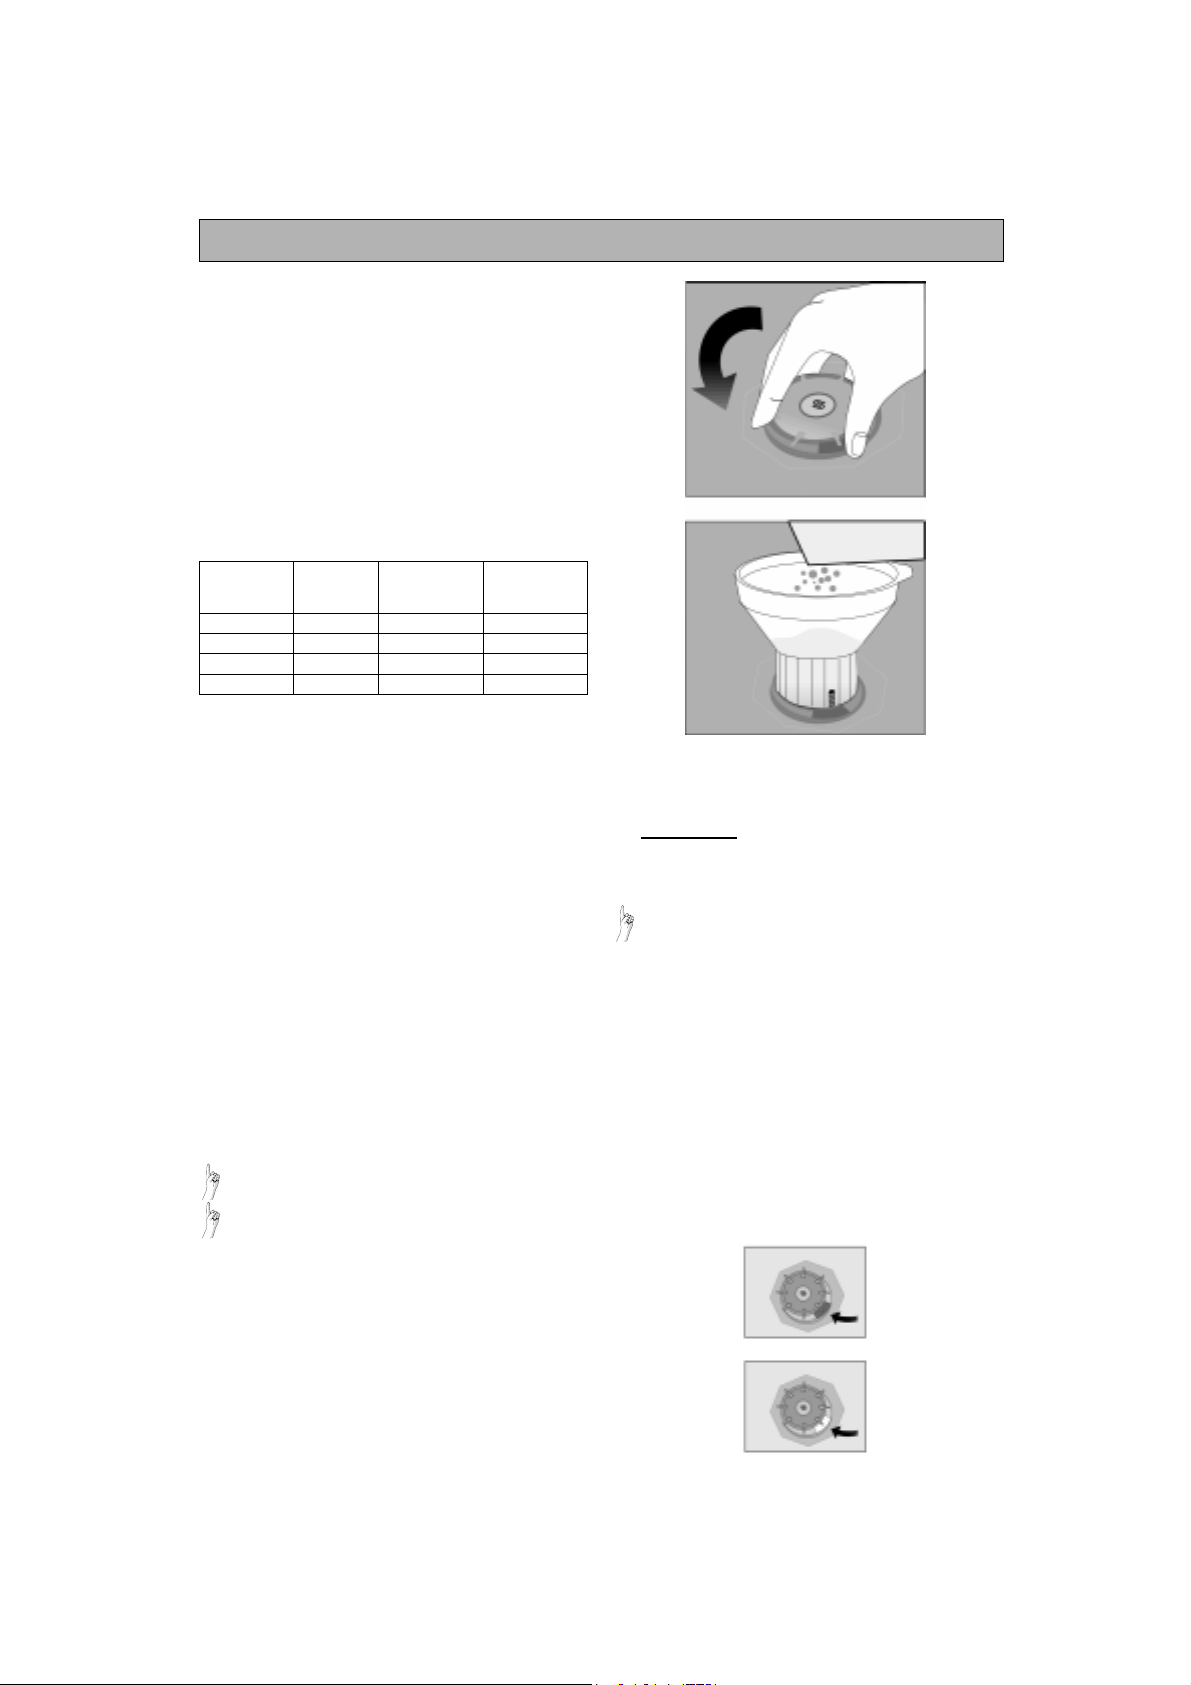
HOW TO FILL THE SALT CONTAINER
To ensure the dishwasher works at its best, soft
water, i.e. water that is lime-free, is required. The
presence of lime in tap water causes water stains
due to calcium deposits on crockery and glasses.
A water softening system has been built in the
dishwasher to ensure a steady supply of soft
water. This is basically a decalcifying system,
which needs to be regenerated regularly using
special dishwasher salt.
Setting the correct water hardness level:
Set the water hardness level by turning the
selector fitted on the left-hand side of the inner
appliance wall by using a coin. Use the table
below to set the dial to the correct setting:
Water
hardness
category
1 0 - 6 0 - 11 0
2 7 - 13 12 - 23 1
3 14 - 20 24 - 36 2
4 21 - 35 37 - 63 3
If the water hardness level falls within category 1
(soft), no salt is required.
German
degrees
°dH
French
degrees
°fH
To find out the waterhardness level of water in
your area contact your local Water Board or
check the last bill you received.
If provided, a simple test can be employed to set
the hardness level using the hardness test strip.
• Dip the test strip into a glass of water from the
tap.
• Wait for 3 seconds, withdraw the strip from
the water.
• Wait for 1 minute.
• If all the three test squares are still green, set
the hardness selector to 0, and disregard all
instructions about salt usage.
• If one of the test squares becomes red, set
the selector to 1.
• If two of the test squares become red, set the
selector to 2.
• If all of the test squares become red, set the
hardness selector to 3.
How to fill the salt container:
Warning: only use dishwasher salt!
Do not fill the salt container with
unsuitable substances, such as
detergent, as this will cause irreparable
damage to the water softener system.
1. Remove the lower rack.
2. Unscrew the cap by turning it counter-clockwise.
3. When first using the dishwasher: fill the salt
container with approximately 1 litre of water.
4. Fill the salt container to the rim with salt
(using the funnel provided) (when filling for
the first time use min. 1.5 kg and max. 2 kg)
and stir with a spoon handle.
14
Position
of the
selector
5. Screw the cap back on by turning it
clockwise.
6. Fit the lower rack.
7. After filling the regeneration salt container,
immediately
start a wash programme (the
Prewash programme alone is not sufficient),
so as to eliminate any residual saline solution
straight away and avoid corrosion.
Check the salt level regularly.
Salt level indicator:
The dishwasher is equipped with an electric or
visual salt level indicator (depending on the
model installed).
Electric indicator:
The salt level indicator lamp on the control panel
lights up when the salt container is empty.
Visual indicator:
The green float is clearly visible in the cap
window when the salt container is sufficiently full.
The green float drops and is no longer visible
when the salt container needs to be refilled.
9LVXDOLQGLFDWRU
)XOO
(PSW\
Page 6
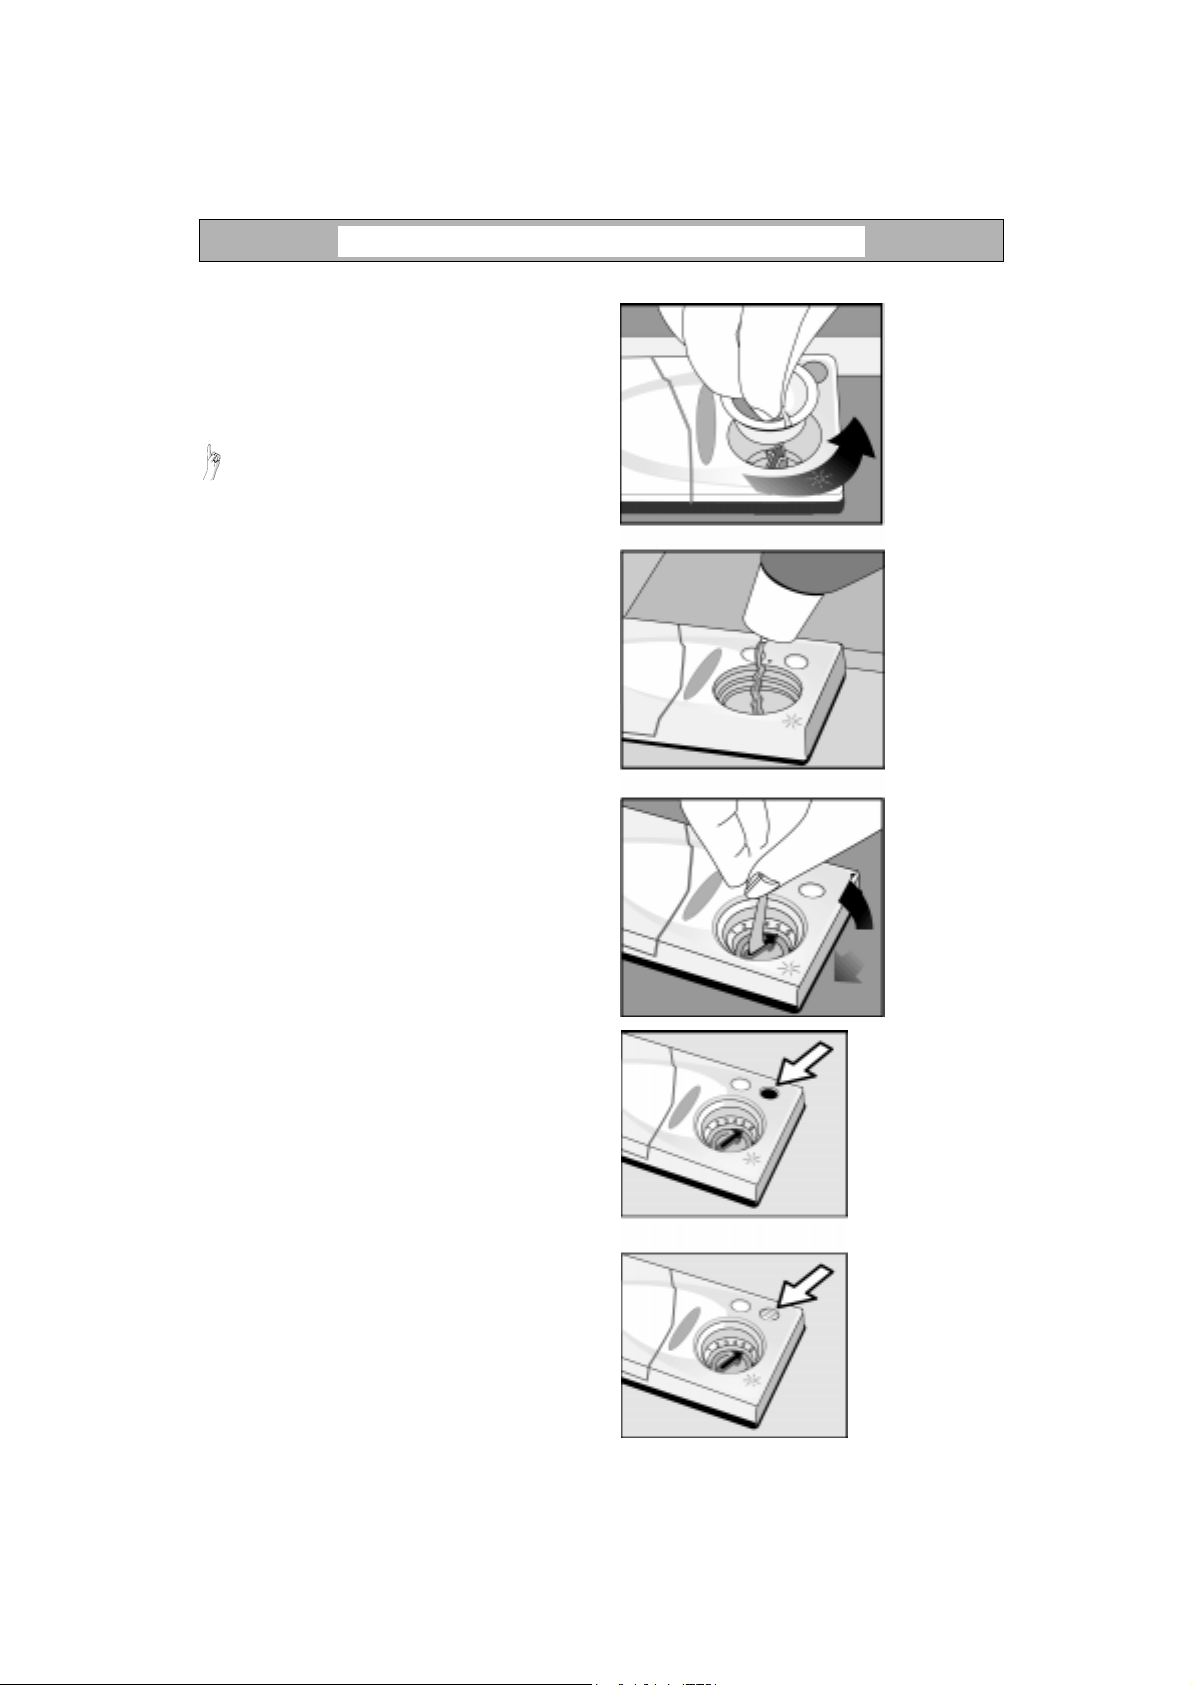
HOW TO FILL THE RINSE AID DISPENSER
The rinse aid is used to reduce the surface
tension of the water droplets remaining on your
crockery after the wash, causing the water to
flow down easily, thus preventing the formation
of water streaks or stains. It also helps reduce
drying time.
Before using the dishwasher for the first time, fill
the rinse aid dispenser.
Only use rinse aids recommended for use in
domestic dishwashers
How to fill the rinse aid dispenser:
1. Unscrew the rinse aid dispenser cap by
turning it anti-clockwise and lift it up (see
drawing).
2. Fill the dispenser with rinse aid as necessary
(about 100 ml).
3. Immediately wipe away any rinse aid spilt
accidentally.
This prevents the formation of excess suds
which may spoil washing results.
4. Replace the cap and close it by turning it fully
clockwise.
How to adjust the rinse aid dosage:
Factory setting: position 3.
If you are not satisfied with your washing or
drying results, change the rinse aid dosage
setting.
1. Unscrew the rinse aid dispenser cap by
turning it counter-clockwise and lift it up (see
drawing).
2. If crockery is prone to lime streaks, reduce
the dosage by turning the dial to a lower
setting using a coin or the back of a spoon. If
crockery is not perfectly dry, increase the
dosage by turning the dial to a higher setting
(4-6).
3. Replace the cap and close it by turning fully
clockwise.
9LVXDOLQGLFDWRU
Rinse aid level indicator:
Visual indicator:
Dark =
Light =
Check the rinse aid level regularly.
Additional electric indicator (if provided):
The indicator lamp on the control panel lights up
when more rinse aid needs to be added.
sufficient rinse aid.
add rinse aid.
'DUN VXIILFLHQWULQVHDLG
/LJKW DGGULQVHDLG
15
Page 7
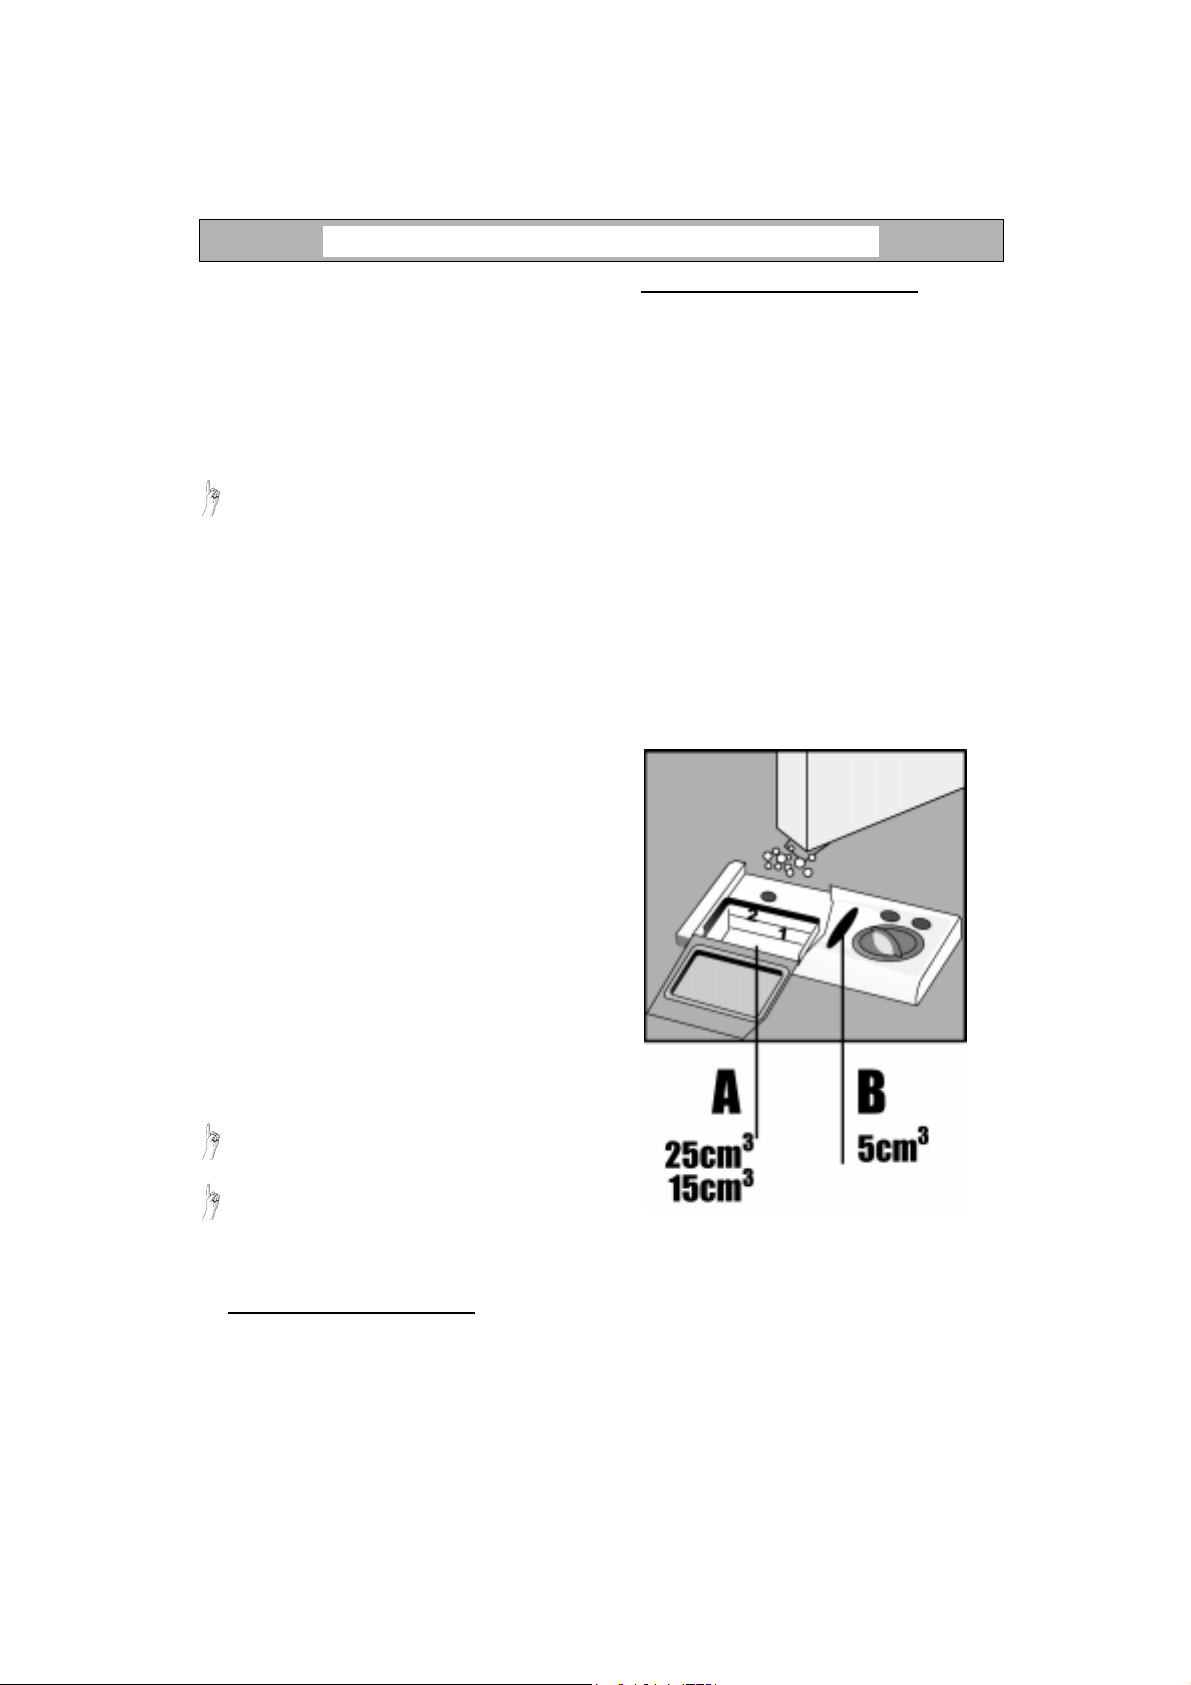
HOW TO FILL THE DETERGENT DISPENSER
A small compartment (A) and a large one (B)
are provided for the detergent.
The use of detergent in excess of the
recommended dosage may cause pollution.
The recommended dosage varies for different
brands.
If you use detergents in tablet form, follow the
manufacturer's directions for use.
The detergents in common use either
contain phosphates or are phosphate-free.
Both can be used with the dishwasher.
Besides their cleaning function, the
phosphates contained in detergents also act
to de-calcify water. Thus, when a
phosphate-free detergent is preferred, a
higher amount of detergent should be used.
This will help avoid lime streaks on the
dishes.
Moreover, phosphate -free detergents are
more environmentally friendly.
“New generation” detergents contain natural
enzymes instead of the caustic chemical
substances usually present in conventional
detergents. These detergents are
biodegradable and, by their nature, possess
dirt removing capabilities effective at much
lower teperatures than possible with
conventional detergents. With the right
Eco/Bio programme, an enzyme based
detergent can reach comparable wash
performance at 40-50° C as possible at
65° C with normal detergents. Use enzymebased detergents
a
Bio-Eco/Eco programme
programmes shown on the control panel to
check whether your dishwasher model has
this option.
if the dishwasher has
only
. Refer to the
For programmes without pre-rinse:
Put the entire recommended dosage into the
•
large compartment (B). If the recommended
dosage on the detergent pack is over 25 ml
(maximum capacity of the large
compartment), put the remaining detergent
into the small compartment (A).
Note:
In the programmes with a pre-rinse, for
which the detergent is put in the small
compartment as well, the latter is introduced
in the washing water as soon as the
dishwasher's door closes, so that its
cleaning action starts immediately.
Close the lid until you hear “click”.
3.
At the end of the cycle, the detergent
dispenser lid will be in the open position.
How to fill the detergent dispenser:
Only use detergents recommended for use
in domestic dishwashers.
Only fill the detergent dispenser prior to
starting a wash programme.
Press the (C) button to open the cover.
1.
Fill in with detergent:
2.
For programmes with pre-rinse:
Put two thirds of the recommended dosage
•
into the large compartment (B).
Put the remaining third in the small
•
compartment (A).
16
Page 8
CARE AND MAINTENANCE
Before cleaning or carrying out maintenance,
switch off the appliance, disconnect the mains
plug and turn off the water tap.
Cleaning the outside of the appliance:
To clean the outside of the appliance, use a
neutral detergent and a damp cloth. To clean
the control panel, use only a slightly damp
cloth.
Do not use abrasive detergents.
Cleaning the inside of the dishwasher:
Regularly wipe the door seal and inside of
the door with a damp cloth to remove any
food residue.
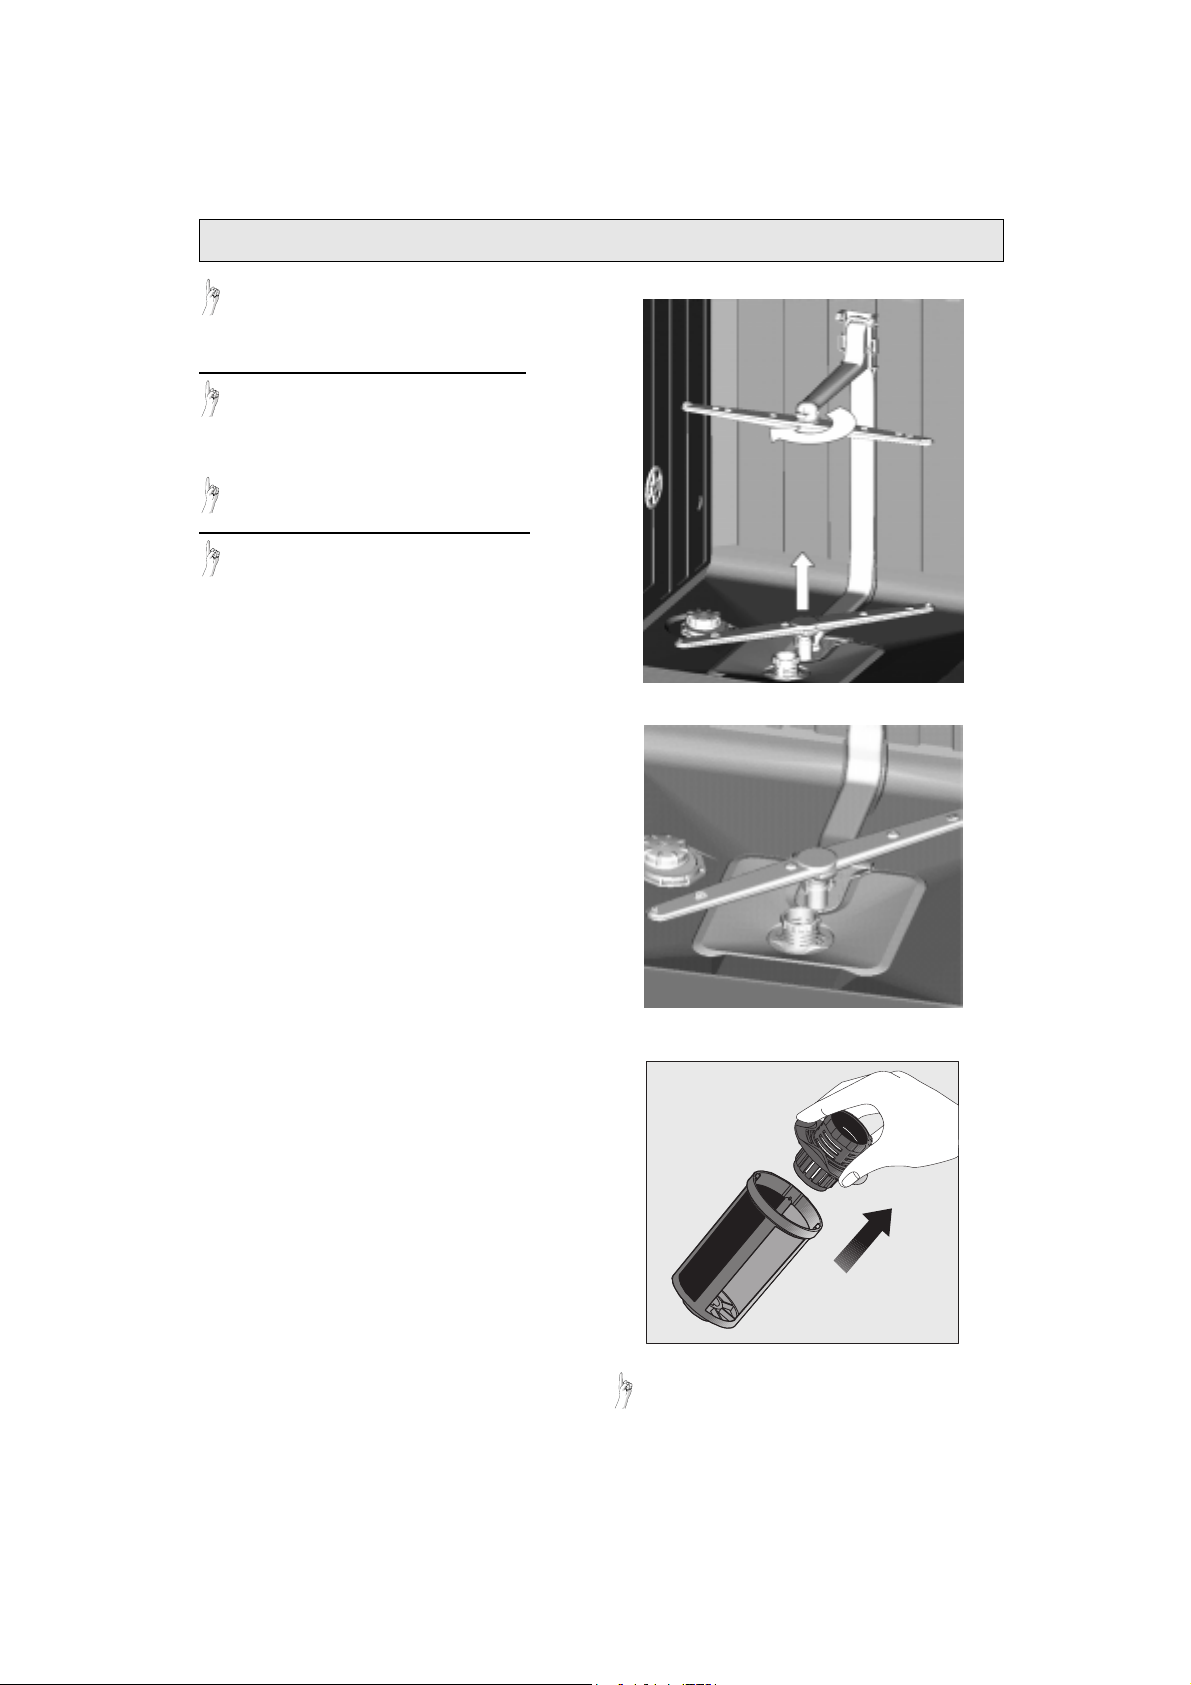
Upper spray arm (A):
1. To remove the upper spray arm, extract the
basket and unscrew the upper spray arm by
turning it to the right. Extract the spray arm by
pulling it downwards.
2. Rinse the nozzles under running water;
remove any obstruction in the holes.
3. Remount the spray arm by aligning it with the
rotary mounting and rotate it completely to the
left as far as it goes (click should be heard).
Make sure the spray arm rotates freely.
Lower spray arm (B):
1. Remove the lower basket and then lift off the
arm.
2. Rinse the nozzles.
3. Remount the spray arm by aligning it with the
rotor pin and insert it.
4. Push the spray arm down until it is fixed in
place (click should be heard).
5. Make sure the two levers are correctly
inserted (they should click).
Make sure the spray arm rotates freely.
Cleaning the filters (C):
The filters (coarse, fine and main plastic or metal
filter) are utilized to prevent large food remains or
other objects from clogging the pump.
Filters should be cleaned periodically to remove
the collected food remains and others.
1. Turn the wide-mesh and fine-mesh filter unit
anti-clockwise and remove it from the main filter.
2. Remove the main filter too.
3. Remove the fine-mesh filter from the
wide-mesh filter (see figure) and wash them.
Clean the main filter with a soft brush.
4. Reassemble: replace the main filter.
Replace the fine-mesh filter into the widemesh one and fix the filter unit down into the
main filter by turning it completely to the right.
5. Make sure the filters have been inserted and
secured correctly.
Do not operate the dishwasher without
filters and check that the filter unit is
correctly assembled to ensure good
wash results.
17
 Loading...