

Page 1
Quick guide
THANK YOU FOR BUYING A WHIRLPOOL PRODUCT.
In order to receive a more complete assistance,
please register your product on
www.whirlpool.eu/register
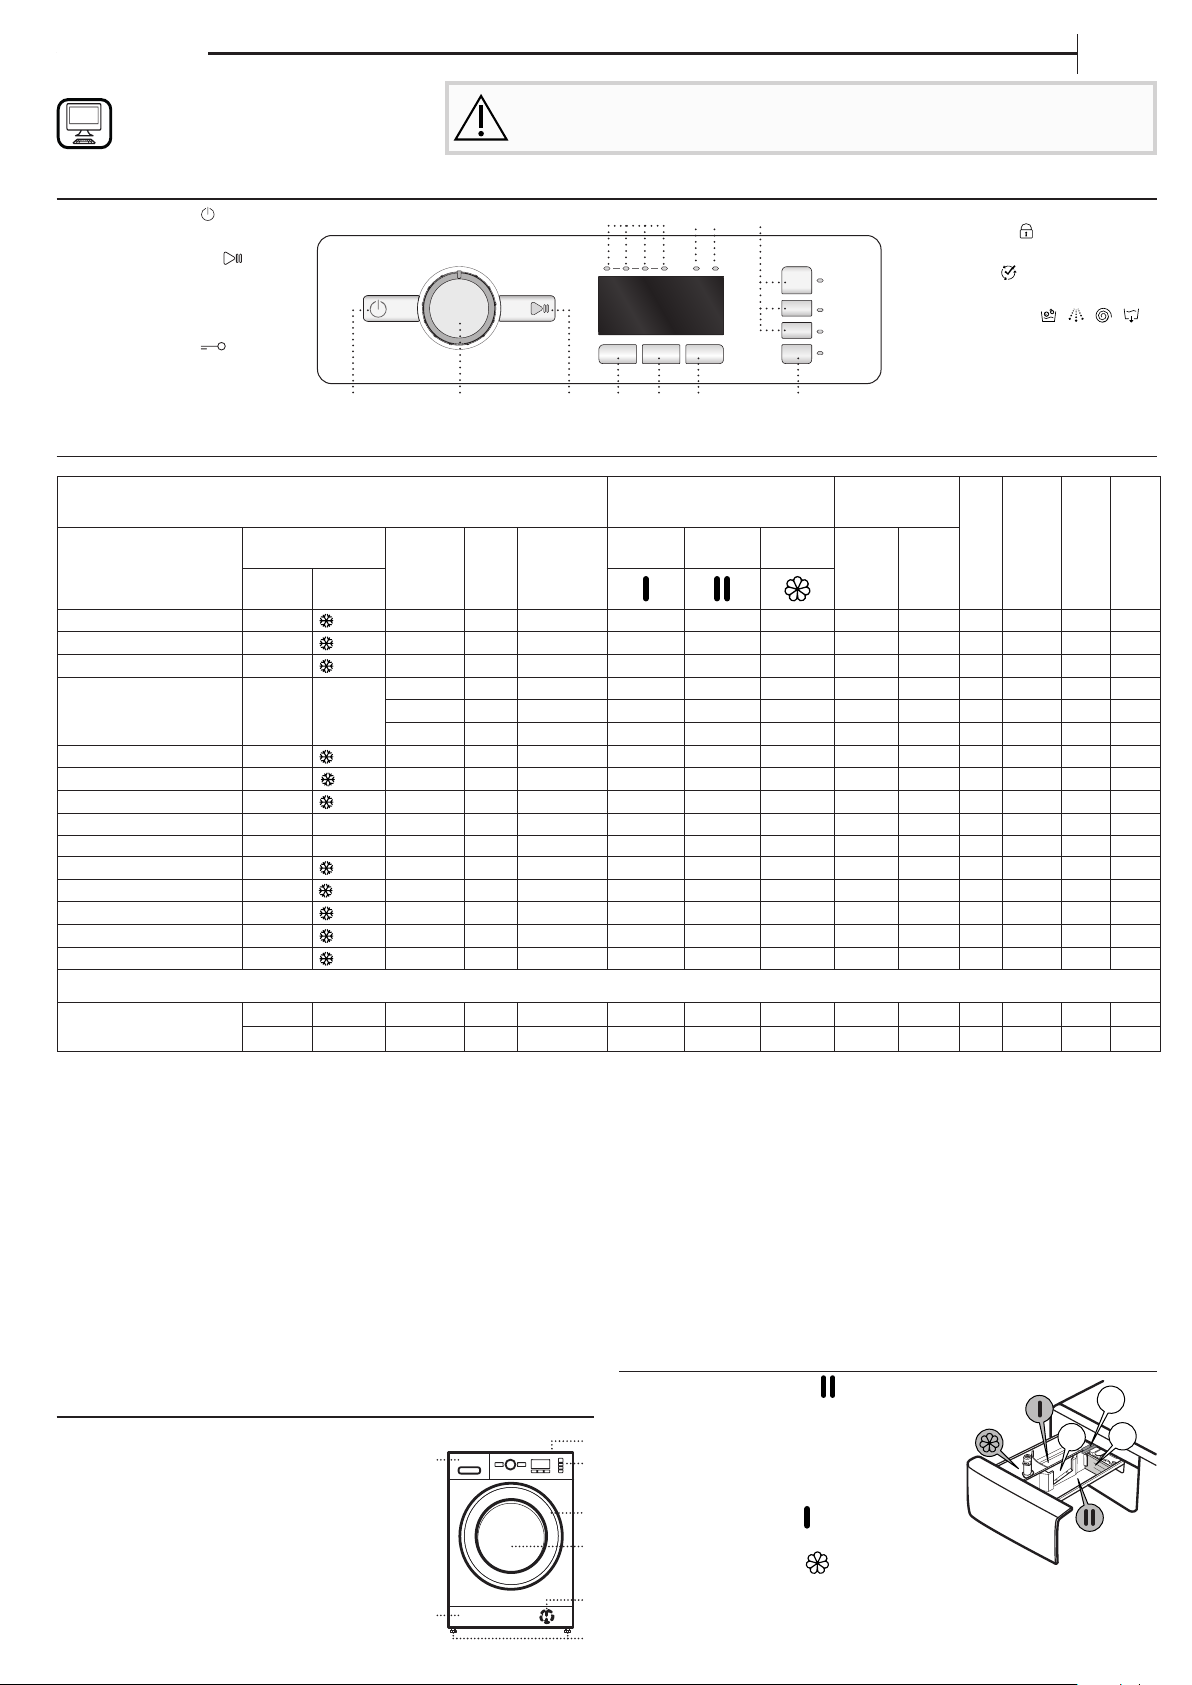
CONTROL PANEL
1. “ON/OFF” button
2. Programme selector
3. “Start/Pause” button
4. “Temperature” button
5. “Spin” button
6. “Start delay” button
7. “Key lock“button
8. Option buttons
PROGRAMME CHART
Before using the appliance carefully read the Safety Instruction.
Before using the machine, it is imperative that the transport bolts are removed.
For more detailed instructions on how to remove them, see the Installation Guide.
9.10.11. 8.
2.1. 3. 4. 5. 6. 7.
EN
LED INDICATORS
9. Door locked
The doors are locked
10. Cycle end
The programme has ended
11. Washing phase
Indicates washing phase of the
cycle
Recommended
detergent
Energy
Powder Liquid
–
–
–
–
– – – – – –
–
–
–
–
Residual
dampness % (*)
– – – –
52 1,36 75 55
50 0,98 75 45
53 0,89 47 35
53 0,58 45 34
53 0,51 39 33
– – – –
– – – –
– – – –
73 0,19 31 27
52 0,16 64 22
– – – –
– – – –
35 0,86 60 43
53 0,8 49 -
50 0,98 75 -
Power consumption in o -mode 0.5 W / in left-on mode 8.0 W
Programme
Mixed 40°C
White 60°C
Cotton 40°C
Eco 40-60 40 °C 40°C
Sport 40°C
Duvet 30°C
Jeans 40°C
Spin & Drain - - 1200 7.0 0:10 – – – – – – – – –
Rinse & Spin - - 1200 7.0 0:55 – –
Rapid 30 Min 30°C
20°C 20 °C
Wool 40°C
Delicates 30°C
Synthetics 40°C
Dosing required Dosing optional
Eco Cotton
This data may dier in your home due to changing conditions in inlet water temperature,
water pressure etc. Approximate programme duration values refer to the default setting of
the programmes, without options.
programme are indicative only.
Eco 40 -60 - Test wash cyc le in compliance wi th EU Ecodesign regu lation 2019/2014. The mos t effici ent
programm e in terms of energ y and water consumpt ion for washing n ormally soile d cotton laundr y.
For all Test Institutes
Long wash cycle for cottons: set wash cycle Cotton with a temperature of 40°C.
Synthetic program along: set wash cycle Synthetics with a temperature of 40°C.
Max load 7 Kg
Temperatures
Setting Range
60 °C 60 °C 1200 7.0 4:30 –
40 °C 40 °C 1200 7.0 3:40 –
The values given for programmes other than the Eco 40-60
- 40°C
- 90°C
- 60°C
- 40°C
-
30°C
- 40°C
- 30°C
- 20 °C
- 40°C
- 30°C
- 60°C
Max. spin
speed
(rpm)
1000 7.0 1:00 –
1200 7.0 2:30
1200 7.0 3:40 –
1151 7.0 3:25 –
1151 3.5 2:40 –
1151 1.75 2:10 –
600 3.5 1:30 –
1000 3.0 1:30 –
800 3.5 1:10 –
800 3.5 0:30 –
1200 7.0 1:50 –
800 1.5 1:15 –
1200 4.0 2:55 –
Max
Duration
load
(kg)
- 1.0 1:20 –
(h : m)
Detergents and additives
Prewash
(90°)
* After programme end and spinning with maximum selectable spin speed, in default
programme setting.
6th Sense - the sensor tech nology adapts w ater, energy and progr amme duration to your w ash load.
Eco Cotto n - Test wash cycles in compliance with regulations 1061/2010. Set “
cycle at a temperature of 40°C or 60°C to access this cycles.
Note: for the Eco 40-60 program in the WASH CYCLE TABLE the value of the maximum
eective spin is shown.
Main
wash
Softener
Laundry
Total water lt
consumption kWh
Cotton
temperature °C
” wash
PRODUCT DESCRIPTION
1.
Worktop
2.
Detergent dispenser
3.
Control panel
4.
Door handle
5.
Door
6.
Water lter - behind plinth
7.
Plinth (removable)
8.
Adjustable feet (4)
DETERGENT DISPENSER
Main wash compartment
Detergent for the main wash, stain remover
or water softener. For a liquid detergent it
1.
2.
is recommended to use removable plastic
3.
partition A (supplied) for a proper dosage.
If powder detergent is used, place the
partition into slot B.
4.
Prewash compartment
Detergent for the prewash.
5.
Softener compartment
Fabric softener. Liquid starch.
6.
7.
Pour in softener or starch solution only up to the “max” mark.
Release button
8.
Press to remove tray for cleaning.
A
B
Page 2
PROGRAMMES
For choosing the appropriate programme for your kind of
laundry, always respect the instructions on the care labels
of the laundry. The value given in the tub symbol is the
maximum temperature possible for washing the garment.
Mixed
For washing lightly to normally soiled resilient garments in cotton,
linen, synthetic bres and mixed bres.
White
For washing normally to heavily soiled towels, underwear, table and
bed linen, etc in resilient cotton and linen. Only when the temperature
is selected at 90°C the cycle is provided with a prewash phase before
main washing phase. In this case it is recommended to add detergent
both, in the prewash and main wash section.
Cotton
Normally to heavily soiled and robust cottons .
Eco 40-60
For washing normally soiled cotton garments declared to be washable
at 40 °C or 60 °C, together in the same cycle. This is the standard cotton
programme and the most ecient in terms of water and energy
consumption.
Sport
For washing lightly soiled sports clothing (tracksuits, shorts, etc.).
For best results, we recommend not exceeding the maximum load
indicated in the ‚‘‘PROGRAMME CHART‘‘. We recommend using liquid
detergent , and adding the amount suitable for half-load.
Duvet
Designed for washing eiderdown padded items such as double or
single duvets, cushions and anoraks. It is recommended to load such
padded items in the drum with the edges folded inwards and not to
exceed ¾ of the drum’s volume. For optimal washing, we recommend
using a liquid detergent.
Jeans
Turn garments inside-out before washing and use a liquid detergent.
Spin & Drain
Spins the load then empties the water. For resilient garments. If you
exclude the spin cycle, the machine will drain only
Rinse & Spin
Rinses and then spins. For resilient garments.
Rapid 30 Min
For washing lightly soiled garments quickly. This cycle lasts only 30
minutes, saving time and energy.
20°C
For washing lightly soiled cotton garments, at a temperature of 20 °C.
Wool
All wool garments can be washed using programme ‚“Wool“ even
those carryng the “hand-wash only “ label. For best results, use special
detergents and do not exceed max kg declaration of laundry.
Delicates
For washing particularly delicate garments. Preferably turn garments
inside out before washing.
Synthetics
For washing soiled garments made from synthetic bres (such as
polyester, polyacrylic, viscose, etc.) or cotton/synthetic blends.
Eco Cotton
For washing normally soiled cotton garments. At 40°C and 60°C.
FIRST TIME USE
To remove any manufacturing debris select the “Cotton” programme at
a temperature of 60°C. Pour a small quantity of detergent powder into
the main wash compartment of the detergent dispenser (maximum
1/3 of the quantity the detergent manufacturer recommends for lightly
soiled laundry). Start the programme without adding any laundry.
DAILY USE
Prepare your laundry according to the recommendations in the
“HINTS AND TIPS” section. Load the laundry, close the door, open the
water tap and press the “ON/OFF” button to switch the wasching
machine on, the “Start/Pause” button ashes. Turn the programme
selector to the desired programme and select any option if needed.
The temperature and spin speed displayed via the corresponding LED
light can be altered by pressing the “Temperature” button or the “Spin
Speed” button. Pull out the detergent dispenser and add the detergent
(and additives/softener) now. Observe the dosing recommendations on
the detergent pack. Then close the detergent dispenser and press the
“Start/Pause” button. The “Start/Pause” button will light up and
the door will be locked.
PAUSE A RUNNING PROGRAMME
To pause the wash cycle, press the “Start/Pause” ; the indicator
light will ash. To start the wash cycle from the point at which it was
interrupted press the button again.
OPEN THE DOOR, IF REQUIRED
After starting a programme, the “Door locked” indicator lights up to
show that the door can not be opened. As long as a wash programme is
running, the door remains locked. To open the door while a programme
is in progress, press the “Start/Pause” to pause the programme.
Provided the water level and/or temperature is/are not too high, the
“Door locked” indicator light goes o and you can open the door. For
example to add or remove laundry. Press the “Start/Pause” button
again to continue the programme.
PROGRAMME END
The “Door locked” indicator light goes o and “Cycle end”
indicator lights up. To switch o the washing machine after programme
end press the “ON/OFF” button, the lights goes o. If you do
not press “ON/OFF” button, the washing machine will switch o
automatically after about a 10 minutes. Close the water tap, open the
door and unload the washing machine. Leave the door ajar to allow the
drum to dry.
OPTIONS
! If the selected option is incompatible with the programme set,
the incompatibility will be signalled by a buzzer (3 beeps) and the
corresponding indicator light will ash.
! If the selected option is incompatible with another previously set
option, only the most recent selection will remain active.
This option enhances washing performance by generating steam
to inhibit the proliferation of the main bad odour sources inside the
machine. After steam phase, the washing machine will perform gentle
tumbling through slow rotations of the drum. option starts after
the cycle ends for a maximum duration of 6h and you can interrupt it at
any time by pressing any button on control panel or turning the knob.
Wait around 5 minutes before open the door.
Intensive rinse
By selecting this option, the eciency of the rinse is increased and
optimal detergent removal is guaranteed. It is particularly useful for
sensitive skin.
Easy ironing
By selecting this option, the wash and the spin cycles will be modied
in order to reduce the formation of creases.
Start Delay
To set the selected programme to start at a later time, press the button
until the LED for the desired delay is illuminated (9h - 6h - 3h). After the
wash cycle has been started the indicator light corresponding to the
selected delay period will begin to ash. As time passes, the remaining
delay will be displayed and the corresponding indicator light will ash.
The set programme will start once the selected time delay has expired.
To cancel the delayed start, press the button until all LED lights are
switched o.
Page 3

Quick guide
Temperature
Every programme has a predened temperature. If you want to change
the temperature, press the temperature button. The corresponding LED
indicator lights up.
Spin
Every programme has a predened spin speed. If you want to change
the spin speed, press the “Spin Speed” button. The corresponding LED
indicator lights up.
KEY LOCK
To lock the control panel, press and hold the “Key lock” button for
approximately 3 seconds. The corresponding LED indicator lights up
to indicate that the control panel has been locked (with the exception
of the “ON/OFF“ button). This prevents unintentional changes to
programmes, especially with children near the machine. To unlock the
control panel, press and hold the “Key lock” button for approximately 3
seconds.
BLEACHING
If you wish to bleach the laundry, load the washing machine and set the
“Rinse & Spin” programme.
Start the machine and wait for it to complete the rst water lling cycle
(roughly 2 minutes). Put the machine in pause mode by pressing the
“Start/Pause” button, open the detergent drawer and pour the
bleach (observe the recommended doses indicated on the package)
into the main wash compartment where the partition was previously
mounted. Restart the cycle by pressing the “Start/Pause” button.
If desired, it is possible to add fabric softener into the appropriate
compartment of the detergent drawer.
HINTS AND TIPS
Sort your laundry according to
Type of fabric/care label (cotton, mixed bres, synthetics, wool, handwash
items). Colour (separate coloured and white items, wash new coloured
items separately). Delicates (wash small items – like nylon stockings – and
items with hooks – like bras – in a cloth bag or pillow case with zip).
Empty all pockets
Objects like coins or lighters can damage your laundry as well as the
drum.
Follow the dosage recommendation / additives
It optimizes the cleaning result, it avoids irritating residues of surplus
detergent in your laundry and it saves money by avoiding waste of
surplus detergent
Use low temperature and longer duration
The most ecient programmes in terms of energy consumption are
generally those that perform at lower temperatures and longer duration.
Observe the load sizes
Load your washing machine up to the capacity indicated in the
“PROGRAMME CHART” table to save water and energy.
Noise and remaining moisture content
They are inuenced by the spinning speed: the higher the spinning
speed in the spinning phase, the higher the noise and the lower the
remaining moisture content.
EN
at container beneath the water lter, to collect the drain water. Slowly
turn the lter counterclockwise until water ows out. Let the water ow
out, without removing the lter. When the container is full, close the
water lter by turning it in clockwise. Empty the container. Repeat this
procedure until all the water has drained. Lay a cotton cloth beneath
the water lter, which can absorb a small amount of rest water. Then
remove the water lter by turning it out anti clockwise. Clean the water
lter: remove residues in the lter and clean it under running water.
Insert the water lter and reinstall the plinth: Reinsert the water lter
again by turning it in clockwise direction. Make sure to turn it in as far
as it goes; the lter handle must be in vertical position. To test water
tightness of the water lter, you can pour about 1 liter of water into the
detergent dispenser. Then reinstall the plinth.
Cleaning the detergent dispenser
Remove the detergent dispenser by pressing on the release button
and at the same time pulling out the detergent dispenser. Remove
the insert from the detergent dispenser, as well as the insert of the
softener compartment. Clean all parts under running water, removing
all detergent or softener residues. Wipe the parts dry with a soft cloth.
Reinstall the detergent dispenser and push it back into the detergent
compartment.
ACCESSORIES
Contact our After-Sales Service to check if the following accessories are
available for your washing machine model.
Stacking kit shelf
By which your dryer can be xed on top of your washing machine to
save space and to facilitate loading and unloading your dryer in the
higher position.
TRANSPORT AND HANDLING
Never lift the washing machine by holding it at the worktop.
Pull out the mains plug, and close the water tap. Make sure that door
and detergent dispenser are properly closed. Disconnect the inlet hose
from the water tap, and remove the drain hose from your draining
point. Remove all rest water from the hoses, and x them so that they
cannot get damaged during transport. Ret the transport bolts. Follow
the instructions for removing the transport bolts in the INSTALATION
GUIDE in reverse order.
CLEANING & MAINTENANCE
For any cleaning and maintenance, switch o and unplug the washing
machine. Do not use ammable uids to clean the washing machine.
Clean and maintain your washing machine periodically (at least 4 times
per year).
Cleaning the outside of the washing machine
Use a soft damp cloth to clean the outer parts of the washing machine.
Do not use glass or general purpose cleaners, scouring powder or
similar to clean the control panel – these substances might damage the
printing.
Checking the water supply hose
Check the inlet hose regularly for brittleness and cracks. If damaged,
replace it by a new hose available through our After-Sales Service or
your specialist dealer. Depending on the hose type:
If the inlet hose has a transparent coating, periodically check if the
colour intensies locally. If yes, the hose may have a leak and should be
replaced.
Cleaning the water lter / draining residual water
If you used a hot wash programme, wait until the water has cooled
down before draining any water. Clean the water lter regularly, to
avoid that the water cannot drain after the wash due to obstruction of
the lter. If the water cannot drain, the display indicates that the water
lter may be clogged.
Remove the plinth by using the screwdriver: push downwards one side
of the plinth with your hand, then push the screwdriver into the gap
between plinth and front panel and pry open the plinth. Place a broad,
Page 4

TROUBLESHOOTING
The washing machine may sometimes not work properly for certain reasons. Before calling the After-sales service, it is recommended to check to see if
the problem can be easily resolved using the following list.
Anomalies: Possible causes / Solution:
The washing machine does not turn on.
The wash cycle does not start.
The washing machine does not ll with
water (the indicator for the rst wash
cycle stage ashes rapidly).
The washing machine loads and drains
water continuously.
The washing machine does not drain or
does not spin.
The washing machine vibrates
excessively during the spin cycle.
• The plug is not inserted into the electrical outlet, or not enough to make contact.
• There has been a power failure.
• The door is not fully closed.
• The “ON/OFF” button has not been pressed.
• The “Start/Pause” button has not been pressed.
• The water tap is not open.
• A “Start delay” has been set.
• The water intake hose is not connected to the tap.
• The hose is bent.
• The water tap is not open.
• The mains water supply has been shut o.
• There is not enough pressure.
• The “Start/Pause” button has not been pressed.
• The drain hose has not been installed at 65 to 100 cm from the ground.
• The end of the drain hose is immersed in water.
• The drain connector on the wall does not have an air vent.
• If the problem persists after having performed these checks, close the water tap, shut o the
washing machine, and call the After-sales service. If the dwelling is located on one of the
uppermost oors of a building, a siphon eect can sometimes occur, thus causing the washing
machine to load and drain water continuously. Special anti-siphon valves are available on the
market to prevent these types of problems.
• The programme does not include the draining function: with certain programmes it must be
activated manually.
• The drain hose is bent.
• The drain line is obstructed.
• At the time of installation, the drum was not properly unblocked.
• The washing machine is not level.
• The washing machine is squeezed between furniture and the wall.
The washing machine leaks water.
The “Start/Pause” indicator lights
up and the option indicator light ash.
Too much foam is formed.
Door is locked, with or without
failure indication, and the
programme does not run.
You can download the H&S INSTRUCTIONS, PRODUCT FICHE and ENERGY DATA by:
• Visiting our website - http://docs.whirlpool.eu
• Using QR code
• Alternatively, contact our After-sales Service (See phone number in the warranty booklet). When
contacting our After-sales Service, please state the codes provided on your product’s identication plate.
For User’s Repair & Maintenance Information visit www.whirlpool.eu
The model information can be retrieved using the QR-Code reported in the energy label. The label also
includes the model identier that can be used to consult the portal of the registry at https://eprel.ec.europa.eu
• The water intake hose has not been tightened properly.
• The detergent dispenser is clogged.
• The drain hose has not been properly fastened.
• Shut o the machine, disconnect the plug from the outlet, and weight about 1 minute before
turning it back on.
• If the problem persists, call the After-sales service.
• The detergent is not compatible with the washing machine (it must bear the wording “for
washing machines”, “for hand washing and washing machines”, or something similar).
• The dosage was excessive.
• Door is locked in case of power breakdown. Programme will continue automatically as soon as
the mains is available again.
• Washing machine is in a standstill. Programme will continue automatically after the origin of
the standstill does not persist anymore.
xxxxxxxxxxxx
xxxx
400011459677
 Loading...