

WHIRLPOOL EV209NBT User Manual

UPRIGHT FREEZER ICE MAKER KIT
INSTALLATION INSTRUCTIONS
MACHINE À GLAÇONS DU CONGÉLATEUR VERTICAL—
INSTRUCTIONS D’INSTALLATION
IMPORTANT: READ AND SAVE THESE INSTRUCTIONS. INSTALLATION REQUIRES 2 OR MORE PEOPLE.
IMPORTANT : LIRE ET CONSERVER CES INSTRUCTIONS. L’INSTALLATION NÉCESSITE
L’INTERVENTION DE 2 PERSONNES OU PLUS.
Table of Contents/Table des matières
FREEZER ICE MAKER SAFETY ...........................................................1
INSTALLATION REQUIREMENTS .......................................................2
INSTALLATION INSTRUCTIONS .........................................................4
TROUBLESHOOTING............................................................................7
SÉCURITÉ DE LA MACHINE À GLAÇONS DU CONGÉLATEUR...... 9
EXIGENCES D’INSTALLATION............................................................ 9
INSTRUCTIONS D’INSTALLATION ...................................................12
DÉPANNAGE........................................................................................ 15
FREEZER ICE MAKER SAFETY
Your safety and the safety of others are very important.
We have provided many important safety messages in this manual and on your appliance. Always read and obey all safety
messages.
This is the safety alert symbol.
This symbol alerts you to potential hazards that can kill or hurt you and others.
All safety messages will follow the safety alert symbol and either the word “DANGER” or “WARNING.”
These words mean:
You can be killed or seriously injured if you don't immediately
DANGER
WARNING
All safety messages will tell you what the potential hazard is, tell you how to reduce the chance of injury, and tell you what can
happen if the instructions are not followed.
follow instructions.
can be killed or seriously injured if you don't
You
instructions.
follow
W10326826A

INSTALLATION REQUIREMENTS
B
Tools and Parts
Tools Needed
Gather the required tools and parts before starting installation.
Read and follow the instructions provided with any tools listed
here.
■ Cordless drill
■ ¹⁄₄" nut driver and drill bit
■ Flat-blade screwdriver
■ #2 Phillips screwdriver
■ ⁷⁄₁₆" and ¹⁄₂" open-end
wrenches or two adjustable
wrenches
■ Small ³⁄₄" round file
■ Tubing cutter
■ Scissors
■ Ruler
■ Level
■ Step stool (optional)
Parts Needed
■ Your freezer dealer has a kit available with a ¹⁄₄" (6.35 mm)
saddle-type shutoff valve, a union, and copper tubing.
■ Or you can purchase a ¹⁄₄" (6.35 mm) copper tubing with
shutoff valve and a ¹⁄₄" (6.35 mm) compression fitting
(coupling).
■ Depending on water line connections, you may also need a ¹⁄₄"
(6.35 mm) nut and ¹⁄₄" (6.35 mm) ferrule.
Parts Supplied with Freezer
Remove the parts from the Ice Maker Adapter kit that was
supplied with your freezer. Check to see that these parts are
included.
A
B
Parts Supplied with Ice Maker Kit
Remove the parts from the ice maker kit. Check to see that all
parts are included. Some of the included parts will not be used for
this freezer.
IMPORTANT: Do not remove the tubing from the water valve. It
has been factory installed and leak tested. Do not move the
compression nut that connects the tubing to the valve or the valve
may leak after you connect it to the water supply.
A
D
C
E
G
K
I
J
M
F
H
L
N
A. Ice maker
B. Ice bin*
C. Water valve with tubing
C
D. Fill tube (short)*
E. Gasket*
F. Short extension tube*
G. Metal water tube insert
H. Long extension tube*
I. Ice maker clips (2)*
J. Tubing clips (2)*
K. Water valve tubing clamp
L.
¹⁄₂
" hex-head sheet metal screws (4)
M.
³⁄₄
" hex-head sheet metal screws (2)
¹⁄₂
" hex-head machine screws (2)
N.
*Not used in two door freezer
A. Long shutoff arm
B. Ice maker cover
C. Flat wire shelf
2

Water Supply Requirements
Read all directions before you begin.
IMPORTANT:
■ If you turn the freezer on before the water line is connected,
turn the ice maker OFF.
■ All installations must meet local plumbing code requirements.
■ Use plastic tubing and check for leaks. Install plastic tubing
only in areas where temperatures will remain above freezing.
Tools Needed
■ Flat-blade screwdriver
■ ⁷⁄₁₆" and ¹⁄₂" open-end wrenches or two adjustable wrenches
■ ¹⁄₄" nut driver and drill bit
■ Cordless drill
NOTE: Your freezer dealer has a kit available with a ¹⁄₄" (6.35 mm)
saddle-type shutoff valve, a union, and plastic tubing. Before
purchasing, make sure a saddle-type valve complies with your
local plumbing codes. Do not use a piercing-type or ³⁄₁₆"
(4.76 mm) saddle valve which reduces water flow and clogs more
easily.
Water Supply Connection
Connect to Water Line
Water Pressure
A cold water supply with water pressure of between 30 and
120 psi (207 to 827 kPa) is required to operate the ice maker. If
you have questions about your water pressure, see the Use and
Care Guide or call a licensed, qualified plumber.
Reverse Osmosis Water Supply
If a reverse osmosis water filtration system is connected to your
cold water supply, the water pressure to the system needs to be a
minimum of 40 to 60 psi (276 to 414 kPa).
If the water pressure to the reverse osmosis system is less than 40
to 60 psi (276 to 414 kPa), a booster pump can be inserted into
the small tubing that goes from the cold water line to the reverse
osmosis system.
If you have questions about your water pressure, refer to the Use
and Care Guide or call a licensed, qualified plumber.
1. Unplug freezer or disconnect power.
2. Turn OFF main water supply. Turn ON nearest faucet long
enough to clear line of water.
3. Locate a ½" to 1¹⁄₄" (12.7 mm to 3.18 cm) vertical cold water
pipe near the freezer.
IMPORTANT:
■ Make sure it is a cold water pipe.
■ Horizontal pipe will work, but drill on the top side of the
pipe, not the bottom. This will help keep water away from
the drill and normal sediment from collecting in the valve.
4. To determine the length of plastic tubing you need, measure
from the connection on the lower left rear of freezer to the
water pipe. Add 7 ft (2.1 m) to allow for cleaning. Use ¹⁄₄"
(6.35 mm) O.D. (outside diameter) plastic tubing. Be sure both
ends of plastic tubing are cut square.
5. Using a cordless drill, drill a ¹⁄₄" (6.35 mm) hole in the cold
water pipe you have selected.
A
G
B
C
DEF
A. Cold water pipe
B. Pipe clamp
C. Copper tubing
D. Compression nut
E. Compression sleeve
F. Shutoff valve
G. Packing nut
6. Fasten the shutoff valve to the cold water pipe with the pipe
clamp. Be sure the outlet end is solidly in the ¹⁄₄" (6.35 mm)
drilled hole in the water pipe and that the washer is under the
pipe clamp.
7. Tighten the packing nut.
8. Tighten the pipe clamp screws evenly so washer makes a
watertight seal. Do not overtighten or you may crush the
plastic tubing.
9. Slip the compression sleeve and compression nut onto the
plastic tubing as shown.
10. Insert the end of the tubing into the outlet end squarely as far
as it will go. Screw compression nut onto outlet end with
adjustable wrench. Do not overtighten.
11. Place the free end of the tubing in a container or sink, and turn
ON the main water supply. Flush the tubing until water is clear.
12. Turn OFF the shutoff valve on the water pipe. Coil the plastic
tubing.
3

INSTALLATION INSTRUCTIONS
A
WARNING
Electrical Shock Hazard
Disconnect power before servicing.
Replace all parts and panels before operating.
Failure to do so can result in death or electrical shock.
1. Unplug freezer or disconnect power.
WARNING
Excessive Weight Hazard
Use two or more people to move and install freezer.
Failure to do so can result in back or other injury.
Prepare Freezer
5. To remove the lower storage bin, pull the bin forward, lift up
and pull forward again to fully extend the sliders. Lift the
storage bin off the sliders. Push the sliders back into the
freezer.
6. Remove the ice maker cover mounting screws from the left-
hand interior freezer wall.
7. Install the ice maker cover behind the mullion using the
mounting screws.
2. Pull the freezer away from the wall so that you can access the
rear.
When Moving Your Freezer:
Your freezer is heavy. When moving the freezer for
cleaning or service, be sure to cover the floor with cardboard
or hardboard to avoid floor damage. Always pull the freezer
straight out when moving it. Do not wiggle or “walk” the
freezer when trying to move it, as floor damage could occur.
3. Open the freezer door and remove the mullion basket clamp.
4. Lift out the small mullion basket.
A. Ice maker cover
8. Remove the tape from the fill tube located on the back of the
freezer. Make sure the fill tube is clear of all tape.
9. Remove the ice maker connection cover.
10. Pull the 4-wire harness out from behind the freezer’s back
cover as far as possible without forcing. Hang it over the edge
of the cutout.
11. Reinstall the ice maker connection cover.
A
A. Connection cover
4
Install the Tubing and Water Valve
A
B
C
Prepare the Water Valve Tubing
1. Untape the coiled flexible tubing coming from the water valve
and straighten it.
2. Starting at the top of the compression nut on the water valve,
measure 32" (81.28 cm) and mark the location on the tubing.
3. Using a pair of scissors, make an even cut across the tubing
at the mark. Discard the excess tubing.
32"
(81.28 cm)
Install the Tubing Clips
1. Peel the backing from the adhesive strips on the tubing clips.
2. Press the clips against the back of the freezer in the locations
shown below.
A
B
A. Fill tube
B. Water valve
A. Compression nut
B. Water valve
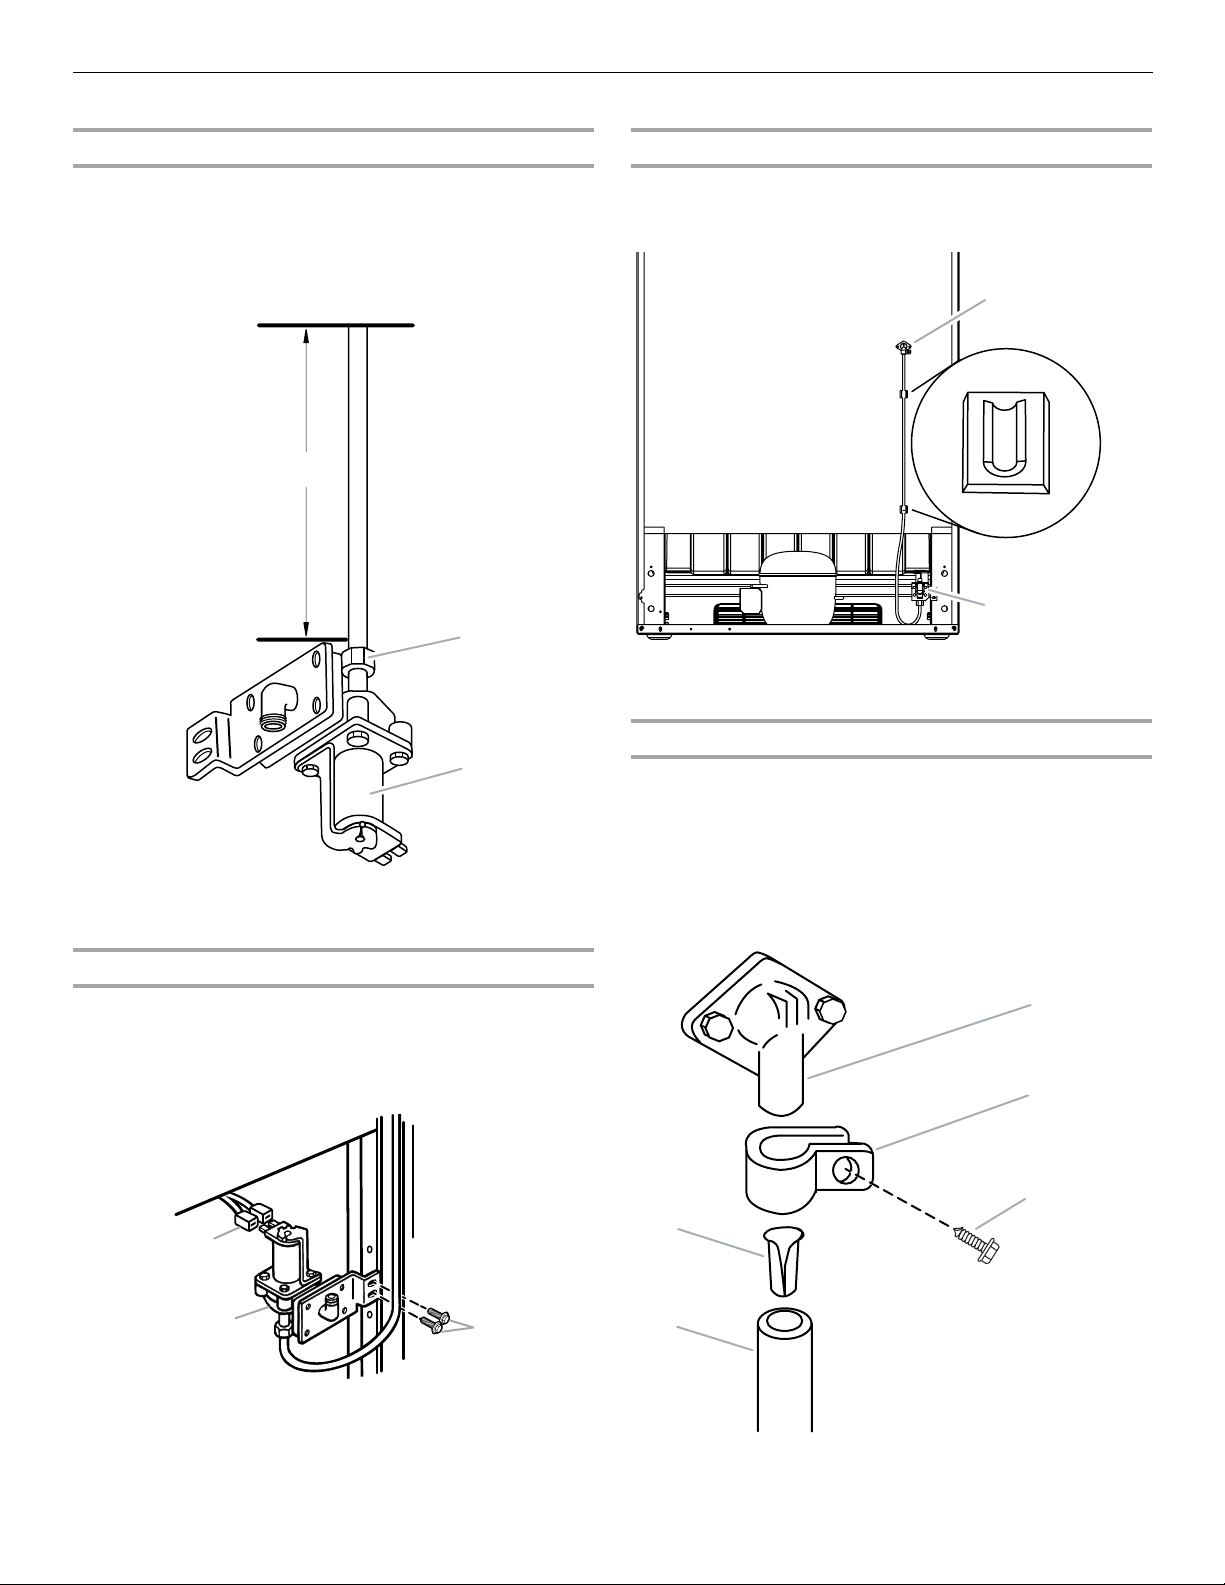
Install the Water Valve
1. Insert the 2-pin connector over the water valve solenoid
terminals as far as possible. You can position the connector
with the wires at either terminal.
2. Mount the water valve to the mounting holes in the cabinet
frame with ¹⁄₂" hex-head machine screws.
A
Connect the Water Valve Tubing
1. Position the water valve tubing clamp with the round hole
facing toward you and slide it over the end of the fill tube
spout.
NOTE: One of the flanges on the water valve tubing clamp is
made for a threaded screw and one side has a round hole.
2. Thread a ¹⁄₂" hex-head sheet metal screw into the water valve
tubing clamp and finger tighten.
3. Place the metal water tube insert into the water valve tubing.
C
D
E
A
B
A. 2-pin connector
B. Water valve
C.
¹⁄₂
" hex-head machine screws
B
A. Water tube insert
B. Water valve tubing
C. Fill tube spout
D. Water valve tubing clamp
E.
¹⁄₂
" hex-head sheet
metal screw
5
 Loading...