

Whirlpool EVL165NXRQ04, EVL165NXRQ03, EV165NXTN00 Owner’s Manual

CONVERTIBLE
REFRIGERATOR/
FREEZER
Forquestionsaboutfeatures,operationlperformanee,
parts or service, call: 1-800-253-1301.
In Canada, call for assistance 1-800-807-6777,
www.whirlpool.com or www.whirlpool.ca
P P
or visit our website at...
REFRIGERATEUR/
CONGELATEUR
CONVERTIBLE
Au Canada, pour assistance, composez le 1-800-807-6777.
ou visitez notre site web &
www.whirlpool.ca
1-82611-001 Rev. O0
Table of Contents/Table des matieres .................. 2

TABLEOFCONTENTS
TABLEDESMATIERES
CONVERTIBLE REFRIGERATOR/FREEZER SAFETY ................ 2
Proper Disposal of Your Old Refrigerator .................................... 3
INSTALLATION INSTRUCTIONS .................................................. 3
Unpack the Convertible Refrigerator/Freezer .............................. 3
Location Requirements ................................................................ 4
Electrical Requirements ............................................................... 4
Convertible Refrigerator/Freezer Door ......................................... 4
Door Closing ................................................................................. 7
Normal Sounds ............................................................................ 7
CONVERTIBLE REFRIGERATOR/FREEZER USE....................... 7
Ensuring Proper Air Circulation .................................................... 7
Using the Controls ....................................................................... 7
Key Eject Lock ............................................................................. 8
CONVERTIBLE REFRIGERATOR/FREEZER FEATURES ........... 9
Shelves ......................................................................................... 9
Crispers and Meat Drawer ........................................................... 9
Crisper Humidity Control ............................................................. 9
Storage Basket ........................................................................... 10
Storage Gate .............................................................................. 10
CONVERTIBLE REFRIGERATOR/FREEZER CARE .................. 10
Cleaning ...................................................................................... 10
Changing the Light Bulb ............................................................ 11
Power Interruptions .................................................................... 11
Vacation and Moving Care ......................................................... 11
TROUBLESHOOTING .................................................................. 12
ASSISTANCE OR SERVICE ......................................................... 13
WAR RANTY .................................................................................. 14
SECURITE DU
REFRIGI:!:RATEUR/CON GI:!:LATEUR CONVERTIBLE ................ 15
Mise au rebut de votre vieux refrigerateur ................................. 15
INSTRUCTIONS D'INSTALLATION ............................................. 16
Deballage .................................................................................... 16
Emplacement d'installation ........................................................ 16
Specifications electriques .......................................................... 17
Porte du rdrigerateuricongelateur convertible .......................... 17
Fermeture de la porte ................................................................. 20
Sons normaux ............................................................................ 20
UTILISATION DU
REFRIGI:!:RATEUR/CON GI:!:LATEUR CONVERTIBLE ................ 20
Pour s'assurer d'une circulation d'air appropriee ...................... 20
Utilisation des commandes ........................................................ 20
Serrure h cle separee ................................................................. 22
CARACTI:!:RISTIQU ES DU
REFRIGI:!:RATEUR/CON GI:!:LATEUR CONVERTIBLE ................ 22
Tablettes ..................................................................................... 22
Bacs a legumes et tiroirs a viande ............................................. 22
Reglage de I'humidite darts le bac a legumes ........................... 23
Panier coulissant ........................................................................ 23
Barriere d'entreposage ............................................................... 23
ENTRETIEN DU
REFRIGI:!:RATEUR/CON GI:!:LATEUR CONVERTIBLE ................ 23
Nettoyage ................................................................................... 23
Remplacement de I'ampoule d'eclairage .................................. 25
Pannes de courant ..................................................................... 25
Entretien avant les vacances ou Iors d'un demGnagement ....... 25
DIc!:PANNAG E................................................................................. 26
ASSISTANCE OU SERVICE ......................................................... 27
GARANTIE .................................................................................... 28
CONVERTIBLEREFRIGERATOR/FREEZERSAFETY
Your safety and the safety of others are very important.
We have provided many important safety messages in this manual and on your appliance. Always read and obey all safety
messages.
This is the safety alert symbol.
This symbol alerts you to potential hazards that can kill or hurt you and others.
All safety messages will follow the safety alert symbol and either the word "DANGER" or "WARNING."
These words mean:
You can be killed or seriously injured if you don't immediately
follow instructions.
You can be killed or seriously injured if you don't follow
instructions.
All safety messages will tell you what the potential hazard is, tell you how to reduce the chance of injury, and tell you what can
happen if the instructions are not followed.

iMPORTANT SAFETY iNSTRUCTiONS
WARNING: To reduce the risk of fire, electric shock, or injury when using your convertible refrigerator/freezer, follow these
basic precautions:
• Plug into a grounded 3 prong outlet.
• Do not remove ground prong.
• Do not use an adapter.
• Do not use an extension cord.
• Disconnect power before servicing.
• Replace all parts and panels before operating.
• Use nonflammable cleaner.
• Keep flammable materials and vapors, such as gasoline,
away from freezer.
• Use two or more people to move and install convertible
refrigerator/freezer.
• Keep key away from children.
• Remove doors or lid from your old freezer or refrigerator.
• Disconnect power before installing ice maker (on ice maker
kit ready models only).
SAVE THESE INSTRUCTIONS
ProperDisposal ofYourOldRefrigerator
Suffocation Hazard
Remove doors from your old refrigerator.
Failure to do so can result in death or brain damage.
IMPORTANT: Child entrapment and suffocation are not problems
of the past. Junked or abandoned refrigerators and freezers are
still dangerous - even if they will sit for "just a few days." If you
are getting rid of your old refrigerator or freezer, please follow
these instructions to help prevent accidents.
INSTALLATIONINSTRUCTIONS
Excessive Weight Hazard
Use two or more people to move and install convertible
refrigerator/freezer.
Failure to do so can result in back or other injury.
Removing packaging materials
• Remove tape and glue residue from surfaces before turning
on the convertible refrigerator/freezer. Rub a small amount of
liquid dish soap over the adhesive with your fingers. Wipe
with warm water and dry.
Do not use sharp instruments, rubbing alcohol, flammable
fluids, or abrasive cleaners to remove tape or glue. These
products can damage the surface of your convertible
refrigerator/freezer. For more information, see "Convertible
Refrigerator/Freezer Safety."
• Depending on your model, remove protective film from shelf
trims. Look for the "Peel Off" strip, and use your fingernail to
peel off the film.
Before you throw away your old refrigerator or freezer:
• Take off the door.
• Leave the shelves in place so that children may not easily
climb inside.
When Moving Your Convertible Refrigerator/Freezer:
Your convertible refrigerator/freezer is heavy. When moving
the convertible refrigerator/freezer for cleaning or service,
be sure to protect the floor. Always pull the convertible
refrigerator/freezer straight out when moving it. Do not
wiggle or "walk" the convertible refrigerator/freezer when
trying to move it, as floor damage could occur.
NOTE: If casters are installed, unlock the casters before
trying to move your convertible refrigerator/freezer.
Cleaning before use
After you remove all of the package materials, clean the inside of
your refrigerator/freezer before using it. See the cleaning
instructions in the "Convertible Refrigerator/Freezer Care"
section.
important information to know about glass shelves
and covers:
Do not clean glass shelves or covers with warm water when
they are cold. Shelves and covers may break if exposed to
sudden temperature changes or impact, such as bumping.
For your protection, tempered glass is designed to shatter
into many small, pebble-size pieces. This is normal. Glass
shelves and covers are heavy. Use special care when
removing them to avoid impact from dropping.

ExplosionHazard
Keep flammable materials and vapors, such as
gasoline, away from convertible refrigeratorlfreezer.
Failure to do so can result in death, explosion, or fire.
IMPORTANT: Do not install the convertible refrigerator/freezer
near an oven, radiator, or other heat source, nor in a location
where the temperature will fall below 40°F (5°C).
Allow at least 3" (7.5 cm) of air space at the top and on both sides
of the convertible refrigerator/freezer and 1" (2.5 cm) between
the back of the convertible refrigerator/freezer and the wall. If the
convertible refrigerator/freezer is to be against a wall, leave extra
space on the hinge side so the door can open wider.
NOTE: This convertible refrigerator/freezer may be installed side
by side with another refrigerator or freezer. Allow for a 3" (7.5 cm)
clearance at the top and sides and a V4"(0.64 cm) clearance
between the appliances.
/
Electrical Shock Hazard
Plug into a grounded 3 prong outlet.
Do not remove ground prong.
Do not use an adapter.
Do not use an extension cord.
Failure to follow these instructions can result in death,
fire, or electrical shock.
Before you move your convertible refrigerator/freezer into its final
location, it is important to make sure you have the proper
electrical connection.
Recommended grounding method
A 115 Volt, 60 Hz., AC only 15- or 20-amp fused, grounded
electrical supply is required. It is recommended that a separate
circuit serving only your convertible refrigerator/freezer be
provided. Use an outlet that cannot be turned off by a switch. Do
not use an extension cord.
NOTE: Before performing any type of installation, cleaning, or
removing a light bulb, turn both temperature controls to the OFF
position as shown and disconnect the convertible refrigerator/
freezer from the electrical source.
\
3" (7.5 crn)
TOOLS NEEDED: %6" hex-head socket wrench, %" hex-head
socket wrench, V4"hex-head socket wrench, V2"hex-head socket
wrench, %" hex-head socket wrench, #2 Phillips screwdriver, flat-
blade screwdriver, %6" open-end wrench, flat 2" putty knife.
IMPORTANT:
• Before you begin, turn the controls OFE and remove food
and adjustable door or utility bins from door.
• If you only want to remove and replace the door, see the
"Remove Door and Hinges" and "Replace Door and Hinges."
All graphics referenced in the following instructions are
included later in this section after "Final Steps." The graphics
shown are for a right-hand swing door (hinges factory
installed on the right).
When you are finished, reconnect the convertible refrigerator/
freezer to the electrical source and reset the temperature controls
to the desired setting. See "Using the Controls."
Remove Door and Hinges
"%6" Hex-Head Hinge Screw
f. Unplug convertible refrigerator/freezer or disconnect power.
2. Open convertible refrigerator/freezer door and remove base
grille from the bottom front of the convertible refrigerator/
freezer. See Base Grille Graphic 1A.
3. Close the convertible refrigerator/freezer door and keep it
closed until you are ready to lift it free from the cabinet.
NOTE: Provide additional support for the door while the
hinges are being moved. Do not depend on the door magnets
to hold the door in place while you are working.

4. RemovethepartsforthetophingeasshowninTopHinge
Graphic1B.
5. Lifttheconvertiblerefrigerator/freezerdoorfreefromthe
lowerhingeandcabinetandsetaside.
6. Remove3hexheadhingescrewsandbottomhinge
assembly,SeeBottomHingeGraphic1C.
Reverse Door (optional on some models)
IMPORTANT: Ifyou want to reverse your door so that it opens in
the opposite direction, continue with "Reverse Door (optional)"
instructions. If you are not reversing the door, see "Replace Door
and Hinges."
Cabinet
1. Remove the cabinet hinge hole plugs from the cabinet top
and move them to the opposite side hinge holes as shown in
Graphic 2,
2. Remove the door stop screws from the Bottom Hinge
bracket, See Bottom Hinge Graphic 1C
3. Remove the Hinge Pin Nut and Hinge Pin from the hinge
bracket,
4. Rotate the hinge bracket for installation on the opposite side
of the cabinet. See Graphic 3
5. Reinstall the Hinge Pin Nut and Hinge Pin to the hinge
bracket. Hinge Pin must point "up" when hinge bracket is
installed to the cabinet.
6. Invert the door stop so that the countersunk holes line up
with the screw holes in the hinge assembly. See Graphic 4
7. Reinstall the door stop screws. See Graphic 3.
8. Reinstall the hinge assembly to the cabinet with the 3 hex
head hinge screws.
Handle
Move the door handle from one side of the door to the other.
Style 1
1. Loosen set screws located on side of handle at each end.
See Graphic 1-1.
2. Remove handle from grommets.
3. Using a 1/4"hex-head socket wrench, remove the grommets
from the door.
4. Position the grommets on the opposite side of the door and
reinstall.
5. Position the handle over grommets on the opposite side of
the convertible refrigerator/freezer door.
6. Ensure grommets are fitted into handle holes,
7. Tighten the upper and lower set screws with hex key
provided. Do not overtighten set screw,
Style 2
1. Slide the handle up and off the clips. See Graphic 1-3,
2. Using a flat-blade screwdriver, remove the screws from the
clips and remove the clips from the door.
3. Position the clips on the opposite side of the convertible
refrigerator/freezer door and reinstall the screws,
4. Position handle over the clips.
5. Apply even pressure and push down to lock in place.
Replace Door and Hinges
NOTE: Graphic may be reversed if door swing is reversed.
1. Replace the parts for the bottom hinge as shown and tighten
screws. See Bottom Hinge Graphic 1C. Replace the
convertible refrigerator/freezer door.
NOTE: Provide additional support for the door while the
hinges are being moved, Do not depend on the door magnets
to hold the door in place while you are working.
2. Assemble the parts of the top hinge as shown in the Top
Hinge Graphic 1B. Do not tighten the screws completely,
3. Line up the door so that the bottom aligns evenly with the
cabinet. Tighten all screws.
Final Steps
1. Check all holes to make sure that hole plugs and screws are
in place. Reinstall top hinge cover. See Top Hinge
Graphic 1B.
2. Replace the base grille. See Base Grille Graphic 1A.
Electrical Shock Hazard
Plug into a grounded 3 prong outlet.
Do not remove ground prong.
Do not use an adapter.
Do not use an extension cord,
Failure to follow these instructions can result in death,
fire, or electrical shock.
3. Plug into a grounded 3 prong outlet.
4. Reset the control. See "Using the Controls."
5. Return all removable door parts to door and food to
convertible refrigerator/freezer.
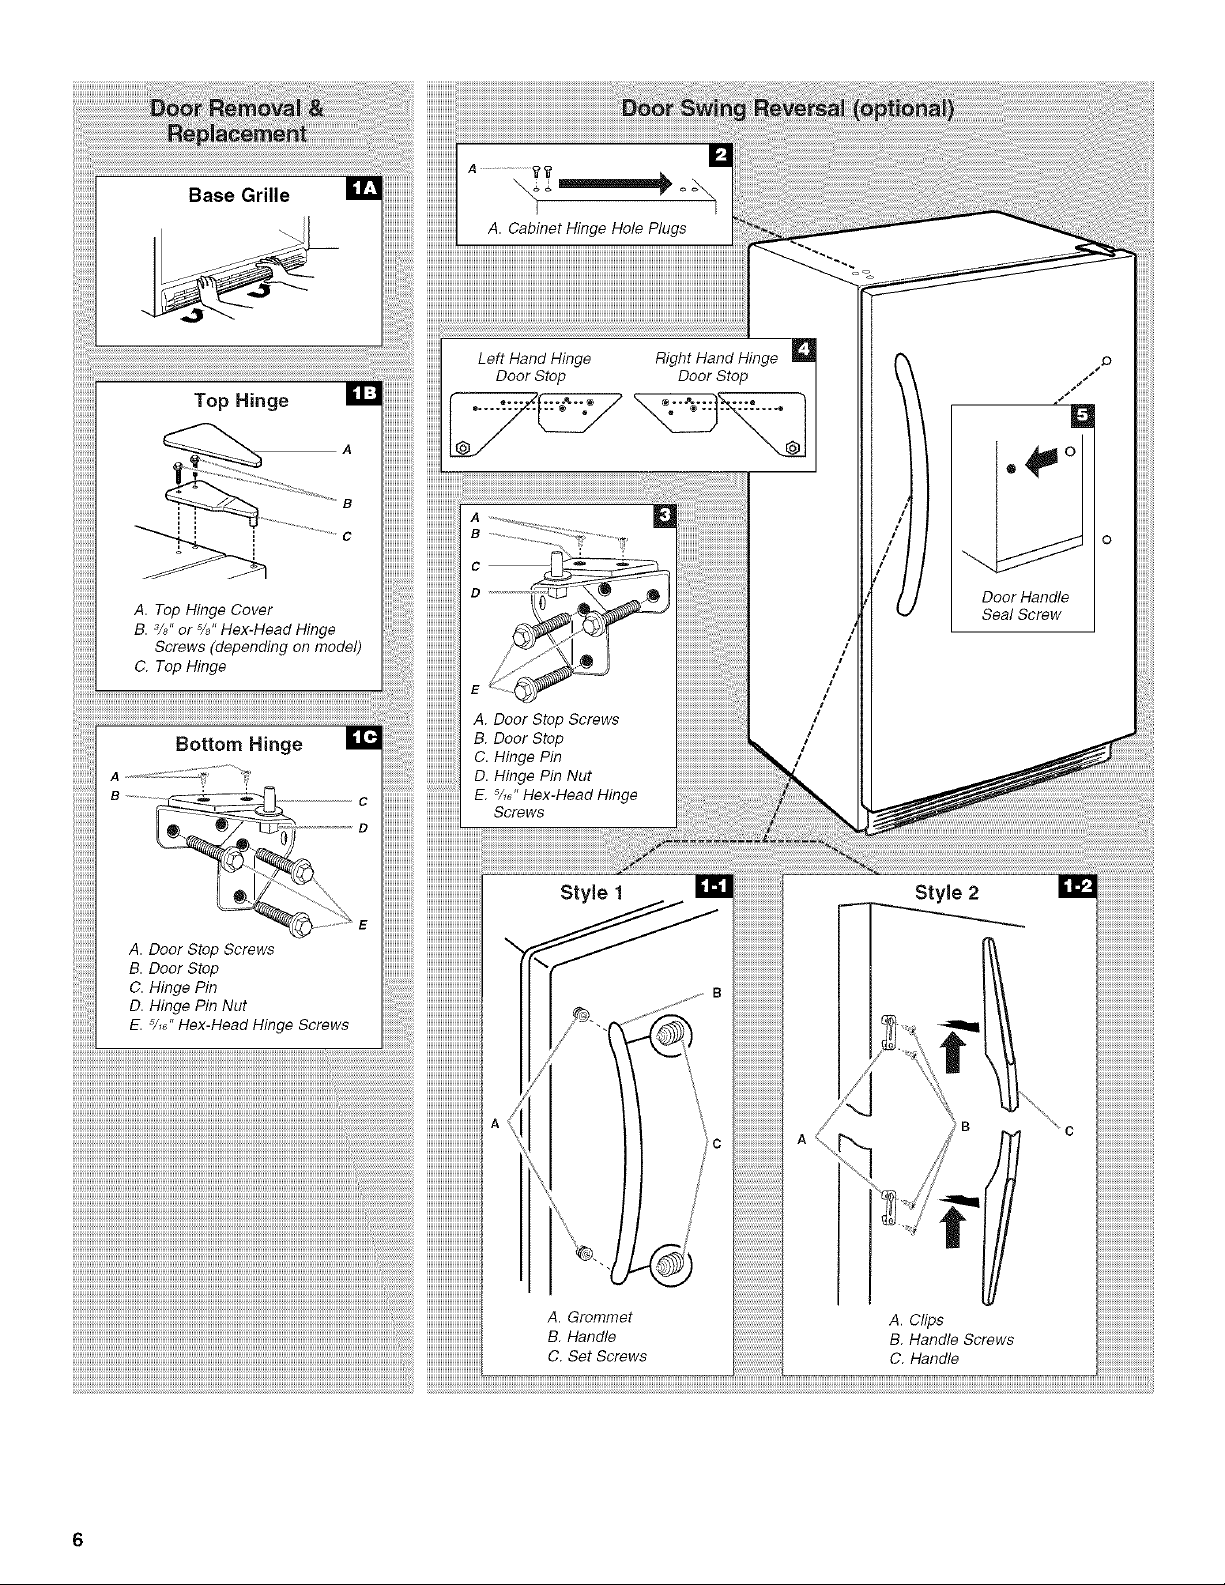
Base Grille
Top Hinge
A. Top Hinge Cover
B. 2/8"or s/8"Hex-Head Hinge
Screws (depending on model)
C. Top Hinge
Bottom Hinge
!i!!!!;!i!!i!!iii!:_iiii!ii!i!!i!ii!i!ii!i!i!i!iii!ii!;!;!;!i!_!!_liii
iiiiiiiiiiiiiiiiiiiiiiiii_i_iiiiiiiiiiiiiiiiiiiiiiiiiiiiiiiiiiiiiiiiiiiiiiiiiii
......
A. Cabinet Hinge Hole Plugs
Left Hand Hinge Right Hand Hinge
Door Stop Door Stop
I
¢L¢./
B
C ----
Door Handle
Seal Screw
/
/
/
/
A. Door Stop Screws
B. Door Stop
C. Hinge Pin
D. Hinge Pin Nut
C
D
E. 5/_,,,Hex-Head Hinge
Screws
/
/
/
A Door Stop Screws
B Door Stop
C Hinge Pin
D Hinge Pin Nut
E. 5/,_,,Hex-Head Hinge Screws
Style 1
A, Grommet
B, Handle
C. Set Screws
Style 2
A, Clips
B Handle Screws
C, Handle

NOTE: Keep the two bolts that secured the convertible
refrigerator/freezer in the shipping case. They are the front
leveling legs.
Your convertible refrigerator/freezer has 2 adjustable leveling
legs. If your convertible refrigerator/freezer seems unsteady or
you want the doors to close easier, adjust the convertible
refrigerator/freezer's tilt using these instructions.
1. Screw the legs all the way into the bolt holes in the bottom
corners of the convertible refrigerator/freezer.
2. Adjust the front legs just enough to lift the cabinet up off of
the floor.
NOTE: If your model is equipped with rollers, the front legs
should be lowered enough to lift the rollers off of the floor to
ensure the convertible refrigerator/freezer does not roll
forward when the door is opened.
3.
Adjust the legs to level the convertible refrigerator/freezer:
• Turn the leveling leg to the right to lower that side of the
convertible refrigerator/freezer.
• Turn the leveling leg to the left to raise that side of the
convertible refrigerator/freezer.
CONVERTIBLEREFRIGERATOR]
FREEZERUSE
In order to ensure proper temperature, you need to permit proper
airflow in the convertible refrigerator/freezer. As shown in the
illustration, cool air enters through the convertible refrigerator/
freezer wall and moves down. The air then recirculates through
the vent near the bottom.
4. Check with a level.
5. Open and close the door to make sure it swings as easily as
you like.
Your new convertible refrigerator/freezer may make sounds that
your old one didn't make. Because the sounds are new to you,
you might be concerned about them. Most of the new sounds are
normal. Hard surfaces, such as the floor, walls, and cabinets, can
make the sounds seem louder. The following describes the kinds
of sounds and what may be making them.
• Your convertible refrigerator/freezer is designed to run more
efficiently to keep your food items at the desired
temperatures and to minimize energy usage. The high
efficiency compressor and fans may cause your convertible
refrigerator/freezer to run longer than your old one. You may
also hear a pulsating or high-pitched sound from the
compressor or fans adjusting to optimize performance.
• You may hear the evaporator fan motor circulating air through
the compartment. The fan speed may increase as you open
the door or add warm food.
• Rattling noises may come from the flow of refrigerant, the
water line, or items stored on top of the convertible
refrigerator/freezer.
• Water dripping on the defrost heater during a defrost cycle
may cause a sizzling sound.
• As each cycle ends, you may hear a gurgling sound due to
the refrigerant flowing in your convertible refrigerator/freezer.
• Contraction and expansion of the inside walls may cause a
popping noise.
• You may hear water running into the drain pan during the
defrost cycle.
Do not block any of these vents with food packages. If the vents
are blocked, airflow will be prevented, and temperature and
moisture problems may occur.
IMPORTANT: To prevent odors and drying out of food, wrap or
cover foods tightly.
IMPORTANT:
The mode switch in the center of the control panel is used to
select the operating mode of the convertible refrigerator/
freezer. When the left-hand side of the switch is depressed
and the indicator lights up, the product is a Refrigerator.
When the right-hand side of the switch is depressed and the
indicator lights up, the product is a Freezer.
NOTE: Do not stack large or bulky items that may cover the
center rib of the top door shelf. Large or bulky items may
press against the mode switch changing the function of the
convertible refrigerator/freezer.
The convertible refrigerator/freezer has 2 separate
controls.The REFRIGERATOR (left-hand) temperature control
is used when operating as a refrigerator. The FREEZER
(right-hand) temperature control is used when operating as a
freezer.
NOTE: Both temperature controls should remain at the
desired temperature setting. This allows the convertible
refrigerator/freezer to return to the desired temperature when
either operating mode is selected.

To Operate as a Refrigerator
Setting the control
For your convenience, your convertible refrigerator/freezer
control is preset at the factory to the recommended setting as
shown.
3 REFRIGERATOR FREEZER 3
1,
Make sure the Refrigerator control is still preset to 3
(mid-setting).
2.
Press the MODE SWITCH closer to the Refrigerator control
until it lights up.
NOTE: To turn your refrigerator off, turn the Refrigerator
control to OFF. Your refrigerator will not cool when the control
is set to the OFF position.
Allow the refrigerator time to cool down completely before adding
food. It is best to wait 24 hours before putting food into the
refrigerator. Turning the temperature control to a colder (higher)
than recommended setting will not cool the compartment any
faster. The control is set correctly when milk or juice is as cold as
you like.
NOTE: If you add food before the refrigerator has cooled
completely, your food may spoil.
When the refrigerator is first started, the compressor will run
constantly until the cabinet is cooled. It may take up to 6 or
8 hours (or longer), depending on room temperature and the
number of times the refrigerator door is opened. After the cabinet
is cooled, the compressor will turn on and off as needed to keep
the refrigerator at the proper temperature.
The outside of your refrigerator may feel warm. This is normal.
The refrigerator's design and main function is to remove heat
from packages and air space inside the refrigerator. The heat is
transferred to the room air, making the outside of the refrigerator
feel warm.
NOTE: During high humidity, moisture may form on the outside of
the refrigerator. To prevent rust, dry the refrigerator's exterior and
adjust the temperature control to a colder (higher) setting.
Adjusting the control
Move the dial one setting at a time and wait 24 hours between
adjustments.
• Turn control to a higher number for colder temperatures.
• Turn control to a lower number for less cold temperatures.
To Operate as a Freezer
IMPORTANT: Remove all glass containers from the convertible
refrigerator/freezer before selecting Freezer mode.
Setting the control
For your convenience, your convertible refrigerator/freezer
control is preset at the factory to the recommended setting as
shown.
1. Make sure the Freezer control is still preset to 3 (mid-setting)
as shown.
NOTE: This setting is designed to maintain the temperature
at or near 0°F (-17.8°C) under normal operating conditions.
2, Press the MODE SWITCH closer to the Freezer control until it
lights up
NOTE: To turn your freezer off, turn the Freezer control to
OFF. Your product will not cool when the freezer control is set
to the OFF position.
Allow the freezer to cool 6 to 8 hours before filling with frozen
food. Turning the temperature control to a colder (higher) than
recommended setting will not cool the compartment any faster.
Let the freezer cool overnight before adding large amounts of
unfrozen food. Never add more than 2 to 3 Ibs (907-1,350 g) of
unfrozen food per cubic foot (28.32 L) of freezer space.
NOTE: If you add food before the freezer has cooled completely,
your food may spoil.
When the freezer is first started, the compressor will run
constantly until the cabinet is cooled. It may take up to 6 or
8 hours (or longer), depending on room temperature and the
number of times the freezer door is opened. After the cabinet is
cooled, the compressor will turn on and off as needed to keep
the freezer at the proper temperature.
The outside of your freezer may feel warm. This is normal. The
freezer's design and main function is to remove heat from
packages and air space inside the freezer. The heat is transferred
to the room air, making the outside of the freezer feel warm.
Adjusting the control
Move the dial one setting at a time and wait 24 hours between
adjustments.
• Turn control to a higher number for colder temperatures.
• Turn control to a lower number for less cold temperatures.
To lock or unlock the convertible refrigerator/freezer, you must
hold the key in the lock while turning. The lock is spring loaded,
so the key cannot be left in the lock.
If the key is lost, contact your dealer for a replacement. Always
give the model and serial number of your convertible refrigerator/
freezer when requesting a replacement key.
CONVERTIBLEREFRIGERATOR/FREEZERFEATURES
important information to know about glass shelves
and covers:
Do not clean glass shelves or covers with warm water when
they are cold. Shelves and covers may break if exposed to
sudden temperature changes or impact, such as bumping.
For your protection, tempered glass is designed to shatter
into many small, pebble-size pieces. This is normal. Glass
shelves and covers are heavy. Use special care when
removing them to avoid impact from dropping.
Store similar foods together and adjust the shelves to fit different
heights. This reduces the time the convertible refrigerator/freezer
door is open and saves energy.
To remove and replace a shelf:
1. Remove the shelf by pulling it forward slightly to align the
shelf stops with the openings in the convertible refrigerator/
freezer compartment liner. Lift straight up, and pull the shelf
out the rest of the way.
2. Replace the shelf by lowering the shelf stops through the
openings in the convertible refrigerator/freezer compartment
liner. Slide the shelf in the rest of the way.
Drawers
To replace crisper cover:
1. Fit the back of the cover frame into the supports on the side
walls of the convertible refrigerator/freezer. Lower the front of
the cover frame into place.
2. Slide the rear of the glass insert into the cover frame and
lower the front into place.
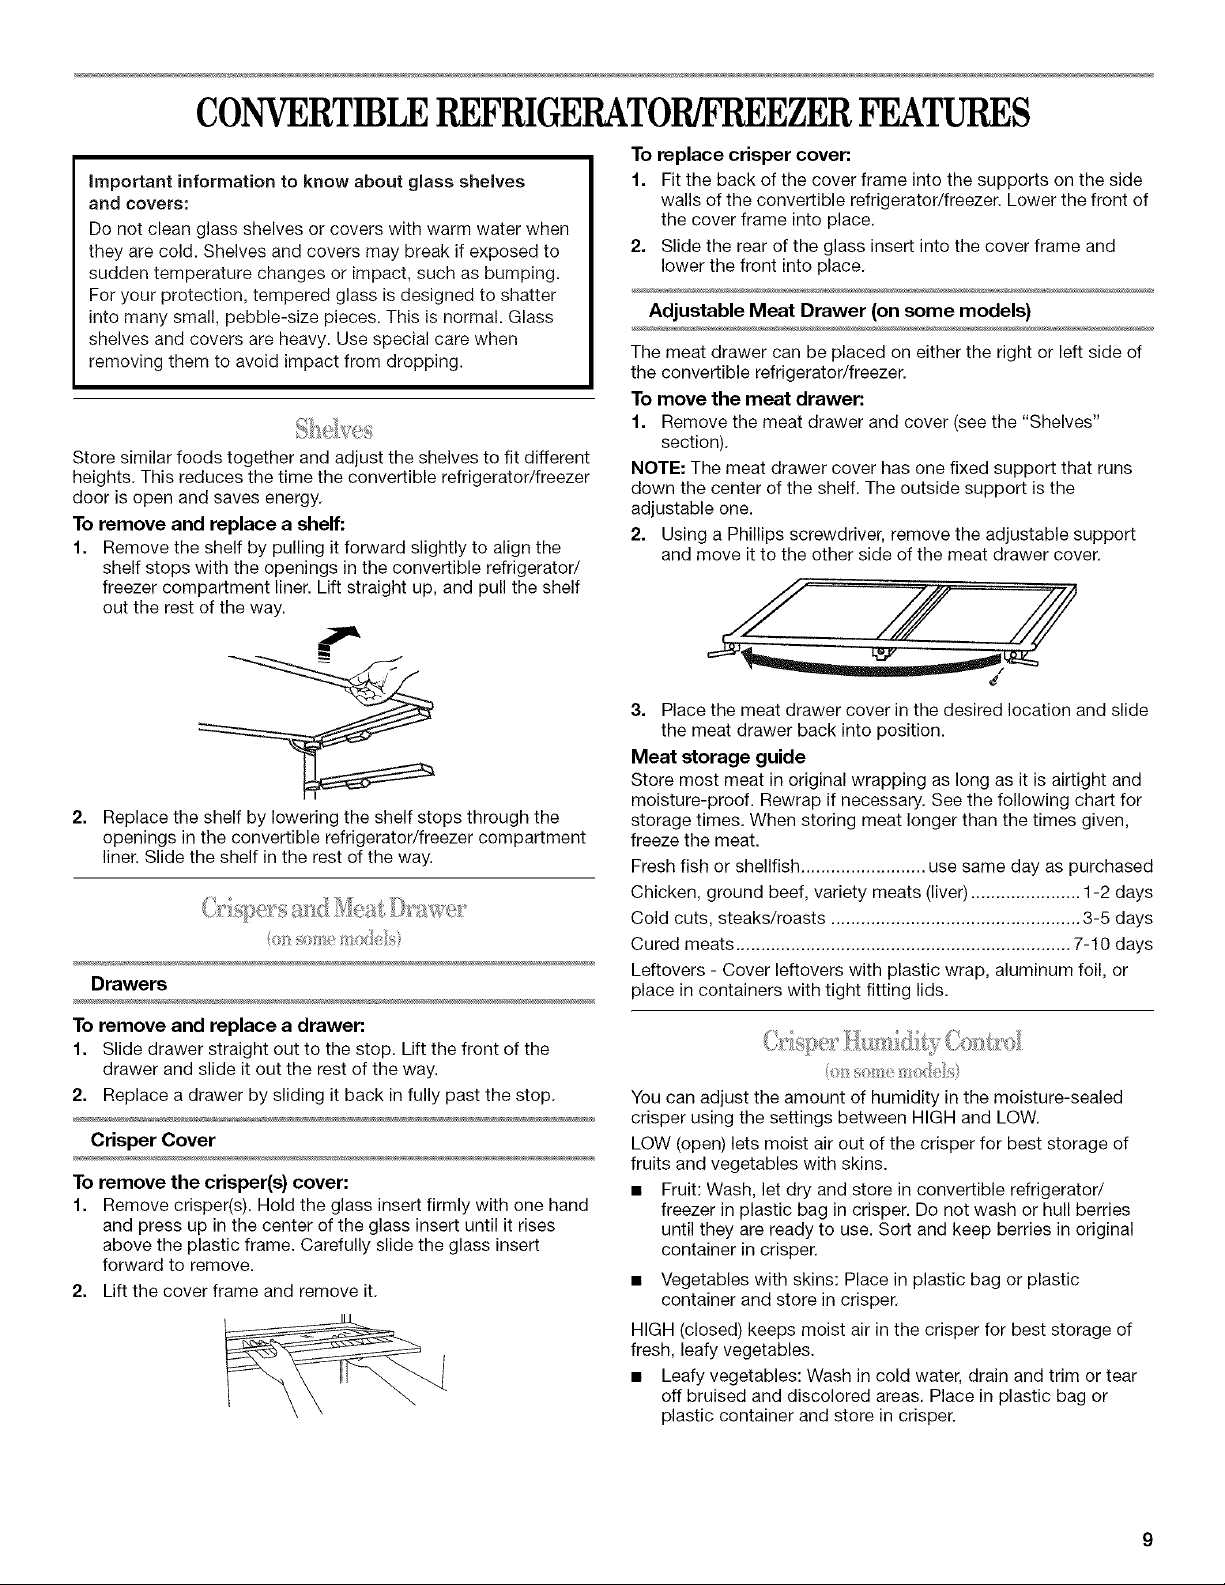
Adjustable Meat Drawer (on some models)
The meat drawer can be placed on either the right or left side of
the convertible refrigerator/freezer.
To move the meat drawer:
1. Remove the meat drawer and cover (see the "Shelves"
section).
NOTE: The meat drawer cover has one fixed support that runs
down the center of the shelf. The outside support is the
adjustable one.
2. Using a Phillips screwdriver, remove the adjustable support
and move it to the other side of the meat drawer cover.
S ....
4
3. Place the meat drawer cover in the desired location and slide
the meat drawer back into position.
Meat storage guide
Store most meat in original wrapping as long as it is airtight and
moisture-proof. Rewrap if necessary. See the following chart for
storage times. When storing meat longer than the times given,
freeze the meat.
Fresh fish or shellfish ......................... use same day as purchased
Chicken, ground beef, variety meats (liver) ...................... 1-2 days
Cold cuts, steaks/roasts .................................................. 3-5 days
Cured meats ................................................................... 7-10 days
Leftovers - Cover leftovers with plastic wrap, aluminum foil, or
place in containers with tight fitting lids.
To remove and replace a drawer:
1. Slide drawer straight out to the stop. Lift the front of the
drawer and slide it out the rest of the way.
2. Replace a drawer by sliding it back in fully past the stop.
Crisper Cover
To remove the crisper(s) cover: •
1. Remove crisper(s). Hold the glass insert firmly with one hand
and press up in the center of the glass insert until it rises
above the plastic frame. Carefully slide the glass insert
forward to remove.
2. Lift the cover frame and remove it.
You can adjust the amount of humidity in the moisture-sealed
crisper using the settings between HIGH and LOW.
LOW (open) lets moist air out of the crisper for best storage of
fruits and vegetables with skins.
Fruit: Wash, let dry and store in convertible refrigerator/
freezer in plastic bag in crisper. Do not wash or hull berries
until they are ready to use. Sort and keep berries in original
container in crisper.
Vegetables with skins: Place in plastic bag or plastic
container and store in crisper.
HIGH (closed) keeps moist air in the crisper for best storage of
fresh, leafy vegetables.
• Leafy vegetables: Wash in cold water, drain and trim or tear
off bruised and discolored areas. Place in plastic bag or
plastic container and store in crisper.
 Loading...