

Whirlpool EV15HKXK Owner's Manual
Whirlpool
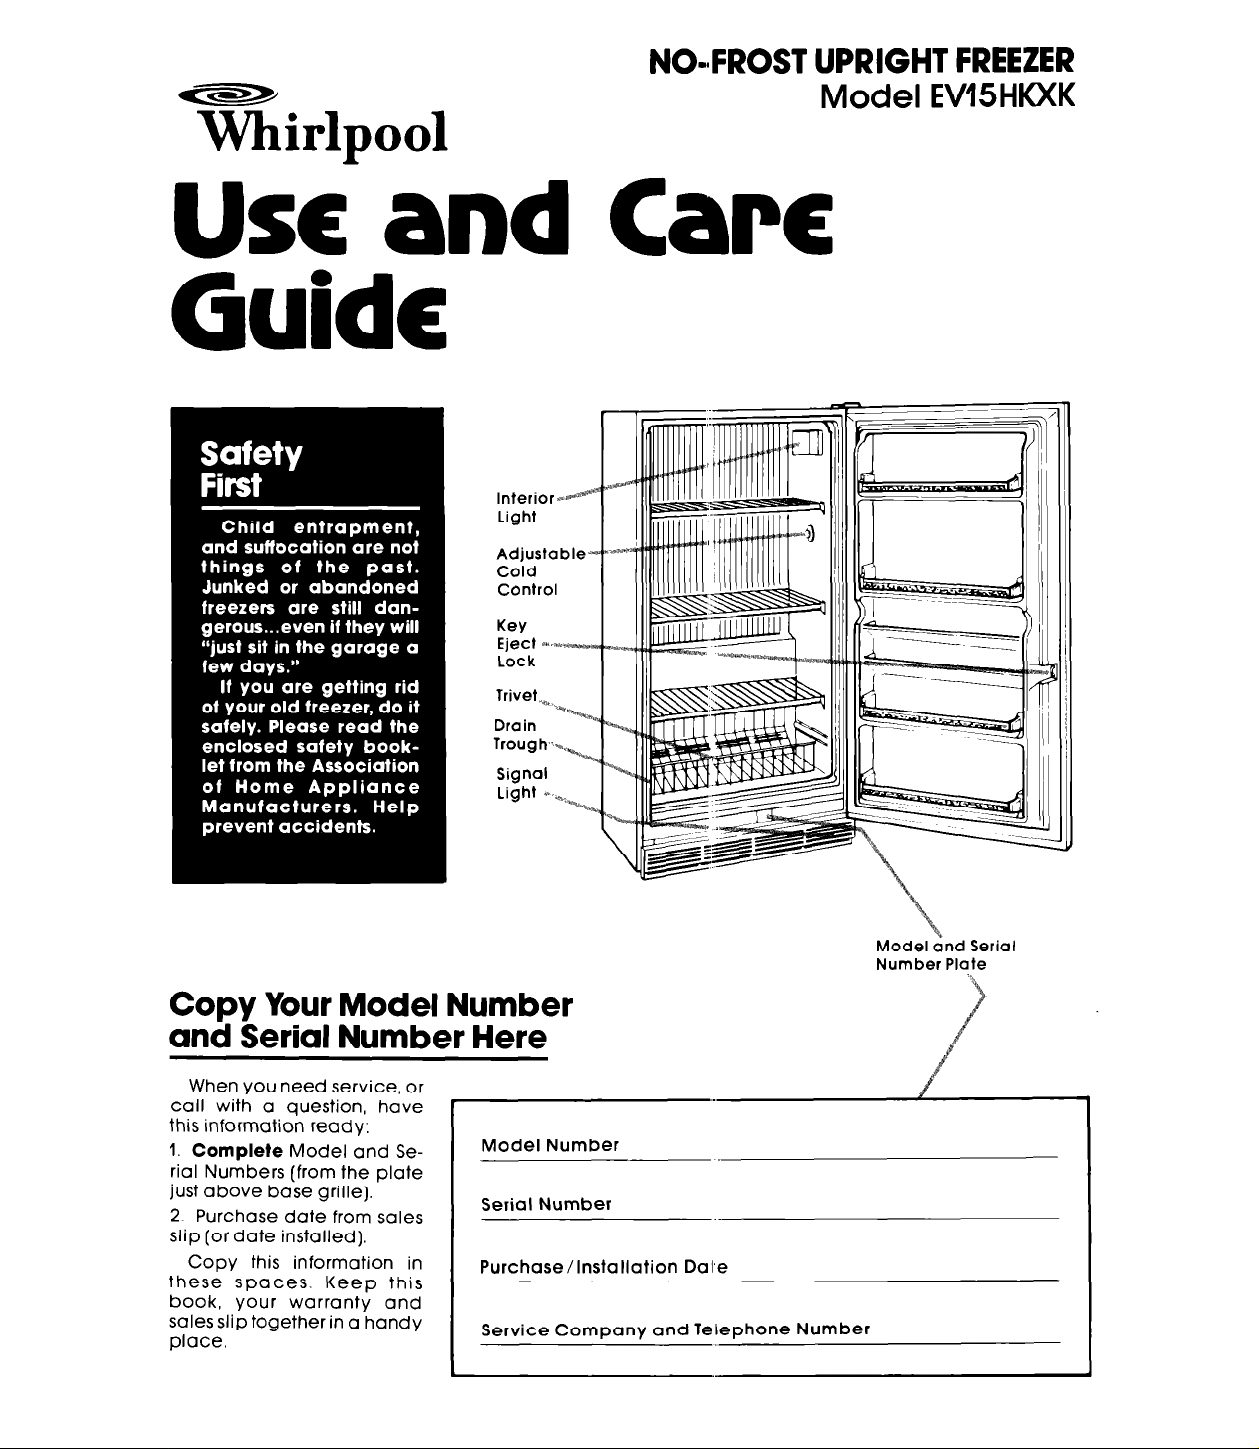
NO-#FROST UPRIGHT FREEZER
Model EVISHKXK
USC
and Care
Guide
Copy Your Model Number
and Serial Number Here
When you need service, or
call with a question, have this information ready:
1. Complete Model and Serial Numbers (from the plate
just above base grille).
2 Purchase date from sales
slip [or date installed).
Copy this information in
these spaces. Keep this
book, vour warrantv and
SQleS
slib together in a handy
place.
Model Number
Serial Number
Purchase/Installation Dale
Service Company and Telephone Number
I
\*
Model and Serial
Number Plate
/
,./

Before you plug it in
Before using your freezer, you are personally
responsible for making sure that it...
l
is installed and leveled on a floor that will
hold the weight, and in an area suitable for
its size and use.
l
is connected only to the right kind of outlet,
with the right electrical supply and
grounding.
l
is used only for jobs expected of home
freezers.
l
is not near an oven, radiator or other heat
source.
Install Properly.. .
1 inch in back1
l
is prc perly maintained.
l
is in cd dry sheltered place.
l
is use83 in an area where the room tempera-
ture vill not exceed 110°F (433°C).
l
is not run where there are explosive fumes.
l
is not Ilsed by children or others who may not
understand how it should be used.
l
is not loaded with food before it has time to
get properly cold.
Remove Sales labels...
Rem’)ve the Consumer Buy Guide label and
any inm#ide labels before using the freezer. Remove crny left over glue with rubbing alcohol.
Notcr: DC NOT REMOVE the Tech Sheet fastene.1 behind the base grille.
I
Cleaii It...
Clean your freezer before using it. See cleaning instructions on page 5,
I
1. Check the strength of the floor It should hold
the weight of fully loaded freezer.
2. Pick a sate place, indoors, away from inflammables such as gasoline.
3. Allow at least 3 inches (7.5 cm] air space on
top of freezer and 1 tnch (2.5 cm] at back between condenser and wall.
level Freezer.. .
so that door will stay open at any position.
1. Remove base grille (see page 4 1. 7
2. Starting with door hinge sid
turn left to raise corner.
3. Turn right to lower corner
4. Check with level
5. After freezer is loaded with
food, recheck with level.
2
Raise
Lower
Plug it in...
3-prong grounding
type wall receptacle
Freeze1
power .:ord
Recommended Grounding
A 12L Volt, 60 Hz., AC only, 15 ampere fused
electric al supply is required. It is recommended
that a separate circuit serving only this appliance t e provided. The receptacle should not
be conlrolled by a wall switch or pull chain.
Do not use an extension cord.
1
See ndividual electrical requirements and
grounding instruction sheet in your literature
packa! re.
Method

Using your freezer
Setting the Cold Control...
To start, turn control to the middle of the dial.
This setting will maintain zero zone temperatures
under normal operating conditions.
Freezer Shelves...
j-j
/A--
To remo>)e:
Lif frorlt slightly, then lift shelf from back supports.
To repla ::e:
Set bock of shelf on rear supports then lower
the front 3n to front mounts.
Adjusting Cold Control. . .
l
Turn control to higher number for colder
temperatures.
l
Turn to lower number for less cold temperatures.
Cooling Freezer First.. .
l
Allow freezer to cool 6 to 8 hours before filling
with frozen food.
l
Let it cool overnight before adding large
amount of unfrozen food.
Note: When freezer is first started the compressor
will run constantly until the cabinet is cooled. It
may take up to 6 to 8 hours or longer, depending
on room temperature and the number of times
the freezer door is opened.
After the cabinet is cooled the compressor will
turn on and off as needed to keep freezer at
proper temperature.
Exterior Signal light...
automatically warns of any unexpected power
failure.
Bottom Trivet...
lo remo\:e:
l
Lift up, ihen pull out. l Set in bottom of freezer.
To replace burned out signal light:
1. Unplbrg power cord from outlet.
2. Remc tie base grille. See page 4.
Toreplace:
l
Push into place.
If the signal iight is not glowing, immediately
check:
0 for power interruption,
l
the power cord: it may be disconnected from
the outlet,
l
the signal light; it moy be burned out.
3. Unpll.3 burned out light and replace with one
of same wattage and size. Signal light can be
ordered from your WHIRLPOOL dealer, Part No.
530504.
4. Replclce base grille. See page4.
5. Plug I)ower cord into outlet.
3
 Loading...