

Whirlpool EV 1280, EV 6089, EV 810, EV 1089, EV 8589 INSTRUCTION FOR USE
6GB10050.fm Page 1 Tuesday, March 2, 2004 12:56 PM
CONTENTS
BEFORE USING THE WASHING MACHINE
FIRST WASH CYCLE
PRECAUTIONS AND GENERAL
RECOMMENDATIONS
DESCRIPTION OF THE WASHING MACHINE
PREPARATION OF THE WASHING
DETERGENTS AND ADDITIVES
PROGRAMME SELECTION
CLEANING THE FOREIGN BODY TRAP
DRAINING RESIDUAL WATER
CARE AND MAINTENANCE
TROUBLESHOOTING GUIDE
AFTER-SALES SERVICE
TRANSPORT AND HANDLING
INSTALLATION
ELECTRICAL CONNECTION
Black process 45.0° 100.0 LPI
6GB10050.fm Page 2 Tuesday, March 2, 2004 12:56 PM
BEFORE USING THE WASHING MACHINE
1.Remove the packaging and check
Cut and remove the shrink-wrap.
a.
Remove the top protection and the protective
b.
corners.
Remove the bottom protection by tilting and
c.
turning the washing machine on one rear bottom
corner.
Open the lid by pressing it slightly down while raising
d.
the handle. Remove the polystyrene cushion.
Remove the blue protective film from the panel
e.
(depending on model).
After unpacking, make sure that the washing
•
machine is undamaged. If in doubt, do not use the
washing machine. Contact After-Sales Service or
your local retailer.
Keep the packaging materials (plastic bags,
•
polystyrene parts, etc.) out of reach of children;
they are potentially dangerous.
2.Remove the transport bracket
The washing machine is fitted with transport
•
screws and a transport bracket to prevent
damage during transport.
washing machine you must remove the
transport bracket
the transport bracket”).
Before using the
(see “Installation/Remove
3.Install the washing machine
Place the washing machine on a flat and stable
•
floor surface.
• Adjust the feet to ensure that the machine
is stable and level (see “Installation/Adjust
the feet”).
4.Water supply
Connect the water supply inlet hose in
•
accordance with the regulations of your local
water company (see “Installation/Connect the
water inlet hose”).
Water supply: Cold water only
•
Tap: 3/4” threaded hose connection
•
Pressure: 100-1000 kPa (1-10 bar).
•
For Great Britain & Ireland only:
Water inlet: hot and cold fill.
•
The warm water inlet temperature must not
exceed 60° C.
5.Drain hose
Connect the drain hose to the siphon or hook it
•
over the edge of a sink with the “U” bend (see
“Installation/Connect the water drain hose”).
If the washing machine is connected to a built-in
•
drainage system, ensure the latter is equipped
with a vent to avoid simultaneous loading and
draining of water (siphoning effect).
6.Electrical connection
Electrical connections must be carried out by a
•
qualified technician in compliance with the
manufacturer’s instructions and the current
standard safety regulations.
The technical data (voltage, power and fuses) are
•
given on the rating plate on the rear of the
washing machine.
The washing machine must be connected
•
exclusively by means of a socket with an earth
connection in accordance with current
regulations. The washing machine must be
earthed by law. The manufacturer declines all
liability for damage to persons or property
deriving directly or indirectly from failure to
observe the directions.
Do not use extension leads or multi sockets.
•
Before any maintenance on the washing machine
•
disconnect it from the mains supply.
Access to the mains plug or to disconnection
•
from the mains supply via a double-pole switch
must be ensured at all times following the
installation.
Do not operate the washing machine if it has
•
been damaged during transport. Inform the
After-Sales Service.
Mains cable replacement is only to be carried out
•
by After-Sales Service.
The washing machine must be connected to a n
•
effective earthing installation, in compliance with
the regulations in force. In particular, washing
machines installed in premises containing a
shower or a bath must be protected by a
differential residual current device of at least 30
mA. Earthing the washing machine is obligatory
under the law. The manufacturer declines all
liability for damage to persons or property
deriving either directly or indirectly from failure
to observe the directions above.
The washing machine may only be used in the
•
household for the prescribed uses.
Dimensions:
Width: 400 mm
Height: 900 mm
Depth: 600 mm
GB 2
Black process 45.0° 100.0 LPI
6GB10050.fm Page 3 Tuesday, March 2, 2004 12:56 PM
FIRST WASH CYCLE
We recommend that the first wash cycle be carried out empty. This will remove any residual water used
in the factory checks.
Turn on the tap.
1.
Close the drum flaps.
2.
Pour a small amount of detergent (about 30 ml) into the detergent dispenser .
3.
Select a short programme (see programme chart).
4.
Switch on the machine.
5.
Press the
6.
“On/Off”
button.
PRECAUTIONS AND GENERAL
RECOMMENDATIONS
1.Packing
The packaging materials are 100% recyclable
•
and bear the recycling symbol . Adhere to
local regulations when disposing of packaging
material.
2.Energy saving tips
Achieve the best use of energy, wate r, detergent
•
and time by using the recommended maximum
load size.
Do not exceed the detergent dosages indicated
•
in the manufacturer’s instructions.
The Eco Ball - a special system in the outlet - will
•
prevent detergent loss from the drum to avoid
detergent loss into the envir onment.
Use “Prewash” for heavily soiled laundry only!
•
Save detergent, time, water and energy
consumption by not selecting “Prewash” for
slight to normally soiled laundry.
Pretreat stains with stain remover or soak dried
•
in stains in water before washing to reduce the
necessity of a hot wash program.
Save energy by using a 60°C instead of a 90°C
•
wash programme or a 40°C inst ead of a 60°C
wash programme.
Save energy and time by selecting a high spin
•
speed to reduce the water content in laundry
before using a tumble dryer (for machines with
adjustable spin speed).
3.Disposing of packaging and old washing
machines
The washing machine is built from reusable
•
materials. The washing machine must be
disposed of in compliance with current local
waste disposal regulations.
Before scrapping, cut of the power cable so that
•
the washing machine cannot be connected to the
mains.
Remove detergent from compartment if you
•
intend scrapping your washing machine.
4.Child safety
Children must not be allowed to play with or in
•
the washing machine.
5.General recommendations
Do not leave the washing machine connected
•
when not in use. Turn off the tap.
Before cleaning or carrying out maintenance
•
switch off the washing machine and disconnect it
from the mains supply.
To clean the outside of the washing machine, use
•
a neutral detergent and a damp cloth.
Do not use abrasive detergents.
•
Do not attempt to force the lid open.
•
If necessary, the power cable may be replaced
•
with an identical one obtained from our AfterSales Service. The power cable must only be
replaced by a qualified technician.
6.EC Declaration of Conformity
This washing machine has been designed,
•
constructed and distributed in compliance with
the safety requirements of EC Directives:
73/23/EEC Low Voltage Directive
89/336/EEC EMC Directive
93/68/EEC CE Marking Directive
Black process 45.0° 100.0 LPI
GB 3
6GB10050.fm Page 4 Tuesday, March 2, 2004 12:56 PM
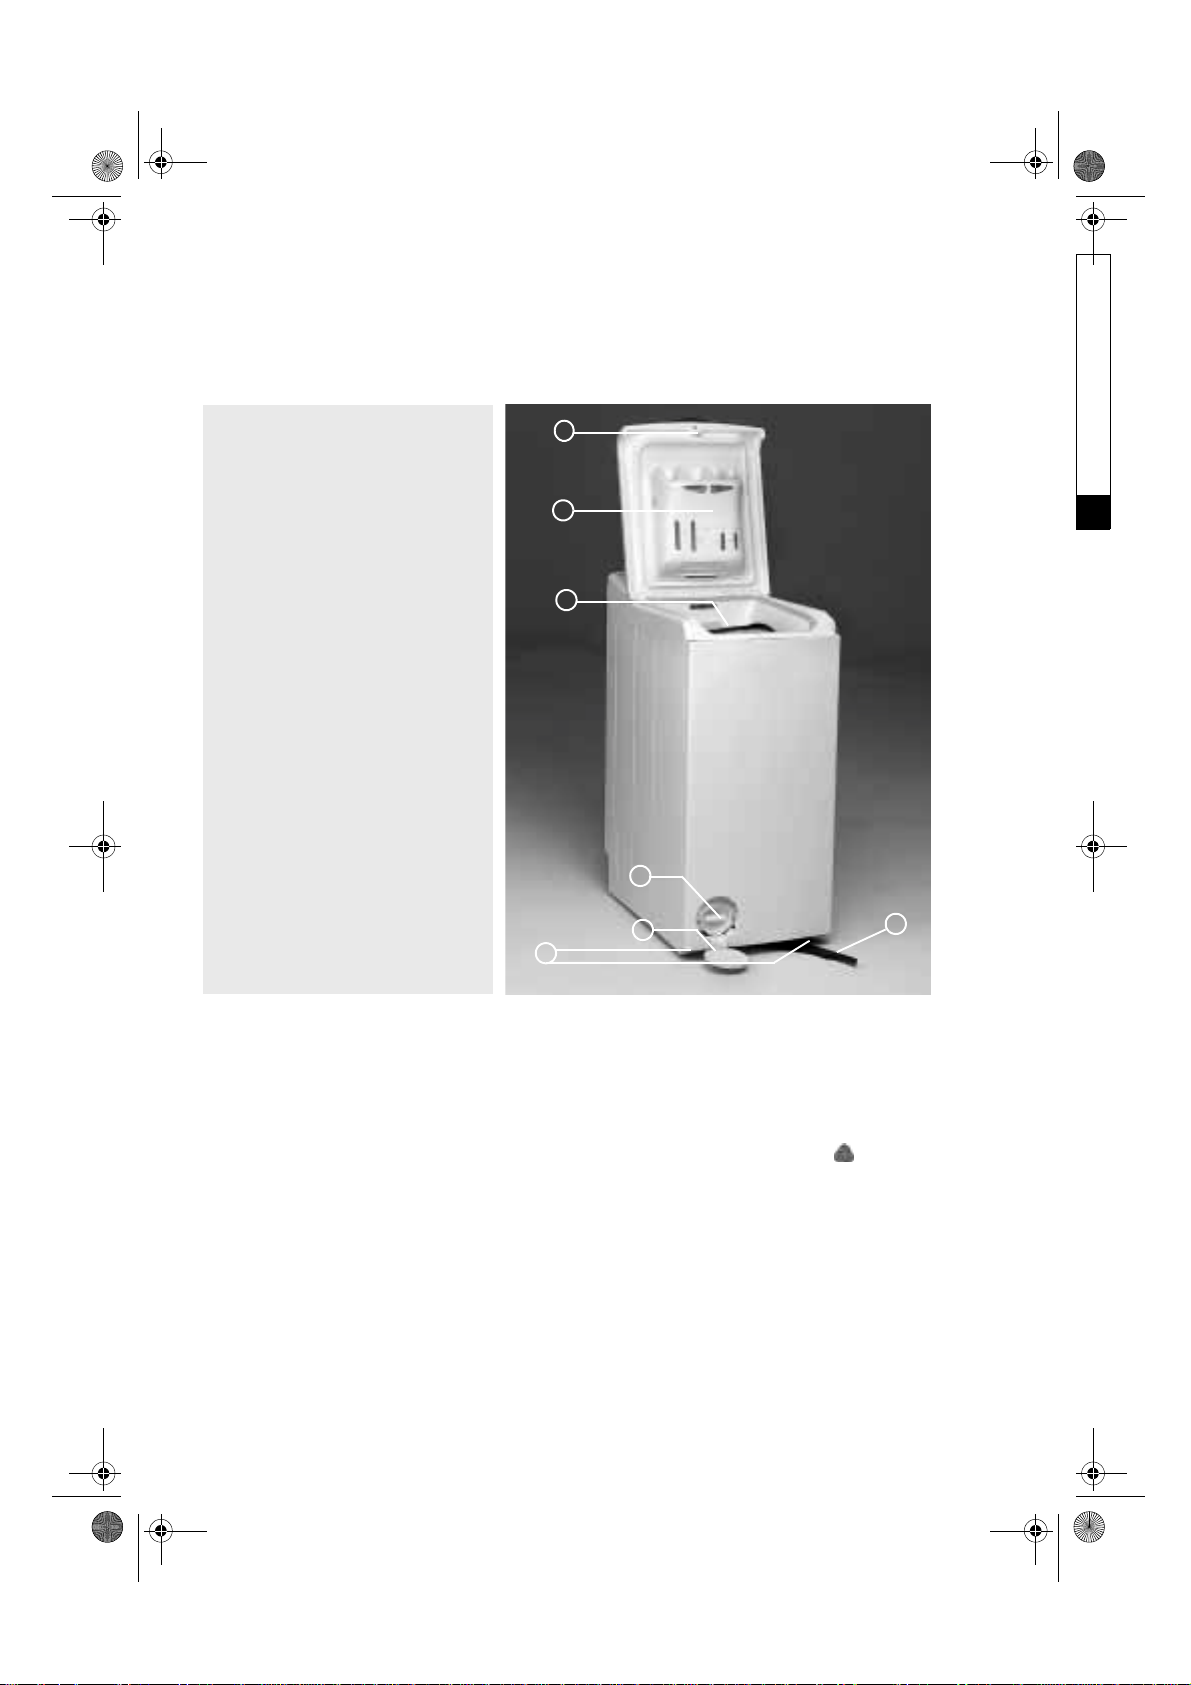
DESCRIPTION OF THE WASHING MACHINE
Lid
1.
Detergent dispenser
2.
Drum flaps
3.
Pump and foreign body trap
4.
After-Sales Service sticker (behind
5.
the foreign body trap cover)
Mobility lever (depending on model)
6.
To move the washing machine: pull
•
the handle out a little bit by hand
and pull it out to the stop with the
foot.
Adjustable feet
7.
1
2
3
4
5
7
PREPARATION OF THE WASHING
Sort the laundry
Sort the laundry according to…
1.
• Type of fabric / care label symbol
Cottons, mixed fibres, easy care/synthetics,
wool, handwashed items.
• Colour
Separate whites and coloureds. Wash new
coloured items separately.
•Size
Wash items of different sizes in the same load to
improve efficiency and distribution in the drum.
• Fabric delicacy
Wash delicate articles separately: use a special
programme for Pure New Wool , curtains
and other delicates. Always remove curtain glides
or wash curtains with the glides inside a cotton
bag. Use the special program for handwa sh
fabrics. Wash stockings, belts and other small
items or articles with hooks (e.g. bras) in special
cotton bags for washing machines or in zipped
pillow cases.
Empty pockets
2.
Coins, safety pins and similar items can damage
your washing machine drum and tub.
Fasteners
3.
Close zips and fasten buttons or hooks; loose
belts or ribbons should be tied together.
6
Black process 45.0° 100.0 LPI
GB 4
6GB10050.fm Page 5 Tuesday, March 2, 2004 12:56 PM
Stain removal
Blood, milk, egg and other organic substances are
•
generally removed by the enzyme phase of the
programme.
To remove red wine, coffee, tea, grass and fruit
•
stains etc. add a stain removing agent in
detergents dispenser compartment or
chlorine bleach in compartment (depending
on model).
Particularly stubborn stains should be treated
•
before the wash.
Loading the laundry
Open the machine lid.
1.
Open the drum by pressing the small flap and holding
2.
the large flap.
Place the items of laundry in the drum one by one
3.
without compressing them. Follow loads
recommended in the “programme chart”: overloading
will result in unsatisfactory washing results and creased
laundry.
4.Close the drum flaps and check that they are
properly locked.
Dyeing and bleaching
Products usually consist of dye colour, fixing agent
and salt. Pour the dye colour, the fixing agent and
then the salt directly into the empty drum. Load the
laundry only afterwards.
Only use dyes and bleaches recommended for
•
washing machines.
Follow the manufacturer’s instructions.
•
Plastic and rubber parts of the machine may be
•
stained by dyes or bleaches.
Starching
Dissolve/dilute the starch, powder or liquid, in
•
approximately 1 litre water outside of the washing
machine in a small container. Load the washing
machine, close the drum flaps and pour the dissolved
starch directly on the drum. Then close the lid, select
the programme “Rinse and Spin” and start.
1
Black process 45.0° 100.0 LPI
2
3
GB 5

6GB10050.fm Page 6 Tuesday, March 2, 2004 12:56 PM
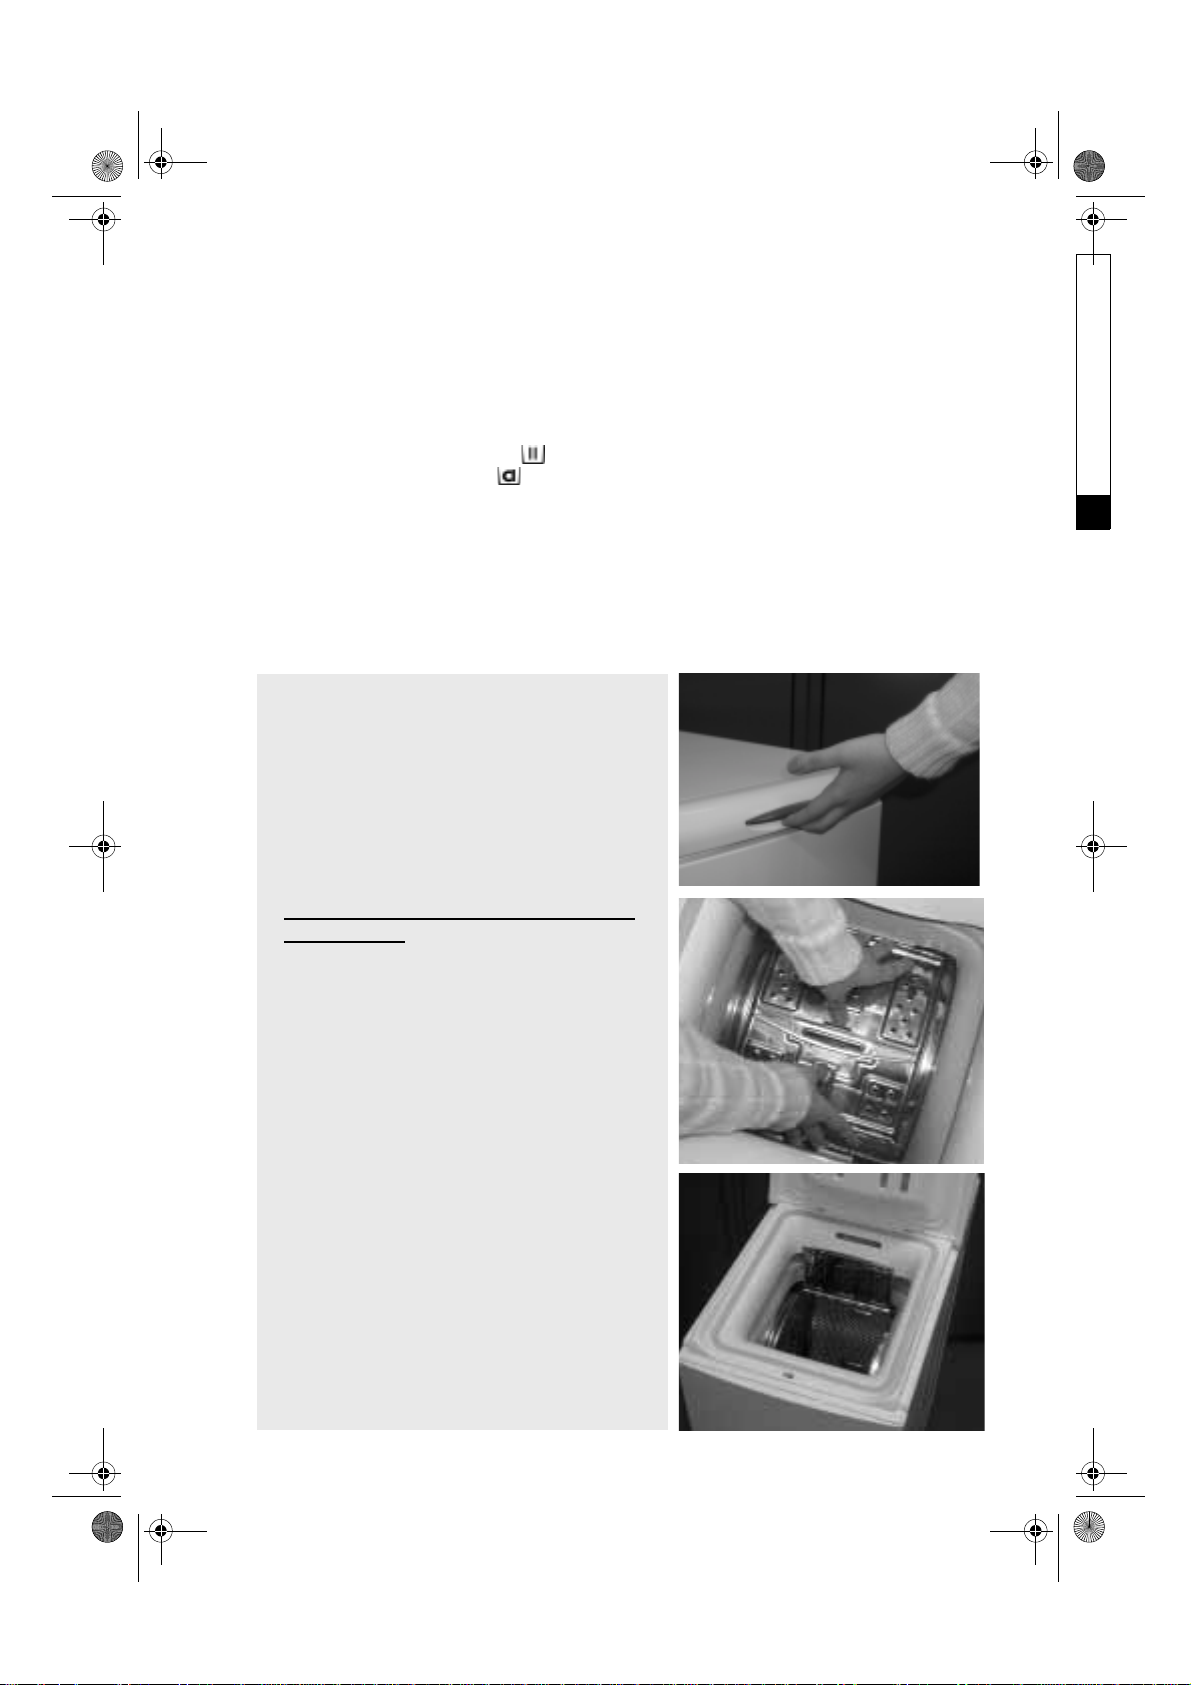
Loading the laundry
Open the machine lid.
1.
Open the drum by pressing the button and keep your
2.
second hand on the big drum door at the same time.
Place the items of laundry in the drum one by one
3.
without compressing them. Follow loads
recommended in the “Programme chart”:
Overloading will result in unsatisfactory washing
results and creased laundry.
To close the drum, please hold both doors in the
4.
middle again.
Attention:
properly locked, so that the button protrudes out
beyond the edge of the big door flap.
Make sure that the drum door flaps are
1
2
3
Black process 45.0° 100.0 LPI
GB 6
 Loading...