

Whirlpool ETPI 8740/NE, ETPI 8640/IN, ETPI 8640/BA, ETPI 8640/NE, ETPI 8540/IN PROGRAM CHART
Page 1

ENGLISH Installation Page 2 Instructions for use Page
IMPORTANT SAFETY INFORMATION
YOUR SAFETY AND THE SAFETY OF OTHERS ARE VERY IMPORTANT
This manual and the appliance itself provide important safety messages, to be read and observed at all times.
This is the safety alert symbol, pertaining t o safety, which alerts users to potential hazards to themselves and others.
All safety messages will follow the safety alert symbol and either the terms:
DANGER
WAR N ING
All safety messages tell you what the potential hazard is, how to reduce the risk of injury, damages and electrical shocks resulting from the incorrect us e of the
appliance. Please o bserve the following instructions:
- The appliance must be disconnected from the power supply before carrying out any installation work.
- Ensure that the installation and maintenance are performed by a qualified technician, following the manufacturer's instructions and in com pliance with current
local safety regulations. Do not repair or replace any part of the appliance unless specifically stated in the user manual.
- Regulations requi re that the appliance is ear thed.
- The power cable must be long enough for connecting the appliance, once fitted in its housing, to the power supply.
- Observance of safety directives requires that a multi-pole switch with a minimum contact gap of 3 mm be used. for the installation.
- Do not use multiple plug adapters or extension leads.
- Do not pull the power cable to disconnect it from the electrical supply.
- The electrical components must not be accessible to the user after installation.
- Do not touch the appliance with wet parts of the body or use it when barefoot.
- The appliance is designed solely for household use for cooking food. No other type of use is allowed (e.g. heating the room). The Manufact urer declines all
responsibility for inappropriate use or incorrect setting of the controls.
- The appliance i s not intended for use by people (chi ldren included) with physical, sensor y or mental impairment or wi thout experience and kn owledge of t he
appliance, unless supervised or previously instructed in its use by those responsible for their safety.
- Accessible parts become very hot when the appliance is in operation. Keep children away from the appliance and supervise them to ensure that they do not play
with it.
- Do not touch the heating elements of the appliance during and after use to avoid the risk of burns. Do not allow cloths or other flammable material to come into
contact with the appliance until all parts have cooled down completely.
- Use oven gloves to re move pans and accessories, ta king care not to touch the h eating elements.
- Do not place flammable material on or near the appliance: A fire may break out if the appliance is inadvertently switched on.
- Overheated oils and fats catch fire easily. Never leave the appliance unattended when cooking with fat and oil.
- This appliance complies with current safety regulation and electromagnetic compatibility regulations. Nevertheless, people with a pacemaker should not use this
appliance. It is impossible to guarantee that all such devices found on the market comply with current safety regulations and electromagnetic compatibility
regulations, and that dangerous interferences will not occur. It is also possible that people with other types of device, such as a hearing aid, could experience
some discomfort.
- Do not place metal objects, such as kitchen utensils (knives, forks, spoons, lids, etc.), on the cooking zone as they can become very hot.
- Insert a separator panel (not supplied) in t he compartment beneath th e appliance.
- If the surface of the hob should become damaged (cracked or broken glass), do not use the appliance and call the After-sales Service immediately.
- The appliance i s not intended to be operated by m eans of an external timer or separate remote control system.
Indicates a hazardous situation which, if not avoided, will cause serio us injury.
Indicates a hazardous situation which, if not avoided, could cause serious injury.
Disposal of household appliances
- This product is built from recyclable or reusable materials. Disposal must be carried out in accordance with local regulations for waste disposal. Before disposing
of it, cut its power cable off in order to render it inoperative.
- For further information on the treatment, recovery and recycling of household applian ces, contact the competent local authority, the domestic waste collection
service or the shop where you purchased the product.
GB12
Page 2
SAFEGUARDING THE ENVIRONMENT
Disposal of packaging materials
The packaging material is entirely recyclable and marked with the recycling symbol ( ). Do not dispose of the various packaging materials carelessly, but do so
responsibly and in full compliance with local authority regulations governing waste disposal.
Scrapping
This appliance is marked in compliance with European Directive 2002/96/EC on Waste Electrical and Electronic Equipment (WEEE).
By ensuring that this appliance is scrapped suitably, you can help prevent potentially damaging consequences for the environment and health.
The symbol on the appliance or accompanying documentation indicates that this product should not be disposed of as unsorted municipal waste but must be taken
to a collection point for the treatment of WEEE.
Energy saving
For optimum results, observe the following advice:
• Use pots and pans whose bottom diameter is equal to that of the cooking zone.
• Only use flat-bottomed pots and pans.
• If possible, keep pot lids on when cooking.
• Cook vegetables, potatoes, etc. with little water in order to reduce cooking time.
• Use a pressure cooker to to save even more energy and time.
• Make sure you place the pot or pan in the centre of the cooking zone outlined on the hob.
DECLARATION OF CONFORMITY
- This appliance is designed to come into contact with food and complies with Regulation ( ) no. 1935/2004, and has been designed, constructed and marketed
in compliance with the safety requirements of “Low Voltage” Directive 2006/95/EC (replacing 73/23/EEC as amended) and protection requirements of “EMC”
Directive 2004/108/EC.
BEFORE USE
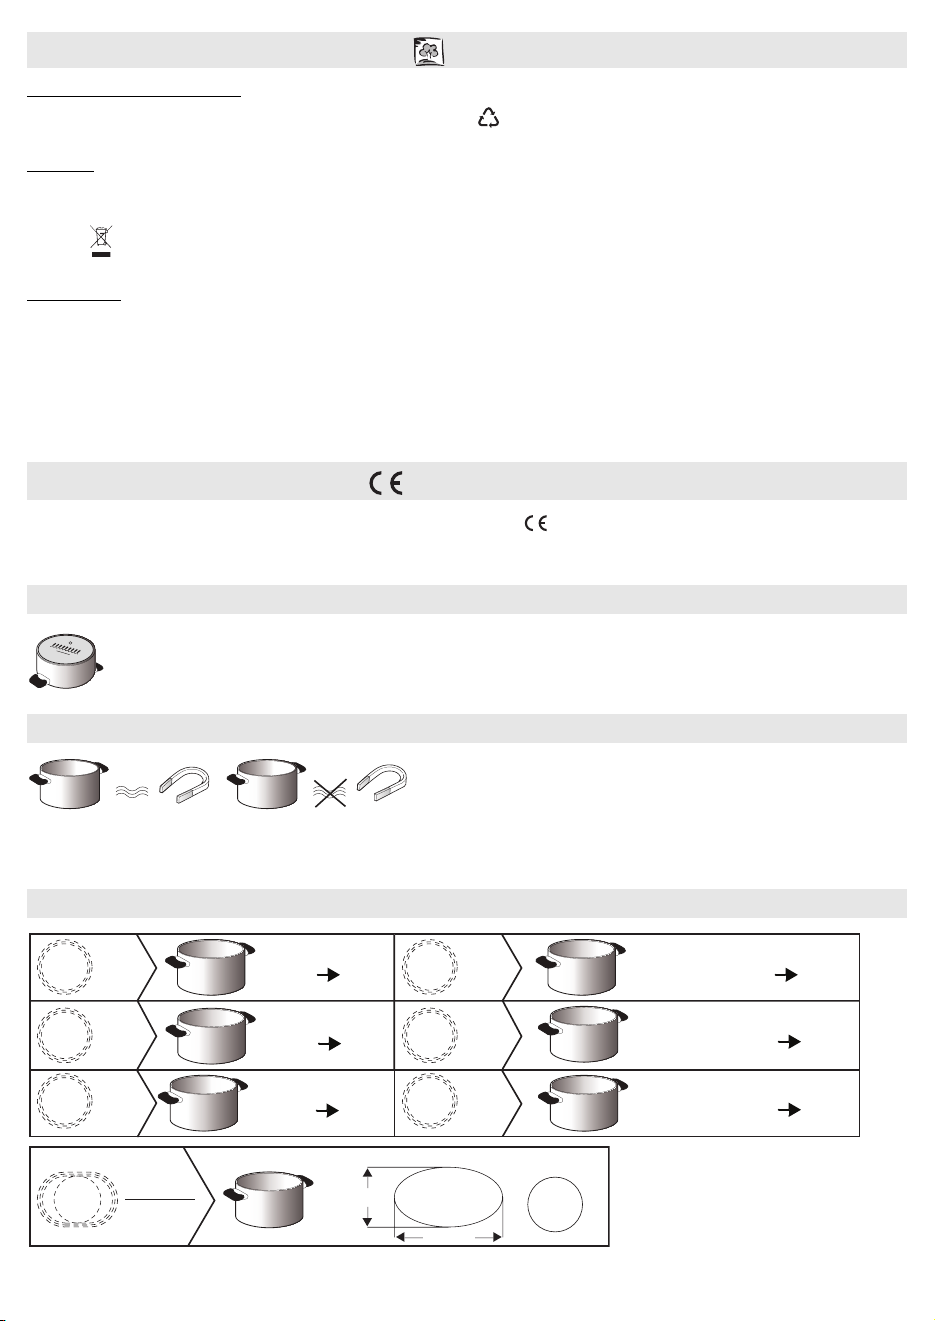
IMPORTANT: the cooking zones will not switch on if pots and pans are not of the correct dimensions. Only use pots bearing the symbol “INDUCTION
SYSTEM” (See figure opposite). Before switching the hob on, position the pot on the desired cooking zone.
EXISTING POTS AND PANS
NOOK
Use a magnet to check whether pots or pans are suitable for use on the induction hob: pots are unsuitable if they cannot be magnetically detected.
- Ensure pots have a smooth bottom, otherwise they may scratch the hob's glass ceramic surface. Check dishes.
- Never place hot pots or pans on the hob's control panel. This could result in damage.
RECOMMENDED DIAMETERS OF POT BOTTOMS
XL
M
Ø
30 cm
Ø
L
24 cm
Ø
18 cm
Ø 18 cm
28.5 x 18 cm
14 cm
17 cm
14 cm
Ø
30 cm
Ø
24 cm
Ø
18 cm
18 cm
XL
L
S
Max.
28.5 cm
Ø
28 cm
Ø
21 cm
Ø
14.5 cm
Min.
Ø
16 cm
18 cm
14 cm (Dual zone)
15 cm
11 cm
Ø
Ø
Ø
28 cm
21 cm
14.5 cm
GB13
Page 3
INSTALLATION
After unpacking the hob, check that there has been no damage during transport. If in doubt, contact the dealer or After-sales Service.
PREPARING THE HOUSING UNIT
WAR N ING
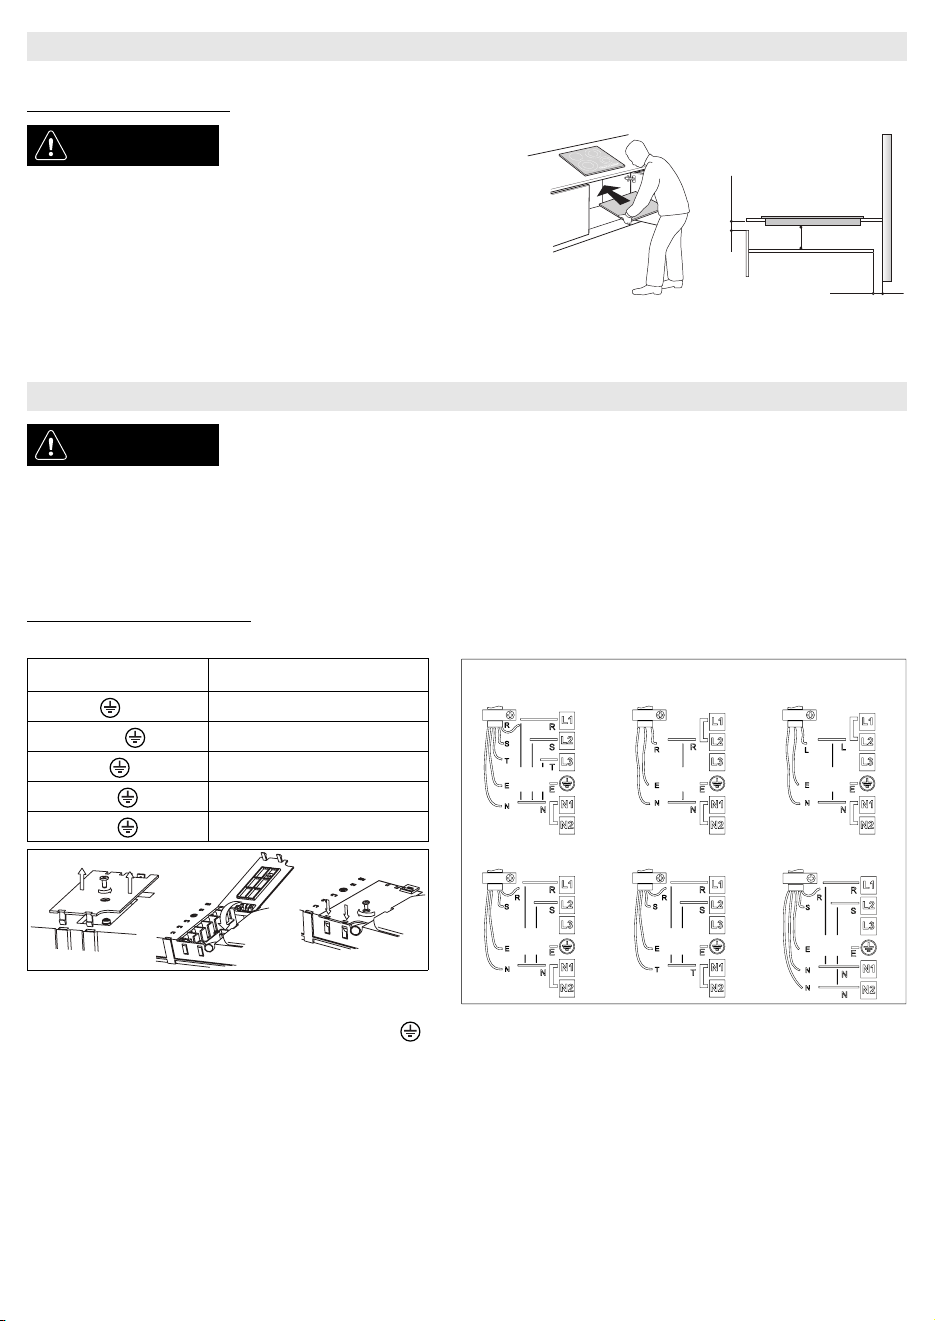
• For the distance between the underside of the appliance and the separator panel below, observe the dimensions given in the figure.
• Do n ot obstruct the minimum required clearance between the hob and the top of the unit to ensure the correct operation of the product.
• Cut the worktop to fit before installing the hob and carefully remove any shavings or sawdust.
- Install a separator panel under the hob.
- The lower part of the product must not be
accessible after installation.
- If there is an oven beneath the hob, do not
install the seperator panel.
min. 5 mm
ELECTRICAL CONNECTION
min. 20 mm
min. 5 mm
WAR N ING
- Disc onnect the appliance f rom the mains power supply.
- The appli ance must be installed by a qualified technician who is fully aware of curren t safety and
installation re gulations.
- The manufacturer declines all liability for injury to persons or animals and for damage to property resulting from failure to observe the
regulations provided in this chapte r.
- The power supply cable must be long enough to allow the hob to be removed from the worktop.
- Make sure the voltage specified on the appliance rating plate is the same as that of the house electrical system.
- Do not use exten sion leads.
Connecting to the terminal board
For electrical connection, use an H05RR-F cable as specified in the table below.
Conductors Amount x size
230 V ~ +
230-240 V ~ +
230 V 3 ~ +
400 V 3N ~ +
400 V 2N ~ +
3 x 4 mm
3 X 4 mm
4 X 1.5 mm
5 X 1.5 mm
4 X 1.5 mm
2
2
(Aust ralia onl y)
2
2
2
400 V 3N ~ 230 V ~
230 V
230 V
230 V
230 V
230-240 V ~ (Australia only)
230 V ~ (UK only)
400 V 2N ~ 230 V 3 ~ (Belgium only) 400 V 2N ~ (NL only)
CBA
230 V
230 V
230 V
230 V
230 V
230 V
230 V
Connect the yellow/green earth w ire to the terminal with the symbol .
This wire must be longer than the other wires.
1. Remove the terminal block cover (A), undoing the screw and inserting the cover in the terminal block hinge (B).
2. Remove approx. 70 mm of sheath from the power supply cable.
3. Remove approx. 10 mm of sheath from the wires. Insert the power supply cable into the cable clamp and connect the wires to the terminal board as indicated in
the diagram next to the terminal board itself.
4. Secure the power cable with the cable clamp.
5. Close the cover (C) and screw it on the terminal block with the removed screw - point (1).
Each time the cooktop is connected to the mains it carries out an automatic check which lasts several seconds.
If the hob already has a power c able, follow the instructions given on the la bel attached to the cable. Connect to the power m ains using a multi-pole power switch with
a contact gap of at least 3 mm.
GB14
Page 4
INSTRUCTIONS FOR USE
Cook
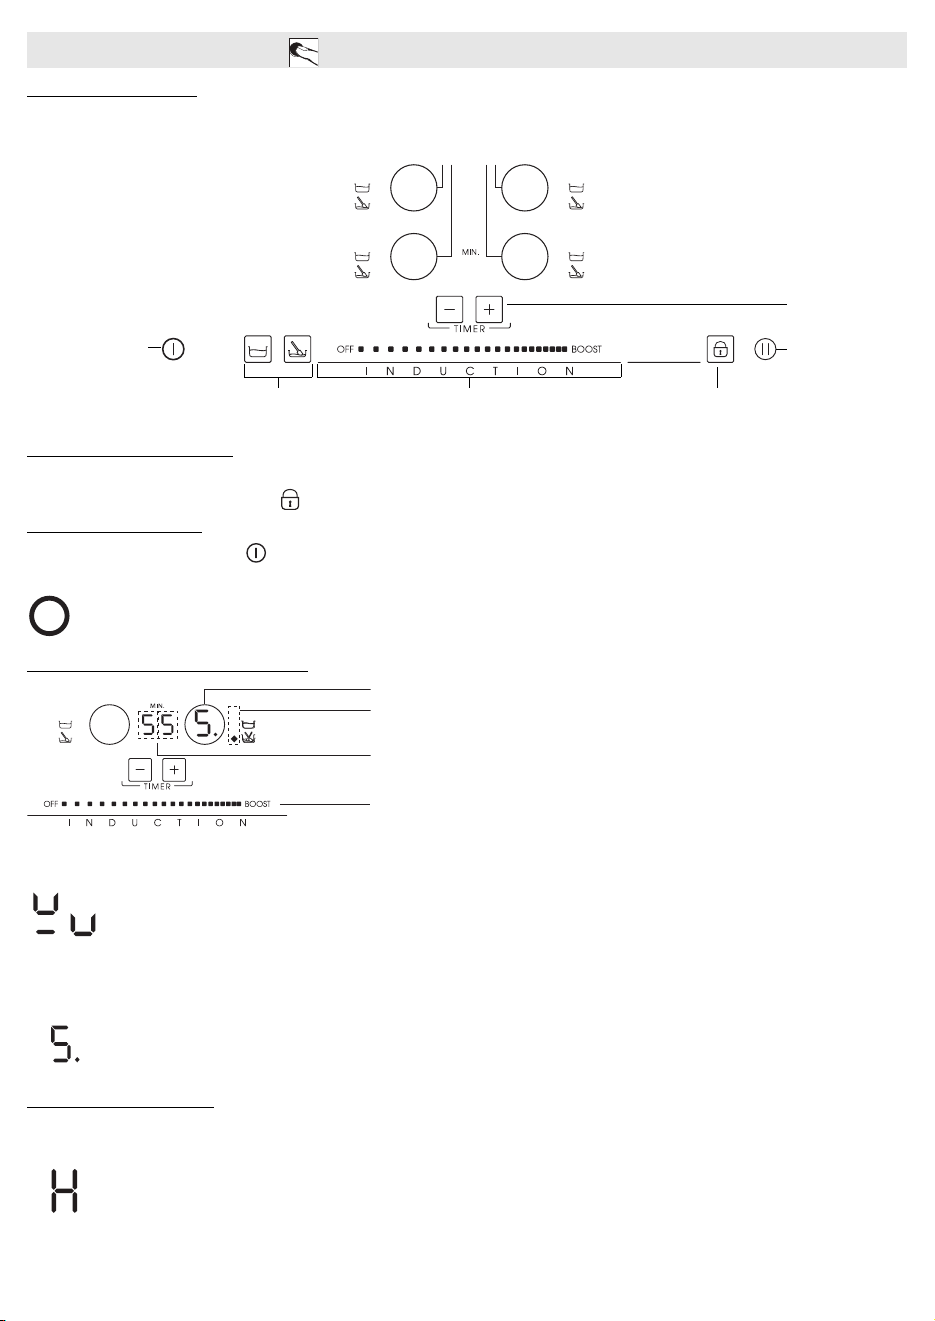
Control Panel Description
The control panel is equipped with touch controls: to use them, just press the corresponding symbol (it is not necessary to press h ard).
To select and activate the cooking z ones
To set the minute
counter
Hob ON/OFF
Slide touch screen To lock the control panelTo select one of the automatic functions
First use / after a power failure
After connecting the hob to the electrical power supply, the control panel is locked (the indicator light above the key is ON).
To unlock the control panel, press and hold the key for 3 seconds. The indicator light switches off and the hob can be used normally.
Switching the hob ON/OFF
To switch the hob on, press and hold the key for approx. 2 seconds: the indicator light above the key turns on and hyphens appear inside the cooking zone circle s.
To switch off, press the same key until the hob switches off. All the cooking zones are switched off.
The hob auto matically switches off if no function is selected within 10 seconds of switching on.
i
To enable the hold
function
Switching on and adjusting cooking zones
ing zone selection and selected cooking zone/power level display
Indicates that one of the automatic functions is On
Cooking zone timer
Slide touchscreen (power adjustment)
After switching on the hob, position the pot on the chosen cooking zone.
Activate the cooking zone by pressing the relative round key: the round key displays number 5 that corre sponds to the intermediate power leve l.
The hob automatically switches off if no function is selected within 10 seconds of switching on. If you are using a pot that is not suitable, not correctly
positioned or not of the correct dimensions for your induction hob, the message “no pot” will appear in the display (see figure on the left). If no pot is
detected within 60 seconds, the hob switches off.
To change the power level, move your finger horizontally on the slide touchscreen: the number inside the circle will change with just a quick slide of the finger from a
minimum of 1 to a maximum of 9. You can activate the booster function by pressing “BOOST” on t he slide touchscreen (“P” on the display).
If more than one cooking zone is on, the slide touchscreen allows you to change the power level of the selected zone, indicated by the presence of a
luminous dot at the bottom right of the power level indicator. To select a zone, simply press the relative round key.
Switching off cooking zones
Select the cooking zone to be switched off by pressing the relative round key (a dot lights up at the bottom right of the power level indicator). Press OFF on the slide
touchscreen.
The cooking zone switches off and, if the zone is still hot, the letter “H” appears in the circle.
“H” is the residual heat indicator. The hob is fitted with a residual heat indicator for each cooking zone; these indicators alert the user when cooking
zones are still hot. When the cooking zone cools down, the display swi tches off.
GB15
Page 5
Timer selection
The timer can be used to set a max. cooking time of 99 minutes.
Select the cooking zone to be used with the timer (a dot lights up at the bottom right of the power level indicator), then set the required cooking time using the + and
- keys of the timer function: the time in minutes is shown next to the cooking zone display.
A few seconds after the key is pressed, the timer begins the countdown (the luminous dot of the selected cooking zone starts flashing).
Once the set time has elapsed, an acoustic signal sounds and the cooking zone switches off automatically.
Control panel lock
This function locks the hob controls to prevent accidental switching on (e.g. during cleaning).
Press the key for three seconds: an acoustic signal sounds and an indicator light turns on above the lock symbol to confirm activation. The control panel is locked
with the excepti on of the OFF function. To unloc k the controls, repeat the ch ild safety activation procedu re. The illuminated dot switches off and the ho b is active again.
IMPORTANT: The presence of water, liquid spilled from pots or objects of any nature resting on the key below the symbol can accident ally activate or deacti vate the
Control panel lock function.
Hold
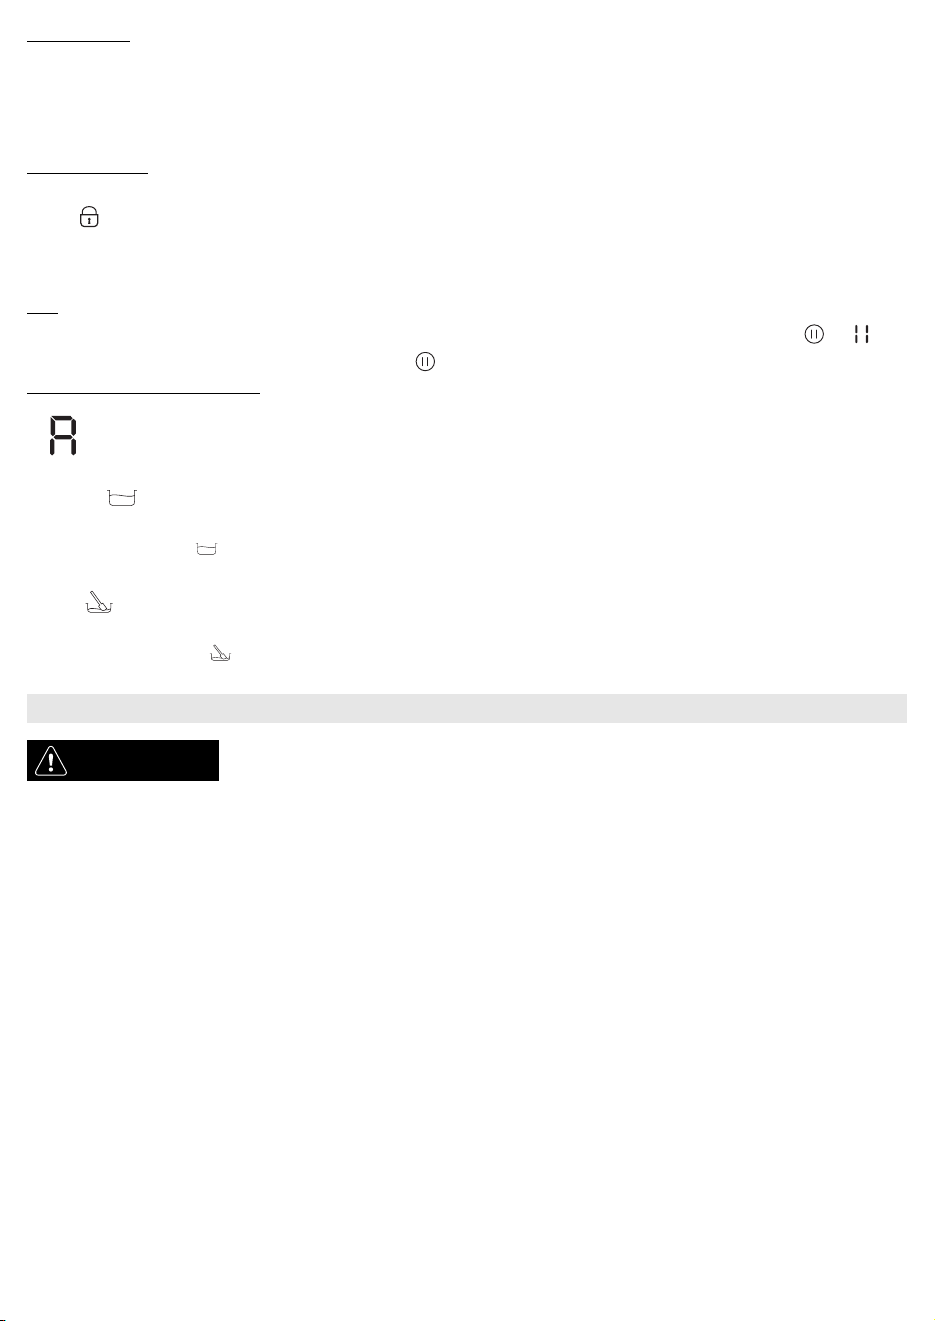
This function allows you to temporarily hold and then resume cooking processes maintaining previous settings (except for timer setting). Press the key: blinks
on the display in place of the power levels. To resume cooking, press the key again.
Description of automatic functions
The hob features automatic functions for each cooking zone. The symbols of the available functions are shown next to the selection key of each cooking
zone. Every ti me an automatic functi on is selected, an indica tor light turns on next to the symbol and the lette r “A” appears in the cooking zone display.
Simmering
The simmering function automatically sets the selected cooking zone to a minimum boiling temperature. After positioning the pot, switch on the hob and select the
chosen cooking zone. Press the key : “A” appears on the display and the indicator light turns on. To deactivate the function, simply press OFF on the slide
touchscreen.
Melting
This function maintains a permanently low temperature in the cooking zone. After positioning the pot/accessory on the chosen cooking zone, switch on the hob and
select the cooking zone. Press the key: “A” appears on the display and the indicator light turns on. To deactivate the function, simply press OFF on the slide
touchscreen.
CLEANING
WAR N ING
IMPORTANT: do not use abrasive sponges or pan scourers. as they could ruin the glass surface.
• Clean the hob, when it is c ool, after each u se in order to remove any food residu es.
• Sugar and foods with a high sugar content damage the glass ceramic surface and must be immediately removed.
• Salt, sugar and sand can scratch the glass surface.
• Use a soft cloth, absorbent kitchen wipes or a specific hob cleaner (follow the Manufacturer's instructions).
- Never use steam cle aners.
- Before cleaning, make sure the cooking zones are switched off and that the residual heat indic ator (“H”) is
not displayed.
GB16
Page 6
TROUBLESHOOTING GUIDE
• Read and follow the instructions given in the section “Instructions for use”.
• Connect the hob to the electricity supply and check that the supply has not been shut off.
• Clean the hob and dry it thoroughly.
• If you are u nable to turn the hob of f after using it, disconnec t it from the power supply.
• If, when the hob is switched on, alphanumeric codes appear on the display, consult the following table for instructions.
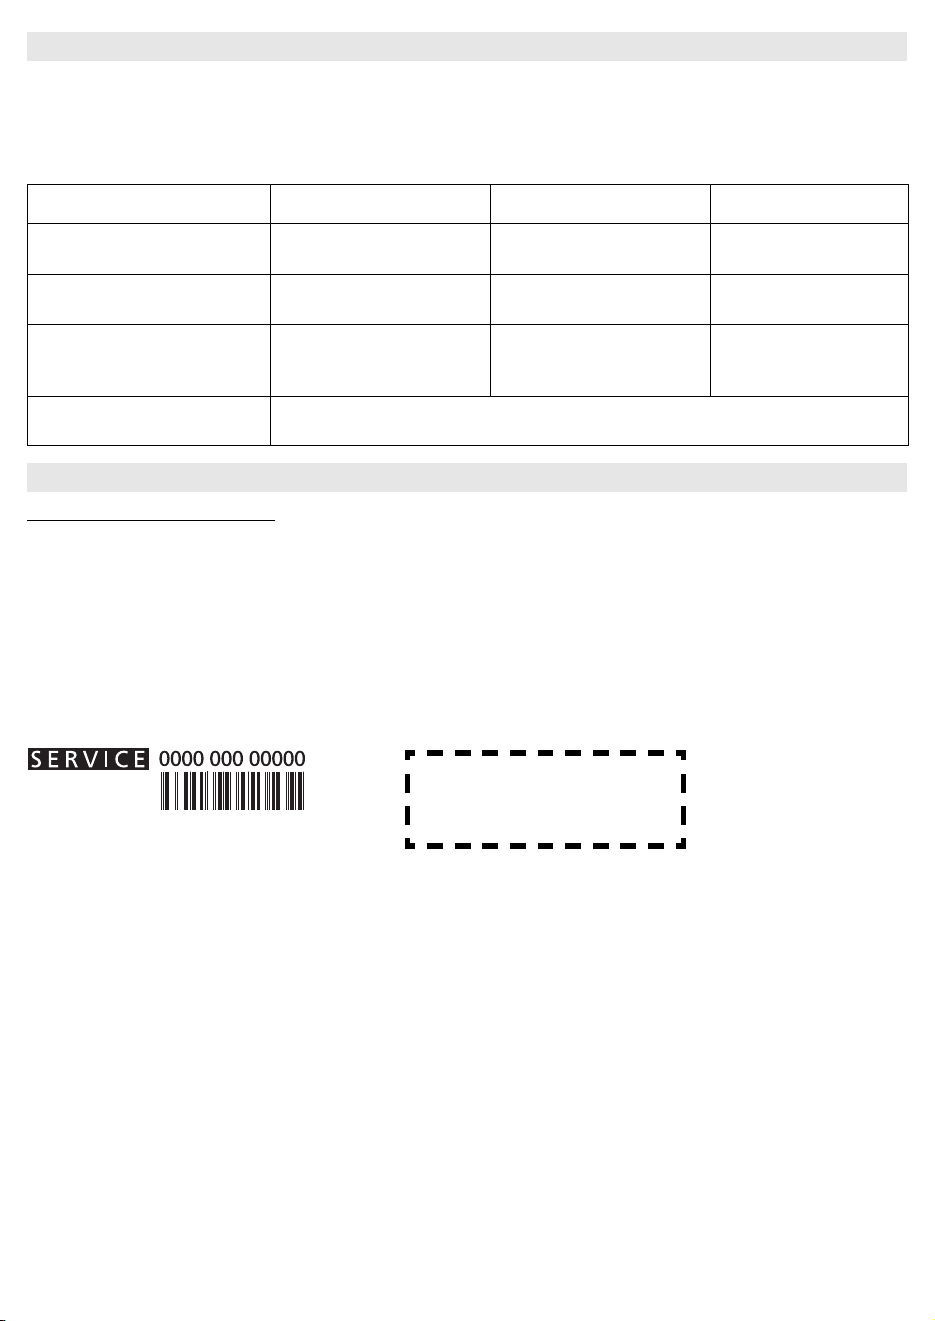
ERROR CODE DESCRIPTION POSSIBLE CAUSES REMEDY
The hob switches off and after 10 seconds
emits an acoustic signal every 30 seconds.
C81, C82, C83 The control panel switches off because
F42 or F43 The connection voltage is wrong. The sensor detects a discrepancy
F12, F21, F25, F36, F37, F40, F47, F56,
F60, F61, F62, F63, F64
Continu ous pressure o n control pa nel
area.
of excessively high tem peratures.
F58,
Call the After-sales Service and specif y the error code.
Water or utensils on control panel. Clean the control panel.
The internal temperature of electronic
parts is too high.
between the app liance voltage and that
of the mains supply.
Wait for the hob to cool down
before using it again.
Disconnect the ho b from the mains
and check the ele ctrical connection.
AFTER-SALES SERVICE
Before contacting After-sales Service
1. See if you c an eliminate the problem on your ow n by referring to the “Troubleshooting gui de”.
2. Turn the hob off and on again to check if the problem has been eliminated.
If after the above checks the fault persists, contact the nearest After-sales Service.
Always specify:
• a short description of the fault;
• the type and exact model of the hob;
• the Service number (the number after the word Service on the rating plate) located under the appliance (on the metal plate). The Service number is also
indicated on the warranty booklet;
• your full address;
• your telephone number and area code.
Attach here one of the two appliance data plate
stickers found in the warranty booklet.
If any repairs are required, please contact an authorised After-Sales Service (to guarantee that original spare parts will be used and repairs carried out correctly).
GB17
Page 7
POWER LEVEL TABLE
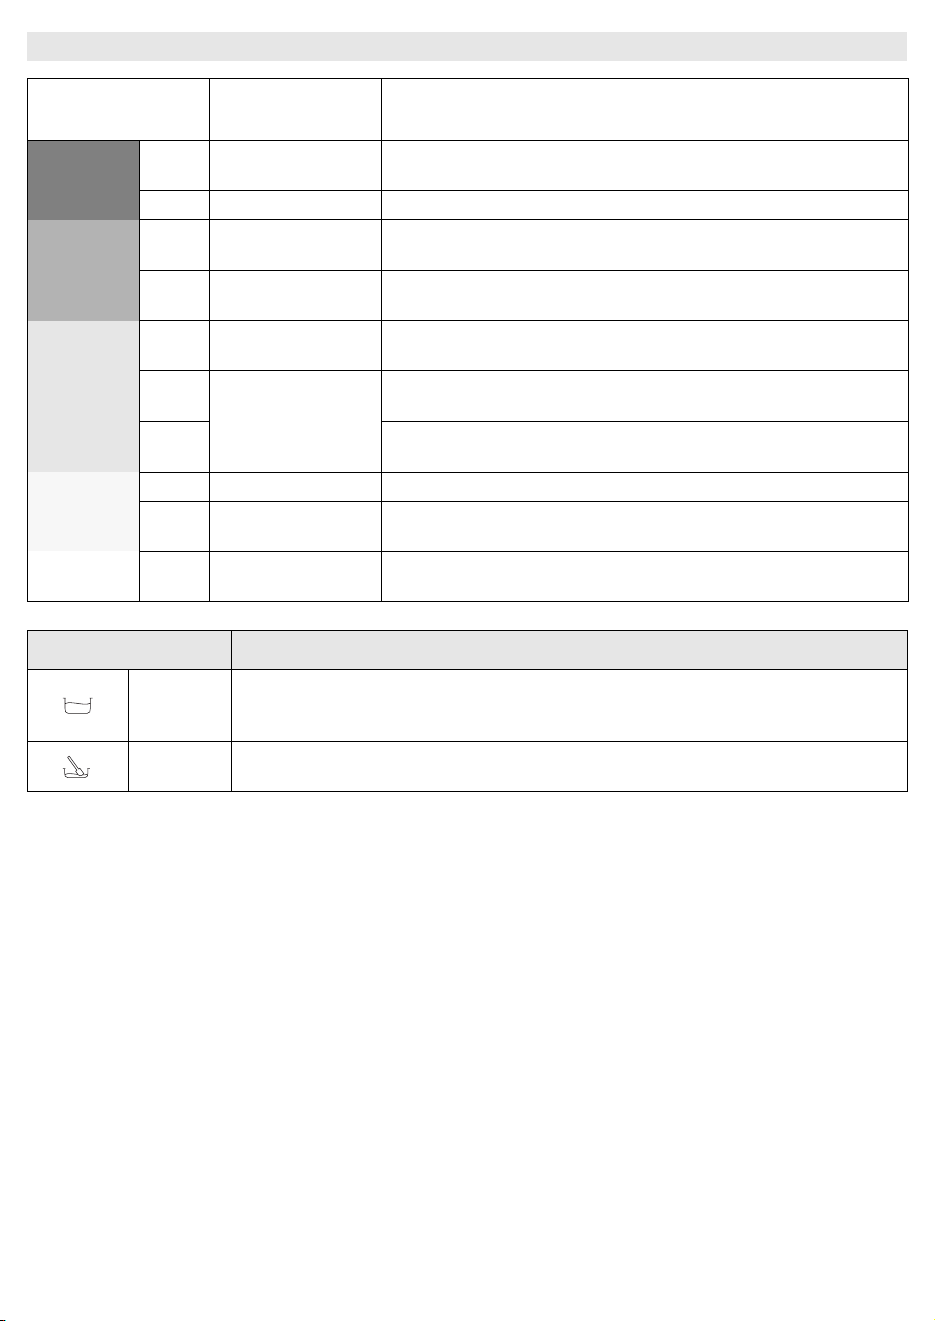
Power level Type of cooking Level use
(indicating cooking experience and habits)
Ideal for rapidly increasing the temperature of food to fast boiling in the case of water or rapidly
heating cooking liquids
Ideal for sautéing, maintaining a lively boil, cooking and grilling (for a short period of time,
5-10 minutes)
Ideal for sautéing, maintaining a light boil, cooking and grilling (for a medium period of time,
10-20 minutes), p reheating accessories
Ideal for stewing, maintaining a gentle boil, cooking (for a long period of time). Creaming pasta
Ideal for long-cooking recipes (rice, sauces, roasts, fish) with liquids (e.g. water, wines, broth,
milk), creaming pasta
Ideal for long-cooking recipes (quantities under 1 litre: rice, sauces, roasts, fish) with liquids (e.g.
water, wine, broth, milk)
Ideal for keeping small portions of just-cooked food or serving dishes warm and for creaming
risotto
Max. power
High power
Medium power
Low power
OFF
Boost Fast heatin g
8-9 Frying - boiling Ideal for browning, starting to cook, frying deep frozen products, fast boiling
Browning - sautéing - boiling
7-8
6-7
4-5
3-4
2-3
1-2 Melting - thawing Ideal for softening butter, gently melting chocolate, thawing small products
1
Zero
power
- grilling
Browning - cooking - ste wing
- sautéing - grilling
Cooking - stewing - sautéing -
grilling
Cooking - simmering thickening - creamin g
Keeping food warm -
creaming
Support surface Hob in stand-by or off mode ( possible end-of-cooking residual heat, indicated by an “H”)
Function Description of function
Identifies a power level that is suitable for simmering long-cooking recipes. Suitable for cooking tomato sauce, ragu, soups,
Simmering
Melting
minestrone, maintaining a controlled cooking level (ideal for cooking in a bain-marie). Prevents food from boiling over or
sticking to the bottom and burning, as often happens with these recipes.
Identifies a power level that is suitable for slowly melting delicate products without compromising their sensorial quality
(chocolate, butter, etc.).
GB18
Page 8
COOKI NG TABLE
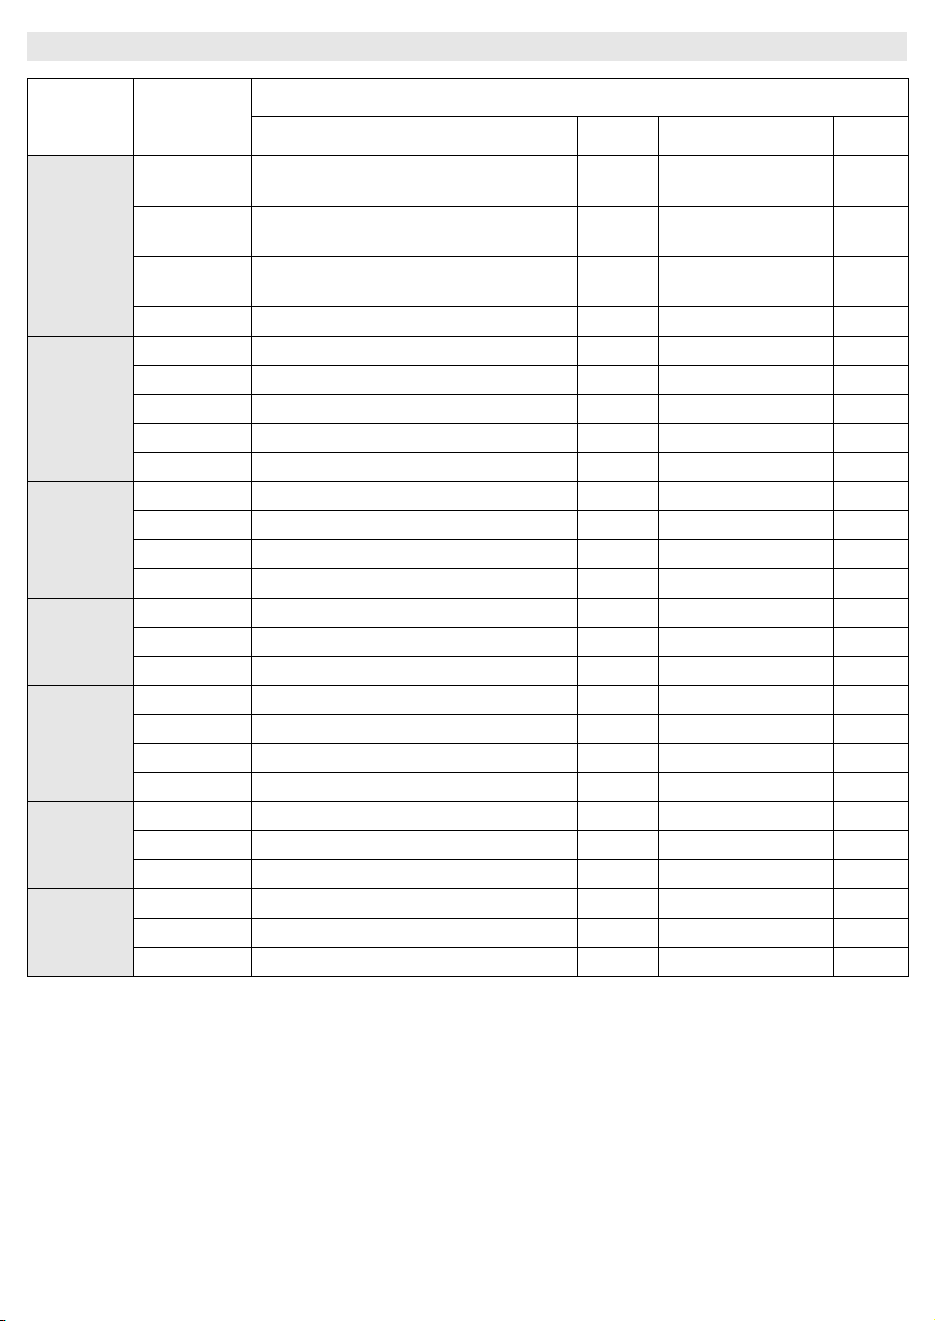
Food
categories
Pasta, rice
Vegetables,
pulses
Meat
Fish
Eggs
Sauces
Desserts,
creams
Dishes or type
of cooking
Fresh pasta Heating the water Booster - 9
Dry past a Heating the water Booster - 9
Boiled rice Heating the water Booster - 9
Risotto Sautéing and roasting 7-8 Cooking 4-5
Boiled Heating the water Booster - 9 Boiling 6-7
Fried Heating the oil 9 Frying 8-9
Sautéed Heating the accessory 7-8 Cooking 6-7
Stewed Heating the accessor y 7-8 Cooking 3-4
Browned Heating the accessory 7-8 Browning the soffritto 7-8
Roast Browning the meat with oil (if with butter power level 6) 7-8 Cooking 3-4
Grilled Preheating the grill 7-8 Grilling on both sides 7-8
Browned Browning with oil (if with butter power level 6) 7-8 Cooking 4-5
Stewed Browning with oil (if with butter power level 6) 7-8 Cooking 3-4
Grilled Preheating the grill 7-8 Cooking 7-8
Stewed Browning with oil (if with butter power level 6) 7-8 Cooking 3-4
Fried Heating the oil or fatty matter 8-9 Frying 7-8
Frittata Heating the pan with bu tter or fat matter 6 Cooking 6-7
Omelettes Heating the pan with butter or fat matter 6 Cooking 5-6
Soft/hard-boiled Heating the water Booster - 9 Cooking 5-6
Pancakes Heating the pan with butter 6 Cooking 6-7
Tomato Browning with oil (if with butter power level 6) 6-7 Cooking 3-4
Ragu Browning with oil (if with butter power level 6) 6-7 Cooking 3-4
Béchamel Preparing the base (melt butter and flour) 5-6 Bring to a light boil 3-4
Pastry cream Bring the milk to the boil 4-5 Maintain a light boil 4-5
Puddings Bring the milk to the boil 4-5 Maintain a light boil 2-3
Rice in milk Heat the milk 5-6 Cooking 2-3
First stage Power Second stage Power
Power level and cooking status
Cooking the pasta and
maintaining t he boil
Cooking the pasta and
maintaining t he boil
Cooking the pasta and
maintaining t he boil
7-8
7-8
5-6
GB19
 Loading...