

Whirlpool ETK 6260 IN PROGRAM CHART
ETK 6260 IN HOB INSTRUCTIONS
GB
A
B
C
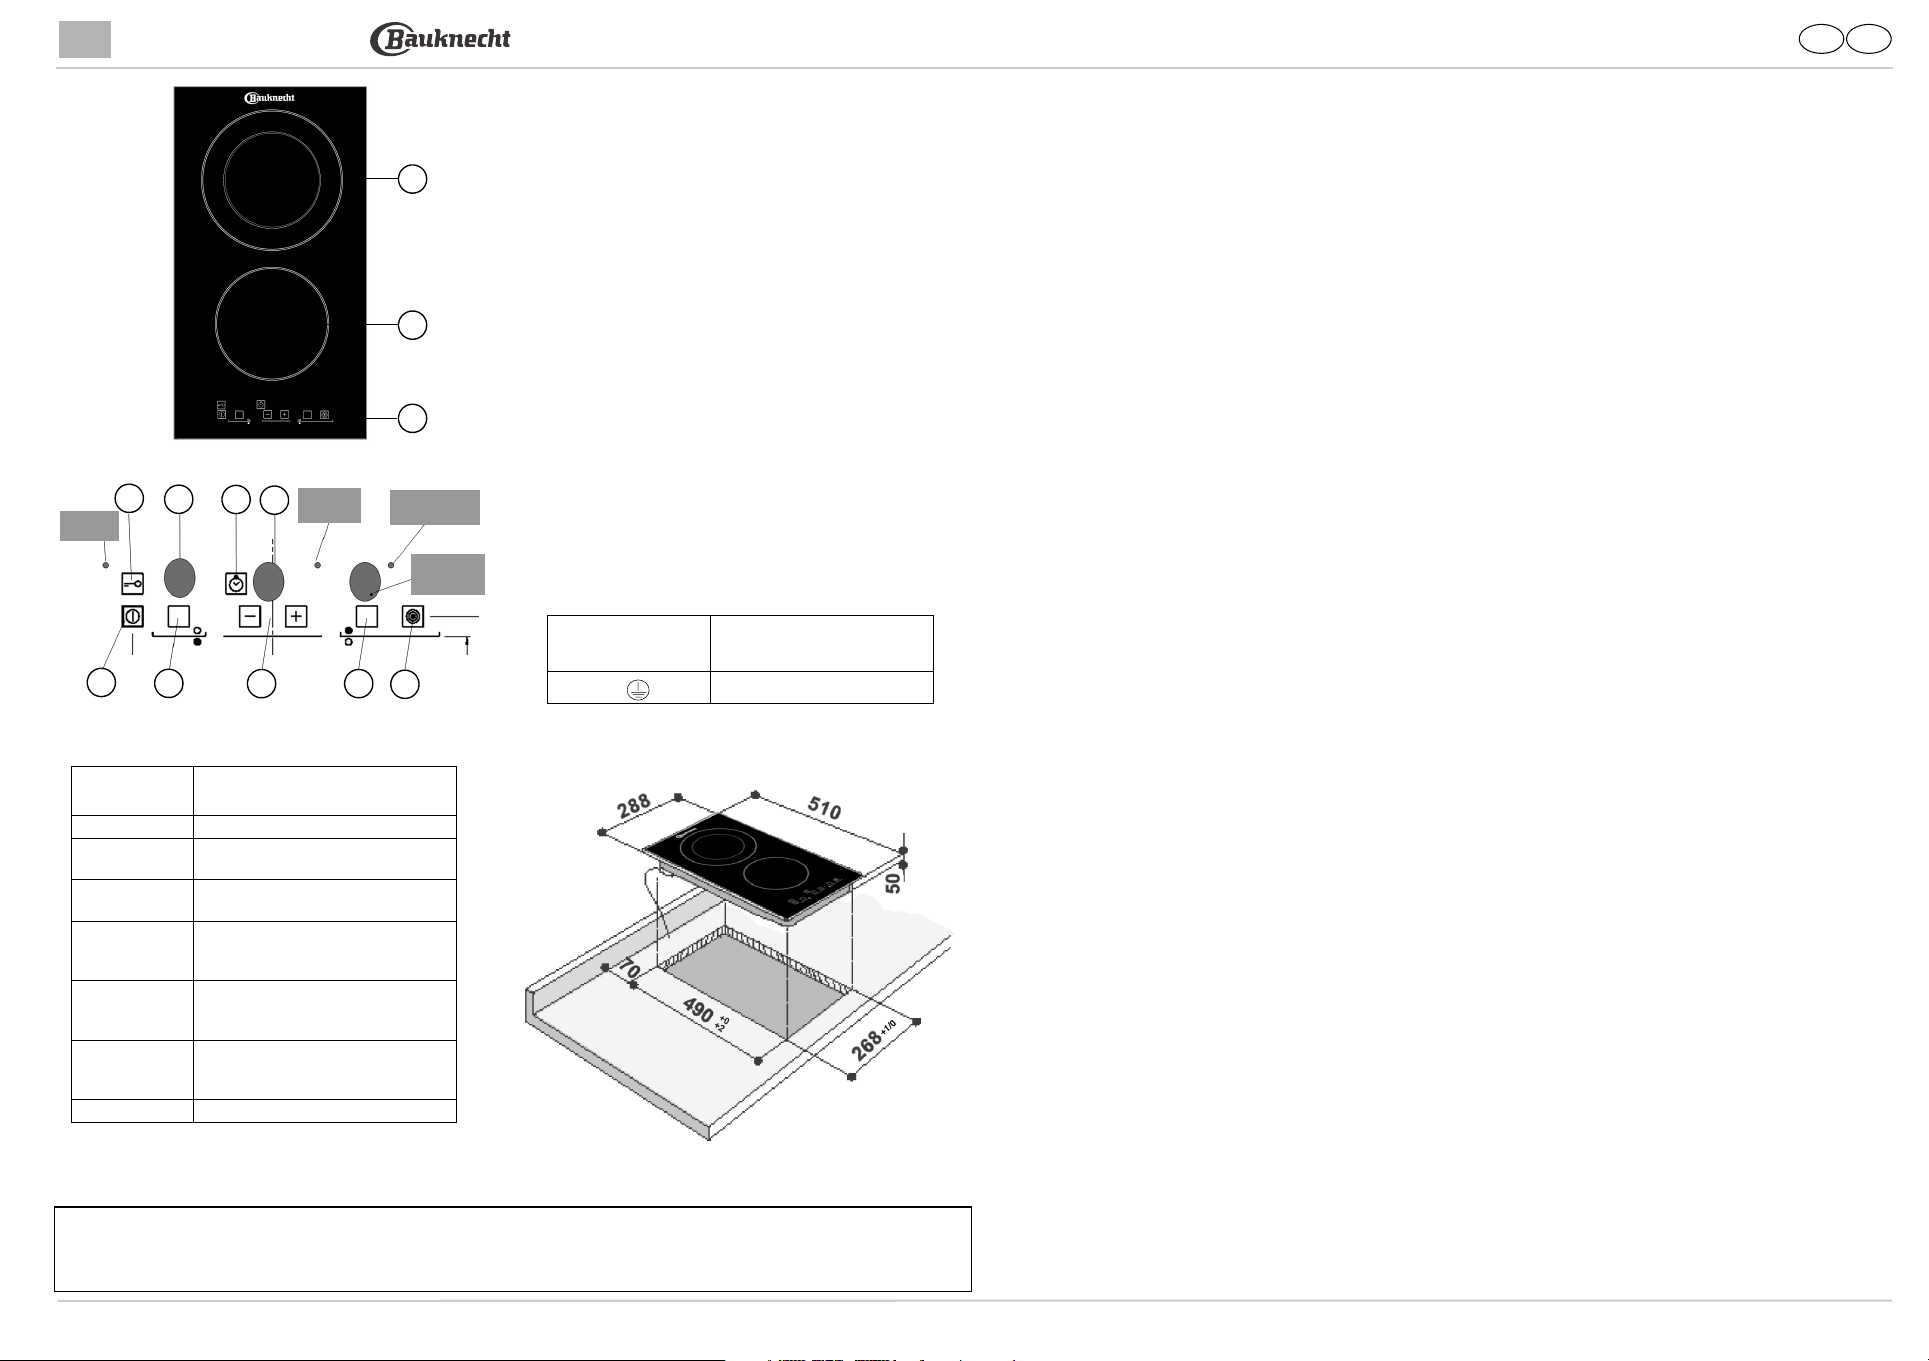
A.
Radiating cooking zone Ø 180 (DOUBLE)
B.
Radiating cooking zone Ø 145
C.
Touch control area (control area)
8
3
7
6
1
2
5
24
(11) LED
ON/OFF
(10) LED
TIMER
(9) LED
Double area
(12) Decimal
point
ELECTRICAL CONNECTION
Power supply
voltage
Number of wires x
dimensions
230 ~ +
H05 RR-F 3 x 1.5 mm
2
Power Levels
(1-9)
Table for using the
cooking zones
1-2
Melting butter, chocolate, etc.
2
Keeping food warm and reheating
small quantities of liquid
3-4
Heating larger quantities, making
custards and sauces
5-6
Gentle simmering, for example:
boiled vegetables, spaghetti, soups,
pot roasts, stews
7
For all fried food, cutlets, steaks,
cooking without use of lid, for
example: risotto
8
Browning meats, roast potatoes,
fried fish and to boil large quantities
of water
8-9
Brisk frying, griddling steaks, etc.
Type: C2VCDC 220-240 V~ 50-60 Hz 2.9 kW
DE GB
DIMENSIONS OF COOKING HOB AND WORKTOP (mm)
5019 419 66035
Switching on the device
1. Press the key (1) to activate the control: the adjustment
level indicators (3) and the timer display (7) are set to “0”
while the decimal points (12) flash.
2. Perform the next operation within 10 seconds, otherwise
the device will switch off automatically.
Adjusting power and the timer by means of the “+”
and “-” keys
Use the “+” and “-” keys (4) to adjust the setting of the
plates and the required time on timer/minute counter (7).
The “+” and “-” controls (4) are common to both functions.
Accordingly, to regulate the power of the hob, first select the
zone with key (2), then adjust the relative power level using
the “+” and “-” keys (4); this done, select the timer function
with key (6) and proceed to set the duration, likewise using
the “+” or “-” key (4).
Important:
To avoid permanently damaging the glass ceramic top,
do not use:
-
pots with bottoms that are not perfectly flat,
-
metal pots with enamelled bottom.
To get full satisfaction from the hob, please read these instructions carefully and keep them for future consultation.
Switching ON the cooking area
Once the device has been activated, switch on the cooking
area (within 10 seconds) as follows:
1. Press one of the keys (2) to select the cooking area
required. The relative display (3) will indicate a “0” and the
decimal point (12) will illuminate to show that the cooking
area has been activated.
2. Use the “+” and “-” keys (4) to adjust the heat level (from
1 to 9). Press and hold down these keys to increase or
decrease the setting.
Switching OFF the cooking area
1. The relevant cooking area must already be activated with
relative decimal point (12) illuminated.
2. Return the setting to “0” by means of the key “-” (4). After
three seconds, the cooking area will automatically switch off.
Rapid shutdown of the cooking area
1. The relevant cooking area must already be activated with
relative decimal point (12) illuminated.
2. To shut down the selected cooking area immediately, press
the “+” and “-” keys (4) at the same time.
Residual heat indicator (“H”)
If the temperature of the cooking area is still high (and a burn
risk still present) after it has been switched off, the display (3)
for the area will indicate the letter “H” (residual heat).
The letter will only switch off when the burn risk is no longer
present (at 60°C).
Switching off the hob
The hob can be switched off at any time by means of the
ON / OFF switch (1)
Switching on a TWIN circuit zone:
1. The twin circuit zone must already be activated with
relative decimal point (12) illuminated.
2. Select the required setting (1 - 9).
3. Press the twin circuit key (5) to switch it on. The LED (9)
for the selected zone will light up; the second circuit will be
activated together with the first.
Switching off the second circuit
1. The twin circuit zone must already be activated with
relative decimal point (12) illuminated.
2. Press the twin circuit key (5). The LED (9) for the selected
zone will go out to indicate deactivation of the second circuit.
Shutting down the unit or the cooking area (key)
To shut down the unit to prevent operation (e.g. by children),
use the lock key (8). While the lock is engaged, all operation
of the keys is disabled, with the exception of the OFF key (1).
Safety shutdown
In the event that one or more cooking areas is inadvertently
left on, the safety system will shut the zones down
automatically after a certain time has elapsed, after which the
letter “H” will be displayed.
Automatic preheating
This function is designed to facilitate cooking, given that the
cooking cycle may be carried out without the need for
human supervision. The function uses maximum power to
preheat the cooking area to bring it to the required operating
temperature. After a time interval, the power level
automatically returns to the original setting.
Using the automatic preheating function
Select the required cooking area by means of the key (2).
Select power level 9 by means of key “+” (4), then press the
“+” key (4) again to activate preheating. The letter “A” will
be shown on the relative display. To preheat the unit with
spontaneous movement towards the required power level
(e.g. “6”), set the power to 6 by means of the “-” key (4).
After the system has set to automatic preheating mode, the
display panel will alternate the set power level (“6”) and the
automatic preheating function (indicated by the letter “A”).
Switching off the automatic preheating function
To deactivate the preheating function (indicated by the letter
“A” on the display), press the “-” key (4) at least 10 seconds
since the function has been activated.
TIMER function
This function too simplifies operation by not requiring human
supervision during the cooking cycle. Once the set time on
the timer has elapsed, the cooking area is automatically
switched off. If no zone has been programmed, the timer
simply operates as a minute counter (see the section “Using
the timer as a minute counter”).
Using the TIMER function
1. The cooking area must already be activated with relative
decimal point (12) illuminated.
2. Select a power level between 1 and 9.
3. Press the timer key (6); the timer display shows “00” and
the indicator (10) relative to the zone being programmed
lights up.
4. Select the cooking time (between 0 to 99 minutes) by
means of the “+” and “-” keys (4). The timer will start up
automatically in a few seconds. Press and hold down the “+”
or “-” key (4) to scroll the time setting. Note that the timer
function applies to the selected cooking area only.
Rapid shutdown of the cooking area and relative timer
Press the “+” and “-” keys (4) at the same time to shut down
the relative cooking area immediately. Note that the timer
function will also be deactivated.
Using the timer as a minute counter
When the timer function is not programmed, the timer
display can be used simply to count down minutes (i.e.
when the displayed time elapses, the cooking area is
not deactivated).
Setting the minute counter
When the unit is OFF:
1. Press the ON ke (1).
2. Press the timer key (6).
3. Use the “+” and “-” keys (4) to set the required time to
be counted back.
When the unit is ON and a cooking area is activated:
1. Deselect the zone by pressing the relative key (2); the
decimal point (13) will go out.
2. Press the timer key (6).
3. Set the time required by means of the “+” and “-” keys
(4).
Deactivating the minute counter function
When the set time has elapsed, an acoustic signal is emitted
for two minutes. To silence the signal,
press any key. To interrupt the timer, proceed as follows:
1. Press the timer key (6).
2. Press the “-” key to reset the time (4).
Rapid deactivation of the minute counter
Press “+” and “-” keys (4) at the same time.
PROTECTING THE ENVIRONMENT
Disposal of packaging materials
•The packing material can all be fully recycled, as
confirmed by the recycling symbol .
• Do not dispose of the various packaging materials
carelessly, but do so responsibly and in full compliance
with local authority regulations governing waste
disposal.
Disposal of used household appliances
• This appliance is marked according to the European
directive 2002/96/EC on Waste Electrical and Electronic
Equipment (WEEE). By ensuring this product is
disposed of correctly, you will help prevent potential
negative consequences for the environment and human
health, which could otherwise be caused by
inappropriate waste handling of this product.
The symbol on the product, or on the documents
accompanying the product, indicates that this appliance
may not be treated as household waste. Instead it shall
be handed over to the applicable collection point for the
recycling of electrical and electronic equipment.
Disposal must be carried out in accordance with local
environmental regulations for waste disposal.
For more detailed information about treatment,
recovery and recycling of this product, please contact
your local city office, your household waste disposal
service or the shop where you purchased the product.
Energy saving
• Use pots and pans whose bottom diameter is equal to,
or slightly larger than, that of the cooking zones.
• Only use flat-bottomed pots and pans.
• If possible, keep pot lids on when cooking.
• Cook vegetables, potatoes, etc.
with little water in order to cut
down cooking time.
• A pressure cooker allows you to
save even more energy and time.
WARNINGS
• If the glass ceramic surface should break or crack,
refrain from using it and call the After-sales Service
immediately.
• If the hob incorporates halogen cooking elements, do
not stare at them.
• The hob is designed for use as a domestic food cooker
only. No other type of use is allowed. The Manufacturer
declines all responsibility for inappropriate use or
incorrect setting of the controls.
• Do not expose the hob to atmospheric agents.
• Any repairs or maintenance work on the appliance must
be carried out exclusively by a qualified technician.
• Never touch the hob with any wet part of the body and
do not operate it with bare feet.
• The two cooking zones are indicated by two circles
marked on the glass ceramic surface. Check that the
cooking hob is clean before switching it on.
• When the hob is in use, accessible parts become
very hot. To avoid burns, keep children away from
the appliance.
• The hob should not be used by children or infirm
persons without supervision.
• Make sure that children do not play with the
appliance.
• Make sure that the electrical wires of other electrical
appliances near the hob do not come into contact with
hot parts of the hob itself.
• Always keep a watch on pans when cooking with oil and
grease. Oil and fat can overheat and catch fire!
• Do not use the hob as a support or worktop.
• Do not switch on the hotplates/cooking zones without
pots.
• Do not place plastic, aluminium foil, cloths, paper etc.
on the hotplates/cooking zones.
• The hob is fitted with hotplates/cooking zones of
different sizes. Use pans whose bottom diameter is
equal to, or slightly larger than, that of the hotplates/
cooking zones.
BEFORE USING THE COOKING HOB
Before use, remove:
- adhesives stuck on the hob;
- cardboard guards and protective plastic film;
- check whether the hob has been damaged during
transport. If in doubt, contact the After Sales Service.
CARE AND MAINTENANCE
Important:
water or steam cleaning equipment.
• Clean the hob, when it is cool, after each use. This will
• Use a clean cloth, absorbent kitchen wipes and washing
• Remove baked-on dirt with the special scraper tool
• Food spills should be cleaned off before they bake onto
• Do not use abrasive products, chlorine-based cleaners,
• The hob should be treated periodically with specific
never clean the appliance with high pressure
prevent the build-up of dirt and make cleaning easier.
up liquid or a specific glass ceramic cleaner.
(if provided) and specific cleaning products.
the glass ceramic surface.
oven-cleaner spray or pan scourers.
products available from the shops, following the
manufacturer’s instructions.
AFTER SALES SERVICE
Before contacting After-Sales Service:
Please give:
• a brief description of the fault;
• the type and exact model of the hob;
• the service number (i.e., the number that follows the
word SERVICE on the rating plate, located under the
hob). The service number is also indicated on the
warranty booklet;
•your full address;
• your telephone number and area code.
If any repairs are required, please contact an authorised
After Sales Service
will be used and repairs carried out correctly).
Failure to comply with these instructions may
compromise the safety and quality of the product.
(to guarantee that original spare parts
 Loading...