

Whirlpool ET20VK, ET20XK User Manual
r
0
NO-FROST
REFRIGERATOR-
FREEZER
Model ET20XK
&
Model ET20VK
$ers. Freezers. Relrlgerator-Freezers, Ice Makers, DIshwashers. Bu~ll-In Ovens and Surface Units. Ranges. MIcrowave Ovens. Trash Compactors. Room Au Condllloners. Dehumldi
Please read this
Use and Care Guide
before you do anything else...
This booklet tells you how to start your retrigerator, clean it, move shelves and adjust controls. It even tells you what new sounds to expect
from your refrigerator.
Treat your new retrigerator with care. Use it
only to do what home refrigerators are designed to do.
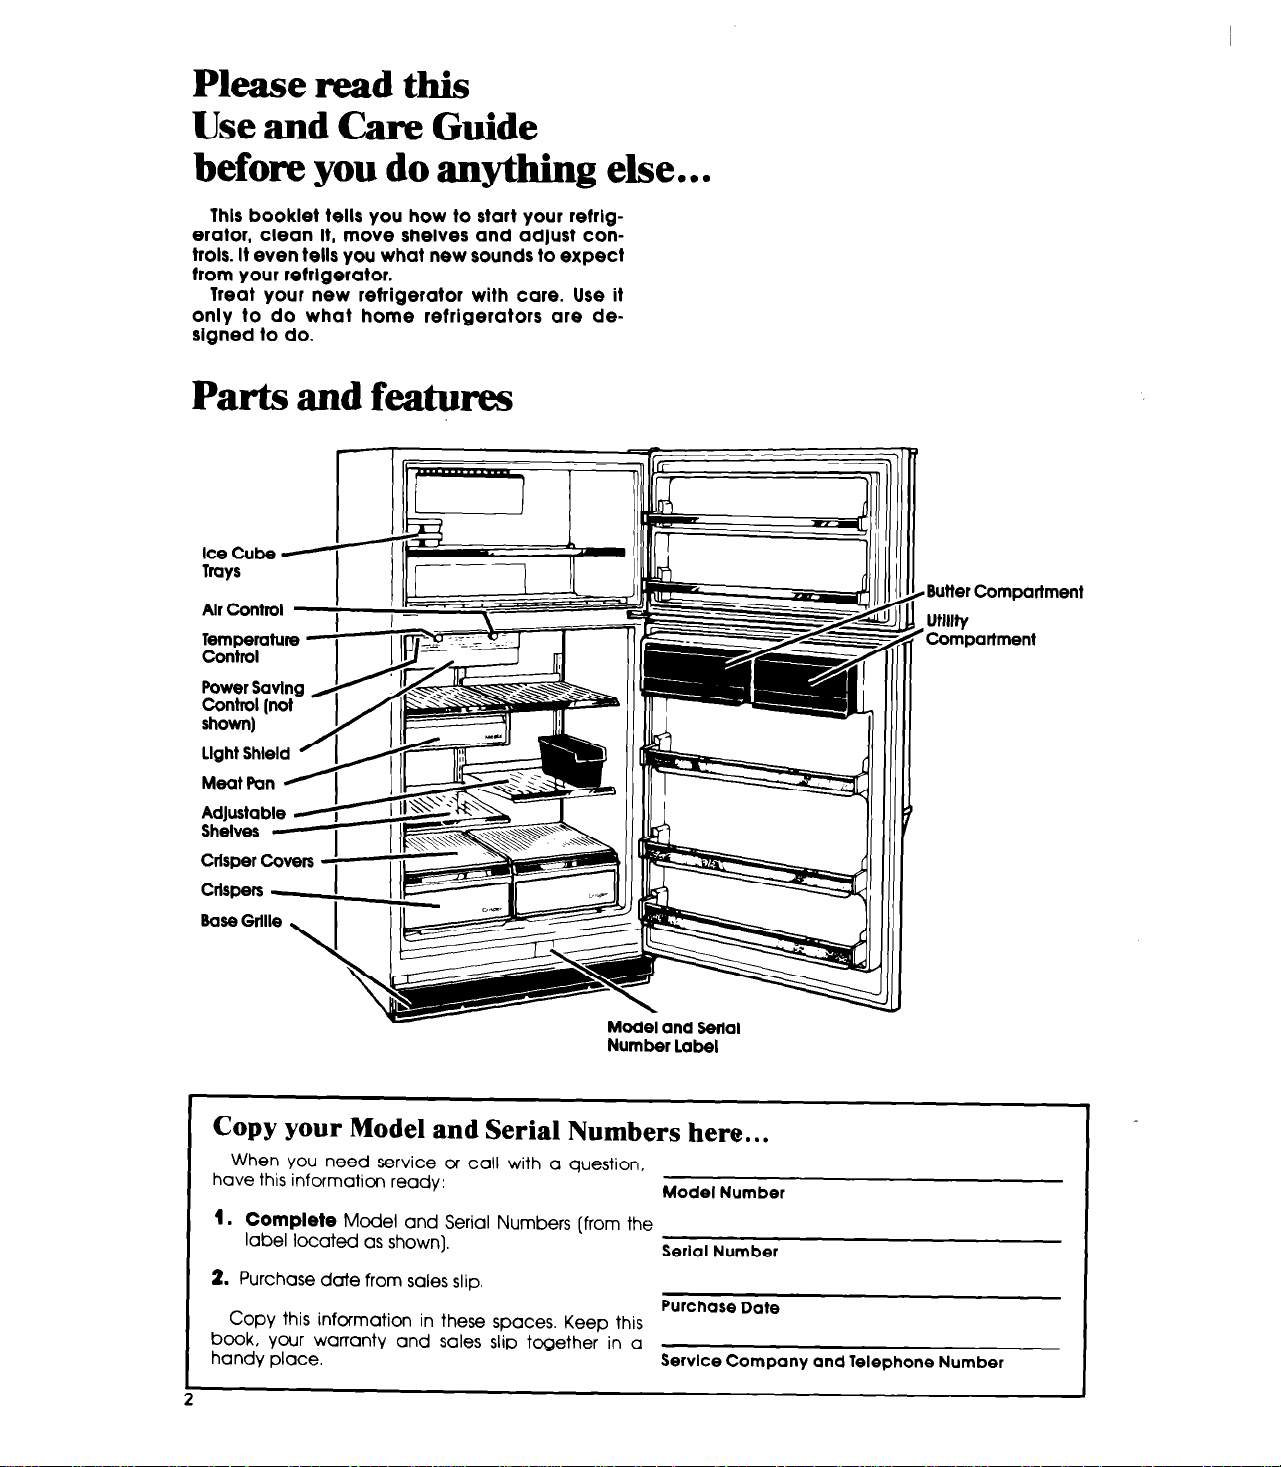
Parts and features
, I
I I-
Icecub e
Trays
Alr Control
Temperature I
Control
Power Savina FI,EZE
CrlsperCovers I
crispers
Basfmle,) 11
I III I--
i
’ “&
-IT-- --
-r
i’
’ I’
ode1 and
Number label
Serial
Butter Compartment
utlllty
Compartment
Copy your Model and Serial Numbers here.. .
When you need service or
have this information ready:
1.
Complete Model and Serial Numbers (from the
label located as shown).
2. Purchase daie from
Copy this information in these spaces. Keep this
book, your warranty and sales slip together in a
handy place.
sales
call
with a question,
slip.
Model Number
Serial Number
Purchase
Service Company
Date
and
Telephone Number
.mp
‘~~cF&$u‘~-t
...... LI ....
r
nts
SAFETY FIRST
BEFOREYOU PLUG IT IN 7 ...........
Install Properly ..................
Level Refrigerator-Freezer ........ 4
Remove Sales Labels ............
Clean It ........................
Plugltln
USING YOUR REFRIGERATOR
Setting the Controls ..............
Changing the Control Settings
Power Saving Control
Adjusting the Refrigerator Shelves
Removing the Freezer Shelf ....... 6
Moving the Meat Pan and Cover.
Removing the Crispers and Covers
Reversing the Door Swing ........
Removing the Base Grille ........ 7
.....................
........................ 4
......
............
mw .xR- .N,~' jl.
....
.*~~~~uJ...~ = " csmqygu*I .fl~,i.
01986 Whirlpool Corporation
be
Changing the Light Bulb
3
Ice Cube Trays
3
Optional Automatic Ice Maker
4
Sounds You May Hear.
Energy Saving Tips
4
......................
.............
...............
...................
4 CLEANING YOUR REFRIGERATOR ......
Cleaning Chart
.....................
5 FOOD STORAGE GUIDE ...............
Storing Fresh Food
Freezing and Storing Frozen Foods
E
...................
5 VACATION AND MOVING CARE .......
6 IF YOU NEED SERVICE OR ASSISTANCE
I, Before Calling for Assistance
2. If You Need Assistance
3. If You Need Service
:
4. If You Have a Problem
7
.... ic,,, .,I .....
............
...............
.............
.......
....
.......
Pwte
7
8
8
8
9
9
10
10
II
14
15
15
15
15
15
I ..
Before you plug it in
IMPORTANT
Before using your refrigerator, you are personally
responsible for making sure that it...
l
is installed and leveled on a floor that will hold
the weight, and in an area suitable for its size
and use.
l
is connected only to the right kind of outlet, with the
right electrical supply and grounding. [Refer to
your “Electrical Requirements and Grounding
Instructions:‘)
l
is used only for jobs expected of home re-
frigerators
l
is not near an oven, radiator or other heat source.
l
is properly maintained.
l
is out of the weather
l
is used in an area where the room temperature will
not fall below 55” F (13” C).
l
is not used by those who may not understand how
it should be used.
l
is not loaded with food before it has time to get
properly cold.
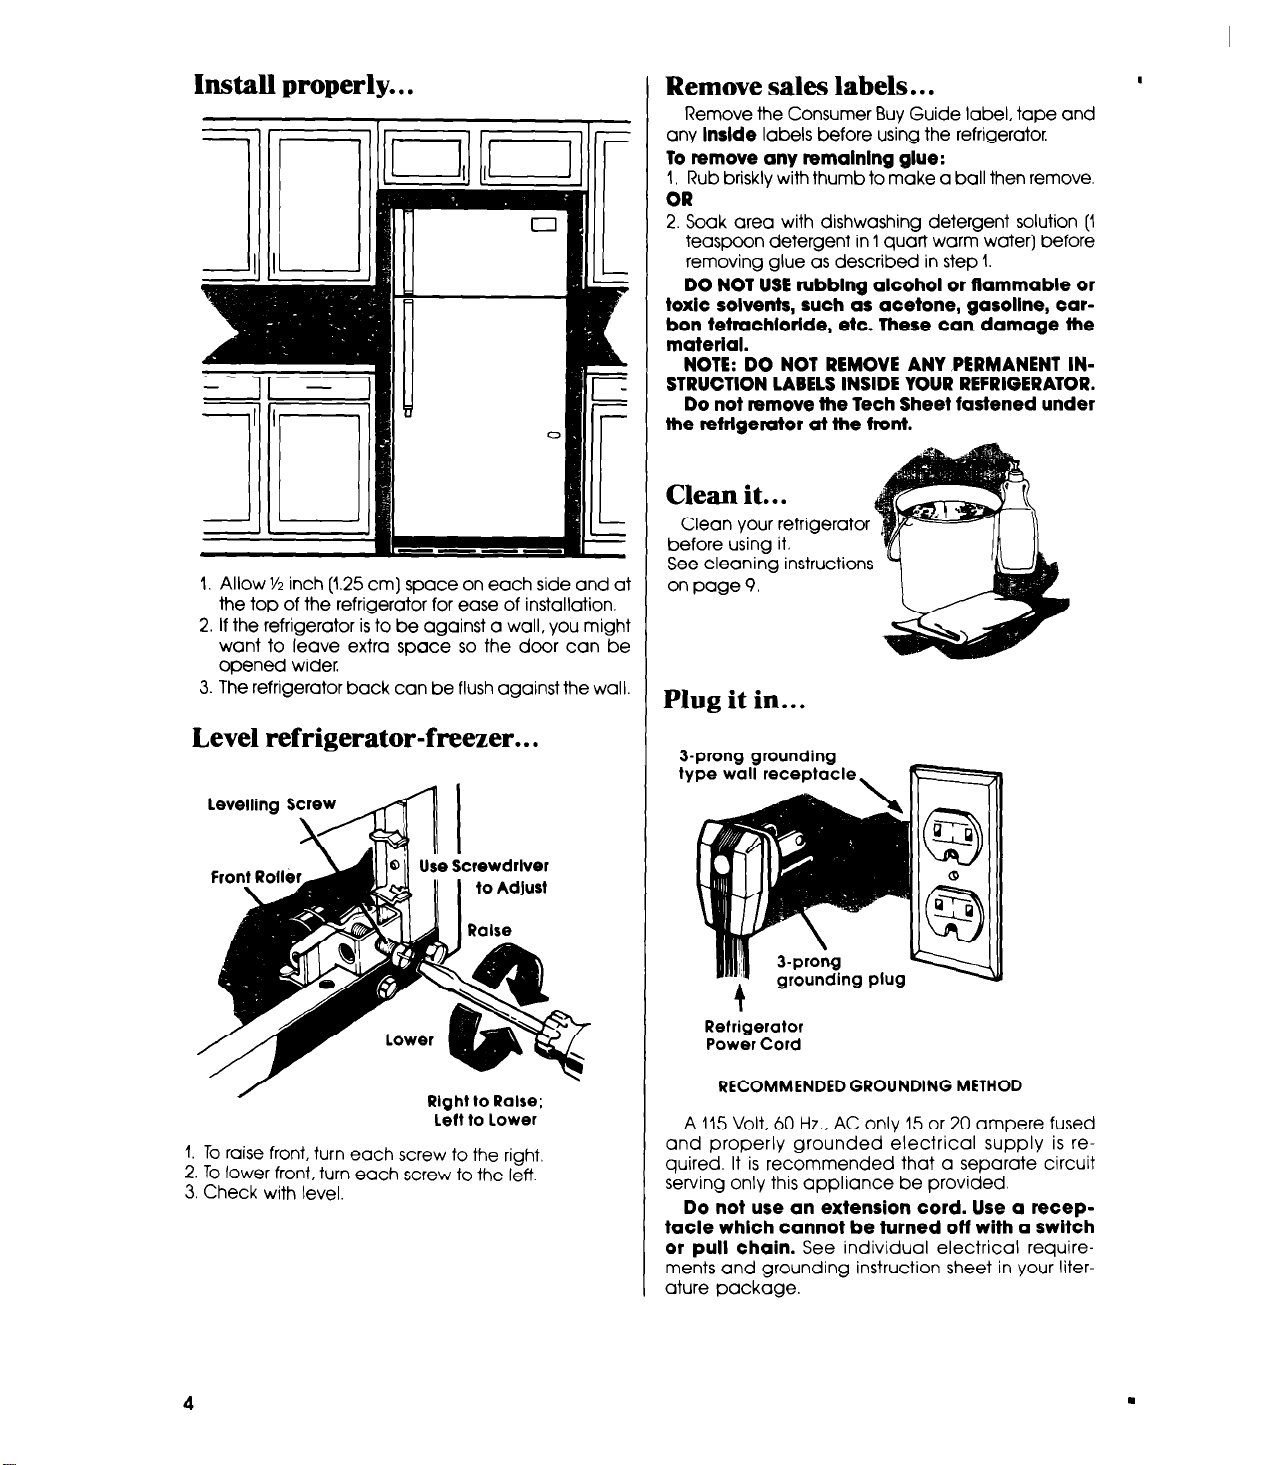
Install properly.. .
I. Allow ‘/2 inch (1.25 cm] space on each side and at
the top of the refrigerator for ease of installation.
2. If the refrigerator is to be against a wall, you might
want to leave extra space so the door can be
opened wider.
3. The refrigerator back can be flush against the wall.
Remove sales labels.. .
Remove the Consumer Buy Guide label, tape and
any
lnslde
labels before using the refrigerator
To remove any remalnlng glue:
1. Rub briskly with thumb to make a ball then remove.
OR
2. Soak area with dishwashing detergent solution (1
teaspoon detergent in 1 quart warm water) before
removing glue as described in step 1.
DO NOT USE rubbing alcohol or flammable or
toxic solvents, such as acetone, garollne, car-
bon tetrachtortde, etc. These
can
damage the
material.
NOTE: DO NOT REMOVE ANY PERMANENT IN-
STRUCTION LABELS INSIDE YOUR REFRIGERATOR.
Do not remove the Tech Sheet fastened under
the refrigerator at the front.
Clean it.. .
Clean your refrigerator
before using it.
See cleaning instructions
on page 9,
Plug it in.. .
Level refrigerator-freezer.. .
Use Screwdrlver
Rlght to Rake;
Left to lower
1. To raise front, turn each screw to the right.
2. To lower front, turn each screw to the left
3. Check with level.
J-prong grounding
type wall receptacle,
Refrigerator
Power Cord
RECOMMENDED GROUNDING METHOD
A 115 Volt, 60 Hz., AC only 15 or 20 ampere fused
and properly grounded electrical supply is required. It is recommended that a separate circuit
serving only this appliance be provided.
Do not use an extension cord. Use a receptacle whtch cannot be turned off with a switch
or pull chain.
ments and grounding instruction sheet in your liter-
ature package.
See individual electrical require-
.
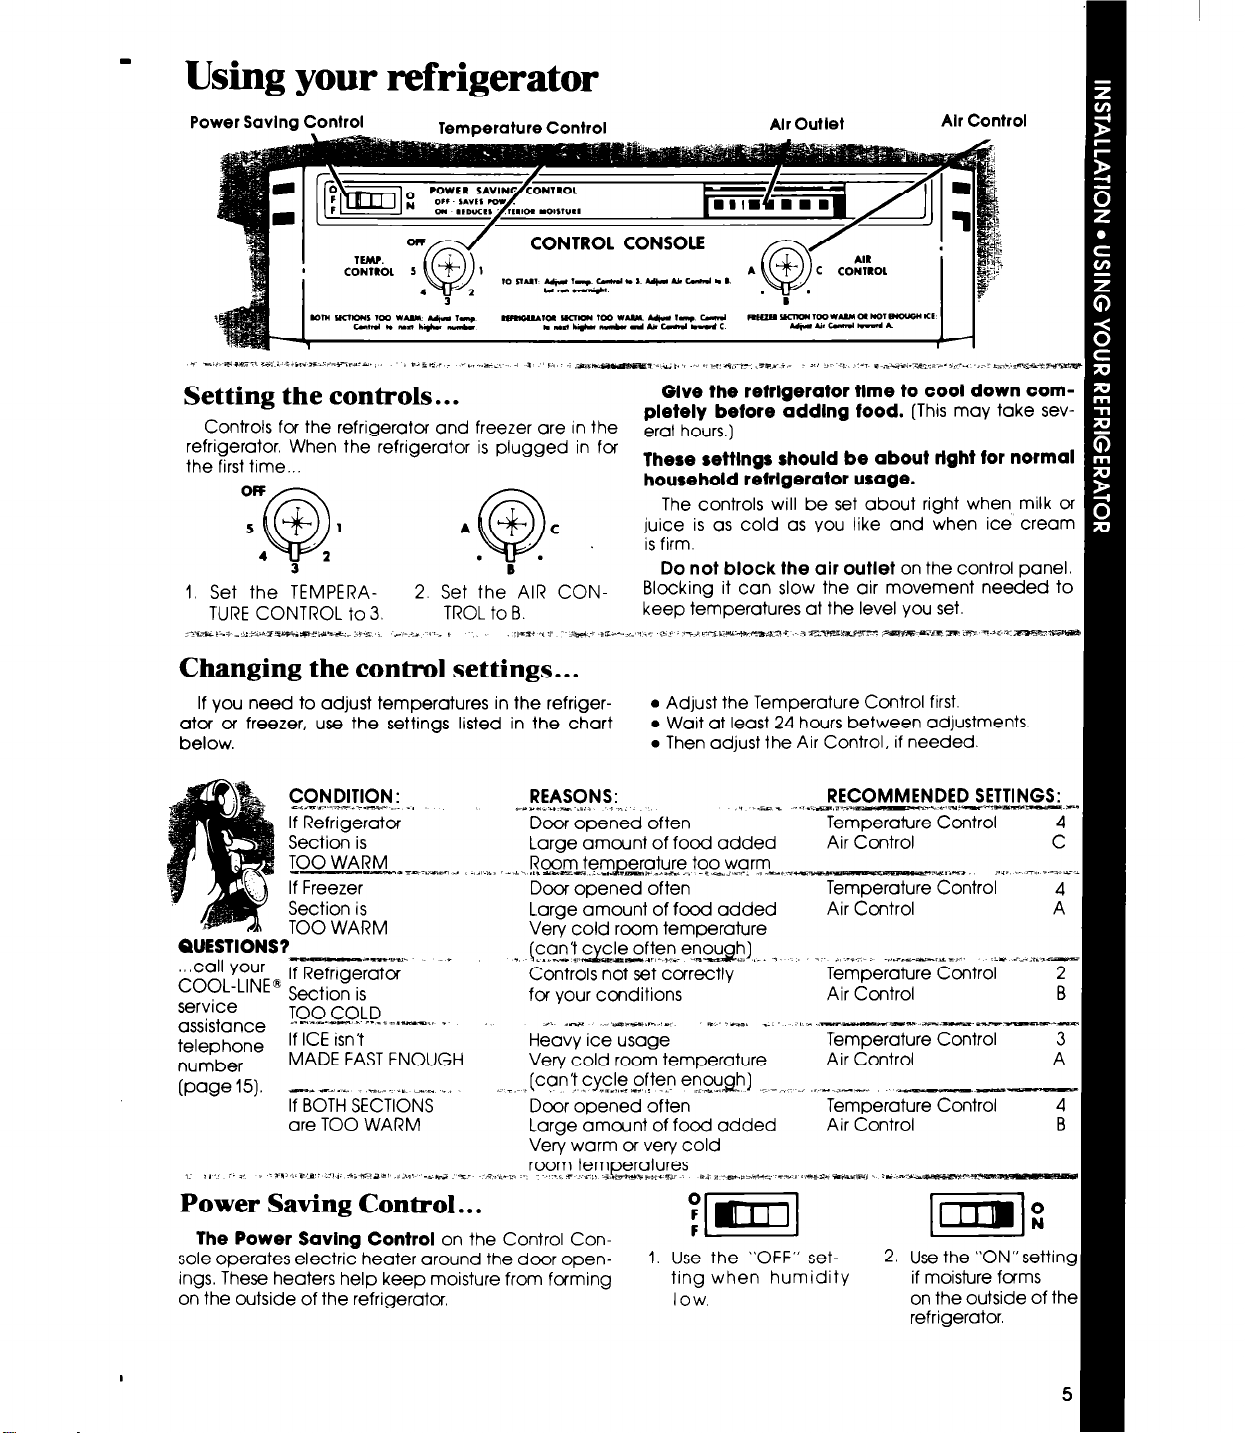
Using your refrigerator
Power Saving Control
COnkOk
refrigerator. When the refrigerator is plugged in for
the first time...
1. Set the TEMPERATURE CONTROL to 3.
for the refrigerator and freezer ore in the
:a1
3
A l ’ isfirm.’
B l
2. Set the AIR CONTROL to B.
Alr Outlet
pletely before addlng food.
erat hours,)
Alr Control
(This may take sev-
These settlngs should be about right for normal
household refrigerator usage.
The controls will be set about right when milk or
juice IS as cold as you like and when ice cream
Do not block the air outlet on the control panel.
Blocking it con slow the air movement needed to
keep temperatures at the level you set.
If you need to adjust temperatures in the refrigerator 01 freezer, use the settings listed in the chart
below.
CONDITION : REASONS:
C.c,-~r.---~_ +.w _. . ,
If Refrigerator
Section is
TOO WARM
If Freezer
Section is
QUESTIONS?
,, ,cQII vour If Refrig&o$g
COOL-LINED Section is
service
assistance
;;;;Fe MADE FAST ENOUGH
@we 151.
.,. ,, i.$, -1-1>-.1m- ,?I,. “iX’ael~,,.&,” .;*a z- -4:-rm ..,.?,T _c.,, i.
TOO WARM
TOO COLD
-Il..,-..- h. n-T.- .7*-m* 1
If ICE isn’t
-d-4111. .-Le__ *.. -fi .I I -.~,
If BOTH SECTIONS
ore TOO WARM
L Ts-tmml, .,
-* ,
wPz.C_.*-~.wz = . . . . _1 *s.&” * ..,.i.m,a.*
Door opened often
Large amount of food added
Room tem_geroture too worm
.,>S.>L1 ,*,A- *t*Ya.aa.:..
Door opened often
Large amount of food added
Very cold room temperature
[c?n’!,.$y.ge often en$gl,-. ,.
Controls not set correctly
for your conditions
Ji .- ._ mm,” ..” v ..W,, _.- I I .-e-w -__---1
Heavy ice usage
Very cold room temperature
(CT’?
FYc!e_of%eP
Door opened often
Large amount of food added
Very worm or very cold
room temetures
Power Saving Control.. .
The Power Saving
sole operates electric heater around the door openings. These heaters help keep moisture from forming
on the outside of the refrigerator
Control on the Control Con-
l
Adjust the Temperature Control first.
l
Wait at least 24 hours between adjustments.
l
Then adjust the Air Control, if needed.
RECOMMENDED SETTINGS:
Temperature Control 4-
Air Control C
-*“,- _, .*_i,r.._ ,, .Y*7-~_Pn___j”.&s.a. -4, .- _. *.---a-=
ma- II ,- I^_ 4m
%%@I _-~- -. .r 1.7e-., .--
r:,,.A*5- *I 2 -
1. Use the “OFF” setting when humidity if moisture forms
low.
Temperature Control
Air Control
.
_, .I.:- -~~~~-rY->~. ir i--:hlcTemperature Control
Air Control
Temperature Control 3
Air Control
Temperature Control
Air Control B
m.., *-m-__P__a
i
2
B
A
4
2. Use the “0N”setting
on the outside of the
refrigerator.
I
I
 Loading...